
Hello Quilty Friends!
Happy Thursday to you!
I am so happy that spring has pretty much sprung here in NW PA, at least for right now, anyway! Last week the weather was simply gorgeous and after a day of cold temps, we’ve bounced back into spring. Today will be in the 70’s! For me, I know that spring is finally here when I fall asleep listening to the peepers. The robins, red- winged blackbirds, and grackles are back, too. When do you know it’s spring in your neck of the woods?
This week we are wrapping up our Beginner Free Motion Quilting (FMQ) series with some ideas for quilting borders. I’ll let you in on a little secret of mine – when I’m rushed for time, I use an allover design for the entire quilt, but when I have some extra time or if a quilt just needs it, I use a different design in the border. Let’s jump right in, there’s a lot to cover today.
If you missed any FMQ lessons, you can find them here:
Lesson 1: All the Background Information
Lesson 3: Practice, Practice, Practice
Lesson 4: The Write Way to Doodle!
Lesson 5: Going Beyond Loops Part 1
Lesson 6: Gong Beyond Loops Part 2
Quilting Borders with 3 Simple Designs
I’m going to share with you 3 of my favorite go-to border designs along with variations of each to spark your creativity and to help you expand your FMQ toolbox of designs.
The hardest part of quilting borders, in my humble opinion, is making the transition around the corners. Usually, I add some kind of element in the corners to connect my border designs, but sometimes a design lends itself to bending around the corner without needing an element. Below, I’m going to show you both styles.
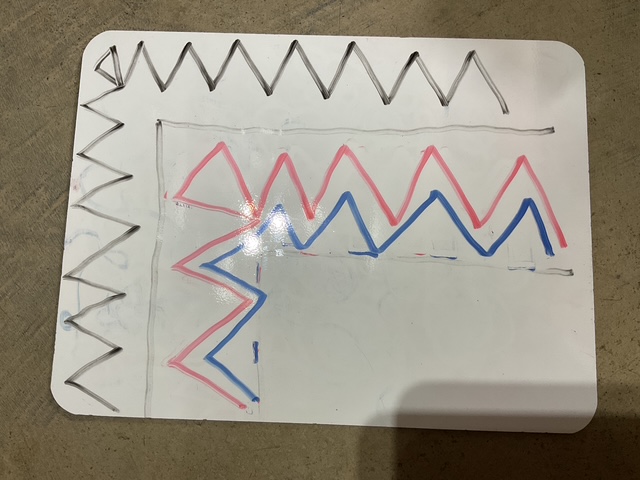
Zig Zags
Zig Zags are a SUPER border option when you’re just getting started with FMQ. It is a base design you can add to as your skills grow.

Here’s a good example of the basic Zig Zag design. You can see in the corner, I did an inverted triangle, which fills the space nicely and is a nice transition. The Zig Zag design is a very flexible design that can be sized to the width of the border strips – make it narrow for inner borders or wide for outer borders. You can even use it for sashings!

Above is the Zig Zag design doodled on my white board with my trusty dry erase marker. Easy piezy. Really.
If you’re not a fan of the inverted corner triangle, try some of your own ideas in the corners. Doodle, doodle, doodle.
Then when it’s easy for you to draw, it’s time to make a fresh practice square and practice quilting the Zig Zag design until you feel comfortable with it. Finally, take a deep breath and quilt it on a small project.
It might not be perfect, but that’s okay. Pat yourself on the back. It takes courage to do something new. I want you to remember there is no such thing as perfect. A finished quilt is a lot more satisfying than trying to find perfection and never finishing that project. YOU CAN DO IT!
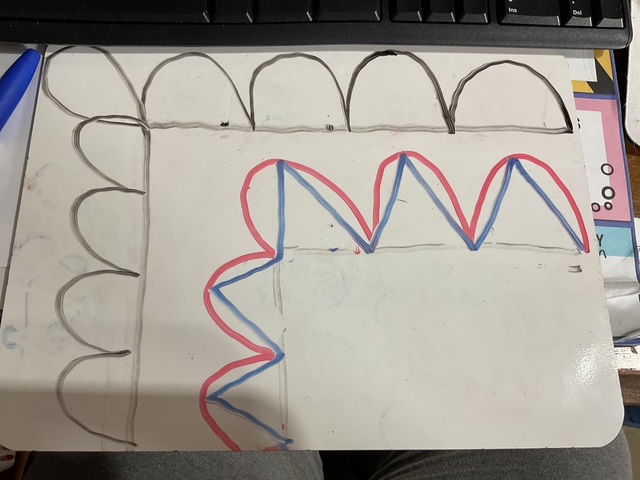
Now let’s look at some variations of the Zig Zag border design. The following designs were created by quilting the border once and then going back and adding a second layer of quilting. The red line is the first quilting line and the blue line is the second quilting line in my doodles below.
PSST! One of the biggest secrets to quilting borders is that you don’t have to create the design in only one pass. Breaking a design into multiple passes can make a real jaw-dropping finished border design and you’ll be the only one who knows how simple it is, so don’t tell anyone, okay?!?
Double Zig Zag
Double Zig Zag is simply quilting the basic Zig Zag design and then echoing another line either above or below the original Zig Zag. Depending on what you put in the corners, you might have to make a different transition than the one I used.
Mirror Image Diamonds

In this variation, I quilted the basic Zig Zag design and then with my second pass, I quilted the mirror image to make Diamonds. Again, depending on your corner element, you might have to come up with your own transition.
Argyle

Here I overlapped 2 lines of Zig Zags, off-setting the second Zig Zag about a half a Zig Zag so that the points are opposite of each other.
Trees

I LOVE this design! So many ways to use it. The first pass is the basic Zig Zag design – just make sure to leave enough space at the inside edges of the border so you have room for your second quilting pass with the trunks. I drew over my corner inverted triangle on the second pass and made it into an outward-facing tree. SEW cute!
I’m going to stop making Zig Zag variations right now or else I’ll never get to show you the 2 other designs! Have fun creating your own variations. I warm you though, it can be addictive. LOL!
Hillside
I’m calling our 2nd border design Hillside. It’s a lot like Zig Zag, but with curves instead of points. This design can also be used as an allover design and it lends itself to lots of variations. Yay!
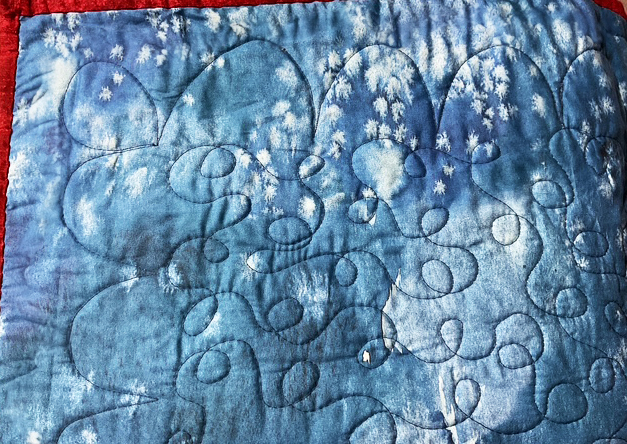
I’m sorry if the example above might be a little hard to see because of the blue backing fabric, but I think you can still make out the Hillside design.
You’ll notice I quilted a teardrop shape in the corner, but you can place any element you want in your corners, or omit corner elements entirely. Be creative, make this design your own.

Here’s my Hillside doodle on my white board. Fun, huh? I really like using this design because curves can be very forgiving.
On the following Hillside variations, please note that the red line is my first quilting pass and the blue line is my second pass.
Grab your white board and doodle along with me!
Hillside Fans
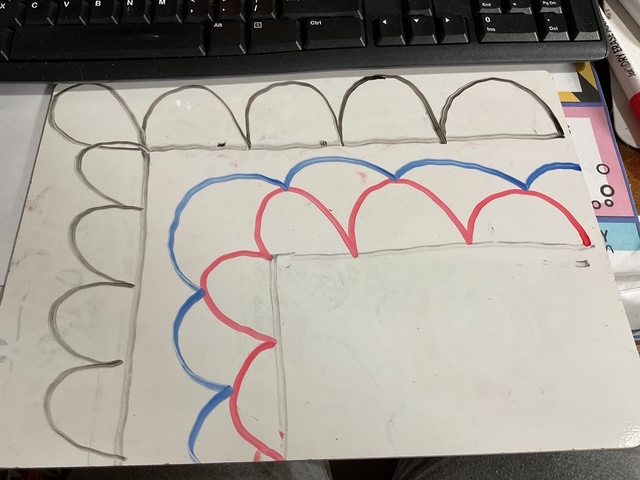
This version is a very simplified Baptist Fan. Like the Zig Zag design, you can size this design for any width of border. If it’s a really wide border, you can quilt multiple passes of the Hillside design to fill the space. In this version, I moved over half a Hillside to offset the second row. I also opted to skip the corner element and simply quilted a big Hillside arc in the corner. Snazzy!
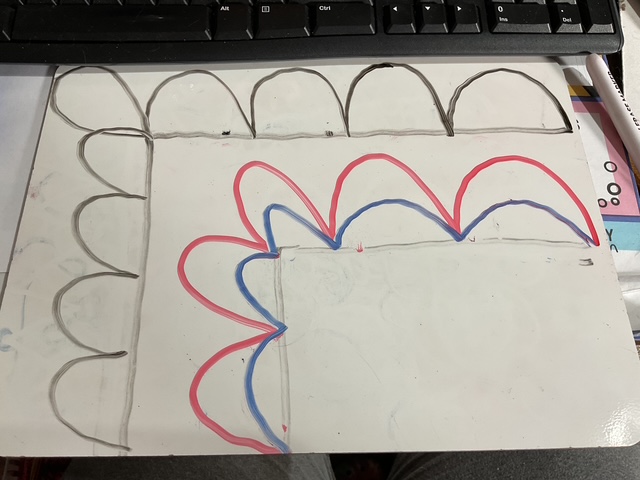
Hillside Echo

Here is Hillside with an echo. This design has a great vibe, is easy to do, and looks very nice on a quilt. Again, I omitted the corner teardrop and just made 2 passes of Hillside.
Rainbows
Isn’t this a really fun and quirky Hillside variation? It looks great on kids’ quilts but could also look elegant on a formal table runner, too. Again, I did not draw a corner teardrop, instead I just let the Hillside Echo strut its stuff. This design is also made with 2 passes; however, you can add as many Rainbow passes as you want and have space for – the more the merrier!
Hillside Zig Zag
Another big secret of FMQ is combining different designs together to make more interesting and more complex-looking designs. It just takes some practice, some time, and a sprinkle of patience. I drew the Hillside design first and then added the Zig Zag inside the Hillside as my second pass.
These are just a few beginner-friendly variations of Hillside. I bet when you’re doodling, you’ll come up with some more. Just don’t forget to actually try quilting on your practice square and once you feel comfortable, quilt a real small project! WOW!
Loops
I’m sorry, but I couldn’t find a quilted example of a border Loops design, so we’ll have to use my doodles as our reference.
This design is a lot like our basic Loop allover design from earlier in the series , but it is straight instead of meandering and the loops all point in one direction.

In the Loops design, above, I drew alternating big and little loops, which is sometimes called E’s and L’s.

Most of the time, though, I make my loops roughly the same size instead of alternating big and small. Grab your white board and try this one out. When you’re ready, try it on your practice square. I bet you’ll get comfortable with this design quickly, so don’t forget to move on to quilting an actual small quilt project.
Now let’s play with a couple Loops variations. Like the previous designs, the red line is my first pass and the blue line is my second pass.
Lace Edge 1
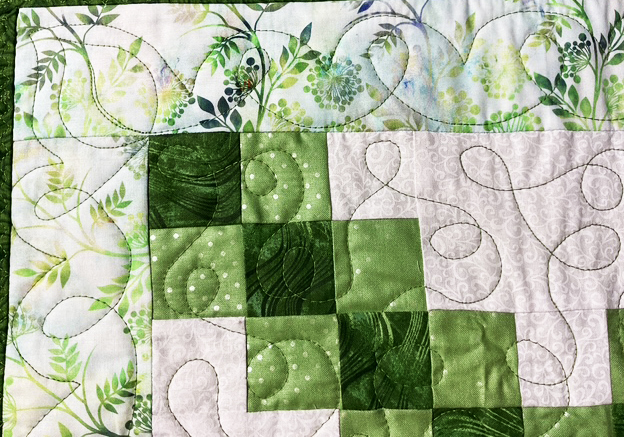
This quilt example, above, is a corner of my recent Erin table runner. I added a simple leaf in the corners because of the foliage border fabric. Want to see more of the quilt? You can find the Erin pattern HERE.
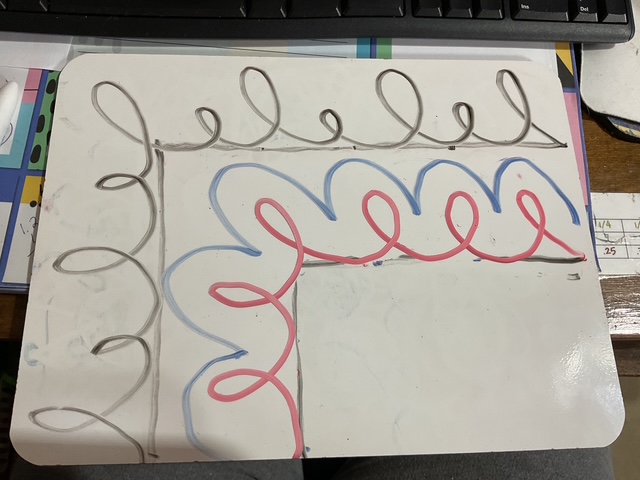
In this Lace Edge doodle, I did Loops (all roughly the same size) for the first pass and then I quilted Hillside as the second pass. This is absolutely one of my favorite designs – hands down! I use it often, quilting different elements in the corners or no elements at all.
Lace Edge 2

In this Lace Edge variation, I quilted 2 rows of Loops, but I flipped the second one over so it was facing the first pass of Loops and I moved over a half space. This design can look stunning on quilts. And complicated, too. SHHH! Never tell anyone how easy it really is. LOL!
Once you’ve quilted your quilt, it’s time to add binding to finish the edge. And don’t forget your label.
Check out these posts from our 2022 Beginner Quilting series:
Well, that’s a wrap! I hope you found our Beginner FMQ series to be helpful. Leave a comment if you did and what you liked the best about the series.
And as always, I’d love to see your free motion quilted quilts! Please share them on our VRD Facebook page.
Have a great week with some sunshine, some FMQ, and a sprinkle of Irish luck (wink, wink!).
Until next week –
Sew. Laugh. FMQ. Repeat.
Always,
Tricia @ VRD
