I am thrilled to tell you that we’ve had a little bit warmer temperatures for a couple days in row here in NW PA. I’m talking above 32 degrees! Actually it’s been in the 40’s, which feels so balmy compared to last week’s temperatures in the single digits and teens. Whew! But I don’t think winter is over yet for us, though, as the beginning of March is looking cold again. Spring can’t get here soon enough!
PSST! While we’re waiting for Spring to arrive, it is a great time to work on our Free Motion Quilting (FMQ) skills, don’t you think? So far we’ve talked about tools, equipment, and resources; doodling, making loops, and using cursive writing as a quilting design.
This week for Lesson 5, we are venturing beyond the Loopy design.
If you missed any of the earlier lessons, you can find them below:
You might be wondering what exactly I mean by “going beyond loops”. Talk a deep breath — there is no need to panic. I promise we are not jumping right into Feathers. Relax, Feathers are ahead of you sometime in the future, but today is not the day. Instead, we are going to add some fun elements to our quilting to change up our basic Loopy FMQ design.
#1Snowflakes with Loops
This design is absolutely one of my favorites, hands down! It is quite flexible and looks great on a lot of different quilts. Depending on the theme of the quilt, it can look like a snowflake, a star, fireworks, a starburst, or even a cool funky flower. Wow! That’s a lot of options for a single element, isn’t it?
Here is an example of the Snowflake and Loop design on a Christmas/winter place mat I created years and years ago for a magazine pattern.
Please notethis place mat design was featured in Quilter’s World magazine some years ago and is a copyrighted design.
Grab your dry erase markers and let’s practice drawing Snowflakes or whatever you would like to call them on our white boards. You can decide how many spokes/rays you want your Snowflakes to have. You can even vary the number in your design to add more interest.
Next let’s add Loops to the Snowflakes and practice drawing our new Loopy variation design. Ready, set, go!Do you see how I surrounded each of the Snowflakes with my Loops? I like to use the Snowflakes as an accent, not the primary design. The primary design, of course, is the Loops. Additionally, I like to give my Loops lots of space to breathe.
Go ahead and practice drawing this design a couple times. Experiment with the Snowflakes (do you want 6 or 8 or more spokes/rays?).
Next, we’re going to FMQ this design on a practice square on our sewing machines. Are you ready? Take a deep breath and just do it.
To get you started, here’s a little video I made for you, showing how I create my Snowflake and Loop variation.
Here is a little example of quilting the Snowflake and Loop design.
Now it’s your turn to practice this design. Enjoy playing with it! Just imagine all the different kinds of quilts you can use it on!
#2Kindergarten Star with Loops
Do you remember when you first learned how to make a five-pointed star? Probably around kindergarten, I should think. Can you remember how to make it now?
Here’s a little tutorial to jog your memory. Keep in mind that I am left-handed so you might draw your star differently than I do. Remember, you do you.
Kindergarten stars aren’t too much different from the Snowflake element above. And once you get comfortable making a five point star again (believe me, it will take some practice for some of you to remaster this shape), the design will flow more easily. Go ahead and draw some Five Pointed Stars on your white board. Make as many as you can fit onto the board. Make them all different sizes, too.
Now let’s practice drawing Kindergarten Stars combined with our FMQ Loop design. Feel free to do this several times until it feels more natural to you.
I bet by now (that is if you’ve been practicing) you are probably finding alternating the direction of the loops to be easier than when you first started several weeks ago. Go you!
Keep practicing on your white board until you can draw the five point stars without thinking about each line. Then I want you to practice making those stars upside down and sideways or else your design will come out very linear with stars lined up going the same direction.
This design looks amazing on patriotic quilts and on children’s quilts, too. What other kinds of quilts would look great with Kindergarten Stars and Loops?
Next up, we’re going to try quilting this design with our machines. Before we do, though, here’s a quick little video showing how I FMQ Kindergarten Stars and Loops.
Let’s make five point Kindergarten Stars!
Okay, now it’s your time to practice quilting Kindergarten Stars paired with Loops! This is fun, isn’t it?
#3Hearts and Loops
Hearts will be our last design for today. So, how are you at making hearts? I have discovered that I can rarely make both sides of a heart exactly the same, so in my quilting (drawing and cutting, too), I intentionally make the sides of my hearts different. It lends a quirky funky look to my Hearts and Loops design, and that works just fine for me. LOL!
I have found that there are 2 basic ways to quilt hearts. Maybe you’ll come up with a different one and if you do, I hope you with share.
Anyway, the first way starts at the top center point and curves down and stops briefly at the bottom point before swooping back up and around to the center point once again. Remember, I’m a lefty so I usually move counterclockwise. Do what is comfortable for you.
The second way is one continuous line which might make it easier for you to FMQ hearts. It starts at the bottom point then curves up and around to the center point where you pause briefly before doing the second top bump and then swooping back down to the bottom point. This heart reminds me more of a heart shaped balloon – you’ll see this more when I quilt it.
So go ahead and practice your stars on your white board. Which style do you like better?
Now that I’ve mentioned both styles, I’m going to show and use the second style Heart design. I find that it can flow better with the loops than the first Heart style.
Now it’s your turn to practice drawing the Heart and Loop design on your white board. Repeat as many times as you want, experimenting with your Hearts.
Notice how I crossed the bottoms of the hearts in the design.
Let’s head back to our sewing machines and try FMQ Hearts and Loops. Here’s a quick video of how I do FMQ my Hearts and Loops.
Check out this cute little Hearts and Loops design!
Well, that’s it for me today. I hope you keep practicing your Loops and adding these fun elements to change up your designs. Next week I’ll have a few more Loop design variations to share with you. So stay tuned!
I hope you are ready for another Free Motion Quilting (FMQ) lesson! But before we do that, I want to take a moment and congratulate Janie in Texas, who is our 1000th email subscriber! WAHOO!!!!!! Thank you, Janie, for supporting the VRD Blog!
I trust you are all practicing your FMQ loops from last week’s leeson. Remember, don’t spend too much time doodling on your white boards before you actually start trying those loops out on your sewing machine.
If you missed our previous FMQ lessons, you can find them below:
I want to take a couple minutes to talk about useful beginning projects as you are developing your FMQ skills.
Projects to Build Your FMQ Skills On
Please don’t tackle a king sized Double Wedding Ring quilt top made by your granny in the Depression as your first FMQ project. I can almost guarantee that you will end up tearing everything out. First you must crawl before you can run!
Maybe you have a whole stack of meticulously pieced antique or vintage quilt tops just waiting to be lovingly completed and that’s your motivation for learning to FMQ. Goodness knows, there are probably as many reasons to learn as there are quilting patterns! But please slow down a little bit.
Do you remember when you learned to tie your shoes? It took a lot of practice before you successfully tied those shoestrings. Same goes with riding a bike. What about driving a car? Or doing pretty much anything you want to master – it all takes work and practice.
FMQ is like that, too. It takes practice to get to the level of mastery you want to achieve. Remember that Rome wasn’t built in a day and most likely you will not be a master free machine quilter in a few practice sessions. It’s going to take some time to get where you want to be. But I promise you, if you put in the work you will get better every time you practice. And the more you practice, the more quickly you’ll be wow-ing your family and friends with your FMQ skills.
Okay, I’m jumping down off my soapbox now.
So you’ve been making up some practice squares and practicing those loops since Lesson 3 last week and you feel pretty good about alternating your loops to the left and to the right. Maybe those loops still look kind of like wiggly carrots sometimes, but you’re itching to quilt something for real.
I suggest starting with smaller projects that are not dear to your heart — potholders, baby bibs, snack mats, place mats, table runners, anything small so you won’t feel like you’re wrestling an alligator while you’re trying to FMQ. I bet you have some orphan quilt blocks lurking in your stash somewhere – make them into potholders or whatever. Then layer those practice quilt pieces with batting and backing (yes, I even give you permission to use up all your ugly fabrics as quilt backing). Now quilt them with loops! Loop to the left, loop to the right. Lots and lots of loops. Consider these practice quilt pieces as practice square variations. Hate how it turned out? Then recycle it into dust cloths. Guilt free. The important thing here is you are building up your FMQ skills by sewing over seams and through different fabrics. Just keep going and growing!
When I taught free motion classes for beginners, I asked the students to layer a printed panel with batting and backing as homework before class (along with their practice squares) and bring it with them. Panels are such a great beginner free motion quilting project because you haven’t put a lot of yourself into it with all the cutting, piecing, and/or applique that usually goes into a quilt.
If you love how your panel project turns out, that’s great! Put it on your wall and show it off or gift it to someone special and tell them you quilted it yourself. Enjoy that lovely feeling of pride in your work!
If you don’t love it, that’s okay, too, because panels are a nice size to make into lovely pet quilts for your own pets or your furry grandbaby. Or donate them to your local shelter or rescue. Either way, they will be used and loved. Of course, if any of your beginning projects end up a total mess, I give you permission to recycle them into cleaning rags.
Here’s great panel with borders already printed on it – just layer it and start quilting. You can find this panel by P&B Textiles HERE. Looking for more great panels? We’ve got ’em at the VRD quilt shop.
Let’s keep moving and dive into today’s lesson – we are going to practice our cursive writing as free motion quilting! Yup, let’s write our way to a finished quilt.
Writing as Free Motion Quilting
Most likely you know how to write in cursive but if you do not or haven’t done so for a long time, never fear – there are great resources and tutorials on the Internet and how-to books out there, too.
If you are like me, your handwriting is a combination of printed and cursive letters. And that is just fine. I am not going to wrap your knuckles with my wooden ruler, I promise. Your cursive writing doesn’t have to be perfect 4th grade handwriting, the letters just have to connect together. You do you.
Let’s use our whiteboards to write the lowercase cursive alphabet, connecting the letters in one long string. The reason I said the lowercase letters is because they naturally flow into the next letter, while not all capital letters will do that. We’re not looking for perfection here, so stop thinking and just do it. I found if I did it quickly without too much thought, I actually wrote better.
Go ahead and practice this a few times, you might be a little rusty and writing the letters on your board will bring back some of your muscle memory.
I hope you have a little room on your most recent practice squares – or you can put together another one like I did – because I want you to try to free motion quilt the alphabet. Seriously. This is great practice to develop a smoother flow to your quilting. So go ahead and quilt the alphabet a couple times.
That was kind of fun, wasn’t it?
Next up is writing your name in cursive on your whiteboards. Depending on the first letter of your name, you might be able to use a capital letter. Mostly, I just use all lowercase letters to keep things simple and so I don’t forget whether I’m using capital letters or not.
Since I’ve been doing this for a while, I’ve already figured out how to dot my i’s and cross my t. Cute, huh? Just my way to incorporate those zany loops into my quilted writing.
Go ahead and practice writing your name. You might have to do this a couple of times until you get the look you want. You can even try different ways to dot any i’s or cross any t’s. Or maybe a capital letter works for your first letter. Just have fun with it.
And now it’s time to quilt your name on your practice squares. Feel free to do this as many times as you want to in order to get the look that makes you happy. I used both a lowercase and a capital T below in my examples and I definitely prefer the all lowercase letters. I think it looks more whimsical with my loopy dotted i’s and my curvy swoosh crossed t. Which one do you like better?
Isn’t this fun? I think it’s pretty cool that my quilted signature looks a lot like my written one. Does your quilted signature look like your written signature, too?
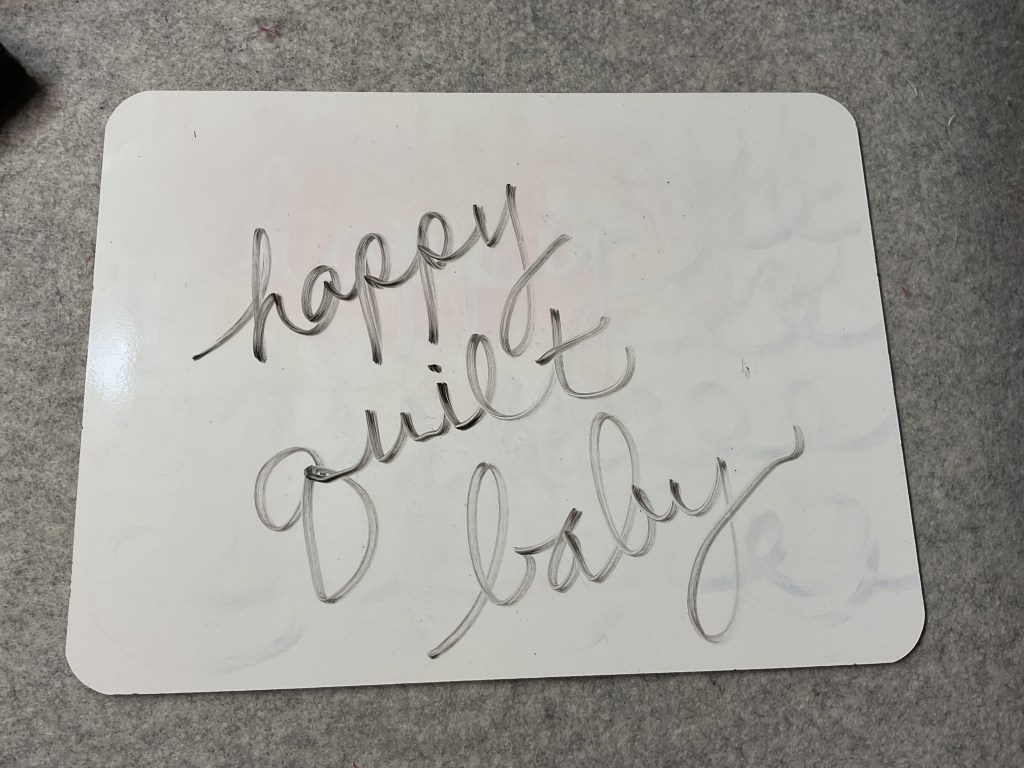
Now let’s try writing other words on our whiteboards. One time I had the brilliant idea to quilt the word “baby” in rows across a baby quilt I was making for my coworker. I loved how it looked after I quilted it, but quilting one word over and over became quite tedious and I was so glad when I finished it. Afterwards, I wished I had included other baby words like bottle, bib, crib, bear, love, etc. That would have made my quilted written design that much more interesting. Oh well. Live and learn.
Let’s write! Just make sure all the letter are connected. Go ahead and experiment with dotted and crossed letters.
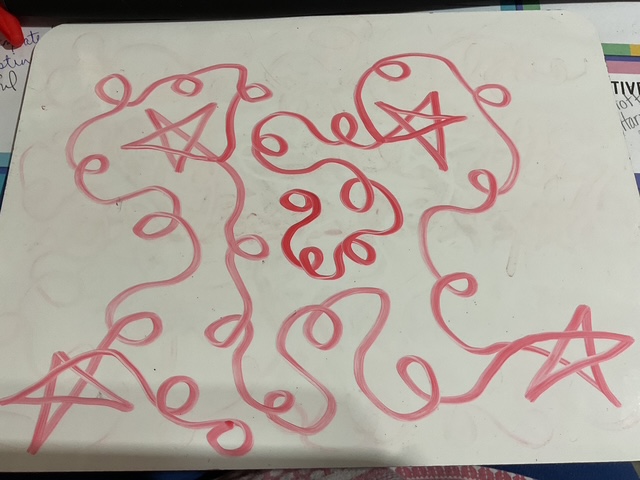
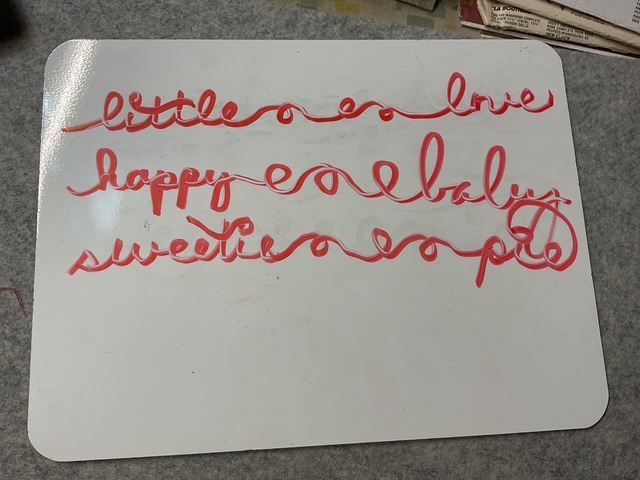
Now let’s connect words together into continuous lines. When I do this, I like to make a consistent number of alternating loops between the words to separate them and I leave lots of room between words to give them space to breathe, which makes the words a little easier to read.
Sorry, I couldn’t find a dry erase marker that wrote very well, but my quilting will look better.
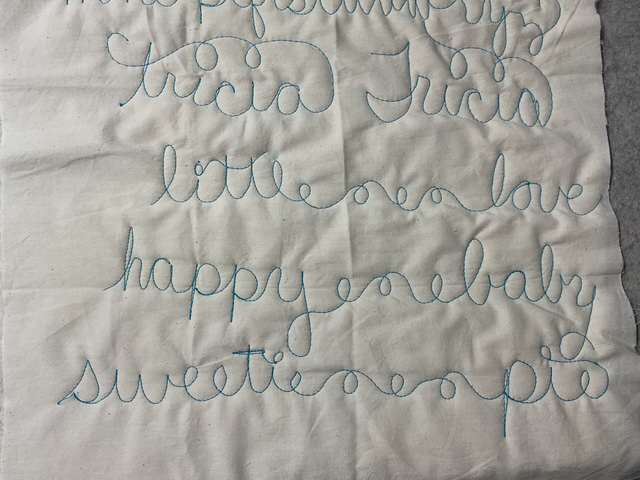
Now let’s practice quilting the words together. Don’t forget to put loops between the words so you can read the words after you quilt them. You may have to be creative with any dots and crosses.
Now it’s your turn to use your cursive writing as a quilting design. Keep practicing. Don’t be afraid to try your FMQ on some actual projects, too — a panel or place mats or orphan quilt blocks turned into potholders. Go ahead – you know you want to! Keep practicing your alternating loop design, too.
Stay tuned next week for Lesson 5: Going Beyond Loops. See you then!
Take care and stay warm. It was -3 this morning here in northwest Pennsylvania. BRRRR!
I’ve been itching to do a new series on the blog and decided that I really wanted to do one about Free Motion Quilting, or FMQ for short. I taught beginner FMQ at my local quilt shops for many years, but it’s been awhile since I’ve taught a class that I also thought it would be fun to revisit my FMQ techniques and share them with you.
This series will be aimed at beginning Free Motion Quilters, but more experienced quilters are of course welcome. LOL! I thought I’d start off with an intro post about getting ready to quilt.
Is there anything specific you would like me to address in this Beginner FMQ series? I’ll try to include it.
Let’s get started!
What the Heck is Free Motion Quilting (FMQ)?
Before we can go much further, I’d like to take a minute and talk about what FMQ really is.
A lot of quilters I know use a walking foot and quilt straight lines on their quilts with their feed dogs up. This is great and gets the job done, but this in NOT FMQ.
Ruler work is starting to take hold in my area now, but this isn’t exactly FMQ either, but it has many similarities.
Free Motion Quilting is exactly as the name implies — it is free motion quilting. This means that you, the quilter, are moving the quilt sandwich. Yes, you can FMQ on a long arm quilting machine, but for this series I am going to work from the domestic machine perspective as that is how I roll.
The feed dogs are down (or covered) when you are Free Motion Quilting and you, the quilter, are making things move which then creates whatever design you are quilting. The machine’s job is simply to provide the juice so the needle will go up and down.
Don’t believe me? Watch this quick video:
The needle goes up and down really fast. And that’s it!
If you still don’t believe me, try it yourself. Disengage your feed dogs, attach a FM foot (darning foot) and push your foot pedal to the metal. No hands!
See??? All the needle does is go up and down really fast until you make a thread knot on the back and your thread eventually breaks. That’s it.
YOU are what creates the actual quilting design in FMQ. YOU are in control.
One more thing about true FMQ — we don’t really mark our quilts or try to quilt on a drawn line. True Free Motion Quilting is free.
When I was a beginning quilter, I tried hand-quilting and my stitches were terribly huge. So then I tried machine quilting in the ditch and couldn’t quilt a straight line to save my life. Then I finally discovered FMQ and found out I wasn’t a complete dunce and I really could machine quilt. Yay me!
The Fear of Free Motion Quilting
As a FMQ instructor for many years, I heard a lot of different ideas about FMQ from my students. One of the most repeated statements was a fear of how fast FMQ looks.
Please don’t be afraid of speed in FMQ. YOU are the one moving the quilt around on your domestic sewing machine. The machine itself just powers the needle to go up and down. If you’ve forgotten, watch the video, above, again to remind you.
The machine is not moving anything — YOU are moving the quilt sandwich so the speed at which you move the quilt is entirely up to you. The needle’s job is just to go up and down. What you do and what the needle does are 2 different things. You need to focus on moving the quilt sandwich at a comfortable speed for you, not trying to go as fast as the needle is going up and down. You will need to find the perfect balance for YOU.
Take a deep breath and repeat after me — “My job is to move the quilt. The needle’s job is to go up and down.” Repeat as many times as you need to in order to internalize and believe this statement.
Another fear I have frequently heard was that quilters were afraid of the needle itself. Just like when we are sewing a seam, we have to keep in mind where our fingers are in relation to the needle. So it is with FMQ. Keep your hands away from the needle by repositioning frequently. We’ll talk about this more later in the series.
No fear, okay? With a little practice, FMQ is a lot of fun and it’s very satisfying to machine quilt your own projects.
The Tools of FMQ
Like anything else, yep, there are tools that can make FMQ easier and more comfortable. Of course, the tools I am going to talk about below are the ones I personally use, and may not be what works for everyone. So please use what tools work best for you. If you’re not sure what works for you yet, try out some different ones to see what you like. If you were a student in my class, I would have all of the thing below so that you could try them out. I’ve even had students use my own sewing machine in class.
Sewing Machine
This is an absolute must for FMQ! LOL!
You don’t need a fancy shmancy machine, though, to successfully FMQ your quilts. What you do need is a reliable sewing machine on which you can drop your feed dogs. Dropping (or disengaging) the feed dogs is a lot better than simply covering the feed dogs. The cover can create a bump on your machine bed which may have a negative affect on your FMQ.
A heavier machine is a better choice than a lightweight one because the lighter the machine, the more it will bounce while you FMQ.
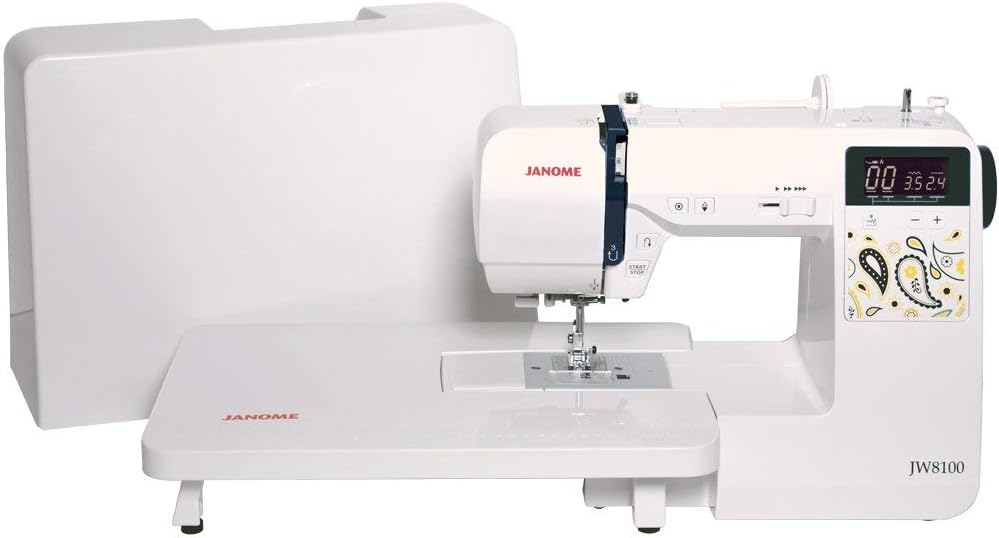
Just a heads up — my quilty pal, Mary Lee, found out the hard way that older Pfaff machines DO NOT like to do FMQ. It just about ruined her machine. She ended up buying a Janome.
Janomes are great machines for FMQ. I can say that personally because I’ve had 2 different Janomes. My current one is a Horizon MC8900 QCP. I’m not sure if they even make this model anymore, though, as it’s some years old now. What makes my big machine awesome at FMQ is that it has a large throat at 11″. I know that some domestic machines are being made today with even larger throats. Wowza!
If you are considering a new machine, head to your local machine retailer (which is also one of my local quilt shops for me). Talk to the people, tell them what you need and might want to do in the future with your machine. Make sure you test lots of different machines. Take your time selecting you new best quilting friend. I’ve bought machines online and I’ve bought machines at my local quilt shop. The best part of buying at your local shop is the customer service. You don’t get that online.
Get the biggest throat on your new machine you can afford. Make sure the feed dogs drop. Does it come with all the quilting feet or do you have to buy them separately? Remember, take your time and get the best machine that does what you want it to do at a price you can afford. You can always upgrade sometime down the road if your needs change.
Needles
I found out a long time ago that quilting needles worked better than universal needles for, well, quilting. There is pretty much a needle for any type of sewing you want to do — embroidery, jeans, etc. So why shouldn’t we be using quilting needles for quilting?
Here are the needles I’ve used and been happy with:
Klasse and Schmetz needles are very good and easy to find at your local shop or online. But these days, I primarily use Janome Purple Tip needles for piecing and quilting on my Janome machine. My machine likes these needles best and as I like to keep my sewing machine happy, I use Purple Tip needles.
You might want to check with your sewing machine manufactureror your local retailer to find out what needles they recommend for free motion quilting on your particular sewing machine.
Sewing Machine Foot
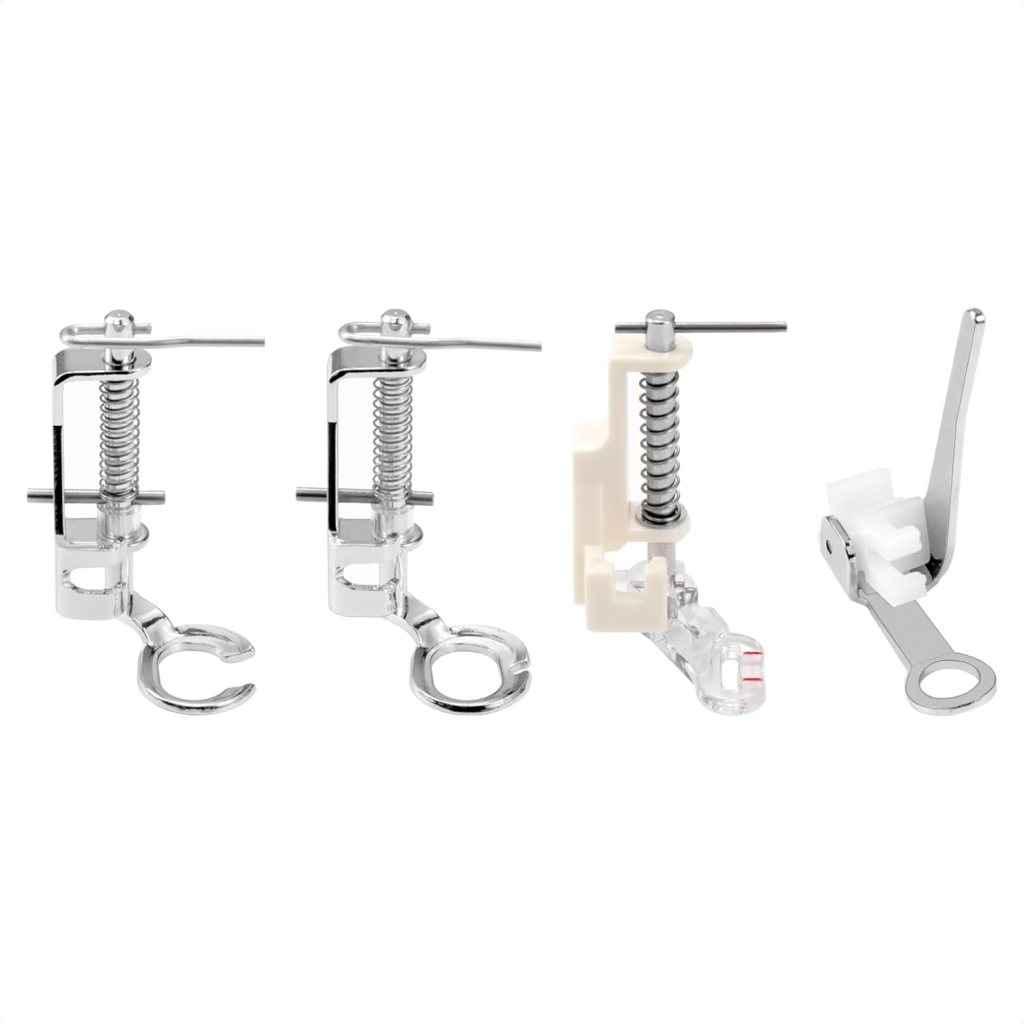
In order to do FMQ, you will need a darning foot, which is also called a FMQ foot or a hopping foot.
Please make sure to check your sewing machine manual to find out what type of shank your machine has. These days most are low shank, but there are also high shank and slant shank.
If you are fortunate, your sewing machine might have come with a set of quilter’s feet which usually includes a 1/4″ foot for piecing, a walking foot for straight line quilting, and a darning foot for FMQ. If your machine didn’t come with a darning foot, you will need to purchase one. Please make sure to check your sewing machine manual to find out what type of shank your machine has. These days most are low shank, but there are also high shank and slant shank machines. A good place to start is your machine retailer who will hopefully have the foot you need to fit your sewing machine. If you cannot find one that matches your machine, there are different generic feet available out there.
Here are some darning foot examples.
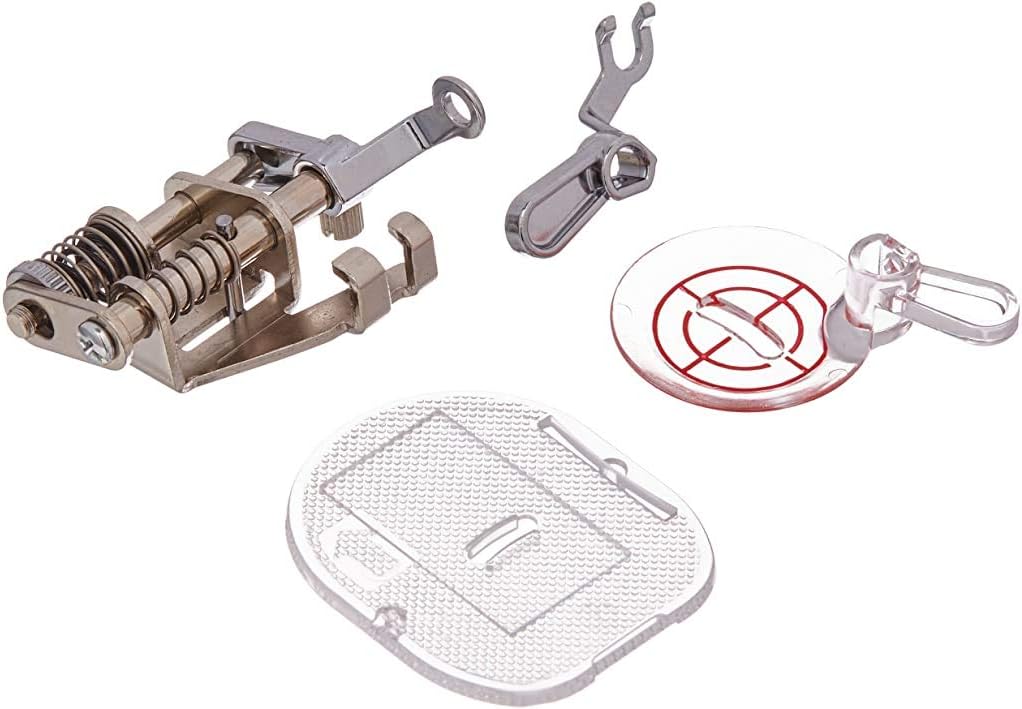
When it comes to the darning foot I use on my machine, I have a convertible foot that came with my machine, but can be bought separately.
You might wonder why I like this FMQ foot system the best. First, it work great with my machine. Second, I prefer an open toe for my FMQ foot and this set has one. And third, it doesn;t hop up and down — it’s stationary, so FMQ is smoother, which improves my quilting.
Extension Table
Does your sewing machine have an extension table? My Janome does as do my 2 smaller Brother machines. An extension table is a great thing when you are doing FMQ because it gives your hands somewhere to rest while you work. Most sewing machine beds are pretty small which doesn’t give you much room to work. An extension table is like a super secret FMQ weapon!
If you are lucky, your sewing machine came with an extension table built exclusively for your machine model. If you don’t have one, check with your local machine retailer to see if there is one that fits your machine. Of course, there are generic extension tables too, but I personally feel that they don’t fit your machine as well as one specifically built for that model.
An example of a sewing machine with an extension table.
Gloves
When I first began FMQ, I didn’t even know there were gloves out there for FMQ. I saw my first pair of gloves in a lovely urban quilt shop called Quiltology in Chicago (the shop is now closed and morphed into a personal design studio) when I was at a teaching conference years and years ago (I slipped away for a few hours one afternoon and took a cab to the shop). The first pair of gloves I ever used were called Machingers.
Wow! What a difference in my FMQ when I started using gloves. I had much better control over the quilt sandwich and I had better gripping power. The only problem I experienced with Machingers was that the elastic wrists stretched out after a while and the gloves were kind of loose.
Eventually I stumbled onto Grabaroos. They fit more snugly than the Machingers and were nice and cool, even when I was FMQ in the middle of a hot summer day in my un-air conditioned studio, but the fingers were a bit too long for me. But they worked great and I kept improving my machine quilting. Alas, the wrist elastic also stretched out and I went through several pairs a year.
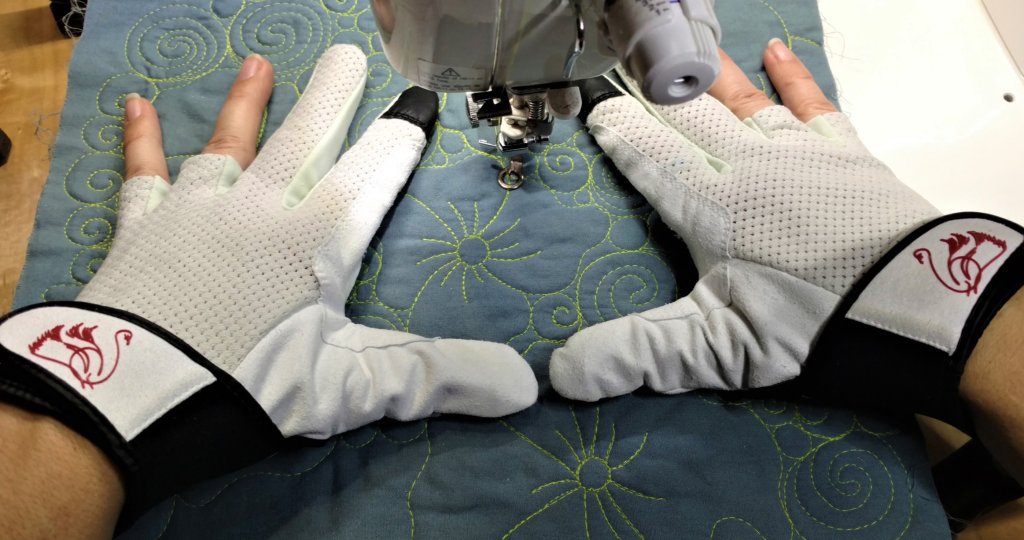
Then some years ago, I went to a Quilt Market Schoolhouse lecture and found the perfect machine quilting gloves for me! Swan Amity gloves. Yep, I’ve talked about these gloves before. I love that they are leather and they have an adjustable wrist strap so they fit perfectly every time. And they last a long time! My first pair lasted for years and I’d still be using them right now except I bought another pair a a couple years ago.
Do you have to have gloves for FMQ? No, not really. BUT, like a sewing machine extension table, quilting gloves are a secret weapon in your FMQ arsenal.
Supreme Slider
As I’ve become a more experienced free motion quilter, I rarely use my Supreme Slider anymore. But it is a good tool to have around so that when your quilt sandwich just won’t slide nicely on your sewing machine bed, you can take a quick break and slap on your Supreme Slider. Voila! Your quilt sandwich now slides around for lovely consistent smooth stitching.
A Supreme Slider is a super slippery Teflon sheet that sticks to your sewing machine bed. It has a tacky back that is reusable — you just need to dampen it and pat it dry so it sticks again.
Just a note — do make sure your Supreme Slider is tacky and sticks to your machine bed. If it isn’t sticking, you will sew the thing to the back of your quilt. Been there, done that. Learn from my mistake.
A Supreme Slider is a very thin slippery sheet that sticks to your sewing machine bed.
A Supreme Slider really does improve your FMQ by reducing friction between your quilt sandwich and the sewing machine bed.
Sewer’s Aid
I’m sure I’ve talked about Sewer’s Aid before. It is another one of those FMQ tools that are great to have around when you need them, although you might not use it very often. There are times that I get so frustrated with my FMQ — those days when no matter what I do, my thread keeps breaking. UGH! So, what do I do??? I drop beads of Sewer’s Aid all over my spool of thread, re-thread my machine, take the bobbin out and put it back in, and then I get back to the business of FMQ.
I call this stuff liquid magic!
Sewer’s Aid is a polymer liquid you drop onto your spool of thread which then helps your thread to pass smoothly through the machine without breaking. Yup, it reduces friction for the thread just like the Supreme Slider does for your quilt sandwich.
Do you have to have all of these things to get started with Free Motion Quilting? Of course not, but I am a proponent for using tools to make sure I achieve the positive results I want. The tools, above, help you to be more successful with FMQ. Of course, there are lots of other FMQ tools out there. What are your favorites?
Thread
Have you looked at thread lately? There is so much to choose from these days. When I first started FMQ, “machine quilting” were bad words in the quilt community so we free motion quilters used invisible thread because it supposedly looked more like hand quilting (naw, it didn’t look anything like hand quilting). Eventually, FMQ became its own art form with its own super stars. Now your choices of thread are literally mind-boggling.
I guess you could call me old school because I prefer 100% long staple cotton thread for piecing and FMQ. Over the years, I’ve tried other types of threads, but I always come back to my cotton thread. I like how it quilts, how it looks, and my machines have always liked cotton thread the best.
So, what kind of thread should you use? These days, pretty much anything goes. My suggestion is to try out different types of threads and see what you — and your machine — like the best.
I do caution you, however, about using old spools of thread. Thread can weaken over time, so as economical and green as it sounds to use old spools of thread, I recommend that you steer clear of them. You don’t want you quilt to fall apart someday down the road.
Books, Websites, and More
As a former teacher and librarian, of course I have a list of helpful books for FMQ. Tehehe….
How Do I Quilt It? Christa also has quite a few books out there on machine quilting.
Leah Day was probably the first Free Motion Quilter I ever actually saw in action on the Internet.
365 Free Motion Quilting Designs This book is out of print now so if you see it, snap it up. Years ago Leah Day challenged herself to do a new FMQ design every day for a year. On her website she has 100 of the designs as free tutorials.
These days, you can find tons of beginner FMQ videos, blogs, and how-tos online. Just make sure they are giving you quality information. There are many different sewing and crafting academies online, too, where you can take video classes. You might want to check them out.
Well, I think that’s enough introductory information today. Join me next week for more FMQ!
I’m sew excited you stopped by today! After doing those fall quilt tutorials a few weeks ago, I am trying to now get them all quilted before I dive into making more quilt tops (my projects seem to be multiplying daily). Do you quilt your own quilts or do you send them out to a long arm quilter? If you do your own quilting, do you hand or machine quilt?
My Machine Quilting Journey
I started machine quilting right after I learned to do patchwork almost 25 years ago. Of course, first I tried to “stitch in the ditch” but I found I couldn’t manage to actually stay in the ditch. Ho hum……
I did try a little hand quilting on my very first quilt, which I lovingly call “Big Ugly”, but my stitches were so big, I could’ve probably caught my toe in them. LOL!
Eventually I heard about a relatively newfangled thing called free motion quilting (FMQ). I was a new enough quilter that I wasn’t afraid to try it. Of course, back then free motion quilting was frowned upon and free motion quilters tried for a hand quilted look by using invisible monofilament thread to hide their machine stitching. The invisible thread back then was like thin fishing line — yuck! But I still slogged through — learning how to free motion quilt with a basic sewing machine on which I had to cover the feed dogs with tape or an index card because the feed dogs didn’t drop. And don’t forget that fishing line (today’s invisible thread is so so much better than back then)! Regardless of the challenges, I kept free motion quilting. And I was hooked!
After I had some quilts under my belt and I upgraded to a little better sewing machine where I could actually drop the feed dogs — it had a needle-down function too, I switched to using the same thread I pieced with — 100% cotton. I experimented with different threads and manufacturers for a while to see what I liked the best, or maybe more accurately what threads my sewing machine liked the best. Then I discovered King Tut variegated thread by Superior Threads. WOW! What fun it was quilting with variegated thread! I grabbed up every variegated thread spool I found, which was especially fun when I went on shop hops and quilting bus trips with my quilty pals.
The only real problem I found working with those yummy variegated threads was that sometimes I lost the thread on the quilt because the thread color matched the quilt exactly. Then it kind of looked like I skipped part of the quilting design. Oh well, nothing’s perfect.
This was when I moved back to working with solid 100% cotton threads. Now I have a small six drawer unit on wheels with all my spools of thread organized by color or type. And yes, the top drawer even has my collection of variegated threads. My drawer unit is the Helmer unit from Ikea.
Helmer image from Ikea
Free Motion Quilting on Fleece
Today I have a fun little video for you with some great tips for free motion quilting a quilt top backed with fleece fabric (you know — the fleece you make tied blankies with or comfy pj pants out of?). I began free motion quilting on fleece long before even Minky was popular as a quilt backing. I guess I was ahead of my time a little bit. Of course, back then, folks kind of looked at me funny when I showed off my free motion quilted quilts backed with fleece. Boy, they didn’t know what they were missing!
There is nothing like curling up with a fleece-backed quilt. Be aware that I don’t put batting in my fleece-backed throw quilts. Nope, not at all. Skipping the batting makes my fleece-backed throw quilts very cozy and super floppy — which I love! Have you ever tried machine quilting with fleece on the back of your quilt?
A friend of mine, Cheryl, who is a free motion long arm quilter, took my quilting on fleece idea even further — she layers 2 pieces of fleece and free motion quilts them together to make a one of a kind textured throw blanket. Maybe you’ll try this too.
Now — on with the show!
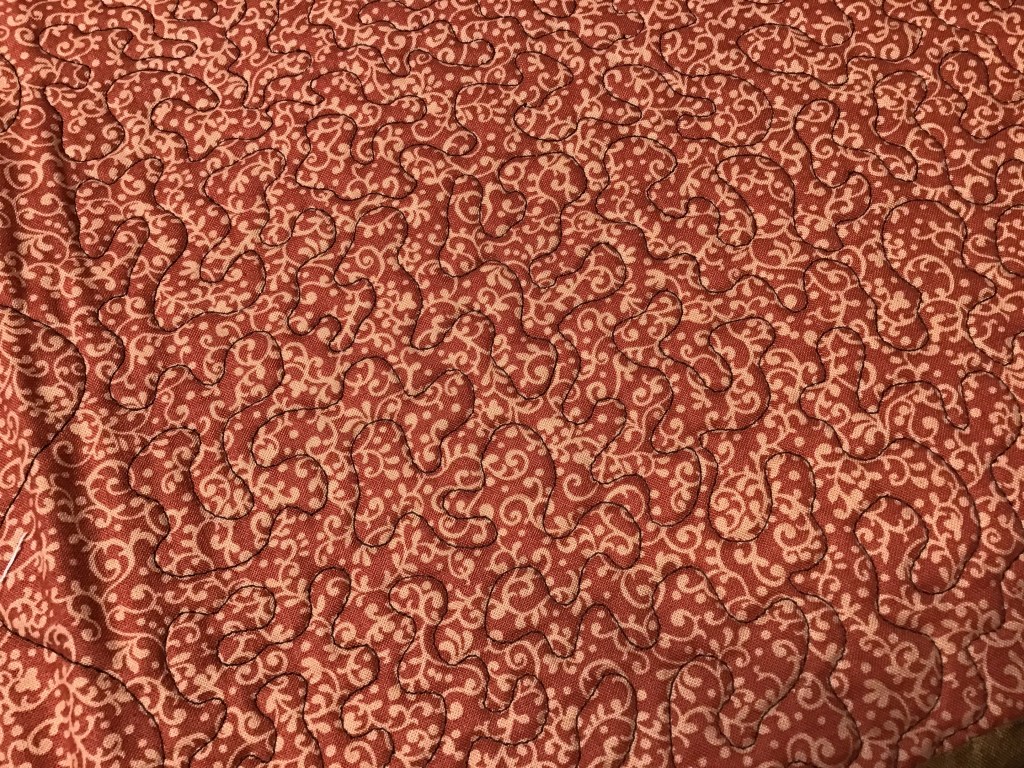
Oops! I see in the video that I actually did cross over some lines. Mea culpa! Luckily, I didn’t get any mischief happening on the back of my quilt. I should haven stuck with my first choice of orange thread instead of the medium chestnut brown, which blended in too much on the quilt top. LOL!
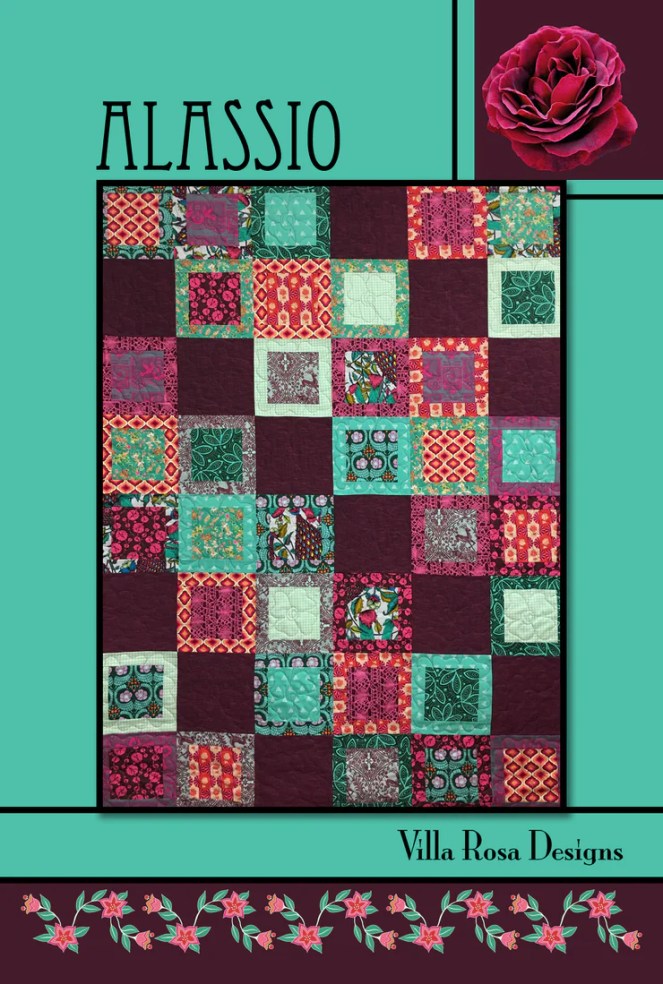
Go HERE for the Alassio tutorial. Or HERE to purchase the Alassio pattern.
Go HERE to read our VRQ post, Quilt as Desired, which is all about machine quilting and is part of our Basic Skills for Quilters Series on the blog.
I hope you enjoyed this little video. Now that I know how to create one and upload it, you might just find more little videos here. You’ll have to stay tuned to find out.
Here’s hoping we all have a productive autumn season — especially with our quilting.
I don’t know if you’re like me or not, but I tend to quilt less in the summer months. First, of course, it’s summer and I want to be busy doing other summer-y things and going places. Second, my Sewing Dungeon, er….Studio, is not air conditioned, so for a couple of months out of each year, it’s hard to sew with sweat dripping down into my eyes and onto my projects.
Yup, here’s my dungeon! LOL! Cue the creepy music, please! Image by upklyak on Freepik
Needless to say, I look forward to the cooler fall months when I feel more productive in my studio and I get excited again about new projects.
What the Heck is “Quilt as Desired”???
If you’re new to quilting, you might have seen the phrase “quilt as desired” at the end of some of your quilt patterns. But what does it really mean? It’s a designer’s way to say quilt your quilt any way you want to.
On our Villa Rosa Designs Rose Cards, we take it a step further and say “Quilt and bind as desired.” Gee, that makes all the difference, doesn’t it? NOT!
If you’re a beginner, how are you supposed to know what to quilt or how to quilt your quilt to finish it?
Never fear — I’m here to help!
The first thing you need to consider after you complete the quilt top is what kind of quilting are you going to do? Machine quilting? Hand quilting? Or even tying/tacking?
Okay, let’s say you want to machine quilt your quilt yourself (sorry, I’m not into hand quilting, so you’re stuck with machine quilting). Here’s a little video I put together a while back about some basic free motion quilting skills and information.
Wiggly lines are just one way you can quilt your project. Here are some of my other free motion quilting favorites.
Straight Lines
If you haven’t tried quilting simple straight lines on a project, it’s way past time you did! To get your lines relatively straight, you will probably want to use a walking foot or an even-feed foot on your sewing machine. A walking foot or even-feed foot moves the top and bottom layers under the needle at the same time so your sewing lines are less likely to pucker and you won’t get those annoying tucks on the back of your quilt.
Here’s a great example of what straight lines can do for your quilt — this is only the backside and it’s unwashed! Cool, huh? Straight lines add a lot of texture. And if you look closely, you’ll see that my lines aren’t really all that straight, but by repeating the lines over and over about the same distance apart, it looks pretty awesome. Now imagine what this table runner will look like after I wash it and it crinkles up beautifully! You’ve just got to try straight lines!
Straight lines look great quilted on anything modern as well as children’s quilts. But I wouldn’t recommend straight lines on your Civil War reproduction quilt. LOL!
Loopy Loops
Loops are probably my all-time go-to design. I usually use this design edge to edge but sometimes I will use loops in the quilt center with something different in the borders. It depends on my mood, how much time I have, and what the quilt needs to be completed. (Yes, quilts talk to me — I am a quilt whisperer…)
As a free motion quilting teacher for a lot of years, I have discovered that loopy loops are more beginner-friendly than stippling/meandering. You have permission to cross over your lines in loopy loops, whereas in stippling/meandering you do not cross lines at all. Loopy loops are less stressful and I find them lots of fun to do.
Below, here’s an example of loopy loops. Neat, huh? See how all the loops are not the same shape or size? That’s what makes this design look easy-breezy. You can also use loopy loops as a jumping off point for A LOT of other variations.
I tend to quilt my loops big and open, which of course uses less thread and takes less time than quilting itty bitty loops. My rule of thumb is to quilt my lines of quilting no closer than a finger’s width. Of course, if I’m quilting a doll quilt, I’m going to quilt this design smaller and closer together than if I am quilting a throw quilt. Adapt the size and density of your quilting to the project you are quilting.
Loopy loops look pretty great on almost any project! Maybe not your Civil War repro quilt, though. (Maybe you should try hand-quilting for that one, just sayin’.)
Stippling/Meandering
All beginner quilters want to learn how to stipple/meander. I have found over the years that a lot of intro to free motion quilting classes start with stippling/meandering. This is not really a true beginner design, in my humble opinion. I think it is better suited for a more advanced machine quilter. Why? Because you cannot cross over your lines and that is hard to do (or not do) while you are trying to get all the other 101 free motion skills and information all at the same time — beginning free motion can be a bit overwhelming, and that’s without having to worry about not crossing over your stitching lines! Ugh!
Sadly, intro free motion classes keep trying. And mostly failing. Then beginners get frustrated and upset when they can’t quickly pick up stippling/meandering in a couple hour class. Then many of them just quit. I’m sorry to tell you, but stippling/meandering takes most people a lot of practice to master. So I recommend that beginner free motion quilters start with straight lines, wiggly lines, and loopy loops before even attempting stippling/meandering. Most of us have to crawl before we walk….
By the way, in case you wondered, stippling and meandering are pretty much interchangeable terms at this point, although once upon a time they were slightly different. I am using both at the same time so as not to cause any confusion for anyone. 🙂
To me, stippling/meandering is a lot like loopy loops except you are not crossing over any lines. That difference can be very daunting to a beginner, however. If the idea of not crossing lines terrifies you, then please do try straight lines, wiggly lines, and loopy loops before moving on to stippling/meandering. I still try to use my rule of thumb of leaving at least a finger’s width between my lines of stitching.
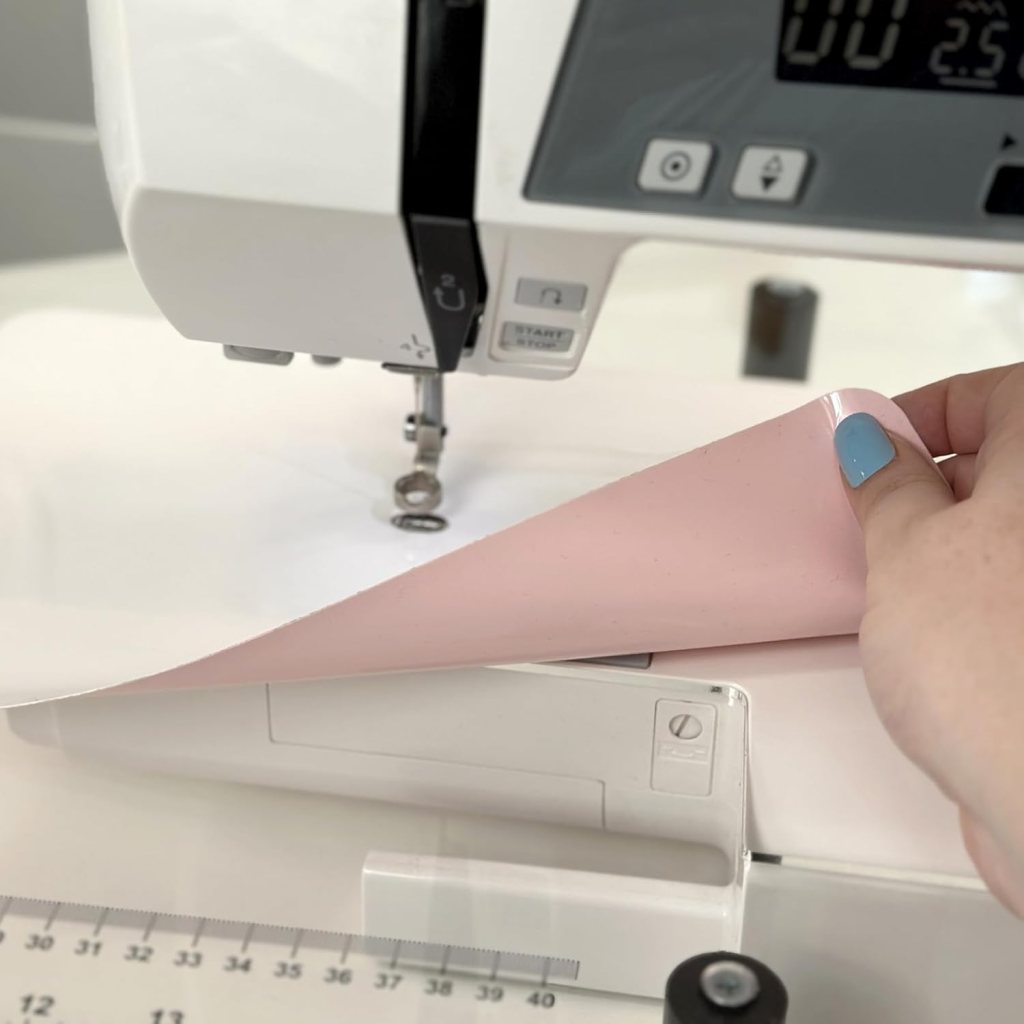
Here’s an example of stippling/meandering. I apologize that it might be hard to see my brown thread on the swirly-printed pink backing fabric on this place mat. Aha! Here’s another one of my tips: Use a busy fabric on the back of your quilt because it helps to hide your quilting stitches — this is particularly helpful when you are a beginner. It will help you to feel more confident about your developing quilting skills!
Probably the most important thing to remember about machine quilting is RELAX and HAVE FUN! Because quilting shouldn’t be like a job or chore, it should be relaxing and fun or else why would we be doing it???
You can check out some of my other favorite quilting tips HERE.
Next week we are going to tackle Binding, so stay tuned!
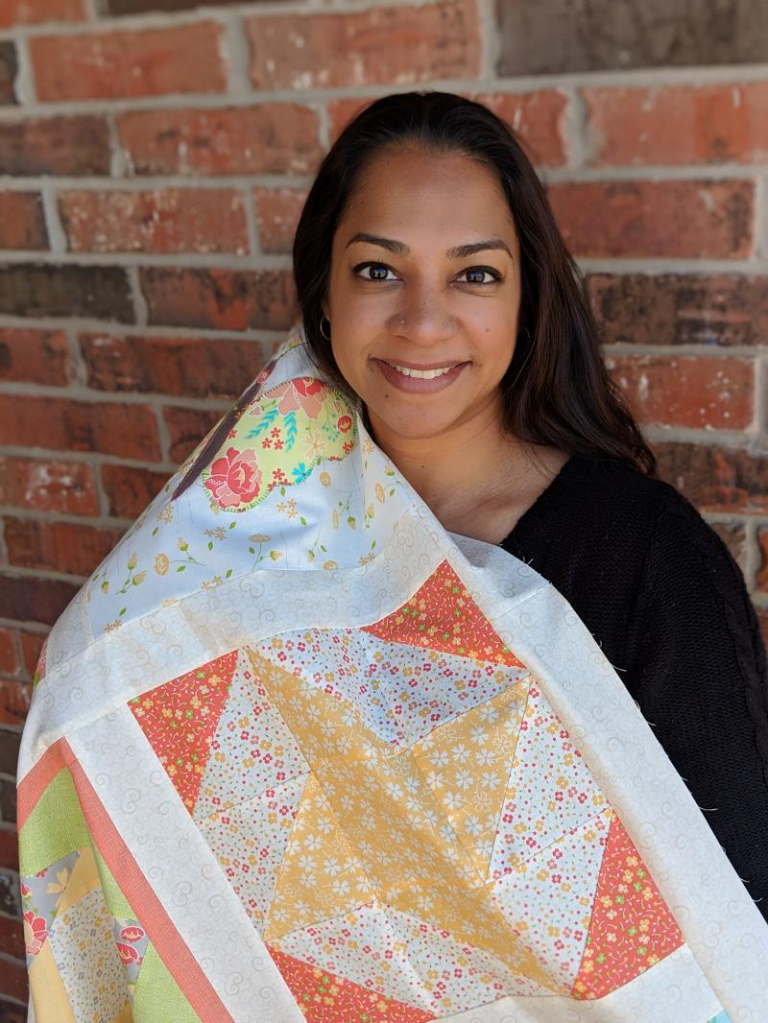
I am sew excited to be interviewing Villa Rosa Designs’s NEWEST Designer, Shankari Paradee. of Sewl Sister www.sewlsister.com today.
Shankari Paradee of Sewl Sister
Tricia: Hello Shakari! Welcome to Villa Rosa Quilts!
Shankari: Hi Everyone! Glad to be here.
Tricia: Let’s get started!
Shankari: All right, let’s go!
Tricia: How did you meet Pat Fryer, the owner and “Rose Queen” of Villa Rosa Designs, or how did you become part of the VRD family of designers?
Shankari: I went to a quilt retreat in Texas, where I met Catherine Cureton of Running Doe Quilts. She has several patterns with Villa Rosa Designs and encouraged me to connect with Pat. It took us a minute to get together as we all had busy schedules but we made it happen!
Tricia: How did you discover quilting? How long have you been quilting?
Shankari: I’ve been sewing since I was a little girl, starting with hand sewing doll clothes. I grew up with sewing in my family. When I moved to Oklahoma from Canada in 2006, my parents gifted me a beautiful 1960’s Viking sewing machine. I pieced and quilted my first quilt on that machine. I now own a long arm and started my long arm journey in 2016.
Tricia: What’s your favorite quilt block(s)?
Shankari: Friendship block is one of my favorites. I love the half-square triangle block because it’s such a simple block and you can use it to make so many other different blocks.
Friendship Star Block
Tricia: I really like that block too. And you’re right — there are sew many different variations. How did you make the leap from being a quilter to becoming a quilt designer?
Shankari: Once I got comfortable with piecing, I felt confident to venture out into the design world. I’ve only been designing for a couple of years and I have learned so much!
Tricia: You’re right — being a designer is all about learning, isn’t it? Can you tell us a little bit about your design process?
Shankari: Sometimes, I just doodle a design and it turns into a quilt design. Sometimes, I am looking for a specific style or feel and I go with my instincts on what I feel looks good. I also talk to other quilty friends to see what their thoughts are on my design. It’s always nice to have perspective.
Tricia: What is your favorite/least favorite part of the quilt-making process?
Shankari: I like it all and I think my least favorite would have to be binding.
Tricia: I am with you, Shankari! Binding is not my favorite part of designing and making quilts. What are your top 3 favorite quilting tools? Why?
Shankari: I love my rotary cutter, it makes cutting fabric so much easier. I could not live without various sized cutting mats. I can use smaller ones while traveling and teaching classes and I have two large ones on my sewing table. Binding clips are a life-saver! They help make the binding process easier.
Tricia: For me, I couldn’t live without my computer, Electric Quilt software, or my rotary cutter! What are you working on now? Any new patterns in the works? Can you give us a sneak peek?
Shankari: I am working on a pattern for VRD coming up and I have another one coming up with a group of quilters that will be out in celebration of Jelly Roll Day in September. You can always check out my Instagram for sneaky peeks! LOL! @hellosewlsister
Tricia: These are Shankari’s Rose Card patterns, you can purchase them HERE.
Shankari’s current patterns at Villa Rosa Designs
Tricia: You just had 2 new patterns come out in July, didn’t you?
Shankari: Yes, I did — Dainty Machines and Optic.
Tricia: Great patterns! You can find them here for purchase — Dainty Machines and Optic. Let’s shift gears a little bit — what’s your favorite book?
Shankari: Right now — One Italian Summer by Rebecca Serle
Tricia: Type of music/musician?
Shankari: Ed Sheeran
Tricia: Movie?
Shankari: Sense and Sensibility
Tricia: Hah! I’m a Janite too! TV show?
Shankari: Downton Abbey
Tricia: Me too! What do you do when you are not quilting/designing?
Shankari: I’m usually running around with my kids or spending time with my family. 😊 I also moonlight as a cardiac nurse.
Tricia: Kiddos and nursing? When do you even have time for quilting? Do you have any advice to quilters who want to become quilt designers?
Shankari: Don’t get bogged down by other designers and what they are doing. It’s easy to feel like you’re just another quilter in the quilt pond, and there’s room for all of us. Just design from your heart and “sewl”. Design what feels good for you and you can’t go wrong.
Tricia: Anything else you’d like us to know about you?
Shankari: I love to work with scraps and I’m on a mission to create a world with no landfill fabric. I like to keep my quilt patterns as least wasteful as possible on fabric, and use simple cuts of fabric. I love teaching sewing and quilt-piecing. If I can do it, you can too and I can teach you how. I have at least 8 sewing machines to my name, maybe that’s not too many?! Feel free to reach out and connect with me on social media or email:
Welcome to another Thursday — the first Thursday in June. Summertime, right? The kids are out of school or will be soon. Life will get crazy. Fun. And more crazy.
Are you kidding? I thought it was still March.
At least, it should still be March, don’t you think?
Que sera, sera.
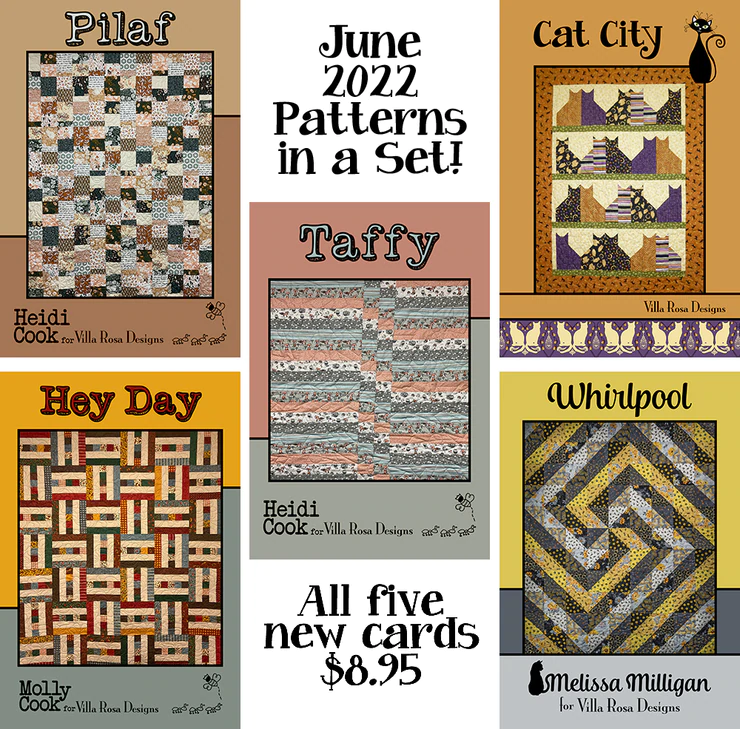
OH! Did you see the new Rose Cards for June yet???? As always, our VRD designers didn’t let you down.
Did you know you can actually join the Rose Card Pattern Club and get the new monthly Rose Cards delivered right to your mailbox every month without you having to do a thing????
If you live out of the USA, you can sign up for the digital Rose Cards, which will be delivered to your inbox without you having to do a single thing.
There are even several different Pattern Club options to consider. Cool, huh?
Another really AWESOME thing about Villa Rosa is that we create a lot of kits using our Rose Card patterns. You can find kits for this month’s new patterns AND you can find kits for lots of other favorites, too. You can visit the websiteHERE to see what our selection of kits are. Please remember that we add new kits all the time, with all kinds of different fabric, so make sure you stop in often to see what’s new.
A Little Bit of Free Motion Quilting and a Video Demo
How many of you are a little bit afraid of free motion quilting on your own domestic sewing machine?
Be honest!
Okay, that’s better, I see a lot of hands raised and heads nodding out there.
Well, I’m here to tell you that you don’t have to be afraid anymore. I’ve been teaching free motion quilting (FMQ) for more than 10 years and I haven’t lost anyone yet!
Here’s my TOP 12 TIPS for FMQ:
1. Find a teacher at your local quilt shop to show you how and to guide you so you feel safe. Don’t try to teach yourself by using YouTube videos.
2. Start out small — the smaller the project the better for beginners. Potholders, table runners, place mats, wall quilts, or other small projects.
3. Start with a beginner-friendly design like wavy lines or loops. Meandering and stippling are NOT beginner-friendly.
4. Try to relax. The more tense you are, the worse your quilting will be.
5. Play music while you quilt, something with a beat. A beat will help you find your rhythm for FMQ on your own machine.
6. Keep practicing, every day if you can, even if it’s only for 10 minutes. The more you practice, the more comfortable you will feel, and the better your quilting will get.
7. Practice machine quilting with a friend. You can encourage each other and laugh together.
8. Try machine quilting gloves. There are a lot of different types of gloves out there, so you might have to try different kinds to find the ones that work for you. Machine quilting gloves will help you get a good grip on the fabric so you can move the quilt more easily when you are quilting.
9. Doodle. Doodle a lot. Practice drawing the designs before you quilt them — this builds some muscle memory between your hands and you brain.
10. Practice…….practice……..practice…….
11. Practice……practice…..practice……. (I can’t stress this one enough)
12. HAVE FUN!
Here’s a little video I put together demonstrating how to free motion quilt wiggly lines on last week’s Ying Yang Cats. Enjoy!
I hope this video inspires you to try free motion quilting some wiggly lines on your own little project.