
Hello Quilty Friends!
Happy Thursday to you!

Here’s hoping we all have a productive autumn season — especially with our quilting.
I don’t know if you’re like me or not, but I tend to quilt less in the summer months. First, of course, it’s summer and I want to be busy doing other summer-y things and going places. Second, my Sewing Dungeon, er….Studio, is not air conditioned, so for a couple of months out of each year, it’s hard to sew with sweat dripping down into my eyes and onto my projects.

Image by upklyak on Freepik
Needless to say, I look forward to the cooler fall months when I feel more productive in my studio and I get excited again about new projects.
What the Heck is “Quilt as Desired”???
If you’re new to quilting, you might have seen the phrase “quilt as desired” at the end of some of your quilt patterns. But what does it really mean? It’s a designer’s way to say quilt your quilt any way you want to.
On our Villa Rosa Designs Rose Cards, we take it a step further and say “Quilt and bind as desired.” Gee, that makes all the difference, doesn’t it? NOT!
If you’re a beginner, how are you supposed to know what to quilt or how to quilt your quilt to finish it?
Never fear — I’m here to help!
The first thing you need to consider after you complete the quilt top is what kind of quilting are you going to do? Machine quilting? Hand quilting? Or even tying/tacking?
Next, are you planning to quilt it yourself? Or pay someone to quilt it for you? Depending on your answer here, you may need to prepare your quilt differently. You can see last week’s post “Basic Quilting Skills for Beginners: Batting, Backing, and Preparing a Quilt for Quilting” to help you with your preparation.
Okay, let’s say you want to machine quilt your quilt yourself (sorry, I’m not into hand quilting, so you’re stuck with machine quilting). Here’s a little video I put together a while back about some basic free motion quilting skills and information.
Wiggly lines are just one way you can quilt your project. Here are some of my other free motion quilting favorites.
Straight Lines
If you haven’t tried quilting simple straight lines on a project, it’s way past time you did! To get your lines relatively straight, you will probably want to use a walking foot or an even-feed foot on your sewing machine. A walking foot or even-feed foot moves the top and bottom layers under the needle at the same time so your sewing lines are less likely to pucker and you won’t get those annoying tucks on the back of your quilt.

Here’s a great example of what straight lines can do for your quilt — this is only the backside and it’s unwashed! Cool, huh? Straight lines add a lot of texture. And if you look closely, you’ll see that my lines aren’t really all that straight, but by repeating the lines over and over about the same distance apart, it looks pretty awesome. Now imagine what this table runner will look like after I wash it and it crinkles up beautifully! You’ve just got to try straight lines!
Straight lines look great quilted on anything modern as well as children’s quilts. But I wouldn’t recommend straight lines on your Civil War reproduction quilt. LOL!
Loopy Loops
Loops are probably my all-time go-to design. I usually use this design edge to edge but sometimes I will use loops in the quilt center with something different in the borders. It depends on my mood, how much time I have, and what the quilt needs to be completed. (Yes, quilts talk to me — I am a quilt whisperer…)
As a free motion quilting teacher for a lot of years, I have discovered that loopy loops are more beginner-friendly than stippling/meandering. You have permission to cross over your lines in loopy loops, whereas in stippling/meandering you do not cross lines at all. Loopy loops are less stressful and I find them lots of fun to do.
Below, here’s an example of loopy loops. Neat, huh? See how all the loops are not the same shape or size? That’s what makes this design look easy-breezy. You can also use loopy loops as a jumping off point for A LOT of other variations.

I tend to quilt my loops big and open, which of course uses less thread and takes less time than quilting itty bitty loops. My rule of thumb is to quilt my lines of quilting no closer than a finger’s width. Of course, if I’m quilting a doll quilt, I’m going to quilt this design smaller and closer together than if I am quilting a throw quilt. Adapt the size and density of your quilting to the project you are quilting.
Loopy loops look pretty great on almost any project! Maybe not your Civil War repro quilt, though. (Maybe you should try hand-quilting for that one, just sayin’.)
Stippling/Meandering
All beginner quilters want to learn how to stipple/meander. I have found over the years that a lot of intro to free motion quilting classes start with stippling/meandering. This is not really a true beginner design, in my humble opinion. I think it is better suited for a more advanced machine quilter. Why? Because you cannot cross over your lines and that is hard to do (or not do) while you are trying to get all the other 101 free motion skills and information all at the same time — beginning free motion can be a bit overwhelming, and that’s without having to worry about not crossing over your stitching lines! Ugh!
Sadly, intro free motion classes keep trying. And mostly failing. Then beginners get frustrated and upset when they can’t quickly pick up stippling/meandering in a couple hour class. Then many of them just quit. I’m sorry to tell you, but stippling/meandering takes most people a lot of practice to master. So I recommend that beginner free motion quilters start with straight lines, wiggly lines, and loopy loops before even attempting stippling/meandering. Most of us have to crawl before we walk….
By the way, in case you wondered, stippling and meandering are pretty much interchangeable terms at this point, although once upon a time they were slightly different. I am using both at the same time so as not to cause any confusion for anyone. 🙂
To me, stippling/meandering is a lot like loopy loops except you are not crossing over any lines. That difference can be very daunting to a beginner, however. If the idea of not crossing lines terrifies you, then please do try straight lines, wiggly lines, and loopy loops before moving on to stippling/meandering. I still try to use my rule of thumb of leaving at least a finger’s width between my lines of stitching.
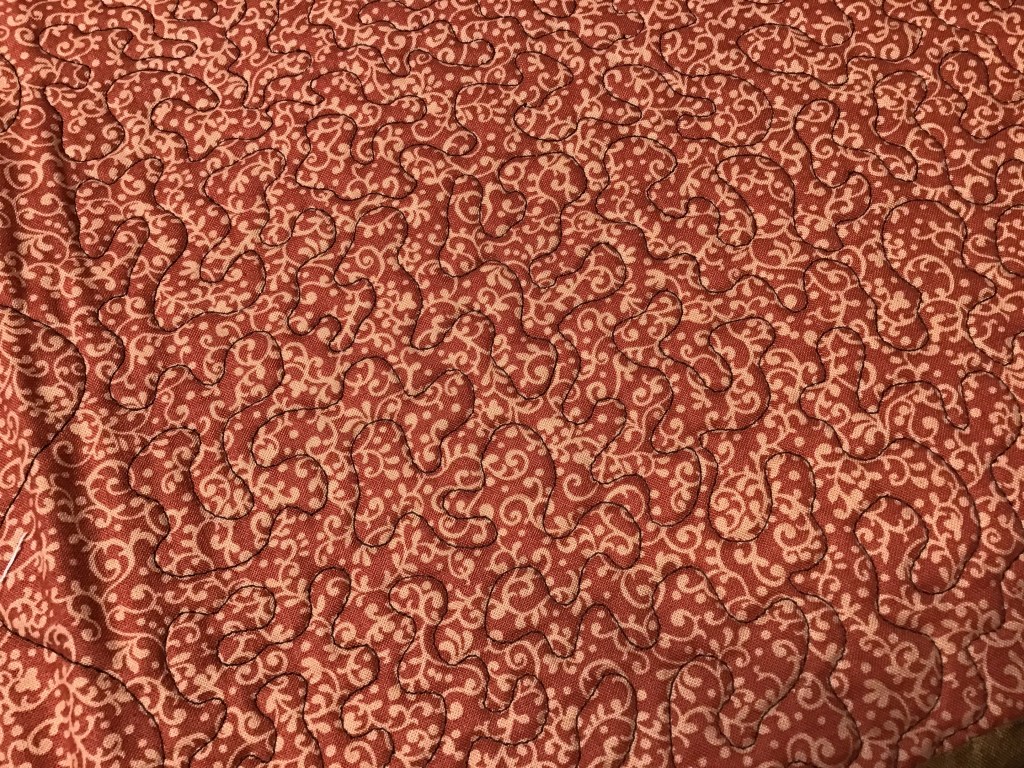
Here’s an example of stippling/meandering. I apologize that it might be hard to see my brown thread on the swirly-printed pink backing fabric on this place mat. Aha! Here’s another one of my tips: Use a busy fabric on the back of your quilt because it helps to hide your quilting stitches — this is particularly helpful when you are a beginner. It will help you to feel more confident about your developing quilting skills!
Probably the most important thing to remember about machine quilting is RELAX and HAVE FUN! Because quilting shouldn’t be like a job or chore, it should be relaxing and fun or else why would we be doing it???
You can check out some of my other favorite quilting tips HERE.
Next week we are going to tackle Binding, so stay tuned!
Until next Thursday —
Sew. Laugh. Repeat.
Always,
Tricia @VRD
