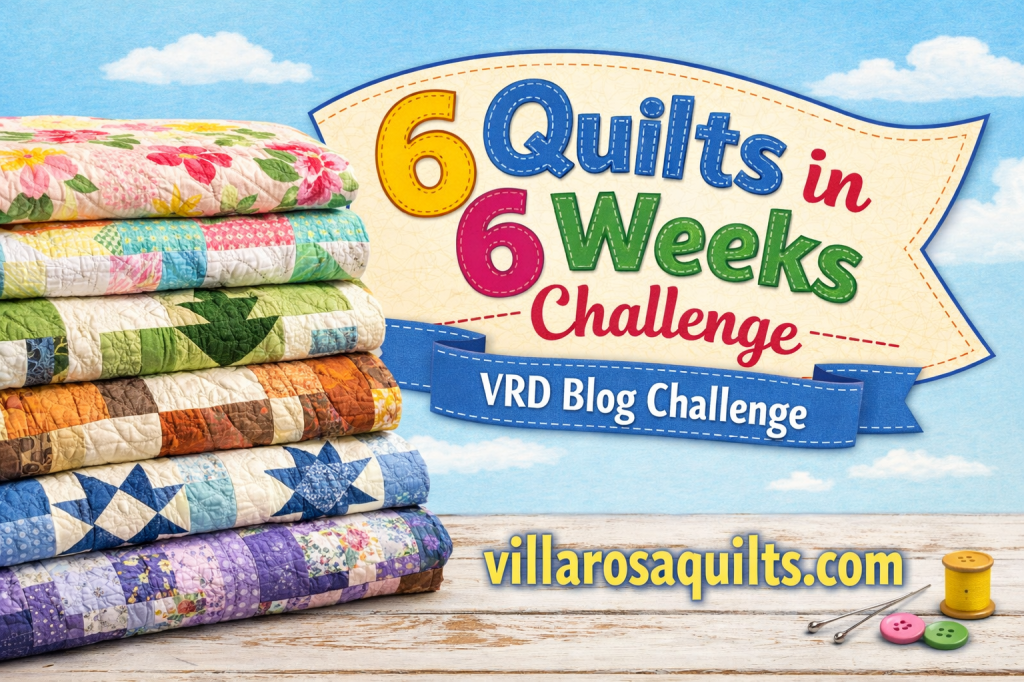
This week we’re all about wrapping up our totally AWESOMESpring Edition 6 Quilts in 6 Weeks Challenge. If you missed the Challenge or the timing wasn’t right for you to participate this time, never fear – I am planning to do it again this Fall. We all need motivation to get stuff done, don’t we? And I can’t think of any better motivation than doing it together.
Let’s take a look at Challenge stats.
6 Quilts in 6 Weeks Challenge Final Stats
By the end of the Challenge, I had 70 people signed up to participate in the Challenge. WOWZER!
Of the 70 folks who signed up, 37 people participated in at least 1 week of the Challenge making at least 1 finished quilt. That’s a 53% participation rate, which is totally fantastic! What a great turn out for our Challenge.
And I know you’re all wondering how many quilts we completed in 6 weeks, right?!? Well, keep wondering for a minute because I want to build a little suspense for that answer yet. (Tehehe.)
Next let’s congratulate our Week 6 Winner!
6 Quilts in 6 Weeks Week 6 Winner
It’s time to announce our Week 6 winner!
Norma K from WI
HOORAY!
Way to go, Norma!
Congratulations!
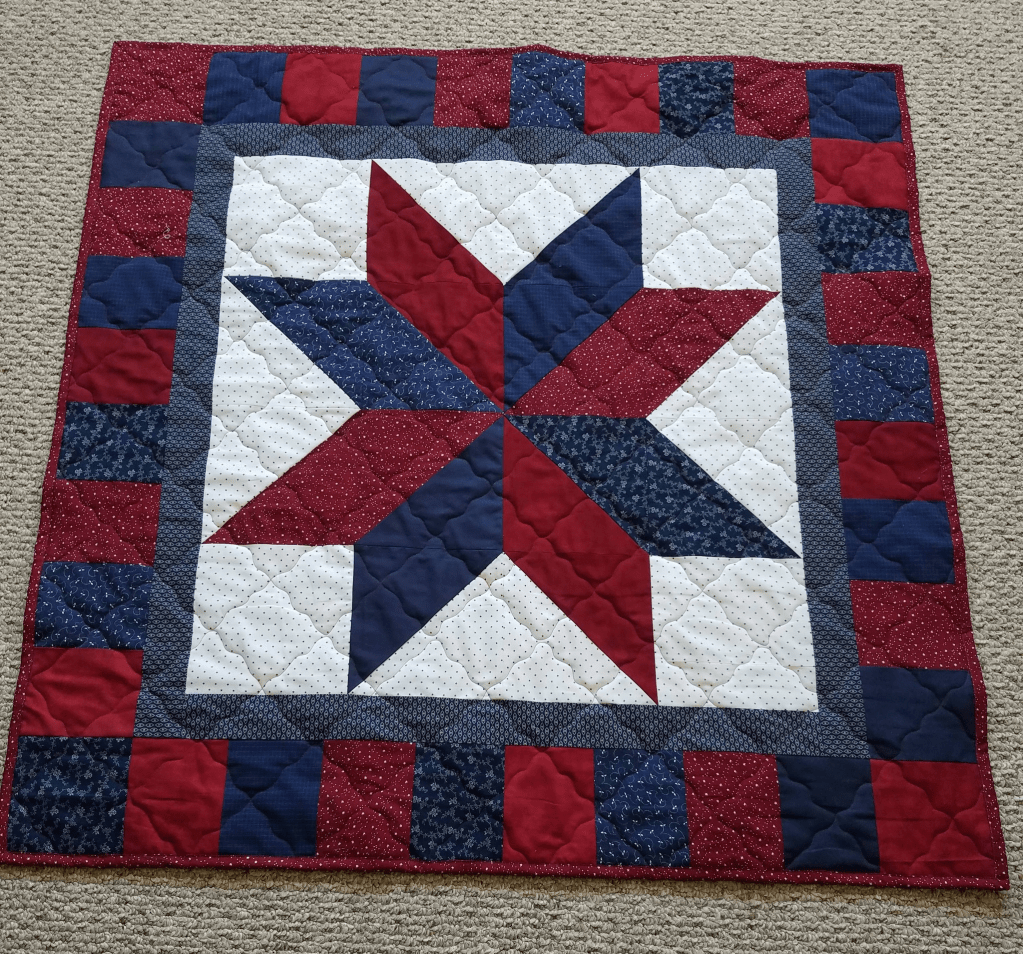
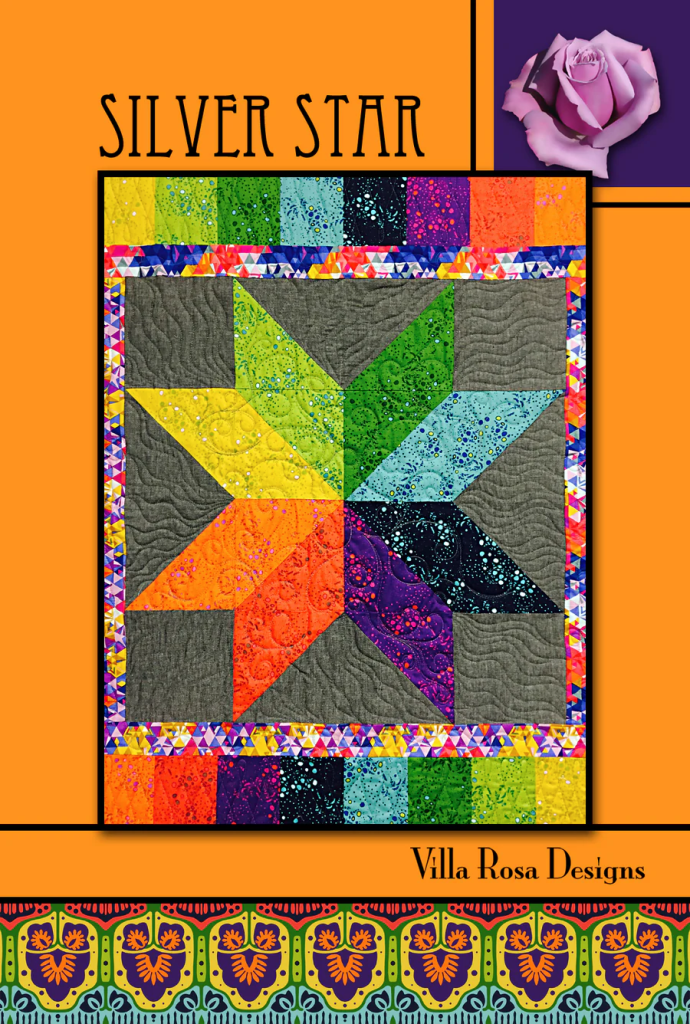
Here is Norma’s Week 6 finish – Silver Star. Isn’t it super? Just perfect for the upcoming 250th birthday celebration in the US this summer.
As you can see, Norma carried the pieced square border the whole way around the center star instead of only at the top and bottom. Great finish, Norma!
Next up is the winner of our Best Guess Contest. Whose best guess was the closest to the actual number of quilts finished in 6 weeks?
Total Number of Quilts Completedand Our Best Guess Winner
Guesses were all over the place, but at the end of our 6 Quilts in 6 Weeks Challenge, only one guess came close to the actual number. Very close actually.
First, the total number of quilts completed for the 6 in 6 Challenge was an astonishing
162 FINISHED QUILTS!
Wow! Isn’t that amazing? I’ll say it again –
162 FINISHED QUILTS!
Our closest guess was 157.
Congratulations!
Cyndi S in FL
YIPPEE!
And we have 1 more winner to wrap up our Challenge.
6 Quilts in 6 Weeks Finishers’ Circle
I want to congratulate ALL of the folks who completed the entire Challenge – there were 14 (15 with me, but I don’t count. LOL!). Which ends up being 20% of all the sign ups who actually finished a quilt every week for 6 weeks. Whoa!
I added one more drawing for these 14 finishers because completing a quilt a week for 6 weeks is a real commitment and I want to celebrate that. Actually I want to shout it from the rooftops, but I’m thinking that might not be so safe…….
Some folks completed UFOs while others created brand new from start to finish quilts. Remember, to be eligible for the weekly drawings projects had to be completely finished – quilting, binding and all.
Drum Roll please…………..
Our Finishers’ Circle winner is
Regina S in MO
Yay you!
Congrats!
Now it’s time to celebrate all the wonderful quilts that were completed during the challenge. Some were made for loved ones, some were made just because, while others will find their way to charitable organizations.
162 quilts in 6 weeks.
I really enjoyed seeing the VRD Facebook page (and my email) light up with so many quilts every week. And it was exciting to see other folks getting inspired to complete their own projects even though they might not have actually signed up for the Challenge. I also saw participants fueled by the momentum and continuing to finish UFOs after the Challenge ended.
162 quilts in 6 weeks.
All I can say now at the end of the Challenge is THANK YOU. Thank you for quilting along with me. Thank you for your encouragement and your support. And thank you for all the amazing inspiration. I have now added oodles of new VRD patterns to my Make List. I bet you did too. It’s a good thing we’re going to do the Challenge again in the Fall.
KEEP THOSE QUILTS COMING!
6 Quilts in 6 Weeks Challenge Sponsors
I want to do a special SHOUT OUT to Hoffman Fabrics and Riley Blake Designs who are sponsoring the prizes for the Challenge. Thanks SEW much for partnering with us for this awesome Challenge!
What’s Next???
I’m thinking it’s going to be hard to come up with a new idea to follow our very successful Challenge. So I thought I’d ask you – what would you like to see on the blog this summer?
I was possibly thinking perhaps a Fun Summer Sew Along, but then I wasn’t sure what exactly to make for the sew along. What do you think?
Yeah…..this is me. Every day! LOL!
Smaller projects? Runners? Accessory patterns? Patriotic projects? Fat quarter projects? Charm Squares? Jelly Rolls? Whew! Do we want to do a project a week or a project a month? Sigh…….too many choices.
So I thought I’d ask for your help. I am open to your thoughts and ideas, so please leave a comment and tell me what you’d like to do this summer on the blog.
I must admit I’m a little sad that this is our final week of the Challenge, but at the same time I know all good things must come to a close. And this was certainly a GOOD THING! 6 more quilts completed! Done and done! And I wasn’t the only person who finished a quilt each week for 6 weeks, so that it totally incredible. For those of you who missed the Challenge or were unable to participate, I hope to repeat the Challenge in the fall, so stay tuned for the Fall edition 6 in 6 Challenge later this year.
YAY ME!!! With 6 quilts finished, now I can get back to the business of creating new tutorials for the blog as well as tackling some new fun projects I have on my list and I won’t feel that little bit of guilt for not finishing stuff first. Woohoo! It’s really amazing how completing 6 projects can really give you a burst of energy and inspiration. I really love that.
Of course, my week long vacation at Myrtle Beach has certainly filled up my creative bucket and I imagine I’ll be creating beach-inspired quilts for a while. Just thought I’d warn you. LOL!
How about I show off my Week 6 finish now?
6 Quilts in 6 Weeks Challenge Week 6
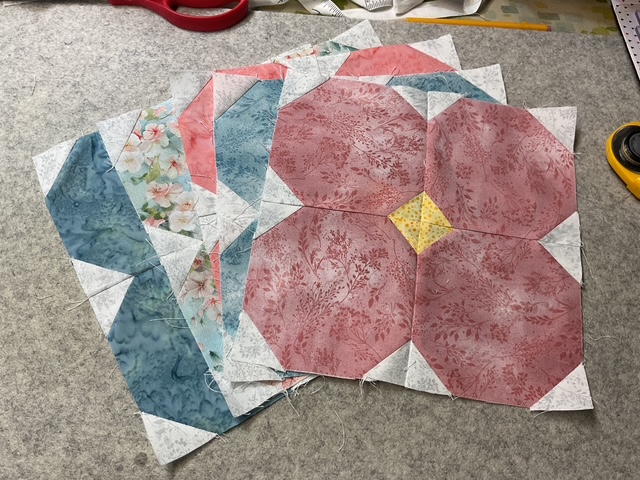
Before I left on vacay, I did a little prep work so I could finish my Week 5 and Week 6 quilts while at the Beach. Last week I completed my mini version of Eclipses on the long ride to Myrtle Beach and on the way home back to good ol’ PA, I actually finished the binding on 2 table runners (including my Week 6 project) as well as hand stitched a set of Drunkard’s Path blocks. I was thrilled to be able to get so much sewing done on the way home.
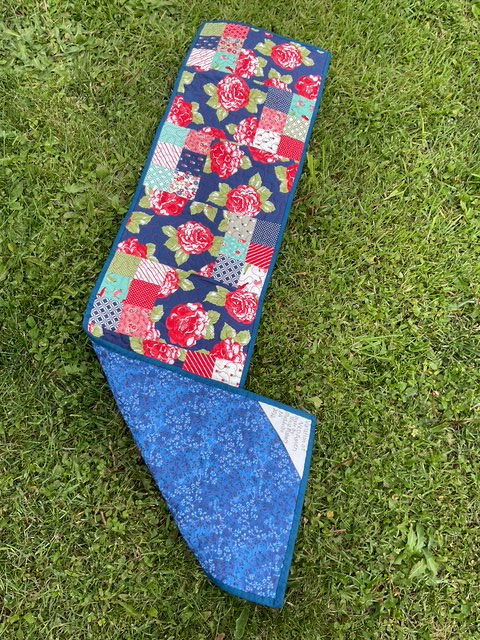
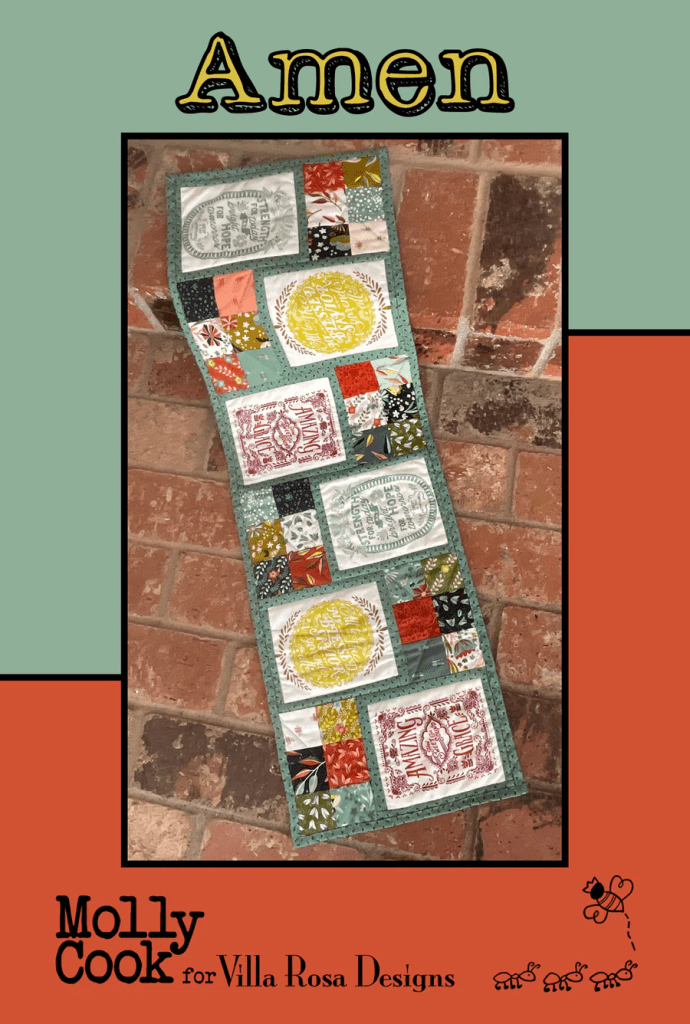
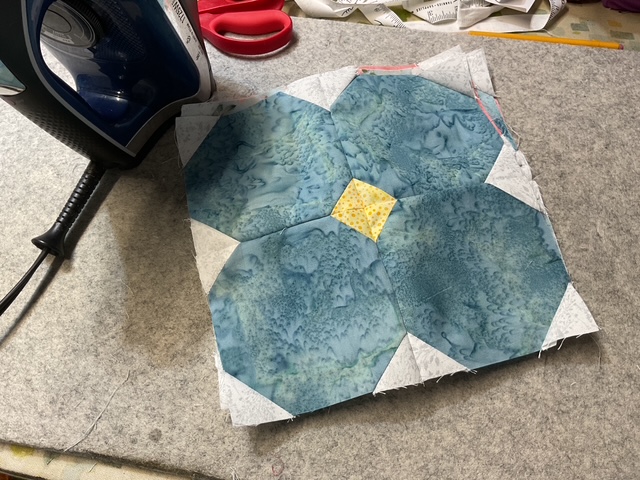
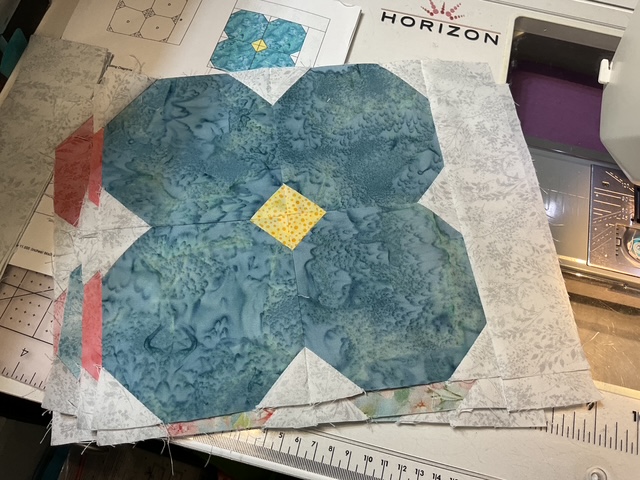
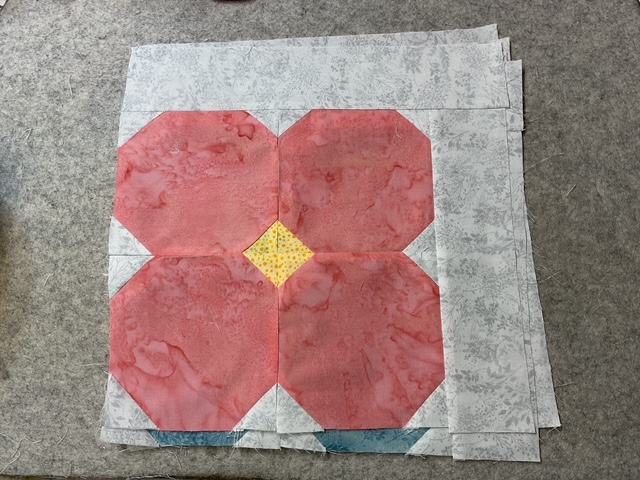
All I needed to do for my Week 6 finish was to hand-stitch the binding on a second version of Molly’s Amen table runner pattern. I completed the first Amen runner for Week 4 and now this one for Week 6.
I modified this version of Amen by eliminating the narrow border around the rectangles. Instead, I used a large bold floral. I also made a few extra blocks to make the runner longer. I quilted it simply with an allover meander in red cotton thread. My backing was a blue floral fabric left over from another quilt. And the binding is a blue texture. All in all, I think it turned out well and I really love it. Although it’s floral, I could definitely use this in July to celebrate the 250th birthday of America.
My BEFORE photo: Here’s the runner quilted but not bound in 2024. It only took 2 years and a road trip to get ‘er done. LOL!
My AFTER photos:
You know, I haven’t had much time to hand-stitch binding lately and I actually really enjoyed doing the hand sewing. I always have a few go projects ready to grab if I’m going to have time to stitch, but binding hasn’t been at the top of my list for a while. I’m hoping that I’ll put a little more effort into finishing those bindings, whether by hand or machine, going forward. Fingers crossed….
6 Quilts in 6 Weeks Week 5 Winner
It’s time to announce our Week 5 winner!
Fiona M. from Ontario, Canada
HOORAY!
Way to go, Fiona!
Congratulations!
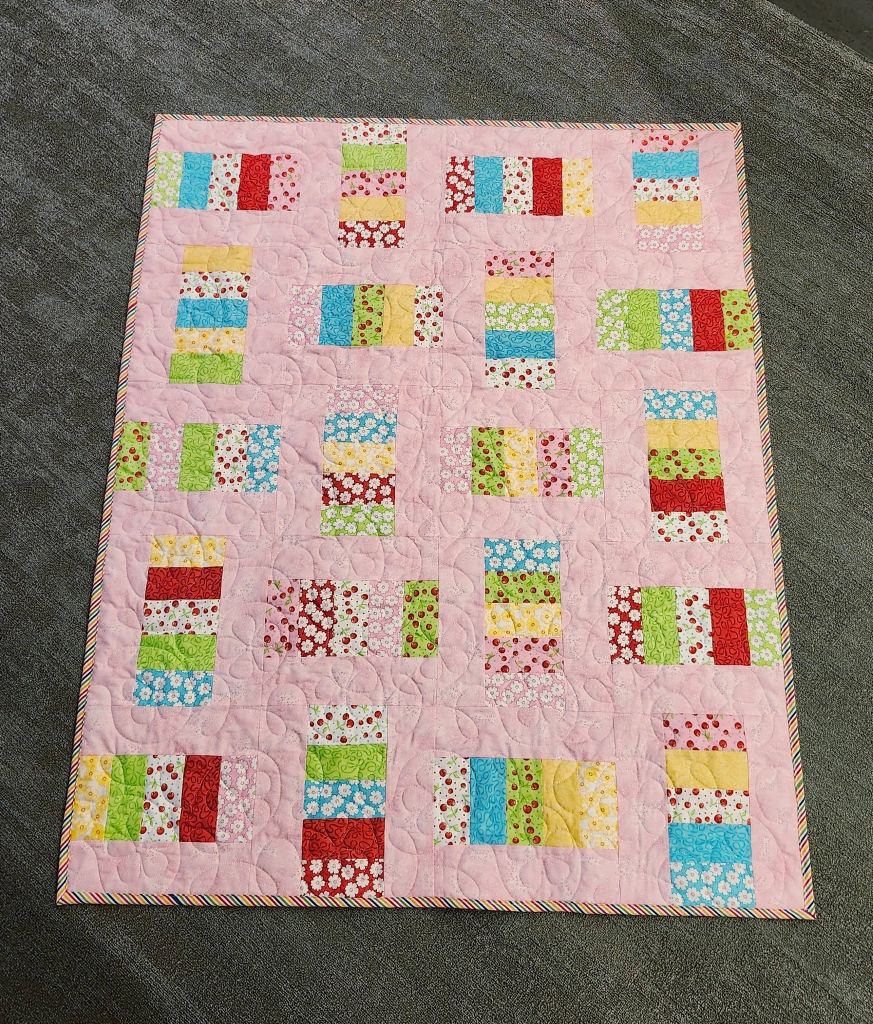
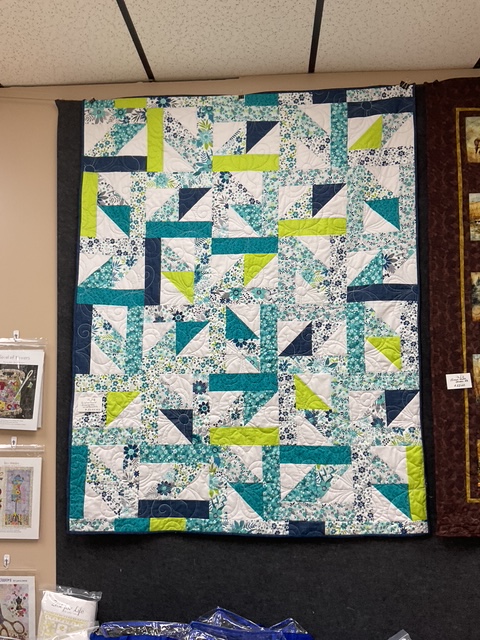
Here is Fiona’s version of Pocket Change. Isn’t it delightful? I just love the pink background. And the red coins really add a fun pop of color. The diagonal striped binding – perfect finish!
Pocket Change is a fun and fast to make wall or baby quilt using 5″ squares. If you’ve never tried it before, now’s your chance. I’m thinking to raid some red, white, and blue 5″ square stacks to whip one of these up for July. Stay tuned….it’ll probably be a new tutorial soon.
Now let’s take a peak at the newest VRD Rose Card patterns!
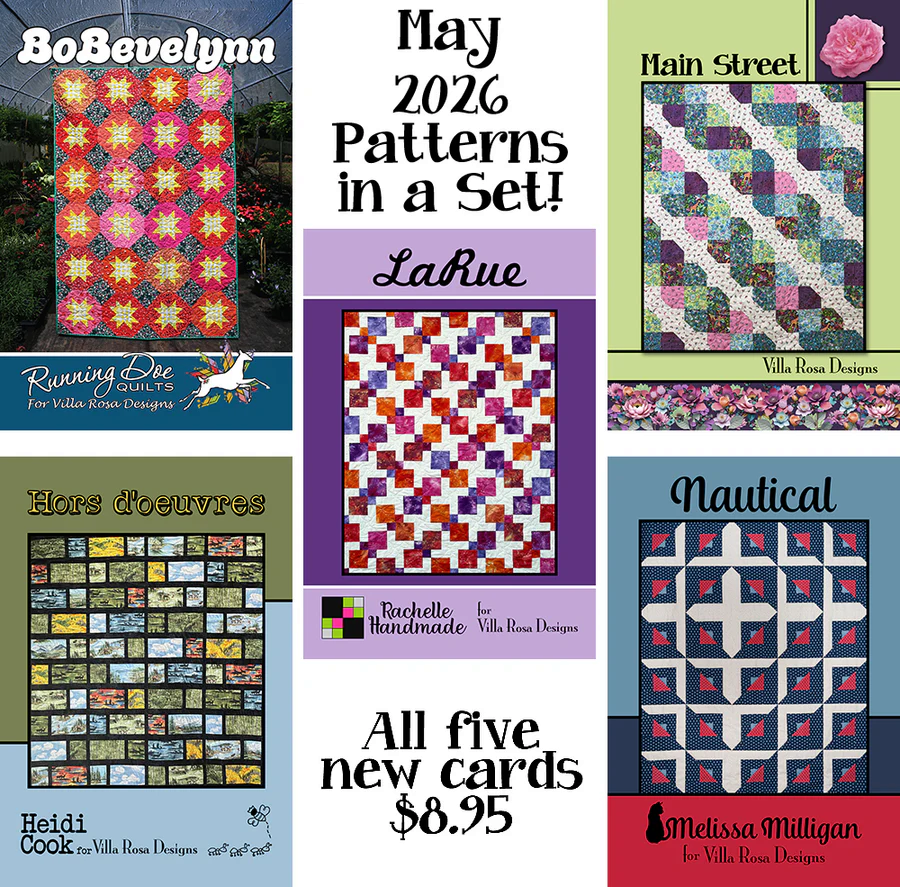
NEW VRD Rose Card Patterns for May
Usually I show off our new patterns the Thursday after the first Friday of each month – which would have been last week’s post, but instead last week I wanted to share my trip to the beach with you. So, here are this month’s newest patterns, a week late, but always right on time!
Bobevalynn is Catherine of Running Doe’s latest mod star design. The quilt finishes at 48″ x 72″ and uses fat quarters plus yardage. You can find the kit HERE.
Hors d’oeuvres is Heidi’s new foodie quilt pattern. It is fat quarter friendly and finishes at a generous 65″ x 72″. You can find the kit HERE.
LaRue is Rachelle’s brand new mod quilt. It finishes at 52″ x 65″ and uses 5″ squares or fat quarters. (no kit available at this time)
Main Street is Pat’s latest delightful pattern. It finishes 45″ x 54″ and uses fat quarters. (kit sold out)
Nautical is Molly’s very timely newest design. It uses yardage and finishes at 48″ x 57″. You can find the kit HERE.
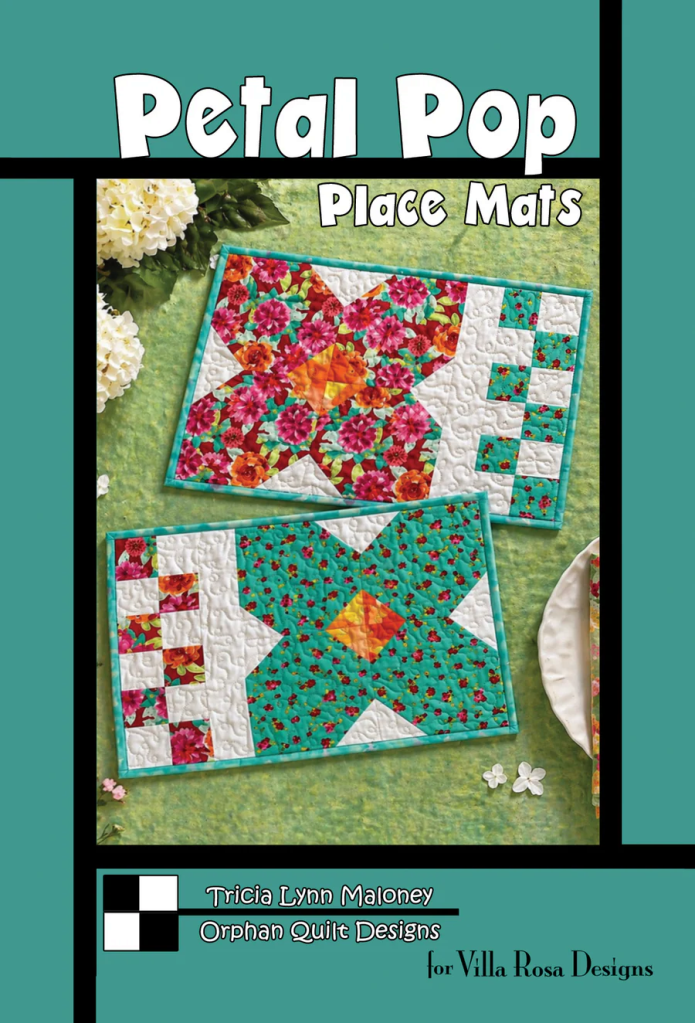
There is no table runner pattern for May. (Awwww, don’t cry….) Instead, there’s a brand new fun and flirty place mat pattern called Petal Pop. This is a fun mix and match fat quarter pattern, made in multiples of 2.
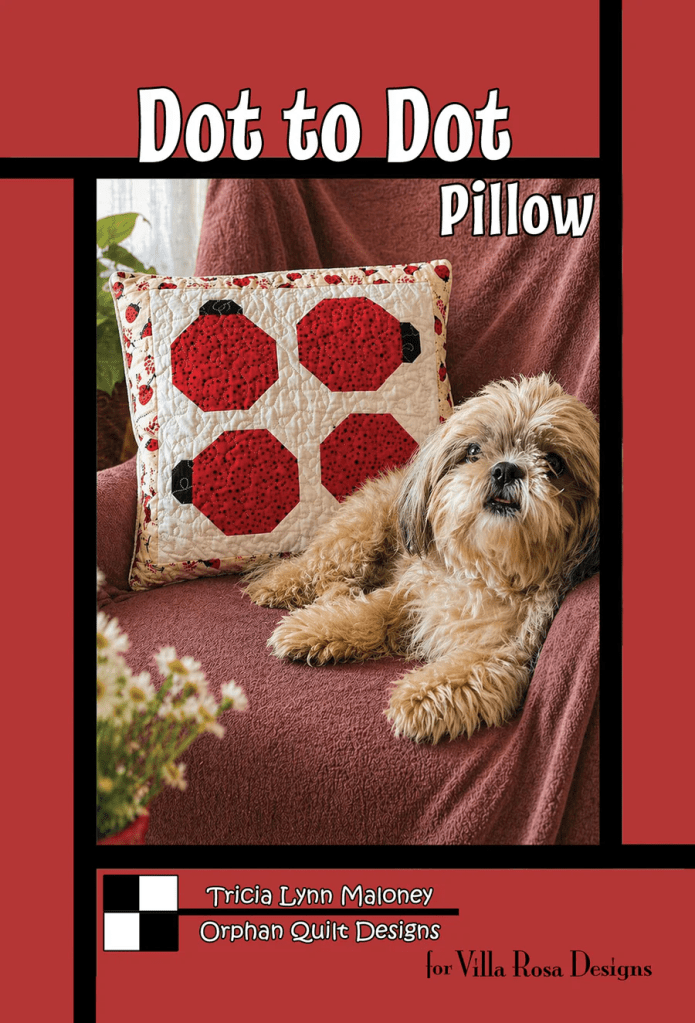
This month’s Seasonal pillow pattern is called Dot to Dot and it’s cuter than a little bug, that’s for sure! As you can see, little Miss Bailly is looking quite pleased with herself! She seems to really enjoy being the “star” of the pillow pattern photos! LOL! SHHH! Don’t tell her it’s really about the pillows, I don’t want her to be disappointed.
That’s 7 brand new patterns for you in May – place mats, an 18″ pillow, and throws. Which one will you make first?
Well, that’s it for me today. We’ll have one more challenge winner for Week 6 next time and we’ll also find out how many quilts were completed in 6 weeks. The anticipation is killing me and I can’t wait to find out the answer. Someone is going to win a prize for guessing the closest number to the total.
I’m getting kind of excited to see how many quilts we finish together at the end of Week 6. Aren’t you???
Last week people had the opportunity to make a guess at the number of quilts we will finish. And the closest guess (or actual guess) will get a surprise something something in the mail after the challenge. I’m going to extend the quilt guess contest into this week because I just didn’t get a chance to post the blog on Facebook last week so others could join the fun.
So if you were thinking about jumping in with your best guess last week, you have one more week to leave a comment.
Guess How Many Quilts Will Be Finished?
How many quilts do YOU think will be finished by the end of the 6 Quilts in 6 Weeks Challenge?
Leave your best guess in the comments on this blog post for a chance to win a little prize at the end of the challenge!
Here’s how it works:
Anyone can participate, not just the Challenge participants
One guess per person, please
Leave your best guess in the blog comments (not Facebook)
Entries close before next week’s post goes live
International friends are absolutely welcome to join in the fun 🙂
You’ll find the comment link just below the blog post title (location may vary a bit depending on your device, so you might need to do a tiny bit of exploring).
If you have trouble finding the comments, you can email your guess to tricia@villarosadesigns.com and I’ll add yours to the list.
Just be sure I have a way to contact you in case you win!
So… what’s your prediction?
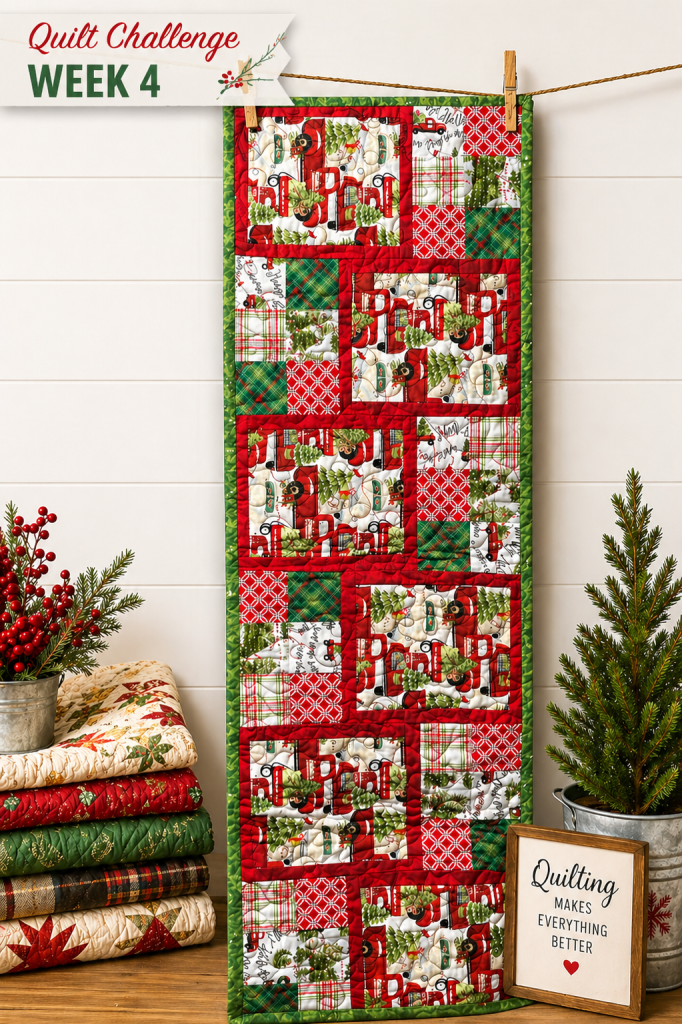
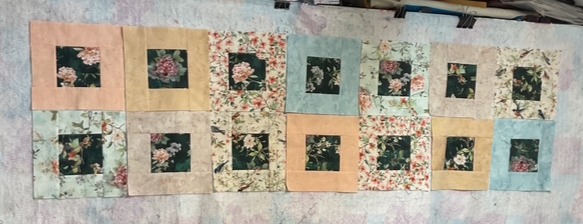
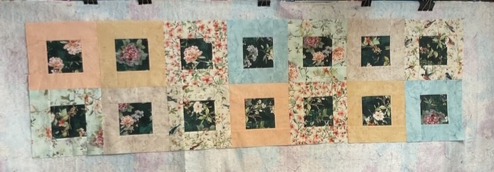
6 Quilts in 6 Weeks Quilt Challenge Week 4
Wanna see my finish for Week 4?
I just didn’t get the quilt that I wanted to finish done this week, so I substituted a little table runner instead that only needed binding. I’m not entirely sure why I never quite finished this runner, but now it’s done. And done.
After last week’s catastrophe with the marching band (tehehe) – we’re just going to need a simple drum roll today.
Drum roll please……………
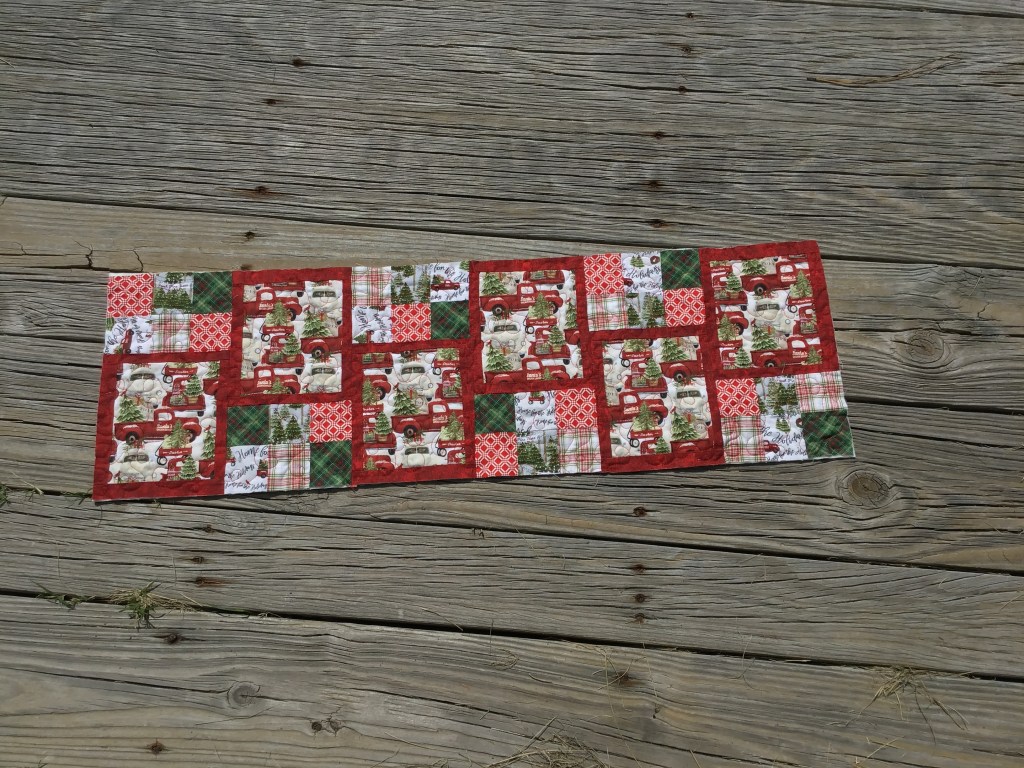
For Week 4, I completed my little Christmas Amen table runner. I had already machine quilted it a few years ago when I had a mini quilt retreat with my friends Leslie and Cathey at Cathey’s lovely cottage in Maryland. Wanna read my post about my Maryland trip? You can find it HERE. But for some strange reason I don’t even know, I never actually finished it with binding.
The poor little thing has sat there dejected all this time, waiting and hoping. Well, those sad days are over, because my version of Amen is finally completed. YAY!
Amen is a really cute little runner. If you want it longer, it’s very simple to make more blocks, you’ll just need more fabric (and sadly, none of us ever has enough fabric, do we??? LOL!). It’s a great runner to feature small printed panel rectangles or your favorite novelty print.
My BEFORE photo:
I have a thing for vintage red trucks. I think they remind of my Dad, who was a self-employed auto mechanic for over 50 years. He’s retired now, but I think he really misses the connection with both the cars and his customers. So red truck Christmas fabric – I’m there. You don’t even have to call me twice.
I machine quilted Amen with an allover loop design (one of my favs!) using red 100% cotton thread. I actually machine quilt my quilts with the same thread I piece with. I have an entire rainbow collection of quilting thread, all tucked into a little Ikea cart with drawers on wheels. I think I’ve talked about my thread collection before, so I won’t bore you with the details. I chose a textured green fabric for the binding and machine stitched the binding down. Of course, I added a label, too.
My AFTER photo (with a little AI magic because it rained all day and I can’t get outside to take my photo):
I think it turned out pretty cute, don’t you? Have you ever made Amen? If not, maybe now’s the time to try this little runner pattern.
6 Quilts in 6 Weeks Week 3 Winner
Lucia L. from Ohio
Wahoo!
Way to go, Lucia!
Congratulations!
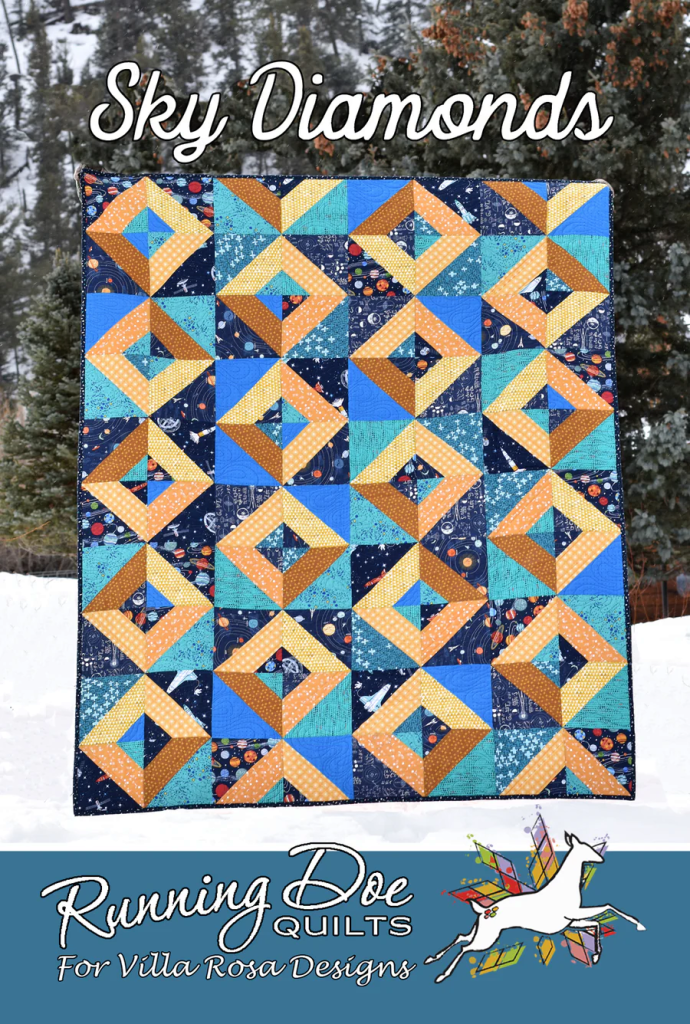
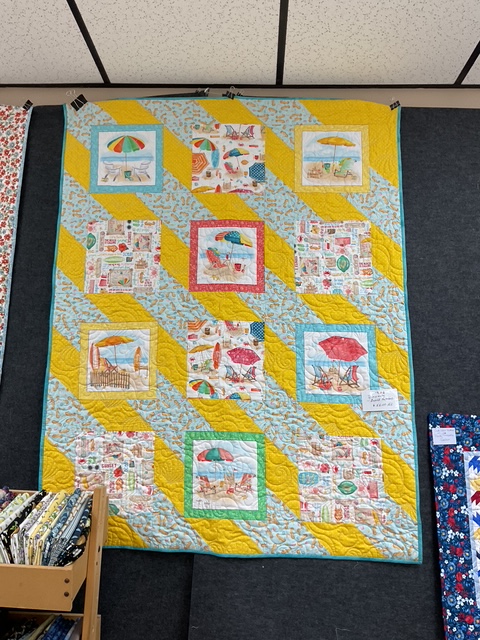
Here’s Lucia’s quilt finish for Week 3, Sky Diamonds. Just love those yummy sherbet-y fabrics!
Great finish, Lucia! Keep going – don’t stop now, you are on a roll!
SHHH! I can’t tell you how many quilt finishers we had for Week 3, but I will say it was more than the week before. Just a little hint……..
A Much Needed Vacation
I have to admit I’ve been a bit preoccupied (and maybe a bit scatter-brained) this week because I’m leaving on vacation on Saturday, as in 2 days from now.
YIKES! I’m not even packed yet!
I’m headed to Myrtle Beach with my quilty pal/cousin Kim (Hey Kim!) and her 2 friends. I am so incredibly excited – I can barely contain myself. This will be my very first time seeing an ocean. Yes, seriously. I’ve seen lakes and rivers and even the St. Lawrence Seaway, but I’ve never been to the ocean. I will finally get to mark this one off my bucket list. We’ll be there for about a week, staying in a condo right there on the beach. Our condo is on the pool and hot tub deck. Nice…..So if you’re looking for me any day next week at say 10 PM, you’ll find me in the hot tub. AHHHHHH!
It’s funny what you worry about when you’re getting ready to leave on vacation – a much need and long anticipated vacation. The thing that’s been on my mind the most is swimwear. I know that sounds funny, but really – how many swimsuits does one take to the beach??? With lots of advice, I’ve settled on 3. I think. Sigh……I guess we’ll see. I’ve order so many things from Amazon recently, I’m not even sure anymore.
Tuesday night at our April quilt guild meeting, I started my packing list for my trip. Clothes……snacks……tech stuff…….sewing projects……meds, etc. I think it’s like 4 pages. Robin and Mary Lee were rolling their eyes and laughing at me while I made my lists. What’s wrong with lists??? I’m always afraid that I’ll forget something vital, so having a list to refer to and to – GASP! – check off is a real lifesaver for me. If that makes me weird, well, that’s okay. At least I won’t be forgetting my swimsuits, not a single one.
Keep getting those VRD quilt finished, folks! You have until the end of Friday May 1st to finish your Week 4 quilt. I know you can do it – let’s get even more quilts finished this week
If you haven’t been able to complete a quilt yet for the Challenge, maybe Weeks 4, 5, and 6 will be your weeks. It’s such an awesome feeling to complete a project that’s been waiting or even to begin and finish that project in a week – we want everyone who signed up to participate to experience that feeling with us. Sew……..go sew!
Well, that’s it for me this week. I’ll see you right here next time from the beach. Maybe even from the hot tub. We’ll see.
I hope you’ve been spending some time over on our VRD Facebook page, where the inspiration is absolutely overflowing! Every time I pop in, I get completely sidetracked by all the wonderful quilt finishes made from our 700+ VRD Rose Card patterns. My “MAKE” list just keeps growing… and growing… and growing! Keep those beautiful quilts coming—I love seeing every single one.
I want to do a great big SHOUT OUT to everyone who has finished a quilt during the Challenge so far! Out of everyone who joined, nearly half are crossing the finish line—and that’s amazing for a challenge like this!
If you’ve got a quilt that’s this close to done, this is your week—let’s see how many more we can push across the finish line for Week 3!
As I mentioned above, we are now in Week 3 of our 6 Quilts in 6 Weeks Challenge. And wow… you all have been busy!
Week 1: 28 quilts finished
Week 2: 26 quilts finished
We’ve completed a grand total of 54 quilts in just 2 weeks! 🎉 TOGETHER!Yay Us!
Isn’t that amazing?? And the best part… we still have Week 3 wrapping up tomorrow, plus three more weeks to go. I don’t know about you, but I can’t wait to see where we land by the end!
Guess How Many Quilts Will Be Finished?
So here’s a little fun idea to celebrate all this amazing progress…
How many quilts do YOU think will be finished by the end of the 6 Quilts in 6 Weeks Challenge?
Leave your best guess in the comments on this blog post for a chance to win a little prize at the end of the challenge!
Here’s how it works:
One guess per person
Leave your guess in the blog comments (not Facebook)
Entries close before next week’s post goes live
👉 You’ll find the comment link just below the blog post title (location may vary a bit depending on your device, so you might need to do a tiny bit of exploring).
If you have trouble finding the comments, you can email your guess to tricia@villarosadesigns.com and I’ll add yours to the list. Just be sure I have a way to contact you in case you win!
The person with the closest guess (or exact guess… you never know!) will win a fun little prize at the end of the challenge. 🎁
And yes—our international friends are absolutely welcome to join in, too!
So… what’s your prediction? Are we headed for 75? 100? Even more? I can’t wait to see what you think!
Remember…..you only have 7 days to get your guesses in the comments (or emailed to me) so put on your thinking caps and leave your best guesses in the comments!
6 Quilts in 6 Weeks Challenge Week 3
Shhhh! Don’t tell anyone, but I just finished the binding right before I sat down to write today’s blog post. But you know what????? When I did it doesn’t matter, though, as much as the fact that I have another finished quilt! WOOHOO!
Please cue the entire marching band – wait where is percussion? And what are the Color Guard doing? And is that the drum major having a meltdown? Oh my, what a catastrophe……
Sigh……I guess we’ll just continue without the band.
For Week 3, I finished my version of Angel Face. Angel Face is another one of my 2024 blog tutorial projects that just never got finished. Hmmm. This seems like a real pattern with me, doesn’t it? Well, that’s what quilt finishing challenges are for, huh? You can find a tutorial for Angel Face HERE.
Get your digital pattern HERE or your print pattern HERE
Here is my Angel Face BEFORE photo:
You may have noticed I made some changes when I made my Angle Face version. Instead of a single fabric for the large squares, I alternated 2 different fabrics (I couldn’t decide which one I liked better, so I used them both. Easy peasy.). And I added an outer border using one of the frame fabrics because my quilt needed just a little bit more something. I think it turned out really pretty with the lovely Hoffman digital fabrics paired with a really cool colorful batik.
PSST! You’ve probably noticed I use a lot of Hoffman fabrics here on the blog. In a nutshell, VRD partners with other companies out there in the quilt o’sphere. I work with Hoffman a lot (Hi Sandy!), so I very happily use their fabrics for many of the tutorials for the blog.
My quilty pal, Mary Lee, literally rolls her eyes at me these days (I see you, Mary Lee!) when I make yet another quilt using Hoffman fabrics – particularly their batiks – because in the past I was always very “take it or leave it” about batiks in general while a lot of my friends were totally wild about batiks (including Ms. Mary Lee). Now I get it, Mary Lee.
Anyway, here is my Angel Face AFTER photo:
What do you think of the purple striped binding? I’m not sure. Is it too much? I had a really tough time finding something I liked with the soft colors of the quilt so I decided to just go a little bold for the finish. It does pull out the purple in the quilt, that’s for sure.
I free motion quilted my quilt on my domestic machine (Janome 8900) with an allover big meander in a soft aqua cotton thread. I used a fun grey print fleece on the back, no batting. And finished it off with the maybe-too-bold purple stripe for the binding. And yes, I added my label, too, because a quilt isn’t finished until there’s a label on the back. I know a lot of quilters do not add labels to their quilts for a variety of reasons, but I know personally from collecting antique quilts that 100 years from now someone will want to know who the maker was, especially if it’s a family quilt. So add a label and make a little history, too.
Here’s a close up of the quilting and my purple striped binding. Meandering is totally one of favorite machine quilting patterns!
How about a winner now?
6 Quilts in 6 Weeks Week 2 Winner
Kat S. in Indiana
YIPPEE!
Drop the balloons from the ceiling now!
Congratulations, Kat!
Here’s Kat’s Week 2 Quilt Finish:
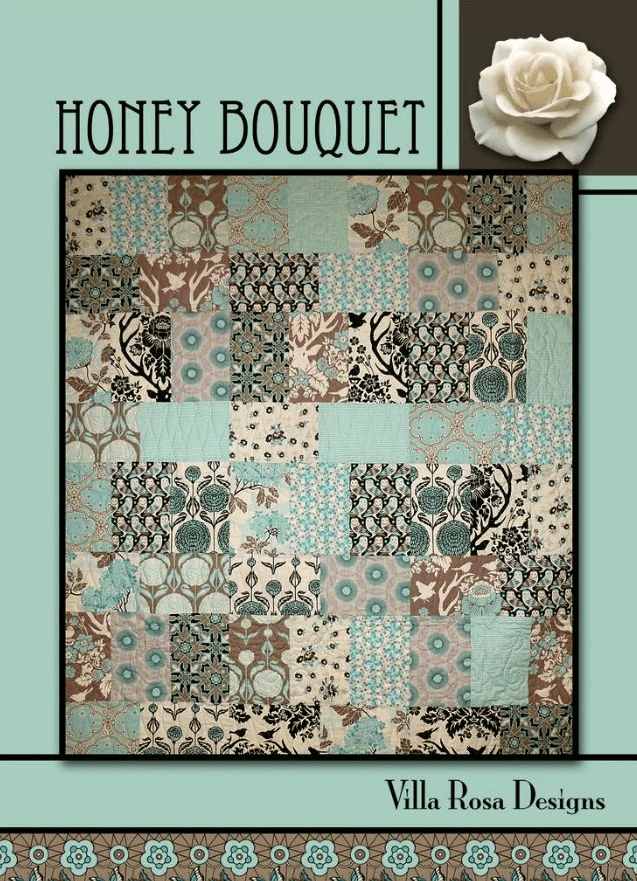
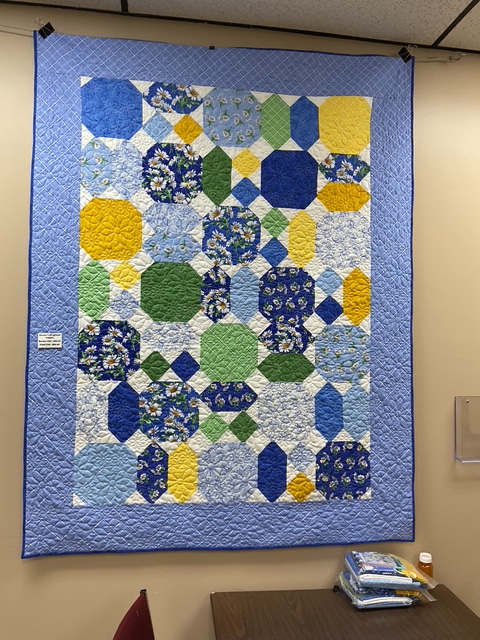
Kat’s awesome quilt is the Honey Bouquet pattern. (Did anyone notice that it’s blue??? Anyone??? Blue and white is one of my absolute favorite color combinations in case you didn’t already know that.) Really, I use a random number generator to pick the Weekly winner, I promise you. It was just kismet that it was blue.
As you take a look at Kat’s quilt, you might notice that she used a different layout than the sample quilt on the front of the pattern. And it’s really fun – I love the movement in her quilt. Way to go, Kat!
So what quilt are you finishing for Week 3 of our Challenge??? You have until Friday, 4/24 midnight EST to post your before/after photos on our VRD Facebook page or email them to me at tricia@villarosaquilts.com. Can’t wait to see them!
You know…..if you signed up but life’s gotten in the way of completing quilts so far for the Challenge, maybe this will be your week! We’re in this together!
Shopping Local
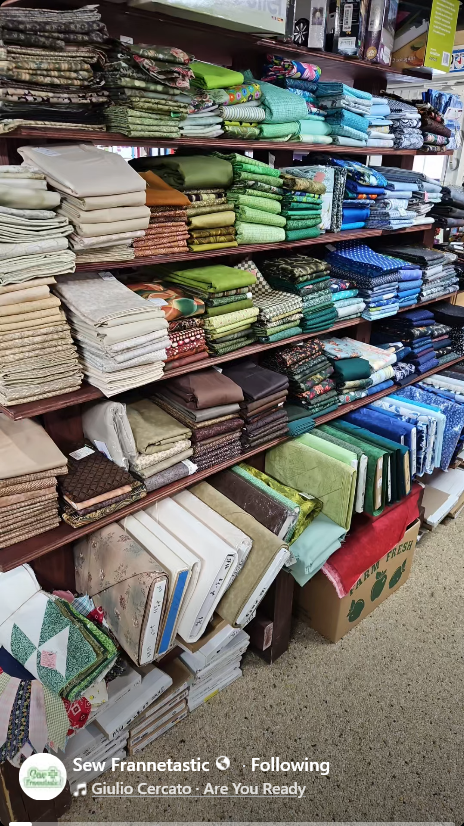
Last Friday, I had an errand to run to one of our local quilt shops, Sew Frannetastic. SewFran is a very unique quilt shop located outside Woodcock Township (near Saegertown) in good ol’ Pennsylvania. It’s unique because it is a quilting and sewing consignment shop – YES! You read correctly – it’s a sewing and quilting consignment shop!
When Franne and James opened a few years ago in a different location, I’d never heard of such a thing, but was of course intrigued. Who wouldn’t be? Now I’m a regular customer and every time I go, I find some wonderful treasures I would have never found anywhere else.
Image from Sew Frannetastic on FB
The exciting thing is that the shop is currently expanding because they are simply bursting at the seams with merch. And it’s not just sewing and quilting – you can find yarn along with crochet and knitting patterns and supplies as well as paper crafting and I hear that painting will be coming soon, too. When our local Jo-Ann’s closed last year, our community was left in the lurch for crafting supplies. And several of our local quilt shops have closed, too. So it’s really exciting that SewFran is creatively filling the quilting/craft store void. And we quilters and crafters couldn’t be more thrilled!
A little AI magic……..
I mentioned I had an errand to run out to SewFran and of course it was a great opportunity for a little quilty road trip – a FART (Fabric Acquisition Road Trip). All of a sudden, I had Robin riding shotgun and Mary Lee was ensconced in the back seat of my li’l red Jeep and we were on our way. The 3 of us did some serious damage to the banking industry while we were there, then of course, we just had to grab some lunch because shopping makes us ravenous.
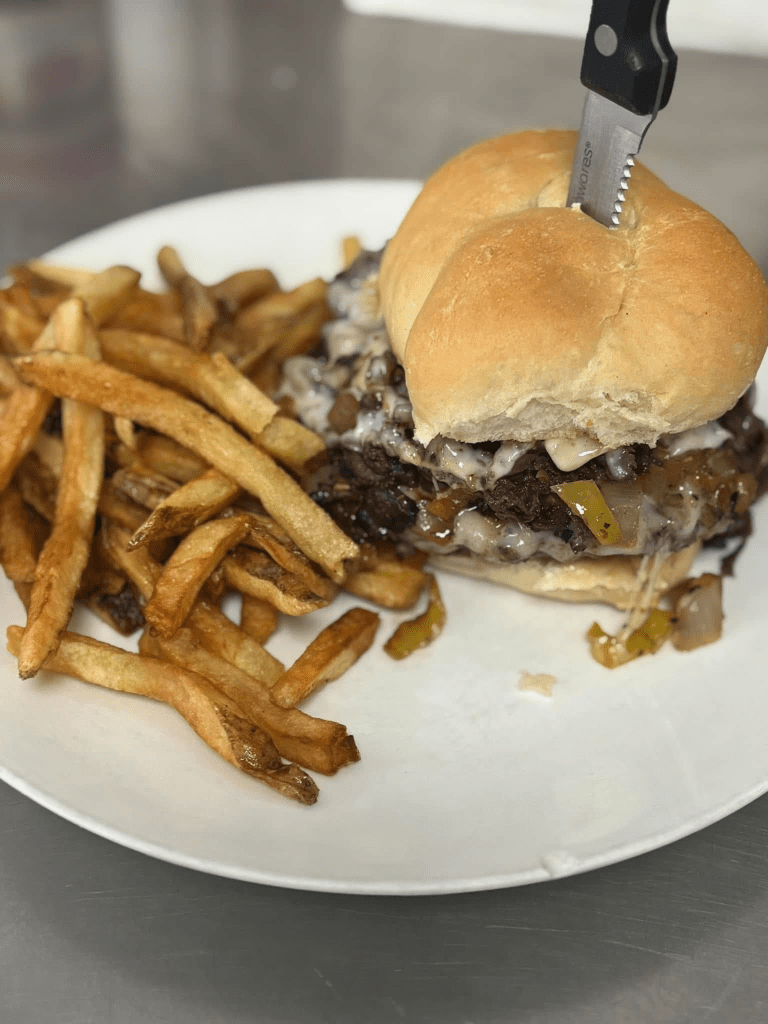
We went to lunch at a small locally owned restaurant in Cochranton, PA called Parkside. The food was good and the company was even better.
Image from Parkside’s FB page
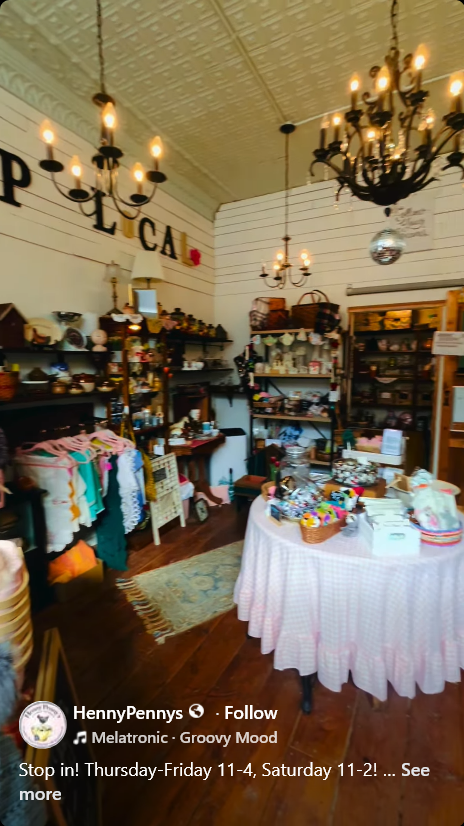
After lunch, we rounded out our local shopping event by heading to an adorable little gem of a shop in Cochranton called HennyPenny’s that had a little bit of everything tucked into cute little nooks and crannies. I grabbed a few new-fangled tea bag holders that perched on the edge of your tea cup for my Mom as well as some books and a quilt magazine. The shop featured new handmade items, gift ideas, clothing, housewares, cookbooks, collectibles, books, and more. Oh, by the way, it has a super fun chicken theme!
Image from HennyPenny’s FB page
If you’re ever in my neck of the woods here in Northwestern PA, you should check out these super friendly and fun locally owned businesses.
What local gems do you have in your community?
Well, that’s it for me this week. I’m off to do some quilting for Week 4.
I’m super excited to be hosting (and participating in!) our 6 Quilts in 6 Weeks Challenge. It’s been such a great motivator for me to start moving some quilt tops out of my to-be-finished pile and into my DONE pile… and that’s a big win in my book.
One thing I’m noticing already is how much easier it feels to focus on one quilt at a time instead of staring at my whole teetering stack of UFOs. (Because let’s be honest… those unfinished projects have a way of quietly judging us from across the room. Yours do that too, right? )
I’ve been having sew much fun seeing all the amazing finished quilts popping up on Facebook and in my inbox. Keep them coming! One of my favorite parts of this challenge is seeing what everyone else is working on. It’s so inspiring to watch these quilts come together… and it’s definitely keeping me motivated too.
Ready to see my Week 2 finish???
6 Quilts in 6 Weeks Challenge Week 2
Drum roll please…………………
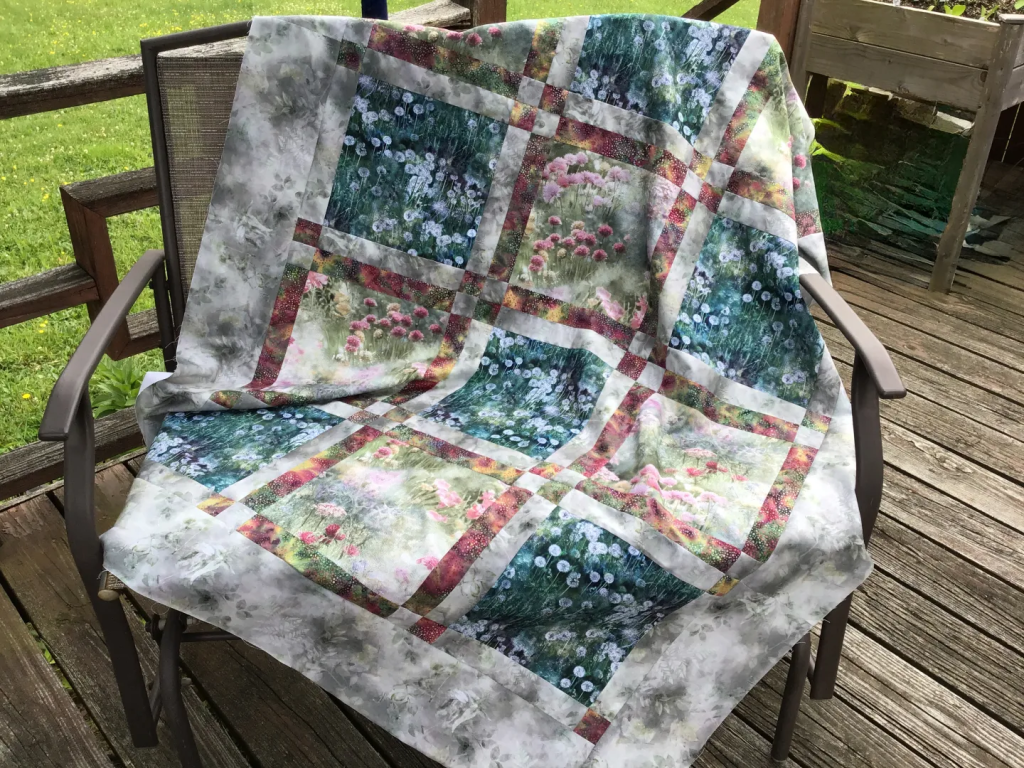
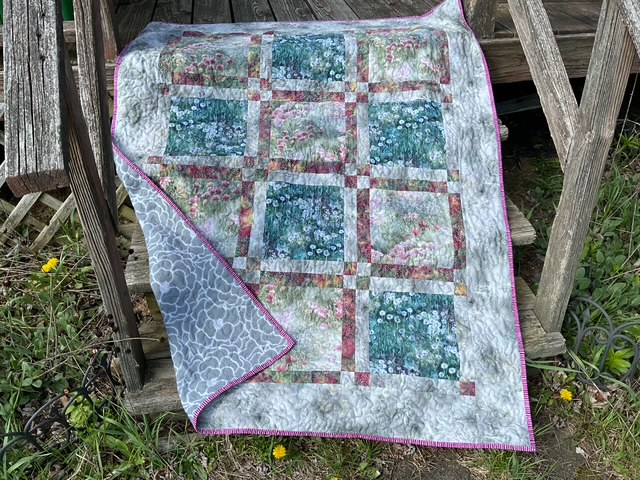
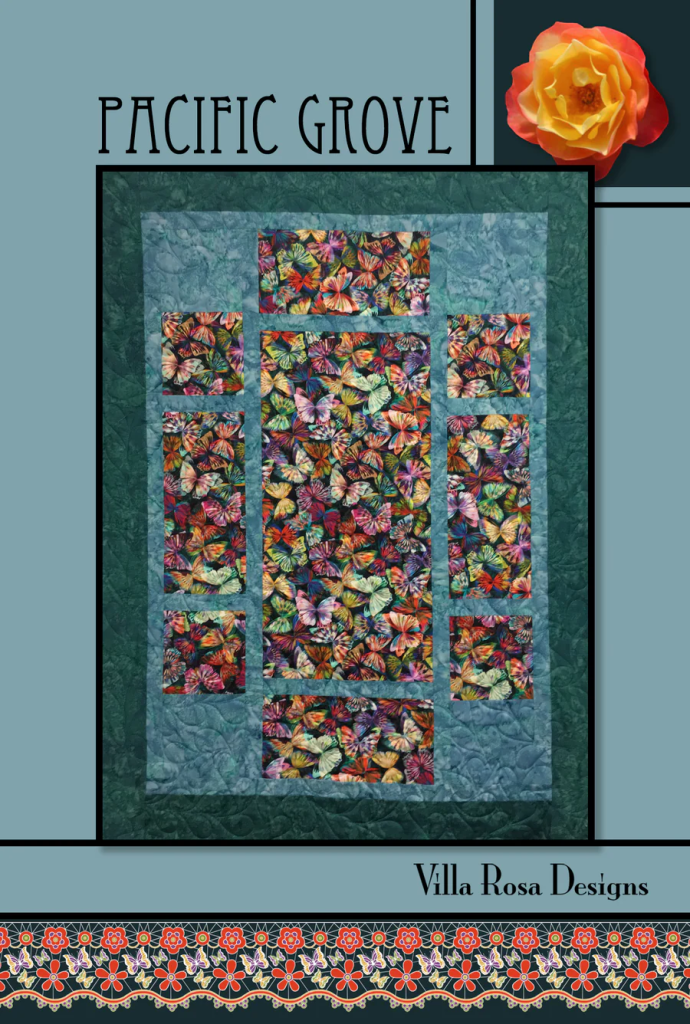
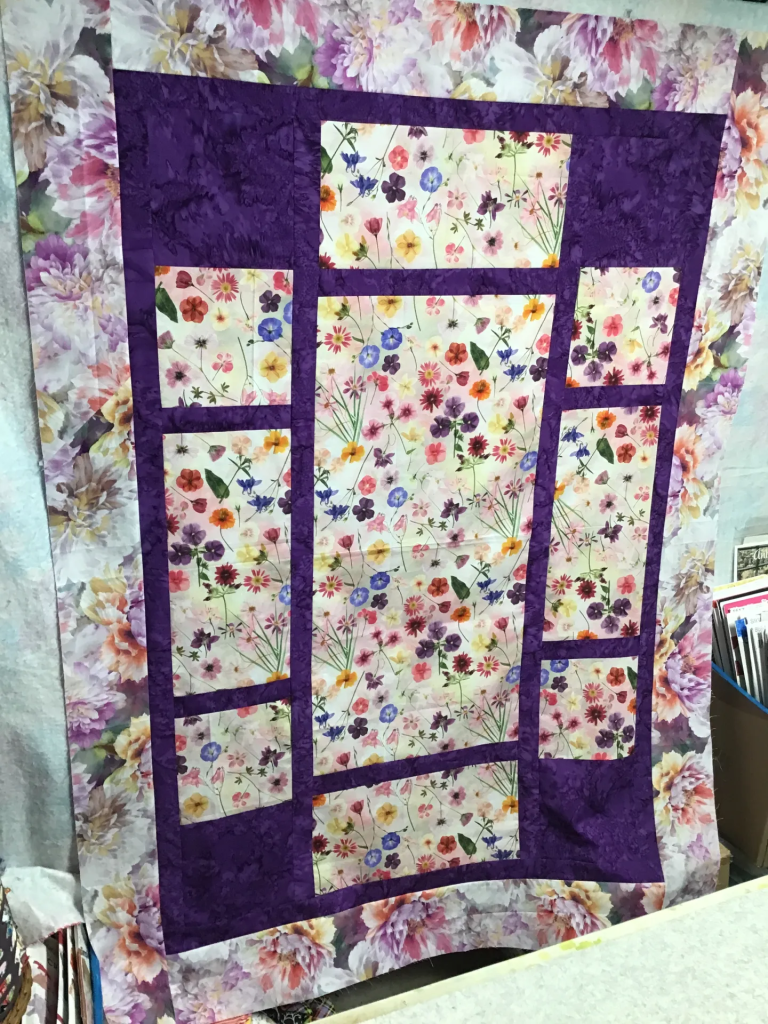
Pacific Grove is my Week 2 finish. I made the Pacific Grove top for a tutorial here on the blog a while back (yeah……just found it on the blog and it was from 2024, sheesh!). You can find the Pacific Grove tutorial HERE.
My version of Pacific Grove, featuring gorgeous digital floral prints from our friends over at Hoffman, is like looking through a pretty framed window at a gorgeous flower garden. I just really love it. I wish I had finished it sooner, but…………..Life always gets in the way, doesn’t it?
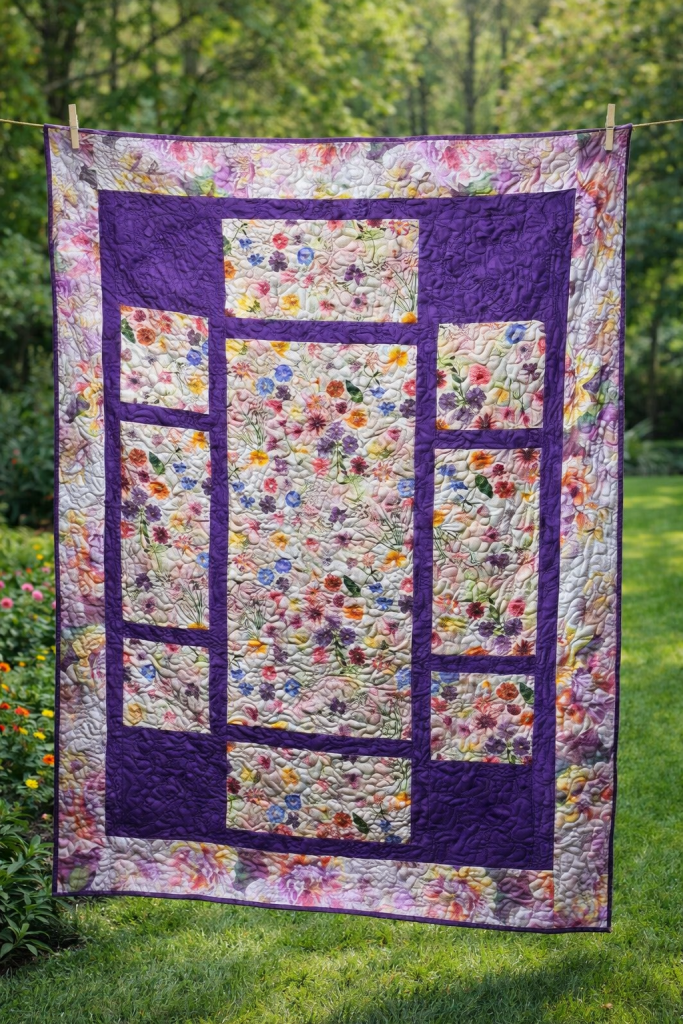
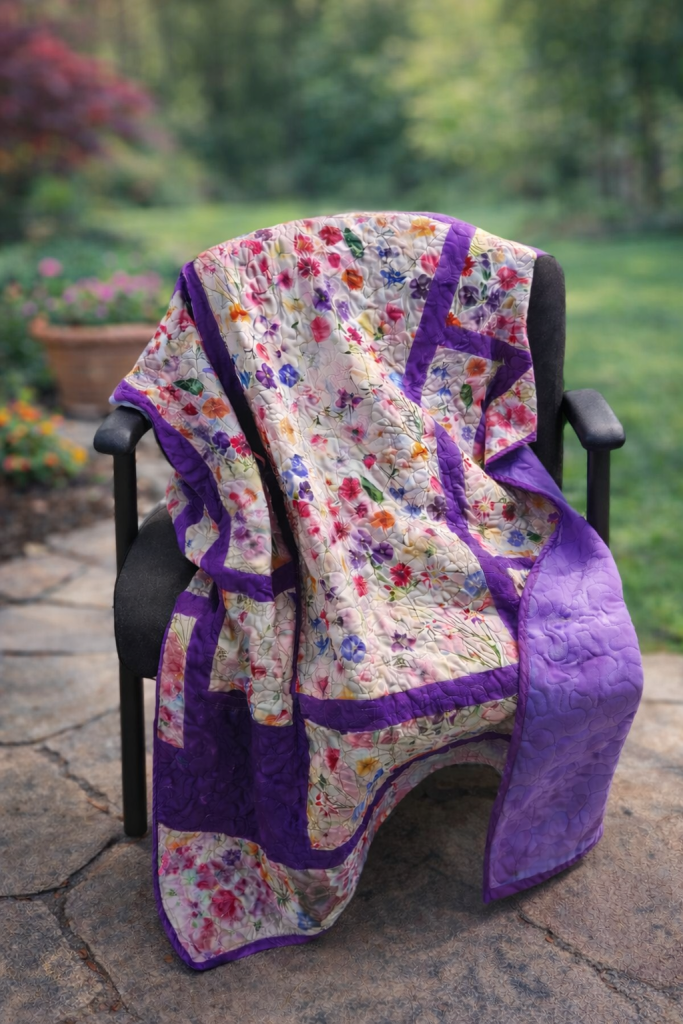
And here’s my FINISHED Pacific Grove quilt!
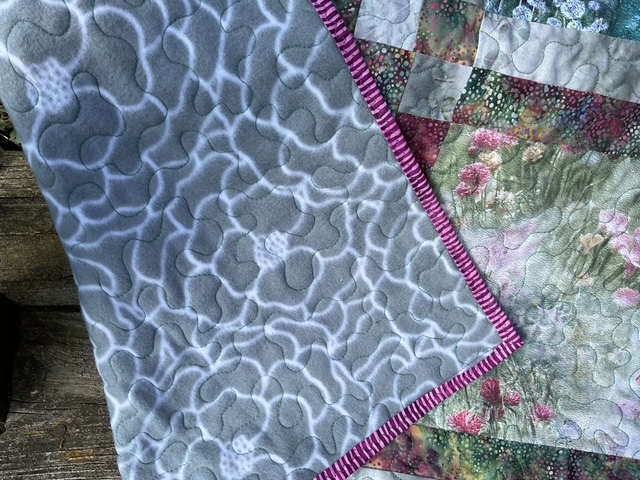
Love how it turned out! I machine quilted it using a medium purple 100% cotton thread in a big open meander allover design which looks good on anything and is quick to quilt, too. I used a marbled purple fleece for the back, no batting. And I machine-stitched my binding again. I think I’m getting a little better at the corners. I figured out that if I folded the fabric the opposite way I normally do for hand-binding, it doesn’t get caught while I’m machine stitching the corners. Huh. Live and learn.
Just have to share another photo of my quilt. I wanted you to be able to see the pretty purple fleece on the back. And the great texture the big open meandering makes on the fleece. Have you ever tried using fleece on the back of a throw quilt instead of batting and backing?
6 Quilts in 6 Weeks Week 1 Winner
Our Week 1 winner for the 6 Quilts in 6 Weeks Challenge is…
So what quilt are you finishing for Week 2 of our Challenge??? You have until Friday, 4/17 midnight EST to post your before/after photos on our VRD Facebook page or email them to me at tricia@villarosaquilts.com. Can’t wait to see them!
10 Tips for Fast Finishing Quilts
After Week 1, I know a lot of you are already feeling that little spark of momentum… and maybe also realizing that finishing quilts can sometimes take longer than we’d like. We start with the best intentions, and then life, perfectionism, or just plain overwhelm sneaks in.
So for Week 2, I wanted to share some of my favorite tried-and-true tips to help you get your quilts across the finish line a little faster. These aren’t about cutting corners… they’re about quilting smarter, keeping things manageable, and actually enjoying the process from start to finish.
Let’s do this! Together.
1. Machine stitch your binding
Yep, we’re skipping the hand stitching. It’s faster, it’s sturdy, and honestly… most people will never flip your quilt over to check. I’m one of those people who sews it to the front and then flips it to the back, but some of my pals prefer sewing the binding to the back and flipping it to the front. There is no wrong or right way to machine stitch your binding. Do what feels the most natural to you.
2. Learn to machine quilt your own quilts
Straight lines, wavy lines, loops… it all works. The goal here is finished, not heirloom show judging. It sure beats waiting your turn at the long arm quilter’s to get your quilt quilted.
If your new to machine quilting, take a class or pair up with a friend who is already doing it. Start out with smaller projects until you feel comfortable and then move on to bigger projects.
For myself, I still send my really big quilts off to the machine quilter while I do my own machine quilting for my throws and smaller projects.
Trust me, if I can machine quilt, so can you. Just remember 3 little words – practice, practice, practice. (Check out our 2025 Beginner Free Motion Quilting Series over on the right side of the blog.)
3. Keep your quilting simple
This is not the time for feathers and custom everything. Save that for another quilt. Today, we finish. My favorite 2 go-to allover quilting designs are meandering and loopy loops. These designs go with everything and they quilt quickly.
Check out our Basic Quilting Skills for Beginners: Quilt as Desired HERE.
4. Press as you go (yes, really)
I know, I know… but skipping this step will come back to haunt you later. A quick press now saves a lot of “why won’t this line up?!” later. And it’s a lot easier to quilt individual blocks and make them behave than saving all the quilting to the end and then trying to get all the blocks to behave. Trust me…..blocks can get very unruly at times (I should know…….I am guilty of saving my pressing to the end now and then).
Crooked quilt tops lead to cranky bindings. A quick trim makes everything behave so much better. I never skip this step, ever because who wants quilts that ripple when there isn’t any breeze? I use a big square ruler on each corner to square up my corners first, then I use a long ruler to straighten the sides so everything is nice and square. I even double check by folding my quilts either on the diagonal (square quilts) or into fours (rectangular quilts) to make sure my corners and sides are even.
6. Use spray baste, fusible batting, or less pins if you pin baste your quilts
Less pinning, less wrestling, more quilting. Your back (and your patience) will thank you later. I prefer pin basting, but I do not over pin. I take the time to make sure my quilt backing/batting (or fleece) is taped down to my table/flat surface so it’s flat and taunt before I place my quilt top on the batting/backing. Then I use pins sparingly to keep everything together, maybe a pin every 10-12 inches. I first pin diagonally, then horizontal and vertical and finally I add any extra pins if needed to keep things nice and square.
Dense quilting is lovely… and slow. Looser quilting still looks great and gets you to the finish line faster. If you’re not sure how loose you can make your quilting design – take a look at the batting you are using. The package will tell you how far apart you can quilt that particular batting.
Quilting bigger takes less time and actually uses less thread is an important lesson I shared with my students when I taught Free Motion Quilting.
8. Batch your boring tasks
Cut all your binding strips at once. Wind extra bobbins. Prep your label ahead of time. Future you will be delighted. Listening to some music or your favorite audio book also makes those boring tasks move a little bit faster.
9.Go with a slightly wider bindingfor machine stitched bindings
A 2½” strip is more forgiving and easier to catch when stitching down by machine. When I hand-stitch my binding, I cut my strips at 2 1/4″ wide, but I’ve found that the little extra in a 2 1/2″ binding for machine stitching makes a huge difference. With the 2 1/2″ cut binding, I find I have just what I need to wrap my binding to the other side and to catch it with my machine stitching.
10. Work in short, focused bursts
Set a timer, sit down, and just start. Even 30 minutes moves you forward… and forward is the whole point. Not perfect. Forward. I’ve found this technique to be really helpful when I am feeling overwhelmed with everything I have to do. So set the timer and quilt. You will be amazed at how much you can get done.
And a bonus tip or two-
Instead of a zig zag stitch or straight stitch for machine stitching your binding, try using a Triple Zig Zag stitch (also sometimes called a multi-step zigzag or 3-step zigzag). It’s stitch #11 on my Janome Memory Craft 8900QCP. Molly Cook (Big shout out to Molly!) shared this tip with me a couple years ago, and this is the stitch I use for machine binding. I also match my thread color to my binding, too.
Finally……………………A Little Reminder
Finished quilts don’t come from perfection… they come from momentum. Done is cozy. Done is usable. Done is something you can actually enjoy.
Well, that’s it for me this week. I’m off to do some quilting for Week 3.
PSST! What VRD quilt will you finish for Week 3???
Woohoo! Today begins our 6 Quilts in 6 Weeks Challenge, are you ready??? There’s still time to join the fun. Let me tell you all about it.
The Challenge Dates:
Week 1 Quilt due by Friday 4/10 midnight EST
Week 2 Quilt due by Friday 4/17 midnight EST
Week 3 Quilt due by Friday 4/24 midnight EST
Week 4 Quilt due by Friday 5/1 midnight EST
Week 5 Quilt due by Friday 5/8 midnight EST
Week 6 Quilt due by Friday 5/15 midnight EST
The Rules and All the Details of the Challenge:
Each week for 6 weeks, participants will post before/after photos of weekly UFOs to our VRD Facebook page or if you prefer, you can email the photos to me at tricia@villarosadesigns.com.
All quilt tops/projects must be VRD patterns – this is the VRD blog, after all. Quilts must be quilted and bound to be eligible for prize drawings. No size requirements (I have UFOs from snack mats up to large throw quilts). It doesn’t even have to be a quilt – we have some great accessories, table runners, place mats, and snack mats. Projects can be in any stage of UFO from a stack of fabric and a pattern to a pile of blocks to quilt tops to projects needing quilt or even just binding and a label. The idea is to simply finish VRD projects so we can feel great about starting new ones.
Each week, I’ll draw a name randomly from those participants who posted before/after photos by each weekly deadline. The winners will get a surprise quilty good in the mail after the Challenge ends. Goodies might be from me or from one of our lovely quilting partners.
This Challenge is open to all, but please note that International winners will receive a selection of VRD digital patterns.
PSST! You can even use the next six weeks to make a NEW VRD quilt each week (or any of the 6 weeks) if you want – hey, maybe you don’t have any unfinished VRD tops just sitting around. So go ahead – pick your favorite VRD pattern and get moving. Wouldn’t this be a great opportunity to get some of your holiday sewing done early??? I am not quite that organized, I’m afraid, but maybe you are.
You might be wondering what happens if you don’t post a before/after photo for a weekly Challenge or you miss the deadline. It’s pretty simple – your name won’t go into that week’s prize drawing – that’s okay because life gets busy. I’m not kicking you out of the Challenge, though – feel free to participate in any or all weeks. Your name will go into each weekly drawing that you complete a project and post your before/after photos before the weekly deadline.
Seriously, I want to encourage all of you as well as myself to finish projects, not to stress about them. LOL!
I think that’s all the important info. I hope I’ve answered any questions you had. If not, feel free to email me.
Wanna join me in this Challenge?
Send your name and email address to me at tricia@villarosadesigns.com to officially join the challenge and be eligible for weekly prizes. Your name and email will only be used for this Challenge, I promise you.
So, the Challenge begins….now. Your Week 1 Finished Project before/after photos are due by Friday, April 10th midnight EST. Post them on our VRD Facebook group or you can email them directly to me at tricia@villarosadesigns.com if you prefer.
Time to get quilting and slash your stash of VRD UFOs! And don’t forget to have some fun, too.
HEY! maybe you can challenge your quilty pals to do the Challenge with you? A few of mine are participating, so why not ask yours? Just sayin’……..
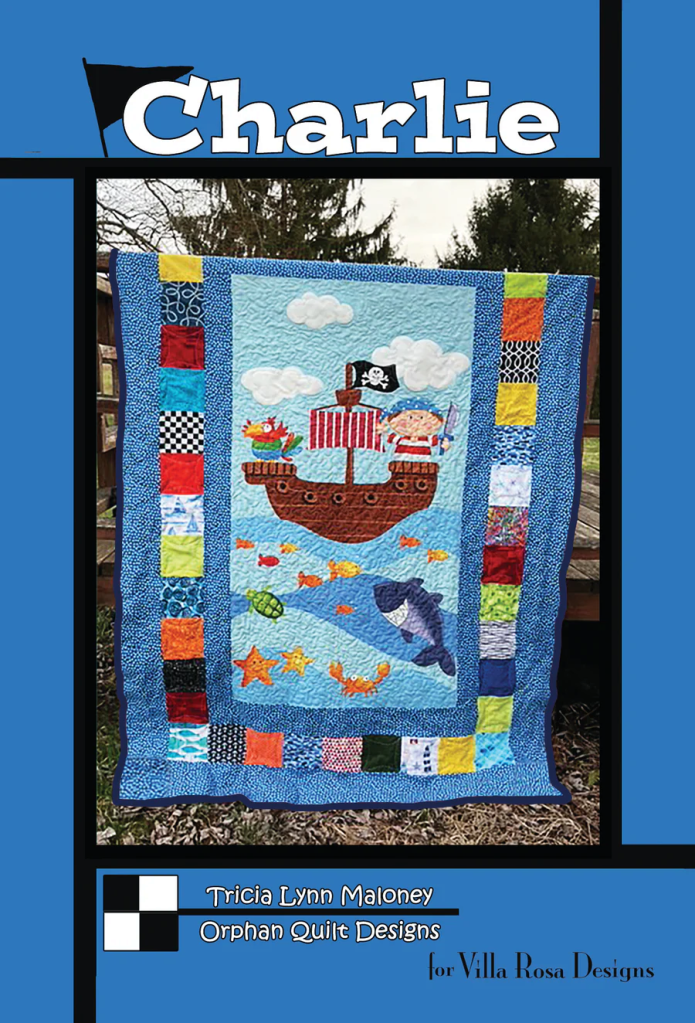
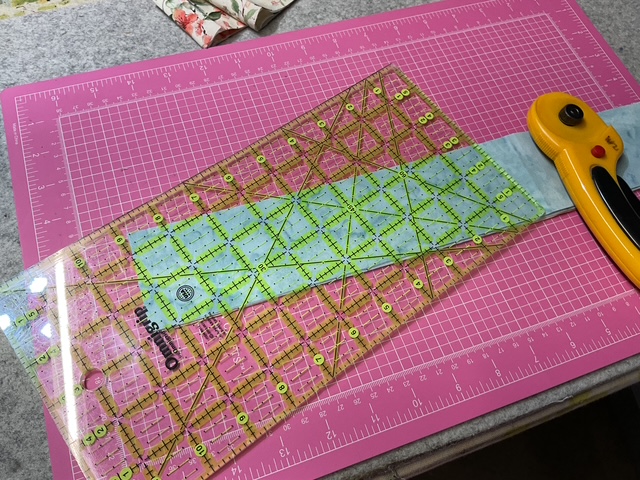
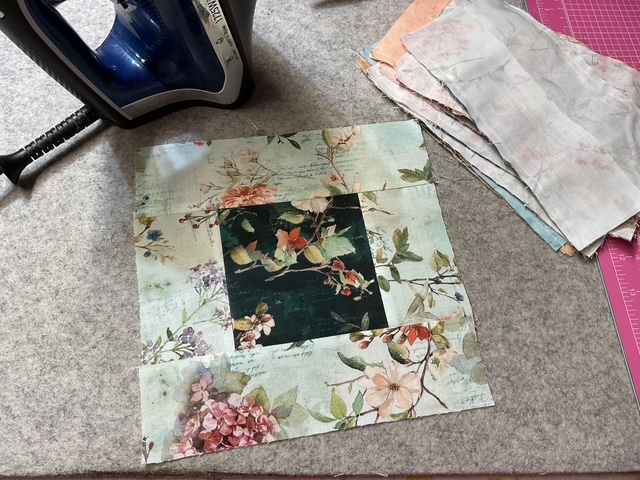
All right, let’s check out this week’s Spring into Spring tutorial, Charlie.
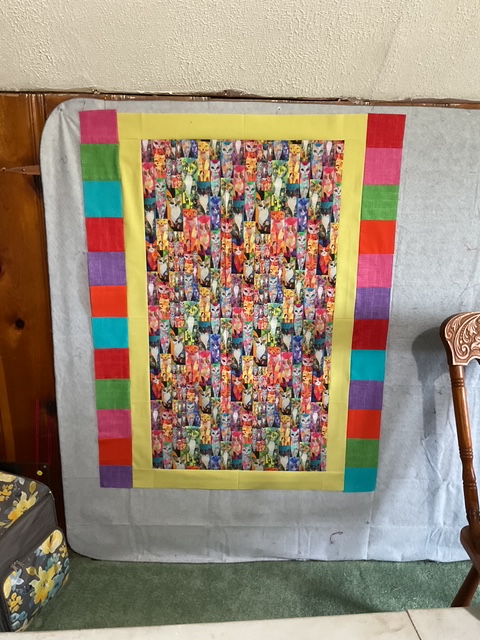
Spring into Spring VRD Quilt Tutorial Series: Charlie
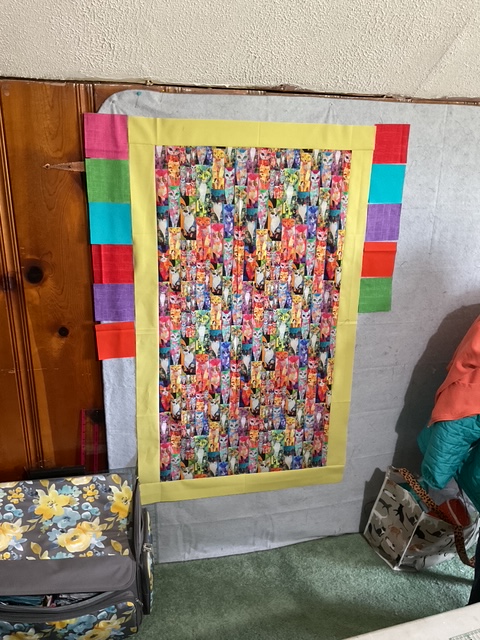
Today’s tutorial is Charlie, a quick fun panel pattern. It finishes at 44″ x 64″. But of course, you could always add another border to make it larger if you want to. A 6″ border (strips cut at 6 1/2″) would finish at 56″ x 76″.
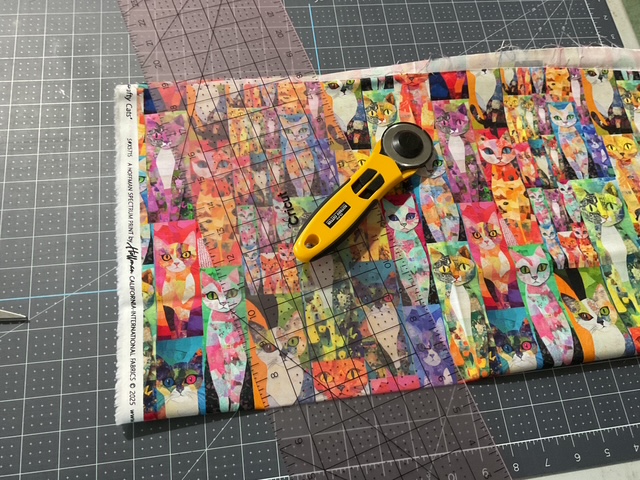
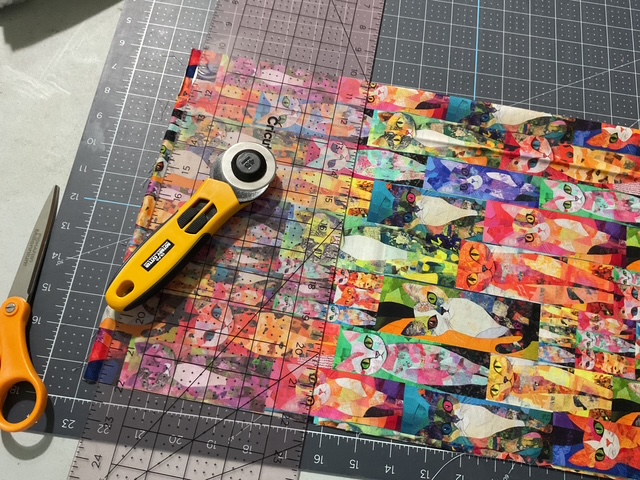
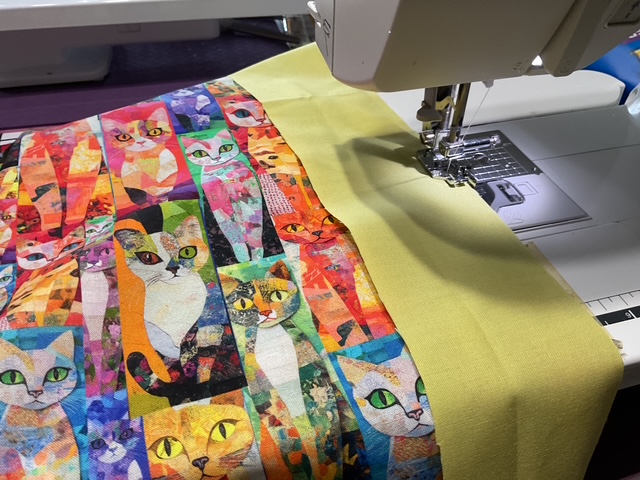
1. The first thing we always start with is our fabric. Today we’re using a super cool digital fabric collection from Hoffman called Crafty Cats. It’s fun and bright with some great rainbow 24/7 Solids and Linen coordinates.
Don’t you just love love love the cat print? Guess what?!? It’s running yardage, NOT a panel.
Have you ever thought about using a favorite novelty fabric instead of a printed panel? As long as you cut the fabric to the right size, novelty prints work beautifully in panel quilt patterns. Just a great tip from little ol’ me.
2. I must admit I’m a little nervous to cut the running yardage to the correct size the pattern calls for because it is just too easy to make a mistake. So wish me luck as I measure and measure again before cutting.
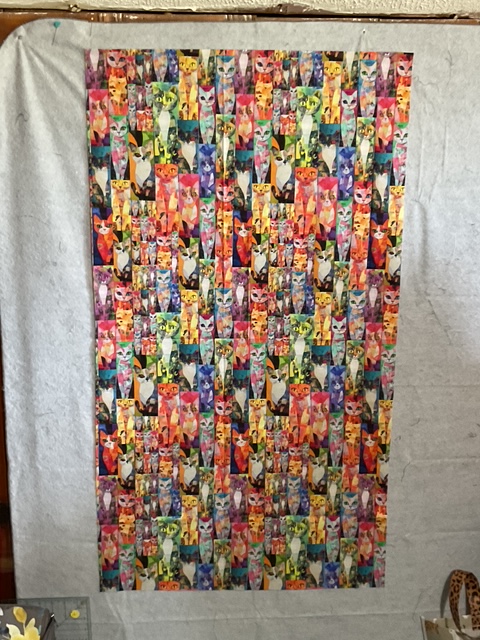
Whew! Got it! I didn’t think I could love this fabric any more, but I totally do now it’s cut and up on the design wall so I can see it properly.
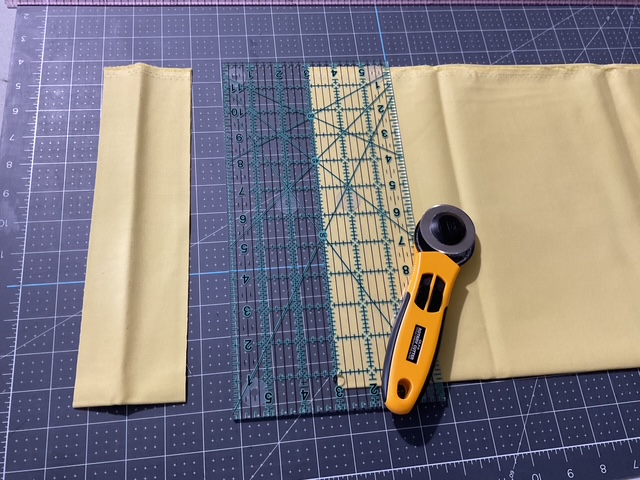
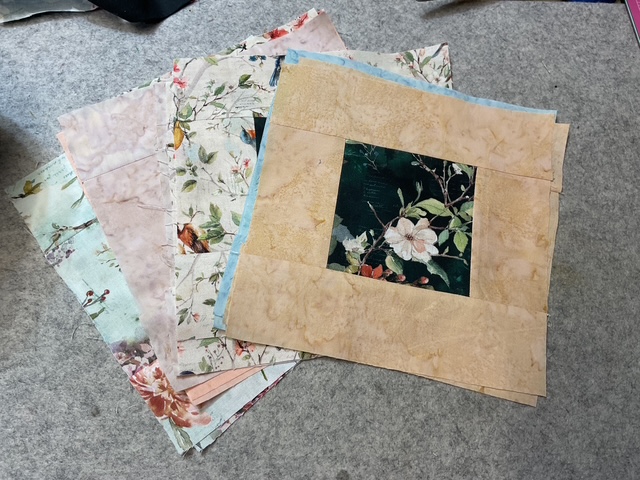
3. Now I’m going to cut the yellow border strips. I’ll need to cut 2 different widths for the 2 yellow borders – the inner border and the outer border. I’ll piece strips/cut them to the right size when I’m ready to actually sew them onto the quilt. So I’m going to set them aside for right now.
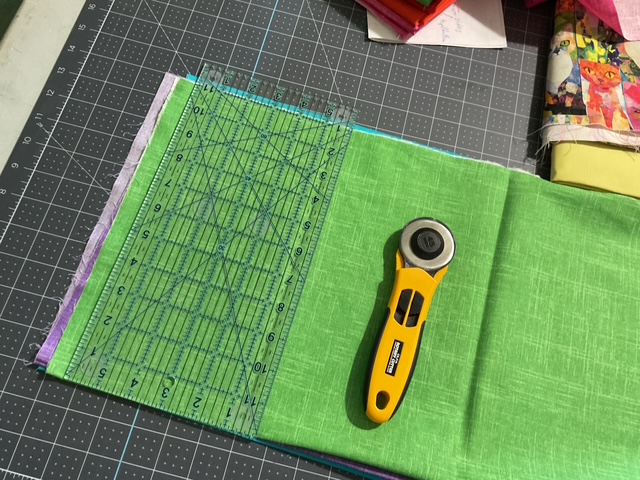
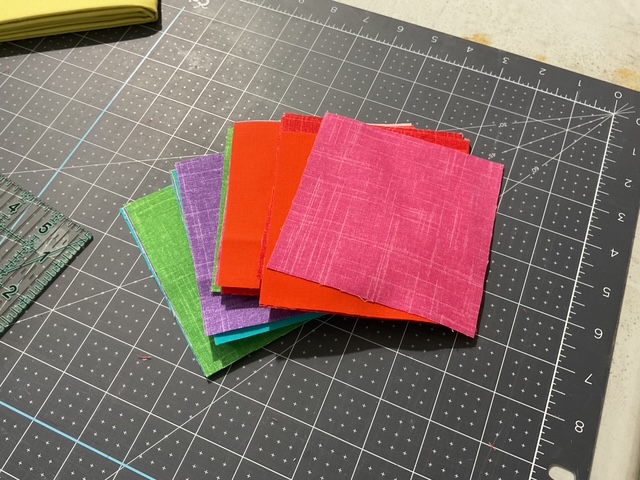
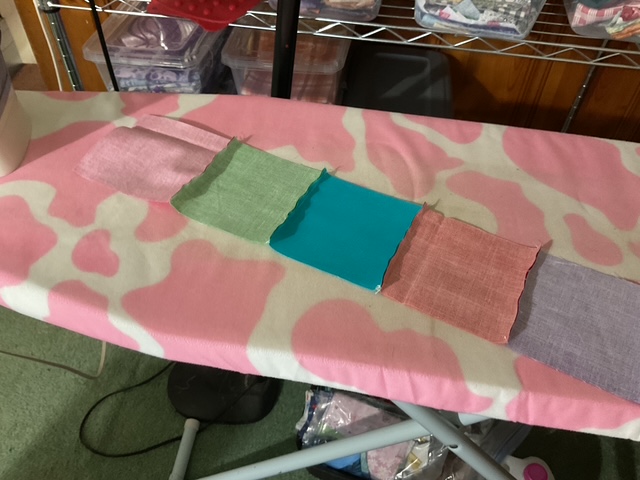
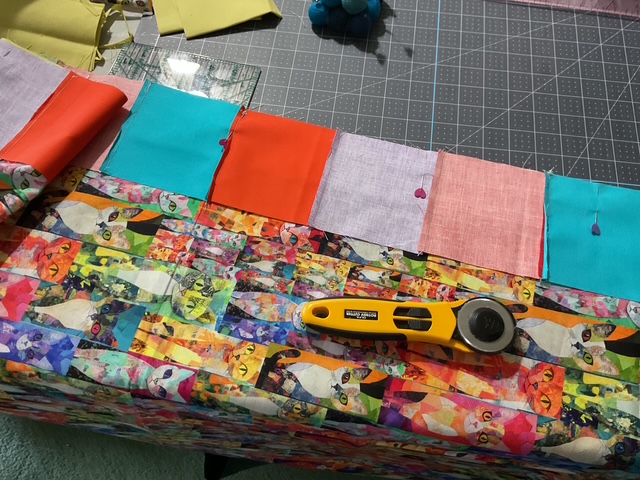
4. Time to cut out the bright and happy squares for the middle border now. I like to layer a couple fabrics when I cut strips and then cut my strips into squares. If you’re comfortable doing that, go right ahead, but if you prefer cutting a single fabric at a time, that works great too.
Okay, here are all my squares, cut and ready to sew.
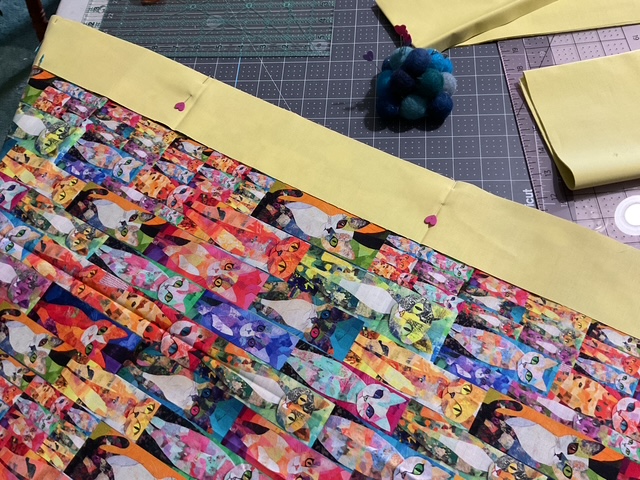
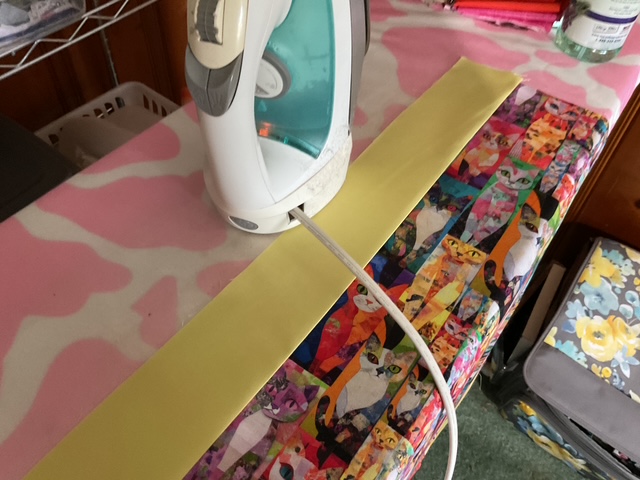
5. Everything is cut out and ready to sew now. I need to measure my cat fabric center in order to cut my side yellow borders to the right length. Then I’ll pin it to the center fabric edge, matching up the centers and the ends to keep everything nice and square. And off to the sewing machine to stitch the yellow border strips to the sides.
6. Next I need to head to the iron to press my seams. Today I’m sewing at my quilty pal, Robin’s house. Our friend Mary Lee, and my big sis, Tracy came to hang out too. It was a fun little impromptu get together. With snacks. You have to have snacks.
You’ve got to love the pink cowhide print ironing board cover, right?
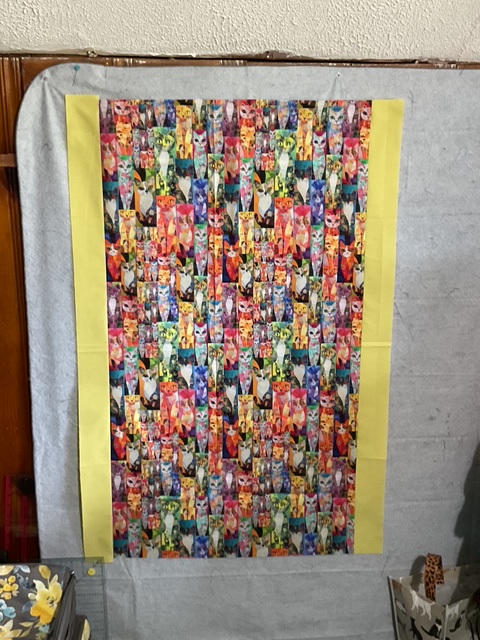
7. Here’s the cat center with the side borders in place.
8. Now to measure, cut, sew, and press the top and bottom borders. So far, so good. Yay!
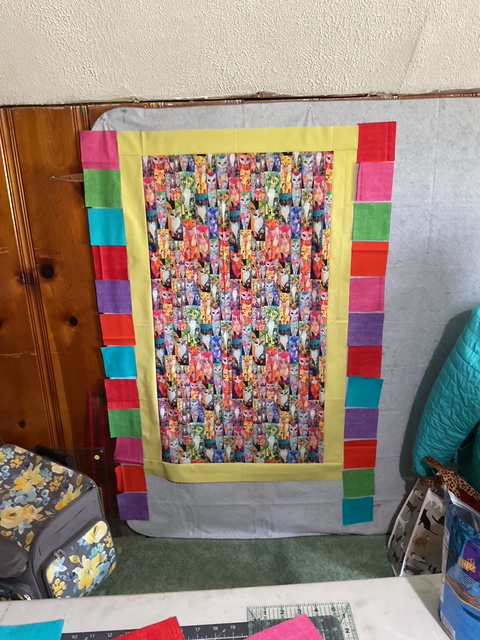
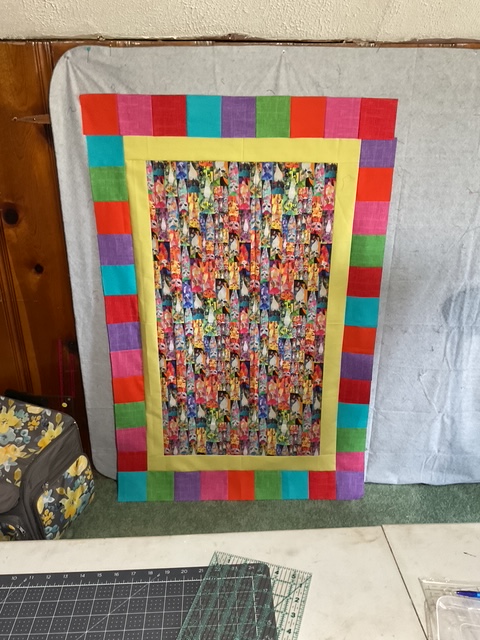
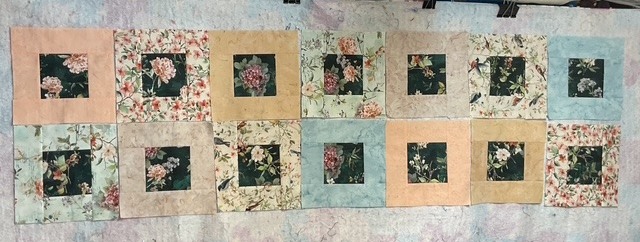
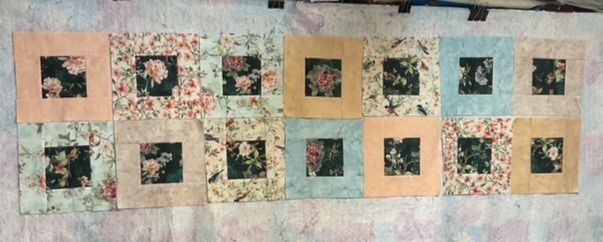
8. The next border is made up of all those fun bright squares. I want the squares to be totally random – not in a specific arrangement – so I’m going to lay out the squares. I’m excited because those bright squares are really going to bring out the colors in the cat fabric!
I’m only going to work on the side squares first. A funny thing happened – I was laying out and wouldn’t you know it but somehow unconsciously I began to lay out the right side to match the same sequence as the left side. Thanks, Mary Lee, for pointing that out to me. I didn’t even notice what I was doing! So after much shuffling and rearranging, the layout finally looks random. Which is quite amusing, since it wasn’t really random at all. LOL!
9. I’m going to sew the left row of squares together, press the row, and then sew it to the left side of quilt. Then I’ll sew the right square row together and add it to the right side of the quilt before I head back to the iron to press all the seams.
Oh dang! When I sewed the square rows to the sides I discovered that I made a mistake when I cut the length of the cat fabric way back at the beginning. Apparently I cut the length about an inch short so my square rows were slightly longer than the framed center. (Here I smack my forehead…..)
No reason to panic, though. I matched the centers of the square rows to the center of the side yellow borders and I simply trimmed off the excess half inch or so at the top and bottom. Maybe not the most elegant solution, but it was quick and worked well and you probably wouldn’t have noticed if I hadn’t told on myself.
10. Easy Peasy. Time to lay out the top and bottom square rows and sew the rows to the quilt. It’s coming together now. Those bright squares really compliment the center cat fabric. This quilt is going to make me smile.
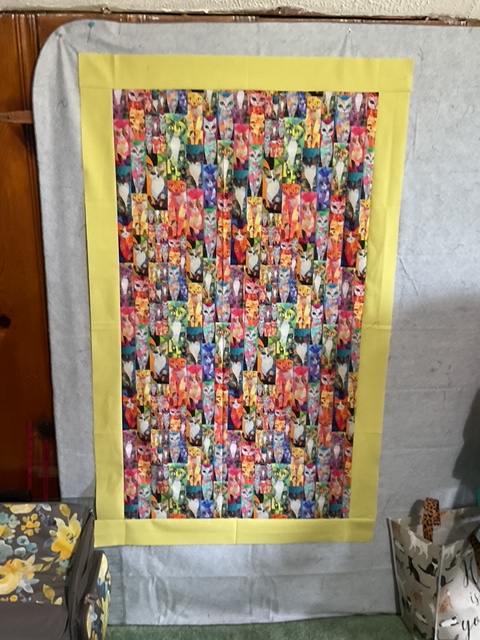
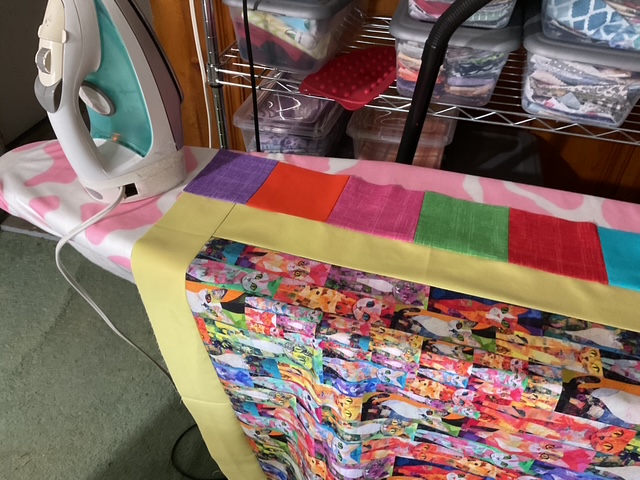
11. Next I’ll add the outside yellow borders. I had to piece these strips together before measuring and cutting them to the right length. Then I sewed them to the sides and pressed them.
WHEW! Finally I added the top and bottom borders. I had to add a little bit to the ends of these border strips, as well, to make them fit the width of the quilt.
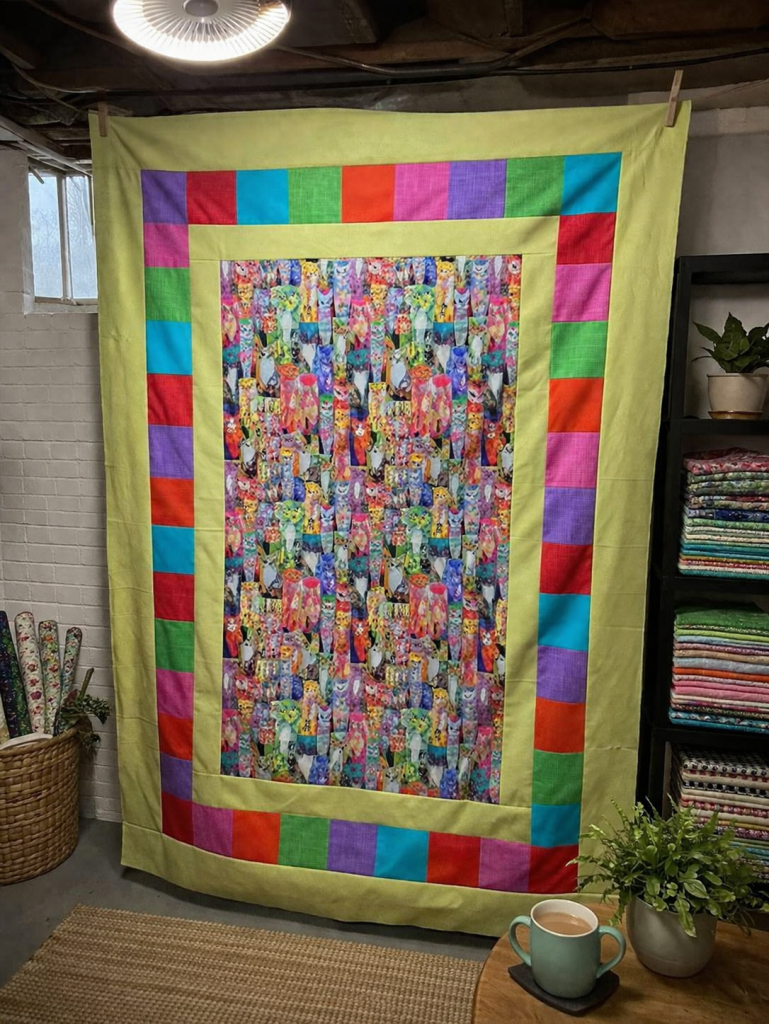
12. And done! Here it is. My finished Charlie quilt top. Yay! What a fun pattern that will showcase pretty much any fabric from panels to novelty fabrics. It turned out really fun!
I hope you’ll give Charlie a try. It was a really fun pattern to make. Maybe I’ll finish this one during the 6 Quilts in 6 Weeks Challenge…. We shall see, though, I have sew many VRD UFOs to complete and it will be hard to decide which ones to finish first.
I hope you will join me and the other 25 quilters who are participating in the 6 Quilts in 6 Weeks Challenge. Together, we can get to the finish line with some of our VRD UFOs. 6 isn’t a scary number. Each of us can make a commitment to finish 6 quilts. Even if we have stacks of UFOs. 6 is doable. If each of the 26 of us completed 6 UFOs, that would be a total of 156 completed quilts. In 6 weeks. WOWZER!
We CAN do this together.
Stay tuned next week to see which VRD UFO I am going to finish first. See you then!
We literally have SEW much to do today, so I’m going to jump right in with both feet.
I’m really excited to be hosting the 6 Quilts in 6 Weeks challenge on the blog again! If you didn’t get the chance to participate last fall in the challenge, you’ll want to join us next week!
6 Quilts in 6 Weeks Challenge
Here’s how the whole 6 Quilts in 6 Weeks idea got started last fall:
With my teetering stacks of unfinished quilt tops (or flimsies), I decided some kind of serious intervention was required. Hey – what if I challenged myself to complete one quilt a week? What if I made myself accountable by posting a before and after photo each week? It sounded a little daunting to me, but I was up for a new challenge last fall. Then I had one of those why not? moments – why not invite all of you to join me? And a fun new blog challenge was born.
So here’s the schedule of events and all the info:
The Dates:
Week 1 – 4/10
Week 2 – 4/17
Week 3 – 4/24
Week 4 – 5/1
Week 5 – 5/8
Week 6 – 5/15
The Rules and All the Details of the Challenge:
Each week for 6 weeks, participants will post before/after photos of weekly UFOs to our VRD Facebook page or if you prefer, you can email the photos to me at tricia@villarosadesigns.com.
All quilt tops/projects must be VRD patterns – this is the VRD blog, after all. Quilts must be quilted and bound to be eligible for prize drawings. No size requirements (I have UFOs from snack mats up to large throw quilts). It doesn’t even have to be a quilt – we have some great accessory, table runners, place masts, and snack mats.
Each week, I’ll draw a name randomly from those participants who posted before/after photos by each weekly deadline. The winner will get a surprise quilty good in the mail after the Challenge ends. Goodies might be from me or from one of our lovely quilting partners.
This Challenge is open to all, but please note that International winners will receive a selection of VRD digital patterns.
PSST! You can even use the next six weeks to make a NEW VRD quilt each week if you want – hey, maybe you don’t have any unfinished VRD tops just sitting around. So go ahead – pick your favorite VRD pattern and get moving. Wouldn’t this be a great opportunity to get some of your holiday sewing done early??? I am not quite that organized, I’m afraid, but maybe you are.
You might be wondering what happens if you don’t post a before/after photo for a weekly Challenge or you miss the deadline. It’s pretty simple – your name won’t go into that week’s prize drawing – that’s okay because life gets busy. I’m not kicking you out of the challenge, though – feel free to participate any or all weeks. Your name will go into each weekly drawing that you participate in.
Seriously, I want to encourage all of you as well as myself to finish projects, not to stress about them. LOL!
I think that’s all the important info. I hope I’ve answered any questions you had. If not, feel free to email me.
Wanna join me in this challenge?
Send me your name and email address at tricia@villarosadesigns.com to officially join the challenge and be eligible for weekly prizes. Your name and email will only be used for this Challenge, I promise you. Then get sewing! And don’t forget to have some fun!!!
Okay, let’s move on to our new Spring tutorial for this week.
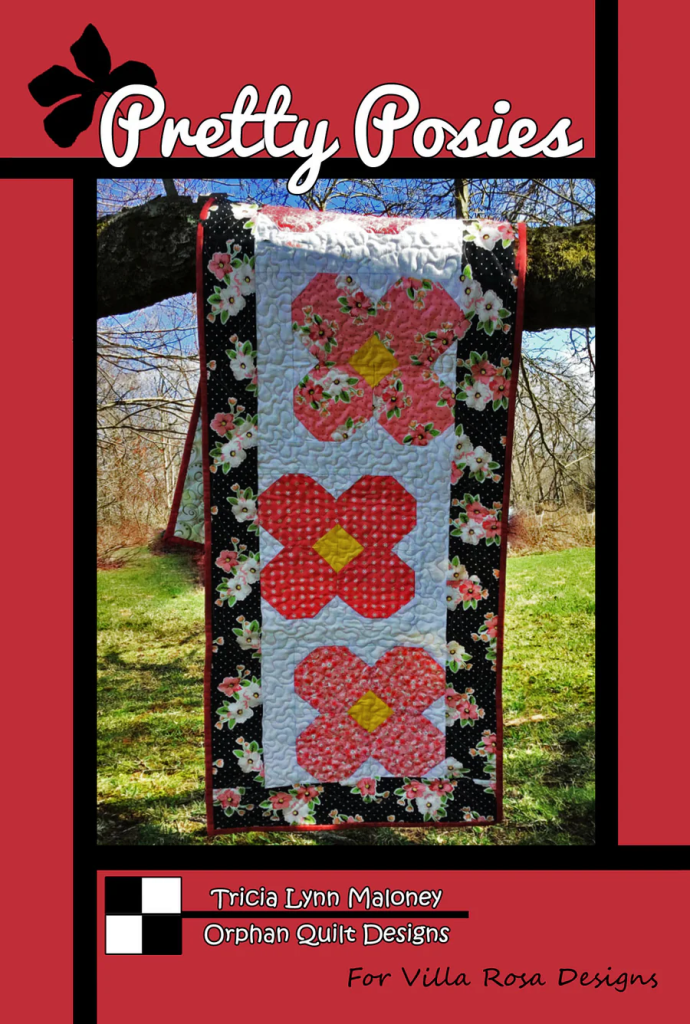
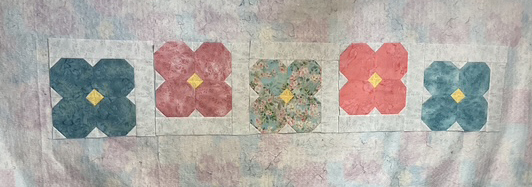
Spring into Spring Quilt Tutorial: Pretty Posies
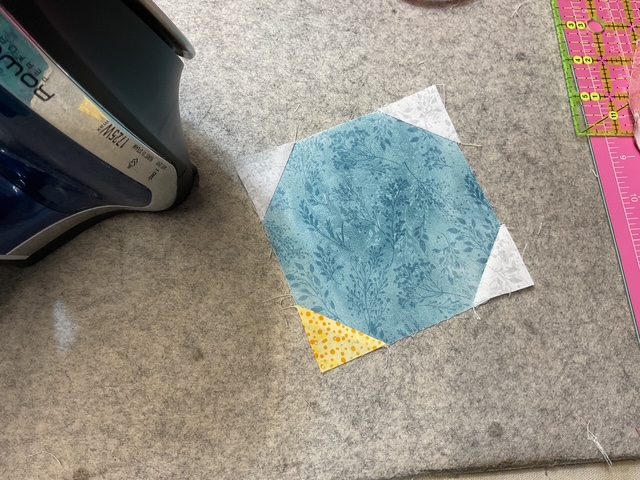
Pretty Posies is totally a perfect table runner for spring with its slightly tossed sweet blooms. I just love the perky yellow centers of the flowers – to me, they look like a little springy hello. 🙂
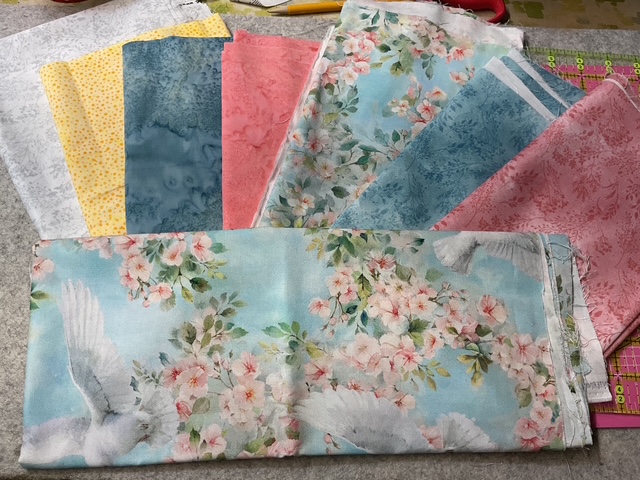
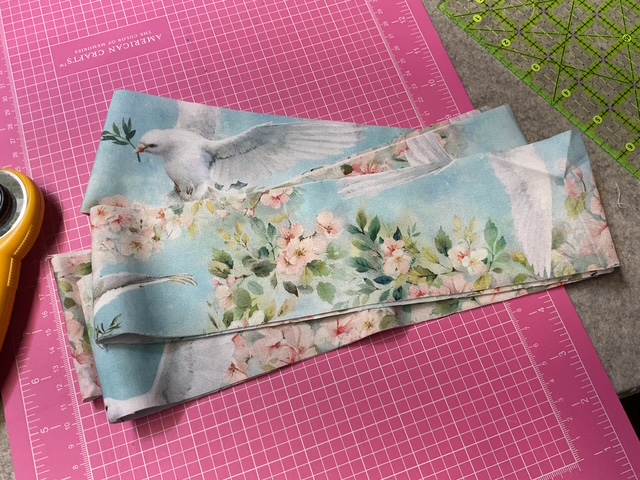
1. Our first step is always to gather up our fabrics. Today I’m using lovely sample fabrics from our quilty pals over at Hoffman Fabrics. SHHH! This fabric isn’t even available yet, so you’re getting a sneak peak!
It’s an upcoming new collection called Blushwing and there are some lovely sweet 1895 Watercolors batik fabrics and a fun 885 Dot batik, too. Quilt shops will be able to order this fabric next month and it will ship to shops in September. So ask your favorite retailer to order Blushwing!
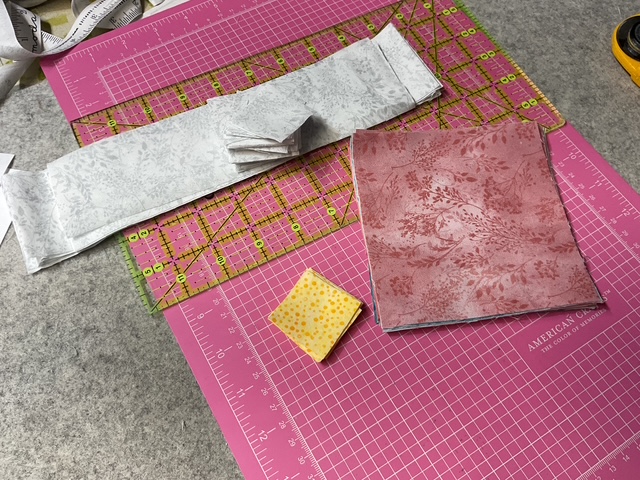
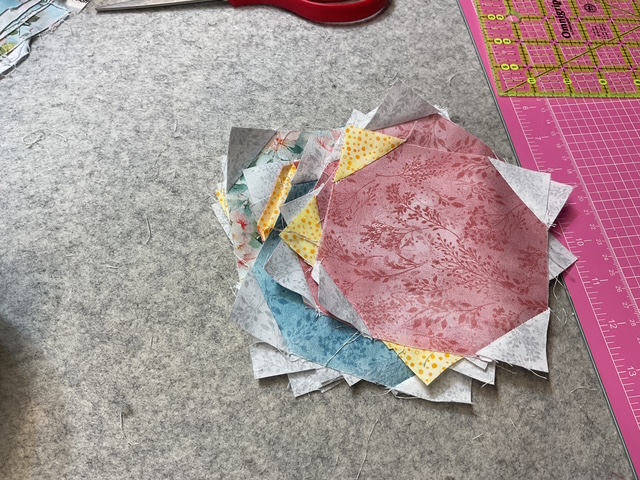
2. Let’s get started at my cutting station (which doubles as my pressing station, too). There’s some simple cutting to do for this runner – cutting strips then cutting the strips into rectangles and squares. There’s nothing difficult or tricky with the cutting, just follow the instructions on your pattern. Instead of showing cutting images for each fabric, I’m just going to show you all the pieces cut and ready to move on to sewing.
3. Now we’re headed to the sewing machine. We are going to use the Stitch and Flip method to add a triangle to each corner of the flower squares. I’ve been calling this method the “flippy corner” method for a while now, but I recently discovered it is called more often the “Stitch and Flip” method, so I’ve decided to use this more common name going forward so I don’t confuse anyone (or myself).
One corner of each flower will have a yellow triangle while the other 3 corners of each flower square will be background fabric triangles.
Let me show you how the Stitch and Flip method works.
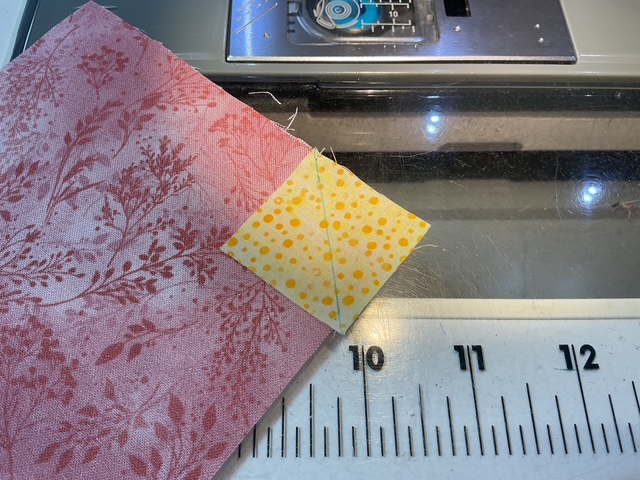
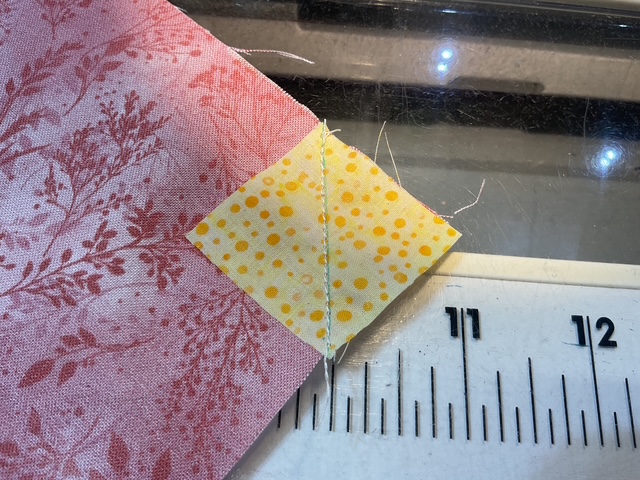
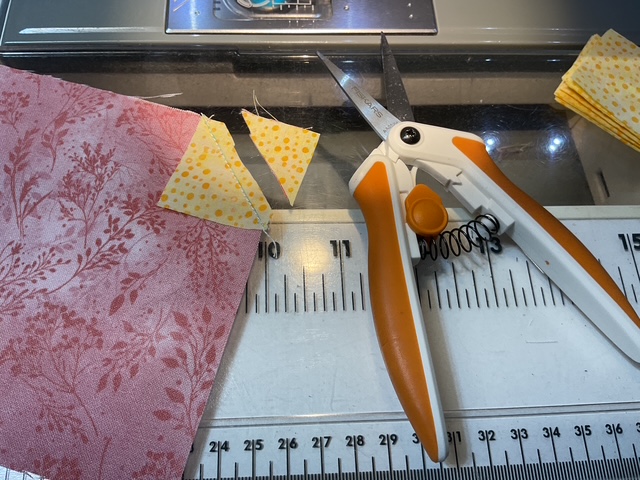
Layer a small square RST (right sides together) on one corner and draw a diagonal line. Then sew on the line. Cut off the excess fabric about 1/4″ away from the sewn line.
We will repeat the Stitch and Flip method to make background triangles for the other 3 corners of each flower square.
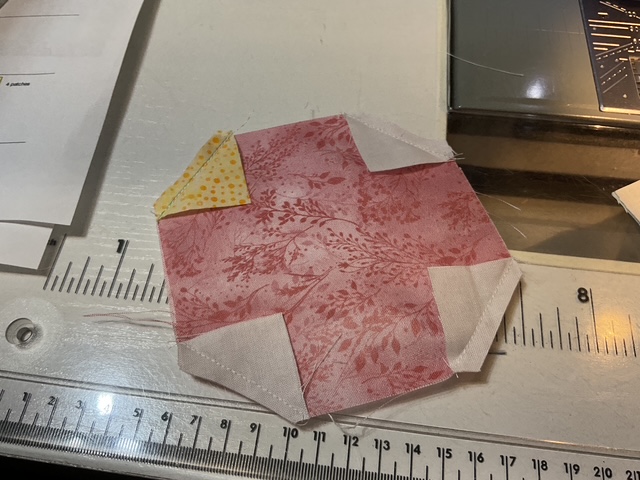
3. Back to my cutting and pressing station to press open all of the Stitch and Flip triangles.
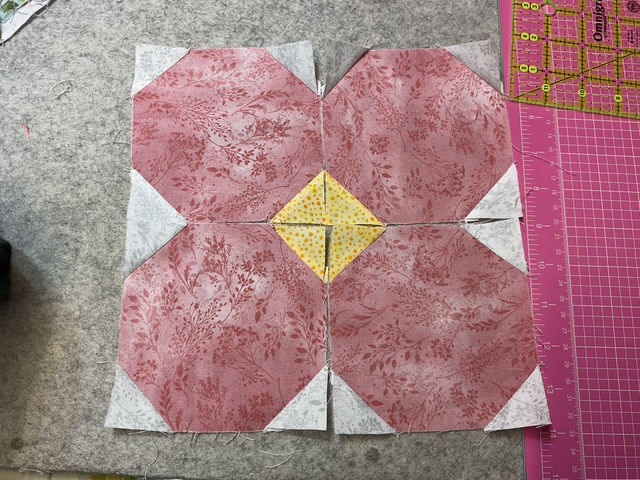
A note about pressing: I suggest you press the triangles for 2 of the flower squares for each complete flower (you need 4 matching flower squares for each complete flower) towards the triangle and the other 2 towards the flower square. This will make sewing the flowers together a lot easier as the seams will nestle.
4. Back to my sewing machine. I’m going to lay out and sew each flower together with the yellow triangles towards the middle to create the flower center.
I’m going to sew the top 2 squares together and the bottom 2 squares together. Then I’m going to sew the top section and the bottom section together to make a complete flower.
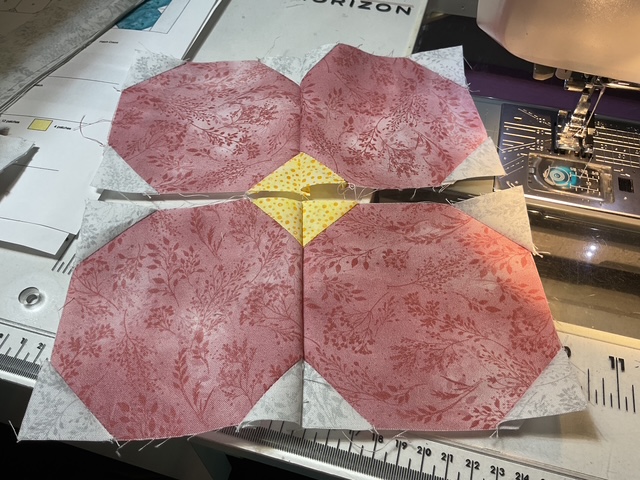
5. Sigh……back to the iron to give the blocks a nice press.
6. Next we’re going to add the half sashing to each flower block. This is what creates the movement in the runner. It’s one of my favorite easy peasy techniques.
Back to the machine. First we add a background strip to the side and then we add the second background strip to the top. A quick press and our blocks are finished.
7. Yay! Time to sew the blocks together. Sooooo, back to the machine. I think I’m starting to feel a bit like a pogo stick. My cutting and pressing station is near my sewing area, but I have to get up and go around the corner of my shelf unit in order to cut or press. Sigh…..I definitely need to take some time and do a little rearranging to make it easier to go from one to the other.
Because I am using 3 blue fabrics and 2 pink/mauve fabrics, I already knew how I wanted to lay out the blocks. You, however, might need to explore some different options until you find the arrangement you like the best. Flip and turn the blocks however you like.
8. Now it’s time to cut border strips. Do you cut all your fabrics before you start a project or do you cut as you go along? When I have a border on a project, I usually wait until after I get the center made before I cut my border strips.
Isn’t this just the prettiest fabric for the border? So soft and gentle.
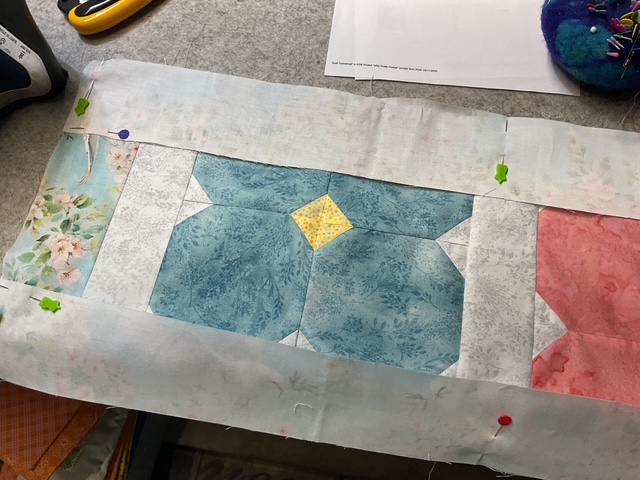
9. I like to measure my quilt before I cut the border strips to size, even if a pattern gives the measurements. I just like to be on the safe side. So I measured my runner through the center both horizontally and vertically to get my final border sizes. I’m going to sew the borders to the short ends first.
I really love how the border pulls out the center blue floral flower, don’t you?
10. All right, now I’m going to pin my long borders to the runner. I would imagine every quilter has their own method for doing this step. For me, I begin by pinning the center of the border strip to the center of the runner side. Then I smooth each side of the border towards the end of the runner, where I pin the corners of the border strip to the corners of the runner. Finally I add a few more pins between the center and the ends to help keep everything lined up. What’s your method for sewing on long borders?
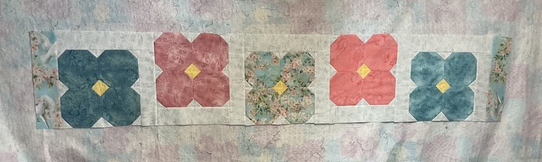
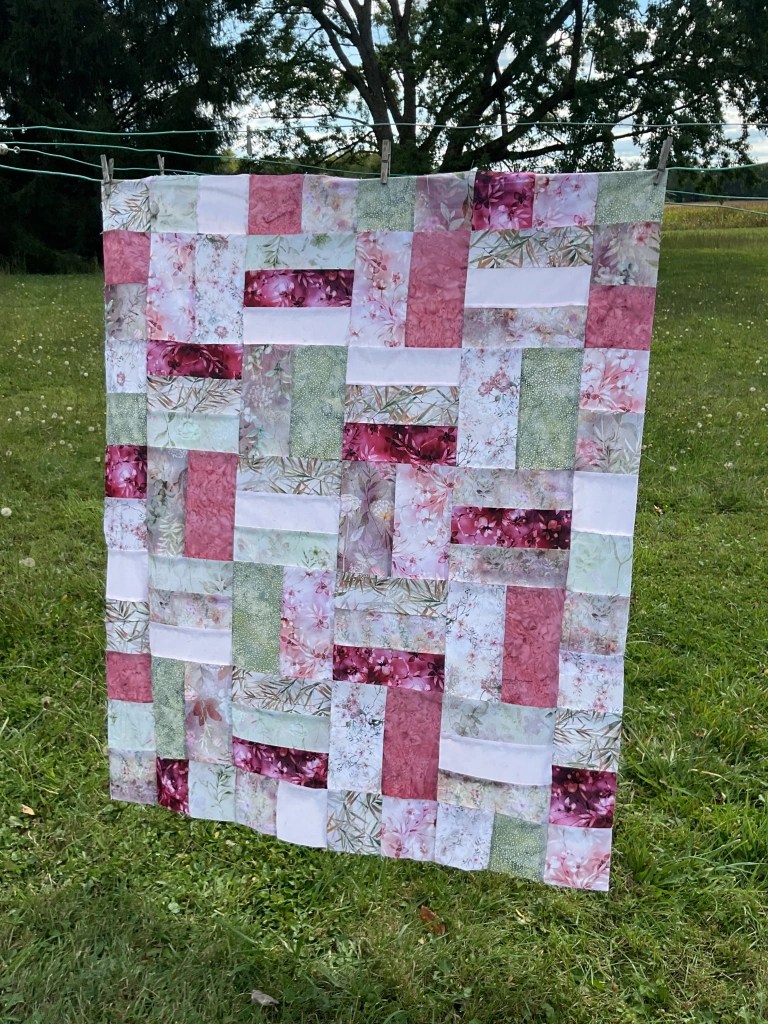
VOILA! A finished Pretty Posies runner top. I just love how it turned out. Perfect for Spring.
Now to layer it with batting and backing. Machine quilt it. Bind it and add a label.
WHEW! I think it’s time to take a break from sewing and go shopping!
A Fabric Acquisition Road Trip (FART)
On Saturday, friends Robin, Mary Lee, and I piled into my cute little red Jeep Compass and went on a fun laughter-filled FART to one of our area shops. Quilter’s Cupboard is located in Seneca, PA. Big SHOUT OUT to owners Shirley and Brenda!
Their shop is cozy and welcoming. You step inside the shop to see rows of colorful bolts of fabric and a wall filled with notions, patterns, and fabric panels. One of my favorite firs tstops are their precut shelves with assorted precuts, fun little goodies, and precut patterns. I of course grab some 5″ squares and 2.5″ squares.
The hallway boasts more bolts of fabric with tons of great rulers on the opposite wall. The first room has seasonal fabrics and flannel. The hallway then branches left into a large bright classroom with many samples gracing the walls with the kits nearby and ample space to have classes. The right branch of the hallway leads to an exit and another room filled with ByAnnie patterns and supplies with the most amazing (and inspiring) samples. I grabbed a new ByAnnie pattern, some mesh, and zippers. We’ll see if I get brave enough to tackle that project.
By the way, the shop is totally crazy about Villa Rosa Designs Rose Card patterns! They have VRD samples galore as well as fantastic kits for all of their samples and of course VRD Rose Card patterns.
Here are some of the super VRD samples on the walls.
What fun trip! Mary Lee spent the most and Robin spent the least. After we shopped, the three of us headed over to The Log Cabin restaurant for lunch.
Last stop was to Ollies to poke around to see what interesting and fun things we could find. Beside, Mary Lee had never been there before.
All in all, our FART was a welcome break from the minutia of our every day activities. And spending time with quilty pals is always a good time. When was your last FART?
WHEW, that’s it for today’s post. Don’t forget to join me for the 6 Quilts in 6 Weeks Challenge which begins next week.
Spring literally starts a few days, which is probably why we have snow on the ground again and it was like 16 degrees last night. BRRR! Regardless, I’m definitely thinking spring! So I thought it would be fun to leap into some fun spring quilt tutorials to get me into the spirit even if the weather doesn’t cooperate with the season.
I’m also thinking it’s time for a spring 6 Quilts in 6 Weeks Challenge. Anyone up for that? I did a 6 in 6 last fall and we had great time. It was incredible to finish one VRD quilt a week for 6 weeks. 6 completed quilts at the end. Which was rockin’ awesome! Especially considering all the tutorial sample tops that I’m accumulating. LOL! So……who’s in? I’m thinking to start this the first week of April, 2 weeks from now. It would last for 6 weeks. Right now, I’m just putting feelers out to see who wants to join me for this 6 in 6 challenge? I figure if I do this challenge twice a year in spring and fall, we can all get up to 12 quilts finished in a year.
There are a few rules, though, I’d better mention –
1) Quilts must be made from VRD patterns
2) You must post a before and an after photo on our Facebook page or email them to me if you’re not on FB to be entered in the weekly drawings
3) Anyone can participate
4) If you don’t have stacks of VRD UFOs like I do, no problem – you are welcome to make new VRD quilts/accessories to participate
I think that’s pretty much it for the rules to get started.
If you’re interested, you have 2 weeks to email me your name and email address at tricia@villarosadesigns.com. I promise your email address will only be used by me to notify you if you win a prize.
Now….on to our first Spring into Spring VRD quilt tutorial!
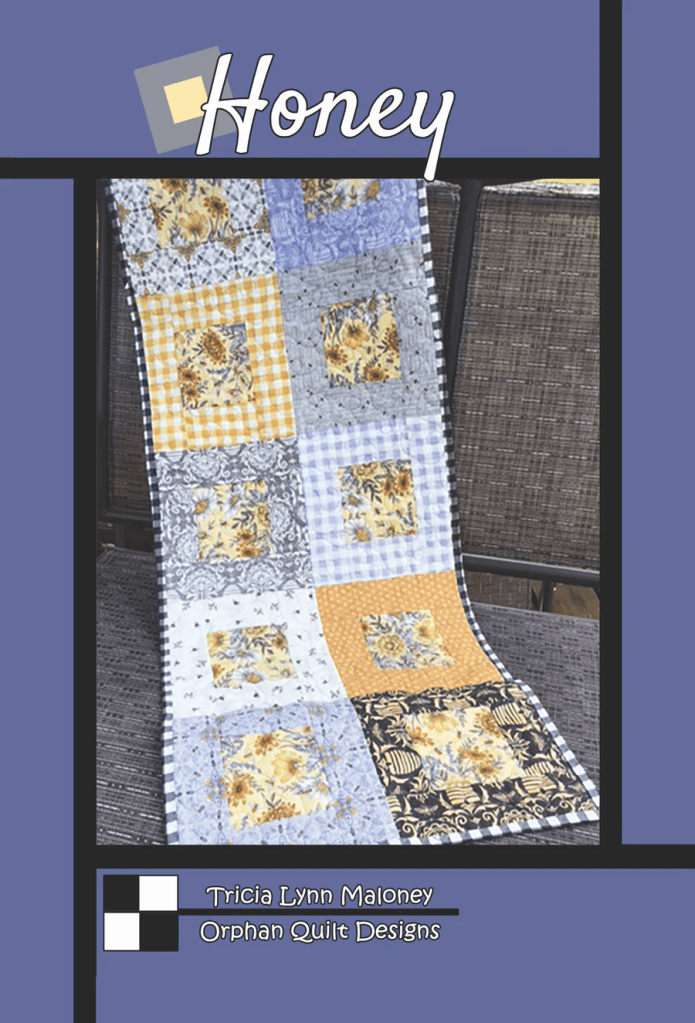
VRD Quilt Pattern Tutorial Honey
There’s nothing like a new table runner to add a touch of spring to you space! Have you ever made Honey before? If not, you’re in for a treat because this runner goes together quick as bunny and looks great in just about any group of fabrics you want to use.
1. Time to gather up our fabrics. I’m using lovely sample fabrics from our quilty pals over at Hoffman Fabrics today. SHHH! This fabric isn’t even available yet, so you’re getting a sneak peak!
It’s an upcoming new collection called Nesting Hour and there are some lovely sherbet-y 1895 Watercolors batik coordinates, too. Quilt shops will be able to order this fabric next month and it will ship to shops in September. So ask your favorite retailer to order Nesting Hour!
2. All right! Let’s get some cutting done. First, I’ll cut strips for the block centers and then I’ll cut the strips into squares.
3. Next I’ll cut the strips for the frames and then subcut the strips into the needed smaller pieces.
4. All the pieces are cut, organized by shape, and ready to sew. Yay!
5. We’re headed to the sewing machine to make the blocks. I’m going to sew the short strips onto opposite sides of the center square. When I’m sewing the same step over and over, I really love chain piecing because it saves both time and thread.
6. After I sew the matching short strips to opposite sides, I’m headed over to the ironing station to press my block so far before adding the next strips. I don’t always press in the middle of sewing a block together, but today I am because I want the blocks to turn out really crisp.
7. Then back to the sewing machine to add the long matching strips to opposite sides of the center square to complete the frame for each block.
8. And back to the iron to press the completed blocks so they will be nice and crisp. I’ve noticed that when I press blocks on my wool pressing mat, I don’t have to use pressing spray to get sharply pressed blocks.
Right now I have an 18″ x 60″ mat on my 24″ X 60″ ironing station. My Dad designed and made the ironing board for me years ago. My lovely big board sits on top of an Ikea Kallax 8 cube shelf on casters and it’s the perfect height for me!
The 18″ wide mat just seems too narrow for me now, so I’m thinking of upgrading. I see mats are now available in 22″ x 60″ and 24″ x 60″, which is really great. Maybe I won’t run off the edge anymore. Definitely worth thinking about now if they have the exact size I need.
9. Yay! My blocks are all pressed!
10. Next up is putting my blocks up on my design wall so I can rearrange them. Here’s a few photos showing how I’m moving things around. Sometimes this step takes more time than I’d like, but it is a really important one because nobody wants a visually lopsided quilt.
11. Here’s the arrangement I decided upon. Then it was back to the sewing machine to sew the blocks together. Next up with be layering, quilting, adding a label, and binding…….sometime.
I really like how it turned out, don’t you? So soft and fresh. I can’t wait for the fabric to be available in quilt shops come September 2026.
Your homework for the next couple weeks is to decide whether you want to join me in a Spring 6 Quilts in 6 Weeks Challenge. Drop me an email (tricia@villarosadesigns.com) if you want in. I’ll post more info next week.
Let’s get quilting and finishing together! YEAH!
See you right here next week for another Spring into Spring tutorial.
It’s hard to believe it’s Week 4 of our 6 Quilts in 6 Weeks Challenge already, isn’t it? How many of you have been following our VRD Project Finishers on our VRD Facebook page? I know I have! I really love how supportive everyone is on the VRD FB page, too, it’s a great place to hang out if you’ve never visited before.
I’m really hoping this “finish 1 project a week” concept will stick with me and I’ll continue after the Challenge is over because I literally have STACKS of flimsies (quilt tops) waiting impatiently to get quilted, bound, and finished. I think it would be a great accomplishment for me (or any of you) to shrink those stacks of unfinished projects before the end of the year.
Wouldn’t it be awesome to jump into 2026 with a plethora of new project ideas without the guilt of that sad stack of unfinished projects sitting there, judging us? Besides, finishing projects will make more room in our quilting spaces for new projects!
Okay, how about our Week 3 Challenge winner now (selected using a random number generator)?
Congrats to Robin M!
Prizes for our Weeks 1-3 winners will be in the mail shortly, so enjoy your quilty surprises sponsored by our good friends over at QT Fabrics. Thank you, QT!
Now we’re ready to jump into our Week 4 Challenge!
6 Quilts in 6 Weeks Challenge Week 4
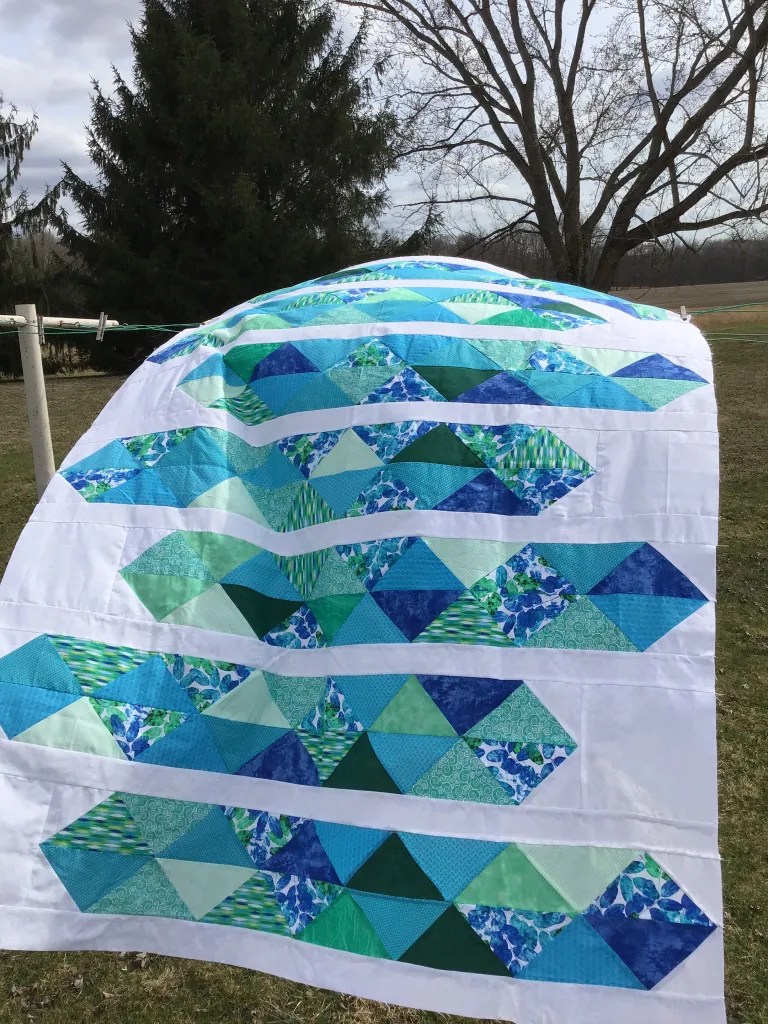
My finish this week was a really fun one – Helix by our talented VRD designer, Molly Cook. Have you ever tried this pattern before? Helix is fat quarter friendly and finishes at a nice 50″ x 66″. You could add a border all around to make it larger if you wanted to.
It is definitely a more challenging project – I would consider it more intermediate/advanced. There’s a lot of matching points and seam intersections in this one. The finished quilt is gorgeous, though, with its eye-catching geometry. A very cool quilt.
When I searched for this tutorial on the blog, I discovered – gasp! – it was from 2023! Huh. How time flies! You can find the Helix tutorial HERE.
If you’ve never made this one before, I really do suggest you check out the tutorial because all those intersecting points can be a challenge if you’ve never done them before.
Here’s my BEFORE photo:
Apparently when I took the photo back in 2023, it was a really windy day!
And here is my AFTER photo:
See the interesting plaid markings showing through the quilt (the sun was behind the quilt when I snapped the photo)? That is courtesy of the fun blue/teal plaid fleece on the back. Yep, another fleece-backed throw with no batting – just the way I like ’em! Fleece-backed throws are perfect all year around as they are lightweight yet cozy and soft.
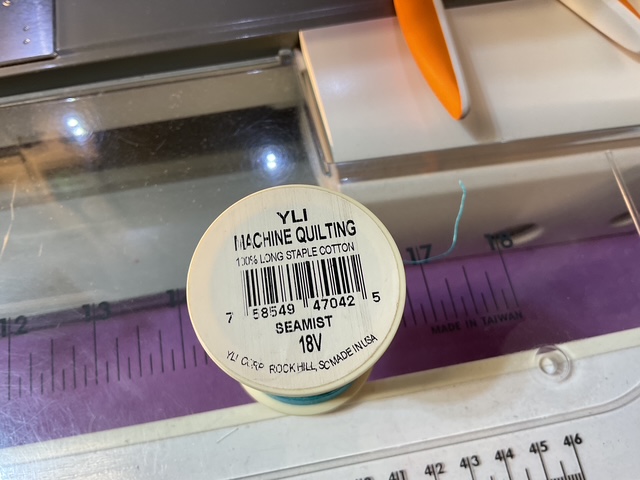
I’m really pleased with how this quilt turned out. The crisp white background was the perfect companion to set off all of the blues, greens, teals, and turquoises. I quilted it with my usual allover meander, but this time I used a very subtle variegated thread, Seamist by YLI. I thought, why not? My Helix has a lot of white space so I thought the variegated thread in blues and teals (I swear there’s a bit of green and lavender, too) would really compliment the quilt. I love how it turned out, but the thread color variations were very very subtle.
I found a blue fabric in my stash that had narrow white lines to give it a subtle plaid look for the binding. I machine stitched the binding on to save time and it definitely went better than last week – my corners were much neater on this one. And of course, I added my label dated 2025, even though I started the quilt in 2023. It’s the end that counts, not the beginning.
Yay! Another finish from my towering stack of UFOs. Hmmm. Which one will I finish next?
Quilting Cats
I’m going to change the subject in honor of National Cat Day (October 29th).
How many of you have a kitty partner in crime when quilting (or knitting, crocheting, garment sewing, crafting, etc.)?
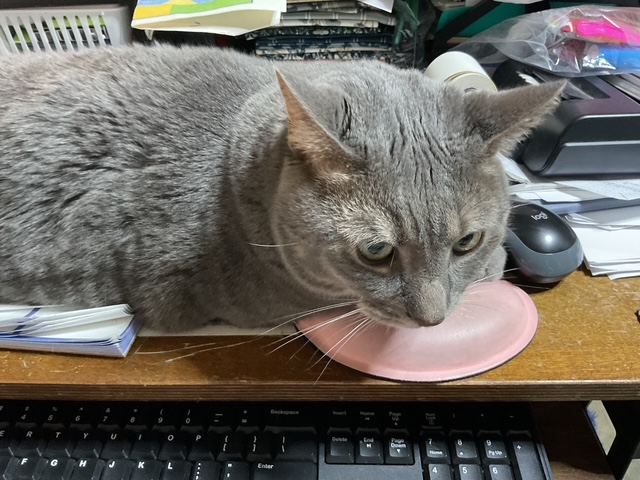
Right now as I type this post, my furry buddy, Griffin (age 4), is sprawled across my desk. Only recently has he started doing that again. I love it, but sometimes we end up playing tug o’ war over my mouse pad area. LOL! He really really likes to stretch out pretty much across my whole desk top. Sometimes when I’m trying to use my mouse (which I do A LOT), Griffy will claim my mouse pad and mouse (and sometimes my hand) as his. Silly boy. Of course, as he sprawls over my desk, he knows I just can’t resist scratching him in his favorite spots. Smart boy!
Here’s my handsome Griffy. You can see that he has control of the mouse pad in the photo. ARGH! We take turns winning our game of tug o’ war. LOL!
I have another cat, Pip, but at 15, she doesn’t come downstairs to my studio dungeon anymore. She is our upstairs diva. Then there’s Bailly, my 3 year old Shih Tzu. She’s a heartful, but also a handful. And she thinks she’s a cat.
So Happy National Cat Day to you and your furry feline companions. Maybe they’ll help you (or hinder you, depending on their mood) get your project finished for next week’s Week 5 of our 6 Quilts in 6 Weeks Challenge.
See you right here next week for more VRD fun and Week 5 of our 6 Quilts in 6 Weeks Challenge.
How are you this fine October Thursday? My thoughts are definitely turning towards cozy quilts, good books, and hot tea right now as the October winds howl outside, swirling the leaves in mini cyclones around the yard.
I’ve been really enjoying our 6 Quilts in 6 Weeks Challenge and I hope you’ve been tuning in to the finished projects on our VRD Facebook page. If you signed up for the Challenge, please make sure to write that your before/after photos are for the 6 Quilts in 6 Weeks Challenge so we can all ooooh and ahhhh over your completed project (this also makes it easier for me to note who finishes a project each week during the Challenge).
I’ve heard that it takes about 30 days to build a new habit so if we finish 1 quilt each week for 6 weeks, hypothetically we are building a new habit. At least, that’s my hope, anyway. LOL!
Before we get much further, though, let’s all congratulate Mary Q as our Week 2 winner. Yay you, Mary! Keep up the great work!
I wonder who will be our Week 3 winner next week??? Maybe Y O U ????
6 Quilts in 6 Weeks Challenge Week 3
For Week 3, I chose to complete one of my recent blog tutorial quilts from last month – Busy Bee. I was sew in love with the Hoffman digital fabrics I used for my tutorial that I just had to finish this one as part of the challenge. Busy Bee is fat quarter friendly and finishes at 45″ x 54″, which is a nice kids quilt, baby quilt, or small throw. If you want it bigger, you can easily add more blocks or an outer border (or both).
If you missed the Busy Bee tutorial, you can find it HERE.
I backed my quilt with a lovely dusty rose textured fleece and free motion quilted the quilt with an allover meander design in a pretty pink thread.
I had a question recently on the blog about using fleece on the back of quilts, so I thought I’d address it here. I do not use batting when I use fleece on the back. I generally only use fleece on the backs of my throw quilts, although my quilty cuz, Kim, is using her fleece scraps on the back of her table runners and smaller projects, too. As for quilting a fleece backed quilt, I try to stay away from designs that cross over because the fleece is really stretchy and the quilt top isn’t (or at least it shouldn’t be) and crossing over lines potentially runs the risk of getting pleats and folds at intersections. I find wiggly line and meandering my designs of choice when quilting fleece backed quilts.
For more tips when quilting fleece, you can check out a blog post HERE from a few years ago.
The binding is Riviera, a Dot batik from our quilting partner, Hoffman , and it’s the absolute perfect finish. I stitched the binding on by machine again to save time. It turned out okay, but a few of my corners had minds of their own and were trying to do the salsa. Sheesh! I even had to rip one out and force it into submission. Corners can be so tricky!
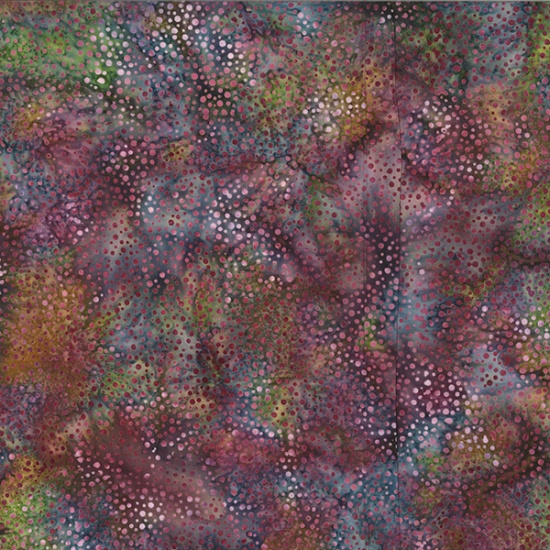
Riviera Dot batik from Hoffman
Now to decide which quilt to finish for Week 4……..
FUN VRD Snack Mat Tutorial
Recently, Chris from Needlepointers.com reached out to us to share a really fun idea and tutorial using our VRD Snack Mat patterns and I’m thrilled to share it with you. If you haven’t ever checked out Needlepointers.com, you should! Chris and her daughter Annette have been sharing craft tutorials and projects for the last 20 years on their website.
If you’re like me, you’re on the lookout for fun and fast Holiday gift ideas because the holidays are almost upon us. Snack Mats, of course, are an AWESOME quick and easy gift idea and as a bonus, each pattern makes 2 Snack Mats. You can find all the VRD Snack Mat patterns HERE. Snack Mat patterns are available in both digital and print formats.
Thanks, Chris, for sharing this GREAT IDEA with us!
Have you made anything fun using any of our VRD patterns and put together a tutorial online? We’d love to see it.
Please note that if you are thinking about creating a tutorial of your favorite VRD project (or you’ve done one already):
You may show the front of the pattern, but never the back where the instructions are
Do not give any cutting dimensions or measurements out verbally or in writing as part of your tutorial
Please keep in mind that all VRD patterns are protected by copyright law. Thank you for kindly respecting our VRD designers, their creativity, and their hard work.
Well, I’d better get to work on my Week 4 Challenge Project. I’ll show it off next week. You’d better get yours going, too.