Rose Cards · Tips and Tricks · Tutorials · villa rosa designs

A Thanksgiving Turkey (Quilt Block) For You!

Hello Quilty Friends!

Happy Thursday to you!

Huh! It just occurred to me that our weekly Thursday blog post will happen on Thanksgiving Day!

I was planning to return to my Panel Quilt series, but then I thought it would be fun to design a little project just for Y-O-U as a Thanksgiving gift, because we here at Villa Rosa Designs couldn’t exist without the loyal support of you, our enthusiastic VRD fans and supporters. We are sew thankful for you.

Image by Freepik

What are your traditions for Thanksgiving? Do you cook a big family meal? Go out for Thanksgiving dinner? Watch football? Attend or watch the Macy’s Thanksgiving Day Parade? Do you celebrate alone or with a big boisterous family? Do you celebrate at someone else’s home or does everyone come to yours? Do you get a head start on your holiday shopping?

Thanksgiving is generally a small quiet affair with my family. Sometimes we cook and eat in, but in the past we’ve gone out, too. Usually there are just three of us but occasionally my sister and her family will stop by later for pumpkin pie. Depending on which teams are playing football on Thanksgiving, I usually find a little time to get some quilting in while my family is cheering on their team.

My favorite Thanksgiving holidays have been spent at my Aunt Helen’s house with my many cousins and their families. My Aunt’s house is usually bursting at the seams with people and dogs. Squabbling, laughter, enough amazing food to feed an army, and lots of good conversation and memories. Football on the television in the living room. Sometimes cards or board games after dinner at the kitchen table. Good times and new memories in the making.

All of these warm fuzzy feelings and memories made me want to design a special Turkey Quilt Block as a way to say “Thank You” to all of you! I was inspired by Lori Holt’s Tom Turkey Quilt Block tutorial, but I created my own turkey block, based on a humble Nine Patch because I wanted my Talking Turkey block to be happy and plump.

My Talking Turkey block finishes at 16″ high by 22″ wide.

Below is my sample Talking Turkey block. Isn’t he a handsome fellow????

Now that you’ve seen how yummy this block turned out, let’s get started on the tutorial!

Talking Turkey Quilt Block Tutorial

Supplies

12 assorted charm squares (5″) for the feathers/body

1 fat quarter for the background

1 fat eighth brown for the head/neck

Scrap of red for the wattle, approximately 2″ x 5″

Cutting

Background: 3 5″ squares, 1 4 1/2″ square, 3 2 1/2″ squares, 1 2 1/2″ x 12 1/2″ rectangle, 1 2 1/2″ x 8 1/2″ rectangle, 1 2 1/2″ x 4 1/2″ rectangle, 1 1 1/2″ x 4 1/2″ rectangle , and 1 1/2″ square

Red Scrap: Trim to 1 1/2″ x 4 1/2″

Brown: 1 2 1/2″ x 16 1/2″ rectangle, 1 2 1/2″ x 4 1/2″ rectangle, and 1 2 1/2″ square

Making the Block

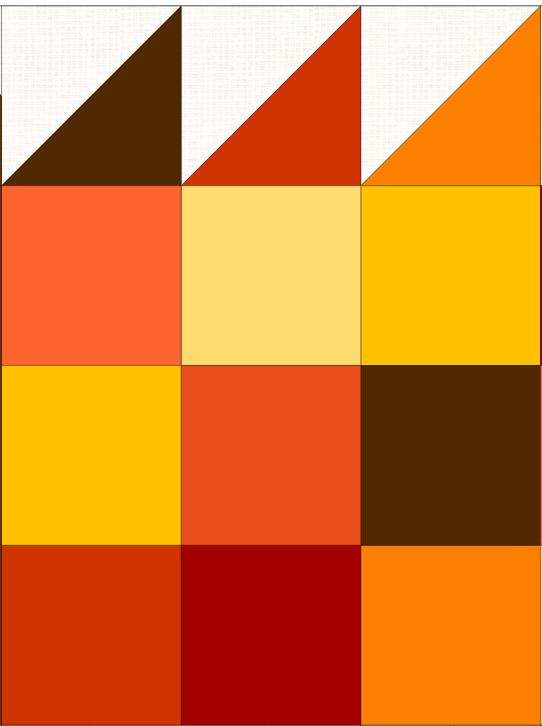
Step1. Trim 9 assorted charm squares down to 4 1/2″ and sew them together into a Nine Patch block.

Step 2. Layer a print 5″ square right sides together (RST) with a background 5″ square. Draw a diagonal line from one corner to the opposite corner. Sew 1/4″ away from both side of the drawn line. Cut apart on the drawn line. Press units open to make 2 Half Square Triangle blocks (HSTs). Repeat to make a total of 6 HSTs. Trim your HSTs to 4 1/2″ if needed.

Step 3. Sew 3 assorted HSTs together into a row with the top point to the right as shown.

Step 4. Sew the remaining 3 HSTs together with the top point to the left as shown. (You are making a mirror image of the unit in Step 3.)

Step 5. Sew the HST unit from Step 3 to the top of your Nine Patch block.

Step 6. Sew a 4 1/2″ background square to the left end of the HST unit from Step 4. Then sew the HST strip to the right side of the Nine Patch block.

Step 7. Layer a background 2 1/2″ square RST on the end of the brown 2 1/2″ x 16 1/2″ rectangle. Draw a diagonal line from the top left corner to the opposite corner. Sew on the line. Trim away the waste piece 1/4″ beyond the sewing line. Open and press.

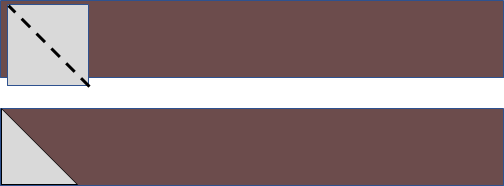
Step 8. Layer a background 2 1/2″ square on the other end of the brown 2 1/2″ x 16 1/2″ rectangle. Draw a diagonal line from the top left corner to the opposite corner. Sew on the line. Trim away the waste piece 1/4″ beyond the sewing line. Open and press.

Step 9. Layer a background 2 1/2″ square RST on the end of a brown 2 1/2″ x 4 1/2″ rectangle. Draw a diagonal line from the bottom left corner to the opposite corner. Sew on the line. Trim away the waste pieces 1 /4″ beyond the sewing line. Open and press.

Step 10. Layer a background 1 1/2″ square RST on the end of a red 1 1/2″ x 4 1/2″ rectangle. Draw a diagonal line from the bottom left corner to the opposite corner. Sew on the line. Trim away the waste pieces 1/4″ beyond the sewing line. Open and press.

Step 11. Sew a background 1 1/4″ x 4 1/2″ to the Step 10 unit. Then sew a 2 1/2″ x 8 1/2″ rectangle to the bottom of the unit as shown.

Step 12. Sew the brown unit from Step 9 to the end of the unit from Step 11.

Step 13. Layer a brown 2 1/2″ square RST on the end of a background 2 1/2″ x 4 1/2″ rectangle. Draw a diagonal line from bottom left corner to the opposite corner. Sew on the line. Trim away the waste pieces 1 /4″ beyond the sewing line. Open and press. Then sew the unit on the right end of a background 2 1/2″ x 12 1/2″ rectangle.

Step 14. Sew the units from Steps 8, 12, and 13 together to make the turkey head, wattle, and neck.

Step 15. Sew the front of the turkey from Step 14 to the back of the turkey from Step 6.

Voila! A plump and yummy Talking Turkey block for you to enjoy! Happy Thanksgiving to you!

As per our Copyright for Quilters post last week, I give you permission to use my original Talking Turkey quilt block for personal and commercial use, as long as you provide proper attribution that I am the designer of the Talking Turkey quilt block.

Add a narrow border, quilt and bind for a little wall or table quilt.

Enjoy!

Until next Thursday —

Eat. Sew. Laugh. Repeat.

Always,

Tricia @VRD

Panel Quilts · Quilting Partners · Rose Cards · Tips and Tricks · Tutorials · villa rosa designs

VRD Hillside Charm Quilt Tutorial and the NEW November Rose Card Patterns

Hello Quilty Friends!

Happy Thursday to you!

After talking about our VRD Rose Card patterns featuring quilt panels a couple weeks ago, I thought it would be fun to do a series of Panel Quilt Tutorials for you. You can find the Panel post HERE.

There’s no way I would be able to do ALL of the Rose Cards I featured in the Panel post, but I thought it would be fun to do some of my favorites. I hope these Panel Quilt tutorials will inspire you to reduce your own stash of panels by making quilts — what an unusual thing to do with fabric, right???

So let’s make Hillside Charm! I just really love this Panel pattern — it looks great with whatever panel and fabrics you use. Don’t have 5″ charm squares? Cut fat quarters, scraps, or even yardage into the number of squares you need. Want to make it bigger? Add another border? Want it smaller? Don’t add the extra border. LOVE LOVE LOVE Hillside Charm! You can buy the pattern HERE.

Right now we even have some great Hillside Charm kits for sale on the website — Halloween, Christmas and more — so check them out HERE.

Before we jump into the tutorial, I have to do a SHOUT OUT to Hoffman Fabrics and a big thank you to them for providing the fabrics for this Hillside Charm Quilt. The collection is called Wading with Water Lilies. Isn’t it beautiful? In addition to the gorgeous digitally-printed panel and coordinates, I also used some of the basics from the 1895 Watercolors collection and 885 Dot Batiks collection.

YAY! We have the panel and some of the coordinates on the website. You can find them HERE. Grab them now because when they’re gone, they’re gone!

The gorgeous panel. Just look at the amazing array of colors that digital printing can create!
These are the companion fabrics.
Here are the accents I used from 1895 and 885.

Now you’ve seen the fabrics, lets get to the tutorial!

Hillside Charm Tutorial

The first thing I did was trim the panel to the dimensions listed in the pattern. Sigh……I really hated cutting anything off this amazing panel but if I wanted to make the quilt, it had to be done. So I did it. I also cut out the squares and the strips. The pattern actually calls for a pack of charm squares, but since I didn’t have an actual charm pack, I went ahead and cut the squares I needed. I won’t have as much variety as I would have with a charm pack, but it will still be beautiful. Sometimes, less is more.

Next I sewed the side strips on to the panel. Then I sewed squares to the ends of the top and bottom strips before sewing them into the panel. It’s already taking shape. I’m really excited about this quilt — it is going to be really gorgeous!

Time to sew my charm squares into strips for the next border. I just had to make sure not to sew 2 of the same fabric side to side. Easy peasy.

Here you can see that I took the time to pin the pieced charm square strip to the framed panel. This is an important step because I don’t want my quilt to be a funny shape. Nope, I like ’em squared up as much as I can as I go along. And one of the best ways to do that is to match your centers and your ends and pin generously.

Yay! Let’s sew the pinned charm square side borders on. Sigh….I must admit I hate removing my pins as I sew and I am guilty of sewing over my pins. Mea culpa.

Here are the pieced charm square borders added to the sides. I am so excited how this quilt is coming together.

Now let’s add the top and bottom charm square pieced strips. Pin, pin, pin. Sew, sew, sew. I really like how the pieced border is giving the look of Four Patch blocks in the corners. Tricky, tricky!

More side borders to add. This time I have to be more careful with the placement of the squares so that I don’t accidentally line up 2 of the same fabric, especially since I’m not using as much variety as a charm pack would provide (although, nowadays there are lots of duplicates in a charm pack because fabric collections are a lot smaller than they used to be).

Here are my last borders — the top and bottom pieced borders. Now you can see the rectangles of the blue/green marbled fabric at each corner, mimicking the inner blue/green marbled inner border. Cool detail!

DONE!

I can’t wait to see your Hillside Charm Quilts! You can email your Hillside Charm photos me at tricia@villarosadesigns.com and I’ll share them on the blog and Facebook.

Thanks for sewing along with this tutorial. Stay tuned for another tutorial next week.

Wait! I can’t go yet without showing you the NEW November Rose Card patterns.

Check out these awesome new patterns. If you attended Quilt Market or Festival last week, you already had a sneak peak. Lucky you!

Oh look! Another Panel quilt! You can buy the November set of 5 Rose Cards HERE for $8.95.

This is my new table runner, Baskets, for this month:

You can buy the Baskets pattern HERE.

As always, shipping is free.

I hope you find a little time to get sewing because the Holidays are right around the corner and if you are like me, you have a long list of quilty gifts you want to make even though you know you’ll never get them all finished. The New November Rose Cards could help you jump start your holiday sewing! Just sayin’….

Until next Thursday —

Sew. Laugh. Repeat.

Always,

Tricia @VRD

quilt market · Rose Cards · villa rosa designs

Welcome to International Quilt Market Fall 2022!

Hello Quilty Friends!

Happy Thursday to you!

Here it is — a little peak inside International Quilt Market by moi just for you.

I remember before I attended my first Fall Market in 2010, “Market” was a term that conjured up all kinds of quilt mystique. We talked about it in hushed voices tinged with awe. What exactly was it? How did you get to go? Why was it such a mystery?

Twelve years later and although the mystery has unraveled over the years, I am still amazed by every Quilt Market I attend.

This year was different from all the others — I came to Market with a whole new purpose. In the past, I either attended Market in order to promote my latest book or as an independent designer associated with a publisher or other business. This time I came as part of the Villa Rosa Designs team and would be working at the VRD booth for the first time. I really didn’t know what to expect, but I was so excited to go. I had a lot to learn and had great teachers in Pat, our “Rose Queen”, Bonnie who manages the retail shop in California, and Leann, Pat’s daughter and the VRD computer whiz.

So what exactly is International Quilt Market?

Since 1979, the show has been the trade show for the quilting and textile industries.

Market is a wholesale trade show, open only to credentialed attendees and those in the business. Here, you’ll be able to visit more than 1,000 booths to see all kinds of products both new and familiar ranging from fabrics, book, and patterns to sewing machines, notions, and supplies. You can also learn in dozens of Take & Teach classes and Business Seminars, and take that knowledge or class skills back home to your shop or business!

From the Quilts, Inc. website.

This year’s Houston Quilt Market might not have been as big as the last pre-pandemic Houston Market in 2019, but everyone there was excited and energized to be there.

Let me take you on a little tour of Quilt Market by visiting some of the booths and vendors.

First up, of course is our Villa Rosa Designs booth!

Nice, huh? All the quilts you see hung around the walls of the booth are all cover quilts for Rose Cards of the last 6 months. Oh! The table runners were there too — draped down on the table fronts. Bright, colorful, and fun! We even had fat quarters bundles and kits.

So many great shop owners/workers, designers, and lots of other folks in the industry stopped by to see the latest patterns and catch up. Everyone was so kind and excited about our Rose Card patterns. I met a lot of super people and really enjoyed chatting and talking Villa Rosa Designs with everyone.

When the booth wasn’t too busy, we all took turns going to appointments, meeting up with contacts, and walking the floor, seeing all the other booths, and checking out displays to see what was new and trending. Of course, when we were swamped, it was all hands on deck!

News Flash!

One of the things we were really excited to share with everyone who walked into the booth was our NEW Villa Rosa Designs fabric collection with Blank Quilting. The collection is called Xanadu. Yep, like the 1970’s movie. And the collection has a wonderful 70s feel that is fresh, fun, funky, and flirty with an updated color palette. It was designed by Pat’s sister, Nancy Lorene, who does most of the art for the Villa Rosa Designs Rose Cards. There are 12 completely different fabrics in the collection. It should be shipping to your local quilt shops in April 2023.

Here it is! Isn’t it great??? My absolute favorite piece is the one that looks like paper snippets (I love them all of course, but that one really sparks my imagination).

We were even able to make up a few quilts using Xanadu samples! The real fabrics are even better than the digital images.

I checked in with some of my favorite vendors and also met some new ones this year.

One of the first places I checked out was the “Toy Department,” Graphic Expressions, where you can find all kinds of fun, useful, and quirky little goodies.

My next stop was to see my old friends, the Springers at Quilts from Mulberry Lane. I met them at my first Quilt Market and at every one I’ve attended since, I make sure to stop to shop and catch up. They always have a great selection of antique quilts and textiles. This year they even had some feed sacks, but I was already familiar with the patterns, so I shopped through their antique quilt blocks and brought a great selection home with me.

It took me a little while to find the Swan Amity booth, but after the second attempt, I found them. Boy was I glad too! They were on my to-do list for Market because I needed a new pair of machine quilting gloves. I found their gloves when I attended Market in 2019 and I never quilt without them now, but after 3 years, my gloves are starting to show some wear (see my 3 year old pair on the left in the photo below). Swan Amity gloves are a lot like a leather golf glove with touchscreen fingertips and padded palms. Love them!

I had a great time shooting the breeze with the ladies at the Mary Ellen’s Best Press booth. Devi and the gang were so much fun! I personally can’t make a quilt without Best Press. My favorite scents are Peach and Citrus. What’s your favorite?

I stopped by the Hoffman California Fabrics booth and got the chance to meet up with Sandy, who I’ve been working with on some projects lately. It was so awesome to finally meet her! That’s one of my favorite things about Quilt Market — meeting people in person, especially if you’ve only been in contact with them through email.

At Market, the fabric companies display quilt samples featuring their upcoming collections so it’s a really good opportunity to see upcoming trends in fabric colors and quilt styles. Look at these gorgeous quilts on display at Hoffman.

I checked in with my pals at Choice Fabrics, too, and introduced them to Villa Rosa Design Rose Cards. Sorry, I never did get around to taking a photo of their booth, we were too busy gabbing! LOL!

I was on the lookout for new products and other cool stuff when I walked around the show.

I met Rosanna of Rosanna Diggs Embroidery. This was her first time at Quilt Market, showing off her great embroidery kits. The kits had absolutely everything in them you needed except scissors! And the designs were just adorable. The Hexagon quilt block kit grabbed my attention on the front table, so I stopped in the booth to say hi.

I stopped to visit with the designer, Lori, of From My Heart to Your Hands, to tell her how much I love her gorgeous miniature quilt patterns. I have collected quite a few of her Fat Quarter Quilting patterns, which have 9 mini quilts in each pattern pack. I love the mix of piecing and applique, although I’m definitely a piecer and not an appliquer — I still haven’t finished my first mini applique quilt from one of her patterns from years ago. I really loved her display of the mini quilts pinned with clothespins to clotheslines. So fun and eye catching! Wish I’d thought of it!

I visited with another pattern designer, Dawn, at the Sew Cherished booth. Her wool applique was simply amazing. Wool applique is something I really admire, but haven’t done much of it yet. Someday……

A new friend I met at lunch introduced me to the ladies at the booth next to hers, Trailhead Yarns. Their threads are truly amazing and there are so many colors to choose from — even variegated! I’m thinking I might want to try some Sashiko again sometime.

Everywhere I turned there were QUILTS, QUILTS, and more QUILTS! Here are some of the great quilts I spotted at Market.

Well, that just about wraps up my visit to International Quilt Market. I hope you enjoyed seeing what I saw. My head is swimming with visions of quilts and fabrics. Time to spend some quality time with my sewing machine.

Until next Thursday —

Sew. Laugh. Repeat.

Always,

Tricia @VRD

Panel Quilts · Rose Cards · Tips and Tricks · Tutorials · villa rosa designs

VRD Hypnotized Quilt Tutorial

Hello Quilty Friends!

Happy Thursday to you!

I was so excited after last week’s post about Panels and our Villa Rosa Rose Card patterns that work for panels, I just had to play with my stuff! I decided to go ahead and get the top done for Hypnotized, using my adorable Halloween Gnomes,. Who doesn’t love gnomes???? I just had to, I didn’t want to wait until next year, although I might not get it quilted and bound until next Halloween.

If you missed last week’s Panel Post, you can find it HERE.

Here’s the Hypnotized Rose card pattern:

You can buy the Hypnotized pattern HERE.

Let’s get started with our tutorial!

The first thing you need to do is to cut out your pieces. I used this adorable Halloween Gnome novelty fabric from Northcott instead of a panel. The cool thing about quilt patterns made for panels is that you can usually substitute a novelty print as long as you cut it to the right dimensions.

YAY! GNOMIES! (That’s what my sister, Tracy, calls them.)

I did not cut the pieces for the inner and outer border out yet. I like to wait until I have the center of the quilt made because sometimes my measurements don’t exactly match the measurements given in the pattern.

If this happens to you too, don’t cut the border strips until you can measure your quilt center. That way you can cut the border strips (and piece the strips together if needed) to your specific measurements, not someone else’s.

Remember when we talked about the “perfect” quarter inch seam allowance? Go HERE if you need a refresher. There really isn’t one. Basically, everyone’s quarter inch seam is a touch different, either a bit smaller or bigger than that elusive quarter inch. Anyway, as each of us use a slightly different quarter inch seam, the dimensions of our quilts are going to be slightly different too. That makes sense, doesn’t it?

So sew with your best quarter inch seam — accuracy is more important than a perfect quarter inch seam in most cases — and measure your quilt before you cut the borders.

Let’s keep moving!

After you’ve cut your pieces, sew strips to the sides of the small square. Then sew strips to the top and the bottom.

You know, I photographed every step of this process, but for some reason all my photos are not on my iPad. Methinks my cat Griffin might have deleted photos when he was painting on his iPad cat painting app.

A cat that paints? No, that’s not strange at all……. What’s strange is that he scratches at my iPad (covered with a protective screen cover) and gets out of his painting game and into other apps somehow. Kids….

Anyway, sew strips to the sides of this block and then add the strips to the top and bottom. Voila! This is your center square. Make 1. (Sorry for the EQ images, but the photos are gone!) Silly Griffy!

Now sew strips to the side of your other 8 squares. Then add the longer strips to the top and the bottom. Make 8.

Here are all my blocks ready to go. Aren’t they fun???

Wow! This quilt is coming together fast. Now to add some background rectangles to our quilt blocks.

Sew a background rectangle to the top of a Framed block. Make 3.

Please Note:  If your fabric is not directional, you can skip adding background rectangles to various sides of the Framed square blocks.  Instead, sew background rectangles to one side of each of the 8 Framed square blocks.

Sew a background rectangle to the bottom of a Framed block. Make 3. (Sorry, these photos are gone, too.) Argh….Griffin…….

Now sew a background rectangle to the left side of a Framed block. Make 1.

Lastly, sew a background rectangle to the right side of a Framed block. Make 1.

Whew! That was a little confusing, I know, but now we get to put things together!

Sew 2 top facing background rectangle units with a bottom facing background rectangle unit in the center. Then sew a long background rectangle to each end of the row. Make 1 row.

Make the bottom row pretty much the same as the top row, above, but reversed — sew 2 bottom facing background rectangle unit with a top facing background rectangle unit in the center. Then sew large background rectangles to the ends of the row. Make 1 row.

Now for the middle row — sew a right facing background rectangle unit, the single center block, and a left facing background rectangle unit at the end. Make 1 row.

Next sew the 3 rows together.

Isn’t this quilt top adorable so far? The orange frame in the center block really pops, don’t you think? Can’t wait to get the borders on next!

Now sew the inner border strips to the sides of the quilt center. You’ll probably have to piece the strips so they’re long enough. Add the top and bottom inner border strips, piecing them too.

Almost there! It’s time to add outer border strips to the sides — piece those border strips carefully, please. Finally! Our last step for the top — sew on the top and bottom borders, piecing your strips.

Houston….we have a problem!

I just discovered I don’t have enough border print fabric to sew borders on all 4 sides of the quilt.

Whatever can I do???

Why, just add borders to the top and bottom of the quilt! Good solution on the fly. That’s how I roll.

Yay! Mission accomplished — adorable Halloween Gnomies quilt top completed before Halloween! (Sorry the photos of the quilt as it gets put together aren’t very good — I am limited on space for working with larger quilts, so here I’m hanging the quilt top on a clothesline strung in the basement. Hey, we do what we have to do, right?)

What do you think?

As I write this post, I’m crazily packing my stuff to head to International Quilt Market in Houston, TX. I haven’t been to Market since 2019 — before the Pandemic. I’m really excited as this will be my first time being part of the Villa Rosa team.

If you’re headed to Market, stop by the booth, we are Booth #747, right behind the center Info booth on the main walkway. VRD is also doing 2 Schoolhouse lectures on Friday, Oct 28th. If you’re headed to Quilt Festival, Villa Rosa Designs will have a booth there, too. We’d love to say “hi.”

Sigh….Back to my packing.

Stay tuned — next week’s post will be all about my Quilt Market trip. The sights, the sounds, the food….

Until next Thursday —

Sew. Laugh. Repeat.

Always,

Tricia @VRD

Panel Quilts · Quilt Play · Rose Cards · villa rosa designs

What Can I Do with a Quilt Panel?

Hello Quilty Friends!

Happy Thursday to you!

After our 8 week Basic Quilting Skills for Beginners series, I find I’m ready for something new. How about you???

I thought it would be fun to talk about quilt panels and what quilts you can make with them. I must admit that I have a big stash of quilt panels. I know that admitting you have an addiction is the first step to recovery, right?

SHHHHH! My super secret stash of panels!

I’ve collected panels for a long time, but I rarely seem to use them or make anything out of them. Sure, I’ve slapped borders around some of them and whipped up a quick baby quilt or simple wall hanging, but does that really count? When I taught free motion quilting classes in the past, I even used a panel as a project so students would actually be quilting a “real” quilt, but not something they’d worked on for hours and hours.

If the quilt police showed up at my front door and asked me about my fabric stash and all my panels, I would say: Who me?? I have no idea where these panels and all this fabric came from. I think fabric is like rabbits and multiplies when you’re not looking. That makes sense, doesn’t it? But would it work?

Well, I’m hear to tell you that Villa Rosa Designs has a lot of GREAT patterns specifically for quilt panels — for vertically printed panels, horizontal panels, and even panels with printed “quilt squares.” Yay! Villa Rosa to your rescue — and mine, too!

Let’s take a look at some of the panel quilt Rose Card patterns. You can find ALL of these patterns on the website, www.villarosadesigns.com

Vertical panels seem to be the most common type of quilt panel and we have quite a few Rose Card patterns to choose from.

One of my absolute favorite Rose card patterns for vertical panels is Hillside Charm! I know I’ve mentioned this one before, but it is an awesome pattern and I have to show it off again! You’ll probably read about it later in the future too. Sorry, not sorry.

You can buy the Hillside Charm Rose card HERE

Isn’t this just the coolest pattern? Aren’t you already mentally going through your panel stash to see what you can use for Hillside Charm? I know I am….

Another one of my favorites is Daring Spirit — the perfect quilt for a Quilt of Valor as long as you add a narrow border around it to meet the minimum width requirement for a Quilt of Valor. You can check out my Daring Spirit tutorial HERE and my Quilts of Valor presentation post HERE.

You can buy Daring Spirit HERE

Take a look at these terrific Rose Card patterns for vertical panels. Grab ’em while they’re hot!

Did you know Villa Rosa has Rose Card patterns for horizontal panels, too? This is awesome because patterns for horizontal printed panels can be hard to find!

October Sky is one of our most popular patterns. I bet you can see why! The really cool thing is that the top and bottom star sections are made with half square triangles, which go together like a snap when you take a little extra care to place your colors correctly.

Shh! Don’t tell anyone and when you make your October Sky quilt, everyone will be in awe at seeing your amazing quilting skills. I can’t wait to make one of these for myself.

You can buy October Sky HERE

Here are some more Rose Card patterns for horizontal panels. Nice!

We even have Rose Card patterns for quilt panels with printed blocks or squares!

Hypnotized is one of our new Rose Cards this year. I just love the look of this quilt — it looks difficult to make, but I know it won’t be because it’s a Rose Card pattern.

You can buy Hypnotized HERE

I’m all set to make Hypnotized. The only problem is that by the time I get to my project, it will be too late for Halloween this year so I guess I’ll have to say it’s early for next year.

Here’s my fabric for the Hypnotized Rose Card pattern — don’t you love it??? Instead of panel squares, though, I’m going to cut the squares from the gnome print and I’m going to use the stripe for my border. You’ll have to stay tuned for this quilt coming soon, or at least some time before Halloween 2023. LOL!

Yay! More Rose Card patterns for panels with printed squares/blocks. Of course, you can always substitute squares of any novelty fabric you love in these patterns, which makes them very versatile.

BUT WAIT THERE’S MORE!

I think you know me by now (and how much I like saying that phrase), so of course there’s more.

You know those really big panels that measure roughly 36″ x 42″? Well, we even have a couple patterns for these big panels, too.

You can buy Nebula HERE
You can buy Puppy Love HERE

And if you know anything about Villa Rosa Designs, you can bet we’ll be adding new patterns for panels in the future. In fact, I have a few ideas of my own.

That’s it for today. I’m off to play with my panels.

Until next Thursday —

Sew. Laugh. Repeat.

Always,

Tricia @VRD

Basic Quilting Skills Series · Rose Cards · Tips and Tricks · Tutorials · villa rosa designs

Basic Quilting Skills for Beginners: Squaring Up Your Quilt

Hello Quilty Friends!

Happy Thursday to you!

First, I want to give each of you a great big THANK YOU hug!

Thank you for reading our Villa Rosa Designs quilt blog, Villa Rosa Quilts. This past week, the number of views has exploded and we’ve added new followers, too. And it’s all because of you, our VRD fans and followers. We are thrilled that you find our blog to be informative, fun, and worthwhile.

Did you know you can follow our blog and never miss a Thursday Post? All you need to do is type in your email address and click the subscribe button just to the right of the blog post towards the top and you’ll get each new post delivered right to your email inbox every Thursday!

Now let’s hop right into this week’s Basic Quilting Skills for Beginners post — Squaring Up.

You cut, you sewed, you quilted, and now it’s time to square up your quilt. I was planning to do both Squaring Up and Binding in this post, but I decided it would probably be better to separate the two topics, otherwise the post was going to be too long, too wordy, and probably too boring and we can’t have that.

Forgive me, but you’ll have to wait until next week for Binding.

Squaring Up

Before you can do the binding, you first must square up your quilt.

Why should I square up my quilt? Can’t I just slap on the binding and be done?

That’s a good question — sure, you could just slap on the binding, but you probably wouldn’t be satisfied with the results. Things can get distorted as you handle your quilt, press (or maybe you iron), quilt it, tug, pull, crumple it up and throw it on the floor — well, you get the picture. Think of squaring up like pre-binding.

My quilt “volunteer” today is a new Halloween version of my Ice Jam VRD pattern. I made this runner a couple months ago as a sample project in my 2022 Villa Rosa Rose Card Table Runner a Month class, but never finished it.

BIG SHOUT OUT to all my awesome class buddies — Mary Lee, Sherry, Missi, Debbie, Anita, Robin, Kim, Gaynel, Jean, Donna and Gayle (the owner of my local shop, Homespun Treasures, where my class meets). Homespun Treasures, of course, has lots of Rose Card patterns in stock. Just sayin’….

Here’s the Ice Jam Rose Card pattern. It’s a super fast and fun table runner which measures 18″ x 54″ and uses 5″ charm squares. It’s a very versatile pattern and will look great in any style or theme. So, try it out.

Here’s the pattern cover with the original wintery blues.

What!?! You don’t have the pattern? You can order it HERE.

Just a quick note about the machine quilting. If you missed our Quilt As Desired post last week, you can find it HERE. I added my wiggly lines free motion quilting video to last week’s post and I just wanted to point out my fun wiggly squiggly lines on this table runner.

Okay, okay……let’s get back to squaring up.

You might want to press your quilt before squaring it up. Pressing your quilt will help everything lay nice and flat.

Next lay your quilt out on your cutting mat, centering one corner of the quilt on the mat because we will square up the corners before cutting the sides. If you are working on a large quilt, it helps to support the weight of the quilt on a table or chair. The problem with larger quilts is that if the quilt is hanging off your cutting mat/table and down to the floor, the weight of the quilt can pull things out of whack . Oops! Gravity works. Now if you lived on the moon, you wouldn’t have to worry about this issue…. (wink, wink)

Use the biggest square ruler you have for cutting your quilt corners, the bigger the ruler, the easier it is to square up your corners. I personally love my 12 1/2″ square for working with table runners and smaller quilts, but I also have 15″ and 18″ square rulers to use for larger quilts.

Once you’ve smoothed your quilt out flat, lay your square ruler down on a corner of your quilt. Adjust the square as needed to make the corner 90 degrees, sliding a little this way and that way until it’s square.

Don’t worry if batting, backing, and even slivers of your top are beyond the edges of the ruler. If you see too much of the front of the quilt beyond your ruler edge, though, wiggle the ruler around some more until there is very little of the quilt top showing beyond the ruler. You don’t want to cut much from your quilt edges, especially if you have triangles all the way to the edge of the quilt because you will probably cut off your triangle points and that will not make you very happy.

Take your time here because once you cut, you can’t go back. Hold the ruler down with one hand using good solid pressure — be careful not to shift the ruler – and cut on the 2 outer sides of the ruler, thus making this corner square.

Let’s move on to the next corner. Line up the ruler, adjust it gently for another nice square corner, then cut. Repeat for corners 3 and 4. Yep — you’re going to have weird strips of batting/backing hanging off your quilt. That’s okay. We’ll take care of that in the next step. In the meantime, think of it like quilt spaghetti.

Now it’s time to position the quilt on the cutting mat so we can cut the long edges and remove all that quilt spaghetti. I use my 6″ x 24″ ruler for this part. Again, if you’re working on a big quilt, support the weight so the quilt doesn’t slide off your mat/table or skew your cutting.

Please be patient and take your time with your squaring up (I know it’s hard but trust me — I have the attention span of a four year old, so if I can do it, you can do it) because if you don’t square up properly during this step, your quilt will never be square, no matter how much you tug and pull later down the road. Wonky quilts don’t lay well on tables or beds nor do they look nice hung up on walls.

Start at one nicely squared up corner and line up the long ruler. Again, don’t worry if you see bits of your quilt top sticking out beyond the ruler edge as that is completely okay and to be expected. Once things are lined up to your satisfaction, cut with your rotary cutter along the ruler edge, stopping before you reach the end of the ruler so you don’t accidentally cut into your quilt. Gently slide the ruler across the quilt edge so you don’t distort your nice straight edge or your square corner. Make sure that the ruler is still lined up with your fresh cut quilt edge. Cut again. Continue doing this until you can line up your ruler from your freshly cut edge to your next squared up corner and cut. Yay you! Only 3 more sides to go.

Go ahead and repeat for the other 3 sides. Luckily with a table runner, I usually only have to cut the 2 long sides this way as the short sides get squared up when I use my 12 1/2″ square ruler for the corners. Not so lucky with big quilts — sometimes it’s like wrestling an octopus, but keep at it, you will be the winner.

Here it is! My squared up quilt. Yay!

Ice Jam runner in Halloween fabrics

Let’s do a quick check to make sure things are all square before we move on.

Fold your quilt in half, lining up the edges and corners as best as you can, use a few straight pins if you need to. If things are nice and square, everything should line up pretty well (there really is no such thing as perfect, so if things aren’t 100% exact, that’s okay). If corners or edges are not lined up, then you need to check the squareness of your corners with your large square ruler again and make any necessary minute adjustments to square up those corners. Then check the long sides again using your long ruler to make sure things are nice and straight, only cutting away slivers of quilt to make things more square and straight.

Fold your quilt again, lining up corners and edges, to check your squareness. Repeat until things are as square and straight as you can get them.

Well, I think that’s it for today. Next week I promise we will attack the Binding in our Basic Quilting Skills for Beginners series.

Quilt on, my friends, quilt on.

Until next Thursday —

Sew. Laugh. Repeat.

Always,

Tricia @VRD

Basic Quilting Skills Series · Rose Cards · Tips and Tricks · villa rosa designs

NEW September 2022 Villa Rosa Designs Rose Card Quilt Patterns and Basic Quilting Skills for Beginners: Pressing Techniques 101

Hello Quilty Friends!

Happy Thursday to you!

I am thrilled to show you our NEW September Rose Card patterns! I can’t wait until the first Fry-Day (Friday) of each month when the new set of patterns is released — it’s always great to see what our awesome VRD designers have come up with. You can see the new patterns first if you have joined the email list to receive our VRD email newsletters.

What??!! You don’t get our newsletter??? You can sign up for our newsletter HERE.

Of course, I follow up with the newest patterns on the next Thursday after the patterns are released each month here on the blog in case you missed them in the newsletter.

Well, here they are! Cue the trumpets! Throw the confetti! Applause!

September’s NEW Rose Cards

You can order all 5 cards HERE for the low low price of $8.95.

But WAIT…….there’s MORE! (Sorry, not sorry — you know how much I love saying this.)

Here’s my September table runner, Maple Grove!

Maple Grove

You can buy the Maple Grove pattern HERE.

There are also kits for some of the September Rose Cards — did someone say KITS??? Each kit comes with the fabric for the top and binding as well as the pattern. You can find kits below, for as long as they last.

Berry Smoothie

Mazed

Pumpkin Pie

Of course, our website, www.villarosadesigns.com, is always stocked with great kits. You can see our current kit offerings HERE. You’re sure to find one…..or maybe a hundred that you can’t live without.

Pressing Techniques

Let’s dive right back into our Basic Quilting Skills for Beginners with Pressing Techniques 101.

I bet you never really thought about the concept that there are different kinds of pressing techniques for different types of projects. Well, I’m here to tell you that how you use an iron for quilting is different than how you use an iron to iron your shirts or pants.

There’s ironing. And then there’s pressing.

According to the Merriam-Webster Dictionary:

(to) iron

1a : to smooth with or as if with a heated iron iron a shirt

1b : to remove (something, such as wrinkles) by ironing

(to) press

5 : to exert pressure (this is the closest definition for pressing with an iron I could find)

You can see a little difference between the two definitions, can’t you? Ironing requires moving the iron around while pressing is more of an up and down motion.

I found this pretty decent YouTube video from Hobby Lobby about the difference between pressing and ironing along with some tips. You can check out the video HERE.

Over the years, I’ve tried a lot of different irons from cheap travel models to expensive specialty irons. Some irons are hotter than others. Some have more weight so you don’t have to press down as hard. Some have longer cords or are larger models. Some have continuous steam or bursts of steam. So many choices, but it all depends on what you want out of your iron and what your budget is. So look around, test out different models and brands. Find the one you like the best, for what you want to do, don’t just go for the most expensive or the least expensive.

Pink Oliso Iron

One of the coolest irons in my opinion is the Oliso iron. It lifts up after so many seconds so there’s no chance that you will burn your fabric or project by pressing too long or forgetting about the iron in the down position. AND they come in a bunch of really pretty colors! You can usually find Oliso irons at your local quilt shop or your favorite online vendor.

Here’s a great YouTube video by SewVeryEasy about what to look for in an iron as well as lots of tips and tricks. You can check out the video HERE.

Some quilters swear by using the steam function of their iron for pressing. Me, I like a dry hot iron for quilting AND I love to use Mary Ellen’s Best Press Starch Alternative. A long time ago, I used spray starch in the can, but got tired of the little flakes and the shiny spots on my fabrics, so when I found Best Press, it was a total game changer for me.

Mary Ellen’s Best Press Spray

A little spritz is all you need. Best Press helps me to get crisper flatter seams without having to work very hard, which then helps my quilt fabrics to stay square and not to stretch out of shape. An added bonus is that Best Press comes in many fun scents and also comes in unscented, too. My personal favorite scent is Peaches and Cream. You can find Best Press at your local quilt shop or favorite online vendor.

I hope these pressing techniques and tips are helpful! Stay tuned for next week’s post all about batting, backing, and preparing a quilt for quilting.

Until next Thursday —

Sew. Laugh. Repeat.

Always,

Tricia @VRD

Basic Quilting Skills Series · Rose Cards · Tips and Tricks · Tutorials · villa rosa designs

Basic Quilting Skills for Beginners: Rotary Cutting 101

Hello Quilty Friends!

Happy Thursday to you!

I hope you had a chance to read our first post in a multi-part series called “Basic Quilting Skills for Beginners.” Last week’s post was all about the quilter’s 1/4″ seam allowance. Did you miss it? You can find it HERE. This week we’re going to talk about the Basics of Rotary Cutting.

First, let’s talk a little about the history of rotary cutting — YES! There is a history of rotary cutting (there is a history of everything, if you’re interested enough to find it). The rotary cutter was invented in 1979. Originally it was used in the garment industry, but once quilters saw its potential to speed up cutting and increase accuracy, they stole it and by the early 1980’s. the rotary cutter was all the rage. Before the rotary cutter, quilters made templates for each piece of a quilt, traced around the shape over and over, and then cut the shapes out using scissors. With rotary cutters came acrylic rulers and templates and of course self-healing cutting mats.

Here’s a cardboard triangle that was used by a friend of mine to cut out hundreds if not thousands of triangles.

Rotary Cutting Tools

When I first started quilting back in 1996, I started with a beginner’s quilting set which included an 18″ x 24″ mat, a 45mm rotary cutter, and a 6″ x 24″ acrylic ruler. These tools worked great for me until I started working part-time in a quilt shop and had the opportunity to try out different cutters and rulers. When I discovered the yellow Olfa ergonomic cutter, below, I was in love (believe it or not, but this is actually my original Olfa and I’ve been using it for around 20 years)!

Keep in mind you might need to try out different rotary cutters until you find the one that fits you and is the most comfortable. What works for a right-handed quilter might not be the best choice for a lefty and vice versa. You want it to be comfortable because you’ll be spending a lot of quality time with your rotary cutter (and don’t forget, you will need to change your rotary cutting blade regularly, just like your sewing machine needle).

Rotary cutting basic set

Some different examples of rotary cutters

These basic tools worked for me for a quite a while, but over time as my skills grew, I began adding more rulers. And I upgraded to a larger mat — I really like my 24″ x 36″, which fits the top of my antique Hoosier cabinet bottom beautifully (and the storage is outstanding, of course). I also have a rotating mat as well as some smaller mats for working with smaller cutting projects or projects on the go. Even though I’ve tried out lots of different tools and made some changes, I’m still just as in love with my Olfa cutter (above, left) as I was the first time I used it.

Here’s my stash of rulers — well, some of my stash of rulers, anyway…….

Nowadays there are so many ruler choices. Two of my favorites are the 6″ x 12″ ruler and the 12 1/2″ square ruler. A 6″ x 12″ ruler is a great companion to the 6″ x 24″ because sometimes you just don’t want to mess with that full 24″ length, especially if you’re working in a tight space or cutting small pieces. The 12 1/2″ ruler just makes sense — it will square up blocks and cut squares up to 12 1/2″ square.

As you go along and your skills increase, you’ll probably add lots of rulers and acrylic templates, too. Some of those rulers will do a lot of different things (why they can’t do the dishes, though, is beyond me….) while others will do one thing and do it well.

There are lots of different companies out there making rulers today. Keep in mind, though, that not all rulers are created equal. Measurements might be slightly different between different manufacturers. The markings of one ruler might be easier to see on light fabrics while another might show up better on dark fabrics. Some rulers have textured bottoms so they don’t slide while others are as slippery as a Slip and Slide (you might need to add some textured dots to the back of a slippery ruler to help hold it in place while you cut — see the third photo, above). You will need to try different rulers to find the ones you like the best. And once you find a manufacturer you like, stick with that one.

Rule of Thumb: Finish a project with the same ruler(s) you started the project with.

Why? Because as I stated earlier, not all rulers are created equal. Switching rulers midstream could affect the accuracy of your project. Imagine this — you’re making a quilt that has thirty-five 12″ (finished) blocks with 5 blocks across by 7 blocks down. You cut out part of the quilt with one ruler and then switch to a different ruler made by a different manufacturer and you keep cutting out your squares and triangles. Then you go to sew them together and suddenly not everything fits together exactly right — you’re cutting off some triangle points while others are perfect. You check your 1/4″ seam allowance. Huh…..that’s not it. Then you check a few of your cut pieces. Depending on which ruler you are using ( the first one, the second one, or even an altogether different ruler), your pieces might be exactly the right size, too big, or too small. You can see how this snowball is rolling downhill and getting bigger and bigger, can’t you?

Here’s our beautiful quilt, which won’t be so beautiful if we don’t figure out what is happening and find a way to fix it ASAP. If you keep plowing ahead without figuring things out, your blocks might end up being different sizes, which will then make it hard to sew the blocks together into rows and the rows together into the finished quilt top. If your blocks are only 1/8″ different, that will add up across and down your quilt. By the time you sew all the rows together, your quilt is off across the width by 5/8″, which is more than a half inch while the length is now off by 7/8″, which is nearly an inch! And if you’re adding borders — well, I don’t even want to think about how those borders might stand up and wave back at you….

Accuracy……Accuracy…..Accuracy.

Consistency…….Consistency………Consistency.

There is so much to remember when you are a beginner! But I promise you, if you take the time to learn the basics, they will become part of you. Like the Force.

How do you actually cut with a rotary cutter???

Since I am not physically by your side to guide you in rotary cutting skills, I am not going to try to teach you how to actually cut with your rotary cutter. Instead, I will give you some tips that I have learned over the years.

  • If you are new to rotary cutting and do not have an experienced quilter to help you learn how to use it, sign up for a class on rotary cutting. Maybe it’s at your local quilt shop or maybe it’s online. But sign up and learn how to be safe and how to cut accurately.
  • KEEP YOUR FINGERS OUT OF THE WAY OF THE BLADE! This means, you have to pay attention to what you are doing. ALWAYS. Keep your fingers of your non-cutting hand back away from the edge of the ruler as you cut. There are rulers out there with special raised edges to keep your fingers safe. There are special gloves you can get to put on your non cutting hand to keep your hand safe. Use them if needed, there is no shame in keeping yourself safe. Ask my Mom about rotary cutting safety and she’ll tell you how she spent Mother’s Day one year in the emergency room with me when I had a bit of a rotary cutting accident……Don’t worry, I was okay……
  • DO NOT GET DISTRACTED WHEN YOU ARE HOLDING A ROTARY CUTTER IN YOUR HAND. Do not look up to watch an exciting part of the TV program or movie. In fact, it’s safer not to have the distraction of the TV while you are cutting. Ignore the telephone or dings and pings that tells you there is a new email or text message or whatever.
  • If you get a drop of blood on your fabric, spit on the spot and rub it. Spit and rub. Trust me. The blood will come out. Gross, I know, but it works. Your saliva will break down your blood on fabric. Your saliva will not break down someone else’s blood, though, only your own.
  • If you do cut yourself, apply pressure to the wound. Hold the wound above the level of your heart. Seek medical help immediately if needed.
  • Hold your rotary cutter straight up and down on the cutting mat and snug up against the edge of your ruler. Press down with enough force to move the blade, but keep it upright.
  • If you are pressing too hard and your cuts are not clean, it’s probably time to change your rotary blade.
  • Always keep extra blades on hand — store them safely. You never know when you will need to change your blade — they nick easily.
  • Change your blade regularly — a dull blade is more dangerous. If you are struggling to get through the layers cleanly, you might slip and cut yourself.
  • Dispose of your blades responsibly — do not just throw them in the trash. You could wrap it in cardboard and tape it up before throwing it away. You could use a large pill bottle or small container to collect used blades as well as broken and bent pins. It will take you a long time to fill it up. Then you can find a safe place to discard it.
  • Keep children and pets away when you are using your rotary cutter. Store your rotary cutter away from children and pets.
  • Keep the blade locked or in the down position when you are not using it.
  • DO NOT lay your rotary cutter down with the blade open or exposed, always close or cover your blade when you lay it down. An unattended exposed blade is an accident waiting to happen.
  • I find that I cut more easily and more accurately when I am standing versus when I am sitting.
  • Always cut on a rotary cutting mat. Otherwise, whatever you are cutting on top of will be damaged and most likely ruined.
  • If your table is too low for comfortable rotary cutting, raise it up on bed risers, PVC pipes, or whatever works safely.

I know this post is just the tip of the iceberg concerning the basics of rotary cutting. There is an entire body of information out there, you just have to look for it. Check out your favorite quilting books and magazines, your local quilt shops and quilt guilds/organizations, as well as online tutorials, blogs, posts, videos, and more.

Next week, we will talk about Pressing Techniques and the new September Rose Cards. So, stay tuned.

May the Force — the Rotary Cutting Force, that is — be with you.

Until next Thursday —

Sew. Laugh. Repeat.

Always,

Tricia @VRD

Quilt Stories · Rose Cards · villa rosa designs

A Quilts of Valor (QOV, QOVF) Presentation

Hello Quilty Friends!

Happy Thursday to you!

I hope your week is going well and you’ve found a few moments to quilt during the hustle and bustle of the end of summer and back to school. I remember those endless days of school shopping — new shoes, clothes, school supplies, etc., etc…. Sadly, there are no more kiddos in my family — my nieces Meghan and Morgan are all grown up. Yet, for some reason I still cannot resist grabbing up extra pens, pencils, tablets, and other supplies. Maybe I miss those days, or maybe in my own mind, I’m still a student.

Last weekend after lots of hard work, we had my Mom’s annual family reunion at our local fire hall. She and my Aunt Helen worked really hard to get it organized. And even though we were all worried about how many folks would be able to make it, the reunion came together and there was a great turn out with cousins coming from as far away as California to our little corner of Pennsylvania.

This year’s reunion was a special one for me — I had organized a Quilts of Valor presentation with my local QOV organization, PA Stitchers of Valor. Collene Munn, who is the force behind our local organization, came to my family reunion along with volunteer husband and wife, Jason and Linda. With their help, we celebrated and honored 4 veterans in our family — my cousins Lisa, Michael, Ron Sr., and Ron Jr. My Dad, my sister Tracy, and I helped with the presentation while my niece Morgan was my photographer.

If you’ve never seen a Quilts of Valor presentation, then you truly have missed witnessing something very special. It’s common for tears to flow and hugs to be shared. Sometimes it’s the first time that family members even get to hear what their veteran or service member actually did during their service. Sometimes the presentation is the moment when a veteran can finally talk about what they might have experienced. Perhaps this is the first time a veteran has actually been thanked for their service. The actual presentation might only last an hour, but the significance of receiving a Quilts of Valor could last a lifetime.

I am very proud to share that I personally made 3 out of the 4 quilts presented. You might recognize 2 of the quilts because they are Villa Rosa Designs Rose Card patterns. The 3rd one I made will be a new Rose Card which will be available soon. I would have made the 4th quilt, but I just ran out of time, so the 4th quilt was made and donated by QOV volunteers.

Allow me to share photos from our family Quilts of Valor presentation.

Each veteran was called up individually while Collene shared a short description of their service. And while each veteran was called up, the veteran’s quilt was displayed behind them usually by a family member and a volunteer. Here, you can see my cousin Lisa with her quilt displayed behind her. This quilt you will see again soon as a new Rose Card pattern called Gallant.

My cousin Michael (Lisa’s big brother) was called up next. His quilt is the Rose Card pattern, Salute, which is one of my patterns. You can buy the Salute Rose Card pattern HERE.

My cousin Ron Sr. was next. You will recognize his quilt as the VRD Rose Card pattern, Daring Spirit. In fact, this is the same quilt from the Daring Spirit tutorial I wrote for the blog a few weeks ago. I am notorious for combining different things into the same project to maximize my time. You can find the Daring Spirit tutorial HERE. You can buy the Daring Spirit Rose Card pattern HERE.

And our final recipient was my cousin, Ron Jr., who is Ron Sr.’s son. This beautiful scrap quilt was made and donated by QOV volunteers. Are you interested in making a quilt to donate to QOV? Or perhaps getting involved in another way? You can visit their website for more information: www.QOVF.org.

Once all the recipients were seated, then it was time to wrap each veteran in their quilt with a quilter’s hug. 2 people hugged each veteran — one a family member and one a quilter as they wrapped the quilt around the veteran. This was an incredibly emotional moment.

At the end of the presentation, each veteran received a certificate and a pillowcase.

Then there were lots of hugs and hand-shaking. What an amazing event to share at my family reunion this year! I know that there are more veterans and service members in the family, so I hope we can do this again next year.

I encourage each and every one of you to connect with the veterans and service members in your family and community. Nominate them to your local Quilts of Valor organization. Make and donate quilts. Volunteer. And above all, go to QOV presentations in your community to support local veterans and service members.

Visit www.qovf.org for more information and to get involved.

Well, that’s it for this week.

Until next Thursday —

Sew. Laugh. Repeat.

Always,

Tricia @VRD

Quilt Play · Rose Cards · villa rosa designs

Flowers, Electric Quilt, and NEW Villa Rosa Designs Rose Card Quilt Patterns

Hello Quilty Friends!

Happy Thursday to you!

I hope you are all having a great week so far! Me, it’s been a bit rocky in my basement studio/office, which I fondly call my “dungeon.” After a really dry July, early August has been really wet. And I mean wet!

In 5 days, water has rolled into my studio casement window THREE TIMES! In 5 days! I have spent most of my time emptying the dehumidifier, moving fans around, washing-drying-rewashing-drying again all the blankets we’ve been able to find for soaking up the water. ARGH! Luckily, the water didn’t completely flood my space, it only got about halfway across the room, almost to my computer desk. It’s been kind of stressful here. I shouldn’t be complaining because others are faring much worse than I am, but it’s been a lot of work to stay on top of the water once the deluges hit. Talking to my family, we don’t think this much flooding in the basement has happened in 20 years. What a fluke (I hope).

Now let’s turn our thoughts to something really fun and seasonal. Sadly, our container garden and other plants did not grow much during the super dry month of July, but all of a sudden everything is growing by leaps and bounds, although the marigolds don’t look so happy.

We planted our garden and plants a bit late this year and now that things are finally growing like crazy, I just hope that they’ll have enough time to bear fruit (or veggies). I would really like some fresh produce that I grew myself on the back porch! Yum yum yummy!

Speaking of flowers and plants, I’m particularly proud of my Black-Eyed Susans, which is one of my all-time favorite flowers, along with Sunflowers and Daisies. I wonder……how many Black-Eyed Susan, Sunflower, and Daisy quilt blocks are there in Electric Quilt 8. Any guesses? Hmm. I haven’t checked yet, so I think I’ll guess 35 total. So let’s see! Hang on, I’ll be right back. Let me check.

I found 6 Black-Eyed/Brown-Eyed Susan quilt blocks. Not too shabby!

Next I counted 34 Sunflower blocks. Nice!

And then I discovered at least 40 Daisy blocks. Way cool!

Well, my guess was a bit low. How about your guess?

Sew, let’s have some fun and play with flower blocks a little bit!

Here are some really fun quilts with Black-eyed Susan blocks. EQ8 ROCKS!

Check out these awesome Sunflower quilts — are you inspired yet???

Now, how about a trio of Daisy quilts?

WOW! I really love love love EQ8 — it is sew sew fun just to explore different blocks and make quilts on the computer screen, whether I ever make them into real quilts or not!

Aren’t you inspired to make your own flower quilt now? I challenge you to create a quilt featuring your favorite flower! I dare you!

I’d love to revisit flower quilts down the road and include the quilts of our VRD fans. Sew, please send me your flower quilts — er, a photo of your flower quilt along with a short description/story of your quilt. If I choose your quilt and story for the blog, I promise I’ll send you a little surprise in the mail! You can email your flower quilt images to me at tricia@villarosaquilts.com.

NEW AUGUST VILLA ROSA DESIGNS ROSE CARDS

Yay! It’s that time of the month again — no, not THAT time of the month. LOL! It’s the beginning of a new month and that means a NEW collection of Villa Rosa Rose Cards!

Here they are — our new August Rose Cards!

You can order the August set of 5 Rose Cards HERE. Go ahead, I know you want to.

But wait — there’s more! Tehehe.

Here’s my NEW August Table Runner, Slice of Summer.

Cute, huh? You can get your own Slice of Summer Rose Card HERE.

Sew, there you have it — our awesome new August patterns! Can’t wait to see what new patterns next month will bring…….

Until next Thursday —

Sew. Laugh. Repeat.

Always,

Tricia @VRD