Huh! It just occurred to me that our weekly Thursday blog post will happen on Thanksgiving Day!
I was planning to return to my Panel Quilt series, but then I thought it would be fun to design a little project just for Y-O-U as a Thanksgiving gift, because we here at Villa Rosa Designs couldn’t exist without the loyal support of you, our enthusiastic VRD fans and supporters. We are sew thankful for you.
What are your traditions for Thanksgiving? Do you cook a big family meal? Go out for Thanksgiving dinner? Watch football? Attend or watch the Macy’s Thanksgiving Day Parade? Do you celebrate alone or with a big boisterous family? Do you celebrate at someone else’s home or does everyone come to yours? Do you get a head start on your holiday shopping?
Thanksgiving is generally a small quiet affair with my family. Sometimes we cook and eat in, but in the past we’ve gone out, too. Usually there are just three of us but occasionally my sister and her family will stop by later for pumpkin pie. Depending on which teams are playing football on Thanksgiving, I usually find a little time to get some quilting in while my family is cheering on their team.
My favorite Thanksgiving holidays have been spent at my Aunt Helen’s house with my many cousins and their families. My Aunt’s house is usually bursting at the seams with people and dogs. Squabbling, laughter, enough amazing food to feed an army, and lots of good conversation and memories. Football on the television in the living room. Sometimes cards or board games after dinner at the kitchen table. Good times and new memories in the making.
All of these warm fuzzy feelings and memories made me want to design a special Turkey Quilt Block as a way to say “Thank You” to all of you! I was inspired by Lori Holt’s Tom Turkey Quilt Block tutorial, but I created my own turkey block, based on a humble Nine Patch because I wanted my Talking Turkey block to be happy and plump.
My Talking Turkey block finishes at 16″ high by 22″ wide.
Below is my sample Talking Turkey block. Isn’t he a handsome fellow????
Now that you’ve seen how yummy this block turned out, let’s get started on the tutorial!
Talking Turkey Quilt Block Tutorial
Supplies
12 assorted charm squares (5″) for the feathers/body
1 fat quarter for the background
1 fat eighth brown for the head/neck
Scrap of red for the wattle, approximately 2″ x 5″
Cutting
Background: 3 5″ squares, 1 4 1/2″ square, 3 2 1/2″ squares, 1 2 1/2″ x 12 1/2″ rectangle, 1 2 1/2″ x 8 1/2″ rectangle, 1 2 1/2″ x 4 1/2″ rectangle, 1 1 1/2″ x 4 1/2″ rectangle , and 1 1/2″ square
Red Scrap: Trim to 1 1/2″ x 4 1/2″
Brown: 1 2 1/2″ x 16 1/2″ rectangle, 1 2 1/2″ x 4 1/2″ rectangle, and 1 2 1/2″ square
Making the Block
Step1. Trim 9 assorted charm squares down to 4 1/2″ and sew them together into a Nine Patch block.
Step 2. Layer a print 5″ square right sides together (RST) with a background 5″ square. Draw a diagonal line from one corner to the opposite corner. Sew 1/4″ away from both side of the drawn line. Cut apart on the drawn line. Press units open to make 2 Half Square Triangle blocks (HSTs). Repeat to make a total of 6 HSTs. Trim your HSTs to 4 1/2″ if needed.
Step 3. Sew 3 assorted HSTs together into a row with the top point to the right as shown.
Step 4. Sew the remaining 3 HSTs together with the top point to the left as shown. (You are making a mirror image of the unit in Step 3.)
Step 5. Sew the HST unit from Step 3 to the top of your Nine Patch block.
Step 6. Sew a 4 1/2″ background square to the left end of the HST unit from Step 4. Then sew the HST strip to the right side of the Nine Patch block.
Step 7. Layer a background 2 1/2″ square RST on the end of the brown 2 1/2″ x 16 1/2″ rectangle. Draw a diagonal line from the top left corner to the opposite corner. Sew on the line. Trim away the waste piece 1/4″ beyond the sewing line. Open and press.
Step 8. Layer a background 2 1/2″ square on the other end of the brown 2 1/2″ x 16 1/2″ rectangle. Draw a diagonal line from the top left corner to the opposite corner. Sew on the line. Trim away the waste piece 1/4″ beyond the sewing line. Open and press.
Step 9. Layer a background 2 1/2″ square RST on the end of a brown 2 1/2″ x 4 1/2″ rectangle. Draw a diagonal line from the bottom left corner to the opposite corner. Sew on the line. Trim away the waste pieces 1 /4″ beyond the sewing line. Open and press.
Step 10. Layer a background 1 1/2″ square RST on the end of a red 1 1/2″ x 4 1/2″ rectangle. Draw a diagonal line from the bottom left corner to the opposite corner. Sew on the line. Trim away the waste pieces 1/4″ beyond the sewing line. Open and press.
Step 11. Sew a background 1 1/4″ x 4 1/2″ to the Step 10 unit. Then sew a 2 1/2″ x 8 1/2″ rectangle to the bottom of the unit as shown.
Step 12. Sew the brown unit from Step 9 to the end of the unit from Step 11.
Step 13. Layer a brown 2 1/2″ square RST on the end of a background 2 1/2″ x 4 1/2″ rectangle. Draw a diagonal line from bottom left corner to the opposite corner. Sew on the line. Trim away the waste pieces 1 /4″ beyond the sewing line. Open and press. Then sew the unit on the right end of a background 2 1/2″ x 12 1/2″ rectangle.
Step 14. Sew the units from Steps 8, 12, and 13 together to make the turkey head, wattle, and neck.
Step 15. Sew the front of the turkey from Step 14 to the back of the turkey from Step 6.
Voila! A plump and yummy Talking Turkey block for you to enjoy! Happy Thanksgiving to you!
As per our Copyright for Quilters post last week, I give you permission to use my original Talking Turkey quilt block for personal and commercial use, as long as you provide proper attribution that I am the designer of the Talking Turkey quilt block.
Add a narrow border, quilt and bind for a little wall or table quilt.
I hope you don’t mind but I’m going to interrupt my VRD Panel series to address a situation that popped up last night at my monthly guild meeting. Next week, we’ll jump back into Panels.
I am apologizing right up front — this is a text-heavy post. Sorry….
Do you belong to a quilt guild?
Last night at my November guild meeting, after much planning, work, and anticipation, we drew the winner for our annual raffle quilt. The money raised by the raffle is partly donated to the church where we meet and used for guild programs and projects throughout the year. After the winner was drawn, we had a discussion about next year’s raffle quilt project. The 2022 raffle quilt organizer explained what she had done and suggested a time frame for next year’s project. Others added their thoughts to the discussion, too. When the discussion turned to ideas about selecting a pattern for next year’s raffle quilt, I naturally raised my hand and said that when we selected a pattern, we needed to check out the copyright information.
Suddenly I felt like the ugly stepsister or an alien from outer space! My comment was met with a lot of confusion and perhaps even some chagrin. Only a few people nodded in support. I was floored. Copyright is such a hot topic in quilting and has been for years that even popular quilt magazines address copyright and quilting from time to time.
I explained that we should contact the designer of the selected pattern to seek permission to use their pattern to make our raffle quilt. Of course, most designers would probably have zero issues with such a request and would gladly provide their permission. Maybe they’d request a photo of the completed raffle quilt, but most designers would just be pleased that we took the time to ask.
As a quilt designer, I would be. If I was asked.
One of the members indicated the magazine in front of her and suggested using a “free” pattern in a magazine. I said that patterns in magazines aren’t really free because someone paid for that magazine. And magazines are protected by copyright laws, too.
I stewed about the discussion all last night after the meeting — even hashing it over with my pals on the way home. When I got home, I talked about it with my family, too.
The subject of copyright and quilting was really weighing on my mind so I decided it was important enough to bring up here on the Villa Rosa blog.
Copyright is a form of protection grounded in the U.S. Constitution and granted by law for original works of authorship fixed in a tangible medium of expression. Copyright covers both published and unpublished works.
So, what exactly is the copyright question?
Actually, it’s a lot more than a single question, it’s a heap of different questions, a lot of conflicting information, and a ton of confusion. But before I get into the topic more deeply, I’d like to tell you about a few of the situations I have personally encountered over the years with copyright issues.
1. One time I was teaching a machine quilting class at one of my local quilt shops. I had designed an original yet simple table runner for the class and provided written instructions to those who registered and paid for the class. As the class was for machine quilting, the students were to make the table runner prior to class so we could work on machine quilting the runner during the class. While I was teaching, a couple of ladies who I knew from the quilt guild I belonged to at the time (not the one I belong to currently) came into the classroom. One of the women commented on my class sample, which was hung on the wall in the classroom area along with a poster with my class information and dates. I thanked her and said if she was interested, she could sign up for the class and would receive the instructions for my table runner. She literally scoffed at me and said she could just take a photo of it and go home and make it herself. I was shocked — so incredibly shocked I couldn’t even say anything. What do you think — is this okay?
2. Last year I found a table runner from one of my Villa Rosa Designs Rose Card patterns for sale on Etsy. The maker/seller took the time to list the name of my pattern and my name as the designer. I have to assume she purchased the table runner pattern at some point, but is it okay for her to make money using my pattern?
3. Recently, I read a comment from someone who said they couldn’t find our VRD Rose Cards in their local area and they don’t want to purchase them online so they made their own version of VRD quilts by copying the quilts in pictures on the Internet. Is this okay?
Every time a copyright issue pops up, I think of my friend and mentor, Cheryl Weiderspahn. Cheryl is the one who started me on the road as a quilting professional by introducing me to her book editor many many years ago. Without Cheryl’s help and patience, I would never have gotten where I am today.
Thank you, Cheryl.
Before she retired, Cheryl owned a pattern company and on her website, she had an article about copyright. With her permission, I am sharing her article in its entirety. Over the years, I’ve read lots of articles, talked to many other professionals, and gathered information, but Cheryl’s article is the one I always come back to when I have copyright questions because it always makes the most sense to me.
So, here is Cheryl’s article:
If you didn’t write it or create it, you do not own the right to copy it or distribute it!” – Susan Levin
Our schoolteachers warned us all about plagiarism. We were refused when we took a professional studio photo to Staples to make color copies. We all know we shouldn’t buy a movie video and make copies for our friends. We all have heard about the piracy controversy over illegal music downloads from the Internet. Yet quilters and sewers are incurable sharers and we think nothing of laying a magazine or pattern in the copy machine and distributing copies to all our buddies. It all seems innocent enough at first.
Copyrights protect “Visual Art” such as drawings, sketches, paintings, blueprints, maps, labels, photos, charts, stationery, music, movies, architecture, sculpture, cartoons, patterns, how-to instructions, books, fabrics, quilt designs and other two- and three-dimensional works. (Patents only apply to inventions.)
This copyright grants the creator five inherent rights: the right to reproduce or copy their work; the right to distribute their work; the right to publicly display their work; the right to perform their work; and the right to create derivative works of the original work.
How long does a copyright last? In 1998, Congress fine-tuned the law to allow works to be copyrighted for the life of the creator plus 70 years. This means that 70 years after the creator dies, the copyright expires if no family heir files for an extension to renew it. After that it is in “Public Domain,” allowing anyone to use the work. So the fact that a magazine, book or pattern is out of print, or the author is dead, does not mean you can copy it.
But many Public Domain works are available for legal copy. Also, there are copyright-free sources such as some of the EQ5 [Electric Quilt] designs. I got over 20,000 results when I did a Goggle search for the topic “public domain quilt patterns!” Take the time to look and ask for necessary permission and grant credit where due.
Let’s dispel a few myths. First of all, forget any nonsense you ever heard about “If I change it 10%” (or 20% or 30%, the myth varies) or “If I change three things” then it is my own design. That is a myth. What will a judge look at? If the work is in any way recognizable as the work of another artist, and you use it without permission, you have created a derivative work of art, which is an infringement on the original artist’s work and a violation of Copyright Laws.
Another myth is that if you don’t sell the work, or if you create it for charity, you aren’t infringing on the artist’s copyright because you aren’t making any money. That is a myth. The law is not based on how much money YOU make, but on how much money the artist might lose had she been able to charge you for your use from licensing, royalties and other fees. An artist denied this income has no money to invest in future designs for you. Artists are in the business of selling their designs. If they don’t sell very many, they can’t keep designing new ones, and the entire creative community suffers in the process.
A quilter called me one day to ask if she could make one of my vests to donate it to a charity auction to benefit Breast Cancer Research. Of course I thanked her for calling and granted permission. It was my choice to enable her to raise money for a worthy cause. Any artist with a heart would grant permission. She was not claiming it as her own design and I did provide her with a sew-in label stating “Created with a Homestead Specialties Pattern” and a catalog flyer to include with the vest. Can she also make one of them for her niece for a Christmas gift? Of course, I see that as being for her own personal use. Would I have grated permission if she had asked to make four vests from my pattern and sell them for profit at her local gift shop? No way! Would I ever find out that she sold four vests at her local gift shop? Would the Copyright Cops arrest her and haul her off to jail? Probably not, but she still broke the law and ripped me off. If I were she, I would not want that guilt hanging over my head.
In a shop class situation, that is why each student is required to purchase the pattern/book being taught. Otherwise, the artist is being denied her income from the sale of her pattern/book. Does paying for that class entitle the student to make and sell those items? No, not without the designer’s expressed permission.
This is also why shop owners must buy the patterns from the designer herself (or one of her distributors, like Checker Distributors), rather than laying the pattern on a Xerox machine or scanning it and making copies for sale. This is clearly denying the artist of her deserved income and the shop owner’s professionalism and integrity is in question to all who see this activity. Legal action could easily follow, especially since the shop owner is bold enough to expose the counterfeit patterns to the public eye.
If you copy a quilt or garment, even making changes, and enter it in a national competition as your own design, you are not only guilty of infringing on the rights of the original artist, you could be forced to forfeit all prizes, as well as any commission work that came as a result of that show. By all means, you should give credit to the original artist and say so when filling out the entry forms!
When I do retail shows with my original garment designs all over the country, I do not allow photography (which amounts to “copying”) in my booth unless the person taking the photo has already bought the pattern. Many people take photos with the intent of making their own garment from the photo rather than buying the pattern, and this denies me my earned income. This photography policy is printed in the show program and most show attendees have the courtesy to ask my permission to take photos.
Have artists actually stood up and won? You bet! For example, Connie Spurlock, owner and designer of Sew Wonderful Dreams Patterns told me how she was looking at patterns at her local fabric chain store one day and was shocked to see that a “major pattern company” had a pattern very similar to one of hers. She opened it up and saw that it was her design; even the instructions had been copied word for word! It was just a crafty little doll pattern, but they settled out of court for a tidy sum of money! True stories abound where the artist prevails over copyright infringement.
If in doubt, ask permission and give credit where credit is due.
For more information:
U.S. Copyright Office: 202-707-3000 Copyright Information Office: 202-479-0700 To request a publication: 202-707-9100 http://www.copyright.gov/
Permission is granted by the author to reproduce this article in its entirety.
— Cheryl Weiderspahn
Let’s use Cheryl’s article to think about my three scenarios above.
1. Was it okay for that guild “friend” to take a photo of my class project table runner and go home and make it?
2. What about the person making and selling my VRD table runner pattern on Etsy?
3. Is it okay to copy a quilt you see as a pattern available for purchase online?
What do you think?
Most likely there are as many people out there who will agree with Cheryl’s article as there are folks who won’t. Copyright law is so confusing! One’s understanding and thoughts of copyright depend on lots of different factors such as who one talks to, what articles or websites they have read, if they have consulted a lawyer who can interpret and understand copyright law (of course, even lawyers and scholars are going to disagree and interpret things differently from each other), whether one is a designer or someone who uses other people’s patterns and many other factors.
Why does copyright have to be so dang confusing?
Hmmmm. Maybe there isn’t really a single answer or a single way to interpret copyright law at all??? That’s an interesting question, isn’t it? But I don’t have the answer — I am a designer, not a lawyer.
It’s funny but while I was writing this post and looking up information, I kept thinking about the Golden Rule. Remember that one from your childhood?
Do unto others as you would have done to you.
I just looked it up on the Internet because I wanted to get the wording right and to see if I could find out the attribution of the quote I grew up hearing at home and at school.
According to the Encyclopedia Britannica, the Golden Rule is from the Gospel of Matthew (7:12), but the similar concepts of fairness are found in the writings of Confucius, Seneca, and others.
According to Wikipedia, “The Golden Rule is the principle of treating others as one wants to be treated. Various expressions of this rule can be found in the tenets of most religions and creeds through the ages.[1]”
Wow! And I thought it was only something my parents told me when I wasn’t getting along with my older sister or what my teachers said when my BFF and I were fighting on the playground.
So, let’s consider my three scenarios again using the Golden Rule.
1. Is it okay for a guild “friend” to take a photo of a class project table runner and go home and make it? Would that guild “friend” want someone to do that to her?
2. Would you want someone to buy your quilt pattern and make table runners from your pattern and sell them for profit on Etsy, even if they mention the name of the pattern and the designer in their description?
3. Would you want someone to see your original quilt online and instead of buying your pattern, just make a quilt copy from the photo?
What are your thoughts?
So, getting back to my quilt guild and the selection of the pattern for next year’s raffle quilt — using the Golden Rule, would whoever decides which pattern to use for next year want some other quilt guild to use their original quilt pattern for a raffle quilt without asking? Wouldn’t it be nice to be asked? Isn’t that just common courtesy?
As a designer, I would gladly give permission for a quilt guild to make one of my Villa Rosa Designs Rose Card quilt patterns for their yearly raffle quilt once they purchase the pattern. As a designer, I just want to be asked and acknowledged for my work.
Here are more resources about copyright and quilting in no particular order. They may have differing opinions from Cheryl’s article and even from each other, but isn’t it good to read a lot of different opinions and interpretations to figure out what you really think?
I hope you take a little time to explore these these articles and posts — there are a lot more out there, too.
I am not trying to influence people one way or the other, I am trying to promote copyright awareness because awareness brings knowledge and knowledge brings understanding. Even to the confusing world of copyright law.
After talking about our VRD Rose Card patterns featuring quilt panels a couple weeks ago, I thought it would be fun to do a series of Panel Quilt Tutorials for you. You can find the Panel post HERE.
There’s no way I would be able to do ALL of the Rose Cards I featured in the Panel post, but I thought it would be fun to do some of my favorites. I hope these Panel Quilt tutorials will inspire you to reduce your own stash of panels by making quilts — what an unusual thing to do with fabric, right???
So let’s make Hillside Charm! I just really love this Panel pattern — it looks great with whatever panel and fabrics you use. Don’t have 5″ charm squares? Cut fat quarters, scraps, or even yardage into the number of squares you need. Want to make it bigger? Add another border? Want it smaller? Don’t add the extra border. LOVE LOVE LOVE Hillside Charm! You can buy the pattern HERE.
Right now we even have some great Hillside Charm kits for sale on the website — Halloween, Christmas and more — so check them out HERE.
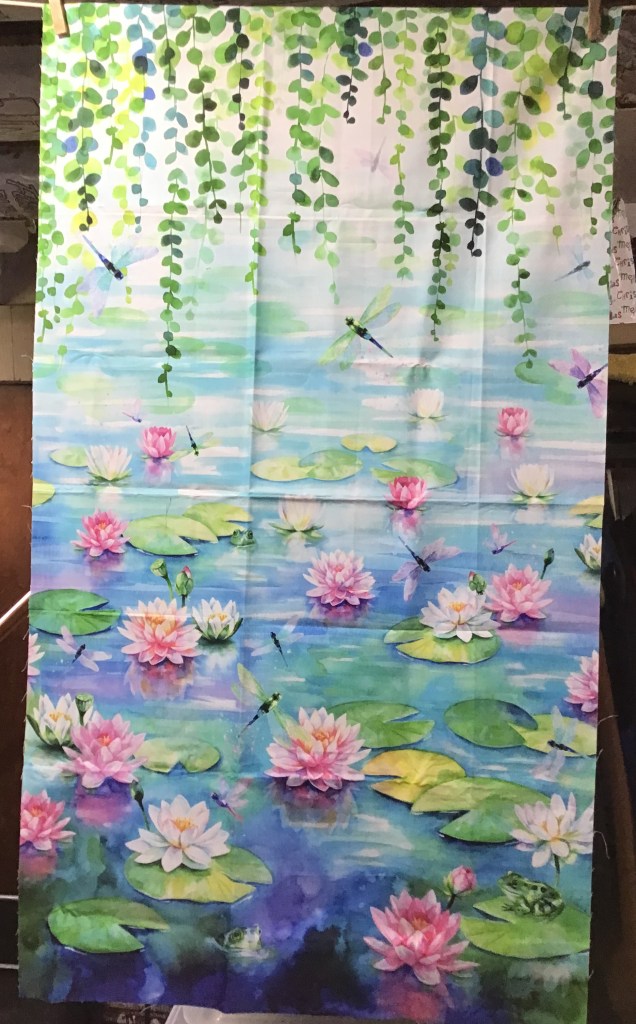
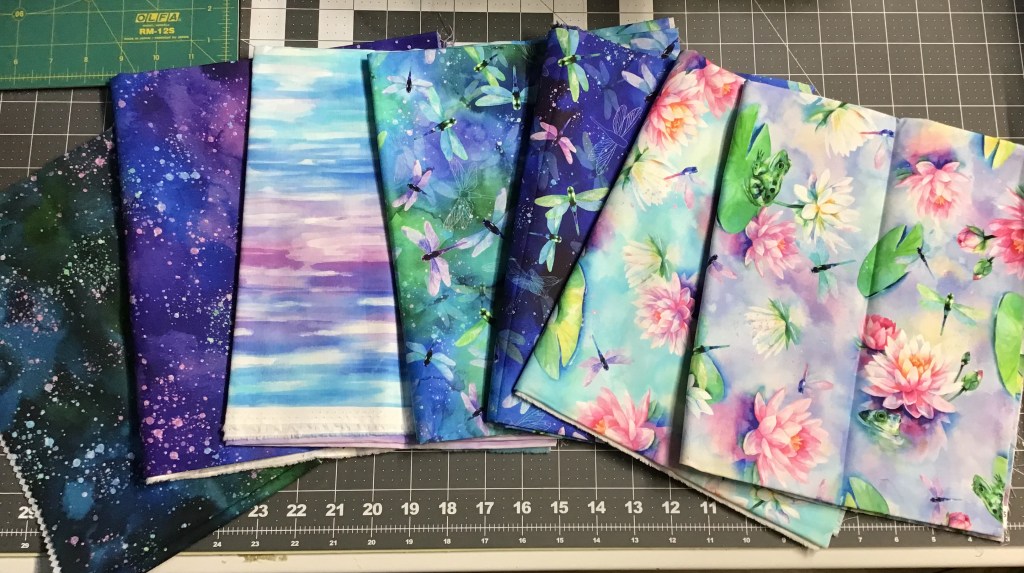
Before we jump into the tutorial, I have to do a SHOUT OUT to Hoffman Fabrics and a big thank you to them for providing the fabrics for this Hillside Charm Quilt. The collection is called Wading with Water Lilies. Isn’t it beautiful? In addition to the gorgeous digitally-printed panel and coordinates, I also used some of the basics from the 1895 Watercolors collection and 885 Dot Batiks collection.
YAY! We have the panel and some of the coordinates on the website. You can find them HERE. Grab them now because when they’re gone, they’re gone!
The gorgeous panel. Just look at the amazing array of colors that digital printing can create!
These are the companion fabrics.Here are the accents I used from 1895 and 885.
Now you’ve seen the fabrics, lets get to the tutorial!
Hillside Charm Tutorial
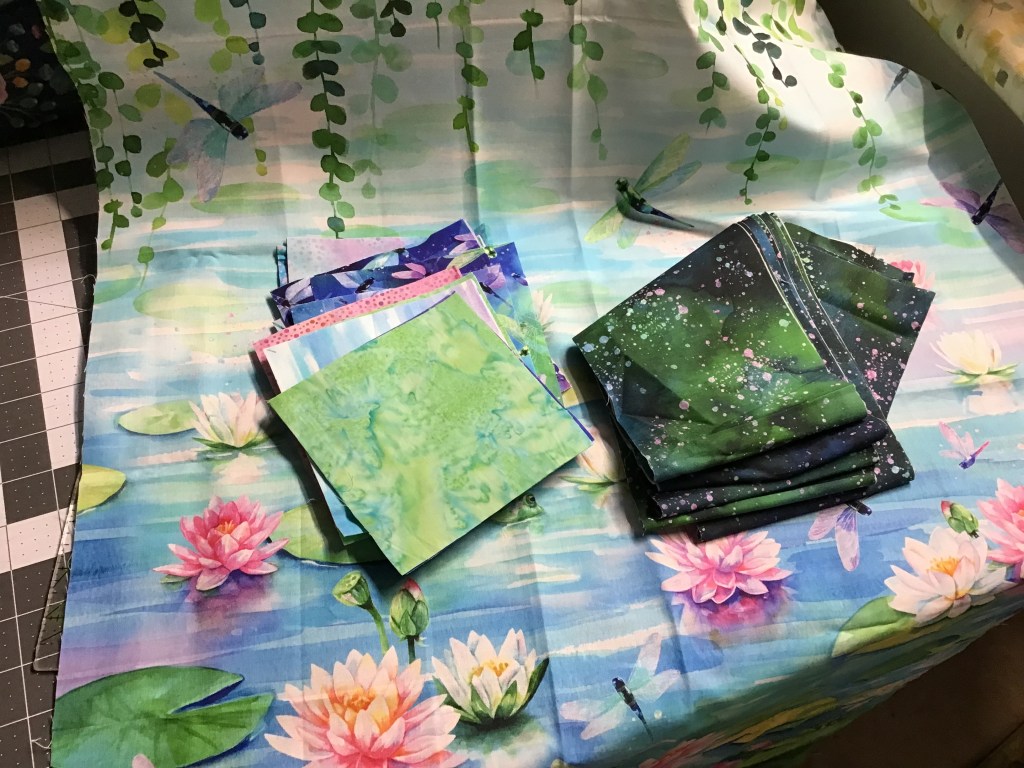
The first thing I did was trim the panel to the dimensions listed in the pattern. Sigh……I really hated cutting anything off this amazing panel but if I wanted to make the quilt, it had to be done. So I did it. I also cut out the squares and the strips. The pattern actually calls for a pack of charm squares, but since I didn’t have an actual charm pack, I went ahead and cut the squares I needed. I won’t have as much variety as I would have with a charm pack, but it will still be beautiful. Sometimes, less is more.
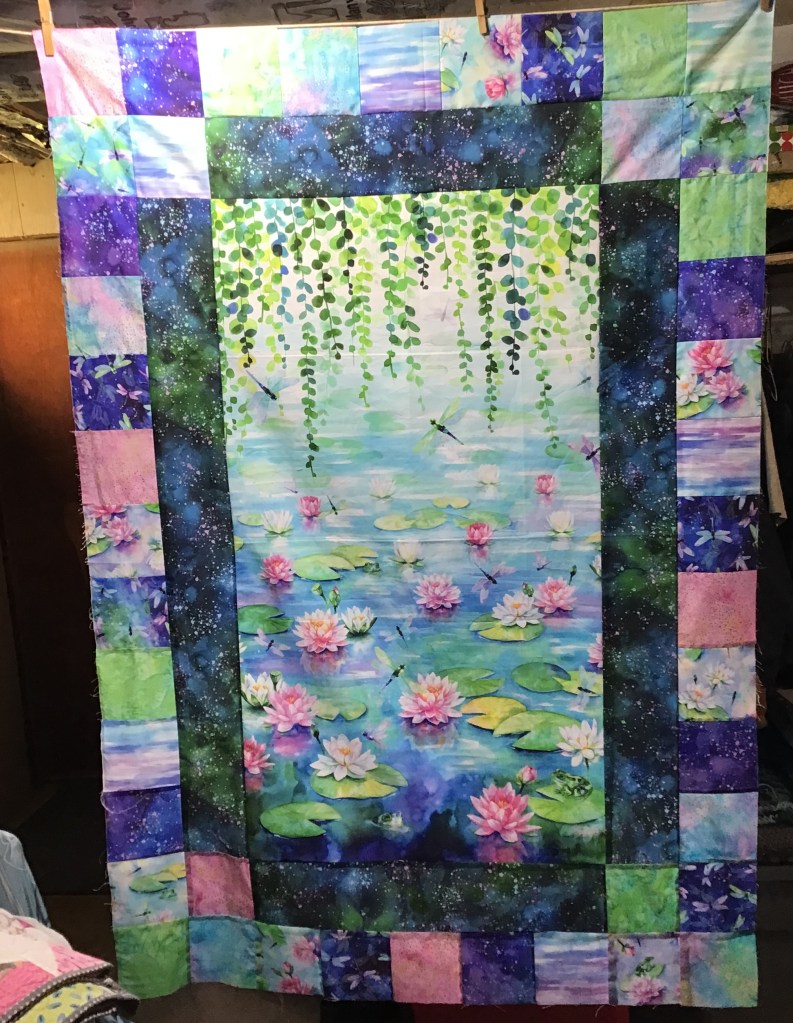
Next I sewed the side strips on to the panel. Then I sewed squares to the ends of the top and bottom strips before sewing them into the panel. It’s already taking shape. I’m really excited about this quilt — it is going to be really gorgeous!
Time to sew my charm squares into strips for the next border. I just had to make sure not to sew 2 of the same fabric side to side. Easy peasy.
Here you can see that I took the time to pin the pieced charm square strip to the framed panel. This is an important step because I don’t want my quilt to be a funny shape. Nope, I like ’em squared up as much as I can as I go along. And one of the best ways to do that is to match your centers and your ends and pin generously.
Yay! Let’s sew the pinned charm square side borders on. Sigh….I must admit I hate removing my pins as I sew and I am guilty of sewing over my pins. Mea culpa.
Here are the pieced charm square borders added to the sides. I am so excited how this quilt is coming together.
Now let’s add the top and bottom charm square pieced strips. Pin, pin, pin. Sew, sew, sew. I really like how the pieced border is giving the look of Four Patch blocks in the corners. Tricky, tricky!
More side borders to add. This time I have to be more careful with the placement of the squares so that I don’t accidentally line up 2 of the same fabric, especially since I’m not using as much variety as a charm pack would provide (although, nowadays there are lots of duplicates in a charm pack because fabric collections are a lot smaller than they used to be).
Here are my last borders — the top and bottom pieced borders. Now you can see the rectangles of the blue/green marbled fabric at each corner, mimicking the inner blue/green marbled inner border. Cool detail!
DONE!
I can’t wait to see your Hillside Charm Quilts! You can email your Hillside Charm photos me at tricia@villarosadesigns.com and I’ll share them on the blog and Facebook.
Thanks for sewing along with this tutorial. Stay tuned for another tutorial next week.
Wait! I can’t go yet without showing you the NEW November Rose Card patterns.
Check out these awesome new patterns. If you attended Quilt Market or Festival last week, you already had a sneak peak. Lucky you!
Oh look! Another Panel quilt! You can buy the November set of 5 Rose Cards HERE for $8.95.
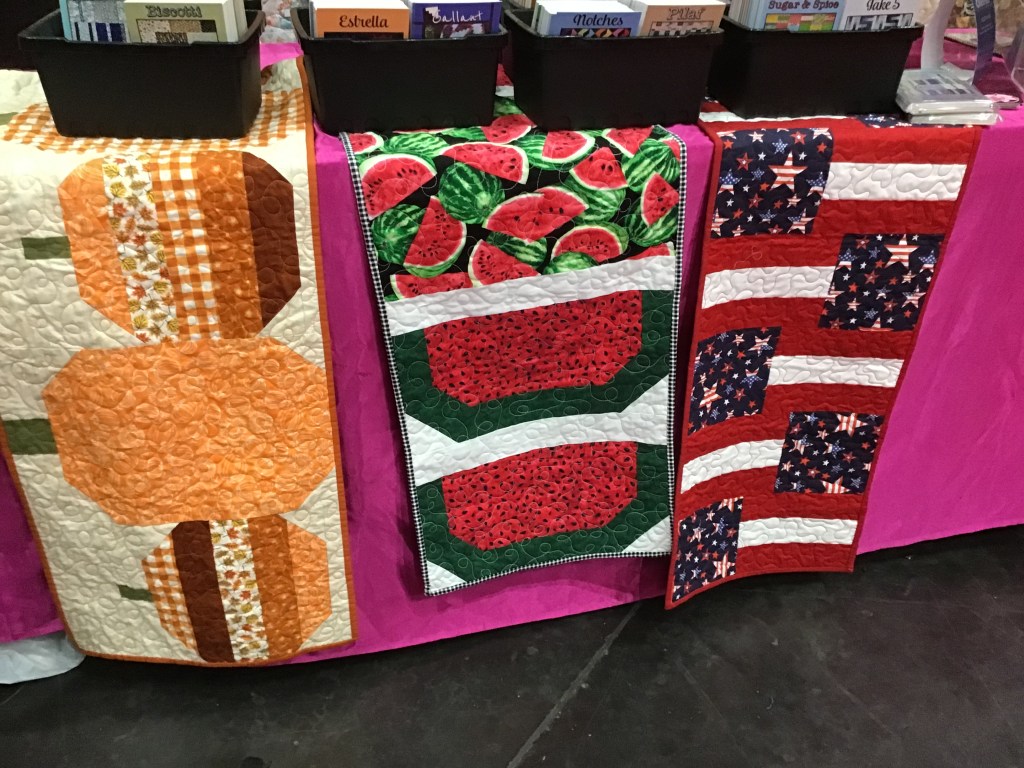
This is my new table runner, Baskets, for this month:
I hope you find a little time to get sewing because the Holidays are right around the corner and if you are like me, you have a long list of quilty gifts you want to make even though you know you’ll never get them all finished. The New November Rose Cards could help you jump start your holiday sewing! Just sayin’….
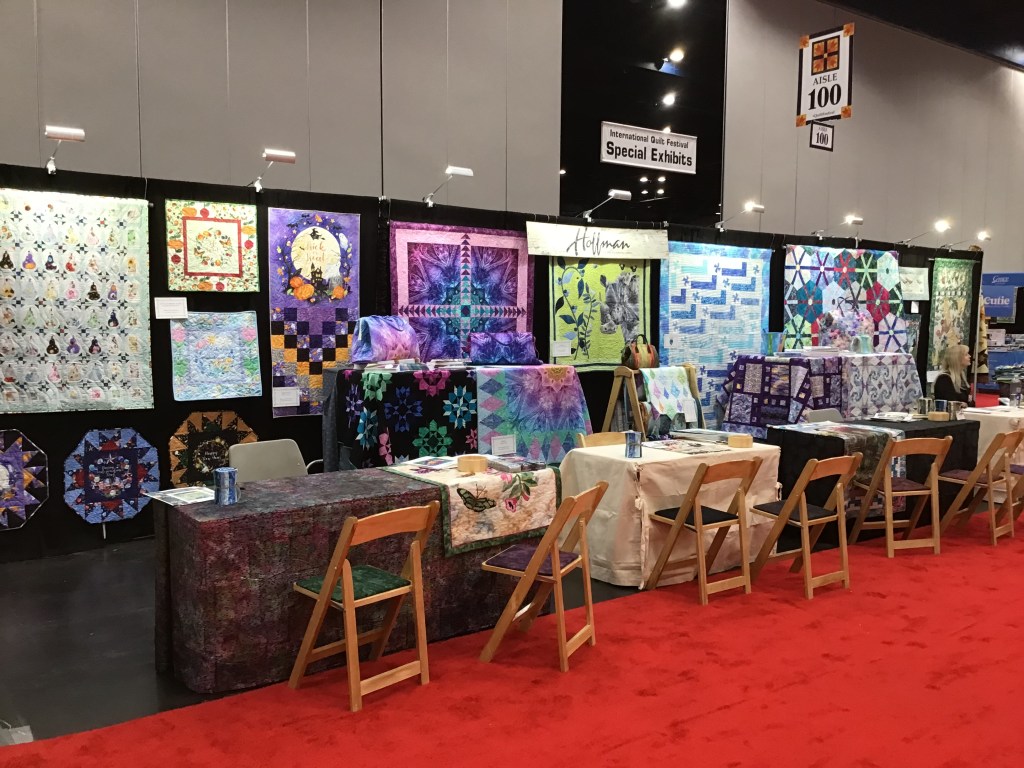
Here it is — a little peak inside International Quilt Market by moi just for you.
I remember before I attended my first Fall Market in 2010, “Market” was a term that conjured up all kinds of quilt mystique. We talked about it in hushed voices tinged with awe. What exactly was it? How did you get to go? Why was it such a mystery?
Twelve years later and although the mystery has unraveled over the years, I am still amazed by every Quilt Market I attend.
This year was different from all the others — I came to Market with a whole new purpose. In the past, I either attended Market in order to promote my latest book or as an independent designer associated with a publisher or other business. This time I came as part of the Villa Rosa Designs team and would be working at the VRD booth for the first time. I really didn’t know what to expect, but I was so excited to go. I had a lot to learn and had great teachers in Pat, our “Rose Queen”, Bonnie who manages the retail shop in California, and Leann, Pat’s daughter and the VRD computer whiz.
So what exactly is International Quilt Market?
Since 1979, the show has been the trade show for the quilting and textile industries.
Market is a wholesale trade show, open only to credentialed attendees and those in the business. Here, you’ll be able to visit more than 1,000 booths to see all kinds of products both new and familiar ranging from fabrics, book, and patterns to sewing machines, notions, and supplies. You can also learn in dozens of Take & Teach classes and Business Seminars, and take that knowledge or class skills back home to your shop or business!
This year’s Houston Quilt Market might not have been as big as the last pre-pandemic Houston Market in 2019, but everyone there was excited and energized to be there.
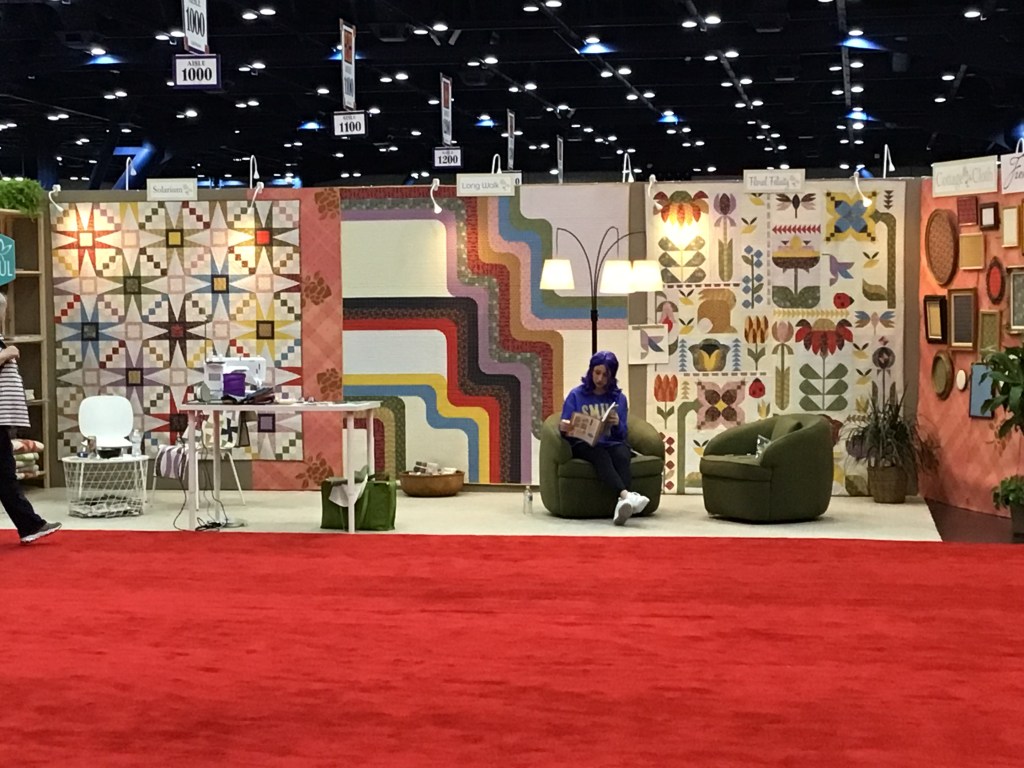
Let me take you on a little tour of Quilt Market by visiting some of the booths and vendors.
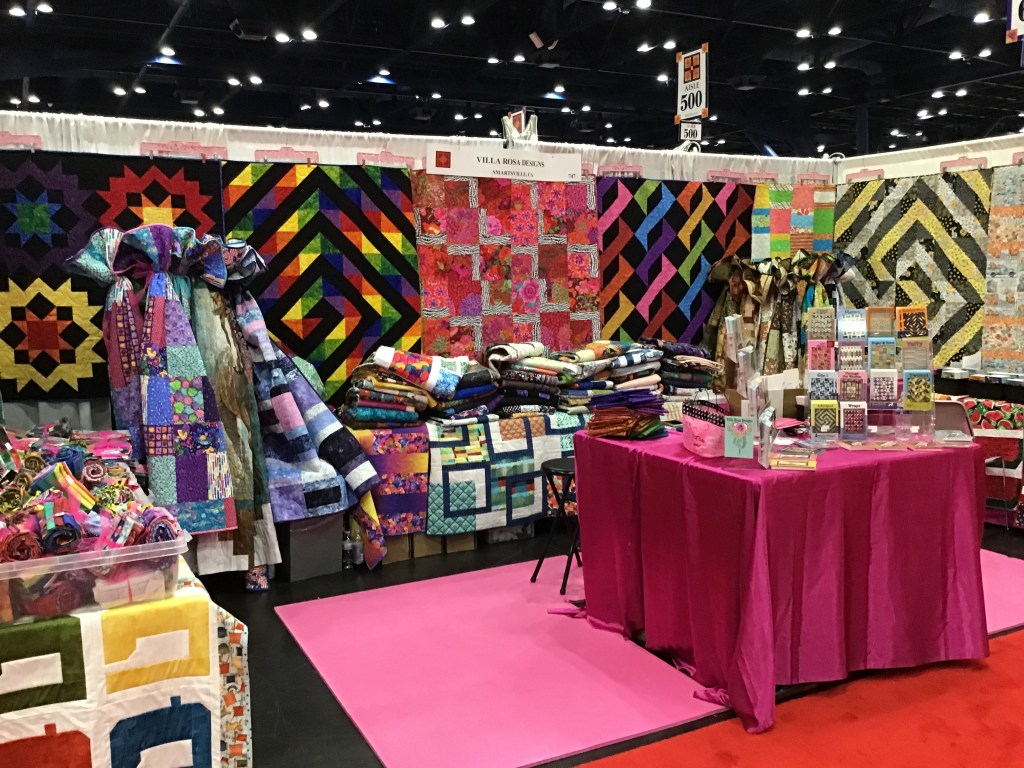
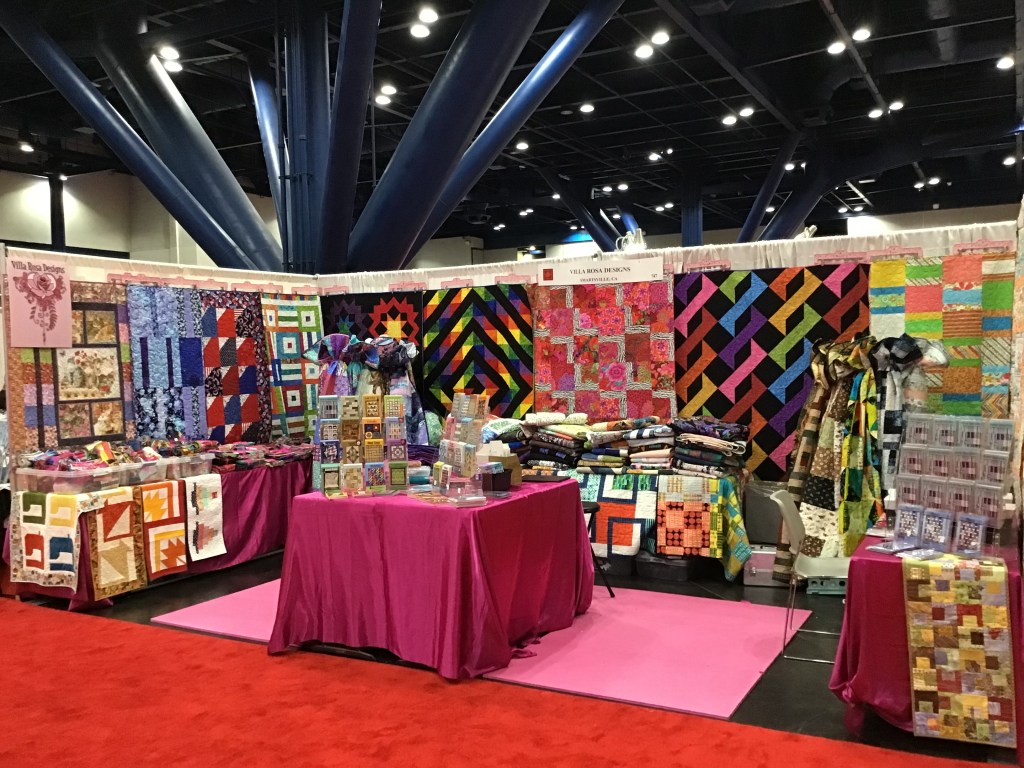
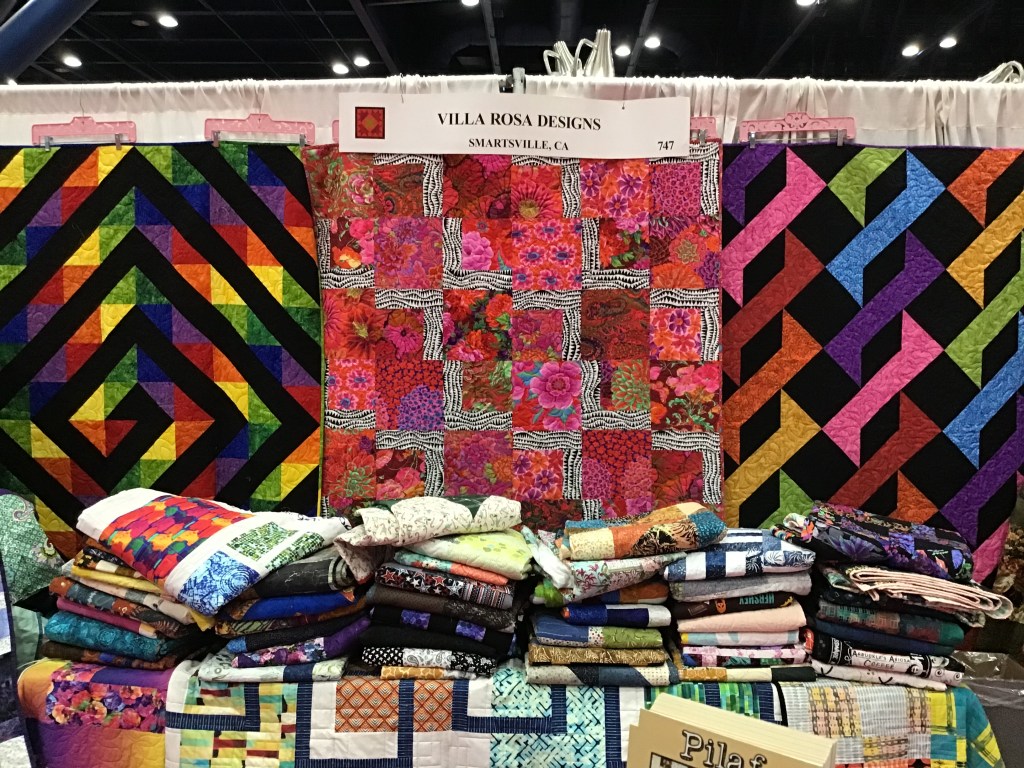
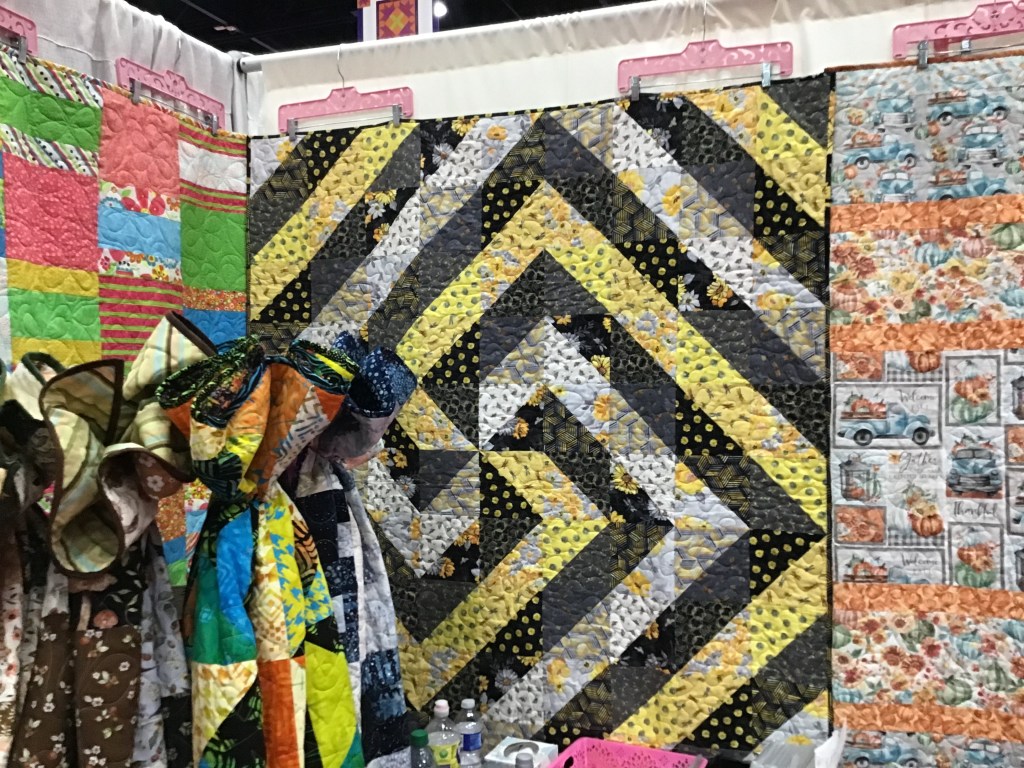
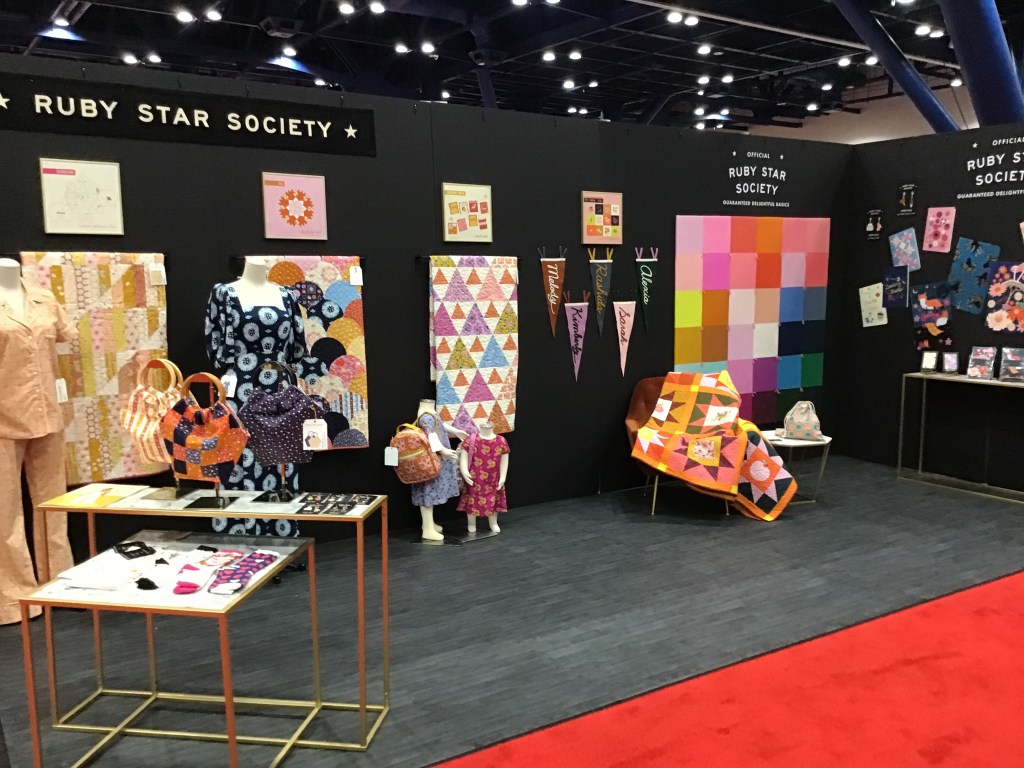
First up, of course is our Villa Rosa Designs booth!
Nice, huh? All the quilts you see hung around the walls of the booth are all cover quilts for Rose Cards of the last 6 months. Oh! The table runners were there too — draped down on the table fronts. Bright, colorful, and fun! We even had fat quarters bundles and kits.
So many great shop owners/workers, designers, and lots of other folks in the industry stopped by to see the latest patterns and catch up. Everyone was so kind and excited about our Rose Card patterns. I met a lot of super people and really enjoyed chatting and talking Villa Rosa Designs with everyone.
When the booth wasn’t too busy, we all took turns going to appointments, meeting up with contacts, and walking the floor, seeing all the other booths, and checking out displays to see what was new and trending. Of course, when we were swamped, it was all hands on deck!
News Flash!
One of the things we were really excited to share with everyone who walked into the booth was our NEW Villa Rosa Designs fabric collection with Blank Quilting. The collection is called Xanadu. Yep, like the 1970’s movie. And the collection has a wonderful 70s feel that is fresh, fun, funky, and flirty with an updated color palette. It was designed by Pat’s sister, Nancy Lorene, who does most of the art for the Villa Rosa Designs Rose Cards. There are 12 completely different fabrics in the collection. It should be shipping to your local quilt shops in April 2023.
Here it is! Isn’t it great??? My absolute favorite piece is the one that looks like paper snippets (I love them all of course, but that one really sparks my imagination).
We were even able to make up a few quilts using Xanadu samples! The real fabrics are even better than the digital images.
I checked in with some of my favorite vendors and also met some new ones this year.
One of the first places I checked out was the “Toy Department,” Graphic Expressions, where you can find all kinds of fun, useful, and quirky little goodies.
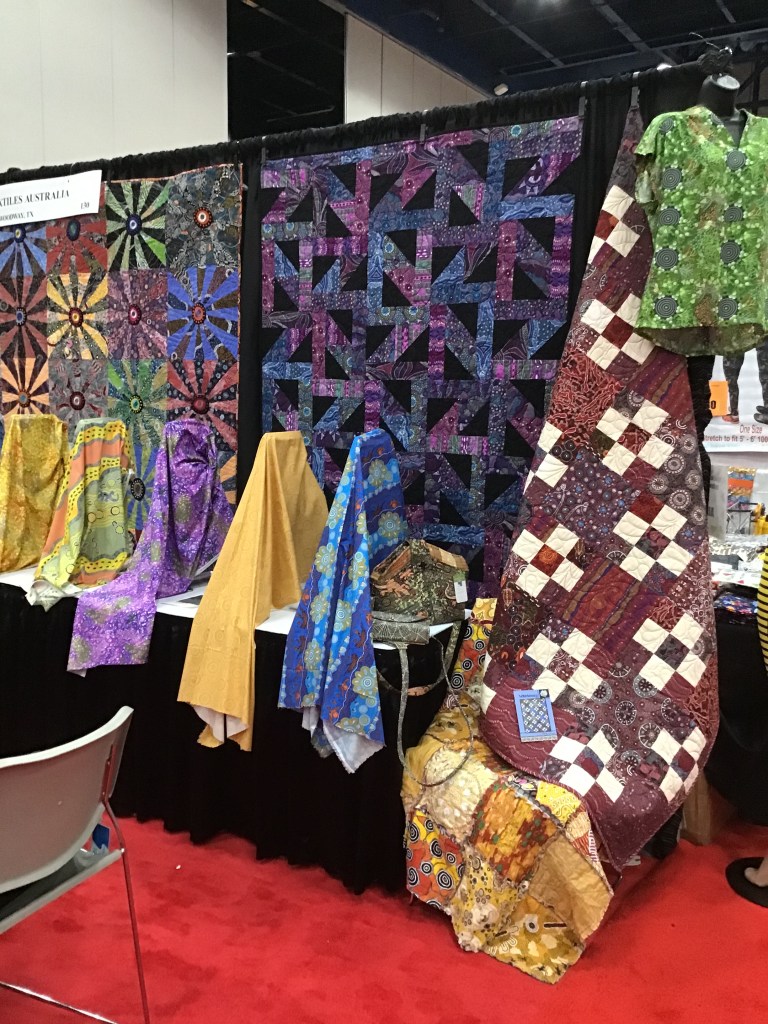
My next stop was to see my old friends, the Springers at Quilts from Mulberry Lane. I met them at my first Quilt Market and at every one I’ve attended since, I make sure to stop to shop and catch up. They always have a great selection of antique quilts and textiles. This year they even had some feed sacks, but I was already familiar with the patterns, so I shopped through their antique quilt blocks and brought a great selection home with me.
It took me a little while to find the Swan Amity booth, but after the second attempt, I found them. Boy was I glad too! They were on my to-do list for Market because I needed a new pair of machine quilting gloves. I found their gloves when I attended Market in 2019 and I never quilt without them now, but after 3 years, my gloves are starting to show some wear (see my 3 year old pair on the left in the photo below). Swan Amity gloves are a lot like a leather golf glove with touchscreen fingertips and padded palms. Love them!
I had a great time shooting the breeze with the ladies at the Mary Ellen’s Best Press booth. Devi and the gang were so much fun! I personally can’t make a quilt without Best Press. My favorite scents are Peach and Citrus. What’s your favorite?
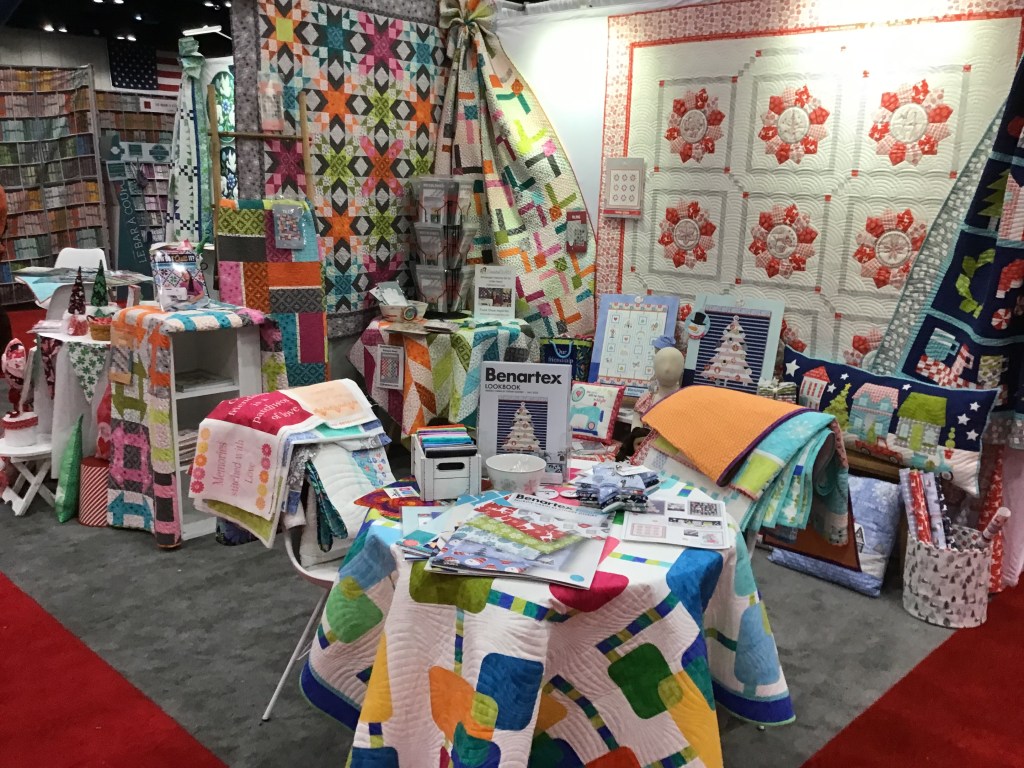
I stopped by the Hoffman California Fabrics booth and got the chance to meet up with Sandy, who I’ve been working with on some projects lately. It was so awesome to finally meet her! That’s one of my favorite things about Quilt Market — meeting people in person, especially if you’ve only been in contact with them through email.
At Market, the fabric companies display quilt samples featuring their upcoming collections so it’s a really good opportunity to see upcoming trends in fabric colors and quilt styles. Look at these gorgeous quilts on display at Hoffman.
I checked in with my pals at Choice Fabrics, too, and introduced them to Villa Rosa Design Rose Cards. Sorry, I never did get around to taking a photo of their booth, we were too busy gabbing! LOL!
I was on the lookout for new products and other cool stuff when I walked around the show.
I met Rosanna of Rosanna Diggs Embroidery. This was her first time at Quilt Market, showing off her great embroidery kits. The kits had absolutely everything in them you needed except scissors! And the designs were just adorable. The Hexagon quilt block kit grabbed my attention on the front table, so I stopped in the booth to say hi.
I stopped to visit with the designer, Lori, of From My Heart to Your Hands, to tell her how much I love her gorgeous miniature quilt patterns. I have collected quite a few of her Fat Quarter Quilting patterns, which have 9 mini quilts in each pattern pack. I love the mix of piecing and applique, although I’m definitely a piecer and not an appliquer — I still haven’t finished my first mini applique quilt from one of her patterns from years ago. I really loved her display of the mini quilts pinned with clothespins to clotheslines. So fun and eye catching! Wish I’d thought of it!
I visited with another pattern designer, Dawn, at the Sew Cherished booth. Her wool applique was simply amazing. Wool applique is something I really admire, but haven’t done much of it yet. Someday……
A new friend I met at lunch introduced me to the ladies at the booth next to hers, Trailhead Yarns. Their threads are truly amazing and there are so many colors to choose from — even variegated! I’m thinking I might want to try some Sashiko again sometime.
Everywhere I turned there were QUILTS, QUILTS, and more QUILTS! Here are some of the great quilts I spotted at Market.
Well, that just about wraps up my visit to International Quilt Market. I hope you enjoyed seeing what I saw. My head is swimming with visions of quilts and fabrics. Time to spend some quality time with my sewing machine.
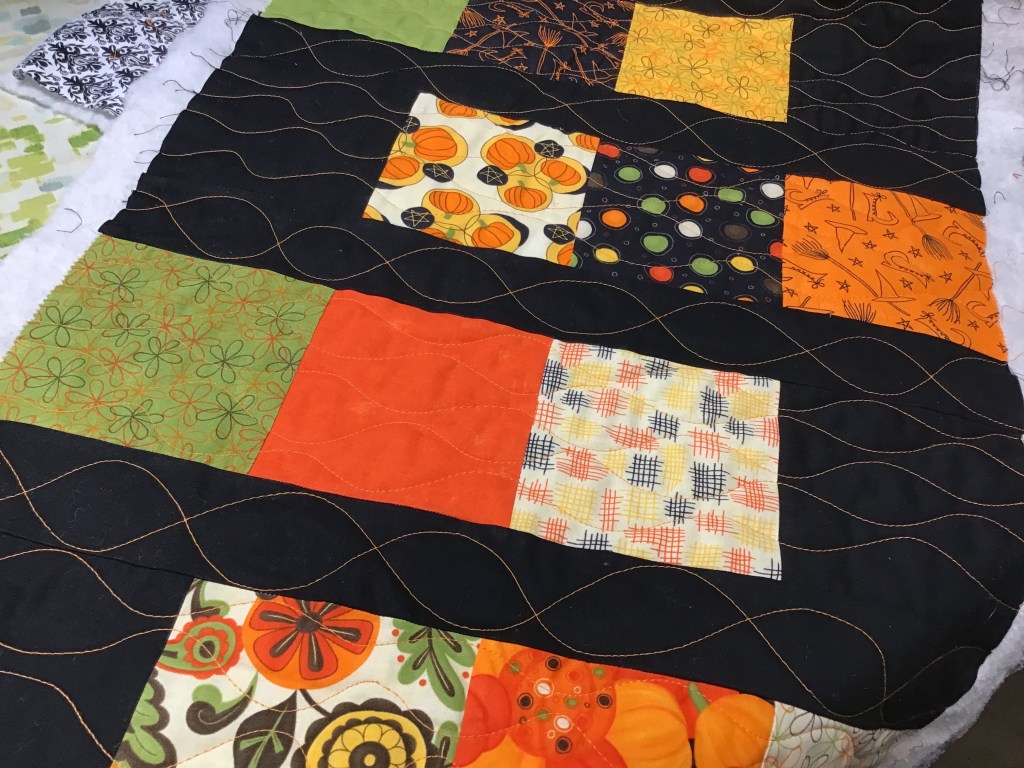
I was so excited after last week’s post about Panels and our Villa Rosa Rose Card patterns that work for panels, I just had to play with my stuff! I decided to go ahead and get the top done for Hypnotized, using my adorable Halloween Gnomes,. Who doesn’t love gnomes???? I just had to, I didn’t want to wait until next year, although I might not get it quilted and bound until next Halloween.
If you missed last week’s Panel Post, you can find it HERE.
The first thing you need to do is to cut out your pieces. I used this adorable Halloween Gnome novelty fabric from Northcott instead of a panel. The cool thing about quilt patterns made for panels is that you can usually substitute a novelty print as long as you cut it to the right dimensions.
YAY! GNOMIES! (That’s what my sister, Tracy, calls them.)
I did not cut the pieces for the inner and outer border out yet. I like to wait until I have the center of the quilt made because sometimes my measurements don’t exactly match the measurements given in the pattern.
If this happens to you too, don’t cut the border strips until you can measure your quilt center. That way you can cut the border strips (and piece the strips together if needed) to your specific measurements, not someone else’s.
Remember when we talked about the “perfect” quarter inch seam allowance? Go HERE if you need a refresher. There really isn’t one. Basically, everyone’s quarter inch seam is a touch different, either a bit smaller or bigger than that elusive quarter inch. Anyway, as each of us use a slightly different quarter inch seam, the dimensions of our quilts are going to be slightly different too. That makes sense, doesn’t it?
So sew with your best quarter inch seam — accuracy is more important than a perfect quarter inch seam in most cases — and measure your quilt before you cut the borders.
Let’s keep moving!
After you’ve cut your pieces, sew strips to the sides of the small square. Then sew strips to the top and the bottom.
You know, I photographed every step of this process, but for some reason all my photos are not on my iPad. Methinks my cat Griffin might have deleted photos when he was painting on his iPad cat painting app.
A cat that paints? No, that’s not strange at all……. What’s strange is that he scratches at my iPad (covered with a protective screen cover) and gets out of his painting game and into other apps somehow. Kids….
Anyway, sew strips to the sides of this block and then add the strips to the top and bottom. Voila! This is your center square. Make 1. (Sorry for the EQ images, but the photos are gone!) Silly Griffy!
Now sew strips to the side of your other 8 squares. Then add the longer strips to the top and the bottom. Make 8.
Here are all my blocks ready to go. Aren’t they fun???
Wow! This quilt is coming together fast. Now to add some background rectangles to our quilt blocks.
Sew a background rectangle to the top of a Framed block. Make 3.
Please Note: If your fabric is not directional, you can skip adding background rectangles to various sides of the Framed square blocks. Instead, sew background rectangles to one side of each of the 8 Framed square blocks.
Sew a background rectangle to the bottom of a Framed block. Make 3. (Sorry, these photos are gone, too.) Argh….Griffin…….
Now sew a background rectangle to the left side of a Framed block. Make 1.
Lastly, sew a background rectangle to the right side of a Framed block. Make 1.
Whew! That was a little confusing, I know, but now we get to put things together!
Sew 2 top facing background rectangle units with a bottom facing background rectangle unit in the center. Then sew a long background rectangle to each end of the row. Make 1 row.
Make the bottom row pretty much the same as the top row, above, but reversed — sew 2 bottom facing background rectangle unit with a top facing background rectangle unit in the center. Then sew large background rectangles to the ends of the row. Make 1 row.
Now for the middle row — sew a right facing background rectangle unit, the single center block, and a left facing background rectangle unit at the end. Make 1 row.
Next sew the 3 rows together.
Isn’t this quilt top adorable so far? The orange frame in the center block really pops, don’t you think? Can’t wait to get the borders on next!
Now sew the inner border strips to the sides of the quilt center. You’ll probably have to piece the strips so they’re long enough. Add the top and bottom inner border strips, piecing them too.
Almost there! It’s time to add outer border strips to the sides — piece those border strips carefully, please. Finally! Our last step for the top — sew on the top and bottom borders, piecing your strips.
Houston….we have a problem!
I just discovered I don’t have enough border print fabric to sew borders on all 4 sides of the quilt.
Whatever can I do???
Why, just add borders to the top and bottom of the quilt! Good solution on the fly. That’s how I roll.
Yay! Mission accomplished — adorable Halloween Gnomies quilt top completed before Halloween! (Sorry the photos of the quilt as it gets put together aren’t very good — I am limited on space for working with larger quilts, so here I’m hanging the quilt top on a clothesline strung in the basement. Hey, we do what we have to do, right?)
What do you think?
As I write this post, I’m crazily packing my stuff to head to International Quilt Market in Houston, TX. I haven’t been to Market since 2019 — before the Pandemic. I’m really excited as this will be my first time being part of the Villa Rosa team.
If you’re headed to Market, stop by the booth, we are Booth #747, right behind the center Info booth on the main walkway. VRD is also doing 2 Schoolhouse lectures on Friday, Oct 28th. If you’re headed to Quilt Festival, Villa Rosa Designs will have a booth there, too. We’d love to say “hi.”
Sigh….Back to my packing.
Stay tuned — next week’s post will be all about my Quilt Market trip. The sights, the sounds, the food….
After our 8 week Basic Quilting Skills for Beginners series, I find I’m ready for something new. How about you???
I thought it would be fun to talk about quilt panels and what quilts you can make with them. I must admit that I have a big stash of quilt panels. I know that admitting you have an addiction is the first step to recovery, right?
SHHHHH! My super secret stash of panels!
I’ve collected panels for a long time, but I rarely seem to use them or make anything out of them. Sure, I’ve slapped borders around some of them and whipped up a quick baby quilt or simple wall hanging, but does that really count? When I taught free motion quilting classes in the past, I even used a panel as a project so students would actually be quilting a “real” quilt, but not something they’d worked on for hours and hours.
If the quilt police showed up at my front door and asked me about my fabric stash and all my panels, I would say: Who me?? I have no idea where these panels and all this fabric came from. I think fabric is like rabbits and multiplies when you’re not looking. That makes sense, doesn’t it? But would it work?
Well, I’m hear to tell you that Villa Rosa Designs has a lot of GREAT patterns specifically for quilt panels — for vertically printed panels, horizontal panels, and even panels with printed “quilt squares.” Yay! Villa Rosa to your rescue — and mine, too!
Let’s take a look at some of the panel quilt Rose Card patterns. You can find ALL of these patterns on the website, www.villarosadesigns.com
Vertical panels seem to be the most common type of quilt panel and we have quite a few Rose Card patterns to choose from.
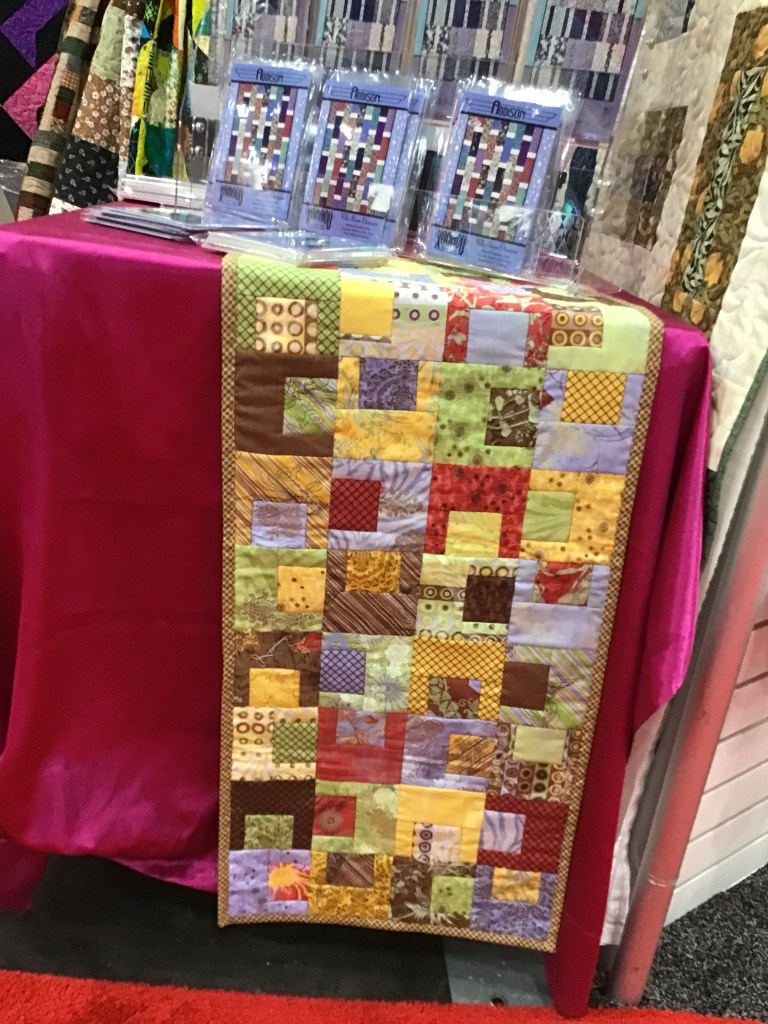
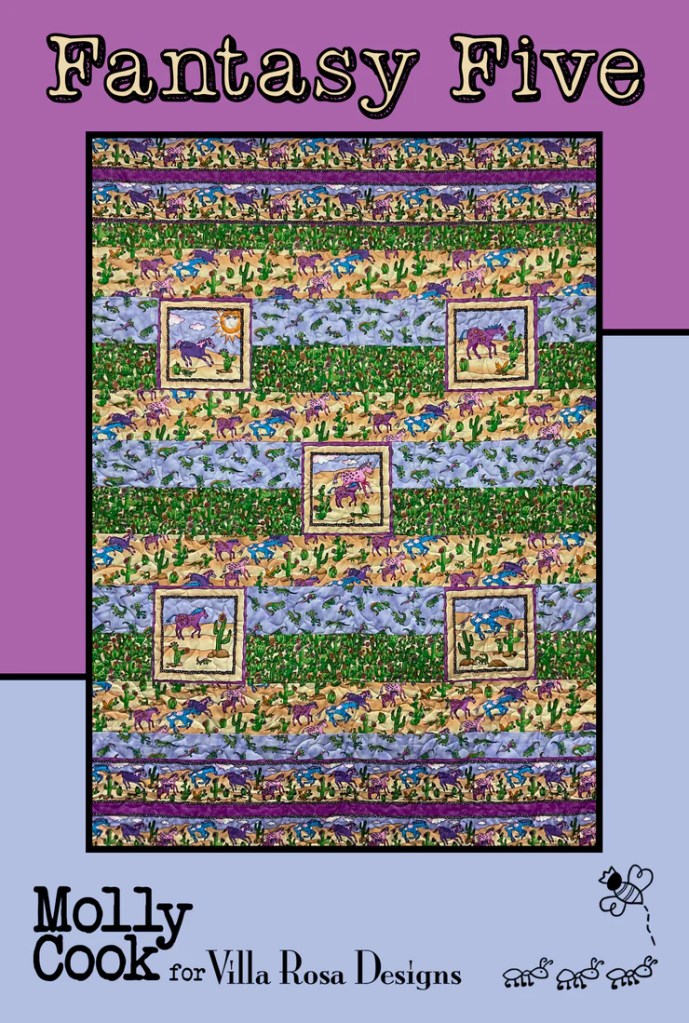
One of my absolute favorite Rose card patterns for vertical panels is Hillside Charm! I know I’ve mentioned this one before, but it is an awesome pattern and I have to show it off again! You’ll probably read about it later in the future too. Sorry, not sorry.
Isn’t this just the coolest pattern? Aren’t you already mentally going through your panel stash to see what you can use for Hillside Charm? I know I am….
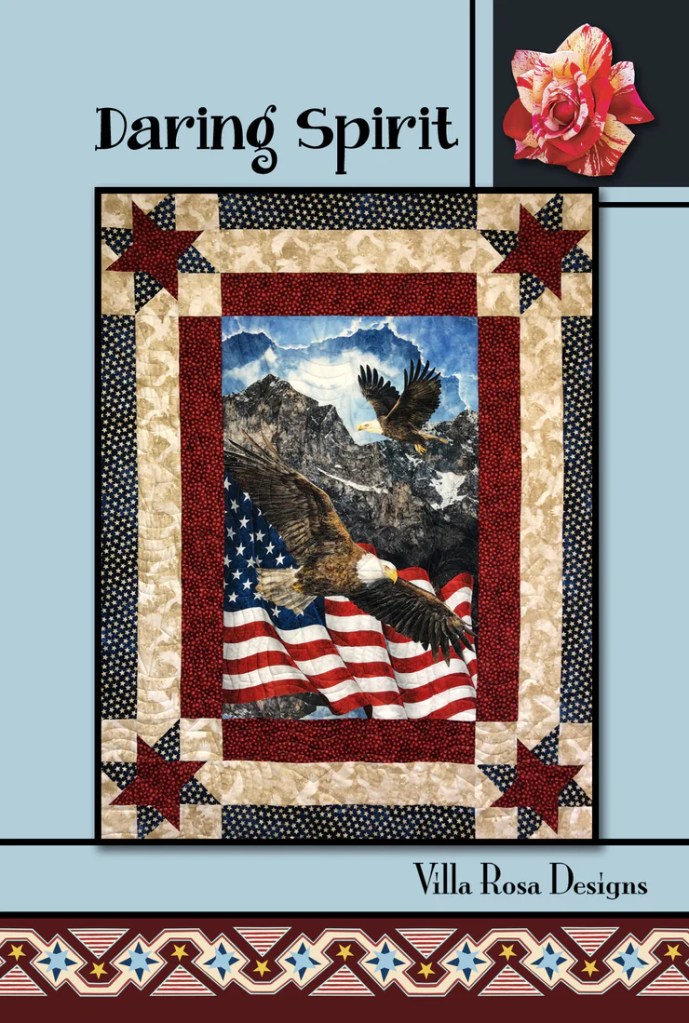
Another one of my favorites is Daring Spirit — the perfect quilt for a Quilt of Valor as long as you add a narrow border around it to meet the minimum width requirement for a Quilt of Valor. You can check out my Daring Spirit tutorial HERE and my Quilts of Valor presentation post HERE.
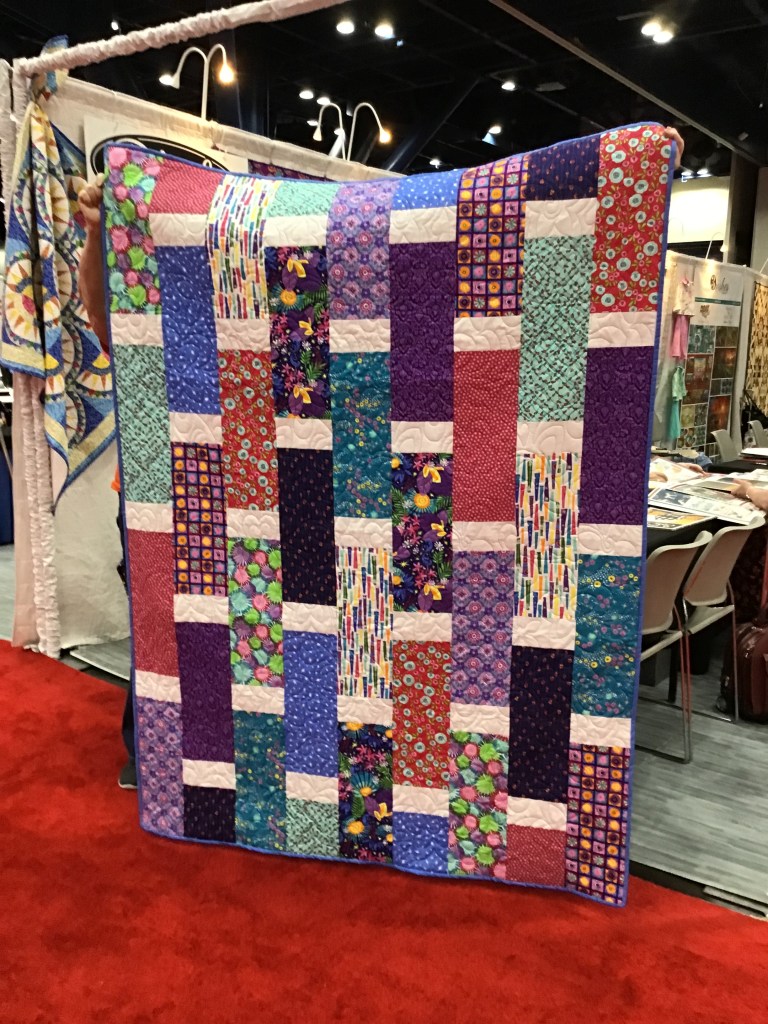
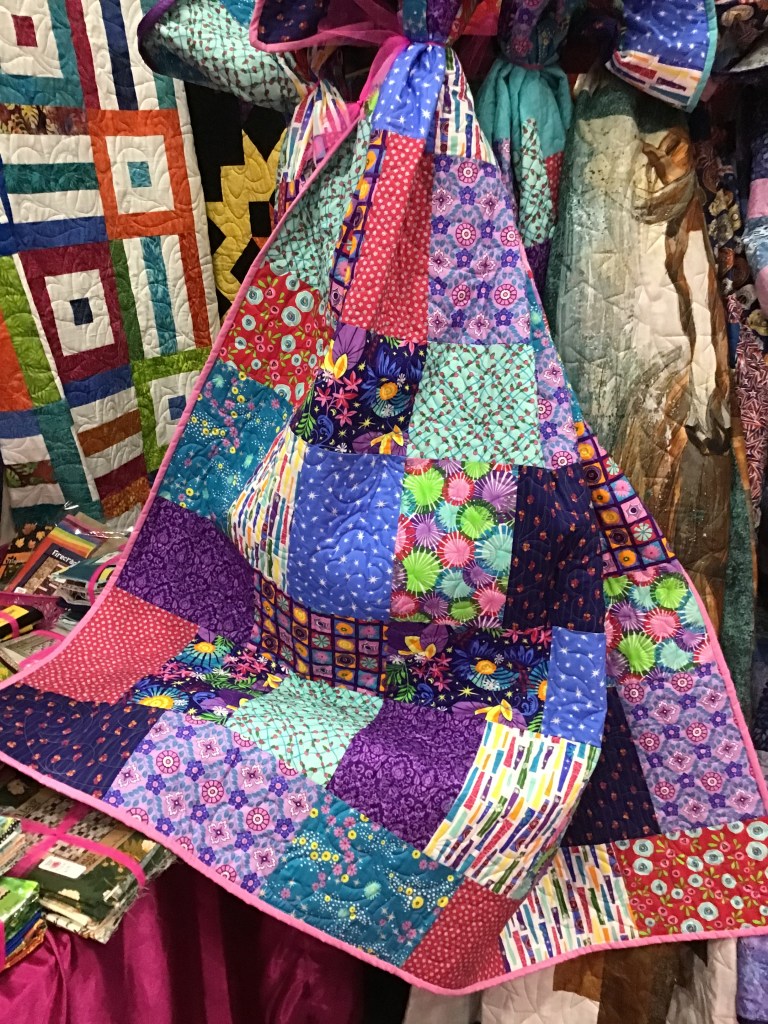
Take a look at these terrific Rose Card patterns for vertical panels. Grab ’em while they’re hot!
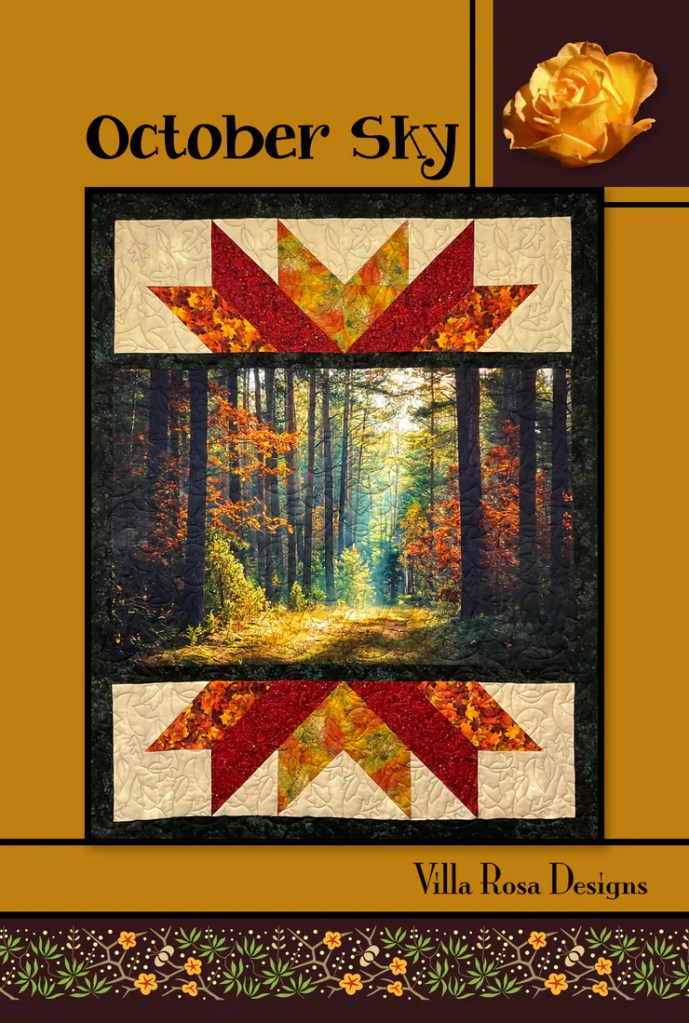
Did you know Villa Rosa has Rose Card patterns for horizontal panels, too? This is awesome because patterns for horizontal printed panels can be hard to find!
October Sky is one of our most popular patterns. I bet you can see why! The really cool thing is that the top and bottom star sections are made with half square triangles, which go together like a snap when you take a little extra care to place your colors correctly.
Shh! Don’t tell anyone and when you make your October Sky quilt, everyone will be in awe at seeing your amazing quilting skills. I can’t wait to make one of these for myself.
Here are some more Rose Card patterns for horizontal panels. Nice!
We even have Rose Card patterns for quilt panels with printed blocks or squares!
Hypnotized is one of our new Rose Cards this year. I just love the look of this quilt — it looks difficult to make, but I know it won’t be because it’s a Rose Card pattern.
I’m all set to make Hypnotized. The only problem is that by the time I get to my project, it will be too late for Halloween this year so I guess I’ll have to say it’s early for next year.
Here’s my fabric for the Hypnotized Rose Card pattern — don’t you love it??? Instead of panel squares, though, I’m going to cut the squares from the gnome print and I’m going to use the stripe for my border. You’ll have to stay tuned for this quilt coming soon, or at least some time before Halloween 2023. LOL!
Yay! More Rose Card patterns for panels with printed squares/blocks. Of course, you can always substitute squares of any novelty fabric you love in these patterns, which makes them very versatile.
BUT WAIT THERE’S MORE!
I think you know me by now (and how much I like saying that phrase), so of course there’s more.
You know those really big panels that measure roughly 36″ x 42″? Well, we even have a couple patterns for these big panels, too.
And if you know anything about Villa Rosa Designs, you can bet we’ll be adding new patterns for panels in the future. In fact, I have a few ideas of my own.
That’s it for today. I’m off to play with my panels.
Fall is in full swing here in northwestern Pennsylvania. We haven’t quite gotten to peak viewing for fall leaves in my area yet, but it should be very soon. There’s nothing like the crunch of leaves underfoot, cooler nights and warm sunny days, colorful leaves sparkling in the autumn sun, and there’s always something crisp about the autumn air. Yes, I admit it — Fall is my most favorite time of the year.
After the “dog days of summer” I am so ready for Fall. It’s time to wrap up old projects and get started on new ones. It’s only a few months until Christmas, so it’s time to start my Christmas crafting and sewing. Fall inspires me to clean, organize, and declutter, getting ready for the upcoming winter season. It’s time to pull out warmer clothes and put the quilts on the beds. I just love sleeping under a quilt or when it’s really cold, under several quilts. There’s nothing like the comfort of sleeping under the cozy weight of a quilt — it’s better than any weighted blanket.
Embrace Fall wherever you are — jump in a pile of leaves with your kids, sit in silence and watch the leaves drift down, go for a hayride, take a walk in the park, go to the farmer’s market, carve a pumpkin, pick apples and make apple pie, drink apple cider and eat doughnuts (an old tradition where I live), go to a Halloween parade or festival. Celebrate the season.
Labeling Your Quilt
There are lots and lots of different ways to label your quilt, but today I’m going to show you my favorite way of labeling ALL my quilts from table runners to baby quilts to bed-sized quilts. It took me a lot of experimenting with different kinds of labels over the years before I finally found this simple, fast and easy label method.
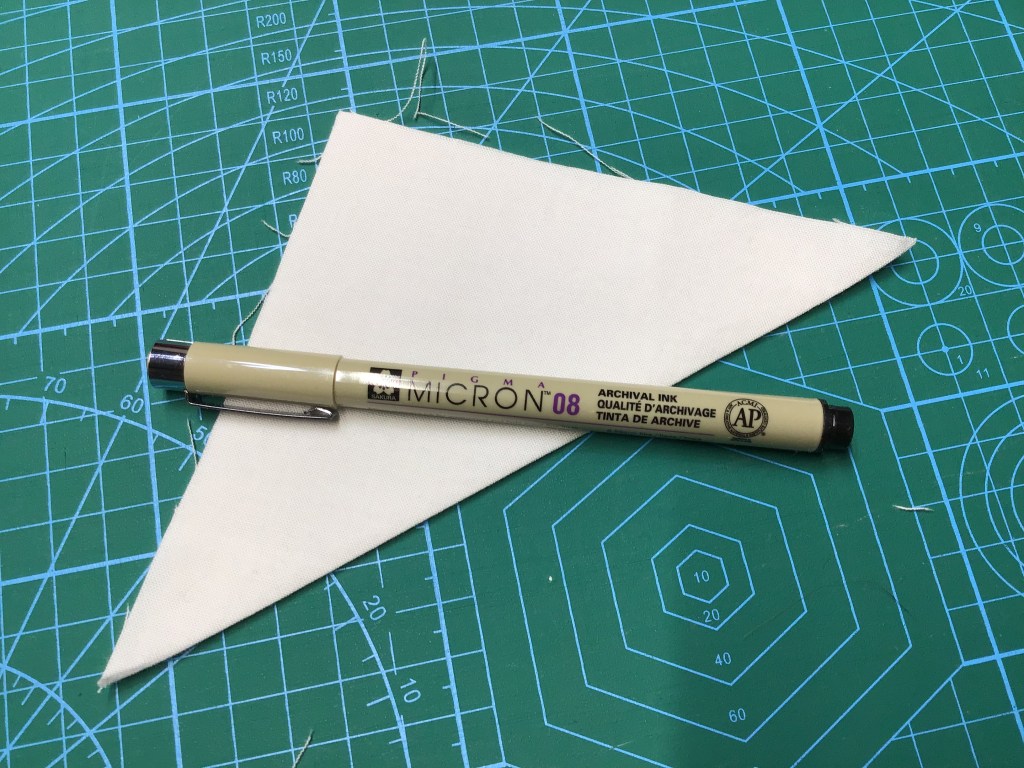
First I start with a square of white cotton solid fabric. For table runners, I might use a 4″ square, for baby quilts maybe 5″, and for bed quilts 6″ works great. Of course, the more information you want on your label, the larger you need to cut your square. The square below is actually 5″. I’m going to put put this label on my Halloween Ice Jam table runner, my sample I’ve been using for the last couple weeks. Normally, a 4″ square works great for a table runner, but I had a 5″ square just sitting there so I thought I’d use it. The size of your square really doesn’t matter, as long as it is large enough for all the writing you plan to do.
The next thing I do is fold my square on the diagonal to make a triangle. With solid fabrics, it usually doesn’t matter which way you fold as both sides are pretty much the same, but if you are using some kind of printed fabric, fold the wrong sides together.
Press your triangle with a hot iron on the cotton setting and let it cool down for a moment or two before moving on to the next step. You want a nice flat wrinkle-free triangle to work with.
Now grab your fabric pen. I use a Sakura Pigma Micron pen in black size 05 or 08 for writing my labels. The ink is archival quality and doesn’t bleed.
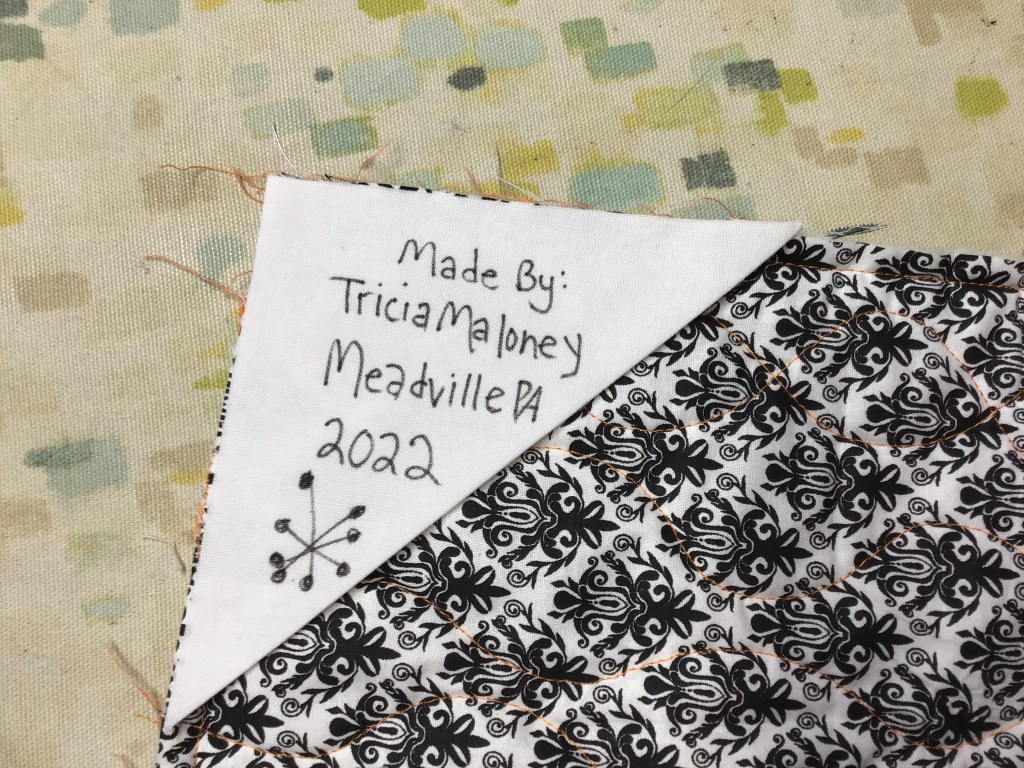
Before you write your information, take a moment to decide what it is you want to write on your label. A basic label includes the maker of the quilt, the quilter if different from the maker, a date, the recipient, and maybe a location. Imagine a hundred years from now, if someone finds your quilt and they see your label. They could do research to discover more about you, the quiltmaker, and perhaps even the recipient. The more information that is on the label, the more “valuable” someone may consider your quilt and its provenance, or history.
As an antique quilt and textile collector, I cannot stress this enough — label EVERY quilt. I have so many pieces in my collection without any information. Sure, quilts and textiles can give you some clues about their history, but without a maker, the story is always incomplete. Don’t let this happen to your quilts and your story. If you have family quilts without labels, please please please make sure to add a label to the quilt with any information you have or that quilt’s story might get lost forever.
You can add whatever you want to your label. Here are some other ideas — the story behind the quilt, the occasion, the quilt pattern if it’s not your pattern, the name of the quilt if you name your quilts like I do, a favorite quote, the inspiration behind the quilt, or whatever your heart desires. This is why I said above that you can make your label as large or small as you want, just make sure there is enough space to add all the details that you want to add. If you like to draw or doodle, you can even add artwork to your label. It’s your label, make it a special part of your quilt. Good at calligraphy? Why not make your labels extra special with unique lettering?
Here is a typical label for me. I write my name, my location, and the year I made the quilt. Sometimes I have enough room to add my characteristic starburst design, like in the first example. Often I write the name of the quilt above my name like in the second example, but not always.
After you write out your label, make sure to press it again with your hot iron on the cotton setting.
Now it’s time to pin the label to a corner of my Halloween table runner. It doesn’t really matter to me in which corner I put the label, but it usually ends up in the top left corner, particularly on larger quilts. I add my label to my quilts after I have machine-stitched the binding to the quilt, but before I have sewn the binding down. That way the binding helps to hold the label in place and it eliminates most the the fussy hand-sewing that is the norm for labels. This fussiness is probably why so many people do not bother labeling their quilts.
I usually place 3 pins in the label to hold it in place for machine stitching — one in the center and one in each corner. Keep in mind that you will need to flip your quilt over for sewing, so when you place the pins think about where you are putting them as that will be the back as you sew. This idea might sound kind of confusing right now, but hang in there and it will become much clearer in just a moment.
I next flip the quilt over with the front of the quilt facing up and the label now on the back. The pins keep the label from shifting.
Time to sew the label onto the quilt. Do you seethe line of stitches where I sewed the binding on in last week’s post? Did you miss last week’s post called Binding 101??? You can find it HERE.
Be careful sewing the label on the back — remember the pins? Begin before the first pin on the side. Back-stitch a few stitches, then continue to sew. Make sure you stay in the seam allowance of the binding, or else the bound edge of your quilt will not be straight and square. Sew until you get close to the fold in the corner, back-stitch a couple stitches and stop. Cut your thread. You don’t want sew into the fold or your beautiful French-folded corner will not be so beautiful anymore. It’s a good idea to pin the fold out of your way.
Take the pin in the fold out. Now turn the quilt and begin sewing again at the edge, making sure to stay in the binding seam allowance. Begin sewing and do a few back-stitches then sew until you go beyond the 2nd pin in the corner of the quilt. Back-stitch again and cut your thread.
Voila! Your label is sewn onto your quilt and when you sew down the binding either by hand or machine, the raw edges of the label will be sandwiched between the quilt and the binding. Later you can hand-stitch the folded edge down to the quilt if you want to, but it really isn’t necessary because the label isn’t going anywhere. I do strongly suggest you take that extra time to sew down the folded edge on baby, young child, and pet quilts.
As labels go, that was fast and easy, wasn’t it?
I hope you will go forward and label each and every one of your quilts, preserving your quilt story for the future.
NEW October 2022 Villa Rosa Rose Card Patterns
They’re here! They’re here! I’m always really excited at the beginning of every month because that’s when Pat, our Villa Rosa Designs Rose Queen, debuts our newest Rose Card patterns.
Aren’t they AWESOME! Every month our VRD designers just blow me away with their creativity. Quilting is one of the few areas in the world where you can keep reinventing the wheel. Our VRD designers do that every month!
You can order all five of the new October Rose Cards for the special price of $8.95 HERE. Wow! These patterns normally sell for $2 each on the website, so you’re getting a great deal at $8.95. Besides, why would you want only a few cards, when you can order ALL of them?!?
If you missed a monthly set or are just looking for a fun little surprise for yourself or your quilting buddy, you can check out our other Rose Card sets HERE, we have lots!
But wait….there’s MORE! (You know how much I love saying this! LOL!)
We have two — yep that’s TWO new table runners this month. Yippee!
Heidi revisited her bestselling Gummies pattern (you can get the Gummies pattern HERE if you missed it) and she came up with this delicious table runner using 5″ squares.
Interested in receiving the NEW patterns each month to your postal box (international quilters get digital patterns delivered right to their inbox) every month?
You can go HERE to sign up for our Monthly Pattern Clubs.
Don’t forget — patterns ship FREE!
Well, that’s it for me this week. And this is the end of our Basic Quilting Skills for Beginners series. Do you have any other special topics you’d like to see on the blog? Drop us a message or email and we’ll do our best.
Again, THANK YOU for following our Basic Quilting Skills for Beginners series. We are all thrilled with your interest to this series of posts. Sadly, this series will come to an end next week with Labeling Your Quilt.
So, I thought I’d ask — are there any other topics you’d like to see here? If so, please leave a comment or you can email your suggestions to me at tricia@villarosadesigns.com. I’d love to have your thoughts and ideas so our blog will continue to be relevant to you, our VRD fans and followers.
Now let’s get to BINDING!
The good news is that once you reach the binding stage, you are totally in the homestretch of having a finished quilt.
Yay you!
This week for our binding tutorial, we’ll use my Halloween Ice Jam table runner again. If you didn’t order the pattern last week, you can order it HERE.
There’s a couple of things we have to go over before we can do our binding.
How wide do I cut my strips?
You could ask a bunch of different quilters this same question and you would get multiple answers, I’m afraid — it’s not a one size fits all situation.
A lot of quilt patterns and quilters prefer to cut binding strips 2 1/2″ wide. As this seems to be the most common size in the quilting world, I too use this width for my patterns, but I personally find 2 1/2″ a bit too floppy, so when I do my own binding, I cut my strips 2 1/4″ wide, which for me makes a nice full binding. Of course, you will have to try both to see which one you prefer.
Yes, I use 2 1/4″ for almost all of my binding, but I must confess that there are a few types of projects I actually cut 2″ wide binding strips for — miniature quilts and any other tiny little quilty projects. Again, you’ll just have to try different widths on different projects to find out what works best for you.
Here’s a little something to consider — I have found that if your 1/4″ seam is a “fat” 1/4″ seam, then you’ll probably like using 2 1/2″ or if you’re like me and you use a “scant” 1/4″ seam, then 2 1/4″ might be a better fit.
As for mini quilts and such, you’ll probably want to use a slightly narrower width than what you use for your regular-sized quilts. You’ll just have to try things out to see what you like better because trial and error is all part of learning, isn’t it?
How do I know how many strips to cut for my binding?
Sometimes you get lucky and your quilt pattern will include the number of strips to cut and it might even suggest a specific width. But, if your pattern doesn’t specify how many strips to cut, read on my friend!
If you don’t know the dimensions of your quilt, you will need to measure the width and the length using your tape measure.
Let’s use my Halloween Ice Jam measurements for this example — it measures 18″ wide x 54″ long, so we need to add together 2 widths and 2 lengths to get the total inches around the outside of the quilt (otherwise known as the circumference).
18+18+54+54=144
Now we are going to divide 144 by 40.
This number will tell us how many strips to cut because we are dividing the total inches by the inches in the width of fabric.
Please understand I didn’t just pull a random number out of the air — ha ha! — 40 is the average width of fabric that I and a lot of other quilt designers use to determine yardage requirements for our patterns. Fabric can vary in width so it helps to use an average number maybe a little smaller than the actual width and 40 does that when fabric generally ranges from 42″ – 45″ wide. Besides, that little extra also helps to make sure you don’t run out of fabric by accident.
So, let’s continue.
144÷40=3.6
Let’s round that number up to 4 — I need 4 strips of fabric for my binding. That little extra is helpful to make room for the corners and joining our binding ends. There’s nothing worse than getting close to the end of sewing on your binding to find you are 3 inches short. When in doubt, add an extra strip.
But what do you do when you get a whole number instead of a fraction for the number of strips needed? Me, I definitely add an extra strip because I don’t want to run out of binding before I get to the end.
Yay! Quilt Math to the rescue again! Three cheers for math! Want to read my post about quilting and math? Check it out HERE.
Moving on……
Cut the required number of strips and then cut off all the selvedges. The selvedges are those tightly woven long sides of the fabric which usually have little holes in them. Off with the selvedges, I say, off with those selvedges!
Now we’re heading back over to the sewing machine.
There are a couple different ways to sew your binding strips together.
The first way is to layer 2 strips right sides together with the ends lined up. Use a 1/4″ seam to sew the strips together, just like in piecing. Press the seam allowance open to reduce bulk in the binding — nobody wants a lumpy binding. LOL!
The second way to join the strips is on the bias or diagonal. Lay a strip right sides up on your flat surface. Place a second strip perpendicular to (NO, not another math word! Horrors!!!) and on top of the first strip with the wrong side up, that way the strips are right sides together. Next, draw a diagonal line from corner to corner.
Then — you guessed it! — sew on the line. Does this sound familiar? It should because quilters use this technique for making triangles (HSTs) and flippy corners.
The next thing you need to do is find the end of the strip that is on top. Turn the strip over so it is now facing right side up. This is really important or else your binding will not have all the seams on the back of the strip. Take another strip and place it perpendicular to the second strip with the right side down, again making them right sides together. Draw a diagonal line and sew on the line again. Repeat this until you’ve sewn all the strips into one long binding strip.
Clip the threads in between the strips if you chain-piece and then cut off the waste triangles where the strips meet, leaving a 1/4″ seam allowance.
Time to press our binding strips. Let’s head back to the ironing board.
Place your binding strip right side down on your ironing board. Using your iron on a cotton or hot setting, fold the strip in half with the wrong sides together, pressing as you go. Remember, you are pressing, not ironing here. We just want to make sure the strip gets folded and creased.
When you come to a seam, press the seam allowance open like we did when we joined our strips into one long binding strip. Then fold, press, and keep going.
Almost done now. Just keep folding and pressing until you get to the end of the very long strip. Keep in mind the bigger the quilt you are working on, the longer the strip and the more time it will take to do this step.
Let’s head back to the sewing machine once again because it’s time to sew the binding onto your quilt. I know this seems like a lot of steps, but writing/reading about it takes longer than actually doing it. After some practice, it will become second-nature and you won’t even have to think about it, you’ll just do it.
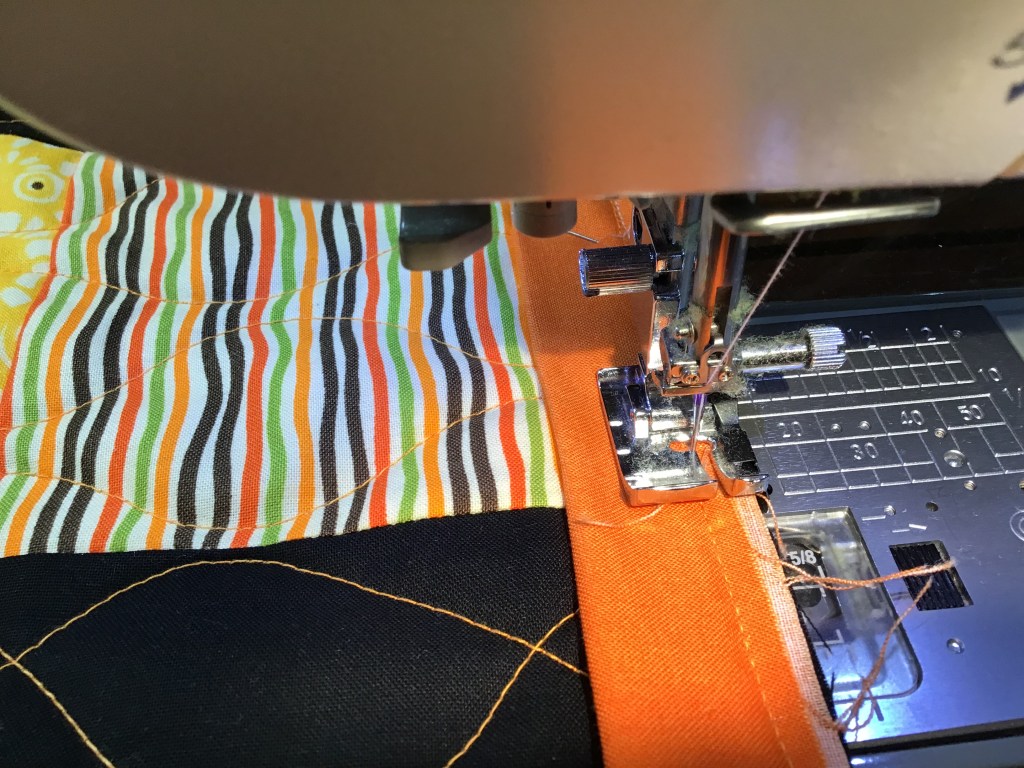
Lay your binding on top of the right side of your quilt with the raw edges lined up. I usually start my binding somewhere towards the middle of a long side. Be careful here because you want to avoid placing binding seams at your corners because the added bulk can make your corner turn out weird. Trust me on this. Been there, done that. It’s okay if you want to pin your binding all the way around your quilt, but with a little practice, you’ll have a fairly good idea how to avoid the dreaded seam allowance at the corner issue.
Pin the layers together about 10-12 inches from where the binding strip starts. Then place a pin through the quilt right before the binging begins, but not through the binding, only the quilt. This second pin right before the binding starts is a marker you will need later.
Start sewing at the pin 10-12 inches from the beginning of the binding strip. Backstitch a few stitches, and….GO.
Most people use a 1/4″ seam for sewing on their binding, but I personally use about a 3/8″ seam because I like a nice full binding. Try both ways to see which one works best for you.
Sew until you get to about 1/4″ from the corner.
When you get to 1/4″ from the corner — STOP and backstitch to secure the stitching. Cut your thread and pull your quilt out from under the needle.
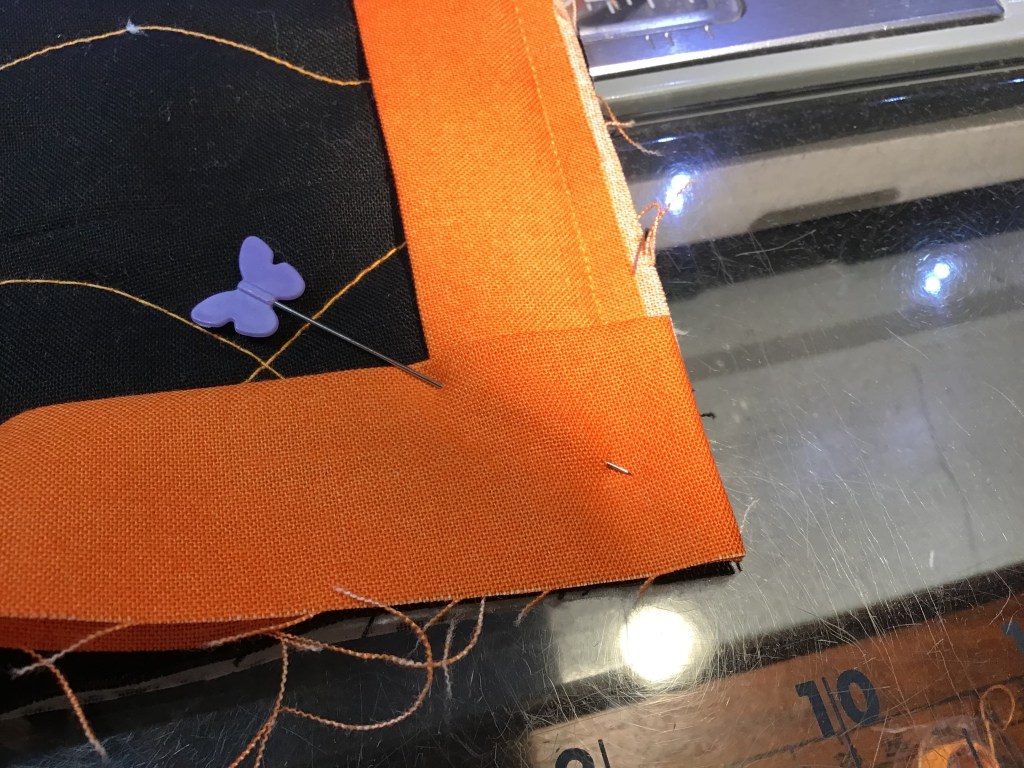
GULP! Here comes the scary part — making a French fold mitered corner. Cue the scary music….
Fold your binding strip at a 45 degree angle towards the right.
Now fold the binding strip back over itself to the left. Place a pin if you need to. This little fold here makes you able to overlap the binding into a nice miter on the back which will give you a really nice square corner.
Turn your quilt and start sewing at the corner, backstitch a couple stitches and sew until you get to 1/4″ from the next corner. Not scary, easy peasy!
Repeat the mitered corner fold, turn your quilt again, and keep going. When you finish the fourth corner, keep your eye out for the pin marking the place where the binding strip began. Stop sewing 3-4 inches before that pin and backstitch to secure the stitching. Once you’ve backstitched, cut your threads and pull your quilt out from under the needle.
Here’s a helpful little video from Alex Anderson and Ricky Tims about mitering corners.
Now we’re going to sew the ends of our binding strip together. This next part is really a leap of faith, but it does work, I promise you. Just stick with me, I won’t steer you wrong.
Smooth your binding strip over and beyond where the marker pin is (move the loose beginning binding tail out of your way). Use a ruler and measure from the marker pin the length of how wide you cut your binding strip. For a lot of you, that would probably be 2 1/2″ but for me and some others, that will be 2 1/4″. Draw a line with a fabric pen at that measurement from the marker pin and cut on the line.
Next open both ends of the binding, overlap them with the the ends right sides together at an angle, and then pin the binding layers together. Draw a diagonal line if you like or just eyeball it.
Please note that this technique isn’t the only one out there. If you want to learn other ways of doing binding, you can do an Internet search.
Sew on your drawn line and trim away the waste triangles 1/4″ beyond your sewing line.
Finger press the seam open to reduce the bulk and refold the binding with wrong sides together again.
Your binding strip should now lay nice and snug against your quilt. Yay! Next pull out the pins and use them to keep the rest of the binding lined up with the quilt.
Now it’s time to finish sewing the binding on. Start where you stopped before we sewed the ends of the binding together until you overlap where you originally started sewing the binding on. Backstitch at the both the beginning and the end of your stitching line.
Finishing Binding by Hand or Machine?
While doing this series about beginning skills, I have discovered that I am an “old school” quilter. It pains me that I am starting to show my age, but I know these tried and true methods work. Feel free to explore different methods to do any of these skills, but keep in mind that it’s important to know the old skills before you can learn the new skills — you have to have somewhere to start. So, maybe I’m not as antiquated as it sometimes feels these days. LOL! But that’s okay, those old skills serve me well and keep me making quilt after quilt with excellent results.
That being said, there are 2 ways to finish your binding on your quilt — by hand or by machine.
I finish all my binding by hand. After writing multiple books and making oodles of samples for magazines and patterns, I know I’ve probably hand-sewn miles and miles and miles of binding. But that’s okay. I like how a hand-stitched binding looks.
If you are interested in learning to finish your binding by machine, here’s a nice video from Jenny at Missouri Star Quilting. It’s actually a complete binding tutorial and shows you how you can sewn it down by machine.
If you prefer finishing your binding by hand, you can check out this video by Quilting in the Rain as she shows you how to sew a hidden blind stitch.
You might wonder why I’m giving you videos here, but I learned a long time ago that as a lefty, there are just some things I can’t teach to righties and sewing down binding is one of them!
BIG SHOUT OUT to my pal, Cathey Laird of Cathey Marie Designs, the inventor of the Y Block Ruler.
Long long ago, I tried to teach Cathey how to do mitered corners like I did, she found out hours later that a lefty can’t teach a righty how to do that because we fold our corners in different directions. Oops, sorry, Cathey!
Anyway, I don’t want to confuse anyone, so here’s a righty doing the hidden blind stitch for you. If you are a lefty and need a little help from a lefty, just shoot me a message and I’d be glad help you.
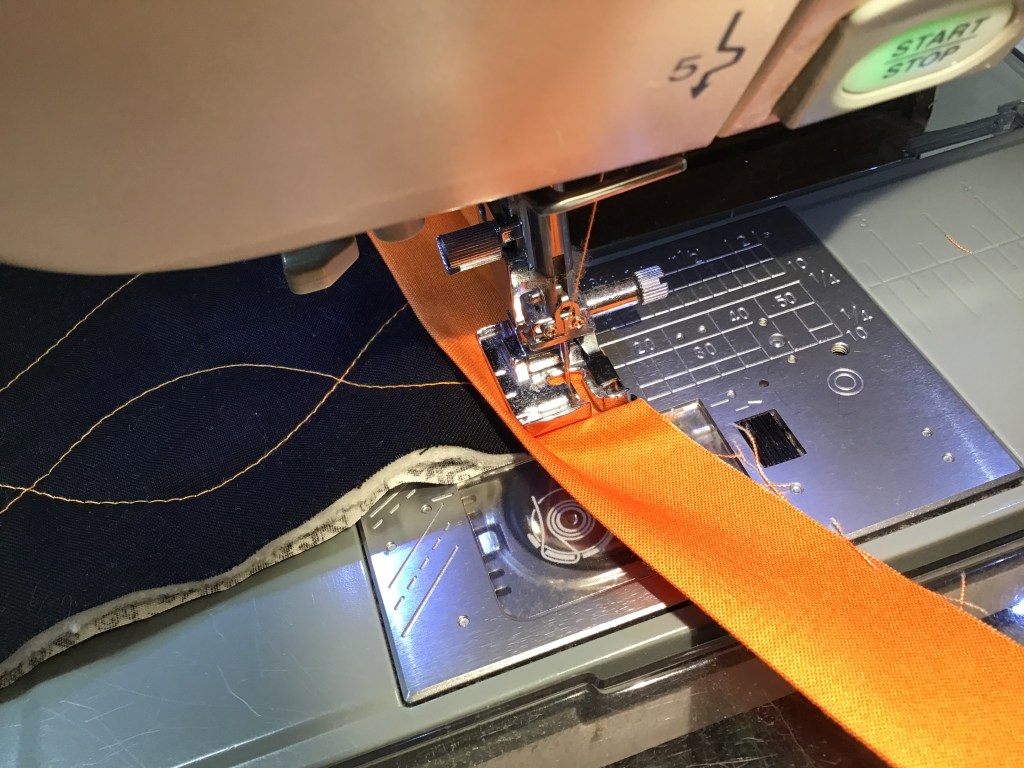
Here is my cute little Halloween Ice Jam table runner! Now all I have to do is sew the binding down and put a label on it.
Whew! I’m totally worn out now! I guess that’s about it for binding, folks. I can’t think of anything else to add.
If you have any questions, though, just ask. Did you know you can send us a message on the blog? You can go to our Contact Us page and scroll down to the bottom to find a form to fill out.
Stay tuned for next week’s post about labeling your quilt.
First, I want to give each of you a great big THANK YOU hug!
Thank you for reading our Villa Rosa Designs quilt blog, Villa Rosa Quilts. This past week, the number of views has exploded and we’ve added new followers, too. And it’s all because of you, our VRD fans and followers. We are thrilled that you find our blog to be informative, fun, and worthwhile.
Did you know you can follow our blog and never miss a Thursday Post? All you need to do is type in your email address and click the subscribe button just to the right of the blog post towards the top and you’ll get each new post delivered right to your email inbox every Thursday!
Now let’s hop right into this week’s Basic Quilting Skills for Beginners post — Squaring Up.
You cut, you sewed, you quilted, and now it’s time to square up your quilt. I was planning to do both Squaring Up and Binding in this post, but I decided it would probably be better to separate the two topics, otherwise the post was going to be too long, too wordy, and probably too boring and we can’t have that.
Forgive me, but you’ll have to wait until next week for Binding.
Squaring Up
Before you can do the binding, you first must square up your quilt.
Why should I square up my quilt? Can’t I just slap on the binding and be done?
That’s a good question — sure, you could just slap on the binding, but you probably wouldn’t be satisfied with the results. Things can get distorted as you handle your quilt, press (or maybe you iron), quilt it, tug, pull, crumple it up and throw it on the floor — well, you get the picture. Think of squaring up like pre-binding.
My quilt “volunteer” today is a new Halloween version of my Ice Jam VRD pattern. I made this runner a couple months ago as a sample project in my 2022 Villa Rosa Rose Card Table Runner a Month class, but never finished it.
BIG SHOUT OUT to all my awesome class buddies — Mary Lee, Sherry, Missi, Debbie, Anita, Robin, Kim, Gaynel, Jean, Donna and Gayle (the owner of my local shop, Homespun Treasures, where my class meets). Homespun Treasures, of course, has lots of Rose Card patterns in stock. Just sayin’….
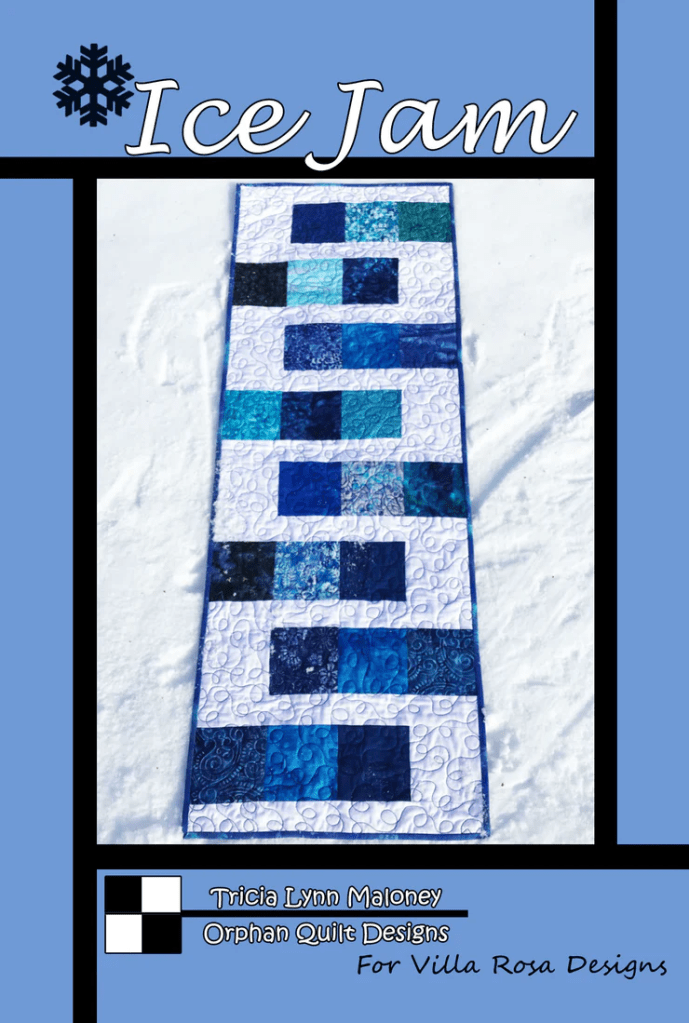
Here’s the Ice Jam Rose Card pattern. It’s a super fast and fun table runner which measures 18″ x 54″ and uses 5″ charm squares. It’s a very versatile pattern and will look great in any style or theme. So, try it out.
Here’s the pattern cover with the original wintery blues.
What!?! You don’t have the pattern? You can order it HERE.
Just a quick note about the machine quilting. If you missed our Quilt As Desired post last week, you can find it HERE. I added my wiggly lines free motion quilting video to last week’s post and I just wanted to point out my fun wiggly squiggly lines on this table runner.
Okay, okay……let’s get back to squaring up.
You might want to press your quilt before squaring it up. Pressing your quilt will help everything lay nice and flat.
Next lay your quilt out on your cutting mat, centering one corner of the quilt on the mat because we will square up the corners before cutting the sides. If you are working on a large quilt, it helps to support the weight of the quilt on a table or chair. The problem with larger quilts is that if the quilt is hanging off your cutting mat/table and down to the floor, the weight of the quilt can pull things out of whack . Oops! Gravity works. Now if you lived on the moon, you wouldn’t have to worry about this issue…. (wink, wink)
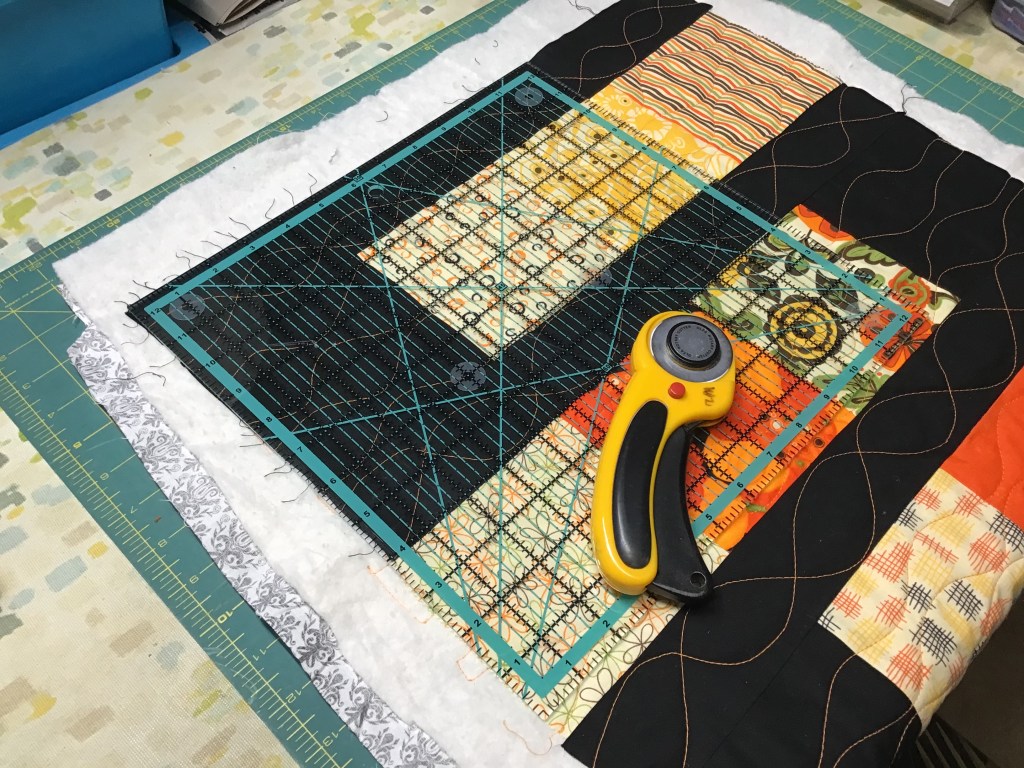
Use the biggest square ruler you have for cutting your quilt corners, the bigger the ruler, the easier it is to square up your corners. I personally love my 12 1/2″ square for working with table runners and smaller quilts, but I also have 15″ and 18″ square rulers to use for larger quilts.
Once you’ve smoothed your quilt out flat, lay your square ruler down on a corner of your quilt. Adjust the square as needed to make the corner 90 degrees, sliding a little this way and that way until it’s square.
Don’t worry if batting, backing, and even slivers of your top are beyond the edges of the ruler. If you see too much of the front of the quilt beyond your ruler edge, though, wiggle the ruler around some more until there is very little of the quilt top showing beyond the ruler. You don’t want to cut much from your quilt edges, especially if you have triangles all the way to the edge of the quilt because you will probably cut off your triangle points and that will not make you very happy.
Take your time here because once you cut, you can’t go back. Hold the ruler down with one hand using good solid pressure — be careful not to shift the ruler – and cut on the 2 outer sides of the ruler, thus making this corner square.
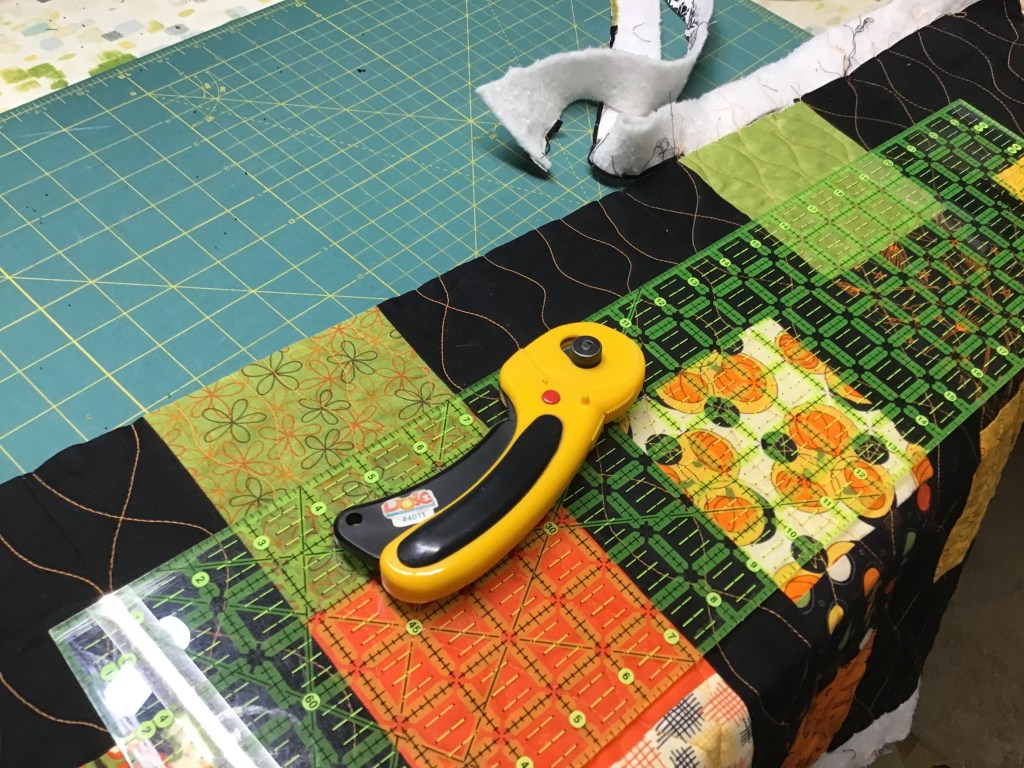
Let’s move on to the next corner. Line up the ruler, adjust it gently for another nice square corner, then cut. Repeat for corners 3 and 4. Yep — you’re going to have weird strips of batting/backing hanging off your quilt. That’s okay. We’ll take care of that in the next step. In the meantime, think of it like quilt spaghetti.
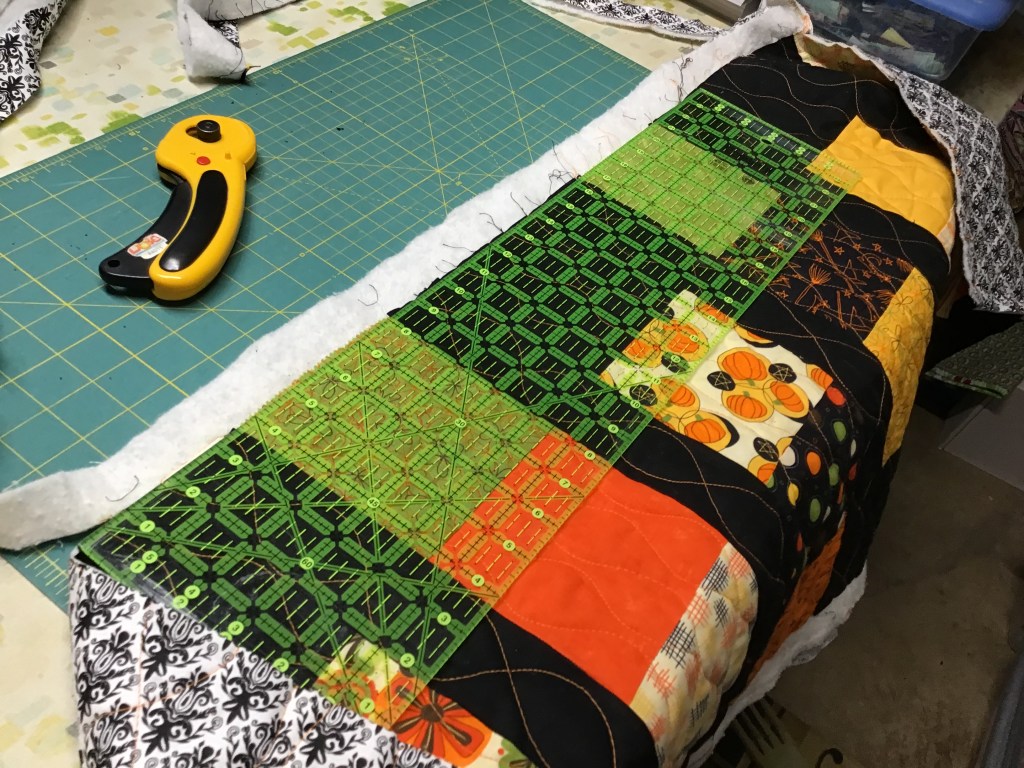
Now it’s time to position the quilt on the cutting mat so we can cut the long edges and remove all that quilt spaghetti. I use my 6″ x 24″ ruler for this part. Again, if you’re working on a big quilt, support the weight so the quilt doesn’t slide off your mat/table or skew your cutting.
Please be patient and take your time with your squaring up (I know it’s hard but trust me — I have the attention span of a four year old, so if I can do it, you can do it) because if you don’t square up properly during this step, your quilt will never be square, no matter how much you tug and pull later down the road. Wonky quilts don’t lay well on tables or beds nor do they look nice hung up on walls.
Start at one nicely squared up corner and line up the long ruler. Again, don’t worry if you see bits of your quilt top sticking out beyond the ruler edge as that is completely okay and to be expected. Once things are lined up to your satisfaction, cut with your rotary cutter along the ruler edge, stopping before you reach the end of the ruler so you don’t accidentally cut into your quilt. Gently slide the ruler across the quilt edge so you don’t distort your nice straight edge or your square corner. Make sure that the ruler is still lined up with your fresh cut quilt edge. Cut again. Continue doing this until you can line up your ruler from your freshly cut edge to your next squared up corner and cut. Yay you! Only 3 more sides to go.
Go ahead and repeat for the other 3 sides. Luckily with a table runner, I usually only have to cut the 2 long sides this way as the short sides get squared up when I use my 12 1/2″ square ruler for the corners. Not so lucky with big quilts — sometimes it’s like wrestling an octopus, but keep at it, you will be the winner.
Here it is! My squared up quilt. Yay!
Ice Jam runner in Halloween fabrics
Let’s do a quick check to make sure things are all square before we move on.
Fold your quilt in half, lining up the edges and corners as best as you can, use a few straight pins if you need to. If things are nice and square, everything should line up pretty well (there really is no such thing as perfect, so if things aren’t 100% exact, that’s okay). If corners or edges are not lined up, then you need to check the squareness of your corners with your large square ruler again and make any necessary minute adjustments to square up those corners. Then check the long sides again using your long ruler to make sure things are nice and straight, only cutting away slivers of quilt to make things more square and straight.
Fold your quilt again, lining up corners and edges, to check your squareness. Repeat until things are as square and straight as you can get them.
Well, I think that’s it for today. Next week I promise we will attack the Binding in our Basic Quilting Skills for Beginners series.
Here’s hoping we all have a productive autumn season — especially with our quilting.
I don’t know if you’re like me or not, but I tend to quilt less in the summer months. First, of course, it’s summer and I want to be busy doing other summer-y things and going places. Second, my Sewing Dungeon, er….Studio, is not air conditioned, so for a couple of months out of each year, it’s hard to sew with sweat dripping down into my eyes and onto my projects.
Yup, here’s my dungeon! LOL! Cue the creepy music, please! Image by upklyak on Freepik
Needless to say, I look forward to the cooler fall months when I feel more productive in my studio and I get excited again about new projects.
What the Heck is “Quilt as Desired”???
If you’re new to quilting, you might have seen the phrase “quilt as desired” at the end of some of your quilt patterns. But what does it really mean? It’s a designer’s way to say quilt your quilt any way you want to.
On our Villa Rosa Designs Rose Cards, we take it a step further and say “Quilt and bind as desired.” Gee, that makes all the difference, doesn’t it? NOT!
If you’re a beginner, how are you supposed to know what to quilt or how to quilt your quilt to finish it?
Never fear — I’m here to help!
The first thing you need to consider after you complete the quilt top is what kind of quilting are you going to do? Machine quilting? Hand quilting? Or even tying/tacking?
Okay, let’s say you want to machine quilt your quilt yourself (sorry, I’m not into hand quilting, so you’re stuck with machine quilting). Here’s a little video I put together a while back about some basic free motion quilting skills and information.
Wiggly lines are just one way you can quilt your project. Here are some of my other free motion quilting favorites.
Straight Lines
If you haven’t tried quilting simple straight lines on a project, it’s way past time you did! To get your lines relatively straight, you will probably want to use a walking foot or an even-feed foot on your sewing machine. A walking foot or even-feed foot moves the top and bottom layers under the needle at the same time so your sewing lines are less likely to pucker and you won’t get those annoying tucks on the back of your quilt.
Here’s a great example of what straight lines can do for your quilt — this is only the backside and it’s unwashed! Cool, huh? Straight lines add a lot of texture. And if you look closely, you’ll see that my lines aren’t really all that straight, but by repeating the lines over and over about the same distance apart, it looks pretty awesome. Now imagine what this table runner will look like after I wash it and it crinkles up beautifully! You’ve just got to try straight lines!
Straight lines look great quilted on anything modern as well as children’s quilts. But I wouldn’t recommend straight lines on your Civil War reproduction quilt. LOL!
Loopy Loops
Loops are probably my all-time go-to design. I usually use this design edge to edge but sometimes I will use loops in the quilt center with something different in the borders. It depends on my mood, how much time I have, and what the quilt needs to be completed. (Yes, quilts talk to me — I am a quilt whisperer…)
As a free motion quilting teacher for a lot of years, I have discovered that loopy loops are more beginner-friendly than stippling/meandering. You have permission to cross over your lines in loopy loops, whereas in stippling/meandering you do not cross lines at all. Loopy loops are less stressful and I find them lots of fun to do.
Below, here’s an example of loopy loops. Neat, huh? See how all the loops are not the same shape or size? That’s what makes this design look easy-breezy. You can also use loopy loops as a jumping off point for A LOT of other variations.
I tend to quilt my loops big and open, which of course uses less thread and takes less time than quilting itty bitty loops. My rule of thumb is to quilt my lines of quilting no closer than a finger’s width. Of course, if I’m quilting a doll quilt, I’m going to quilt this design smaller and closer together than if I am quilting a throw quilt. Adapt the size and density of your quilting to the project you are quilting.
Loopy loops look pretty great on almost any project! Maybe not your Civil War repro quilt, though. (Maybe you should try hand-quilting for that one, just sayin’.)
Stippling/Meandering
All beginner quilters want to learn how to stipple/meander. I have found over the years that a lot of intro to free motion quilting classes start with stippling/meandering. This is not really a true beginner design, in my humble opinion. I think it is better suited for a more advanced machine quilter. Why? Because you cannot cross over your lines and that is hard to do (or not do) while you are trying to get all the other 101 free motion skills and information all at the same time — beginning free motion can be a bit overwhelming, and that’s without having to worry about not crossing over your stitching lines! Ugh!
Sadly, intro free motion classes keep trying. And mostly failing. Then beginners get frustrated and upset when they can’t quickly pick up stippling/meandering in a couple hour class. Then many of them just quit. I’m sorry to tell you, but stippling/meandering takes most people a lot of practice to master. So I recommend that beginner free motion quilters start with straight lines, wiggly lines, and loopy loops before even attempting stippling/meandering. Most of us have to crawl before we walk….
By the way, in case you wondered, stippling and meandering are pretty much interchangeable terms at this point, although once upon a time they were slightly different. I am using both at the same time so as not to cause any confusion for anyone. 🙂
To me, stippling/meandering is a lot like loopy loops except you are not crossing over any lines. That difference can be very daunting to a beginner, however. If the idea of not crossing lines terrifies you, then please do try straight lines, wiggly lines, and loopy loops before moving on to stippling/meandering. I still try to use my rule of thumb of leaving at least a finger’s width between my lines of stitching.
Here’s an example of stippling/meandering. I apologize that it might be hard to see my brown thread on the swirly-printed pink backing fabric on this place mat. Aha! Here’s another one of my tips: Use a busy fabric on the back of your quilt because it helps to hide your quilting stitches — this is particularly helpful when you are a beginner. It will help you to feel more confident about your developing quilting skills!
Probably the most important thing to remember about machine quilting is RELAX and HAVE FUN! Because quilting shouldn’t be like a job or chore, it should be relaxing and fun or else why would we be doing it???
You can check out some of my other favorite quilting tips HERE.
Next week we are going to tackle Binding, so stay tuned!