2025 Let's Design a Quit Together Series · Just Quilty Stuff · Quilt Play · Tips and Tricks

Let’s Design a Quilt: Playing with the Courthouse Steps Block

Happy Thursday to you!

Are you ready to play with another quilt block? Yippee! Me too. This really is SEW much fun for me to do and I think it’s also helping me to think more “outside the box.” I’ve definitely noticed more designs popping into my head lately. 🙂

If you’ve missed our Quilt Design Series so far, you can catch up:

Playing with Nine Patch Blocks

Playing with the Spool Block

I was a little disappointed that no one was brave enough to suggest a quilt block in the comments on last week’s blog post. Please consider letting me know what your favorite block is or another block suggestion to design with as I’m planning to do this mini series on designing for a few more weeks. Do you really want me to have all the fun of picking out all the blocks?

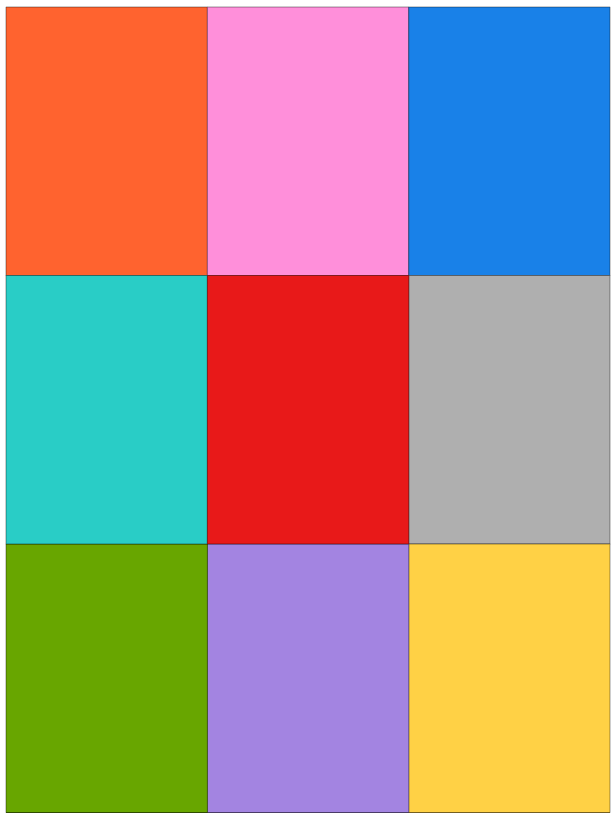
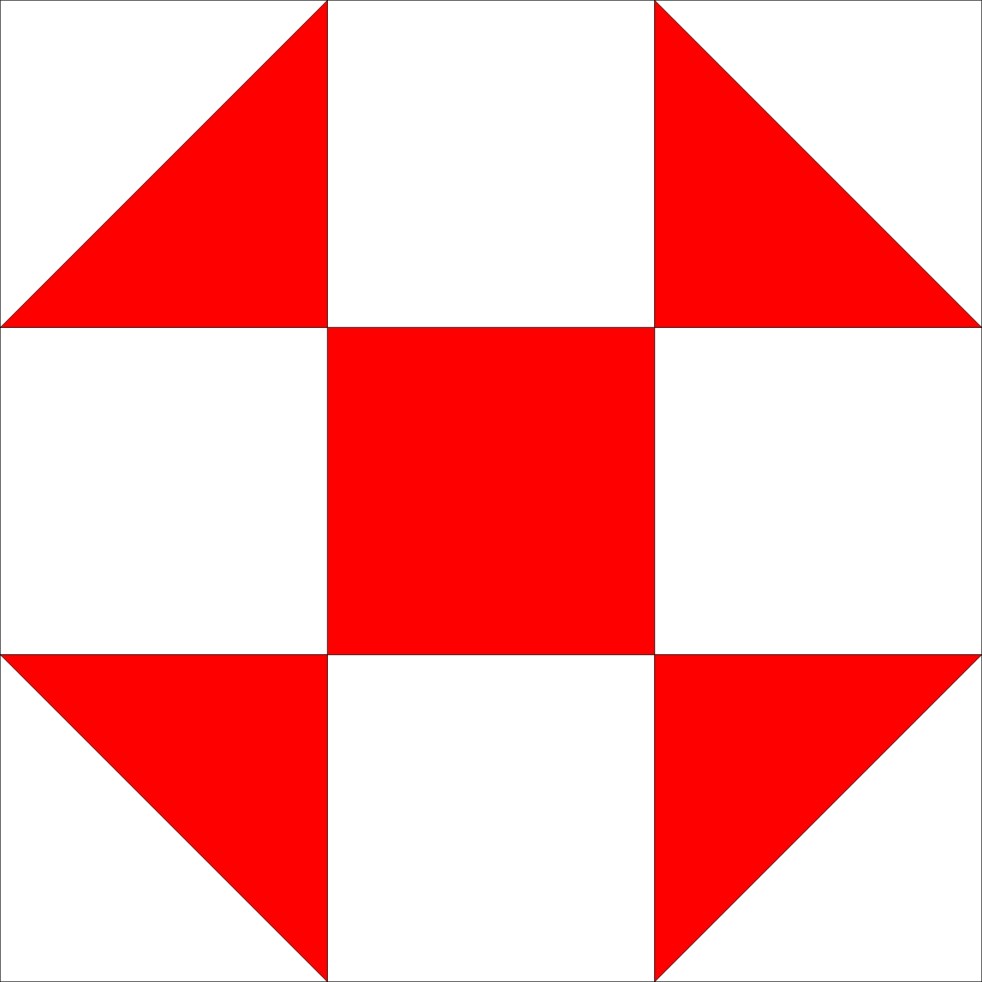
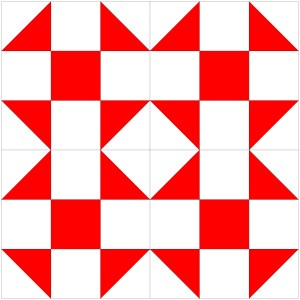
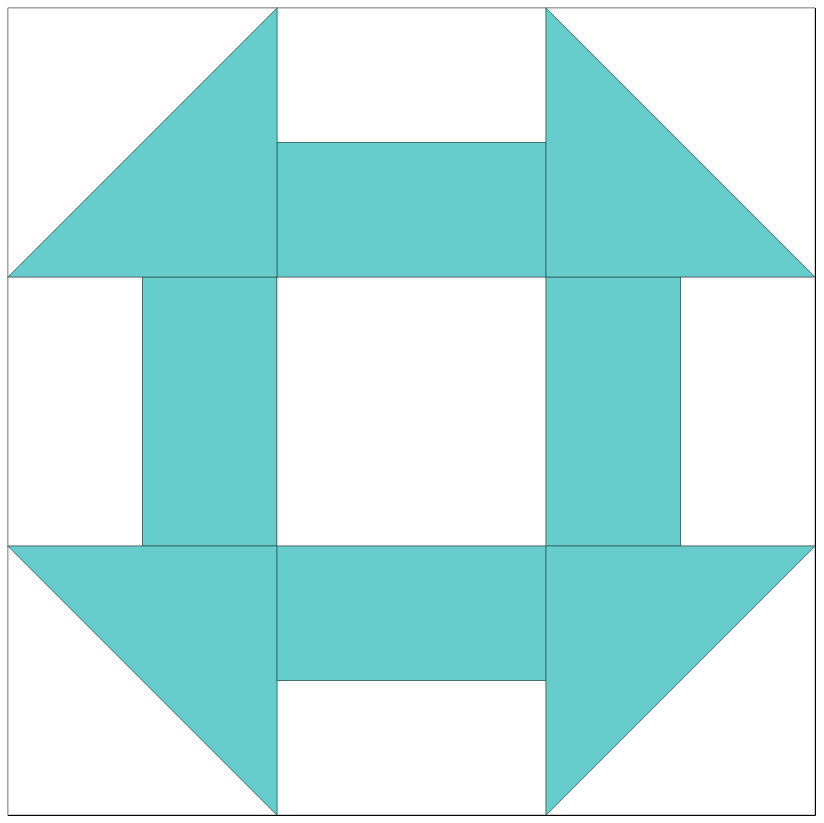
So I asked my quilty pal, Mary Lee (Hey Mary Lee!) for a block suggestion. She thought for a few seconds and then suggested either Churn Dash or Courthouse Steps. I thought both were good options. Churn Dash (image 1, below) is another Nine Patch variation while Courthouse Steps (image 2, below) is a variation of a traditional Log Cabin block. Because we’ve already done 2 Nine Patch blocks, I zoomed in on her Courthouse Steps suggestion and immediately began to wonder what we could do with it.

A digital illustration of a Courthouse Steps quilt block design featuring a central square surrounded by rectangles and triangles in a light teal color.
Image 1 – Churn Dash block, also known as Hole in the Barn Door and Monkey Wrench
A quilt block design featuring a central pink square with gray and white rectangles surrounding it, arranged to create a geometric pattern.
Image 2 – Courthouse Steps block

Since I’m going to focus on the Courthouse Steps block today, I’m assigning all of you readers “homework” — see what you can do with the Churn Dash block (image 1, above).

You can share your “homework” on our Facebook Page, in the comments (although I’m not sure if you can upload images), or you can email them to me at tricia@villarosadesigns.com.

I’d love to share your ideas on next week’s blog or upcoming posts if we have a big response. I hope you will take a little time and play – er, I mean design a quilt – along with me. Hand drawn, EQ, or Adobe images are great, please use a .jpg or .pdf format atat no more than 300 dpi.

Who knows????? There might even be a prize or 2…. US and International friends can play along, so go get started – right after you finish reading this post, that is.

Let’s learn a bit about the Courthouse Steps block. As I mentioned earlier, it’s a variation of a Log Cabin block. According to Barbara Brackman in the Encyclopedia of Pieced Quilt Patterns, it was originally called White House Steps and appeared in print circa 1890 in the first Ladies’ Art Company catalog, which included 272 patterns. White House Steps was block #221. Of course, that doesn’t mean the block just suddenly appeared in the 1890’s. rather, that was the first known version in print. Quilters may have been making the block much sooner than the 1890’s.

A Courthouse Steps quilt block design featuring a central pink square surrounded by alternating gray rectangles.
White House Steps block
A graphic representation of the Courthouse Steps quilt block, featuring a central pink square surrounded by alternating gray and white rectangles.
Courthouse Steps block

The Courthouse Steps block we are familiar with today uses color a bit differently than the White House Steps version, above. Interestingly enough, “Courthouse Steps” isn’t even mentioned in Barbara Brackman’s book. I wonder if it’s a regional term used for the block? Does anyone know this block by another name? Just curious. I did find the block in Electric Quilt 8 software (which is based on Barbara Brackman’s book), but it is considered a foundation pieced block and does not include any historical information.

Doing a quick Internet search, I discovered a post on Suzy Quilts about Courthouse Steps blocks with a touch of history and wonderful examples of Gee’s Bend quilts. Check it out HERE.

Alright! Ready to get designing???

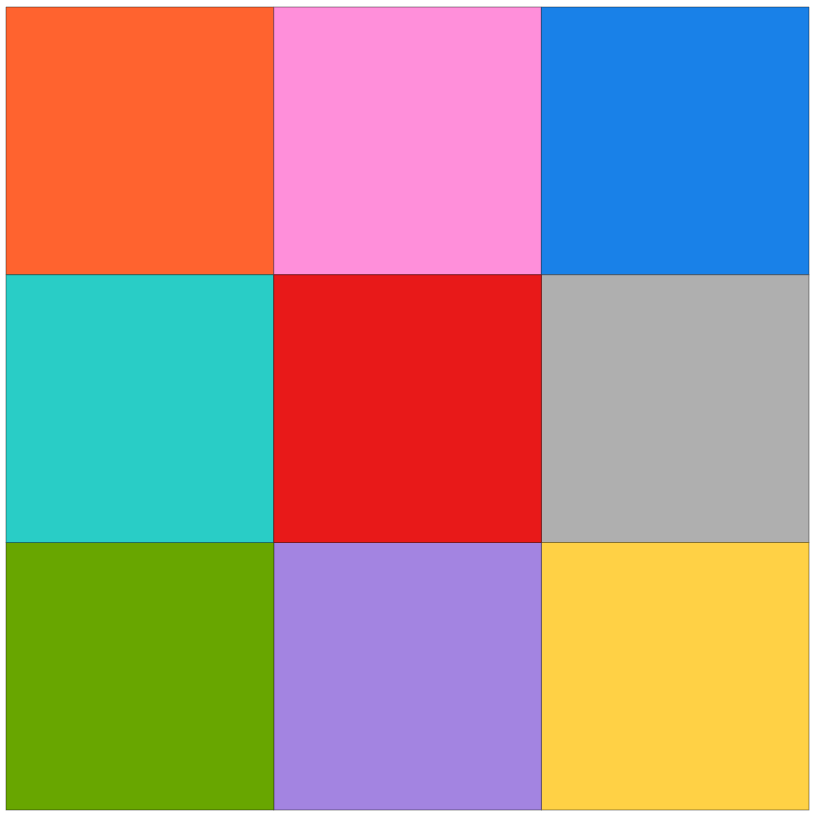
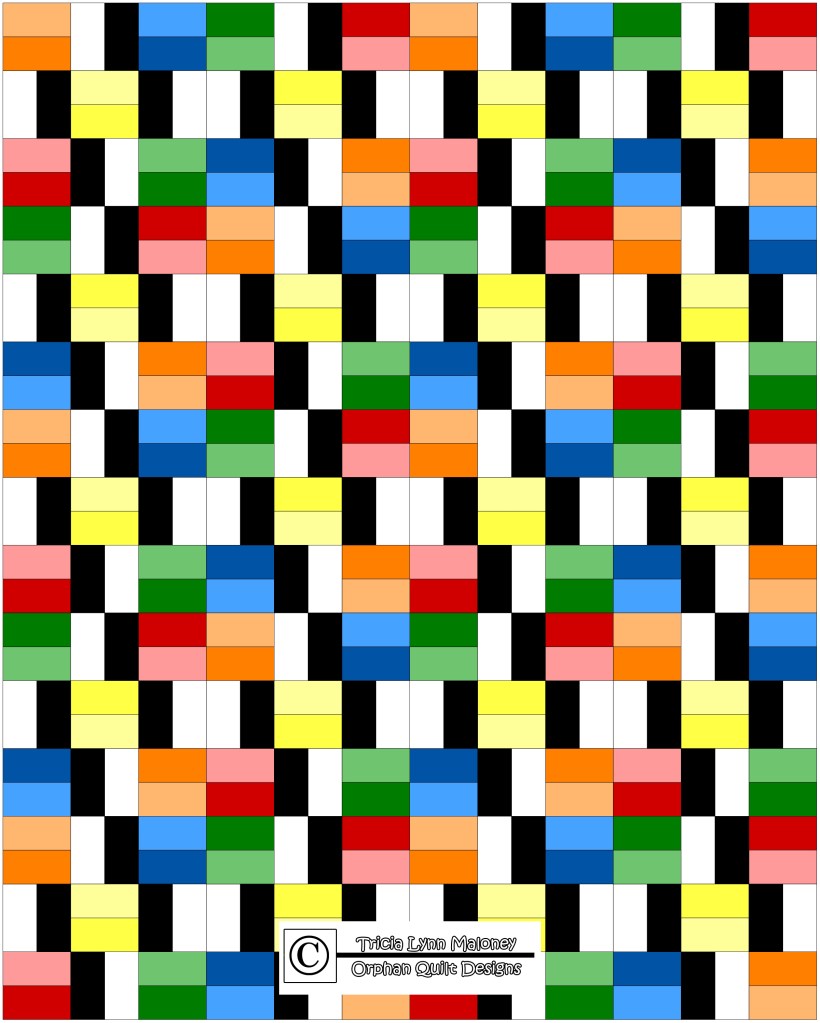
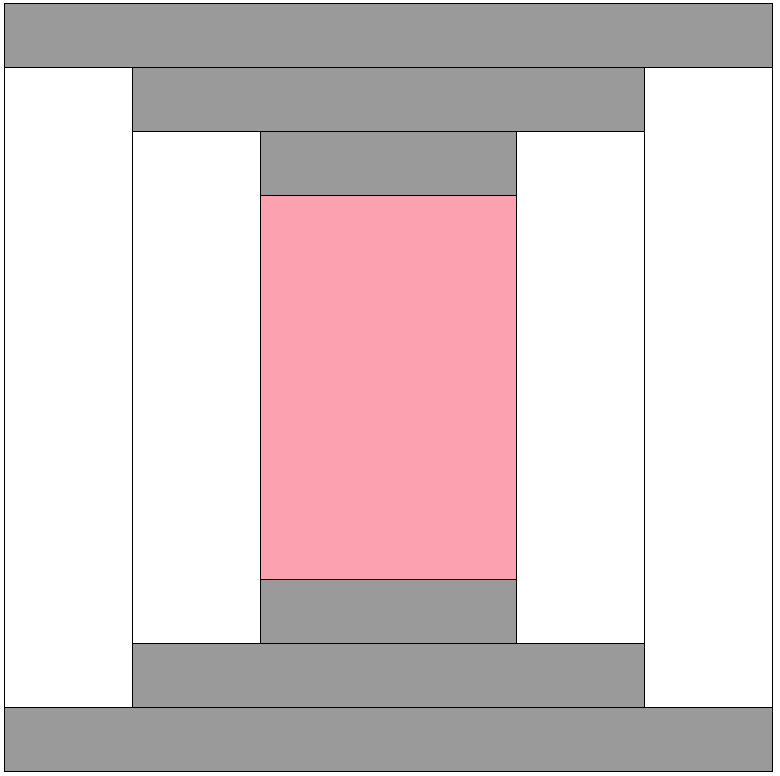
So, here’s our block again. Take a good look at it – what do you see? A central square with rectangles radiating from the center square both horizontally and vertically. That’s it! Simple, but very effective, very geometric, and very graphic.

Illustration of a Courthouse Steps quilt block design featuring a central pink square surrounded by gray and white rectangles.
Courthouse Steps block

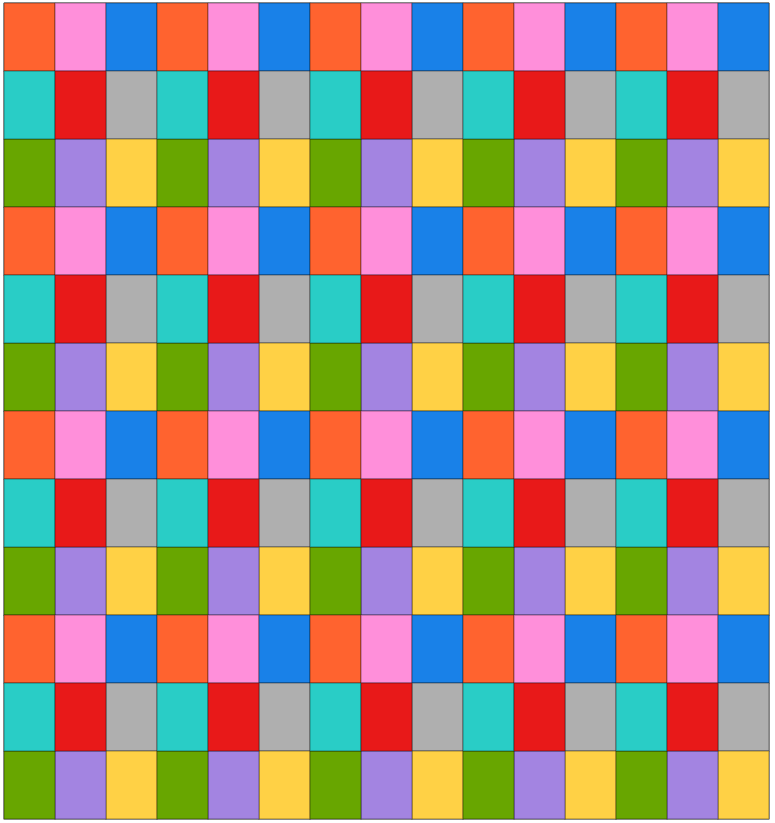
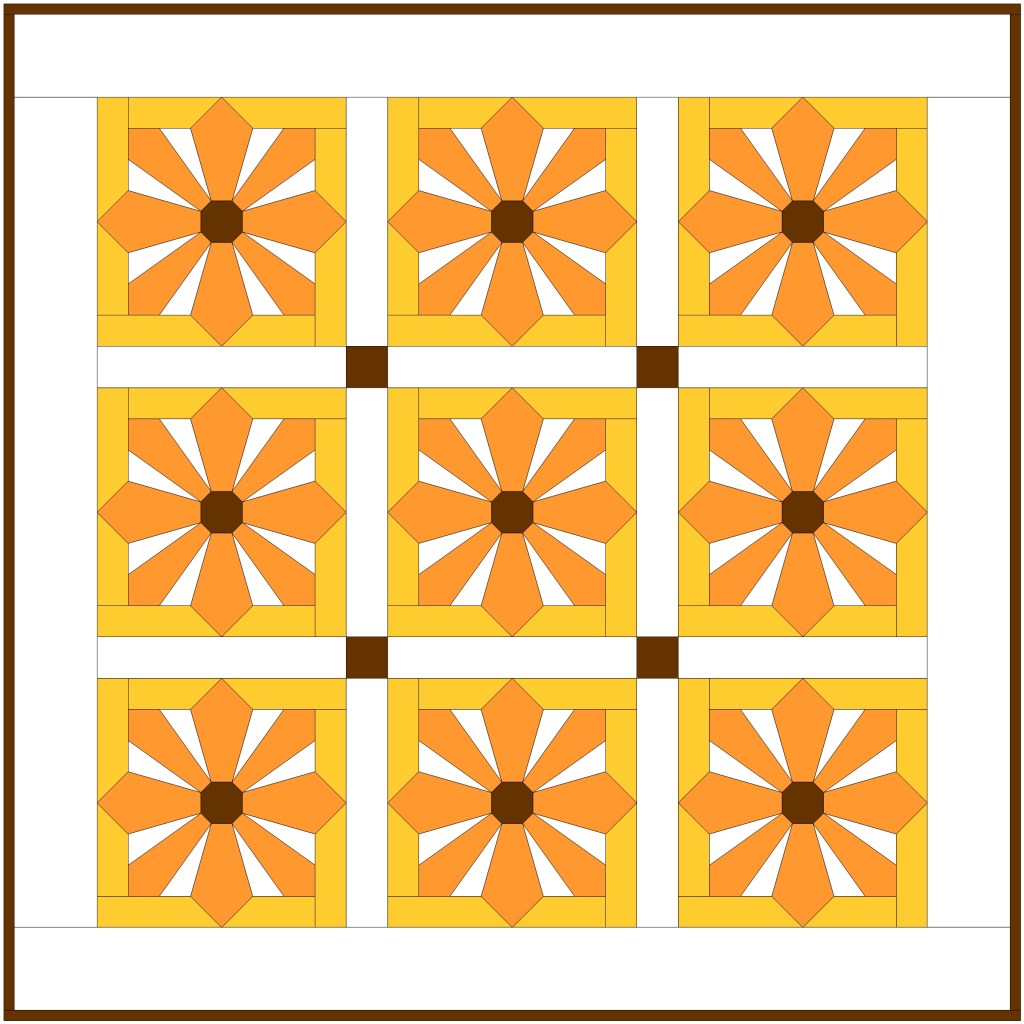
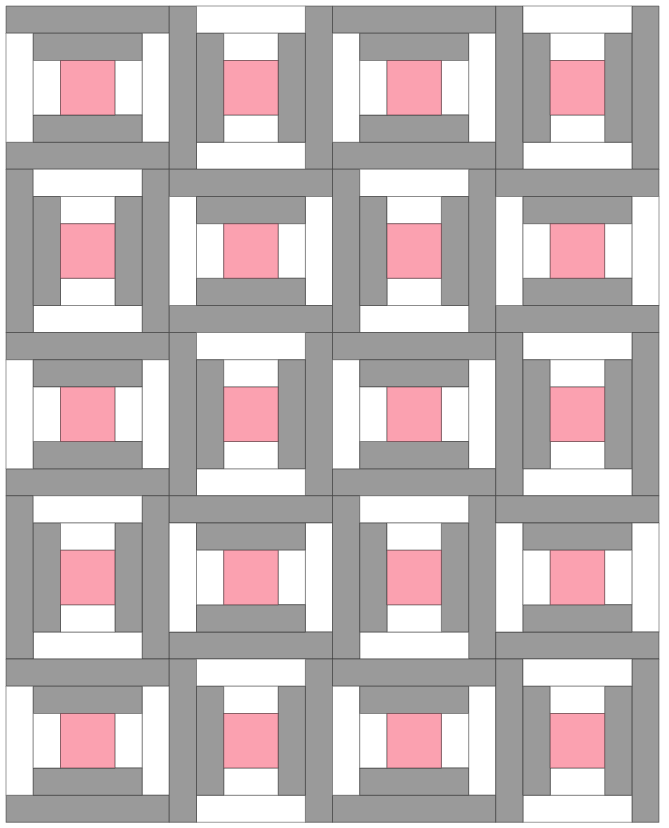
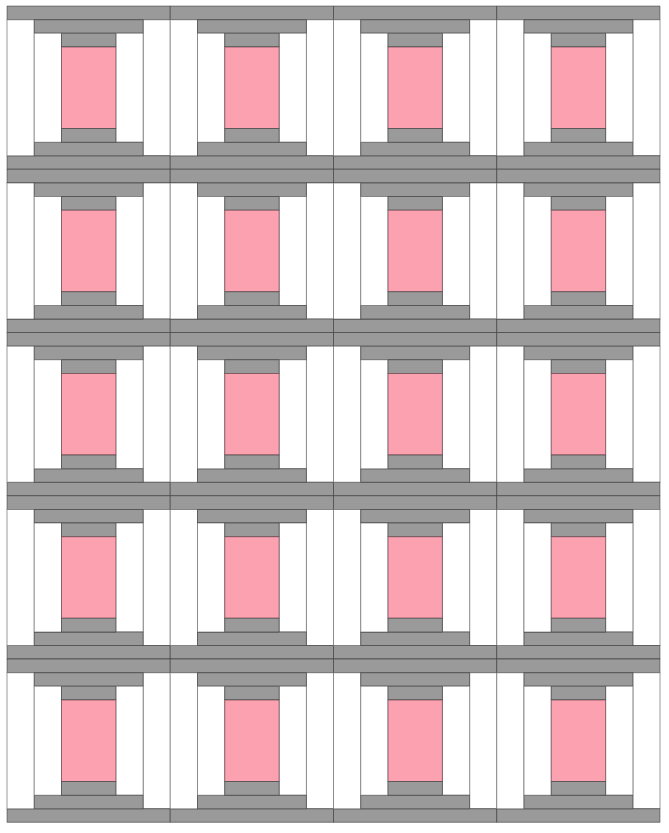
Let’s put the blocks side by side with all of the blocks going the same direction. Okay, this is fun. And it would make an awesome scrappy quilt, wouldn’t it?

A digital mockup of a Courthouse Steps quilt block design featuring pink squares, grey and white rectangles arranged in a geometric pattern.

Let’s turn the blocks sideways and see if we get something different. Pretty much the same thing, just different direction.

Pattern design of the Courthouse Steps quilt block featuring alternating shades of gray, pink centers, and white accents in a geometric layout.

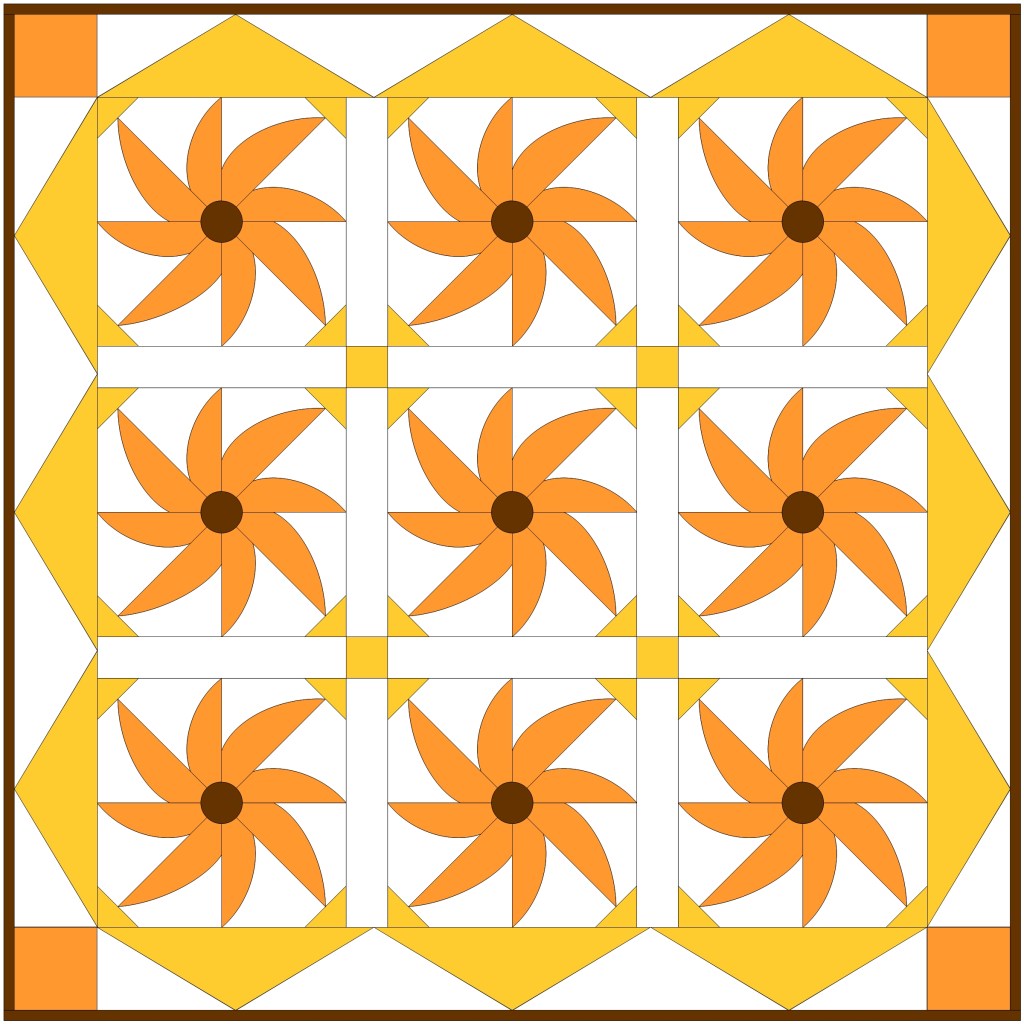
Let’s alternate every other block next. Huh. Better. Definitely more movement in this one, wouldn’t you agree? I almost detect a bit of a curvy look happening, which is interesting with a square block.

A quilt design featuring alternating Courthouse Steps blocks in shades of gray, pink, and white arranged in a grid pattern.

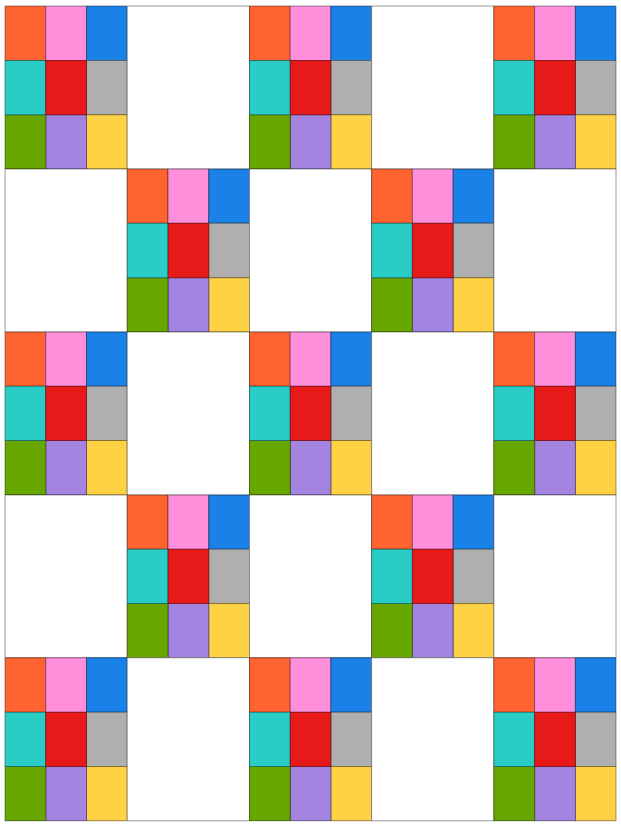
Now I think I’d like to see what happens when I group the blocks in 4’s. That’s interesting.

A digital quilt design featuring multiple Courthouse Steps blocks arranged in a grid pattern with a mix of gray, white, and pink colors.

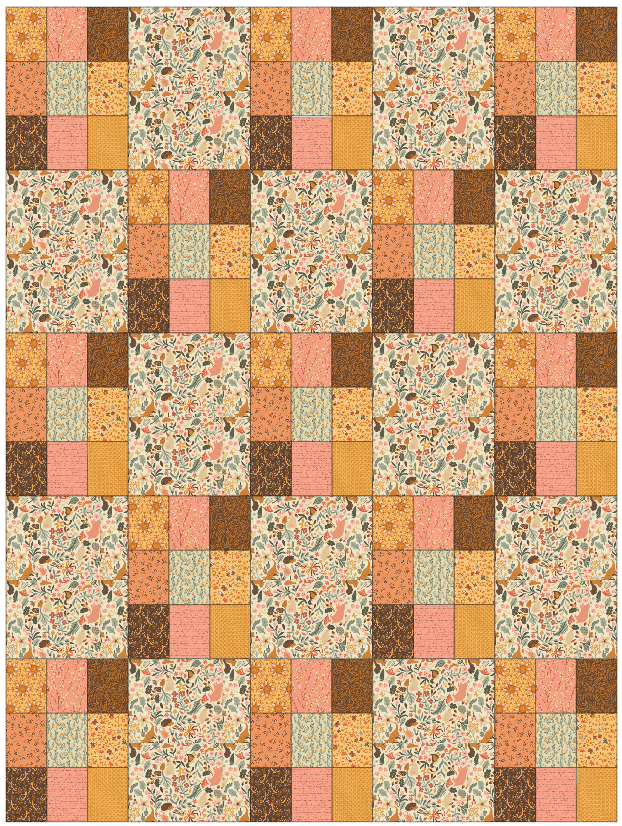
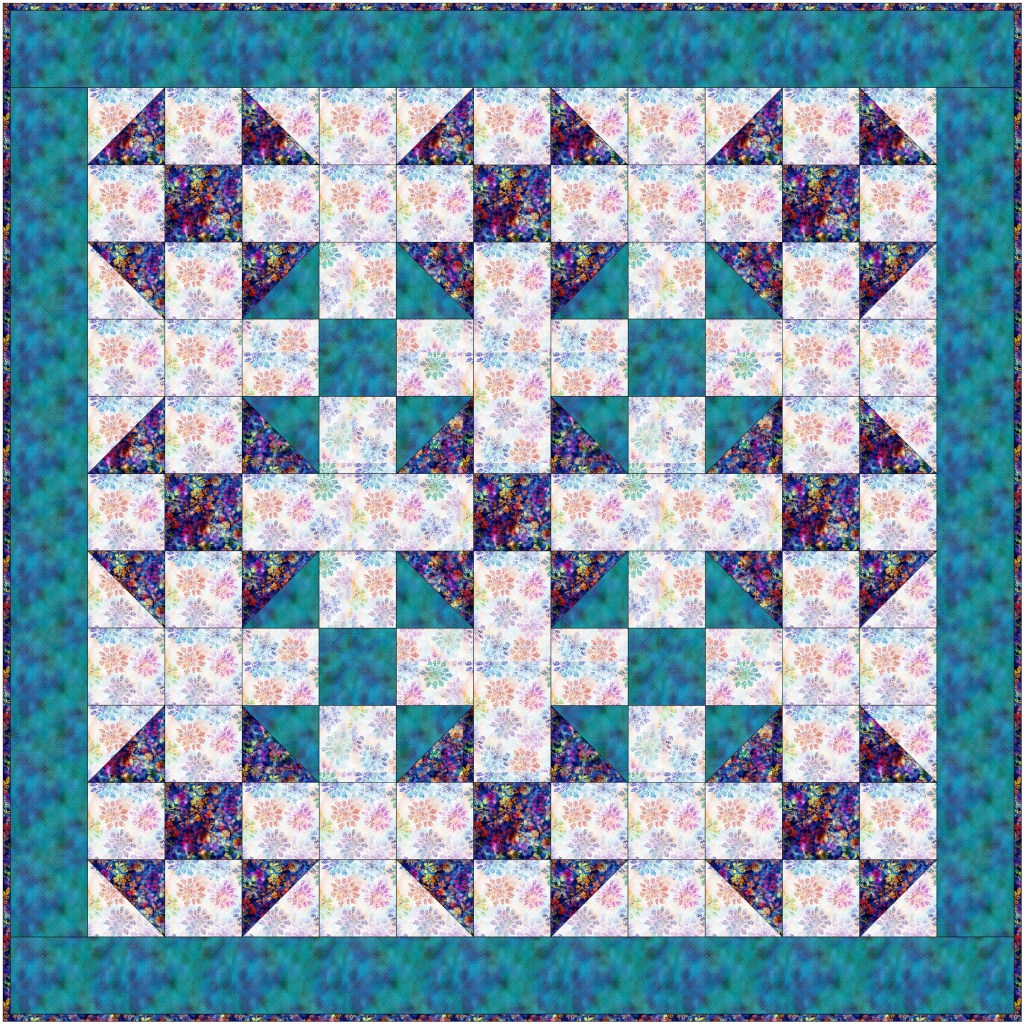
Let’s add fabric to see what happens, shall we? I’m using Lori Holt’s warm and homey Riley Blake collection, Autumn. I can almost smell the apple pie…..

A patchwork quilt featuring a Courthouse Steps block design with a variety of colorful fabrics arranged in a grid layout.

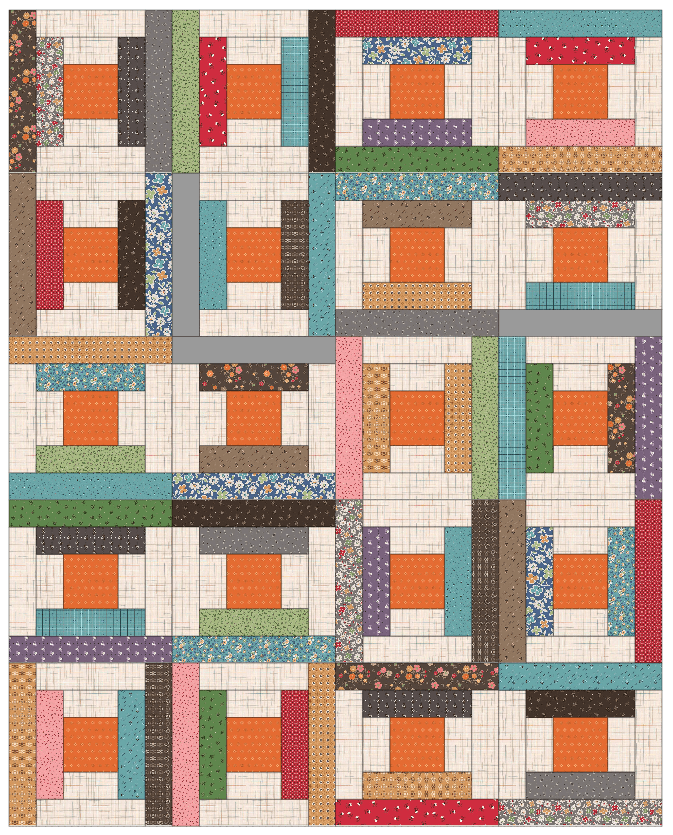
I want to tweak the blocks one more time. In this example, I turned alternating rows which then gave me an interesting boxed effect in rows 2 and 4.

A colorful quilt design featuring the Courthouse Steps block, showcasing a mix of fabrics in varying patterns and colors arranged in a geometric layout.

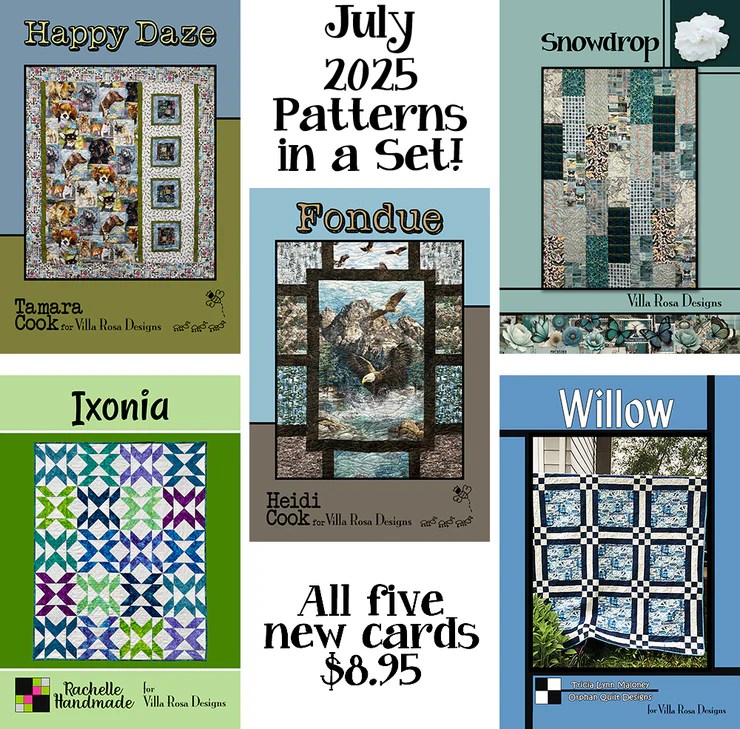
Whoah! Stop the bus! Here was the basic idea behind my VRD Rose Card pattern, Boxed In (hence the name), although it’s not totally the same. I wasn’t even thinking about any of our VRD patterns when playing with Courthouse Steps, but – there it is. LOL!

A quilt design titled 'Boxed In' by Tricia Lynn Maloney, showcasing a colorful patchwork pattern with various fabrics arranged in geometric blocks on a table.

Get your digital pattern HERE or your print pattern HERE

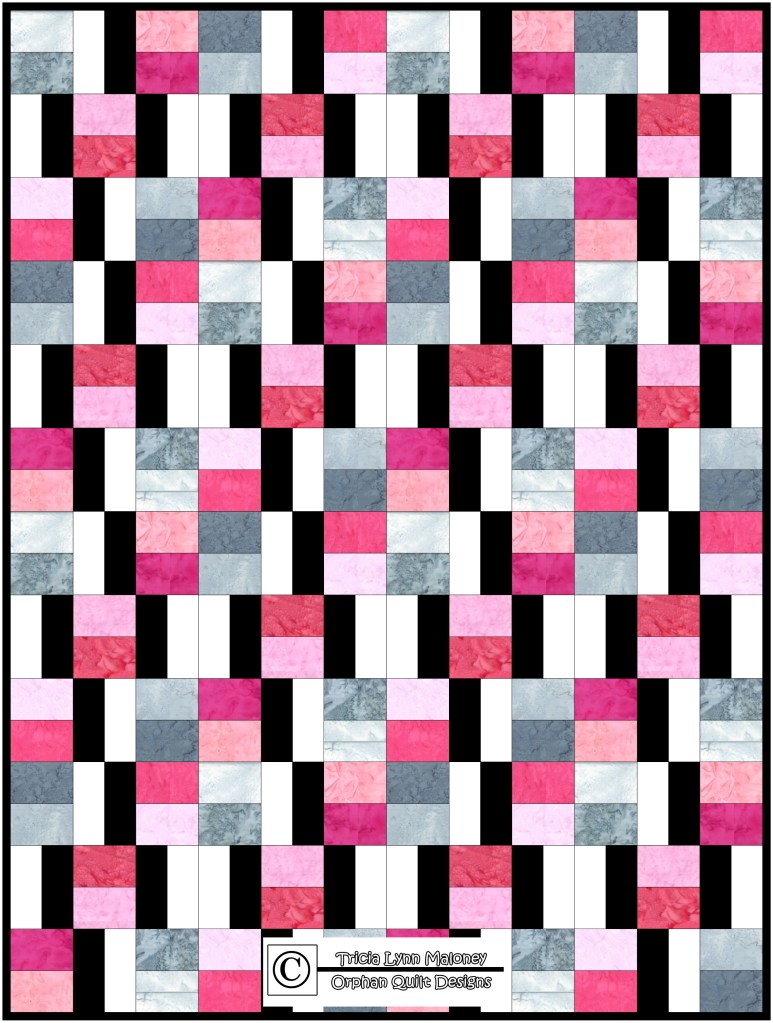
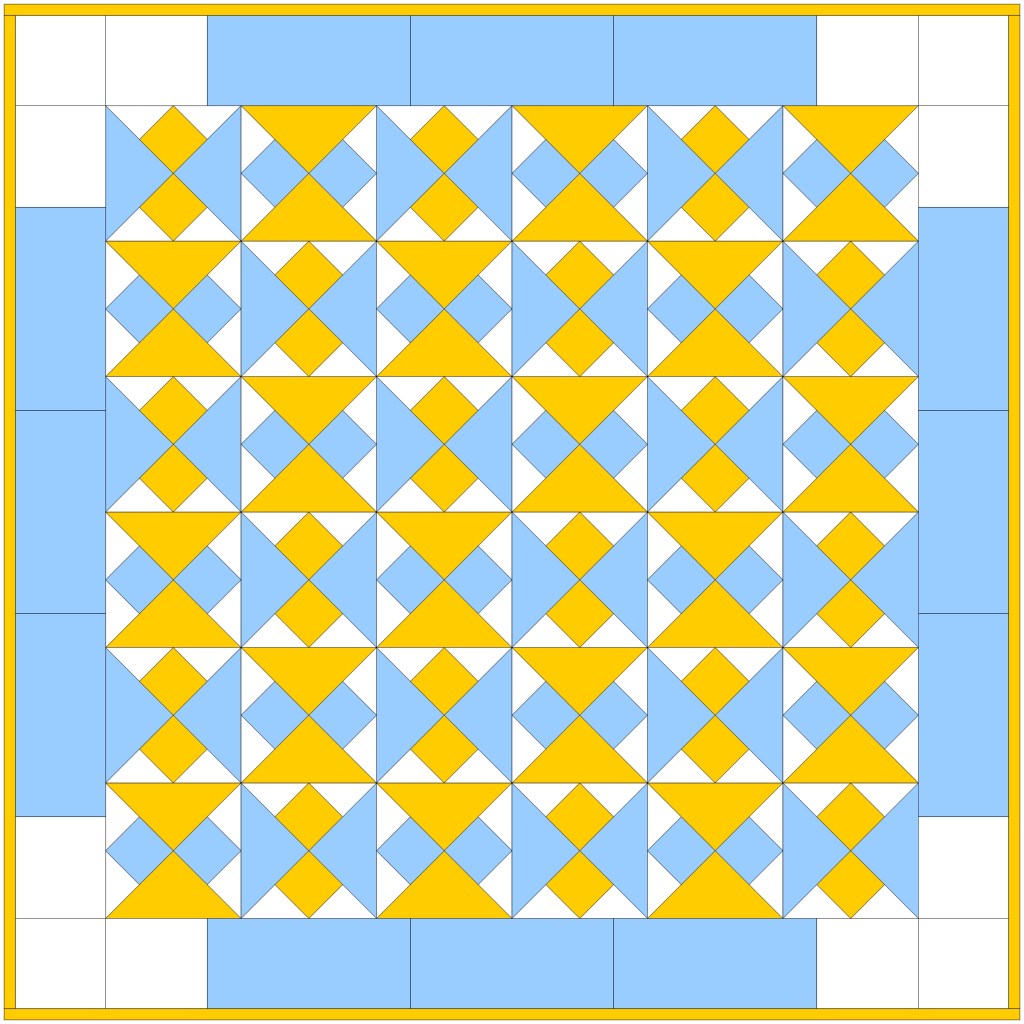
Okay, let’s go back to our Courthouse Steps block and tweak it a little bit by changing the width of some of the rectangles. I left the side rectangles the same, but I made the top and bottom rectangles narrower.

Diagram of the Courthouse Steps quilt block design featuring a central pink square surrounded by gray rectangles.

Let’s use the first setting from above to see how the blocks plays in a design. I really think this looks pretty cool and it reminds me of paper lanterns.

A digital representation of a Courthouse Steps quilt block design featuring a central pink square surrounded by white and gray rectangles, arranged in a grid layout.

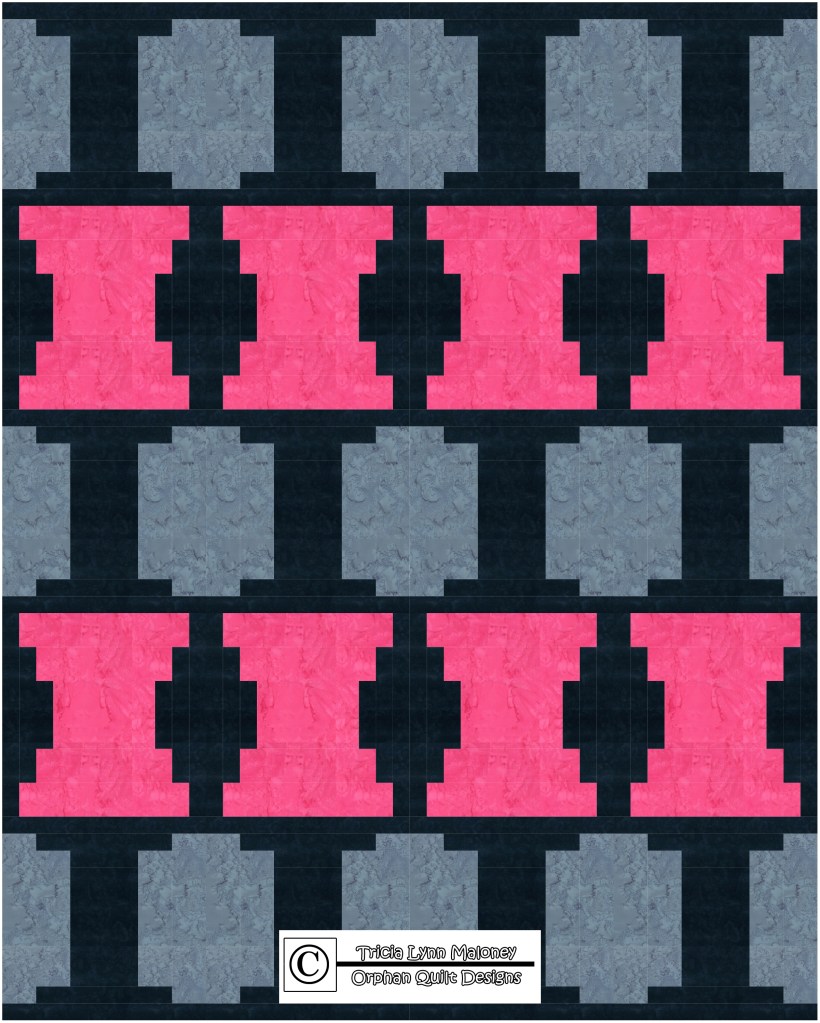
Let’s tweak the color a little bit. Again, I’m using a couple prints from Lori Holt’s Autumn collection. WOW! What a mod yet classic 2 color quilt! Love it!

A digital quilt design featuring a Courthouse Steps block layout in brown and turquoise colors, arranged in a grid pattern, with a light grid background.

Cool! Check out this block arrangement! It’s the same layout as our previous 2nd design, above.

A quilt design featuring a Courthouse Steps block pattern in brown and light blue color scheme.

Hmmm. I just don’t feel that’s it totally complete yet, so let’s add another fabric to see what happens. In this example, I’m using some lovely Hoffman 1895 Watercolors batiks. Love it!

A quilt design featuring a central pink pattern framed by dark and light gray rectangles, creating a geometric composition.

Just….one….more….tweak. As you can see, designing a quilt can get kind of addicting. Yup. But, I think you’ll agree with me that this is the final design. I changed the block directions a bit, changed the black centers to grey, changed the black background to a light grey and added more fabrics from Hoffman.

I think it’s perfect now.

A digital quilt design showcasing alternating blocks of the Courthouse Steps pattern in shades of pink and gray, framed by light blue fabric strips.

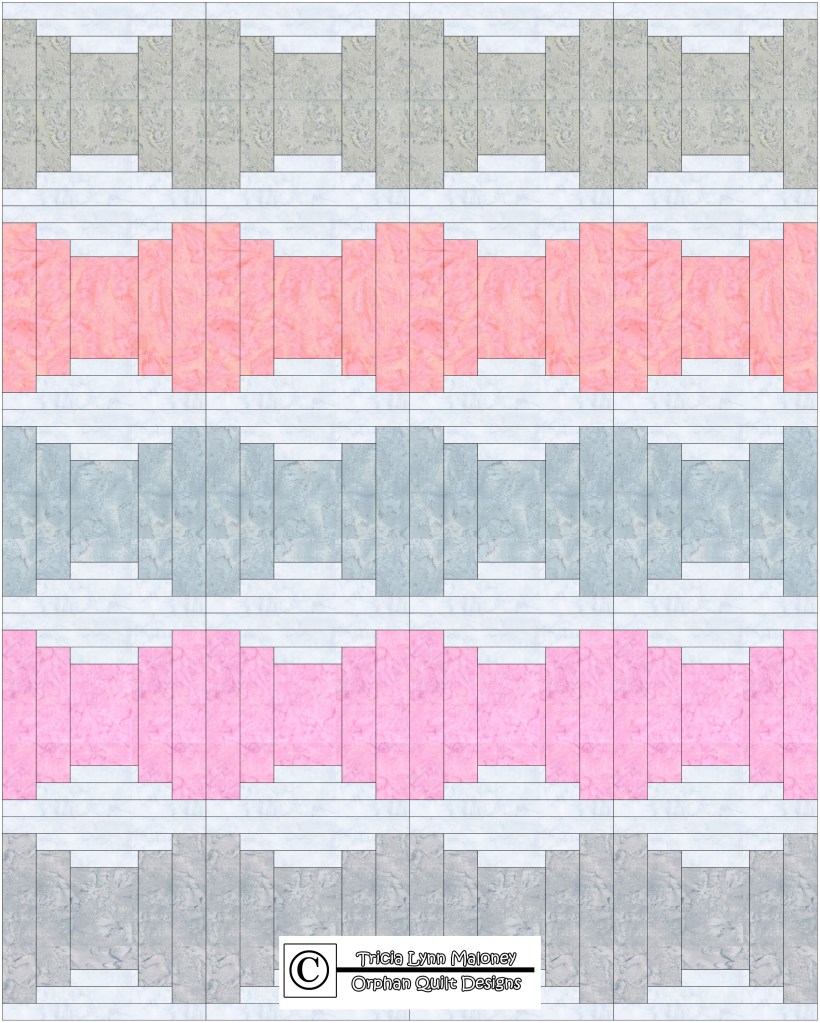
There’s not much else I can say………except I’m very satisfied with this final design. Seriously. Sometimes it takes just one more try to get where you want to. And I’m not just talking about quilt design, you know.

What would you do to tweak the Courthouse Steps block to create your own design?

Don’t forget to do your homework for next Thursday! I’ll see what I can find in the prize department while you play with the Churn Dash quilt block to see what you can come up with.

Ta! Ta!

Until next time –

Always,

Tricia @ VRD

2025 Let's Design a Quit Together Series · Quilt Play · Rose Cards · villa rosa designs

NEW July Villa Rosa Designs Rose Card Quilt Patterns and Let’s Design a Quilt: Playing with Nine Patch Blocks

Happy Thursday to you!

Hope you are enjoying these lazy, hazy, crazy days of summertime. Me, still making my summer to-do list. Ha Ha!

We’re just going to jump right in today because I’ve got some fun stuff for you. Yippee!

First up – NEW July patterns.

I just love the first Thursday after the first Friday of every month because it means NEW VRD patterns.

A collage of five new quilt patterns titled 'Happy Daze,' 'Fondue,' 'Snowdrop,' 'Ixonia,' and 'Willow,' each displayed with colorful designs. The text reads 'July 2025 Patterns in a Set!' with a price of '$8.95'.

Here’s the set of 5 patterns. As always, our talented VRD designers do not disappoint! You can get the print set of 5 HERE (they are also available individually as print patterns too) or you can get the digital patterns individually below:

Happy Daze features a panel (or substitute a novelty print if you wish) in a fun modern setting. Quilt kits are still available HERE, but get yours ASAP because they’re going fast.

Fondue is also a panel quilt with a very interesting and unique setting. We still have a few quilts kits left, so get ’em HERE while they last.

Snowdrop uses your favorite collection of fat quarters. This is Pat’s latest pattern in her Tim Holtz Palette patterns. You can get the kit HERE.

Ixonia is Rachelle’s latest mod quilt. It also uses fat quarters.

Willow is a super versatile pattern – use a single fabric for the centers, panel squares, or even quilt blocks! We kitted it up with the Playgrounds collection (see below), get your kit HERE.

A colorful quilt featuring blocks with vibrant floral patterns, bordered by a black and white checkerboard design.
Willow kit in Moda’s Playgrounds collection

And here’s this month’s table runner, Bubblegum. It uses a collection of fat sixths, but works equally well with leftover Jelly Roll strips or your stash.

A colorful quilt named 'Bubblegum' designed by Tricia Lynn Maloney, featuring a patchwork layout with vibrant patterns, displayed against a textured black brick background.

Get your digital pattern HERE or your print pattern HERE.

I know it’s summer and most of us don’t quilt as much, but I think these new patterns will inspire you. Besides, VRD patterns go together like greased lightening. Make one in a weekend or even a day.

Why not get your quilty friends together for a summer sew day? You could each have a quilt top done at the end of the day and enjoy some overdue friend time, too.

Next up – let’s play with the Nine Patch block and design a quilt together.

Nine Patch blocks were on my mind the other day. Why? Because I was thinking about antique quilts and Nine Patch blocks are one of the oldest quilt block patterns as well as one of the most humble. Have you ever gone to see an antique quilt display or perused a book about antique quilts? If you have, I bet you’ve seen A LOT of Nine Patch quilts.

I started wondering what kind of interesting designs I could create from the historic humble Nine Patch. Then it hit me – this would be a really fun blog post idea. So here we are.

It’s been a while since I’ve talked about my quilt design process. Here’s the last post I did: Let’s Design a Quilt Together — A Peek into My Quilt Design Process. In it, I used a Shoofly block as inspiration.

If you’re interested in designing your own quilts, there are several ways to do so.

1. Graph Paper

Graph paper, a pencil, and a calculator are often a designer’s first tools for creating one of a kind quilt designs. I started out with this, but quickly found I didn’t have the patience for figuring everything out all the time. I still draw lots of doodles with blocks or setting ideas, but these aren’t my primary design tools anymore.

And guess what?!? Even graph paper for quilting has evolved over time! There are many different options available these days for quilters such as quilter’s graph paper books. Some even include stencils and other goodies to help you in your design process, like C&T’s QuiltGenius Design Tool kit.

The QuiltGenius Design Tool Kit, featuring stencils, graph paper, and a booklet for quilt design.

Get your QuiltGenius kit HERE.

2. Design Workbook

A design workbook with prompts and space to draw is a step up from plain old graph paper. Last year I actually created such a workbook because I got tired of losing all my little scraps of paper when I came up with a new idea. Now I can keep all of my ideas in one place.

Colorful hexagonal quilt design featuring flowers in pastel shades with a central green hexagon, overlaid with the text 'Plan Design Quilt' and 'Tricia Maloney Orphan Quilt Designs'.

Get your copy HERE

3. Electric Quilt 8 Software

Electric Quilt 8 software by the Electric Quilt Company is a fantastic design program! I couldn’t do what I do without it. Seriously. One of the great things about this program is all the support out there so you can learn how to use it. The EQ website offers tutorials, classes, and even fun design challenges. There are books galore available to teach you all the ins and outs of the program. And EQ is always coming up with new add-ons to enhance your design capabilities.

Packaging for Electric Quilt 8 quilt design software, featuring a colorful geometric design on the front, with a computer screen displaying quilt patterns and instructions included.

Get your EQ8 HERE

So now we’ve talked about the 3 top ways to design quilts, let’s play with Nine Patches using EQ8, of course!

A Nine Patch quilt block featuring a pattern of red and white squares arranged in a 3x3 grid.

Here is our humble Nine Patch block. It uses 9 squares all the same size in a 3 square across by 3 square down layout. Easy peasy.

A colorful grid of quilt squares featuring orange, pink, blue, turquoise, red, gray, green, purple, and yellow in a 3x3 layout.

This block is a Nine Patch, too. Nobody ever said you had to use only 2 fabrics for a Nine Patch block. The 3 across by 3 down is what makes it a Nine Patch. And my personal philosophy is the more fabric, the better!

Time to play — er, design. To me designing is playing with blocks, colors, fabrics, shapes. I ask myself a lot of “What if?” questions as I go along.

What happens if we make our Nine Patch block rectangular instead of square?

A colorful Nine Patch quilt block design featuring seven squares in various bright colors: orange, pink, blue, teal, red, gray, green, purple, and yellow.

It’s still a Nine Patch, only it’s elongated. Let’s see what this block looks like in a quilt.

A colorful Nine Patch quilt block design featuring a grid of squares in various vibrant colors including red, blue, green, yellow, purple, pink, orange, and grey.

Hmmm. It doesn’t really do anything for me, but it would make a nice simple scrap quilt, wouldn’t it? Let’s add some sashing.

A colorful quilt design featuring a grid of Nine Patch blocks in various colors, separated by white sashing.

Okay, I’m liking this one better. Now I can see the individual blocks. But it’s still basically a decent scrap quilt. Let’s try taking away the sashing and adding plain alternate blocks instead.

A colorful quilt design featuring a Nine Patch block layout with vibrant squares in various colors arranged in a grid pattern.

This one’s okay, too, but it just doesn’t quite do it for me, either. I could use a cool novelty for the alternate blocks and use coordinating fabrics in the Nine Patch blocks. Let’s try that.

A colorful quilt design featuring a pattern of patches in various colors and floral prints, arranged in a grid layout.

Here is our design using Moda’s collection Acorn Hollow. I like it, but something is still missing. What do you think we need?

Let’s go back to our elongated Nine Patch block and try splitting some of the rectangles into 2 pieces so we can add more fabric.

A colorful Nine Patch quilt block featuring various squares in red, pink, white, orange, yellow, green, blue, and light blue arranged in a 3x3 grid.

Okay, that’s interesting, but now I think I want to split the other 4 patches horizontally to add movement.

Yay! Now we’re getting somewhere. I like the look of our Elongated Rainbow Nine Patch block. Like I said, designing is all about playing and exploring. Ask those “What If?” questions and you’ll be surprised where they will take you in your designing.

A colorful Nine Patch quilt block design featuring rectangular and square patches in various colors, including red, pink, white, orange, yellow, green, and blue, with black as a dominant background.

Let’s try our block in a quilt setting now.

A colorful quilt pattern composed of a grid layout featuring vertical and horizontal rectangular blocks in various vibrant colors, interspersed with black and white checkered squares.

Now that is starting to look like something. I really love the diagonal thing going on with the black rectangles. Hmmm. Let’s keep going. It still needs tweaking.

Colorful nine patch quilt layout featuring vibrant rectangles in blue, red, green, yellow, and orange, arranged against a black and white background.

With a little flip flopping and switcheroo, I discovered this layout. I am loving the elongated Four Patches in black and white that showed up when alternating blocks were turned upside down. What are your thoughts on this design?

Let’s try it in real fabric this time.

A colorful quilt design featuring a variety of rectangular and square blocks in pink, gray, and white, arranged in a patterned layout with black borders.

LOVE LOVE LOVE it! I am using a selection of Hoffman’s 1895 Watercolors batiks in pink and grey with solid black and white here. I added the solid black binding to frame everything nicely as well as accent the black in the blocks. Now it’s a finished design. And it started with a humble little Nine Patch block.

Well, that’s it for me today. I hope you enjoyed coming along on a quilt design adventure with me. After showing you how much fun I have designing a quilt, I thought maybe this would make a fun new series for the summer. What do you think? Would you like to see more of this in maybe a 4 or 5 part series using different quilt blocks as the inspiration? Any suggestions on blocks you’d like to see (think simple and pieced, though)?

See you next week, right here at Villa Rose Quilts.

Until then –

Always,

Tricia @ VRD

Quilt Play · Rose Cards · villa rosa designs

Flowers, Electric Quilt, and NEW Villa Rosa Designs Rose Card Quilt Patterns

Hello Quilty Friends!

Happy Thursday to you!

I hope you are all having a great week so far! Me, it’s been a bit rocky in my basement studio/office, which I fondly call my “dungeon.” After a really dry July, early August has been really wet. And I mean wet!

In 5 days, water has rolled into my studio casement window THREE TIMES! In 5 days! I have spent most of my time emptying the dehumidifier, moving fans around, washing-drying-rewashing-drying again all the blankets we’ve been able to find for soaking up the water. ARGH! Luckily, the water didn’t completely flood my space, it only got about halfway across the room, almost to my computer desk. It’s been kind of stressful here. I shouldn’t be complaining because others are faring much worse than I am, but it’s been a lot of work to stay on top of the water once the deluges hit. Talking to my family, we don’t think this much flooding in the basement has happened in 20 years. What a fluke (I hope).

Now let’s turn our thoughts to something really fun and seasonal. Sadly, our container garden and other plants did not grow much during the super dry month of July, but all of a sudden everything is growing by leaps and bounds, although the marigolds don’t look so happy.

We planted our garden and plants a bit late this year and now that things are finally growing like crazy, I just hope that they’ll have enough time to bear fruit (or veggies). I would really like some fresh produce that I grew myself on the back porch! Yum yum yummy!

Speaking of flowers and plants, I’m particularly proud of my Black-Eyed Susans, which is one of my all-time favorite flowers, along with Sunflowers and Daisies. I wonder……how many Black-Eyed Susan, Sunflower, and Daisy quilt blocks are there in Electric Quilt 8. Any guesses? Hmm. I haven’t checked yet, so I think I’ll guess 35 total. So let’s see! Hang on, I’ll be right back. Let me check.

I found 6 Black-Eyed/Brown-Eyed Susan quilt blocks. Not too shabby!

Next I counted 34 Sunflower blocks. Nice!

And then I discovered at least 40 Daisy blocks. Way cool!

Well, my guess was a bit low. How about your guess?

Sew, let’s have some fun and play with flower blocks a little bit!

Here are some really fun quilts with Black-eyed Susan blocks. EQ8 ROCKS!

Check out these awesome Sunflower quilts — are you inspired yet???

Now, how about a trio of Daisy quilts?

WOW! I really love love love EQ8 — it is sew sew fun just to explore different blocks and make quilts on the computer screen, whether I ever make them into real quilts or not!

Aren’t you inspired to make your own flower quilt now? I challenge you to create a quilt featuring your favorite flower! I dare you!

I’d love to revisit flower quilts down the road and include the quilts of our VRD fans. Sew, please send me your flower quilts — er, a photo of your flower quilt along with a short description/story of your quilt. If I choose your quilt and story for the blog, I promise I’ll send you a little surprise in the mail! You can email your flower quilt images to me at tricia@villarosaquilts.com.

NEW AUGUST VILLA ROSA DESIGNS ROSE CARDS

Yay! It’s that time of the month again — no, not THAT time of the month. LOL! It’s the beginning of a new month and that means a NEW collection of Villa Rosa Rose Cards!

Here they are — our new August Rose Cards!

You can order the August set of 5 Rose Cards HERE. Go ahead, I know you want to.

But wait — there’s more! Tehehe.

Here’s my NEW August Table Runner, Slice of Summer.

Cute, huh? You can get your own Slice of Summer Rose Card HERE.

Sew, there you have it — our awesome new August patterns! Can’t wait to see what new patterns next month will bring…….

Until next Thursday —

Sew. Laugh. Repeat.

Always,

Tricia @VRD

Quilting Partners · Tips and Tricks · Tutorials · villa rosa designs

Let’s Design a Quilt Together — A Peek into My Quilt Design Process

Hello Quilty Friends!

It’s Thursday again! Here’s hoping your week has been going well. Mine has been good and fast — just the way I love my quilt projects to be! LOL!

A lot of people ask about my design process so I thought I’d tell you a little bit about my process. Keep in mind that all designers have their own way of doing things and this post is only about my process.

Sometimes it’s like I eat, sleep, and breathe quilts and quilting! Not only do I read/flip through quilt books and magazines, I also look online for new trends. I talk to my quilt friends about what they are doing. I teach a quilt class once a month. I design patterns, write instructions, make quilts, take photos of quilts. I look at and get inspired by fabric. I jot down ideas and even do rough sketches of quilt blocks (which I promptly lose most of the time). I have even been known to wake up in the middle of the night with a new idea for a quilt. Whew!

Inspiration comes in a lot of different forms for me. Sometimes I see a fabric or collection and an idea pops into my head. Sometimes I start with a favorite quilt block and a quilt develops out of that. I have quite a few quilt block references that I use for ideas. Here are a few books in my library:

The first 2 books are by Barbara Brackman. The one on the left is the first edition of the 2nd book and is out of print and can be hard to find. I have both of them and love them both. The newer edition has even more blocks in it than the first edition! Barbara Brackman is one of the most renowned quilt historians of our time! You can visit her blog, Material Culture, HERE.

I also have Barbara Brackman’s software program, Blockbase, which works with Electric Quilt. You can find Blockbase HERE.

The third book, 5500 Quilt Block Designs, is by well-known quilter and author Maggie Malone. I have only known about this book since 2021 when a friend of mine showed it to me and I was so impressed, I had to grab a copy for myself. This book is out of print so it can be harder to find as well.

I have talked about Electric Quilt software before in an earlier post, but I want to mention it again here because I really couldn’t design quilts without it! Some designers sit down with a ruler and graph paper to draft quilt patterns, but I am an Electric Quilt user because it makes designing quilts a lot easier for me. You can find Electric Quilt 8 (EQ8) software HERE.

If you are interested in designing your own quilts, I totally recommend EQ8 if you’re into computers. If you’re not into computers, graph paper and a ruler might be your new BFF.

Once I get an idea, it’s time to play — which usually means I head to my computer and EQ8. I play with blocks, try different color combinations, download different fabrics to try all before I actually make anything at all. Some designers start by making the project and then work backwards to create the pattern and instructions. I do my designing on my computer and then make the project once I know what I am going to do. At least this is what I do probably 99% of the time. That’s one of the fun things about being a designer — I can try different ways of doing things. They don’t always work out for me, but that’s okay, there’s always another way to try.

Let me show you an example of my design process. For this example, I’m gong to start with my favorite quilt block, the Shoo Fly block.

When I am starting with the quilt design before I select the actual fabrics, I usually design in red, black, white, and grey. I don’t know exactly why I do that, but I think it probably has to do with the high contrast so I get a good sense of the pattern before I add actual fabric.

So, let’s make a wall quilt using 4 Shoo Fly blocks. It will look something like this:

Hmmmmm. This doesn’t really excite me. How about you? Let’s tweak it a little bit and see what happens next. We’ll add a bit more color, too.

Okay, this is better, don’t you think? By adding a sashing between the blocks, I was able to put another Shoo Fly block in the center. I changed the colors of the larger blocks to black and grey with the smaller center Shoo Fly block in red. It definitely has a lot more interest, doesn’t it? But it’s not quite there. Let’s tweak it a little bit more, shall we?

Now we’re getting somewhere! I got rid of the grey and went with plain black. Then I added 2 narrow blocky borders so I could continue to build out with more Shoo Fly blocks. Now I think we need a border.

Yay! A finished quilt design. I added an outer plain black border and a red binding. Pretty zippy, isn’t it? Now we’re gong to add some real fabric to the design.

Here are 3 different versions of our Shoo Fly quilt using Hoffman’s Paisley in Love batik collection. Of the 3, I think the last one with the white background is my favorite. I like the contrast, but I think I need to do a little more tweaking with the design, so back to the drawing board (or EQ8).

What are your thoughts? How would you improve this design? Any ideas?

Well, I hope you enjoyed a peek into my design process. Who knows? You might see this design as a VRD Rose Card some day.

Until next Thursday —

Sew. Laugh. Repeat.

Always,

Tricia @VRD

Quilt Stories · Rose Cards · villa rosa designs

The Villa Rosa Designs Ap and a Bear Hugs Story

Hello Quilty Friends!

Hope you are all having a wonderful week filled with lots of quilting and sunshine! Recently here in NW PA, we finally had some warm temperatures and lots of sunshine. It’s like we went from winter to summer in a matter of days. Everything is turning green and there is an explosion of color — it almost hurts your eyes, but in a good way!

Did you know Villa Rosa Designs has an ap?

Yes, we do!

It is available through your ap store. It’s a free ap and after you download it, you will be able to view all the Rose Cards, listed alphabetically. It even updates when new cards are added each month, so you will always have the most up-to-date list of Rose Cards.

In addition to the complete Rose Card list, you can create your own lists such as What I Own or What I Want or even Fat Quarter Quilts — whatever lists you can think of.

Another useful thing is that when you click on a Rose Card, another screen pops up with the quilt dimensions and its fabric requirements.

It’s not a shopping ap, but it’s fun to be able to search Rose Cards on the go.

For example:

Like when you’re at a quilt show or shop and you can’t remember if you have a specific Card — use the ap to find out.

Or maybe you’re shopping and find the perfect fabrics for a Rose Card project but you forgot the Card at home and you don’t know how much fabric you need — use the ap and look up the Rose Card to see the fabric requirements.

What a great resource to have at your fingertips wherever you go!

Bear Hugs: A Sweet Story

As a quilter, I just love hearing the story behind the quilt, don’t you?

You might remember the Bear Hugs Rose Card as one of the new Rose Cards for this month. Here’s the story behind the quilt.

You can order Bear Hugs HERE

I was invited to a baby shower for my cousin’s daughter — KK’s first baby. Of course I was going to make a baby quilt. I’m sure KK was expecting one, too, as she and her 2 siblings all received baby quilts when they were born.

I asked KK’s mom (my cousin) what the nursery theme was. She sent me a video which showed the crib and unfinished nursery in the background and told me “buffalo plaid, bears, fox, [and] deer.”

Now I had a starting point and it was time to head to my local quilt shop. I was sew lucky because there was a great display of the exact fabrics I was looking for! I grabbed a yard of a black and white buffalo plaid as well as 8 coordinating fat quarters of woodsy bears, deer, checks, and dots in black, white, red, and grey. I didn’t know what design I was doing yet, but I had the fabric — I was halfway there.

The next thing I did was fire up my computer and my Electric Quilt 8 (EQ8) software. Interested in learning more about EQ8? Go HERE.

I decided to use some type of a Log Cabin block because of the woodsy theme. I played around with different Log Cabin-type blocks for a while and this block is what I came up with:

Bear Hugs block

It’s a modern take on the old classic Log Cabin block.

This is one of the things I find the most fun about being a quilt designer — starting with a traditional block and re-imagining it. I really love doing that. It’s such a great way to create an entirely new quilt block to build a quilt around.

Happily, I finished the quilt a few days before KK’s baby shower. It was a beautiful baby shower –the theme of the shower matched the baby quilt perfectly, right down to the colors! I couldn’t wait for her to open it.

Surprise! A few days later, KK had baby J — a few weeks early, but he was perfect. And he had a full head of hair, too!

Here are a couple photos of Baby J on his Bear Hugs quilt — his quilt is the original quilt used for the front of the Bear Hugs pattern.

Baby J on his Bear Hugs quilt
You can see the top right corner of the quilt turned down, that’s the label. Do you label your quilts?

VRD Invites You…

Want to share your VRD Rose Card story? We’d love to hear it!

Please email your quilt story and original photo along with the Rose Card pattern you used to make the quilt to tricia@villarosadesigns.com. Stories and accompanying photos will be selected randomly to share on our blog and Facebook. This project will be ongoing. If your story is selected, we’ll send you a little thank you surprise to you in the mail! Can’t wait to hear your quilt stories!

Until next Thursday —

Sew. Laugh. Repeat.

Always,

Tricia @VRD