2025 Free Motion Quilting (FMQ) Series

Beginner Free Motion Quilting (FMQ) Lesson 6 – Going Beyond Loops Part 2

Happy Thursday to you!

I hope you have all been practicing your Loops and your Loop variations from last week’s Lesson 5. This week we are going to continue Going Beyond Loops with 3 more Loop variations.

If you missed any of our Beginner Free Motion Quilting (FMQ) Lessons so far, you can find them all below:

Lesson 1: All the Background Information

Lesson 2: Let’s Doodle!

Lesson 3: Practice, Practice, Practice

Lesson 4: The Write Way to Doodle!

Lesson 5: Going Beyond Loops Part 1

I have also added a section over on the right side of the blog entitled 2025 Beginner Free Motion Quilting Series where you will be able to easily find all of the lessons in the future so you don’t have to sift through posts to find them.

If you’ve been having fun playing around with the Loop variations from last week, good for you! I hope you came away with the knowledge that you can add any kind of motif to the basic Loop design to change it up. Stars? Check! Hearts? Check Check! Elephants? Sure, why not. You just need to practice drawing an elephant motif without lifting your dry erase marker on your handy dandy white board. Practice until you are happy with your motif. Then practice drawing your Loops and motif together on your white board. Again, practice until it feels natural and you are not lifting up your dry erase marker (this is super important!). Then make a fresh practice square, take a deep breath, and just do it! This is my basic method for creating endless Loop variations. I’ve done hot air balloons and palm trees, to name a few. You can too, it only takes practice. And courage. You. CAN. Do. It.

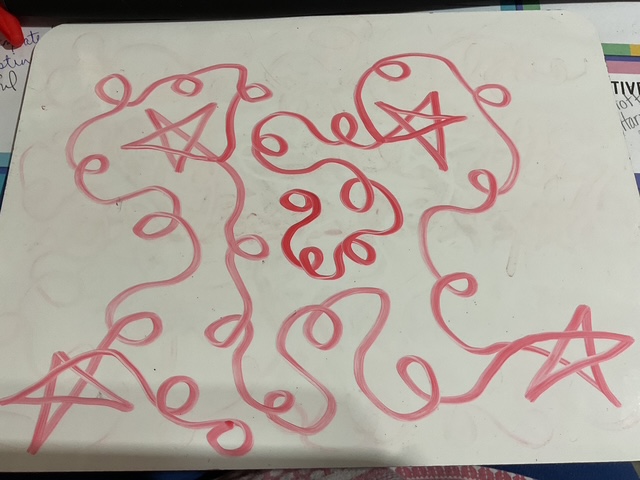
Are you ready? Strap on your helmet and put on your your seat belt cause here we go!

#4 Double Loops

I think you’ll love these Double Loops – they are quick and fun and look great on most any project except maybe Civil War reproductions.

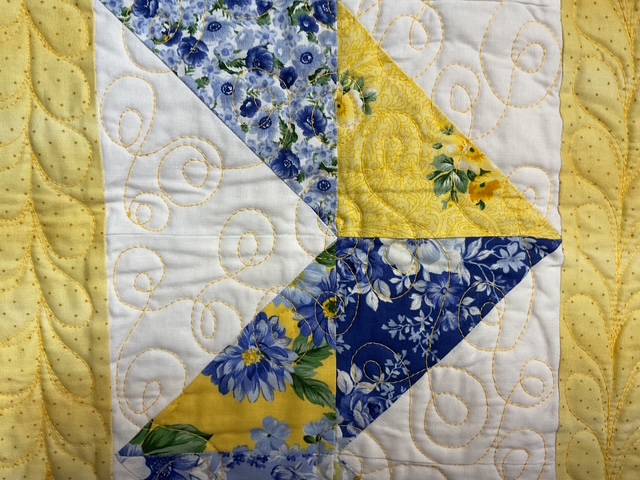
Check out my Double Loop example below. This is a close up of the quilting on my cover quilt for my Sunny Day VRD Rose Card pattern. Yes, I quilted a simple Feather design in the borders. LOL!

So, let’s grab our white boards and give Double Loops a try. Go ahead and draw a loop, then loop around the loop. Easy and very fun.

Now let’s practice connecting our Double Loops together.

Go ahead and practice this a bit until it feels comfortable.

It’s time to try this design on a practice square on your sewing machine. Below, you can see how I make Double Loops. It takes a little practice, but because you’ve already been working on the basic Loops design, adding a second loop around your first loop won’t take as long to master. So, get to it and quilt some Double Loops!

Wasn’t that a fun design? Just imagine all the quilts you can finish using this quirky and cool FMQ design? And don’t forget that you can change it up and make it entirely your own designs.

#5 Leaves

Leaves are a super element to have in your FMQ toolbox because leaves are all around us from the fabrics to the quilt blocks to the trees right outside the window. Can’t you picture how leaves will look quilted on your autumn quilts?

You can create leaves in just about any shape or style you can imagine. For this lesson, I’m going to show you a simple leaf or two. Feel free to use your imagination to come up with your own leaf shapes, too.

Here is a simple heart-shaped leaf for you to practice.

Once you get the leaf shape down, now it’s time to add it to your basic Loop design.

Go ahead and practice the Leaf variation until you can do it smoothly. Then it’s time to try it on your practice square with your sewing machine.

Here’s a quick video clip of me quilting the Leaf and Loop variation.

Practice. Practice. Practice.
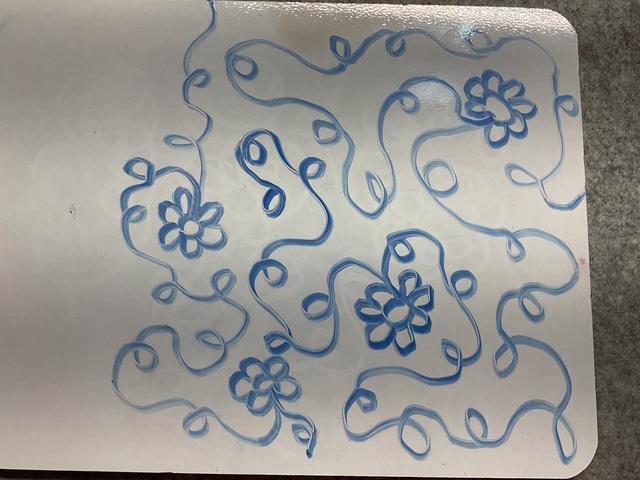
#6 Flowers

Our last variation is adding flowers to our basic Loop design. Like leaves, you can create any flower shape you want or you can even mix different flower shapes together with you loops to create an entire quilted flower garden. For today, we are going to focus on Daisies.

Daisies are simple to make. A circle followed by a ring of petals. Add an echo around the daisy if you want as this will make your flowers stand out.

Now it’s your turn to doodle and draw some flowers on your white board. What’s your favorite flower? Can you draw it without lifting your dry erase marker?

Next we’re going to add our Daisy to our basic Loop design. Go ahead and practice this variation on your white board.

Okay, time to quilt the Daisy and Loop variation on your practice square with your sewing machine. You can do it. Of course you can.

Below is a short video of me quilting Daisies and Loops.

I hope you are having fun with all of the designs and variations we’ve been exploring. Keep practicing as often as you can, but don’t wait too long before you quilt a small project for real. A snack mat, place mats, table runner or other small project is the perfect sized project on which to hone your skills. So hop to it and get quilting the FMQ way.

I hope you’ll stop back in 2 weeks as we wrap up our Beginner FMQ series with our final lesson – Quilting Borders with Simple Designs. Next week we’ll be showing our March patterns and a fun quilt tutorial for St. Patrick’s Day.

Until then –

Always,

Tricia @ VRD

2025 Free Motion Quilting (FMQ) Series · Quilt As Desired · Tips and Tricks · Tutorials · villa rosa designs

Beginner Free Motion Quilting (FMQ) Lesson 5: Going Beyond Loops Part 1

Happy Thursday to you!

I am thrilled to tell you that we’ve had a little bit warmer temperatures for a couple days in row here in NW PA. I’m talking above 32 degrees! Actually it’s been in the 40’s, which feels so balmy compared to last week’s temperatures in the single digits and teens. Whew! But I don’t think winter is over yet for us, though, as the beginning of March is looking cold again. Spring can’t get here soon enough!

PSST! While we’re waiting for Spring to arrive, it is a great time to work on our Free Motion Quilting (FMQ) skills, don’t you think? So far we’ve talked about tools, equipment, and resources; doodling, making loops, and using cursive writing as a quilting design.

This week for Lesson 5, we are venturing beyond the Loopy design.

If you missed any of the earlier lessons, you can find them below:

Lesson 1: All the Background Information

Lesson 2: Let’s Doodle!

Lesson 3: Practice, Practice, Practice

Lesson 4: The Write Way to Doodle!

Let’s get started!

You might be wondering what exactly I mean by “going beyond loops”. Talk a deep breath — there is no need to panic. I promise we are not jumping right into Feathers. Relax, Feathers are ahead of you sometime in the future, but today is not the day. Instead, we are going to add some fun elements to our quilting to change up our basic Loopy FMQ design.

#1 Snowflakes with Loops

This design is absolutely one of my favorites, hands down! It is quite flexible and looks great on a lot of different quilts. Depending on the theme of the quilt, it can look like a snowflake, a star, fireworks, a starburst, or even a cool funky flower. Wow! That’s a lot of options for a single element, isn’t it?

Here is an example of the Snowflake and Loop design on a Christmas/winter place mat I created years and years ago for a magazine pattern.

Please note this place mat design was featured in Quilter’s World magazine some years ago and is a copyrighted design.

Grab your dry erase markers and let’s practice drawing Snowflakes or whatever you would like to call them on our white boards. You can decide how many spokes/rays you want your Snowflakes to have. You can even vary the number in your design to add more interest.

Next let’s add Loops to the Snowflakes and practice drawing our new Loopy variation design. Ready, set, go!Do you see how I surrounded each of the Snowflakes with my Loops? I like to use the Snowflakes as an accent, not the primary design. The primary design, of course, is the Loops. Additionally, I like to give my Loops lots of space to breathe.

Go ahead and practice drawing this design a couple times. Experiment with the Snowflakes (do you want 6 or 8 or more spokes/rays?).

Next, we’re going to FMQ this design on a practice square on our sewing machines. Are you ready? Take a deep breath and just do it.

To get you started, here’s a little video I made for you, showing how I create my Snowflake and Loop variation.

Here is a little example of quilting the Snowflake and Loop design.

Now it’s your turn to practice this design. Enjoy playing with it! Just imagine all the different kinds of quilts you can use it on!

#2 Kindergarten Star with Loops

Do you remember when you first learned how to make a five-pointed star? Probably around kindergarten, I should think. Can you remember how to make it now?

Here’s a little tutorial to jog your memory. Keep in mind that I am left-handed so you might draw your star differently than I do. Remember, you do you.

Kindergarten stars aren’t too much different from the Snowflake element above. And once you get comfortable making a five point star again (believe me, it will take some practice for some of you to remaster this shape), the design will flow more easily. Go ahead and draw some Five Pointed Stars on your white board. Make as many as you can fit onto the board. Make them all different sizes, too.

Now let’s practice drawing Kindergarten Stars combined with our FMQ Loop design. Feel free to do this several times until it feels more natural to you.

I bet by now (that is if you’ve been practicing) you are probably finding alternating the direction of the loops to be easier than when you first started several weeks ago. Go you!

Keep practicing on your white board until you can draw the five point stars without thinking about each line. Then I want you to practice making those stars upside down and sideways or else your design will come out very linear with stars lined up going the same direction.

This design looks amazing on patriotic quilts and on children’s quilts, too. What other kinds of quilts would look great with Kindergarten Stars and Loops?

Next up, we’re going to try quilting this design with our machines. Before we do, though, here’s a quick little video showing how I FMQ Kindergarten Stars and Loops.

Let’s make five point Kindergarten Stars!

Okay, now it’s your time to practice quilting Kindergarten Stars paired with Loops! This is fun, isn’t it?

#3 Hearts and Loops

Hearts will be our last design for today. So, how are you at making hearts? I have discovered that I can rarely make both sides of a heart exactly the same, so in my quilting (drawing and cutting, too), I intentionally make the sides of my hearts different. It lends a quirky funky look to my Hearts and Loops design, and that works just fine for me. LOL!

I have found that there are 2 basic ways to quilt hearts. Maybe you’ll come up with a different one and if you do, I hope you with share.

Anyway, the first way starts at the top center point and curves down and stops briefly at the bottom point before swooping back up and around to the center point once again. Remember, I’m a lefty so I usually move counterclockwise. Do what is comfortable for you.

The second way is one continuous line which might make it easier for you to FMQ hearts. It starts at the bottom point then curves up and around to the center point where you pause briefly before doing the second top bump and then swooping back down to the bottom point. This heart reminds me more of a heart shaped balloon – you’ll see this more when I quilt it.

So go ahead and practice your stars on your white board. Which style do you like better?

Now that I’ve mentioned both styles, I’m going to show and use the second style Heart design. I find that it can flow better with the loops than the first Heart style.

Now it’s your turn to practice drawing the Heart and Loop design on your white board. Repeat as many times as you want, experimenting with your Hearts.

Notice how I crossed the bottoms of the hearts in the design.

Let’s head back to our sewing machines and try FMQ Hearts and Loops. Here’s a quick video of how I do FMQ my Hearts and Loops.

Check out this cute little Hearts and Loops design!

Well, that’s it for me today. I hope you keep practicing your Loops and adding these fun elements to change up your designs. Next week I’ll have a few more Loop design variations to share with you. So stay tuned!

Take care!

Until then –

Always,

Tricia @ VRD

Quilt As Desired · Tips and Tricks · villa rosa designs

Tips for Free Motion Quilting (FMQ) on Fleece

Happy Thursday to you!

I’m sew excited you stopped by today! After doing those fall quilt tutorials a few weeks ago, I am trying to now get them all quilted before I dive into making more quilt tops (my projects seem to be multiplying daily). Do you quilt your own quilts or do you send them out to a long arm quilter? If you do your own quilting, do you hand or machine quilt?

I started machine quilting right after I learned to do patchwork almost 25 years ago. Of course, first I tried to “stitch in the ditch” but I found I couldn’t manage to actually stay in the ditch. Ho hum……

I did try a little hand quilting on my very first quilt, which I lovingly call “Big Ugly”, but my stitches were so big, I could’ve probably caught my toe in them. LOL!

Eventually I heard about a relatively newfangled thing called free motion quilting (FMQ). I was a new enough quilter that I wasn’t afraid to try it. Of course, back then free motion quilting was frowned upon and free motion quilters tried for a hand quilted look by using invisible monofilament thread to hide their machine stitching. The invisible thread back then was like thin fishing line — yuck! But I still slogged through — learning how to free motion quilt with a basic sewing machine on which I had to cover the feed dogs with tape or an index card because the feed dogs didn’t drop. And don’t forget that fishing line (today’s invisible thread is so so much better than back then)! Regardless of the challenges, I kept free motion quilting. And I was hooked!

After I had some quilts under my belt and I upgraded to a little better sewing machine where I could actually drop the feed dogs — it had a needle-down function too, I switched to using the same thread I pieced with — 100% cotton. I experimented with different threads and manufacturers for a while to see what I liked the best, or maybe more accurately what threads my sewing machine liked the best. Then I discovered King Tut variegated thread by Superior Threads. WOW! What fun it was quilting with variegated thread! I grabbed up every variegated thread spool I found, which was especially fun when I went on shop hops and quilting bus trips with my quilty pals.

The only real problem I found working with those yummy variegated threads was that sometimes I lost the thread on the quilt because the thread color matched the quilt exactly. Then it kind of looked like I skipped part of the quilting design. Oh well, nothing’s perfect.

This was when I moved back to working with solid 100% cotton threads. Now I have a small six drawer unit on wheels with all my spools of thread organized by color or type. And yes, the top drawer even has my collection of variegated threads. My drawer unit is the Helmer unit from Ikea.

Helmer image from Ikea

Today I have a fun little video for you with some great tips for free motion quilting a quilt top backed with fleece fabric (you know — the fleece you make tied blankies with or comfy pj pants out of?). I began free motion quilting on fleece long before even Minky was popular as a quilt backing. I guess I was ahead of my time a little bit. Of course, back then, folks kind of looked at me funny when I showed off my free motion quilted quilts backed with fleece. Boy, they didn’t know what they were missing!

There is nothing like curling up with a fleece-backed quilt. Be aware that I don’t put batting in my fleece-backed throw quilts. Nope, not at all. Skipping the batting makes my fleece-backed throw quilts very cozy and super floppy — which I love! Have you ever tried machine quilting with fleece on the back of your quilt?

A friend of mine, Cheryl, who is a free motion long arm quilter, took my quilting on fleece idea even further — she layers 2 pieces of fleece and free motion quilts them together to make a one of a kind textured throw blanket. Maybe you’ll try this too.

Now — on with the show!

Oops! I see in the video that I actually did cross over some lines. Mea culpa! Luckily, I didn’t get any mischief happening on the back of my quilt. I should haven stuck with my first choice of orange thread instead of the medium chestnut brown, which blended in too much on the quilt top. LOL!

Go HERE for the Alassio tutorial. Or HERE to purchase the Alassio pattern.

Go HERE to read our VRQ post, Quilt as Desired, which is all about machine quilting and is part of our Basic Skills for Quilters Series on the blog.

I hope you enjoyed this little video. Now that I know how to create one and upload it, you might just find more little videos here. You’ll have to stay tuned to find out.

Until next Thursday —

Always,

Tricia @VRD

Quilt As Desired · Rose Cards · Tips and Tricks · Tutorials · villa rosa designs

NEW June VRD Rose Card Patterns and A Free Motion Quilting Demo

Hello Quilty Friends!

Welcome to another Thursday — the first Thursday in June. Summertime, right? The kids are out of school or will be soon. Life will get crazy. Fun. And more crazy.

Are you kidding? I thought it was still March.

At least, it should still be March, don’t you think?

Que sera, sera.

OH! Did you see the new Rose Cards for June yet???? As always, our VRD designers didn’t let you down.

You can order all 5 cards HERE.

And here is June’s NEW Table Runner, Cake Day. Cute, huh?

You can purchase the Cake Day pattern HERE.

Did you know you can actually join the Rose Card Pattern Club and get the new monthly Rose Cards delivered right to your mailbox every month without you having to do a thing????

If you live out of the USA, you can sign up for the digital Rose Cards, which will be delivered to your inbox without you having to do a single thing.

There are even several different Pattern Club options to consider. Cool, huh?

You can sign up for the Pattern Clubs HERE .

Another really AWESOME thing about Villa Rosa is that we create a lot of kits using our Rose Card patterns. You can find kits for this month’s new patterns AND you can find kits for lots of other favorites, too. You can visit the website HERE to see what our selection of kits are. Please remember that we add new kits all the time, with all kinds of different fabric, so make sure you stop in often to see what’s new.

A Little Bit of Free Motion Quilting and a Video Demo

How many of you are a little bit afraid of free motion quilting on your own domestic sewing machine?

Be honest!

Okay, that’s better, I see a lot of hands raised and heads nodding out there.

Well, I’m here to tell you that you don’t have to be afraid anymore. I’ve been teaching free motion quilting (FMQ) for more than 10 years and I haven’t lost anyone yet!

Here’s my TOP 12 TIPS for FMQ:

1. Find a teacher at your local quilt shop to show you how and to guide you so you feel safe. Don’t try to teach yourself by using YouTube videos.

2. Start out small — the smaller the project the better for beginners. Potholders, table runners, place mats, wall quilts, or other small projects.

3. Start with a beginner-friendly design like wavy lines or loops. Meandering and stippling are NOT beginner-friendly.

4. Try to relax. The more tense you are, the worse your quilting will be.

5. Play music while you quilt, something with a beat. A beat will help you find your rhythm for FMQ on your own machine.

6. Keep practicing, every day if you can, even if it’s only for 10 minutes. The more you practice, the more comfortable you will feel, and the better your quilting will get.

7. Practice machine quilting with a friend. You can encourage each other and laugh together.

8. Try machine quilting gloves. There are a lot of different types of gloves out there, so you might have to try different kinds to find the ones that work for you. Machine quilting gloves will help you get a good grip on the fabric so you can move the quilt more easily when you are quilting.

9. Doodle. Doodle a lot. Practice drawing the designs before you quilt them — this builds some muscle memory between your hands and you brain.

10. Practice…….practice……..practice…….

11. Practice……practice…..practice……. (I can’t stress this one enough)

12. HAVE FUN!

Here’s a little video I put together demonstrating how to free motion quilt wiggly lines on last week’s Ying Yang Cats. Enjoy!

I hope this video inspires you to try free motion quilting some wiggly lines on your own little project.

Until next Thursday —

Sew. Laugh. Repeat.

Always,

Tricia @VRD