Hello Quilty Friends!
Happy Thursday to you!
I am thrilled to tell you that we’ve had a little bit warmer temperatures for a couple days in row here in NW PA. I’m talking above 32 degrees! Actually it’s been in the 40’s, which feels so balmy compared to last week’s temperatures in the single digits and teens. Whew! But I don’t think winter is over yet for us, though, as the beginning of March is looking cold again. Spring can’t get here soon enough!
PSST! While we’re waiting for Spring to arrive, it is a great time to work on our Free Motion Quilting (FMQ) skills, don’t you think? So far we’ve talked about tools, equipment, and resources; doodling, making loops, and using cursive writing as a quilting design.
This week for Lesson 5, we are venturing beyond the Loopy design.
If you missed any of the earlier lessons, you can find them below:
Lesson 1: All the Background Information
Lesson 3: Practice, Practice, Practice
Lesson 4: The Write Way to Doodle!
Let’s get started!
Going Beyond Loops
You might be wondering what exactly I mean by “going beyond loops”. Talk a deep breath — there is no need to panic. I promise we are not jumping right into Feathers. Relax, Feathers are ahead of you sometime in the future, but today is not the day. Instead, we are going to add some fun elements to our quilting to change up our basic Loopy FMQ design.
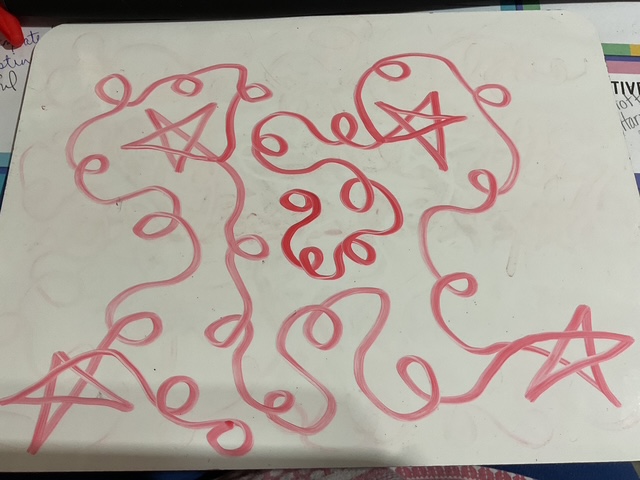
#1 Snowflakes with Loops
This design is absolutely one of my favorites, hands down! It is quite flexible and looks great on a lot of different quilts. Depending on the theme of the quilt, it can look like a snowflake, a star, fireworks, a starburst, or even a cool funky flower. Wow! That’s a lot of options for a single element, isn’t it?
Here is an example of the Snowflake and Loop design on a Christmas/winter place mat I created years and years ago for a magazine pattern.

Grab your dry erase markers and let’s practice drawing Snowflakes or whatever you would like to call them on our white boards. You can decide how many spokes/rays you want your Snowflakes to have. You can even vary the number in your design to add more interest.

Next let’s add Loops to the Snowflakes and practice drawing our new Loopy variation design. Ready, set, go!Do you see how I surrounded each of the Snowflakes with my Loops? I like to use the Snowflakes as an accent, not the primary design. The primary design, of course, is the Loops. Additionally, I like to give my Loops lots of space to breathe.

Go ahead and practice drawing this design a couple times. Experiment with the Snowflakes (do you want 6 or 8 or more spokes/rays?).
Next, we’re going to FMQ this design on a practice square on our sewing machines. Are you ready? Take a deep breath and just do it.
To get you started, here’s a little video I made for you, showing how I create my Snowflake and Loop variation.
Now it’s your turn to practice this design. Enjoy playing with it! Just imagine all the different kinds of quilts you can use it on!
#2 Kindergarten Star with Loops
Do you remember when you first learned how to make a five-pointed star? Probably around kindergarten, I should think. Can you remember how to make it now?
Here’s a little tutorial to jog your memory. Keep in mind that I am left-handed so you might draw your star differently than I do. Remember, you do you.

Kindergarten stars aren’t too much different from the Snowflake element above. And once you get comfortable making a five point star again (believe me, it will take some practice for some of you to remaster this shape), the design will flow more easily. Go ahead and draw some Five Pointed Stars on your white board. Make as many as you can fit onto the board. Make them all different sizes, too.
Now let’s practice drawing Kindergarten Stars combined with our FMQ Loop design. Feel free to do this several times until it feels more natural to you.
I bet by now (that is if you’ve been practicing) you are probably finding alternating the direction of the loops to be easier than when you first started several weeks ago. Go you!
Keep practicing on your white board until you can draw the five point stars without thinking about each line. Then I want you to practice making those stars upside down and sideways or else your design will come out very linear with stars lined up going the same direction.
This design looks amazing on patriotic quilts and on children’s quilts, too. What other kinds of quilts would look great with Kindergarten Stars and Loops?
Next up, we’re going to try quilting this design with our machines. Before we do, though, here’s a quick little video showing how I FMQ Kindergarten Stars and Loops.
Okay, now it’s your time to practice quilting Kindergarten Stars paired with Loops! This is fun, isn’t it?
#3 Hearts and Loops
Hearts will be our last design for today. So, how are you at making hearts? I have discovered that I can rarely make both sides of a heart exactly the same, so in my quilting (drawing and cutting, too), I intentionally make the sides of my hearts different. It lends a quirky funky look to my Hearts and Loops design, and that works just fine for me. LOL!
I have found that there are 2 basic ways to quilt hearts. Maybe you’ll come up with a different one and if you do, I hope you with share.
Anyway, the first way starts at the top center point and curves down and stops briefly at the bottom point before swooping back up and around to the center point once again. Remember, I’m a lefty so I usually move counterclockwise. Do what is comfortable for you.

The second way is one continuous line which might make it easier for you to FMQ hearts. It starts at the bottom point then curves up and around to the center point where you pause briefly before doing the second top bump and then swooping back down to the bottom point. This heart reminds me more of a heart shaped balloon – you’ll see this more when I quilt it.

So go ahead and practice your stars on your white board. Which style do you like better?
Now that I’ve mentioned both styles, I’m going to show and use the second style Heart design. I find that it can flow better with the loops than the first Heart style.
Now it’s your turn to practice drawing the Heart and Loop design on your white board. Repeat as many times as you want, experimenting with your Hearts.

Let’s head back to our sewing machines and try FMQ Hearts and Loops. Here’s a quick video of how I do FMQ my Hearts and Loops.
Well, that’s it for me today. I hope you keep practicing your Loops and adding these fun elements to change up your designs. Next week I’ll have a few more Loop design variations to share with you. So stay tuned!
Take care!
Until then –
Sew. Laugh. FMQ. Repeat.
Always,
Tricia @ VRD