Rose Cards · Tips and Tricks · Tutorials · villa rosa designs

NEW March VRD Rose Card Quilt Patterns and Wrapping Up the 2026 Winter Olympics with the Arctic Flame Quilt Tutorial

Happy Thursday to you!

I hope you’ve gotten the chance to watch some of the Paralympics this week. I have, and the athletes are so so inspiring. I’ve never seen anyone work harder than they do. I am truly at a loss of words to describe how I feel watching and cheering the athletes on.

In honor of all Olympic and Paralympic athletes, today I’m doing a tutorial for Arctic Flame, which I really felt embodies the whole Winter Olympic theme. So stay tuned after the NEW patterns for the tutorial.

OH! Before I forget, I want to say HI to all of our new subscribers. We’re glad to have you aboard the VRD ship. I’m Tricia, your Cruise Director.

Now, let’s cue the marching band and let the balloons fly to celebrate the new March VRD patterns!

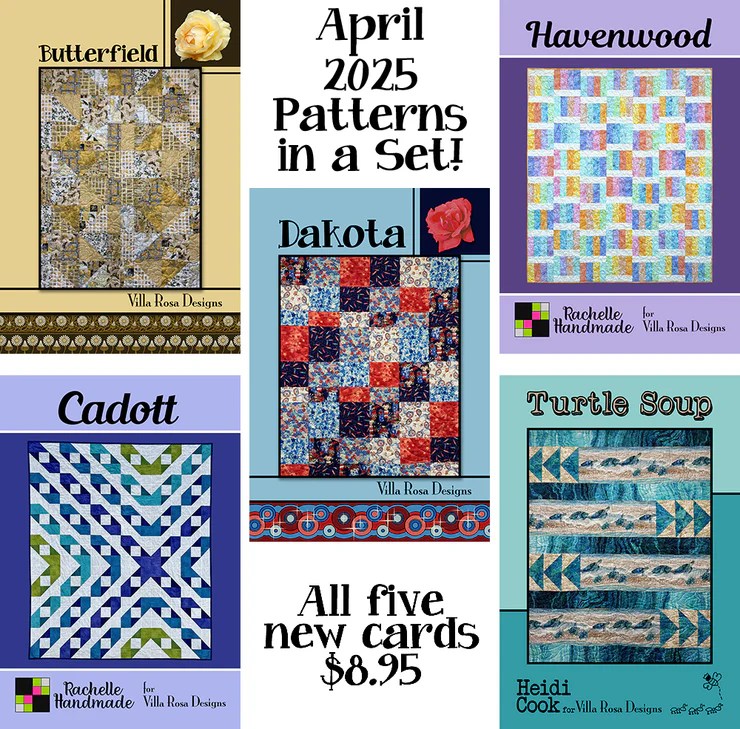
NEW March VRD Quilt Patterns

Hard to believe another month of 2026 has passed and it’s time for another collection of new patterns. I think you’re going to LOVE this month’s patterns. When I saw all of them, I was really amazed by the creativity of our designers. They are bright, bold, visual, and fun.

Dang! I’m not sure which one I want to make first.

Argh! Guess I’ll just have to add ’em to my mile long list that just keeps getting longer. I don’t think I’ll ever reach the end of the list, though.

A promotional image featuring five quilt pattern designs for March 2026 from Villa Rosa Designs. The patterns are titled Dacada, Serpentine, Maraschino, Up & Away, and Wanderlust. The graphic highlights the patterns and indicates that all five cards are available for $8.95.

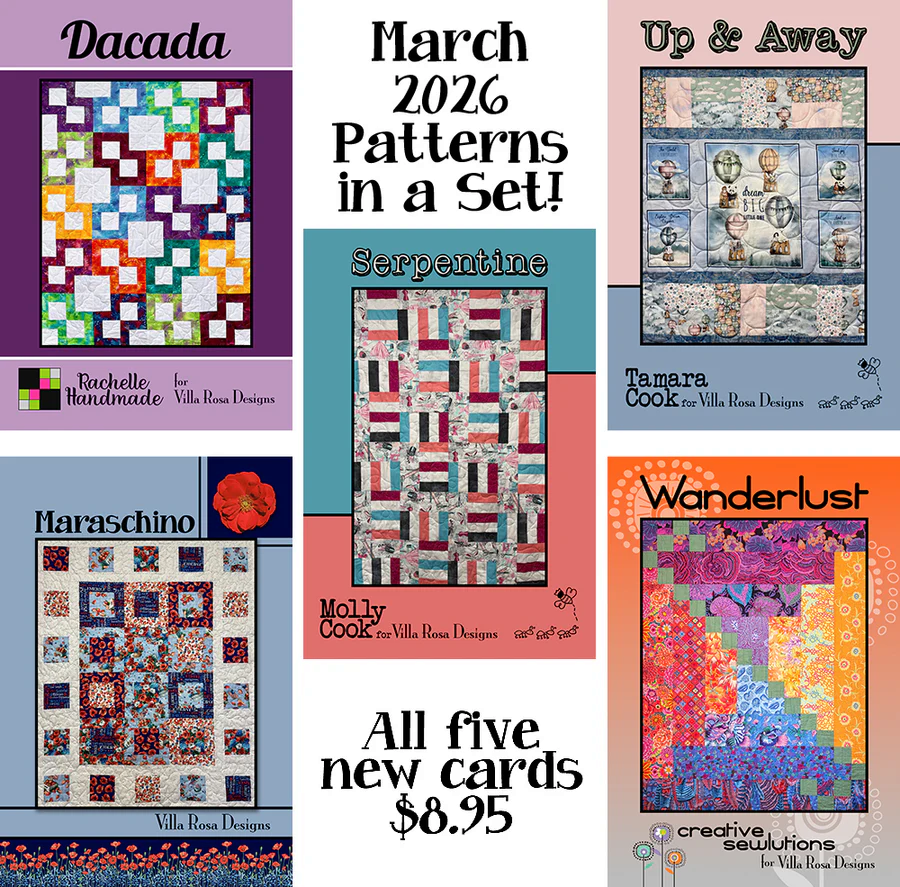
You can get all 5 print patterns HERE

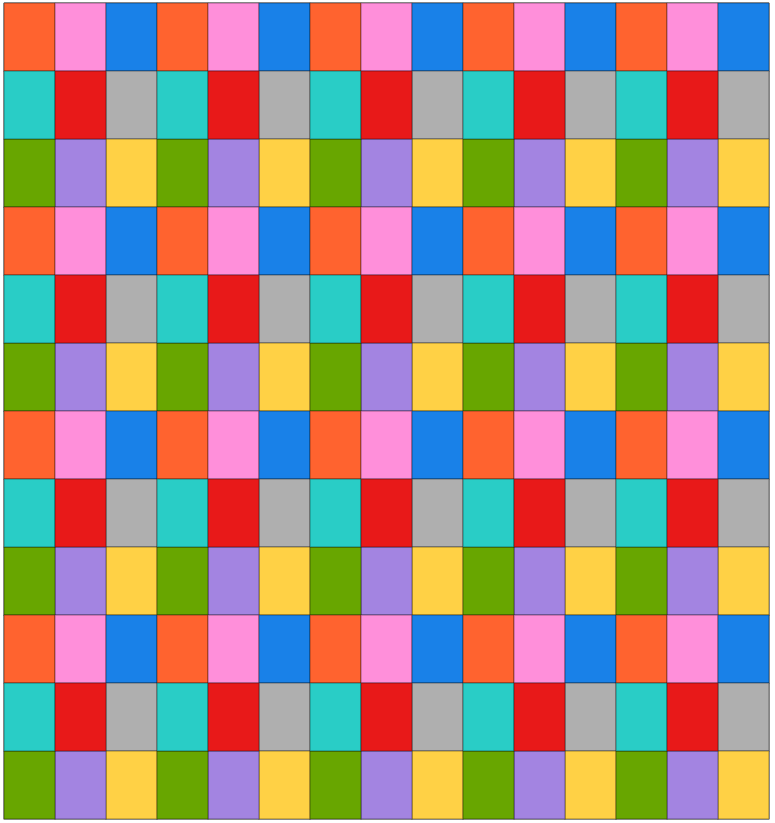
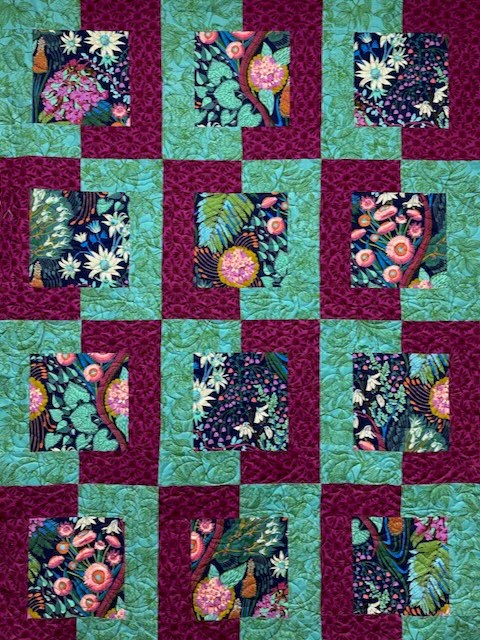
Dacada is Rachelle’s latest modern design and it almost leaps off the pattern. I wonder what it would look like with black or navy background instead of white? It finishes at 48″ x 60″ and is fat quarter friendly. You can find a kit featuring Bold in Bloom batiks HERE.

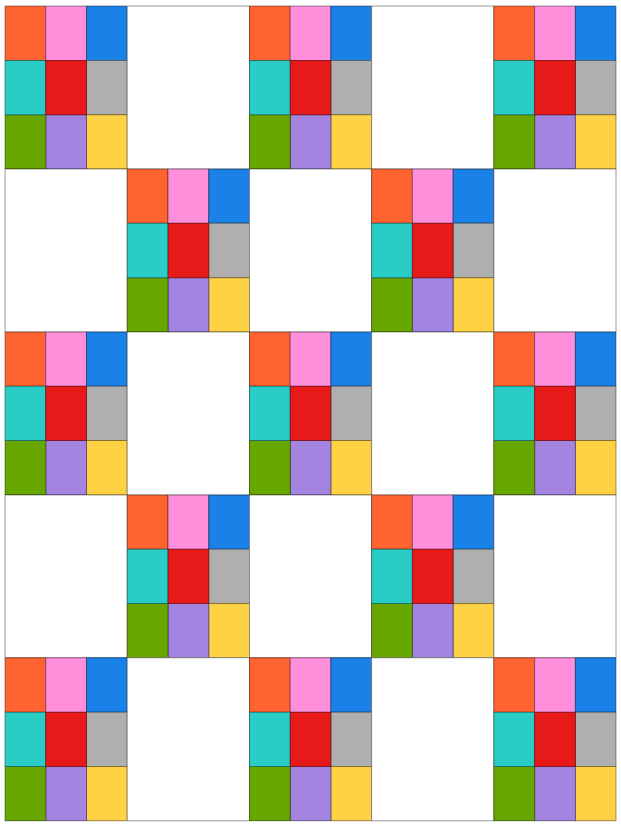
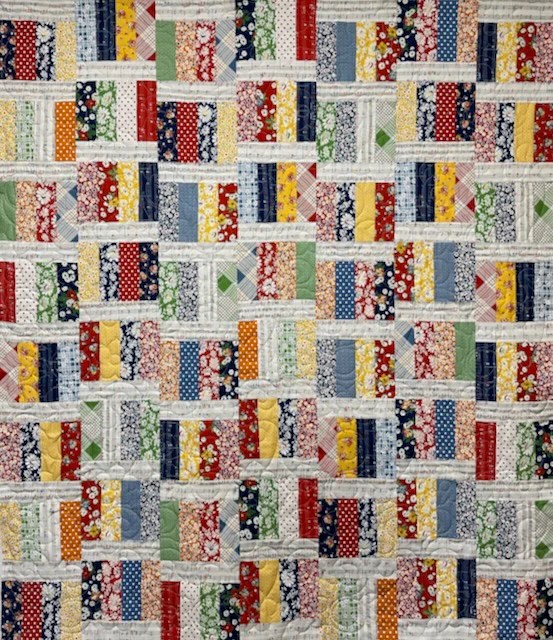
Serpentine by Molly is a fast and super fun strippy quilt that you can make in a wink. I love that you can use a favorite novelty fabric in her pattern. It finishes at 40″ x 60″ and uses yardage. You can find a kit featuring the same fabrics (Dressmaker) that Molly used HERE or a kit using batik fabrics HERE.

Up & Away is Tamara’s new pattern and it is as sweet as can be. It features a horizontal panel – 23″ and up so it gives you lots of options. With a 23″ panel, it finishes at 41″ x 49″, which is a lovely size for a baby quilt. Using a 36″ panel, the size would be approximately 41″ x 61″ which would be a small throw quilt. You can find a kit with the same fabrics Tamara used (Let’s Go on an Adventure) HERE.

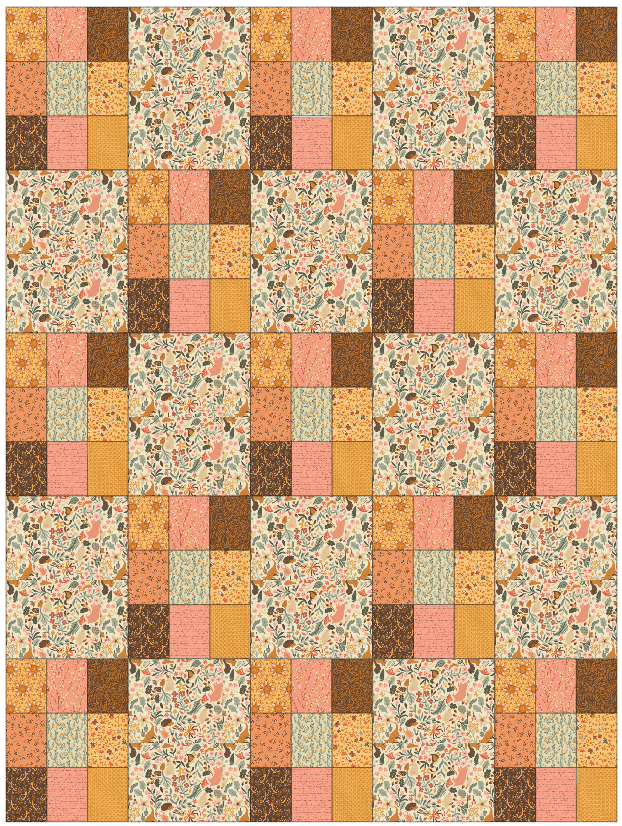
Maraschino is Pat’s March pattern and it couldn’t be more fun. It finishes at 45″ x 54″ and uses fat quarters and a little bit of yardage. You can find a kit with the same fabrics Pat used (Red, White, and Sweet) HERE.

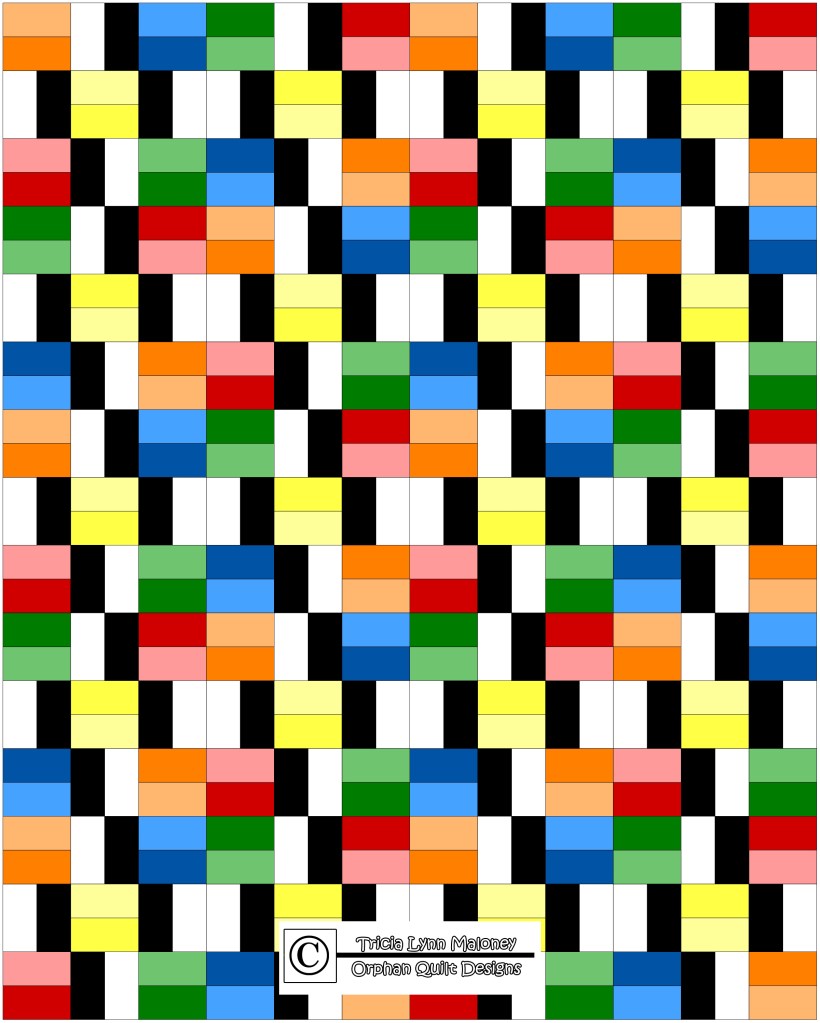
Wanderlust is Creative Sewlutions’s latest modern design. It finishes at 49″ x 63″ and uses yardage. I’m itching to make this one out of my stash with an awesome pop of color.

But wait – we’re not done yet!

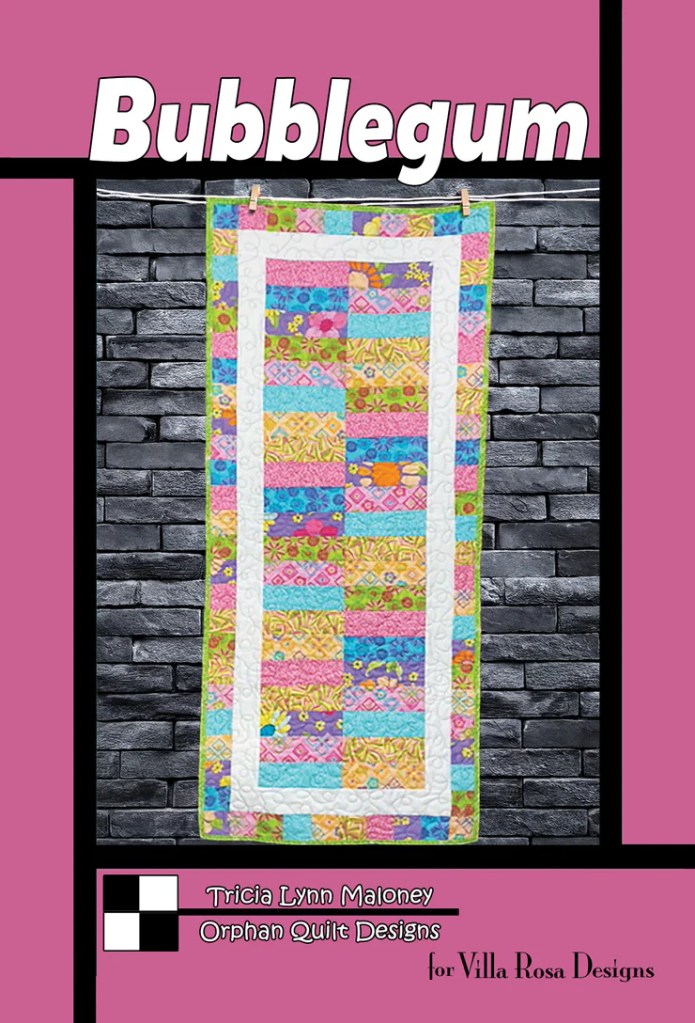
Here’s my March Table Runner, Be Square. The center blocks are great for using your favorite fun novelty fabrics, printed panel squares, or even stray quilt blocks. It’s a very versatile design. And it goes together really fast.

A colorful quilted table runner featuring square blocks with floral patterns on a red background, titled 'Be Square' by Tricia Lynn Maloney. The design includes white spaces between the colorful squares.

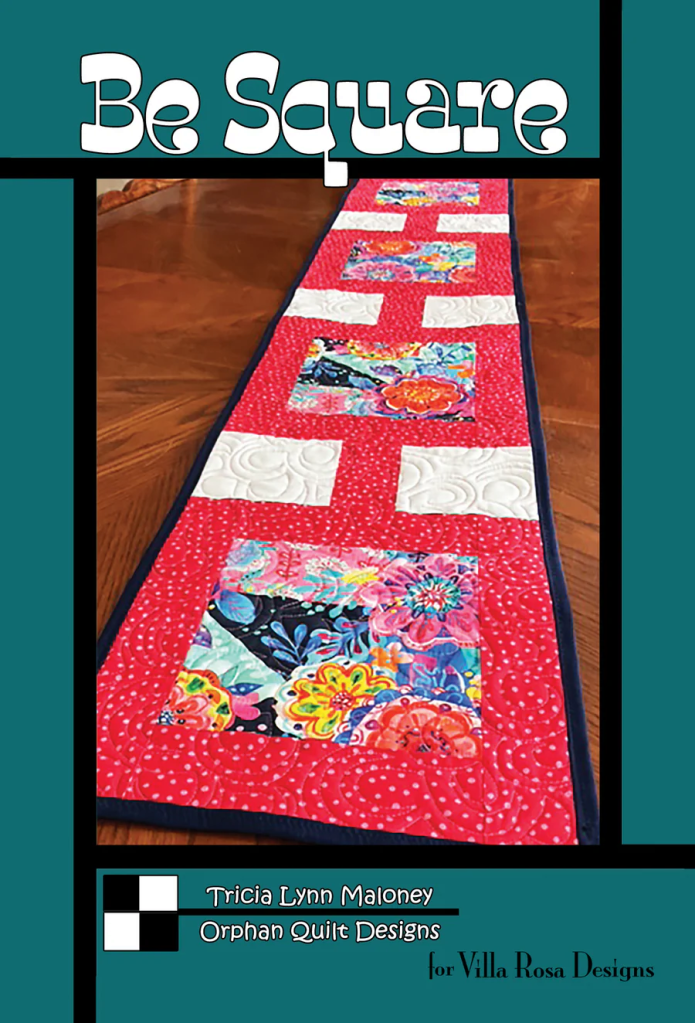
Get the digital pattern HERE or the print pattern HERE.

And last, but certainly not least, is the third Pillow pattern in the 2026 Seasonal Pillow Series. It’s called Spring Blooms. This pillow design would look great in so many different color combinations! What would your favorite combination be?

Guess what? My Mom claimed this pillow for herself even before it was finished! Moms can be like that sometimes…….LOL!

And a star is born! My cute little Shih Tzu girl, Bailly, is always happy to pose for me. Isn’t she a cutie?

A decorative pillow titled 'Spring Blooms' displayed on a green couch, with a small dog sitting beside it.

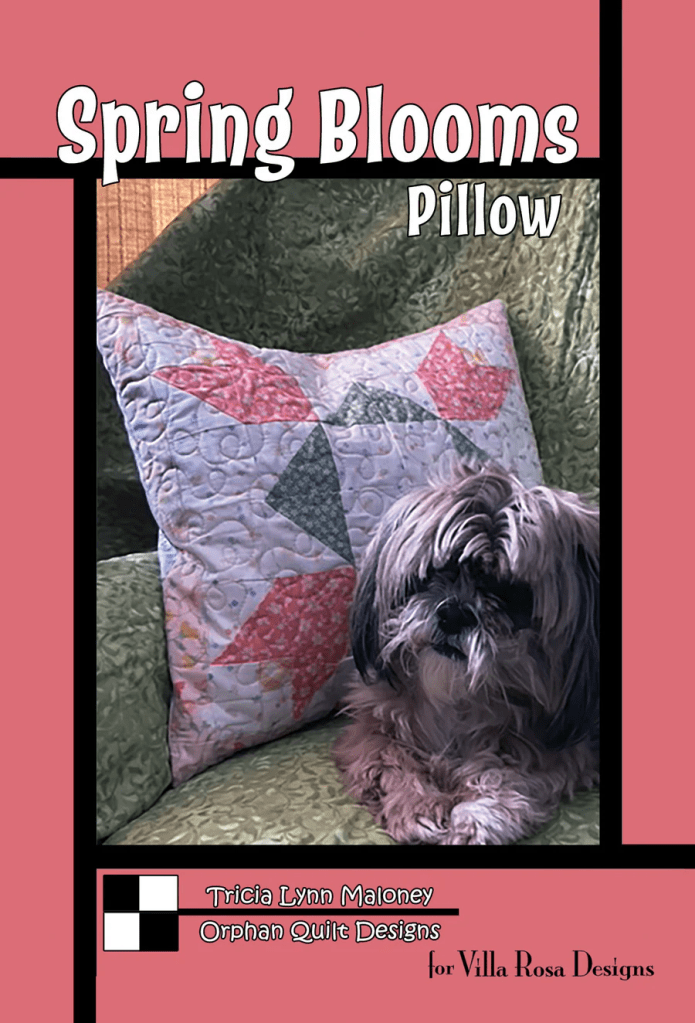
Get your digital pattern HERE or your Print pattern HERE.

3 Aunts Quilt Shop is doing a Block of the Month with the Pillow series this year and you can find the new Spring Blooms kits below:

Kaffe Fabrics

Tonals

Tula Fabrics

They still have some kit options available for Happy Hearts (Jan) and Good Luck (Feb) available HERE if you haven’t made yours yet.

All right! What an awesome collection of patterns for March! Which one are you going to make first?

Now let’s dive right into our tutorial for today – Arctic Flame.

VRD Arctic Flame Quilt Tutorial

Are you familiar with the Arctic Flame pattern? It’s an oldie but definitely a goodie! This is one of Pat’s clever designs.

I’ve always wanted to make Arctic Flame, but for some reason I thought it looked kind of daunting and…I just didn’t. So, I keep coming back to it and then telling myself “someday.” Have you ever felt that way about a pattern?

Well, someday has finally come. I chose to do the Arctic Flame tutorial today in celebration of the 2026 Winter Olympic Games. The pattern name just sung for me and seemed to embody the spirit of the games. And I had just the perfect fabrics to use – wait ’til you see them!

A vibrant quilt design titled 'Arctic Flame' by Villa Rosa Designs, featuring a colorful pattern with floral motifs and zigzag elements on a brown background.

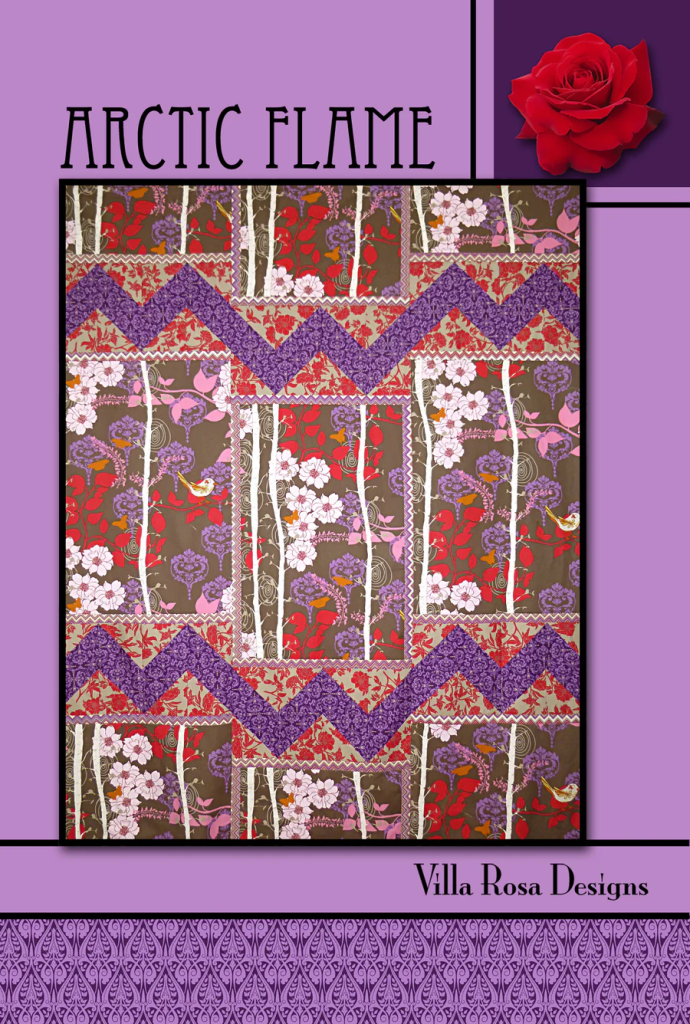
Get your Digital pattern HERE or your Print pattern HERE

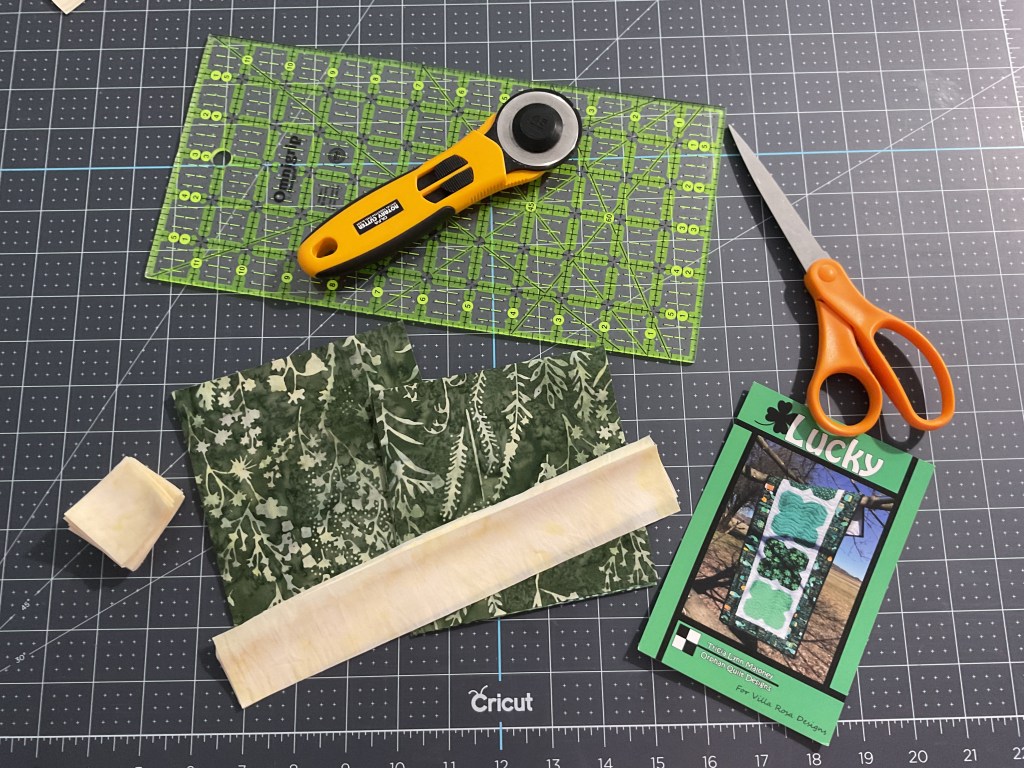
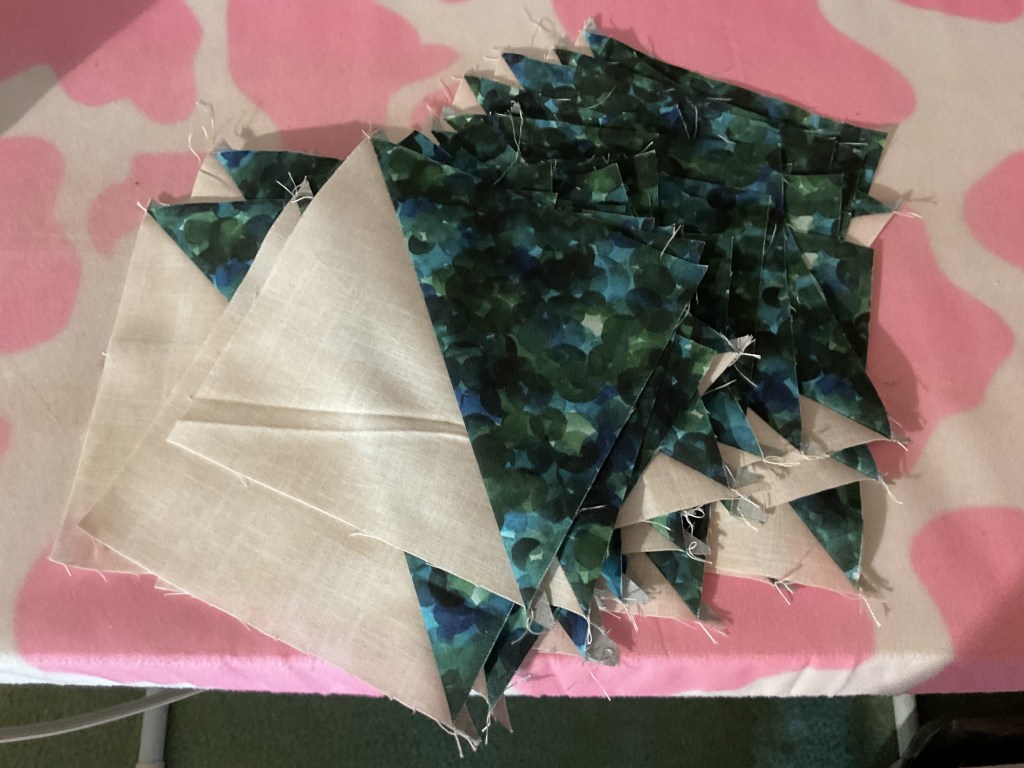
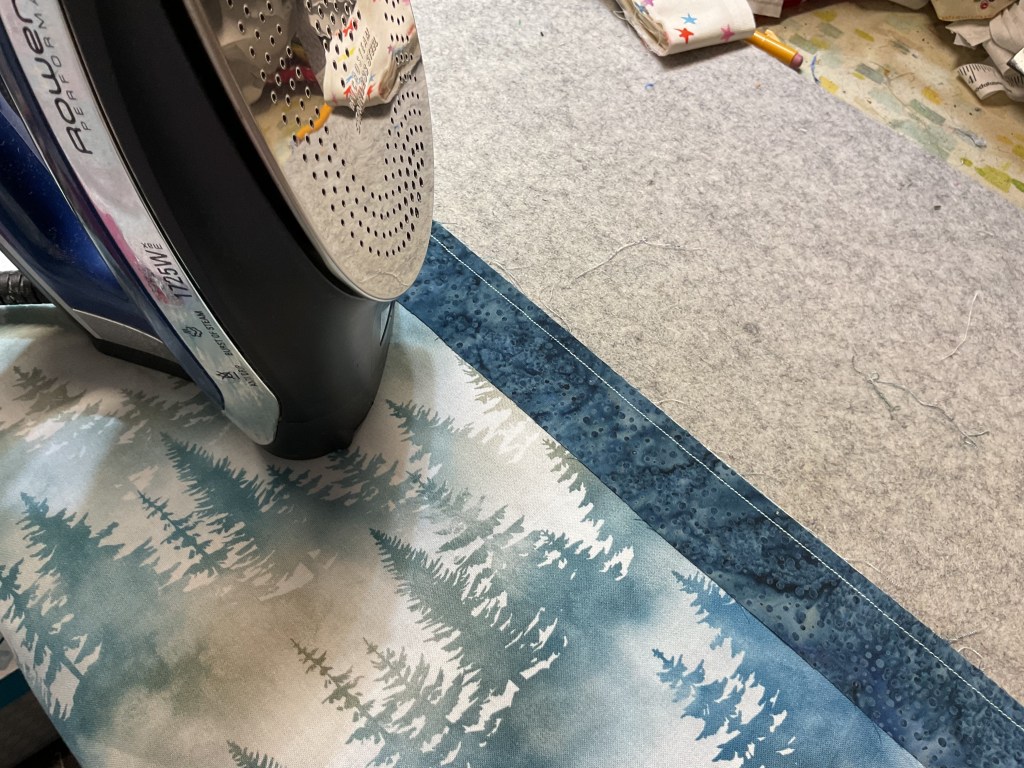
1. Time to gather up our fabrics. The fabrics I’m using today are from an older Hoffman digital collection called Starry Nights. I’ve had these fabrics hanging out for a while and now they’re ready to shine! Just wait until you see what I’ve got planned for the mountain and trees running yardage print.

Various fabric pieces displayed on a cutting mat, featuring a scenic landscape design with trees, alongside solid and patterned fabrics in shades of blue and green.

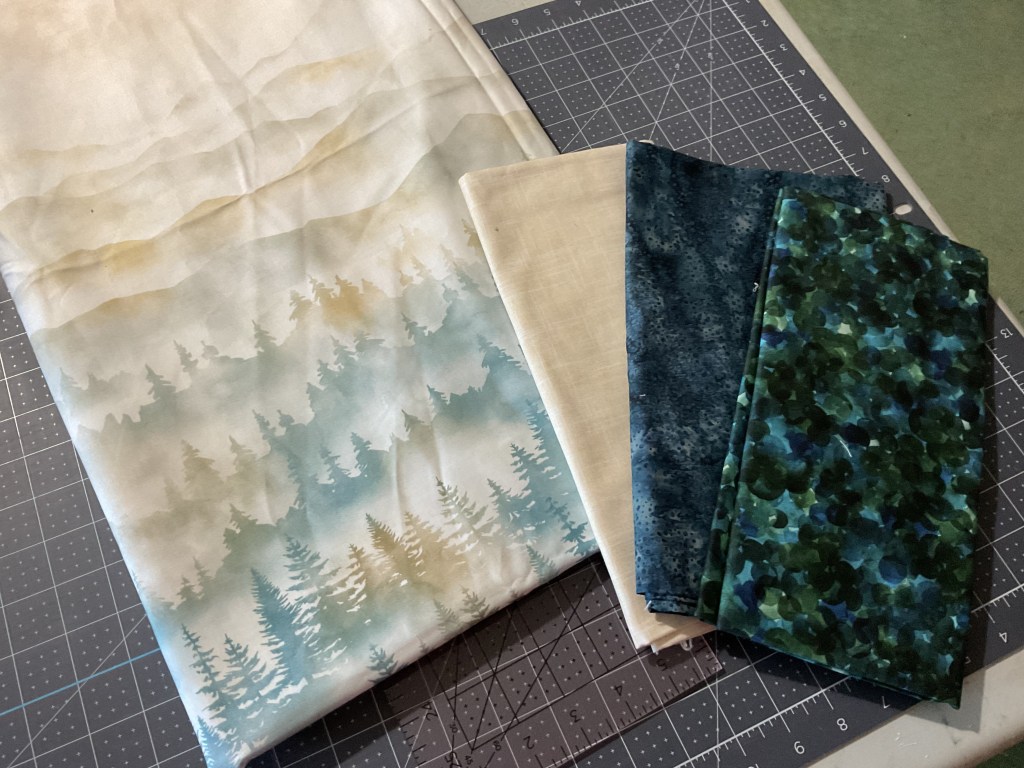
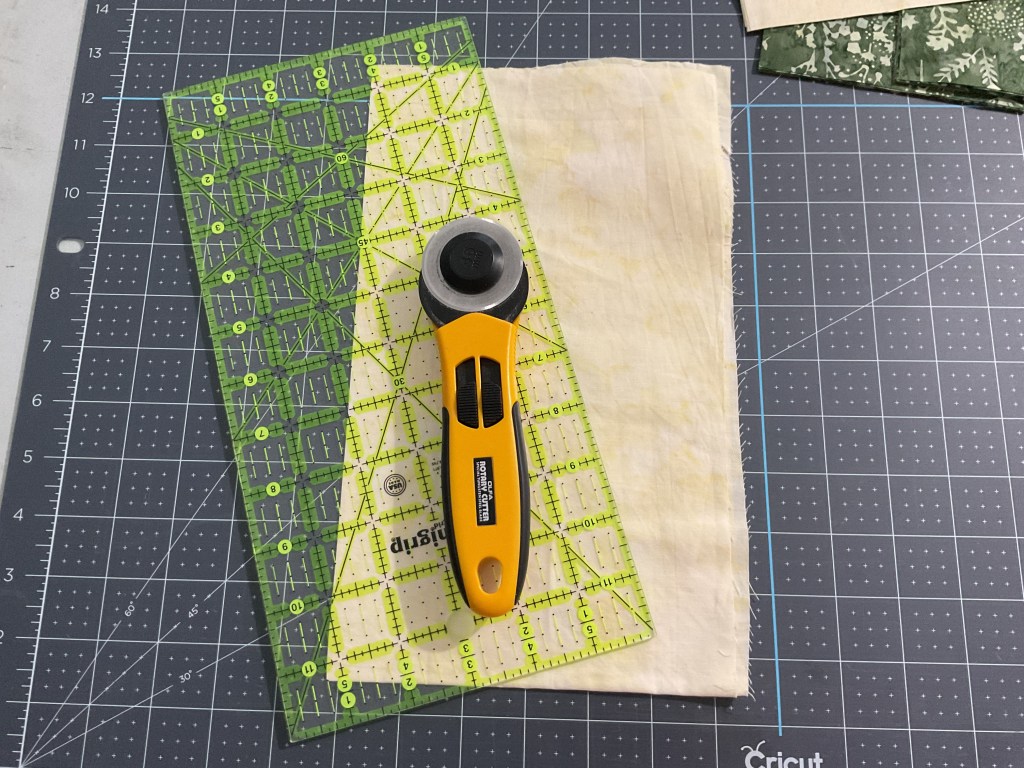
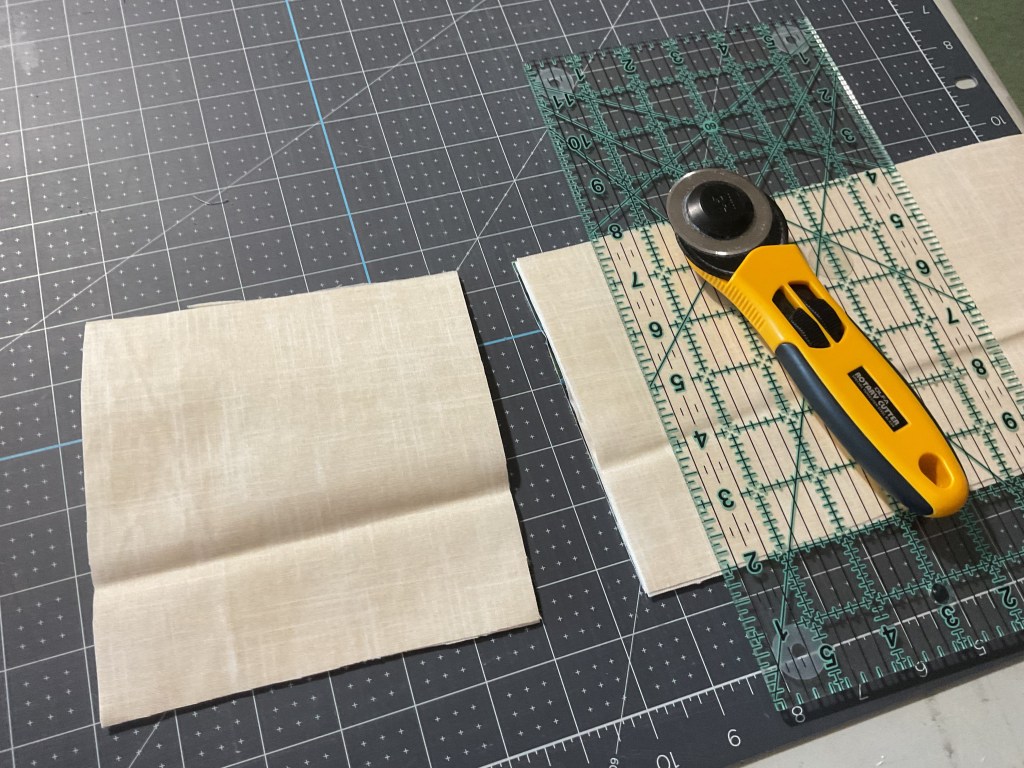
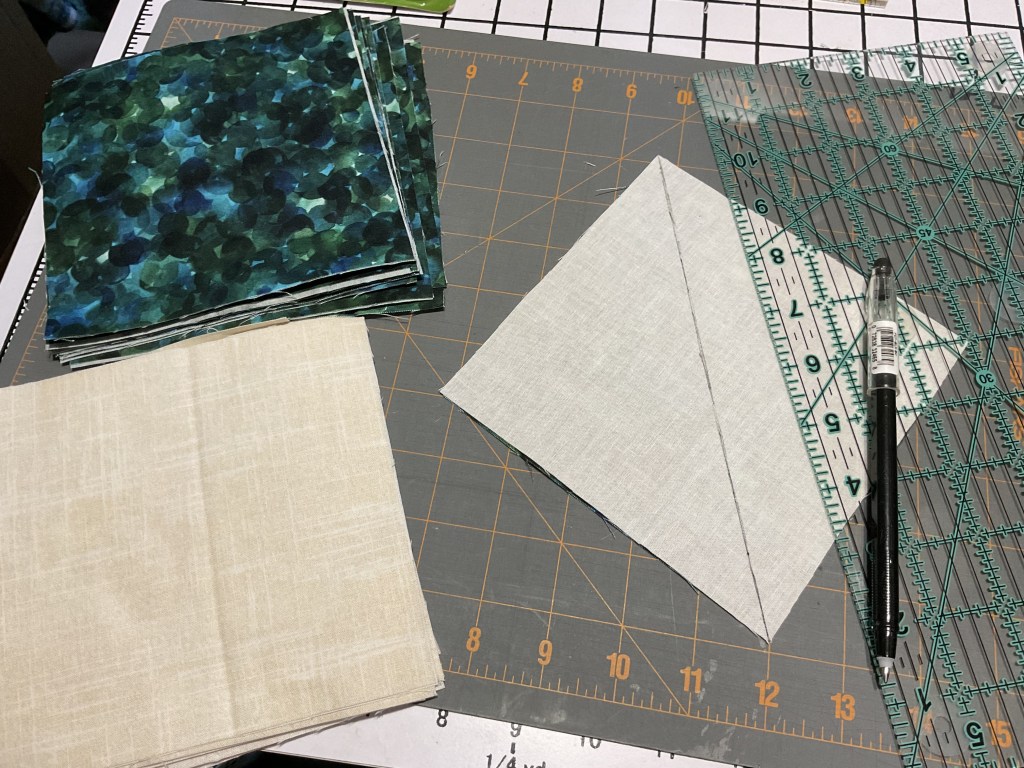
2. Next up we’re cutting our light and dark fabrics into squares. Easy peasy.

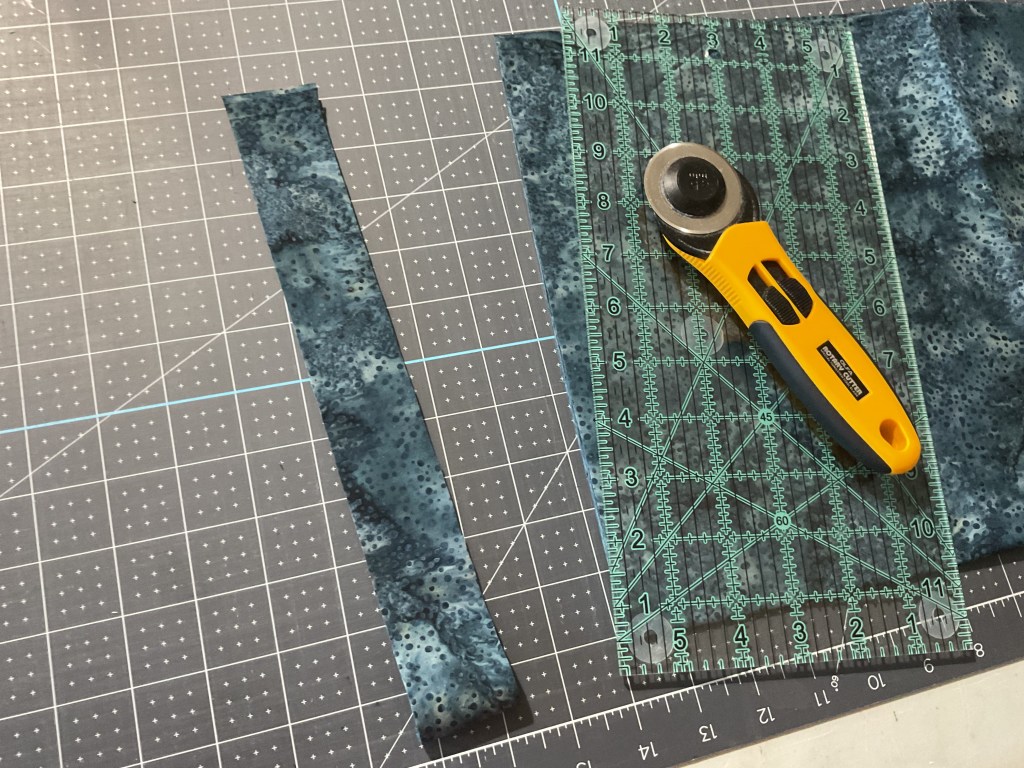
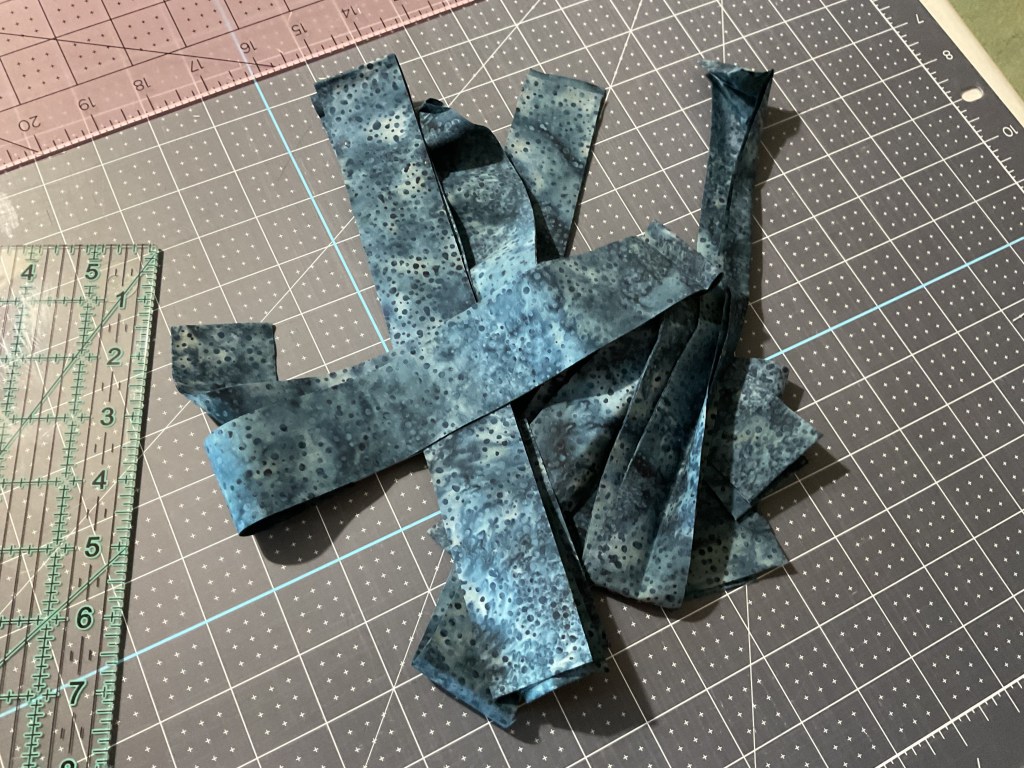
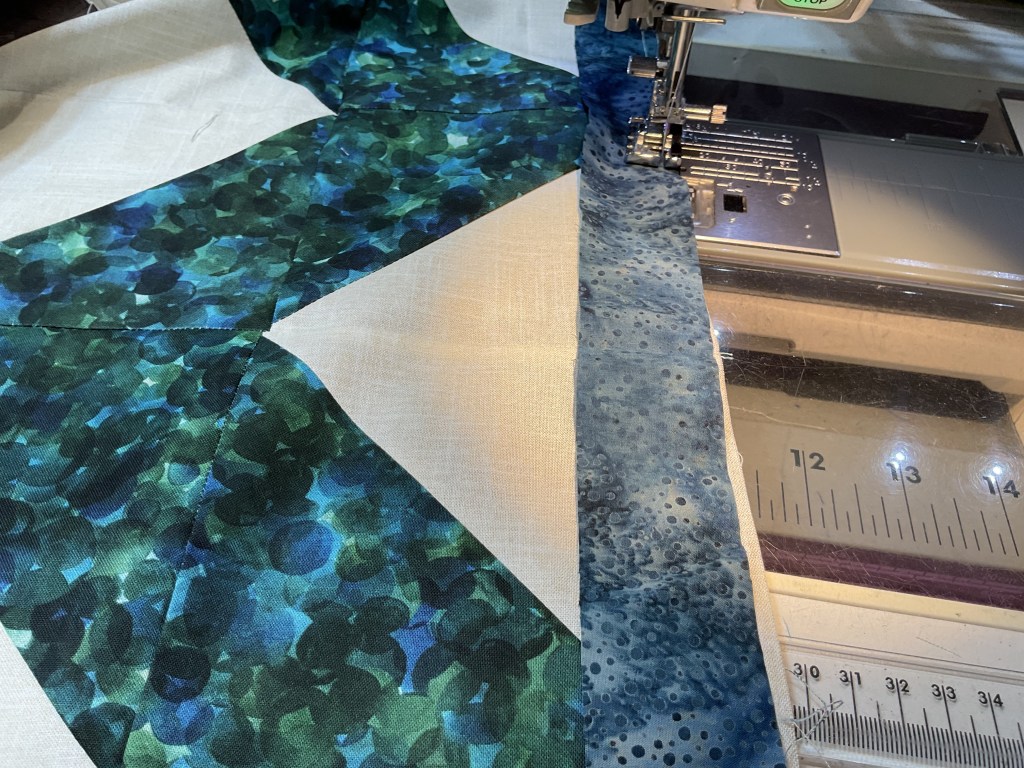
3. Another easy one – cutting the strips for the sashing. Please note that my binding will be the same fabric as the sashing which will give the quilt a wonderful finish (that is when I quilt and bind it in 2099). Do likewise if you want – just make sure you have enough fabric for both.

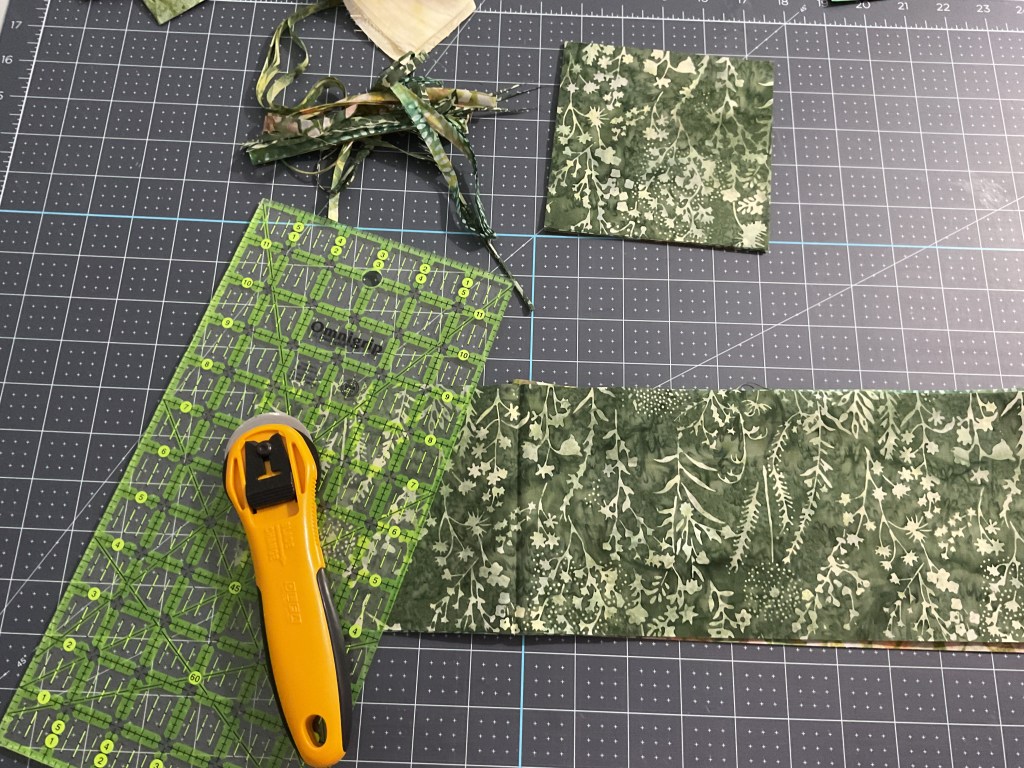
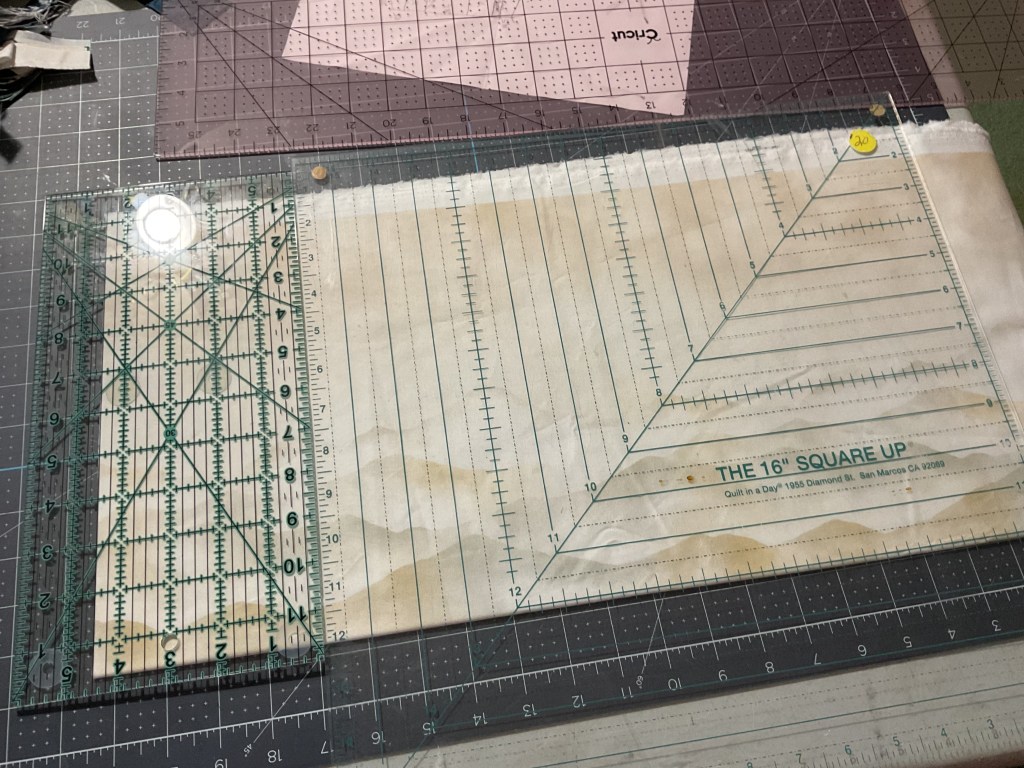
4. Now for the piece de resistance – the mountains and trees theme fabric. Oh my goodness! I’m almost afraid to cut into it.

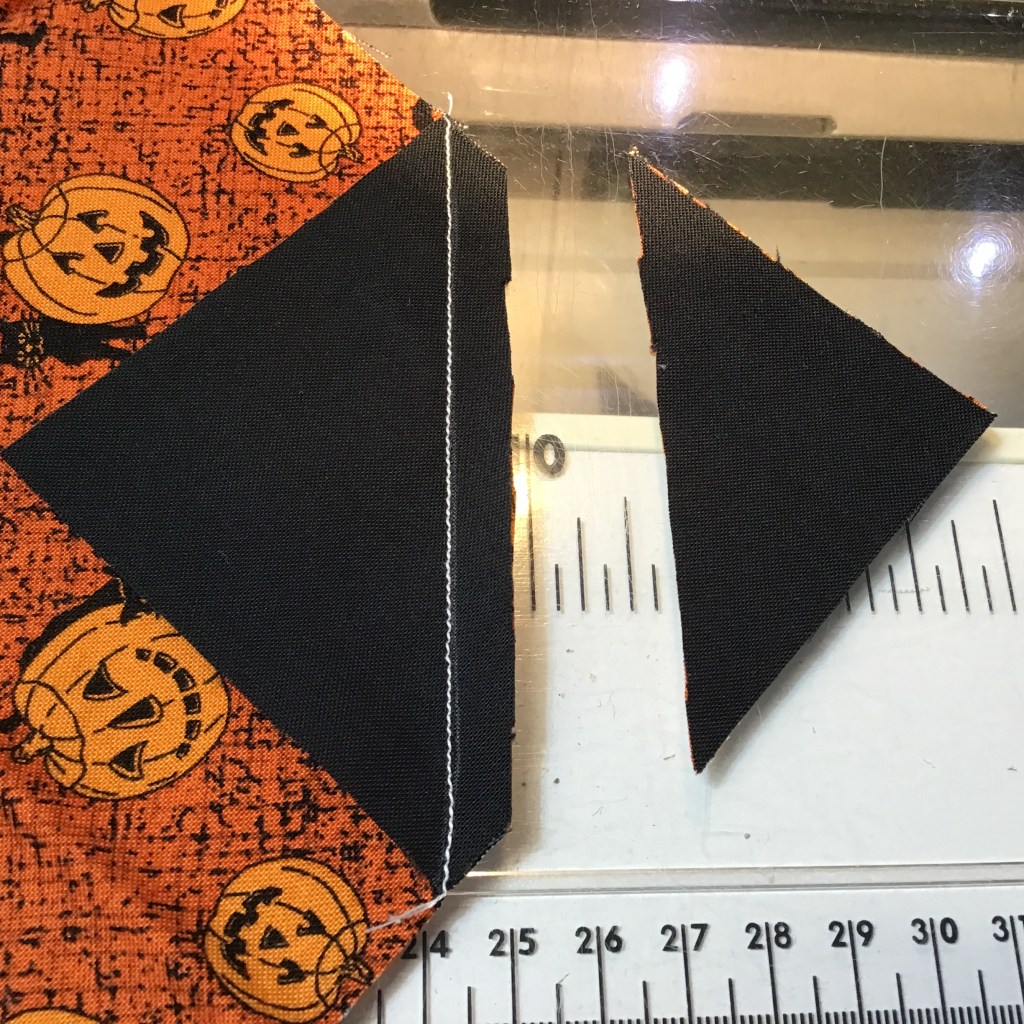
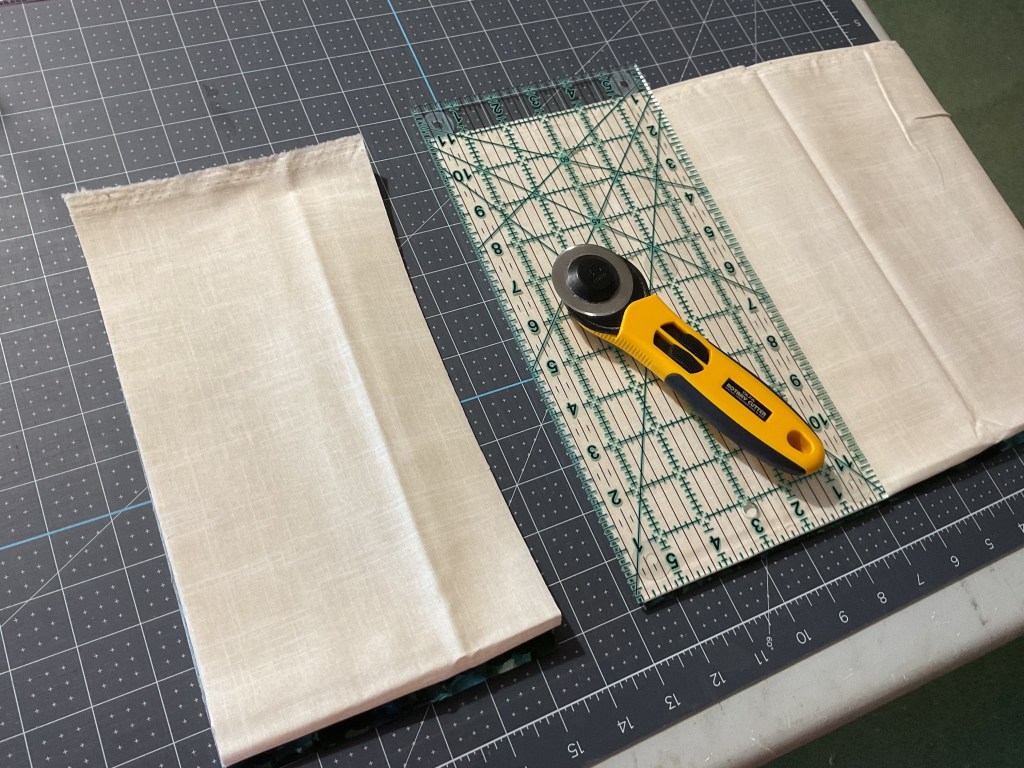
Do you have issues when trying to cut large pieces of fabric for a pattern? Well, let me tell you a little trick that I use – I use 2 rulers end to end to create the right size because I don’t have any gigantic quilt rulers to work with.

In the photo on the left, I’m using a 15″ square paired with my favorite 6″ x 12″ ruler to get the correct fabric width.

In the right photo, I’m using a 6″ x 26″ and my 6″ x 12″ ruler again to get the correct length.

PSST! I really do try to use the same manufacturer when using multiple rulers for a project so the measurements will more likely be the same, but sometimes you just have to do the best you can with what you have available. And I’m definitely taking the time to triple check my math before cutting.

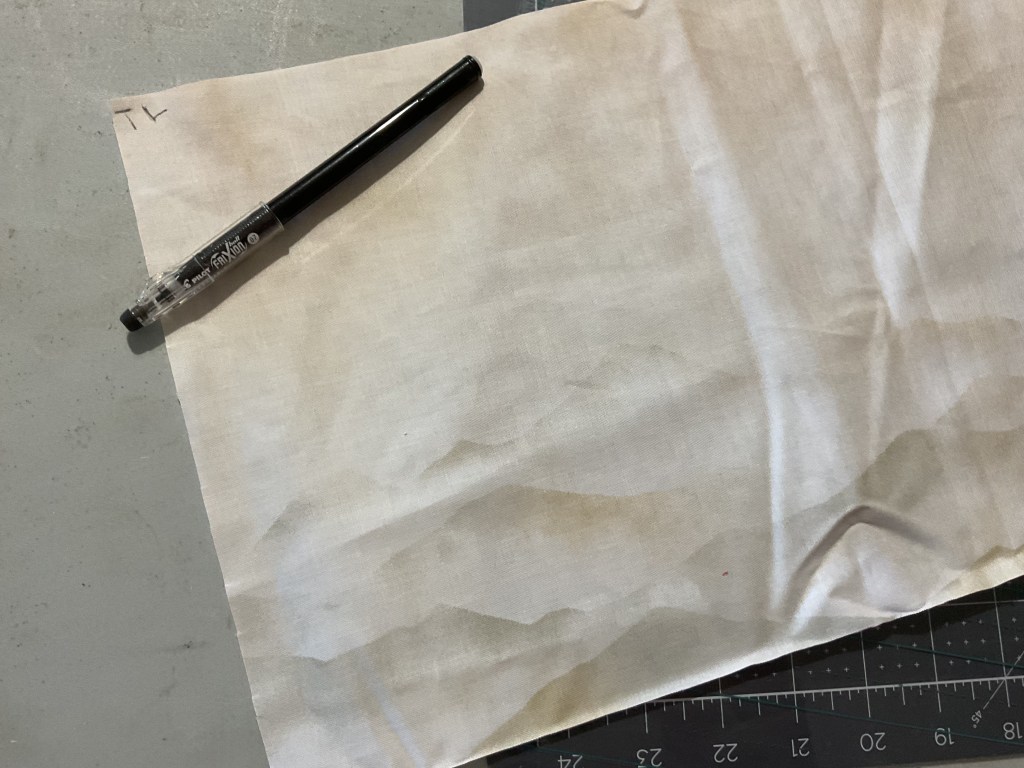
In the bottom photo, I used my Frixion pen to mark which section the cut piece was so I didn’t get the pieces mixed up. I used TL for top left, TC for top center, TR for top right and so on.

A white fabric with light creases and stains, lying on a gray surface, accompanied by a black pen.

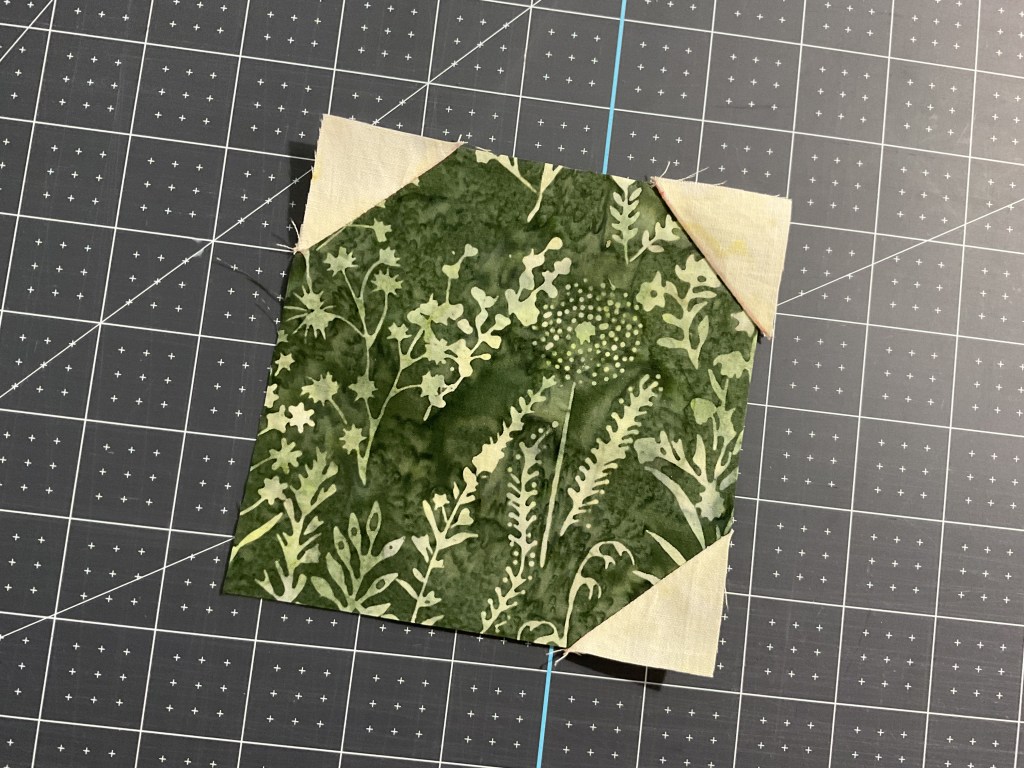
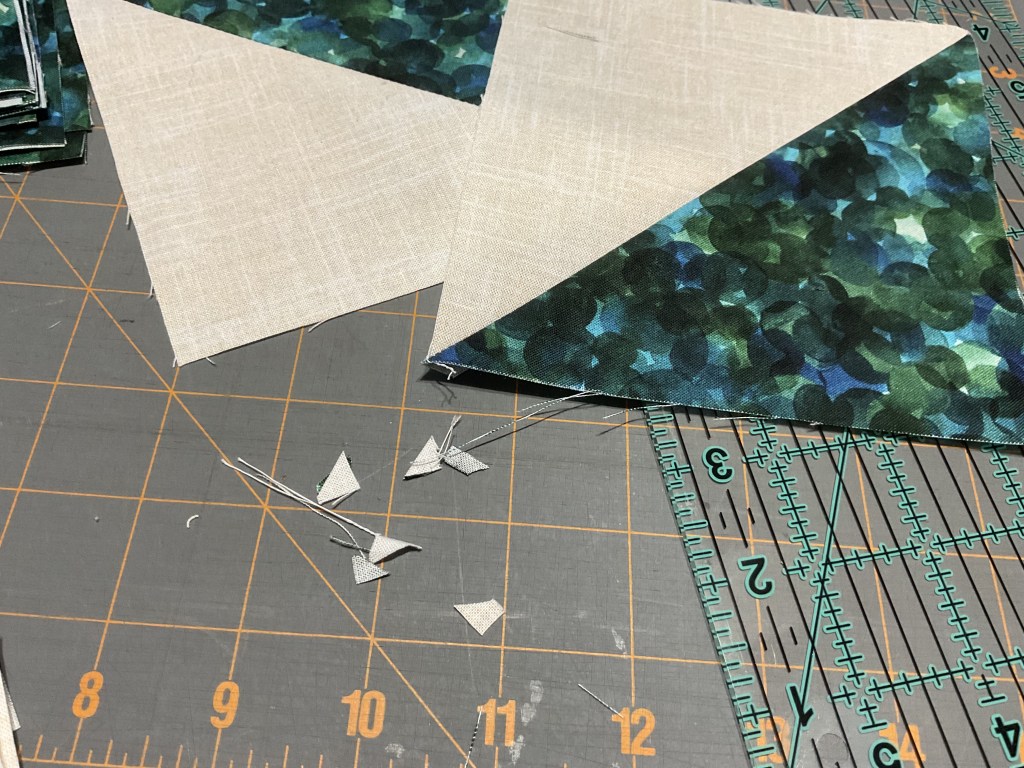
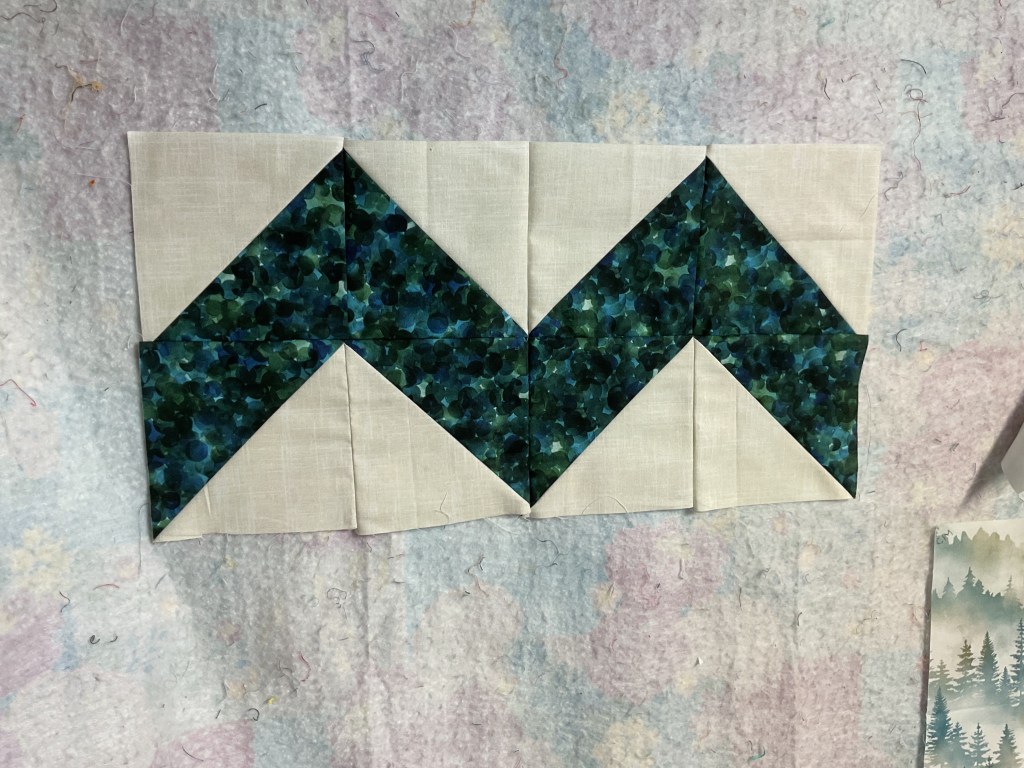
5. Okay, we’re going to make some Half Square Triangles (HSTs) with our light and dark squares. Oops! I’m just rereading the instructions on the pattern and I realized I did the tutorial slightly different. Let me explain – the pattern calls for you to cut the squares on one diagonal and then sew dark and light triangles together to make HSTs.

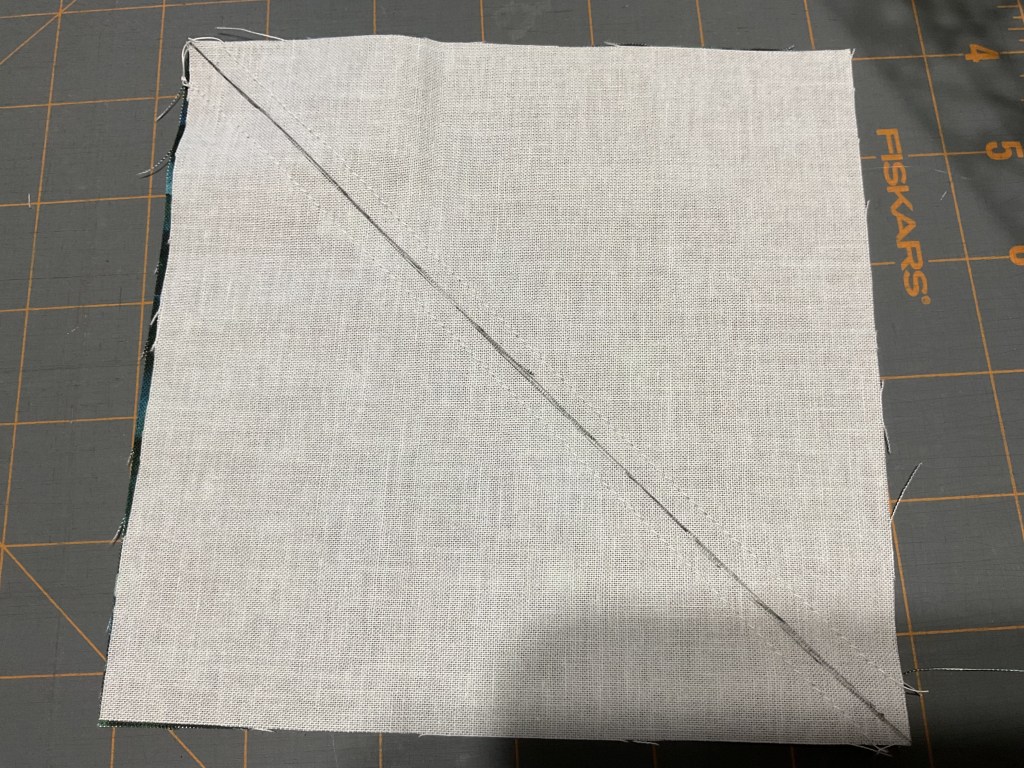
My usual method, shown here, gets the same results, but is slightly different. I layer my light and dark squares RST and draw a diagonal line with my Frixion pen. Then I sew 1/4″ away from both sides of the line. Finally I cut on the line to make my 2 HSTs.

Same results, but I have found making HSTs this way eliminates sewing on the bias which can make the units stretch or do other funky things.

You do you, though – whichever method works the best for you.

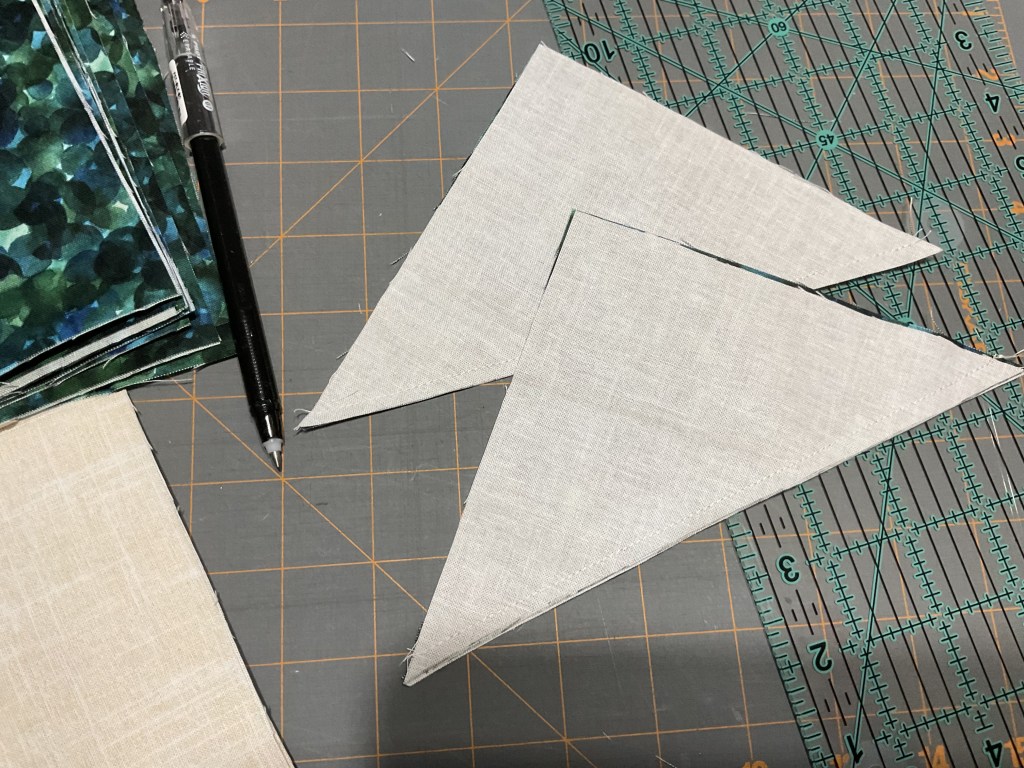
6. We’re off to the iron now to press all of the HSTs open. Looking ahead at how we’re going to assemble the HSTs, I am going to err on the side of caution and press half my blocks to the dark and half to the light. Don’t forget to cut off all those little annoying ears after you are done pressing.

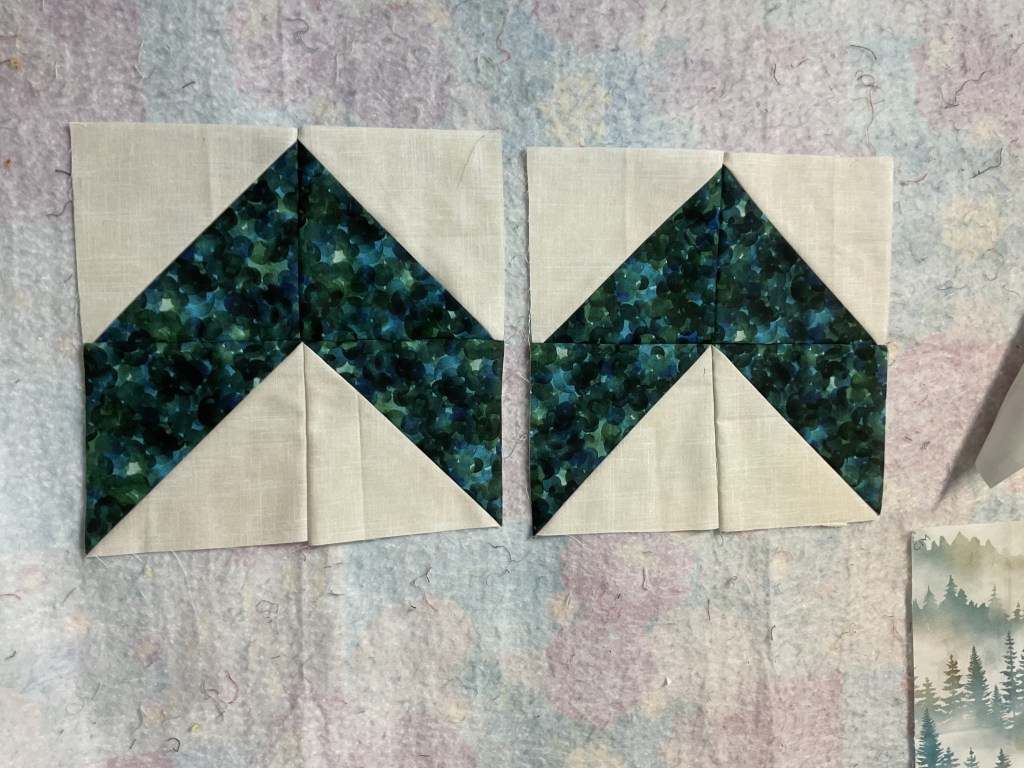
7. Now let’s sew those HSTs together into larger units of 4 HSTs. Having the seams pressed to both light and dark is going to make this a lot easier than if they were all pressed to the dark (which is what I normally do). I laid one of the units out on one of my small flannel boards so I wouldn’t get confused while sewing them together (Hey! Wanna make your own small flannel board? Check out this tutorial!)

A close-up of a fabric quilt block featuring a geometric design with dark green and blue patterns alongside cream-colored fabric squares. The background is light-colored quilt batting.

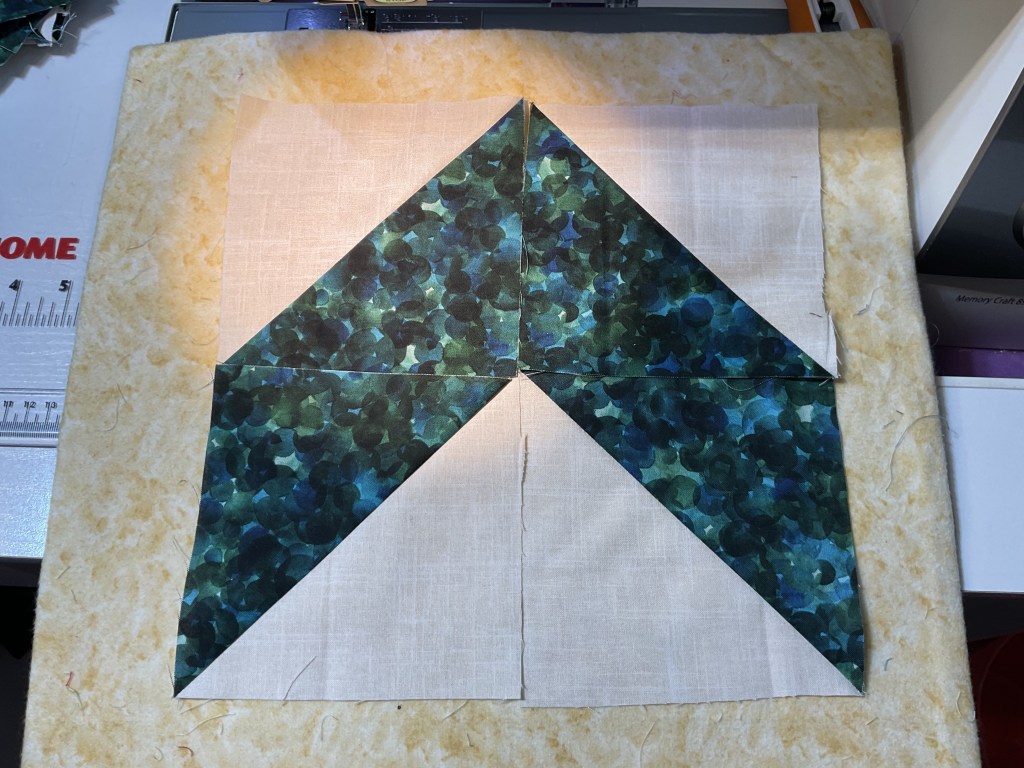
8. Now that we know how to assemble the larger units, let’s sew them together, following the layout on the flannel board above. First, I’m going to sew the top 2 HSTs together. Second, sew the bottom pair together. Third, sew the top pair to the bottom pair. I often skip pressing until the end when I’m putting together a block or unit, but please press each step if you need to. Because I pressed the HST seams to both the right and the left, it’s a snap to nestle my seams to achieve good crisp points.

Two quilt blocks featuring a geometric design with green and blue fabric on a light background.

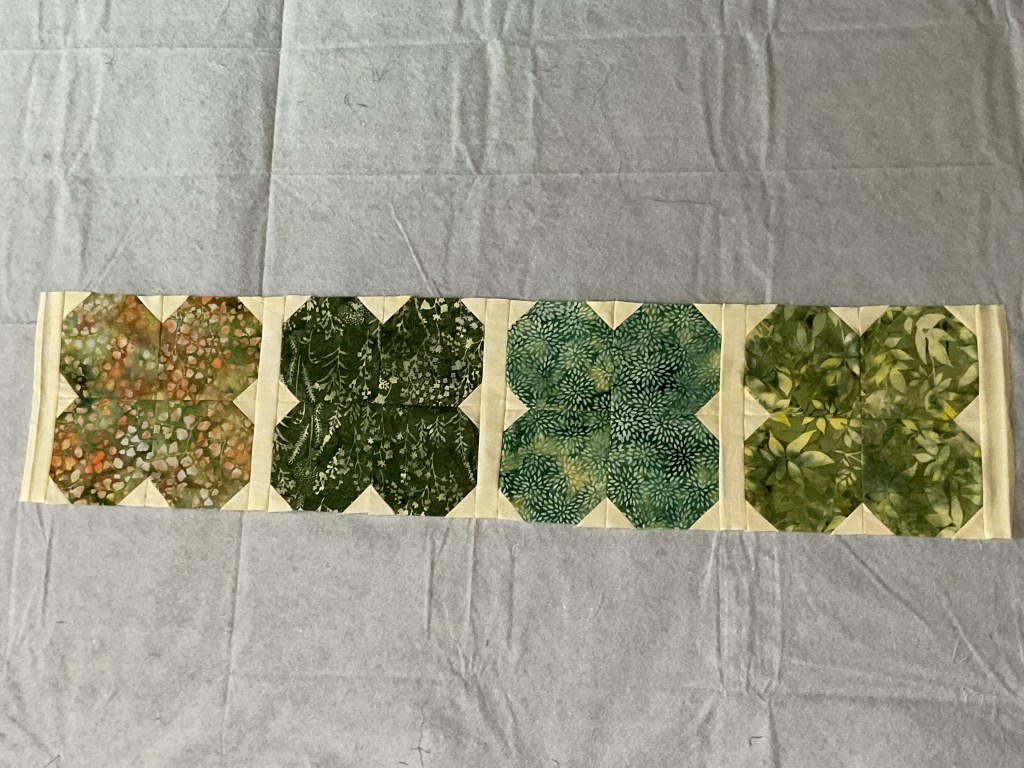
9. Now that the 4 HST units are sewn and pressed, we are going to sew 2 of those units together into a big 8 HST unit. This was really a lot easier to put together so far than I thought it would be. Yay!

A quilt block featuring a zigzag pattern with dark green and blue prints complemented by light beige fabric.

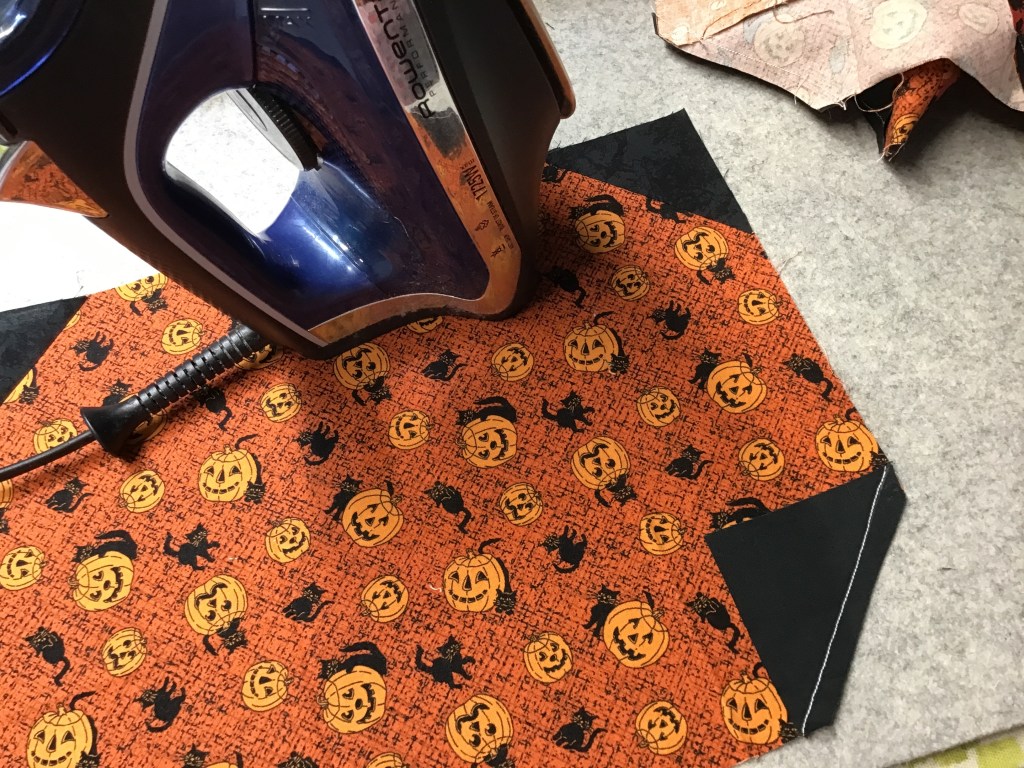
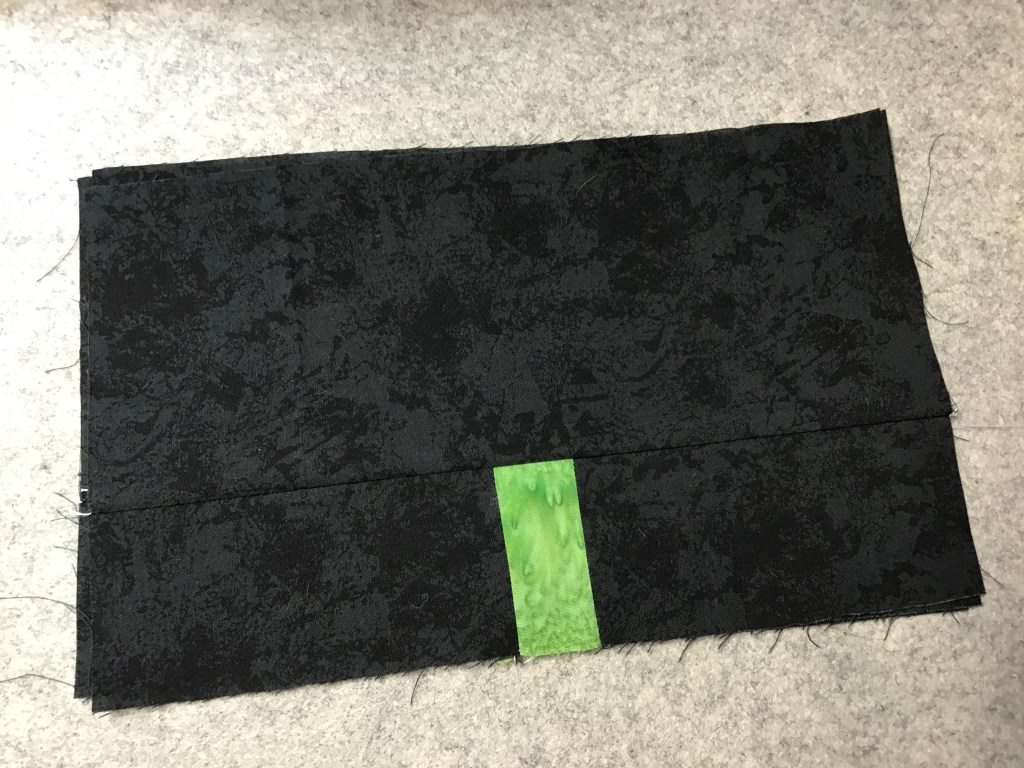
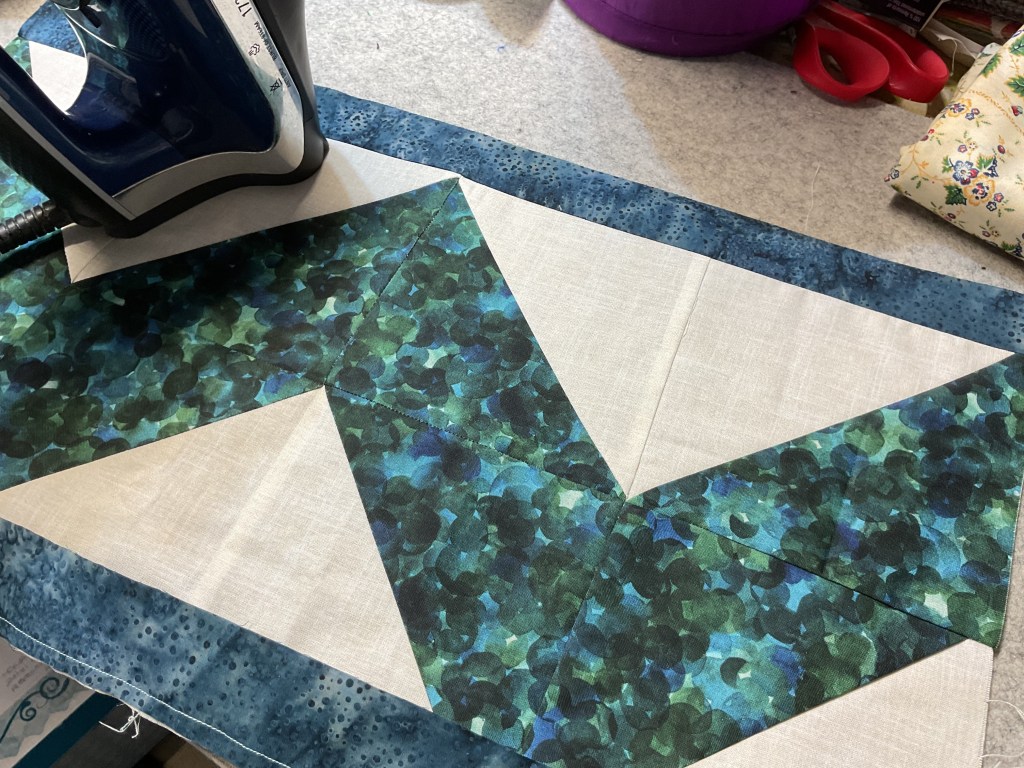
10. Next step is to sew the sashing strips on according to the pattern. I am definitely pressing all of my sashing strips to the dark side (Huh….and it’s not even May 4th yet).

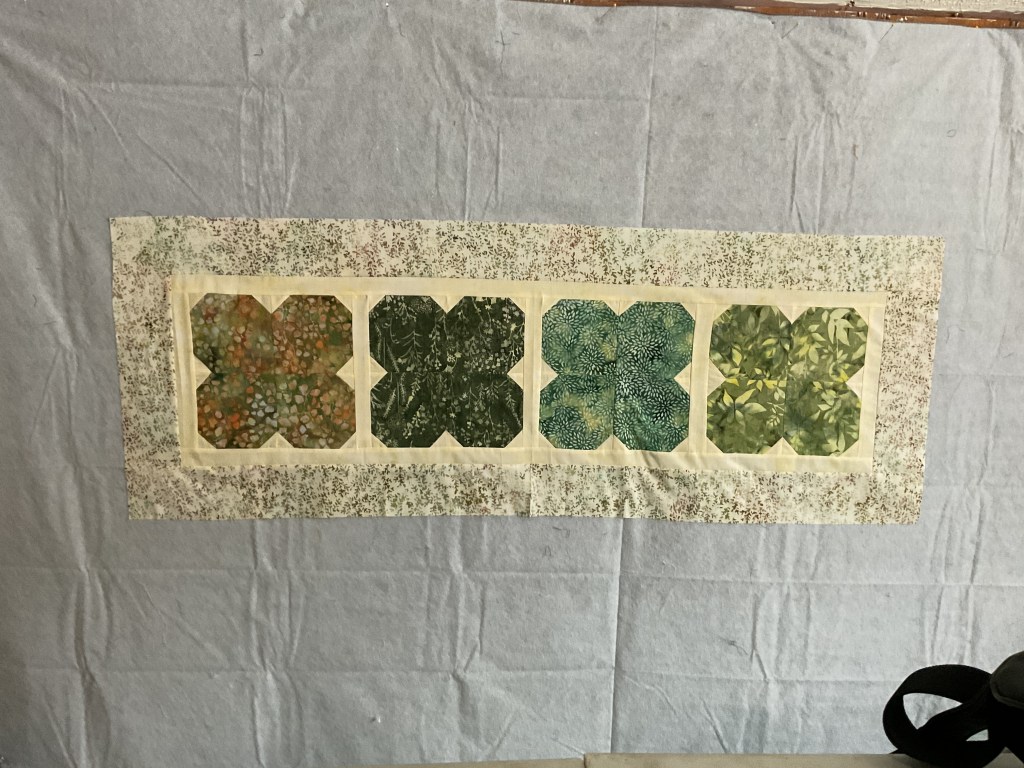
11. Now it’s time to lay everything out on my design wall before I can sew the sections together. WHEW! This is where I’m really glad I wrote fabric positions in the corners earlier so I don’t get the large pieces mixed up.

A patchwork quilt in progress featuring layered fabrics with mountainous and forest designs, arranged in a pattern of alternating colors and shapes.

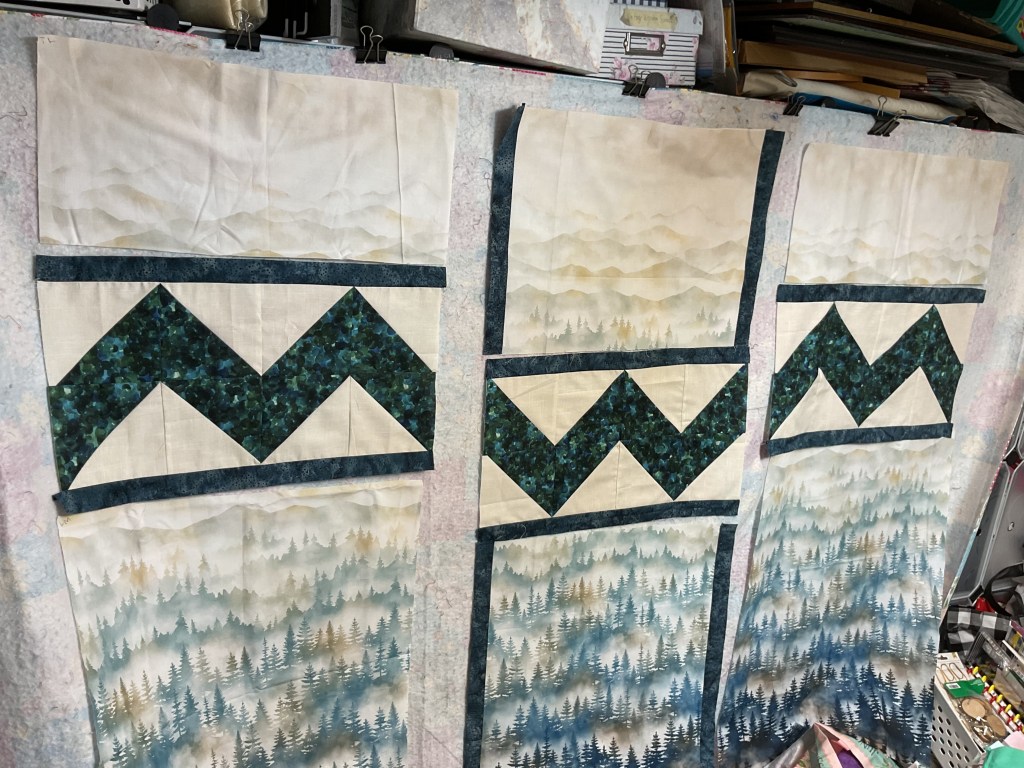
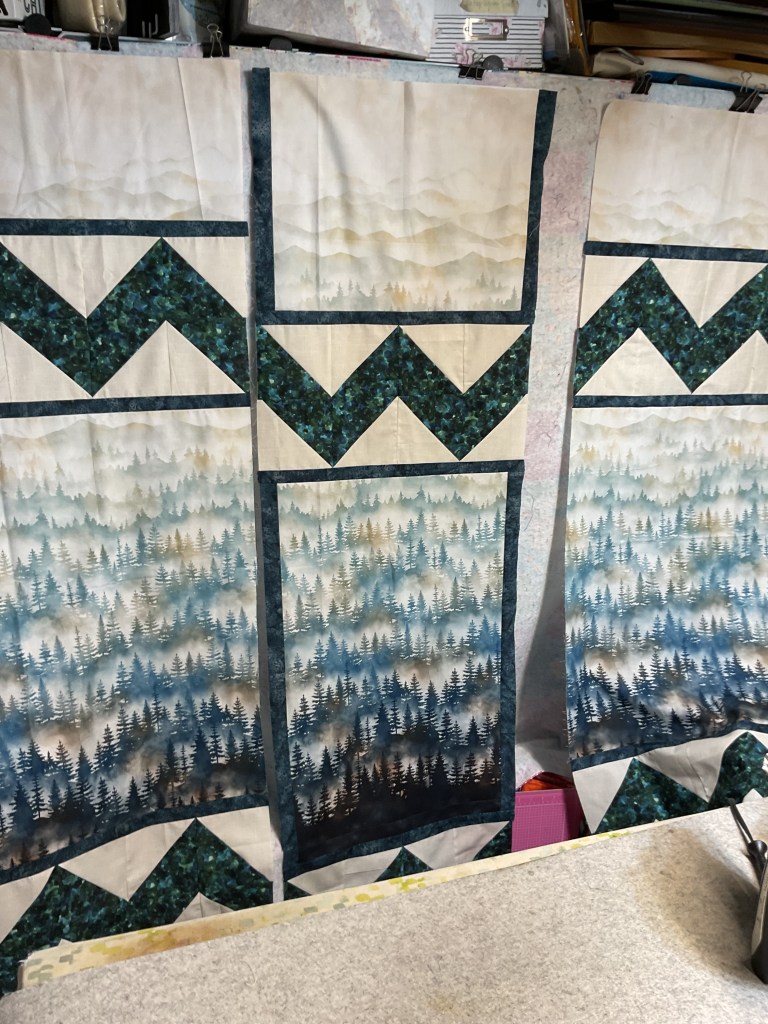
12. I need to sew all the pieces in each section together before I can sew the 3 vertical sections together. OH NO! I ran into a little unexpected problem with the bottom of my quilt –

I LITERALLY RAN OUT OF THE TREES/MOUNTAINS FABRIC. Because I wanted to arrange it vertically instead of cut random or scrappy. It’s an out of print fabric and no longer available and I have to complete the top now. Ugh! What’s a quilter to do? Improvise, of course.

Sadly, I can’t show you my solution yet because the quilt is too long and is hiding behind my cutting and pressing station. You’ll have to wait until the end when I show the entire quilt.

A partially completed quilt featuring a forest and mountain design, with shades of blue and green fabrics arranged in a zigzag pattern.

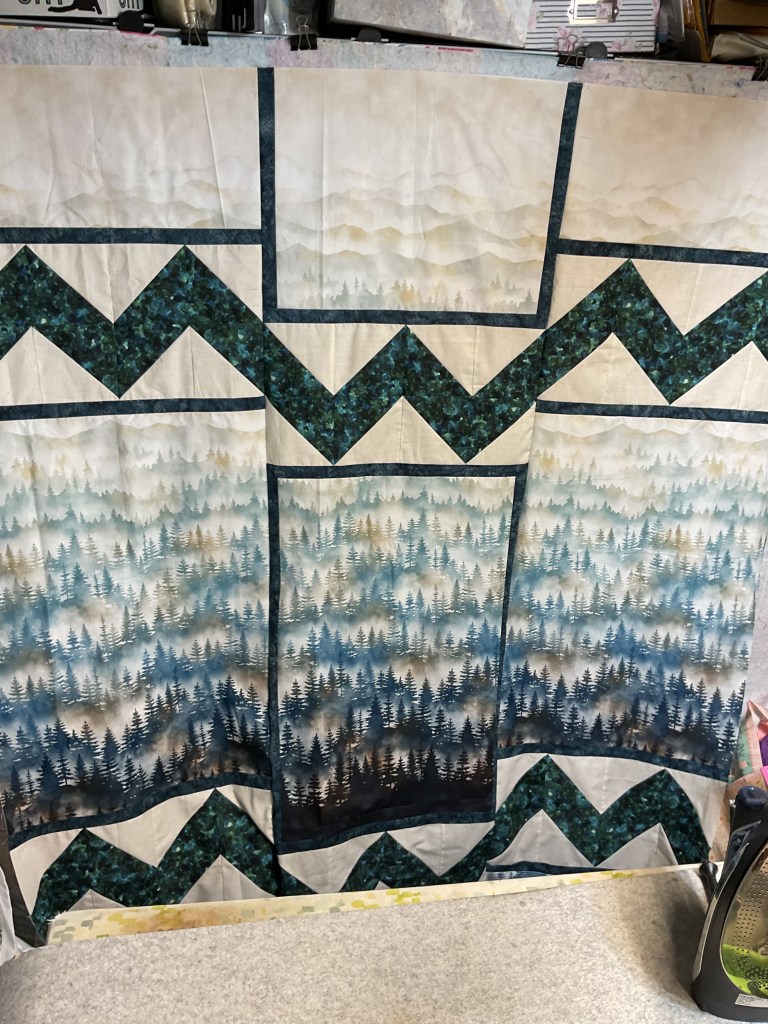
13. Now I’m going to sew the 3 vertical sections together. And suddenly the quilt came together like magic! I have no idea why I felt intimidated by it for so long. Silly me.

I really love how the sashing frames the center sections – it’s almost like looking out a window at the Alps in Italy, isn’t it?

A creatively designed quilt featuring soft, blended colors depicting mountain landscapes and forest silhouettes with a geometric zigzag pattern at the bottom.

14. And here’s the completed Arctic Flame quilt top. Please forgive the rocks anchoring the corners of the quilt top, but it’s a typical windy March day here in northwestern Pennsylvania.

Can you see my solution for running out of the trees/mountain print? The bottom center piece. I found a dark mottled fabric in my stash to place there. It works, doesn’t it? It really does. As the bottom of the center middle section is dark, like it’s fading into the shadows, the dark mottled fabric continues the shadow idea. What are your thoughts on my design decision? Have you ever run into a similar situation when you ran out of fabric and had to improvise? What did you do?

A patchwork quilt laid out on grass, featuring designs of blue and green mountains and forest landscapes.

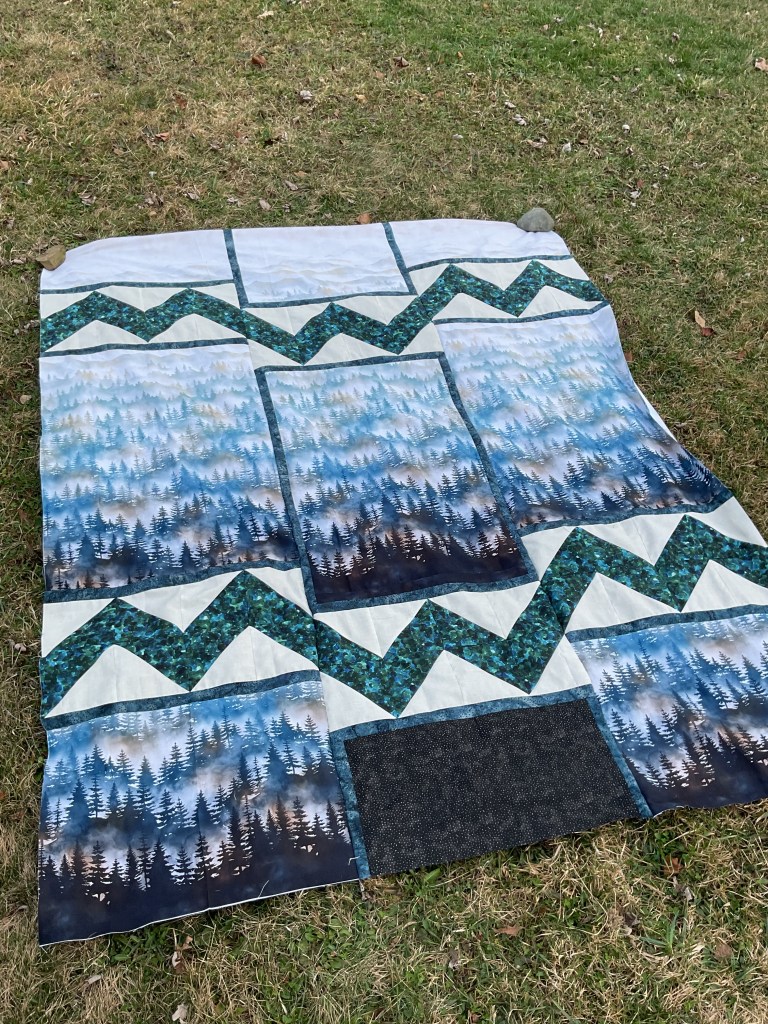
I really love how Arctic Flame came together and how the HST sections now mimic the mountains in the digital trees/mountain fabric by our friends over at Hoffman’s.

Hoffman’s sometimes creates landscape running yardage for their digital collections. Here is a great one from the current Stag and Stone collection:

A watercolor pattern featuring birch trees and evergreen foliage in muted tones of gray, white, and hints of gold, creating a serene forest scene.

Stag and Stone

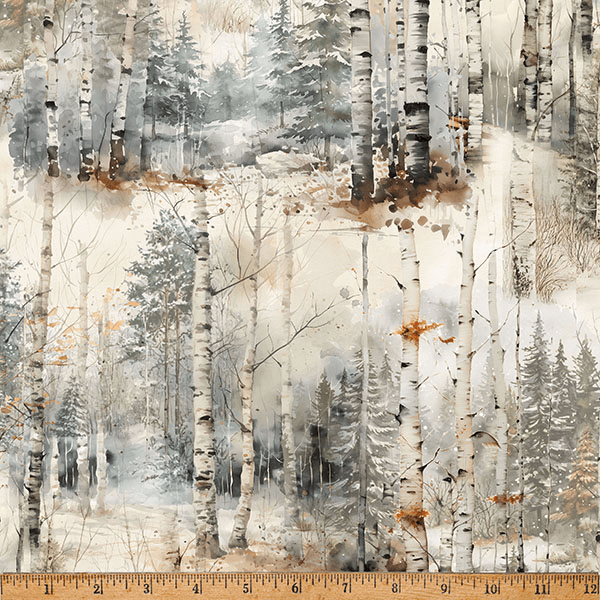
Wouldn’t this print be gorgeous in the Arctic Flame pattern? What would you choose for the light and dark fabrics for the HSTs and the sashing?

Who knows? Maybe Arctic Flame will be your next quilt project.

As the Winter Olympics and Paralympics draw to a close, so does our Olympic celebration here on the blog. Stay tuned next week to see what mischief I’m cooking up for you next.

See you right here next time!

Always,

Tricia @ VRD

2025 6 Quilts in 6 Weeks Challenge · Quilting Partners · Rose Cards · villa rosa designs

6 Quilts in 6 Weeks Challenge – Week 6, NEW November VRD Quilt Patterns, and VRD Rose Card Pattern Storage

Greetings from snowy northwestern Pennsylvania! We had around 5 inches of lake effect snow (thank you Lake Erie!) dropped on us Monday night. It sure did look beautiful when I got up Tuesday morning. Suddenly I had the urge to listen to Christmas music and binge-watch Hallmark Christmas movies while sipping hot chocolate with scads of marshmallows floating on the top.

So apparently for me, the Christmas holiday season has begun. When do you usually get your Merry on?

It also made me start thinking about what holiday fun I wanted to do on the blog. Still brainstorming right now, in case any of you lovely readers have any holiday ideas you might like to see on the blog.

But for right now, let’s get back to our Challenge!

Our winner for Week 5 is ……………

Barb F.

Congrats, Barb! Keep up the good work!

Now let’s check out my Week 6 finish!

For my final Week 6 finish, I chose to complete my blog tutorial sample, Ebb Tide.

A colorful quilt design titled 'Ebb Tide' featuring various patterns in shades of pink, purple, and teal, framed by decorative borders.

Get your digital pattern HERE or your print pattern HERE

This is one of my absolute favorite patterns for using large prints! The framing really gives large print fabrics room to shine as well as to breathe. It is fat quarter friendly and finishes at a nice 47″ x 61″. To make it larger, simply add an outer border – a 6″ finished border would make the quilt a nice 59″ x 73″.

Here is my Before photo:

A patchwork quilt featuring various floral and patterned fabrics, displayed outside against a backdrop of blooming yellow flowers.

YIKES! In looking for my “before” photo, I discovered the Ebb Tide tutorial was from 2023 – way past time to get it finished, don’t you think?

The fabrics are fall-licious batiks from our friends over at Hoffman.

And here is my After photo:

A quilt with a patchwork design featuring rich burgundy, cream, and floral prints, displayed draped over a chair in a cozy setting.

I considered photographing it out in the snow, but I didn’t want to bundle up in order to go outside so I ended up taking an inside photo.

I quilted Ebb Tide with a copper colored cotton thread in my usual allover meander design. It is backed with a cream fleece that has little stars on it. The binding is a brown stripe batik, which I cut on the bias so my stripes are diagonal. I was a little nervous to finish the binding by machine because the last time I machine-finished a bias binding, the edges ended up rippling.

WHEW! What a relief – this time it finished beautifully with no rippling and the corners actually turned out quite well, too. I think finishing the binding by machine for the last 6 weeks has helped me gain a little more confidence with this technique. This winter, though, I plan to snuggle under quilts, watch movies, and do some hand binding.

I want to thank everyone who signed up and participated in this Challenge. I hope you are as pleased with your accomplishments as I am with mine. Let’s all pat ourselves on the back for a job well done.

We will have one final winner next week.

I’m thinking we’ll do this Challenge again in the New Year. That way, we can keep finishing our UFO’s and flimsies so we don’t feel a little guilty every time we start something new.

Now let’s take a look at the NEW VRD patterns for November. Yay!

I LOVE the Thursday after the first Friday of every month because that means – NEW PATTERNS!

Here is the set of 5:

A promotional image showcasing five new quilt patterns for November 2025: Fall Windmills, Markesan, Limited, Nevermore, and Warrenwood, with pricing information.

Get the set of 5 print patterns HERE

Fall Windmills is Sewl Sister’s super fun quilt this month. It finishes at 48″ x 60″. You can find a Fall WIndmills kit on the VRD website featuring the Planetarium collection HERE.

A colorful quilt featuring a geometric pattern with shades of teal, gray, and white, showcasing various block designs in a patchwork layout.
Fall Windmills in Planetarium

Limited is Molly’s newest pattern. It uses either 10″ squares or FQs and finishes at 45″ x 59″. You can find kits featuring the same fabrics as the cover quilt HERE.

Markesan is this month’s new mod quilt by Rachelle Handmade. It is Jelly Roll friendly and finishes at a nice 60″ x 70″.

Nevermore is by yours truly and features a 24″ panel along with some coordinates and an accent. It finishes at 47″ x 66″. Anybody get the name reference of the pattern???

Warrenwood is Pat’s 11th Tim Holz Palette design and is fat quarter friendly. It finishes at 45″ x 59″. You can find kits featuring the Tim Holtz Charcoal Palette HERE.

And this month, there’s a NEW Table Runner, too.

A colorful quilt pattern titled 'Family Fun-gi' designed by Tricia Lynn Maloney for Villa Rosa Designs. The design features a crafting theme with blocks and textured fabric elements against a pastel background.

Get your digital pattern HERE or your print pattern HERE

Family Fun-gi is a cute little mushroom runner with a silly name (I can say that because it’s one of my runners, LOL!). And guess what??? The mushrooms could also be trees if you wanted. The runner finishes at 17″ x 45″ and goes together really fast. You can find a kit featuring the Sienna collection HERE.

A quilted table runner featuring a pattern of three stylized trees with a floral and leaf design in autumn colors against a dark background.
Family Fun-Gi in Sienna

One last thing before I go…….

Our VRD designer and partner, Running Doe, has created a brand new storage option – a discbound binder for storing your Rose Card patterns. Each binder comes with 40 sleeves to hold 40 patterns. Get yours HERE.

A mint green discbound binder with several clear plastic sleeves, designed for pattern storage.

Want to learn more about Catherine’s binder? Check out her Facebook video HERE.

Don’t forget – just because our Challenge is over doesn’t mean you can’t still finish one UFO each week. I’m going to try.

Take care and just keep quilting!

Always,

Tricia @ VRD

2025 Let's Design a Quit Together Series · Quilt Play · Rose Cards · villa rosa designs

NEW July Villa Rosa Designs Rose Card Quilt Patterns and Let’s Design a Quilt: Playing with Nine Patch Blocks

Happy Thursday to you!

Hope you are enjoying these lazy, hazy, crazy days of summertime. Me, still making my summer to-do list. Ha Ha!

We’re just going to jump right in today because I’ve got some fun stuff for you. Yippee!

First up – NEW July patterns.

I just love the first Thursday after the first Friday of every month because it means NEW VRD patterns.

A collage of five new quilt patterns titled 'Happy Daze,' 'Fondue,' 'Snowdrop,' 'Ixonia,' and 'Willow,' each displayed with colorful designs. The text reads 'July 2025 Patterns in a Set!' with a price of '$8.95'.

Here’s the set of 5 patterns. As always, our talented VRD designers do not disappoint! You can get the print set of 5 HERE (they are also available individually as print patterns too) or you can get the digital patterns individually below:

Happy Daze features a panel (or substitute a novelty print if you wish) in a fun modern setting. Quilt kits are still available HERE, but get yours ASAP because they’re going fast.

Fondue is also a panel quilt with a very interesting and unique setting. We still have a few quilts kits left, so get ’em HERE while they last.

Snowdrop uses your favorite collection of fat quarters. This is Pat’s latest pattern in her Tim Holtz Palette patterns. You can get the kit HERE.

Ixonia is Rachelle’s latest mod quilt. It also uses fat quarters.

Willow is a super versatile pattern – use a single fabric for the centers, panel squares, or even quilt blocks! We kitted it up with the Playgrounds collection (see below), get your kit HERE.

A colorful quilt featuring blocks with vibrant floral patterns, bordered by a black and white checkerboard design.
Willow kit in Moda’s Playgrounds collection

And here’s this month’s table runner, Bubblegum. It uses a collection of fat sixths, but works equally well with leftover Jelly Roll strips or your stash.

A colorful quilt named 'Bubblegum' designed by Tricia Lynn Maloney, featuring a patchwork layout with vibrant patterns, displayed against a textured black brick background.

Get your digital pattern HERE or your print pattern HERE.

I know it’s summer and most of us don’t quilt as much, but I think these new patterns will inspire you. Besides, VRD patterns go together like greased lightening. Make one in a weekend or even a day.

Why not get your quilty friends together for a summer sew day? You could each have a quilt top done at the end of the day and enjoy some overdue friend time, too.

Next up – let’s play with the Nine Patch block and design a quilt together.

Nine Patch blocks were on my mind the other day. Why? Because I was thinking about antique quilts and Nine Patch blocks are one of the oldest quilt block patterns as well as one of the most humble. Have you ever gone to see an antique quilt display or perused a book about antique quilts? If you have, I bet you’ve seen A LOT of Nine Patch quilts.

I started wondering what kind of interesting designs I could create from the historic humble Nine Patch. Then it hit me – this would be a really fun blog post idea. So here we are.

It’s been a while since I’ve talked about my quilt design process. Here’s the last post I did: Let’s Design a Quilt Together — A Peek into My Quilt Design Process. In it, I used a Shoofly block as inspiration.

If you’re interested in designing your own quilts, there are several ways to do so.

1. Graph Paper

Graph paper, a pencil, and a calculator are often a designer’s first tools for creating one of a kind quilt designs. I started out with this, but quickly found I didn’t have the patience for figuring everything out all the time. I still draw lots of doodles with blocks or setting ideas, but these aren’t my primary design tools anymore.

And guess what?!? Even graph paper for quilting has evolved over time! There are many different options available these days for quilters such as quilter’s graph paper books. Some even include stencils and other goodies to help you in your design process, like C&T’s QuiltGenius Design Tool kit.

The QuiltGenius Design Tool Kit, featuring stencils, graph paper, and a booklet for quilt design.

Get your QuiltGenius kit HERE.

2. Design Workbook

A design workbook with prompts and space to draw is a step up from plain old graph paper. Last year I actually created such a workbook because I got tired of losing all my little scraps of paper when I came up with a new idea. Now I can keep all of my ideas in one place.

Colorful hexagonal quilt design featuring flowers in pastel shades with a central green hexagon, overlaid with the text 'Plan Design Quilt' and 'Tricia Maloney Orphan Quilt Designs'.

Get your copy HERE

3. Electric Quilt 8 Software

Electric Quilt 8 software by the Electric Quilt Company is a fantastic design program! I couldn’t do what I do without it. Seriously. One of the great things about this program is all the support out there so you can learn how to use it. The EQ website offers tutorials, classes, and even fun design challenges. There are books galore available to teach you all the ins and outs of the program. And EQ is always coming up with new add-ons to enhance your design capabilities.

Packaging for Electric Quilt 8 quilt design software, featuring a colorful geometric design on the front, with a computer screen displaying quilt patterns and instructions included.

Get your EQ8 HERE

So now we’ve talked about the 3 top ways to design quilts, let’s play with Nine Patches using EQ8, of course!

A Nine Patch quilt block featuring a pattern of red and white squares arranged in a 3x3 grid.

Here is our humble Nine Patch block. It uses 9 squares all the same size in a 3 square across by 3 square down layout. Easy peasy.

A colorful grid of quilt squares featuring orange, pink, blue, turquoise, red, gray, green, purple, and yellow in a 3x3 layout.

This block is a Nine Patch, too. Nobody ever said you had to use only 2 fabrics for a Nine Patch block. The 3 across by 3 down is what makes it a Nine Patch. And my personal philosophy is the more fabric, the better!

Time to play — er, design. To me designing is playing with blocks, colors, fabrics, shapes. I ask myself a lot of “What if?” questions as I go along.

What happens if we make our Nine Patch block rectangular instead of square?

A colorful Nine Patch quilt block design featuring seven squares in various bright colors: orange, pink, blue, teal, red, gray, green, purple, and yellow.

It’s still a Nine Patch, only it’s elongated. Let’s see what this block looks like in a quilt.

A colorful Nine Patch quilt block design featuring a grid of squares in various vibrant colors including red, blue, green, yellow, purple, pink, orange, and grey.

Hmmm. It doesn’t really do anything for me, but it would make a nice simple scrap quilt, wouldn’t it? Let’s add some sashing.

A colorful quilt design featuring a grid of Nine Patch blocks in various colors, separated by white sashing.

Okay, I’m liking this one better. Now I can see the individual blocks. But it’s still basically a decent scrap quilt. Let’s try taking away the sashing and adding plain alternate blocks instead.

A colorful quilt design featuring a Nine Patch block layout with vibrant squares in various colors arranged in a grid pattern.

This one’s okay, too, but it just doesn’t quite do it for me, either. I could use a cool novelty for the alternate blocks and use coordinating fabrics in the Nine Patch blocks. Let’s try that.

A colorful quilt design featuring a pattern of patches in various colors and floral prints, arranged in a grid layout.

Here is our design using Moda’s collection Acorn Hollow. I like it, but something is still missing. What do you think we need?

Let’s go back to our elongated Nine Patch block and try splitting some of the rectangles into 2 pieces so we can add more fabric.

A colorful Nine Patch quilt block featuring various squares in red, pink, white, orange, yellow, green, blue, and light blue arranged in a 3x3 grid.

Okay, that’s interesting, but now I think I want to split the other 4 patches horizontally to add movement.

Yay! Now we’re getting somewhere. I like the look of our Elongated Rainbow Nine Patch block. Like I said, designing is all about playing and exploring. Ask those “What If?” questions and you’ll be surprised where they will take you in your designing.

A colorful Nine Patch quilt block design featuring rectangular and square patches in various colors, including red, pink, white, orange, yellow, green, and blue, with black as a dominant background.

Let’s try our block in a quilt setting now.

A colorful quilt pattern composed of a grid layout featuring vertical and horizontal rectangular blocks in various vibrant colors, interspersed with black and white checkered squares.

Now that is starting to look like something. I really love the diagonal thing going on with the black rectangles. Hmmm. Let’s keep going. It still needs tweaking.

Colorful nine patch quilt layout featuring vibrant rectangles in blue, red, green, yellow, and orange, arranged against a black and white background.

With a little flip flopping and switcheroo, I discovered this layout. I am loving the elongated Four Patches in black and white that showed up when alternating blocks were turned upside down. What are your thoughts on this design?

Let’s try it in real fabric this time.

A colorful quilt design featuring a variety of rectangular and square blocks in pink, gray, and white, arranged in a patterned layout with black borders.

LOVE LOVE LOVE it! I am using a selection of Hoffman’s 1895 Watercolors batiks in pink and grey with solid black and white here. I added the solid black binding to frame everything nicely as well as accent the black in the blocks. Now it’s a finished design. And it started with a humble little Nine Patch block.

Well, that’s it for me today. I hope you enjoyed coming along on a quilt design adventure with me. After showing you how much fun I have designing a quilt, I thought maybe this would make a fun new series for the summer. What do you think? Would you like to see more of this in maybe a 4 or 5 part series using different quilt blocks as the inspiration? Any suggestions on blocks you’d like to see (think simple and pieced, though)?

See you next week, right here at Villa Rose Quilts.

Until then –

Always,

Tricia @ VRD

Rose Cards · villa rosa designs

NEW June VRD Rose Card Patterns and an Impromptu Road Trip

Happy Thursday to you!

Guess what day it is, folks!?!  It’s the Thursday after the first Friday in June, and you know what that means ………. NEW PATTERNS!  Yippee!

Check these beauties out!

Here is the set of 5 monthly patterns for June. Definitely a little something for everyone, don’t you think?

A set of five monthly quilt patterns for June 2025, featuring the names Escalate, Sunita, Limerick, Tomah, and Well Seasoned, with a price of $8.95.

Get all 5 print patterns HERE

Aren’t they lots of fun? Tomah is spot-on for your upcoming July 4th celebration. Escalate makes a BIG bed quilt and uses 1/2 yards. Sunita uses just 3 fabrics! Limerick and Well Seasoned are both fat quarter friendly and make nice throw-sized quilts. Although we offer them as a set of 5, you can get them as individual patterns, both as digital or as print.

Digital patterns HERE

Print patterns HERE

And in case I haven’t said this for a while, there is zero shipping on print patterns in the US (we only offer the digital format internationally). Yep, that’s right – ZERO shipping on print patterns regardless if you purchase 1 or 100!

But wait……there’s more!

I can’t forget this month’s table runner, can I? It’s called Stars & Ribbons and will make a wonderful statement on your July 4th table next month.

A table runner titled 'Stars & Ribbons', featuring a red, white, and blue quilt design, displayed against a backdrop of colorful flowers.

Get your digital pattern HERE or your print pattern HERE

Which pattern are you going to make first???

I was planning to do another tutorial for this week, but life got in the way.  Ho hum….. Hopefully I’ll have a new tutorial for you next week.

Instead, let me tell you about my impromptu road trip!

So today I’m on an acquisition road trip with pal Robin and her brother Dan in Robin’s big blue truck.  We are heading to Apollo PA, which is in the Pittsburgh area, to pick up a new desk solution for me for my studio/office space.

Currently, my desk is an old sewing table with a wooden top and metal legs.  Good and sturdy, but not very ergonomic because it’s a bit too high for short little ol’ me.  I’ve been on the lookout for a new desk for a while now, hoping to maybe find an L-shaped desk with at least one file drawer and as much storage as one can possibly cram into a desk to help keep me organized – most of the time my desk looks like an office and quilt store collided. LOL!

Sigh……I have found that if I don’t have a specific place to put something, then I just end up with piles on my horizontal surfaces. My defense – I think paper and fabric multiply like rabbits…….. So because of my tendency towards clutter, I am totally a storage junkie.  Can you relate?

I’ve been watching Facebook Marketplace for a gently used desk and the other morning, an intriguing possibility popped up.  I’d seen it before, but I didn’t take a closer look then. This time, I stopped and took that closer look and I liked what I saw – a group of Ikea (YAY! LOVE Ikea!) office pieces that could be arranged in lots of different configurations.  A tall shelf, 2 desktops, a small desk (which had one of the desk tops on top), 3 drawer units, and a chair. Exactly what I have been looking for, but I didn’t know that I was looking for it until I saw it!  Does that make any sense? I really really like the flexibility of the pieces.  

A garage space showing a dark brown office desk setup, including a desk, shelving unit, and a chair, with tiles on the floor and natural light coming through a window.
Here are all the desk components.

The pieces looked to be in decent condition; however, there were a few hesitations before I messaged the owner. First, the pieces were dark brown instead of my usual white. I thought about that for a quick second and decided I could accept it because the flexibility made up for the color. Second, and it was a biggie – the pieces would definitely not fit in my cute little red Jeep Compass.

I needed a truck!

I messaged the seller and asked a few questions. She was quick to reply. OK, now what???? I still needed a truck. So, I sent an SOS to my quilty pal, Robin, who just so happens to have a really big blue truck.  Yay!  Problem solved.  ROAD TRIP!

Interior view of a truck while driving on a highway, showing the dashboard, a driver steering, and a passenger on the right.
On the road in Robin’s big blue truck to pick up my new desk and storage! Dan is driving and Robin is navigating. Lucky me! I get to chill in the backseat.

It was around 2 hours to drive to get to the seller’s home in the Apollo area, which turned out to be a lovely farm with horses running in a fenced field right beside the driveway to the house. What a pretty setting it was! I wanted to get a photo of the horses for the blog, but by the time we were all loaded (which seemed to take only minutes with the owner’s husband and Dan teaming up), the horses had all headed to get water further down in the field and I couldn’t see them anymore. Dang it!

A man loading furniture into the back of a blue truck, with a sunny sky and greenery in the background.
Dan took on the important task of arranging the desk pieces in the truck. What a pro – he fit them together just like puzzle pieces and we had room to spare.
Two women smiling for a selfie outdoors with a sunny sky in the background.
Robin and I were the supervisors while Dan and the owner’s husband loaded the truck. Tehehe!
A blue pickup truck loaded with black furniture pieces secured in the bed, parked on a gravel driveway under a sunny sky.
Here’s Robin’s big blue truck all loaded up and ready to head home.

It took longer to come home than it did to get to Apollo because we stopped off for dinner at Eat n’ Park and then to get fuel. Once we made it to my home, we unloaded all the pieces and Dan helped me get them into the space I had carved out in the back of the garage.

A cluttered workspace filled with dark brown Ikea office furniture pieces, including desktops, drawer units, and a chair, ready to be assembled in a studio.
Here’s my desk and storage – I can’t wait until I have space for them in my studio/office.

Of course, before I can set up my new workspace, I have to do a HUGE clean/sort/purge in my studio/office to make room.  Not only is it my work area, it’s also the pantry and storage (most of the crates are mine, but not all of them). Luckily, I’ve been cleaning the garage and I have some space to store the pieces until I’m ready for them.  Now that the pieces are stashed in the garage, I think that will really motivate me to get the clean up in my space done ASAP so I can arrange my lovely Ikea pieces into a configuration that will work for me.  

I am thrilled there are lots of storage drawers with multiple file drawers! That means I will have no excuse for a messy desktop anymore. There is also a wonderful cube storage shelf as part of the desk system.  Finally!  A place for my books. Piles of books – begone!

I’ve been trying to visualize different configurations, but I know I’ll have to wait until my space is cleared out so I can create my dream office space in my dungeon studio. It will be some time yet before I will be able to get everything just the way I want in my studio/office, so there won’t be any before/after photos right now. Of course, I’ll show it off when I’m all done, so you’ll just have to stay tuned.

A BIG thank you goes out to Dan, Robin, and her big blue truck!

That’s it for me this week. I think I’ll head outside to enjoy a little sunshine now because I think summer has come before spring even had the chance to hang out.

Always,

Tricia @ VRD

Quilting Partners · Rose Cards · villa rosa designs

NEW VRD April Rose Card Quilt Patterns and A Fabulous Catalog by our Quilting Partner, QT Fabrics

Happy Thursday to you!

Guess what today is??? It’s the Thursday after the first Friday in April, which means………..NEW PATTERNS!

If you are a new blog follower, you might not know that at Villa Rosa Designs, we add 5-7 NEW Rose Card patterns each and every month, all year long. New monthly patterns are usually launched the first Friday of the month on VRD’s Fry-Day Live event online. You can find Fry-Day Live events HERE most Fridays at 4:00 PM Pacific Time (7 PM Eastern time).

With 5-7 new patterns every month, that adds up to between 60-84 NEW patterns every year – WOW! Then add those to our over 700 patterns already in print! It’s almost mind-boggling. We really do have something for everyone!

I know you’re anxious to see this month’s patterns, so here they are –

Collage of five new quilting pattern cards for April 2025, including Butterfield, Dakota, Havenwood, Cadott, and Turtle Soup, featuring colorful quilt designs.

Get the set of 5 print cards HERE

As usual, our talented VRD designers do not disappoint!

Butterfield is by our own Rose Queen, Pat, uses a collection of fat quarters and goes together really fast. You can find the Digital pattern HERE or the Print pattern HERE. We also have Butterfield kits (includes the pattern) featuring Tim Holtz Palette Yellow fabrics.

Dakota is also by Pat and is a quick to make fat quarter quilt. You can find the Digital pattern HERE or the Print pattern HERE. And we have Dakota kits (includes the pattern) featuring Victory Garden fabrics.

Havenwood, designed by Rachelle, is Jelly Roll or scrap friendly. It works up fast with your favorite quick piecing techniques. You can find the Digital pattern HERE or the Print pattern HERE. We have Havenwood kits (includes the pattern) featuring the Sweet Melodies collection (below).

A colorful quilt featuring a patchwork design with various patterns and fabrics, arranged in blocks of different colors including red, blue, yellow, green, and floral prints.

Havenwood in Sweet Melodies

Cadott is also by Rachelle and is a fun modern quilt with A LOT of visual appeal. It uses yardage or your stash. You can find the Digital pattern HERE or the Print pattern HERE. Sorry, no kits for this one.

Turtle Soup by Heidi features a theme fabric or border stripe – and what a fun name! You can find the Digital pattern HERE or the Print pattern HERE. Sorry, the kits are already sold out.

But Wait………there’s more! (Tehehe, you know how much I love writing this.)

Our NEW April Table Runner (by moi) is called Window Boxes. You can use panel squares or fat quarters for this pretty runner pattern.

Cover of the quilt pattern 'Window Boxes' featuring a quilt with hexagonal shapes in yellow, turquoise, and pink fabrics, surrounded by floral prints, set against a peach background.

Get the Digital pattern HERE or the Print pattern HERE.

That’s it for the new patterns this month. Which one are you going to make first??? I can’t wait to see your April projects on our VRD Facebook Group.

Now let me tell you about QT Fabrics and VRD.

As many of you already know, Villa Rosa Designs has made lots of connections with other companies in the quilting industry in recent years. We call them our Quilting Partners. You can find our Quilting Partners over on the right side of the blog towards the top.

Are you familiar with our pals over at QT Fabrics? They are an employee-owned and operated company and have been in business for a long time. You can find QT fabrics at your local quilt shop AND you can check out VRD’s QT Fabric offerings on our website HERE.

We’ve been partnering with QT Fabrics for a while now and I’m really excited to share with you their recent publication featuring our Rose Card patterns and QT’s newest fabric collections, which will be out in quilt shops this Fall. Aren’t you the lucky ones to get a sneak peak???

Here’s the PDF version of the wonderful catalog that QT put together featuring ALL VRD Rose Card patterns paired with their new 2025 Summer Collection, which will available this fall.

I definitely have some of these on my to-do and look forward to sharing new tutorials here on the blog featuring some of these fun designs and fabrics. Woohoo!

If you’d rather check out the really cool digital Flipbook version, you can find it HERE.

I hope you found a lot of inspiration in this catalog – maybe some new-to-you patterns and/or great upcoming fabric collections. If you see a collection you love, ask for it at your local quilt shop – the fabrics will be available this fall. All of the featured patterns in the catalog are available on our website, villarosadesigns.com.

Well, that’s it for me. Take care and do something fun this week.

Until next time –

Always,

Tricia @ VRD

Quilting Partners · Rose Cards · Tips and Tricks · Tutorials · villa rosa designs

NEW March VRD Rose Card Quilt Patterns and Lucky, a Quilt Tutorial for St. Patrick’s Day

Happy Thursday to you!

I trust you’re all having fun with your Free Motion Quilting (FMQ) practice. We’re going to take a quick break from our Beginner FMQ series this week because I have NEW March patterns to share as well as a fun table runner tutorial just in time for St. Patrick’s Day. We’re all Irish on St. Patrick’s Day, right?

Here are the new patterns for March – be prepared to be inspired….

Get the print set of all 5 patterns HERE.

The 5 main patterns are great, aren’t they?

Molly created a brand new St. Patrick’s Day throw-sized quilt called Clover Patch. I just love that she added a single Four Leaf clover to her quilt – can you find it in the Clover Patch?

Molly also created a second pattern this month called Jackknife. This clever block uses long quarters instead of fat quarters. We still have a few kits left, too, if you’re interested.

Get your Jackknife kit in Art Glass AbstrArt HERE.

Heidi wows with her new 24″ panel quilt pattern, Jerky. If you don’t already know, Heidi always gives her patterns a foodie name because she loves to cook.

Rachelle created a new modern pattern called Kenosha. I love the secondary design that happens in this striking quilt pattern.

Pat, our Rose Queen, has another fun and fast throw sized pattern for you called Zamora. If you didn’t know, Pat always names her quilts after a rose. Yep, Zamora is the name of a rose. Zamora only uses three main fabrics plus a binding fabric. Sew easy piezy. We still have a few Zamora kits left, too.

Get your Zamora in Indelible kit HERE.

We also have a new table runner pattern this month called Erin.

Get your digital Erin pattern HERE or your print Erin pattern HERE.

I’ve always wanted to make a green and white Double Irish chain for St. Patrick’s Day. I can now check that off my bucket list. The Double Irish chain looks complicated, but I promise you, it really isn’t when you break it down. Give it a try.

I guess I should have done a tutorial for today with Erin, but I’d already gotten Lucky stepped out and photographed before I even designed Erin. I’m sure I’ll do a tutorial for Erin sometime in the future – you’ll just have to stay tuned.

That being said, let’s move right along to our Lucky tutorial.

The first thing we’re going to do is gather up our fabrics.

I’m using a beautiful Hoffman batik collection called Forest Floor. Don’t you just love the greens? With a pop of orange? Love Love Love it!

The first photo shows the background and the greens for the blocks. The second photo shows the border and binding.

Grab your rotary cutter, board, and ruler and let’s start cutting out our pieces!

Now that our pieces are all cut out, let’s start sewing!

Layer a background square right sides together on the corner of a Clover square and draw a diagonal line from corner to corner. I love my Frixion Fineliner pens and my 1×6 little ruler for making my flippy corners and HSTs right at my sewing machine. What are your favorite tools for making yours?

Next we’re going to sew on the drawn line.

Let’s cut 1/4″ away from our drawn line. Did you knou can use these little cut off triangles for a scrappy little project? I’ve been saving mine for a long time, and have even started sewing them into HSTs, but I haven’t started making anything with them yet.

TIP: You might notice in the photo below that my seam is slightly to the right of the drawn line. This is actually on purpose because it gives a bit more room for the seam and my flippy corners are more precise. I learned this little trick from my quilty pal, Mary Lee. THANK YOU, Mary Lee!

Don’t forget to press that flippy corner open.

We’re not done yet! Go ahead and make flippy corners on 2 more corners of the Clover square.

Okay, now we’re talking! Let’s repeat these 3 flippy corners for the rest of the Clover squares while we’re at it.

Finally it’s time to make a Clover block. Yeah! Sew 4 matching Clover squares together with the 4th unpieced corners towards the center so they all meet for the middle of the Clover block. Such a pretty block!

Repeat to make a total of 4 Clover blocks. Don’t you just love that pop of orange???

The next thing we need to do is sew the 4 Clover blocks together with background strips in between the blocks and at each end.

Then we’re going to add top and bottom background borders. Lookin’ good!

Now it’s time to add the side outer borders and then the top and bottom outer borders. And DONE!

Yay! All that is left to do is layer it with batting and backing, quilt it, bind it, and label it.

I hope you enjoyed the Lucky runner tutorial and are super inspired by the new March patterns. Next week we are going to wrap up our Beginner Free Motion Quilting (FMQ) series by addressing borders.

Until next week –

Always,

Tricia @ VRD

Rose Cards · Tutorials · villa rosa designs

NEW VRD October Rose Card Quilt Patterns and a VRD Pumpkin Hollow Tutorial

Happy Thursday to you!

Guess what day it is????? The Thursday after the first Friday of the month. And you all know by now what that means — NEW PATTERNS!

Yay! I really love seeing the new patterns every month, they just make me feel SEW inspired. Do you know what I mean? And without further ado, here they are!

You can get the set of 5 print patterns HERE.

(If you are interested in digital patterns, you will need to purchase each pattern separately)

These 5 great patterns are a must-have for your growing Rose Card pattern collection! They include a delightful star quilt (Amelia), 2 panel quilts (Morning Spring and Surf & Turf), and 2 fun modern designs (Changing Lanes and Landina. I know I say this all the time, but the creativity of our VRD designers always amazes me. You rock, designers!

But wait We can’t forget this month’s Table Runner and Snack Mat can we???

Get the print pattern HERE or the digital pattern HERE

I designed the Pumpkin Spice pattern to showcase all those fantastic autumn fabrics out there we never want to chop up into little pieces! And who doesn’t love pumpkins — Log Cabin pumpkins. What a fun twist, huh? Depending on the fabrics you choose for Pumpkin Spice, this runner can decorate your table for both October and November. Just sayin’…..

Get the print pattern HERE or the digital pattern HERE

It just isn’t October with a cat or two, is it? My cats had to be grey because I actually have 2 grey cats. Pip is my senior citizen who is a 14 year old silver tabby with a very svelte figure. Griffin (or Griffy as I usually call him) is my 3 year grey tabby who is a real sweetie pie. My 2 year old shih tzu pup, Bailly, rounds out my little furry family.

Of course, you can make your kitties any colors you want — wouldn’t it be fun to make them look like your real cats, if you have any? I chose to use Halloween fabrics for the background and the binding, but you could make Christmas kitties or 4th of July kitties or any kind of kitties you desire.

Which pattern are you going to make first?

Speaking of fall sewing, I thought it would be fun to do a tutorial for my very first pumpkin runner pattern, Pumpkin Hollow. It’s been a popular pattern. Thank you! I’m thrilled you like it as much as I do. 🙂

I have really enjoyed seeing all the different Pumpkin Hollow runners folks have been posting on our VRD Facebook page. If you’re looking for inspiration for your Pumpkin Hollow runner, please stop by the Facebook page and I promise you’ll find awesome quilts there. And a lot of friendly helpful quilters.

One of my favorite Pumpkin Hollow runners so far had appliqued vines and leaves added to the pumpkin stems. What a lovely addition to my humble little pumpkin pattern. Just another reason I love our VRD Rose Card patterns — there are plenty of opportunities for you to add your own touches!

Get the print version HERE and the digital pattern HERE

Well, let’s get started on our tutorial!

Of course, the first thing we need to do is gather up our fabrics. I pulled out some pumpkin and Halloween fabrics from my stash for today’s tutorial. I must admit that I’m embarrassed to even tell you how long these fabrics have been lurking quietly in my stash (I’m not actually sure, to be truthful), but now it’s finally their time to shine. I bet you don’t have any fabrics like that in your stash, do you? LOL!

I chose a mottled black background to compliment these burnt orange fabrics with black accents. I tried a couple different colors, but black looked the best, so black it is. And the green batik was just hanging out on my cutting table from another project, so that was an easy choice.

Lime to get started with the cutting.

Now that I’ve cut my fabrics, I’m getting kind of excited to see how this runner will look when it’s finished. It will definitely be different from my original version, which had a light background (the one on the front of the pattern, above).

Let’s sew 5 strips together to make 3 small pumpkins. You can sew the strips for all 3 pumpkins in the same order or mix them up. I like to mix things up (wink, wink).

Time to sew some “flippy corners”! Yes, I am using the scientific name for this technique. You may have even noticed that lately I’m using that scientific term on my new patterns.

Layer a background square right sides together on the corner of a pumpkin. Draw a diagonal line. Sew on the line. Cut 1/4″ away from the line and press open. Now repeat this for all 5 pumpkins — the 3 strippy ones and the 2 tall single fabric ones.

Next we are going to prepare our pumpkins stems. Sew a background strip to each side of the stems. Keep in mind that the smaller pumpkin has a smaller stem, so don’t get the background pieces confused between the 2 sizes of pumpkins.

Wow! This is coming together so quickly.

Now add the top background rectangle to the small pumpkin stems.

Let’s sew the stems to the tops of the pumpkins. Sheesh! We’re almost done. Wow! It really does go together super fast.

Okay, I’m going to put my pumpkins up on my design wall and arrange them. For fun, I decided to make the strips on the center little pumpkin go up and down instead of side to side.

I like how it looks. Isn’t it fun? I’m going to sew the blocks together.

Easy piezy! Done! Now all that is left to do is layer it with batting and backing, quilt it, bind it, and slap a label on it.

My pal, Robin (BIG Shoutout to Robin!), has already made 2 Pumpkin Hollow runners.

Don’t you just love her teal background in the first one? It’s an awesome unexpected pop of color paired with her mostly lighter florals and leaves.

In contrast, her second one is very warm and cozy with traditional browns and oranges. Love the little bit of blue! Robin even added a narrow inner border and a fall outer border to finish things off. Psst! Adding borders makes your quilt larger without having to make more blocks.

Great job! Thank you for sharing your runners with us! For more Pumpkin Hollow inspirations, please visit our VRD Facebook page.

Now you’ll have to excuse me. I’ve got to get back to my super secret projects for Quilt Market. Shhhhhh…….. Hang in there, you’ll see them very soon, I promise!

Take care and happy quilting!

Until next week –

Always,

Tricia @VRD

Rose Cards · Tips and Tricks · villa rosa designs

NEW September Villa Rosa Designs Rose Card Quilt Patterns and a Spot of Decluttering in My Studio

Happy Thursday to you!

I love September and the approaching autumn season! It’s such a refreshing time of year. This summer was certainly one of the hottest on record here in northwestern PA. Wow! Then it was Labor Day and suddenly the weather turned very fall-like.

It reminded me of when I was a kid going back to school the first week of September, wearing my crisp new school clothes — sweaters, jeans, long sleeve tops, new school shoes, not like the shorts and tees of today.

Speaking of inspiration, today is the Thursday after the first Friday of the month and you know what that means — NEW PATTERNS. YAY!

Drum roll please………

And here they are!

Get the print collection HERE

(Sorry, the collection isn’t offered as a digital set, but the patterns are available as digital downloads individually, below)

Good as Gold

Pavers

Ric Rac Roll

Roam

Stuffing

Aren’t they fun??? Our designers never disappoint, do they? There’s definitely something for everyone here with a new panel pattern (Good for Gold), several fat quarter patterns (Roam, Stuffing, Pavers [can also use 10″ squares]), and a 2 1/2″ strip pattern (Ric Rac Roll). We’ve got traditional and modern. Sizes range from smaller throws to a large twin-sized bed quilt (Ric Rac Roll).

But wait! There’s more!

Check out this month’s table runner and snack mat.

Get the print pattern HERE

Get the digital pattern HERE

Get the print pattern HERE

Get the digital pattern HERE

By now you’ve most likely noticed how much I love to create seasonal patterns. You see, I have this goal to someday have my seasonal decorating organized into storage crates — one for each season/holiday. Then I can just grab the right crate for the season/holiday and add my decorative touches like quilted pillow covers, table runners, wall quilts, throws, etc. How close am I to achieving this goal? Not even close (eye roll here). But it’s important to have goals, isn’t it?

Speaking of Snack Mats, have you picked up on my evil nefarious plan yet??? Yep, my plan is to create a different Snack Mat for each month of the year. So far I’ve created 7 Snack Mat patterns, so that means I’ve got 5 more to go in order to have a full year of Snack Mats. And, yes, I’ll be adding these to my seasonal/holiday crates as well.

All of the Snack Mats finish at a generous 8″ x 14″, which makes the perfect landing spot for your mug of coffee/tea/cocoa and a little something yummy on the side. And at 8″ x 14″, they do double duty as a small place mat. When I worked at my local small town public library for 11 years, I ate lunch (or dinner) at my desk most of the time. It would have been super fun to pull out a new seasonal mini place mat (Snack Mat) for my desk every month to make my meal at work a little more special, even if it was leftovers from the day before. Snack Mats also make great gifts for yourself or for someone else. You can find all of the Snack Mats to date right HERE.

Now that you are super hyped about our NEW September patterns, grab ’em all and get started with your new makes because September is a great month to get back to quilting.

As I mentioned earlier, I am feeling so much more inspired as autumn is only about 10 days away. Ever since I bought my new-to-me sewing table back in July, I haven’t been able to get back into the cleaning and organizing groove. Of course, the need to declutter and clean wasn’t just because of my new table, it’s been an ongoing project. In fact, I started 2024 off by having a goal to get my spaces cleaned and organized. Truthfully, I haven’t made much progress.

Over the weekend I was lamenting to my pal, Mary Lee (Hey Mary Lee!), that my spaces are such a disaster and that I really want to dive back into getting my space shipshape. In truth, I basically feel paralyzed because there’s so much that needs done, there’s only one me, and I feel so completely overwhelmed. I just don’t know where to begin.

Mary Lee, in all her wisdom (she is a retired children’s librarian, after all, so I suspect she knows everything!) shared some great ideas, so I thought I’d share them with you.

Think Small

Utilize small pockets of time to do smaller tasks. You will be amazed at how much you will get done by focusing on the small things.

Break Big Jobs into Small Bites

Instead of cleaning the whole bookcase, clean one shelf off at a time until you complete the entire big task. Instead of tackling an entire room, start with one corner. So, basically, stop looking at the whole overwhelming paralyzing picture and focus on smaller manageable pieces.

Institute a Job Jar

This goes right along with the previous suggestions of breaking things into smaller chunks except this time, you write the smaller chunks onto slips of paper and put them in a jar. For example, write “clean off one book shelf” on a slip of paper, fold it in half and pop it into the jar. Add other smaller chunks, too, like “clean the cobwebs from the corners of a room”, “Empty and clean out one drawer”, “pull 5 things out of the closet you don’t wear anymore,” or whatever works for you.

Mary Lee explained that you pull a slip of paper out of the jar and then you do that specific task – “clean off one book shelf,” for example. Once you complete that specific task, you can put the slip back in the jar (if there is more of the same specific task to do), toss the paper slip if it’s complete, or repeat the task if you’re still into it.

The key is, though, that you do not choose another slip of paper (or take on another project), until you have completed the task on the slip of paper you pulled out. You can repeat that task as many times as you want/need or put the slip of paper back into the jar and pull out another one. If you keep taking small bites of those big overwhelming projects, eventually you’ll get that big project done.

Mary Lee’s ideas really resonated with me so on Sunday night, I decided to tackle a corner of my studio. I started with a pile of fabric on top of an open plastic crate. The fabrics were from several recent projects, so I organized and rehomed them elsewhere. When I finally reached the crate itself, I was happy to see it was half-filled with vintage fabric, blocks, and a quilt in the bottom (these were some of my more recent vintage textile finds and I guess I forgot about them as the crate got buried). I found the matching lid to the crate, tucked more vintage blocks and fabrics inside (I spied these over on top of my cutting table) and closed it up.

Here’s a peak inside my crate of vintage blocks and fabrics.

Then I moved onto a pile of fabric and totes sitting on top of a cardboard box next to the vintage goody crate. I organized the fabrics and cleaned out the totes, throwing away a bunch of old papers and handouts from quilt classes I taught years ago. Fabrics were then organized into appropriate places, including a box for gifting and another I’ll call my bye bye box.

But I didn’t stop there. Once the pile was gone, I finally had access to a drawer unit I haven’t seen for a while. The top drawer had Halloween and fall fabrics, some old quilt kits from 2008 as well as miscellaneous fabrics. I happily surprised myself by emptying about half of the drawer. Some of the fabrics went into my fabric cubes (organized by color) while the rest went into my bye bye box (or should I say on top of my bye bye box as it’s overfull now).

These are my fabric storage cubes. I have 50 cubes in 2 units which cover the entire back wall of my studio. I am aiming to do the same thing with the opposite wall, but right now that wall is used as a pantry, so I’ve got work ahead of myself to tackle that project, too. Hello Job Jar!!!

I still wasn’t quite done yet, so I tackled the bottom drawer, too. That bottom drawer stopped me in my tracks. It was pretty smelly and such from being closed up with no air circulation behind the cardboard box with the totes and fabric on top. Methinks everything in this drawer needs a good washing.

All in all, not too shabby for a couple hours work.

On Monday, I washed and dried all the fabrics from the bottom drawer and spent the evening untangling the big mess from the dryer — talk about strings! After everything was folded, I sorted these fabrics too, some went into my panels cube while others went into color cubes. I found some fun stuff in that bottom drawer — 4 fabrics from a Cranston Elvis Blue Hawaii collection from way back when. Cool! A military panel I designed as a freelance designer for a fabric company a long time ago. There was Christmas fabric, too. What I didn’t love went into my bye bye box (or actually on top of it).

I haven’t gotten back to my corner clean up since Monday, but I plan to start getting my tasks written onto slips of paper and put into my very own Job Jar so I can start tackling the big jobs bit by bit.

I’m thinking about making myself a Reward Jar, too. I’d better not include any trips to the quilt shop to add more fabric, though. LOL! Maybe my Reward Jar will just have chocolate……

Well, that’s it for me this week. Wish me luck as I tackle my clutter one bite at a time.

Until next week –-

Always,

Tricia @VRD

Copyright and Quilting · Rose Cards · villa rosa designs

My Recent Copyright Issue and NEW Villa Rosa Quilts Rose Card Patterns for May

Happy Thursday to you!

What a gorgeous day here in NW PA! I woke up to bright sunshine and happy bird song. I love mornings like this! We’ve had a couple wonderful summery days and it makes me so glad that I have a nontraditional career where I can get outside anytime I want to drink in the lovely weather. Lucky me….

We have so much to do today, we’d better get started.

Hip! Hip! Hooray! I just shipped the last bunch of prizes yesterday — all 41 of ’em! I know those of you who won prizes and haven’t received them yet are probably getting a little anxious by now and today I’m happy to say the last of the Blog Hop prizes will be arriving shortly.

If you won a prize during the Blog Hop and do not receive it within the next couple weeks, please email me at tricia@villarosadesigns.com so I can look into it.

Again, thanks for your patience. I hope all of you winners enjoy your prizes!

Let’s keep moving!

Congratulations to Barbara in MA! She is our giveaway winner.

Thanks everyone for telling me about your favorite color combinations. Like you, I have lots of different combinations and it’s hard to pick just one. Wink, wink……..

If you didn’t get your own copy of Plan Design Quilt yet, you can find it HERE.

I love being a quilt designer and author, but sometimes things happen that make me so so frustrated. Recently, I had a copyright issue and I’d like to tell you about it.

I’ve talked about copyright and quilters a couple times before and you can find links to those posts here:

NEW April 2023 Villa Rosa Designs Rose Card Quilt Patterns and Revisiting the Copyright Question for Quilters

The Copyright Question for Quilters

I also want to remind you that I am not an expert in the field of US Copyright Law. What I’ve learned, I’ve learned by reading, researching, talking to others, and experiencing issues first hand. If you need expert advice or information about US Copyright Law, please seek the help of a Copyright lawyer.

Recently, a quilter familiar with our VRD Rose Card patterns emailed us with a screenshot showing the back of one of my Rose Card patterns — the instructions — posted on Facebook. The kicker was that the poster actually covered up the copyright information at the bottom of pattern, which indicated the person posting my pattern knew exactly what they were doing. Please don’t assume they just didn’t know that it was wrong or what they were doing was violating US copyright Laws — if they covered up the copyright info, then this was done completely intentionally.

I tried to check it out on FB, using the info on the screenshot to guide me, but I found out that the group was private. Now what? I ended up having to join the group so that I could address this copyright infringement. While waiting for my membership in the group to be active, I was able to look up the person who posted my copyrighted pattern instructions and I wrote a very firm message to them. I also found out that person was — of all people — an administrator of the Group!

When I was finally accepted into the group later the same day, I then posted a super firm comment showing the front of my pattern and telling all 3000+ members that I owned the copyright and I did not give permission to share my pattern instructions and that by doing so AND covering up the copyright information intentionally was a violation of US Copyright Law.

I also found out how to make an intellectual property complaint to Facebook, which I promptly did.

You can find Facebook’s Intellectual Property article which also includes a link to the form for reporting Intellectual Property abuse HERE.

Finally, the original post was taken down in the Group before Facebook even had the chance to do it (which told me that at least one of the administrators of the group knew it was wrong and deleted it before the group could get in trouble from Facebook). But it wasn’t deleted before over 3000 people had the opportunity to save/print/copy/repost my pattern. THEN I got grief from another one of the administrators who not only deleted my public posts in the group about copyright law and my rights as the copyright owner, but also told me that I should contact the guilty administrator and not post to the entire group. Seriously??? Not one person accepted responsibility for this nor did anyone even offer an apology! I am still seething about this experience.

You might wonder why this upsets me so much. Let me explain.

Sure, maybe that person originally purchased my VRD pattern for $2 before posting it on Facebook, but that did not give them the right (legally or morally) to share it with over 3000 people for free. They did not ask my permission to post my copyrighted pattern instructions — I would NEVER have given my permission to post it on Facebook anyway.

Copyright laws are there to protect intellectual property for many good reasons, including a copyright owner’s ability to earn income on their own intellectual property.

I design quilt patterns as part of my livelihood. By posting the instructions of my pattern for free on the FB Group, that person so kindly helped me (and VRD) to lose potential income — possibly more than $6000 in pattern sales, if each of the 3000+ group members had purchased their own pattern at $2 per pattern.

This all makes me second guess my desire to design and publish new quilt patterns. If designers stopped creating new quilt patterns, new quilt books, and new quilt magazine patterns featuring new techniques, new fabric collections, new tools, and new ideas then the quilt world would suffer greatly. Eventually the sale of fabric, notions, tools, rulers, etc. would suffer, which would then hurt fabric companies, publishers, advertisers, quilt shops and other quilt-related businesses. People could lose their jobs and companies and businesses could eventually go out of business. Do you see the domino effect here? Ultimately, it would hurt you, the quilter, who just wants to make beautiful quilts.

Copyright law protects ALL of us.

I appreciate you taking the time to hear my latest copyright story. And now I’ll jump off my soapbox.

Time to check out the NEW May patterns!

Yep, it’s the Thursday after the first Friday in May, which means — NEW PATTERNS!

There are 7 — count ’em — 7 NEW patterns this month — the set of 5 that you know and love along with a table runner and a snack mat. Definitely something for everyone in this month’s patterns.

YAY! Aren’t they Fab??? You can get the set of 5 physical patterns for the special price of $8.95 HERE

I’m sorry, but we don’t offer the set as a digital pattern collection. However, the good news is that each pattern is individually available as a digital format. You can find the patterns by name on our website, villarosadesigns.com.

Here’s a pretty flower runner, perfect to whip up for Mother’s Day or just for spring — I can see you already picking out your favorite colors and fabrics for this one. You can find the runner physical pattern HERE or the digital pattern HERE.

And here’s a very spring-y fun Snack Mat pattern. Don’t you just love pinwheels??? They are so fun and happy! You can find Pinwheelies the physical pattern HERE or the digital pattern HERE.

So, which one are YOU going to make first???

Well, I’m off to take my sweet and crazy little Shih Tzu, Bailly, out for a walk to enjoy this gorgeous day. Ta Ta!

Here’s my 1 1/2 year old cutie, Bailly, who needs a haircut and a shave right now….LOL! Don’t you love her happy grin???

Until next week —

Always,

Tricia @VRD

Quilting Partners · Rose Cards · villa rosa designs

NEW January 2024 Villa Rosa Rose Card Quilt Patterns and Quilting Together

Happy Thursday to you!

I hope January is off to a good start for you. I’ll bet you have some great quilting plans for this year. Me too! In fact, I am already getting started on some. Yay!

What about New Year’s Resolutions? Do you make any? If you do, how hard is it for you to keep them? 

I don’t really make “Resolutions” anymore because they’ve always been so specific and of course, that just set myself up for failure — sigh…….I guess I’m just not disciplined enough. So, instead of Resolutions, I make “Goals” for the New Year. The great thing about Goals over Resolutions for me is that my goals are not carved in stone and can change over time, can become completely irrelevant, or even get carried over into the next year. Know what I mean?

That being said, here are my Goals so far for the New Year:

  • Eat more healthfully and get more active
  • De-clutter, downsize, and organize
  • Finish more projects
  • Use my stash more efficiently
  • Save more money
  • Stick to a regular daily work schedule
  • Find more time for creativity
  • Change what I can and accept what I cannot change
  • Be kind

I find that if I actually write my Goals down and review them once in a while, then I am more likely to accomplish them, or at least break them down into smaller steps so I am working my way towards the finish line. I keep a list of my Goals (written in pencil) in the front of my yearly planner. Sometimes I add more Goals throughout the year, change a Goal completely or even erase it if it no longer makes sense to me. Basically, I think it really all boils down to beginning and maintaining new habits.

Speaking of the New Year, it’s the Thursday after the first Friday of the month, which means NEW Rose Card Quilt Patterns! Yay!

January 2024 VRD Rose Card Quilt Patterns

January’s patterns are awesome, aren’t they? Lucky you, you can get the set of 5 patterns for the special price of $8.95 HERE.

Please join me in warmly welcoming our newest designers, Rachelle of Rachelle Handmade and Deanne of Creative Sewlutions! Welcome Rachelle and Deanne! Hopefully soon, we’ll have Designer Spotlights here on the blog so everyone can get to know the two of you better. 

Yep, there’s a new table runner pattern for Janaury, too. It’s called Snowberry and you can get it HERE.

Did you know you can get the New Rose Card patterns delivered right to you mailbox every month? You can sign up to get just the 5 monthly patterns HERE or you can get the 5 monthly patterns plus table runner(s) HERE.

But wait — there’s MORE!

If you missed last week’s blog post, I debuted our very special NEW Collection of patterns in partnership with the Quilts of Valor Foundation (QOVF). The collection features 12 Rose Card patterns that meet the size requirements for a QOV quilt. And of course, they are FAST and FUN patterns! 

You can get the collection of 12 QOV patterns for the amazing price of $14.95 HERE. AND, a portion of the sales will be donated to the QOVF. It’s a win-win-win for you, for the QOVF, and for Villa Rosa Designs! 

This collection of QOV patterns is sew inspiring that I challenge you to get together with a group of your quilty pals and make some quilts to donate to your local QOV organization. You can check HERE to find your closest QOV chapter. Maybe you’ll join and support the QOVF’s mission to get quilts into the hands of veterans and active service members.

Quilting Together

I know I’ve talked about getting together with your quilt posse before, but with a brand new year, it’s time to make some plans to quilt together. Quilting together is not a new idea at all, our grandmothers and their grandmothers gathered together to make quilts as well as to work on hand-sewing projects. Quilting circles were very popular during the Civil War, while women and girls did their part for the war effort by sewing for the soldiers, often their fathers and sons, neighbors and friends. My point is that quilting together is an important part of quilting and sewing and has been for generations.

This vintage photo shows a group of women hand-quilting a Double Wedding Ring quilt in the 1930’s or 1940’s. See the young lady at the end on the left, she’s a lefty like me. Just sayin’!

Here are some great benefits we get when we quilt together:

  • Social Connection, Community, and Friendship
  • Sharing and Collaboration
  • Learning New Skills
  • Improving Existing Skills
  • Teaching Others
  • Self Esteem and Confidence
  • Stress Relief and Relaxation (for some quilters, anyway)

Quilt Guilds are a continuation of the quilting bees and sewing circles of the past. I’ve been a member of the Free Spirit Quilters for quite some time now. And I know I’ve talked about my Friday Quilt Class/Group here on the blog before and how important those ladies are to me. Additionally, I have several friends (yes, I have friends [eye roll here]) with whom I get together to sew. It might be hand-sewing hexies while watching tennis or mysteries on TV or sewing all day in a friend’s newly set-up quilt room. And as part of my decluttering, downsizing, and organizing goal, I hope to get a second workspace set up in my studio so I can have a friend over to quilt with me in my space, too.

When I was a Girl Scout a long time ago, I can remember singing the song “The More We Get Together.” Do you remember this song? 

The more we get together,

Together, together,

The more we get together,

The happier we’ll be.

For your friends are my friends

And my friends are your friends.

The more we get together,

The happier we’ll be.

Written by Irving King

This is Quilting to me.

Always,

Tricia @ VRD