Rose Cards · Tutorials · villa rosa designs

New August Villa Rosa Rose Card Quilt Patterns and VRD Weave Quilt Tutorial

Happy Thursday to you!

It’s August??? It’s August! How did that happen??? It must have sneaked up behind me when I wasn’t looking….

The good news is that today is the Thursday after the first Friday of a new month! And guess what that means?

Yep, you got it! NEW PATTERNS!
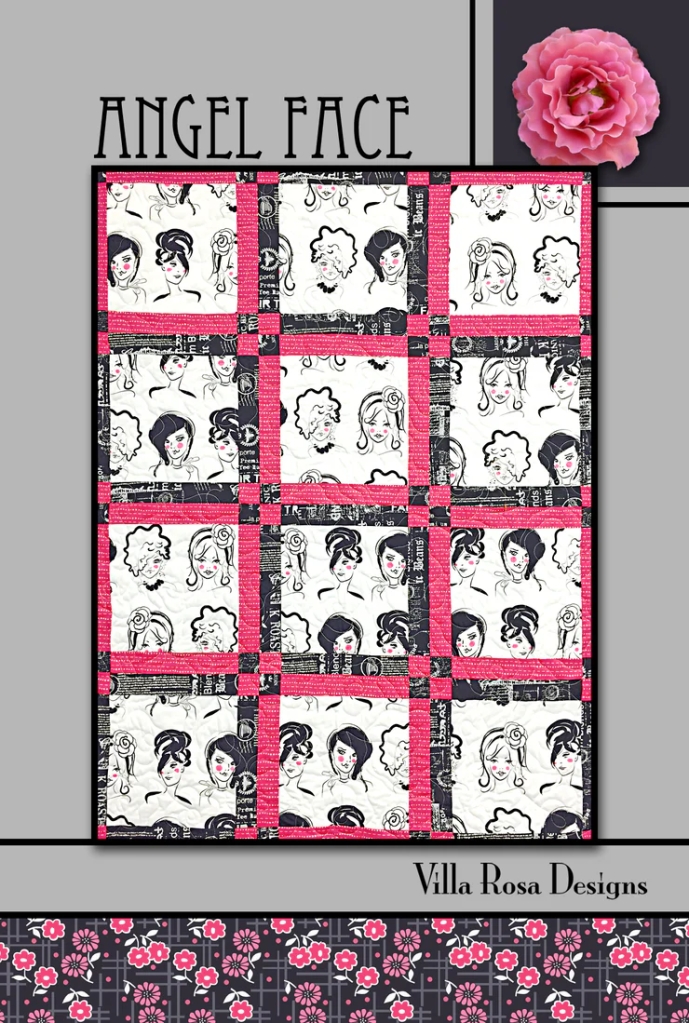
Aren’t they awesome? Definitely something for everyone this month from panel quilts to modern quilts. I bet you’re already picking which ones you’re going to make, am I right? I must confess that Drizzle rather fascinates me and I am looking forward to giving it a try soon. Hmm, a new tutorial, perhaps? Or maybe several as all of the new patterns are great.

I know I probably say it every month, but our VRD designers keep surprising me with their innovative, fun, and easy to make patterns.

PSST! Here’s the good news — you can order a set of all 5 print patterns for $8.95 HERE. Sorry, but we do not offer digital sets of patterns at this time unless you sign up for a Pattern Club (see below for more info), but you can peruse all of our digital patterns (including our newest patterns this month) HERE.

But wait! There’s more! Tehehe — you knew I was going to say that.

We have a new table runner and snack mat for August, too.

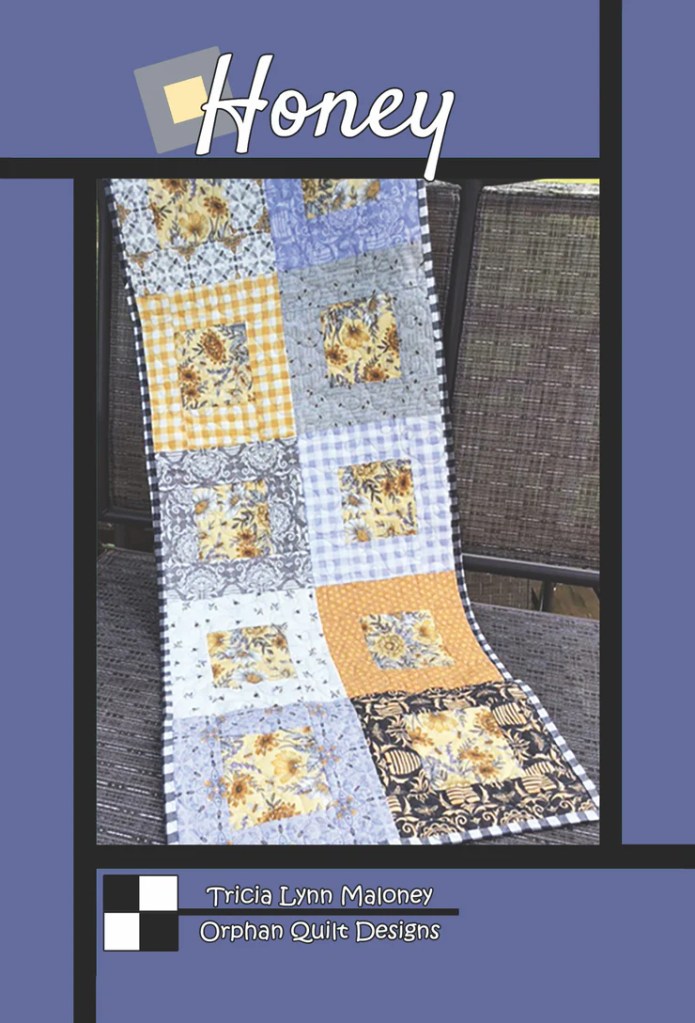
Here is Honey, my most recent table runner pattern. It is quick and oh so satisfying because it uses many different fabrics. You can get the Honey print pattern HERE or the digital pattern HERE.

A lot of folks have already been asking about the fabric I used for the runner. It’s called Honey & Lavender by Deb Strain for Moda. It is available in quilt shops right now. As the runner uses fat eighths, you can find a fat eighth collection HERE just in case you can’t find it at your local quilt shop, because these fabrics seem to fly right off the shelves.

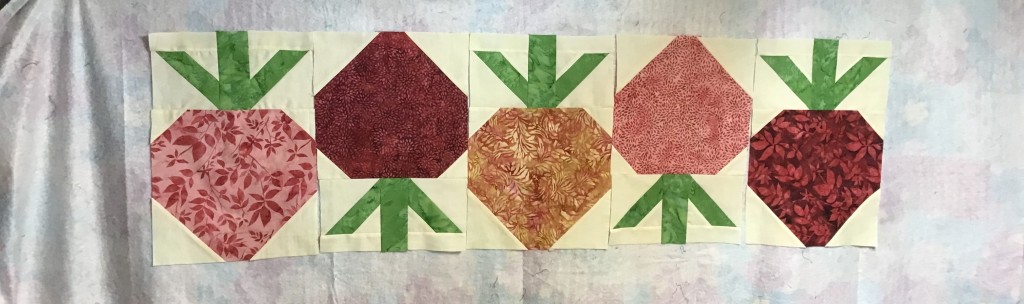
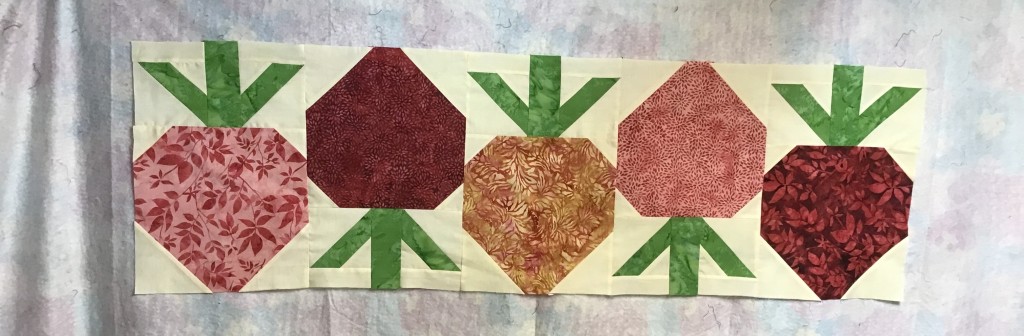
There’s also a new Snack Mat for August, too.

Awww! Isn’t this the cutest l’il watermelon slice? You can get the print snack mat pattern HERE or the digital snack mat pattern HERE.

Please forgive me for repeating myself, but as we have a lot of new subscribers and blog readers, I thought I’d remind all of you that you can get the new print patterns delivered right to your postal mail box every month if you live the USA.

If you want to get digital patterns every month, YOU CAN TOO!

All you have to do is follow one of the links to the appropriate Club form, below, and select “International” on the form in order to sign up to get digital pattern collections emailed to your inbox every month (you do not have to live outside the USA to sign up for digital patterns).

HERE you will find the form to fill out to sign up to receive the 5 main patterns each and every month (select “International” if you want the digital pattern sets).

OR

HERE you will find the form to fill out to sign up to receive the 5 main patterns in addition to table runners and/or accessory patterns (select “International” if you want the digital pattern sets).

Patterns always ship FREE, too. So what are you waiting for? Go ahead and sign up to get your monthly card sets delivered right to your doorstep or your email inbox. Never miss a new pattern!

I hope you enjoyed last week’s post, 11 Awesome Ways to Incorporate Quilts into Your Life. Now that you know what to do with your quilts beyond the basics, let’s make more quilts. YEAH!

Ready for another Summer Quilt Tutorial???
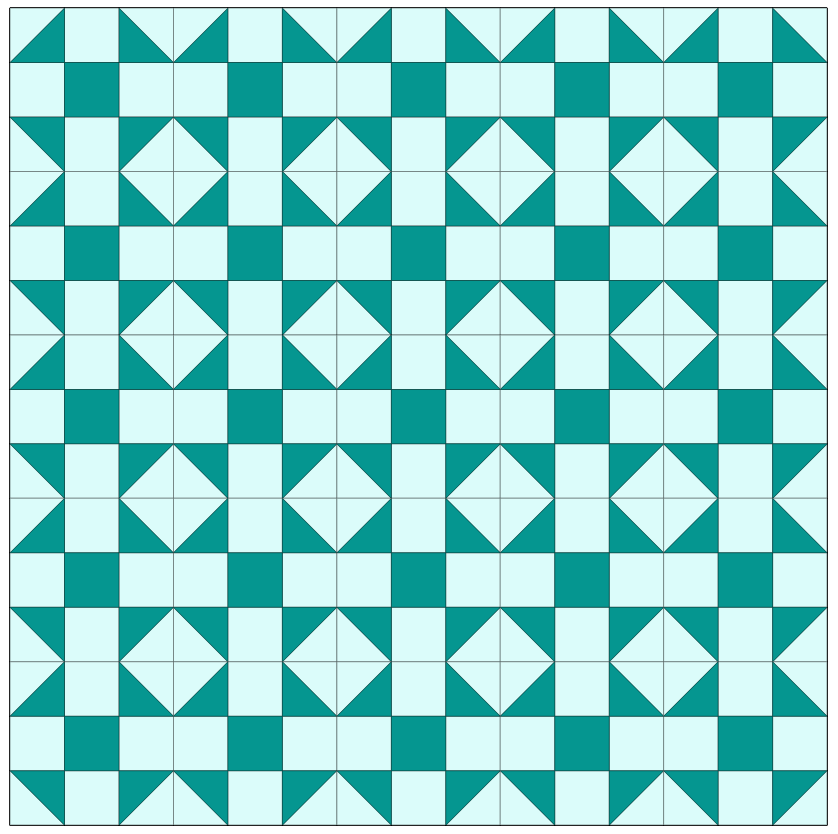
This being the last month of summer, I was in the mood for a late summer warm and sunny feeling quilt and I think you’ll agree that my version of Running Doe’s Weave quilt pattern certainly feels like an warm hazy lazy August afternoon.

You can get your own print Weave pattern HERE or the digital Weave pattern HERE.

Sit back and enjoy this Weave tutorial.

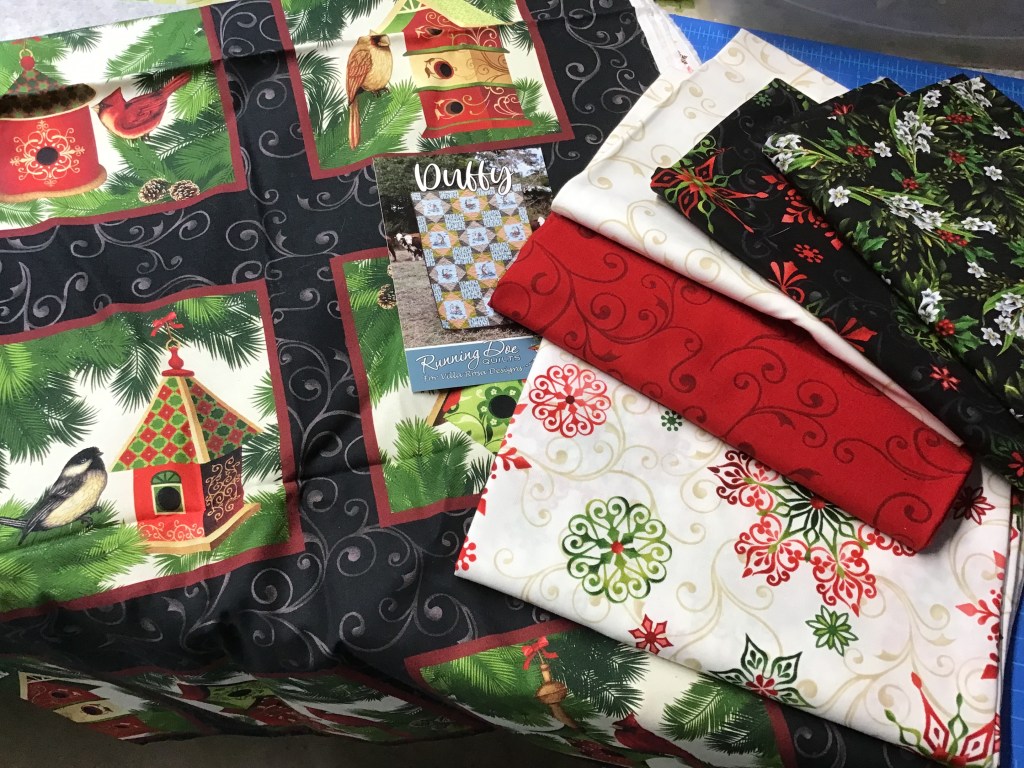
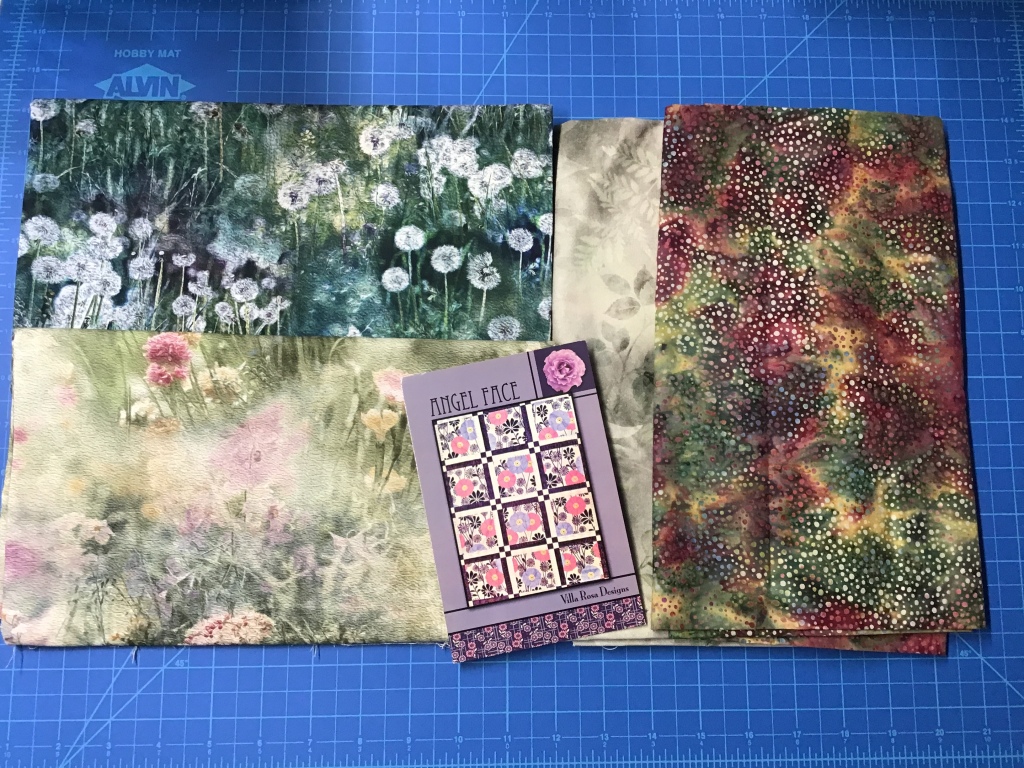
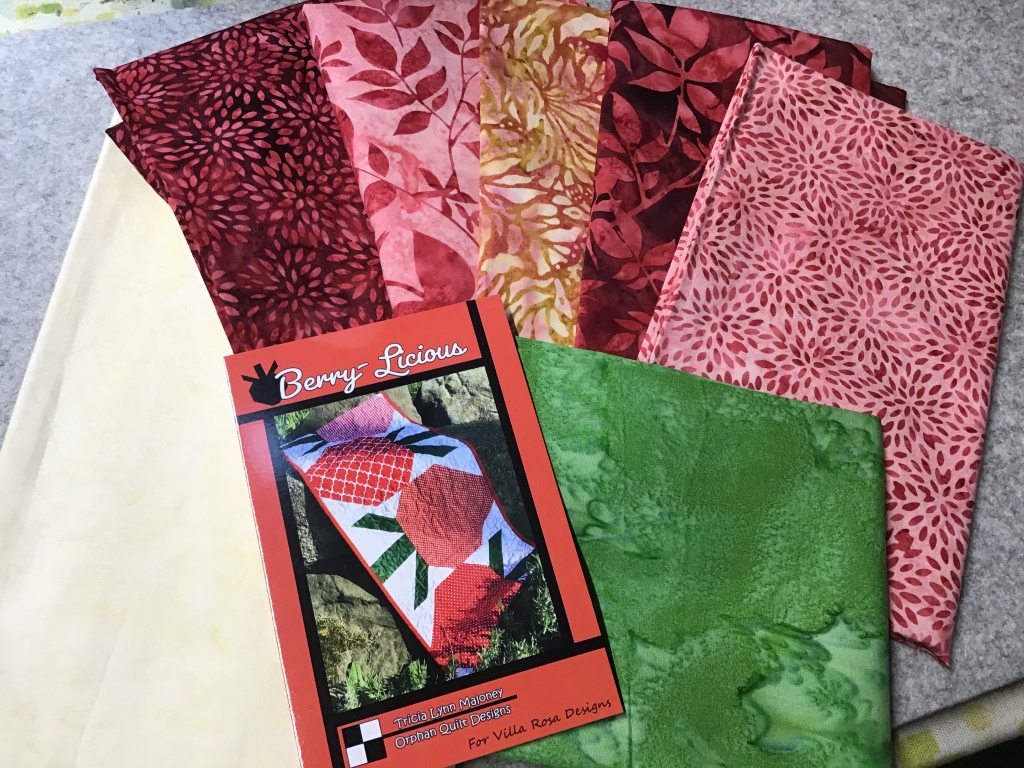
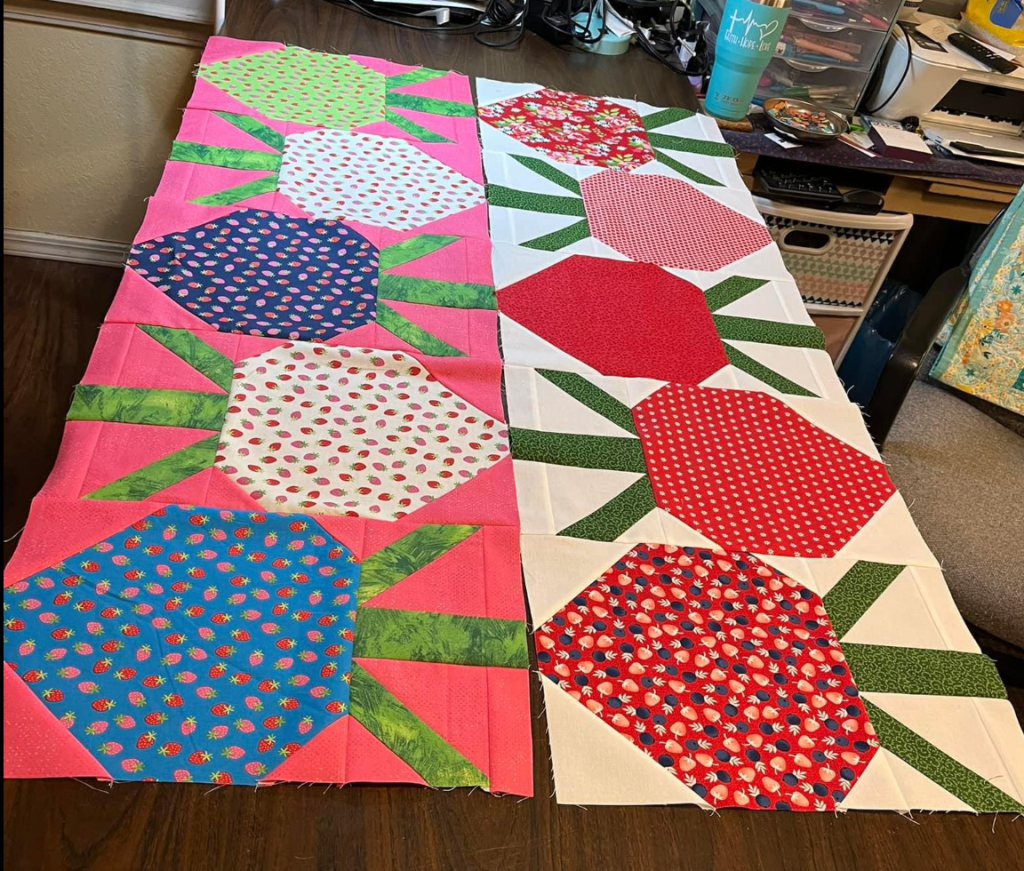
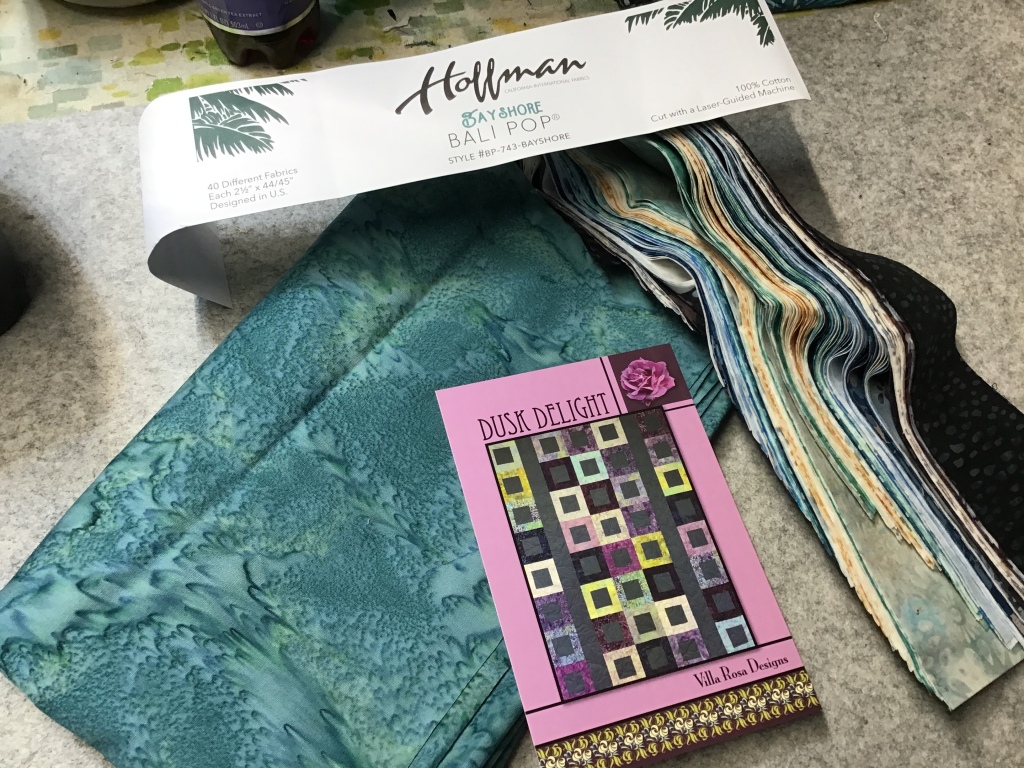
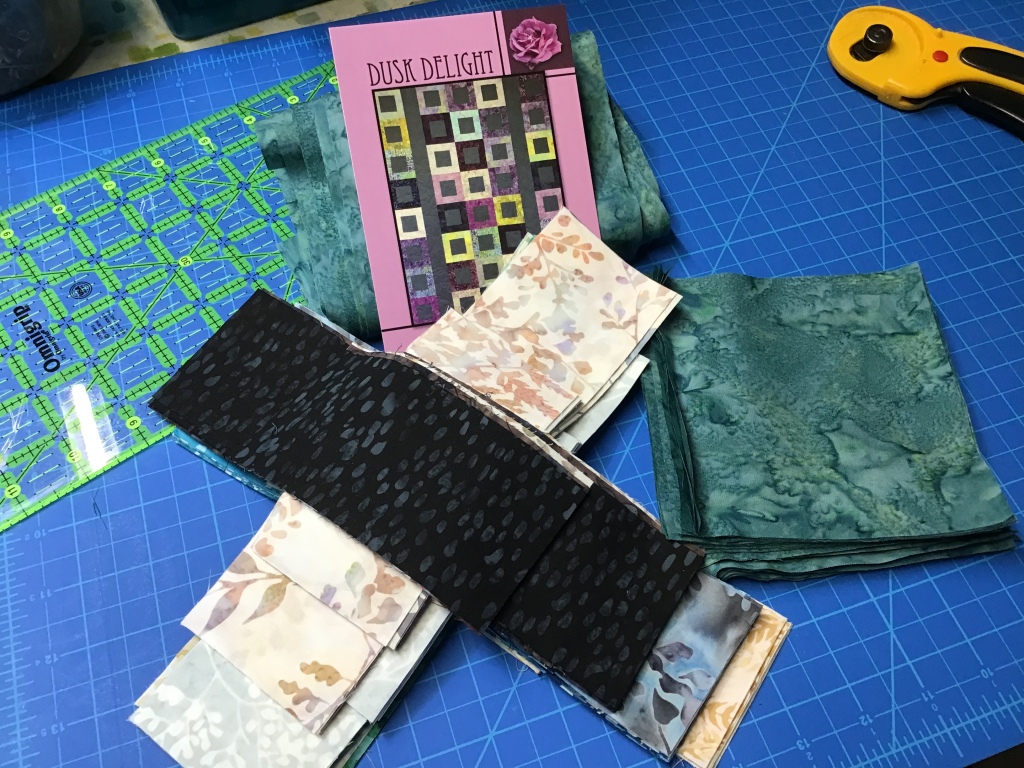
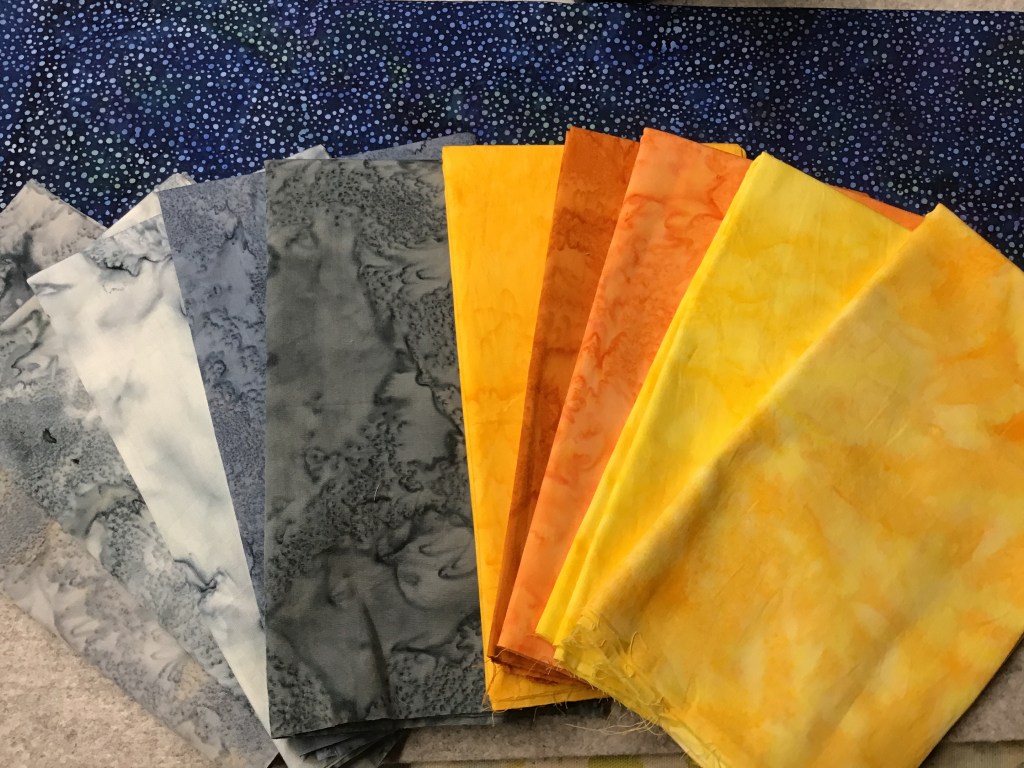
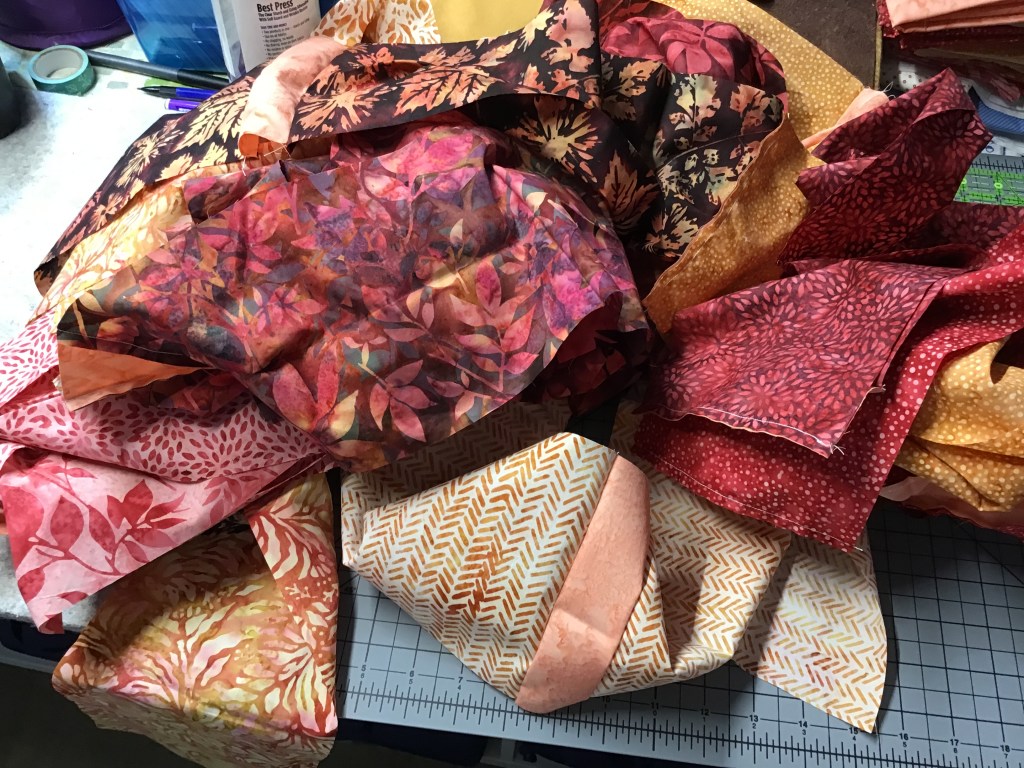
For my Weave quilt today, I am using fabric from the Garnet Glow Batik Collection by our quilting partners, Hoffman California-International Fabrics.

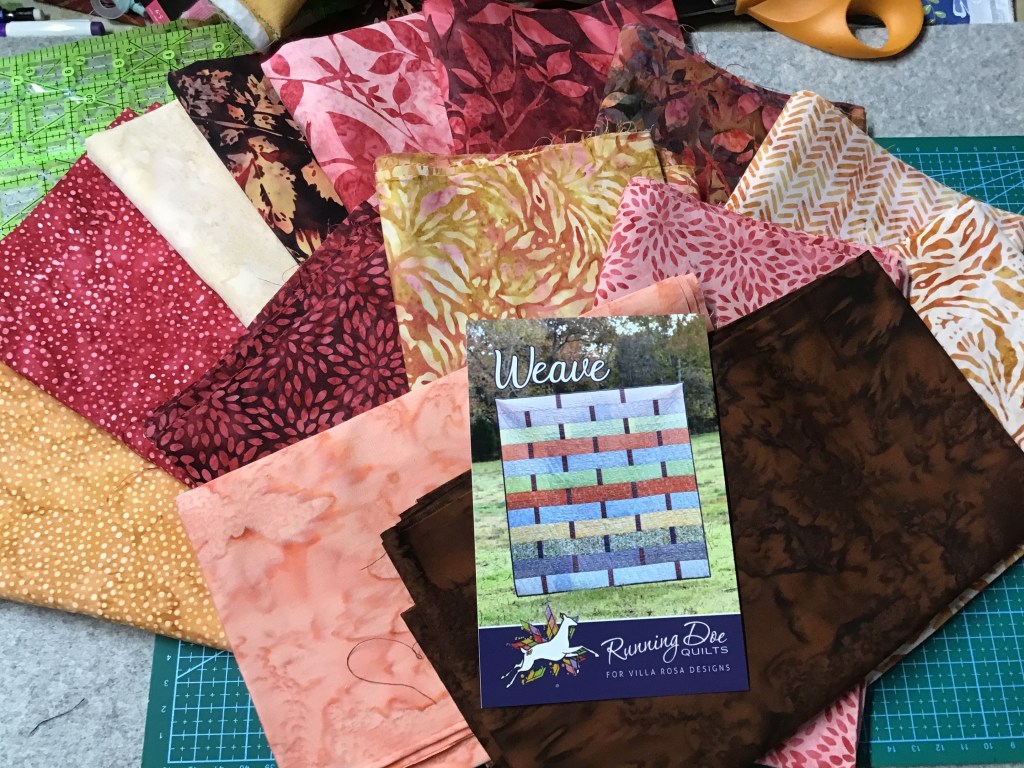
Did you happen see my Berry-Licious tutorial a while back? I used the same fabric collection for that table runner as I am using for Weave. You can check out the Berry-Licious Table Runner Quilt Tutorial HERE.

Okay, let’s get started!

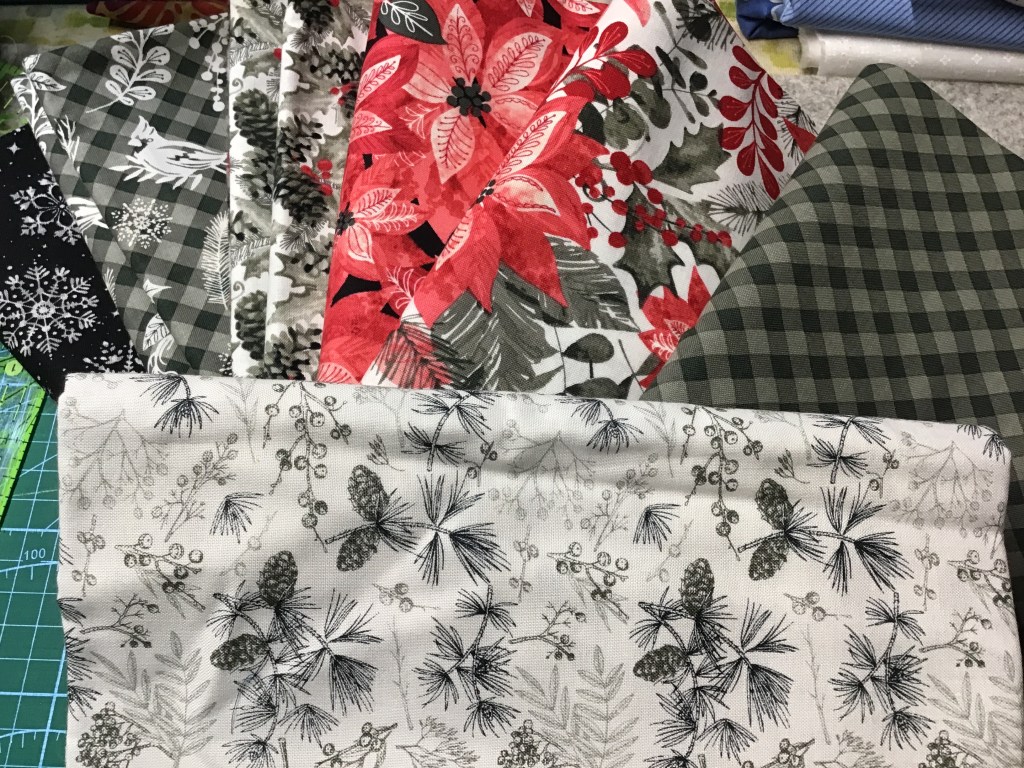
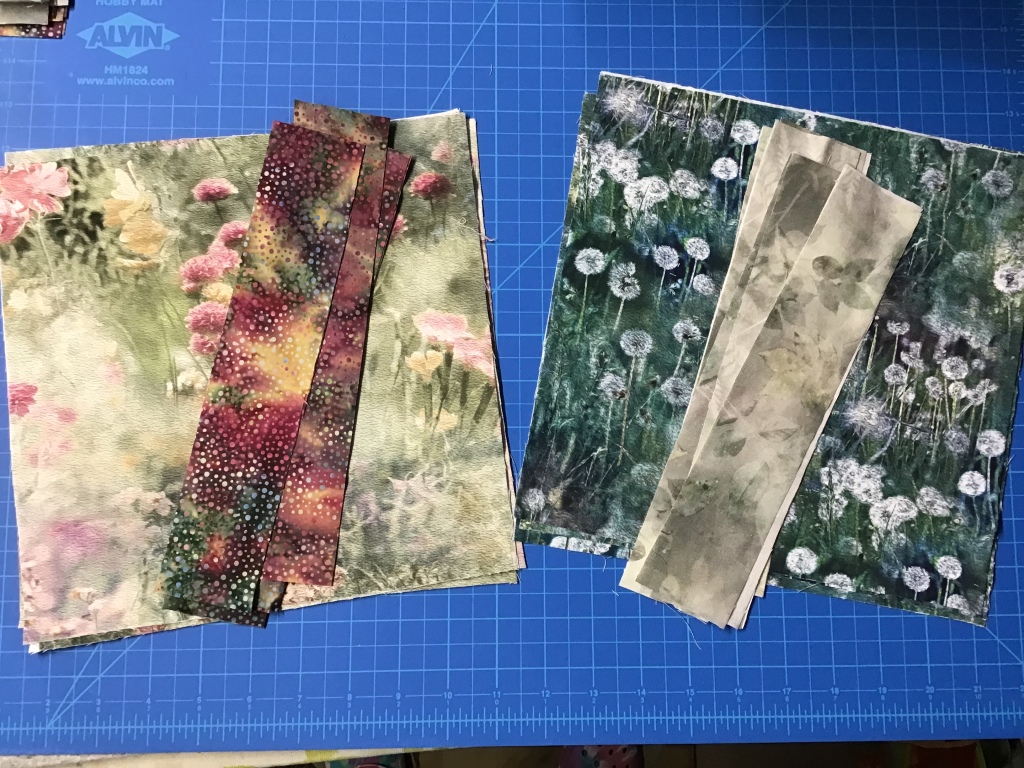
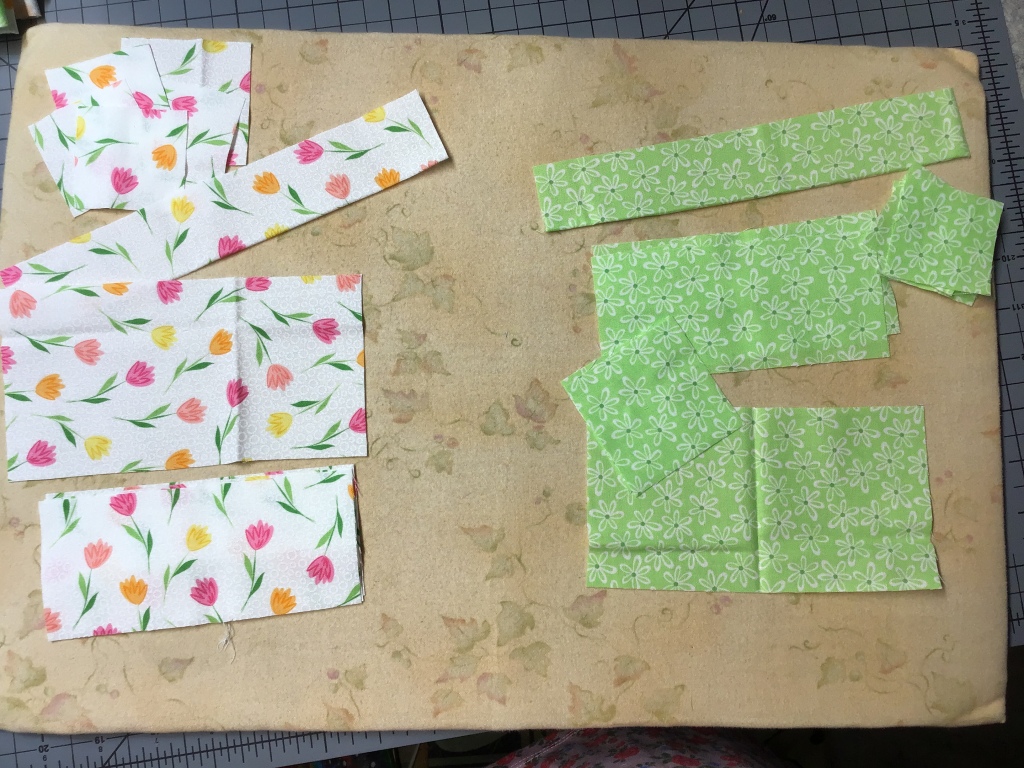
First thing you need to do is decide how you will arrange your fabrics. As you will see later in the tutorial, I had 6 lighter fat quarters and 6 darker fat quilters so I decided to alternate my lights and darks. This decision influenced how I cut my rectangles because 6 fabrics are cut one way and the other 6 fabrics are cut a different way.

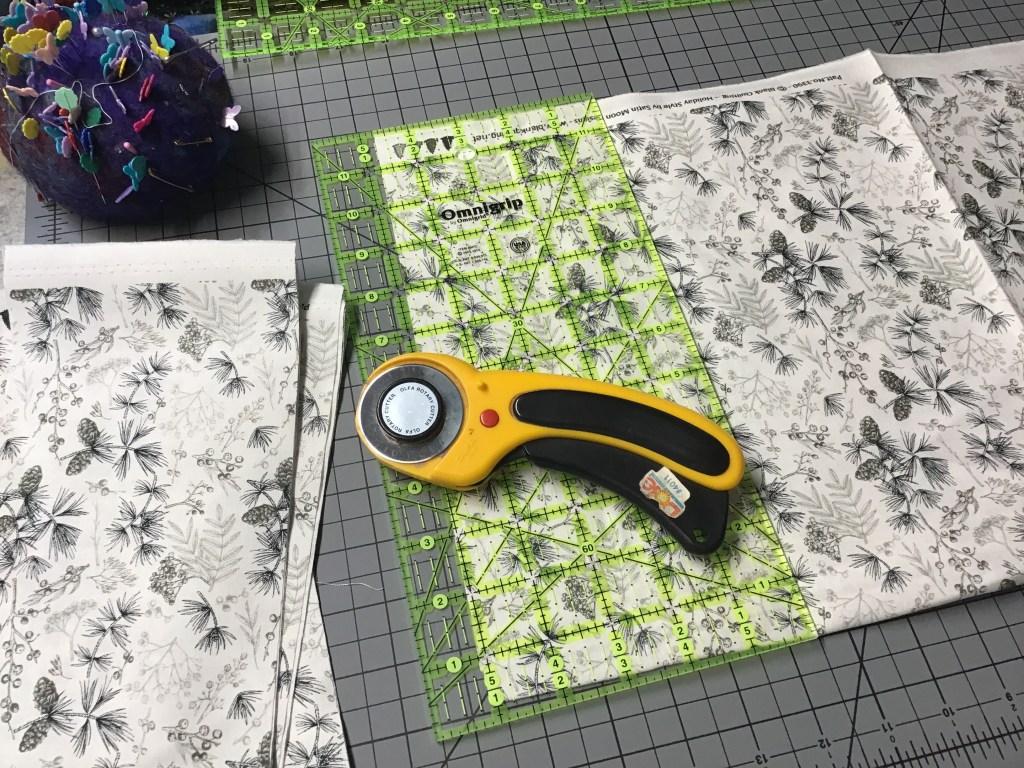
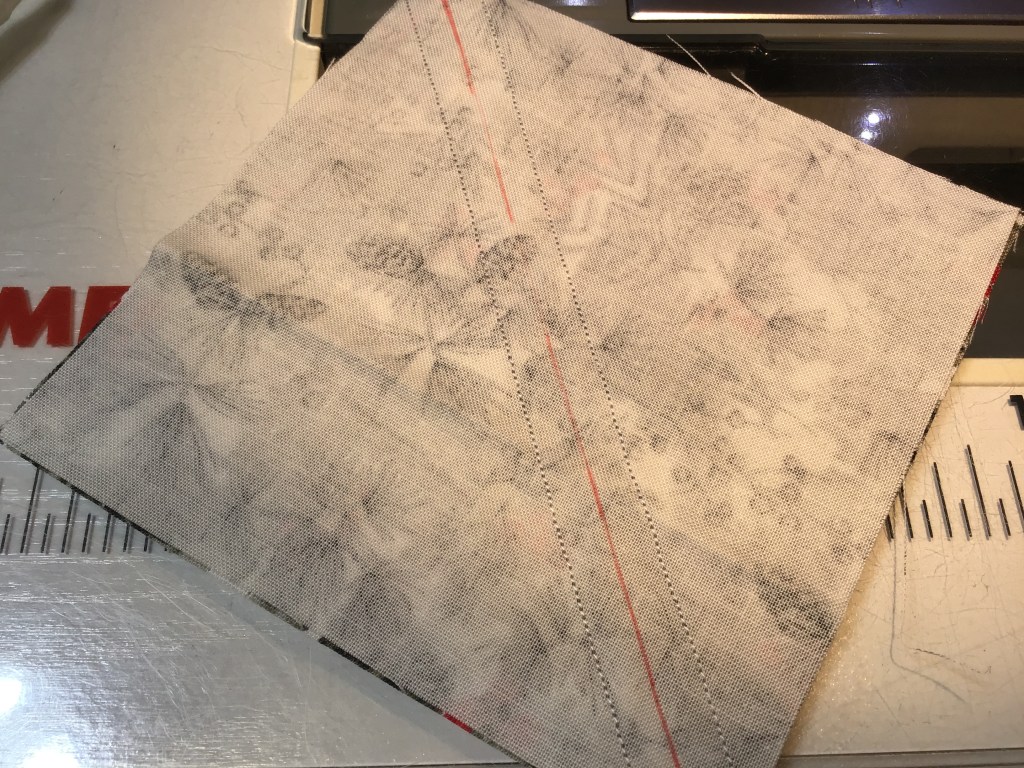
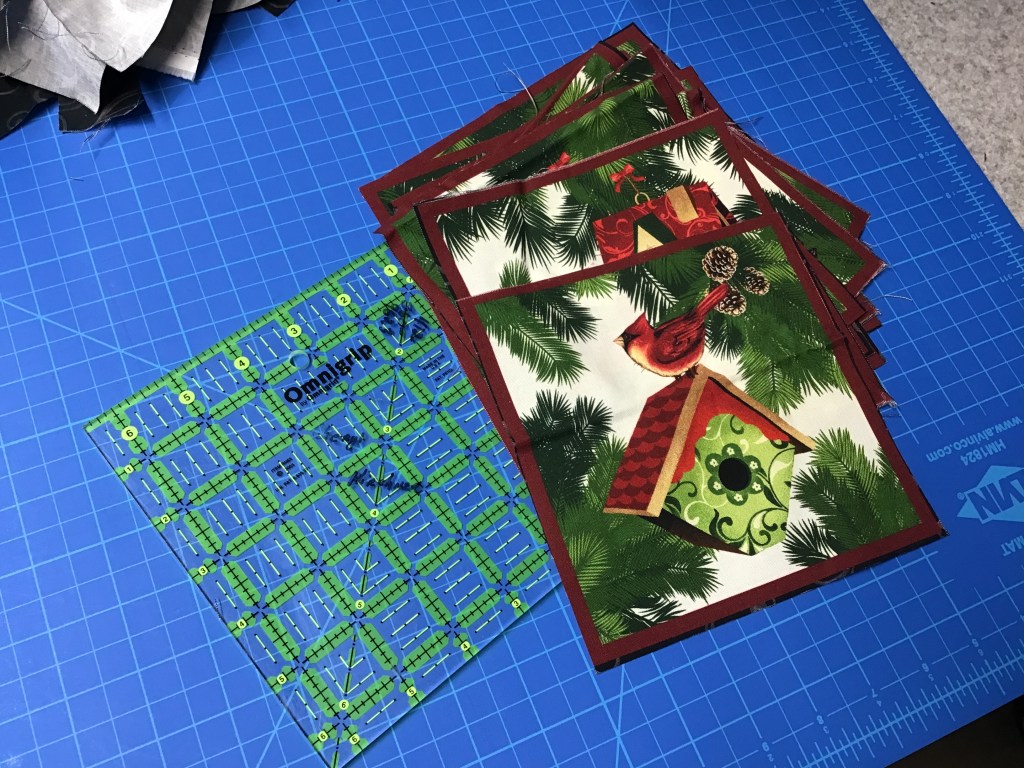
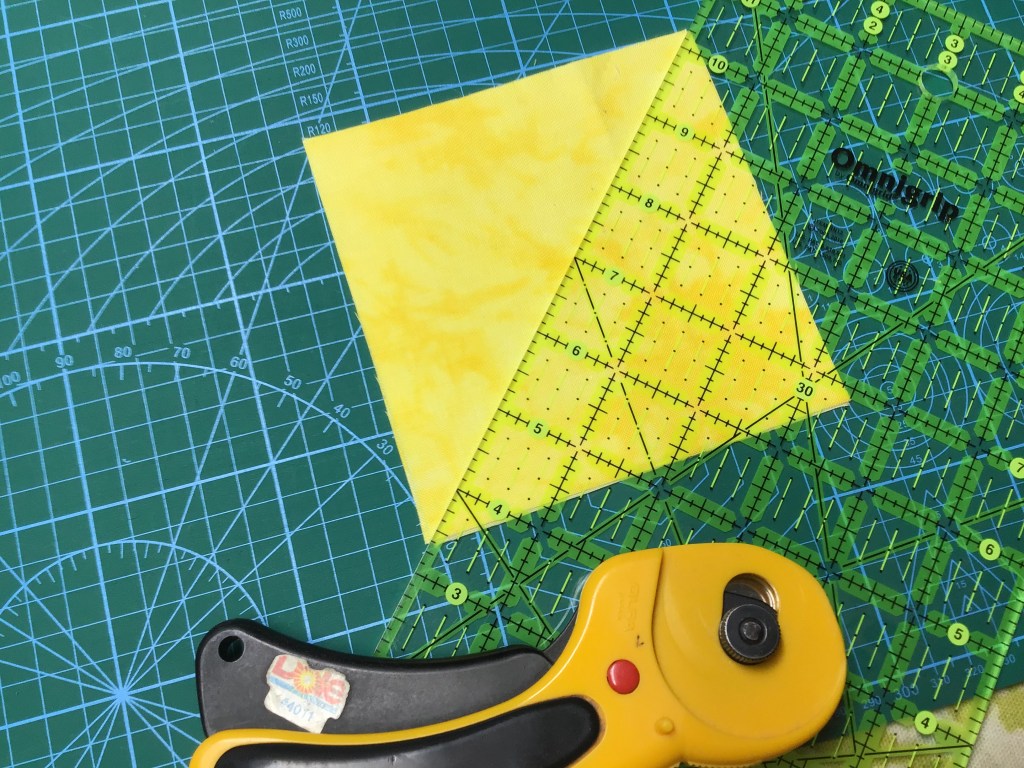
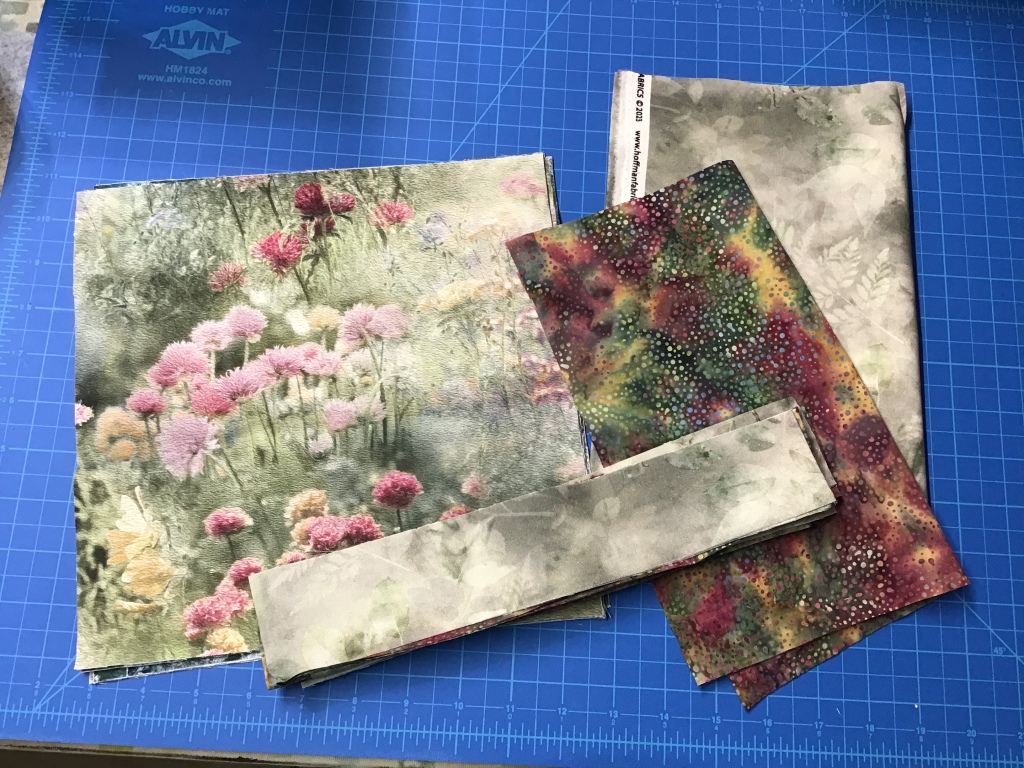
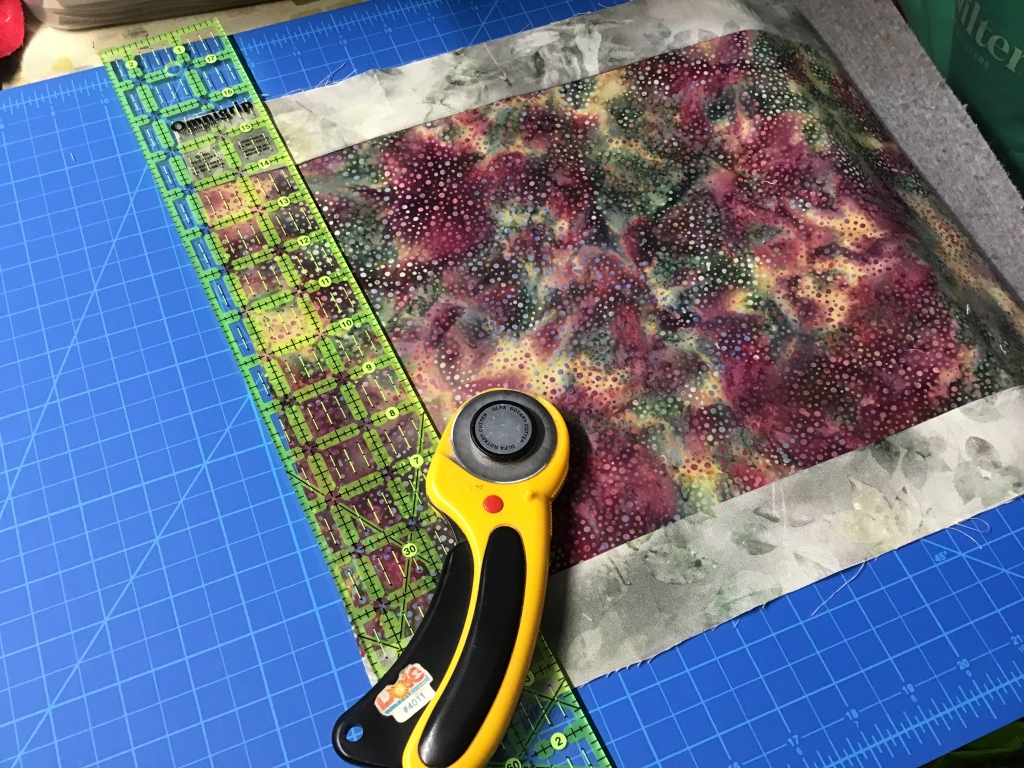
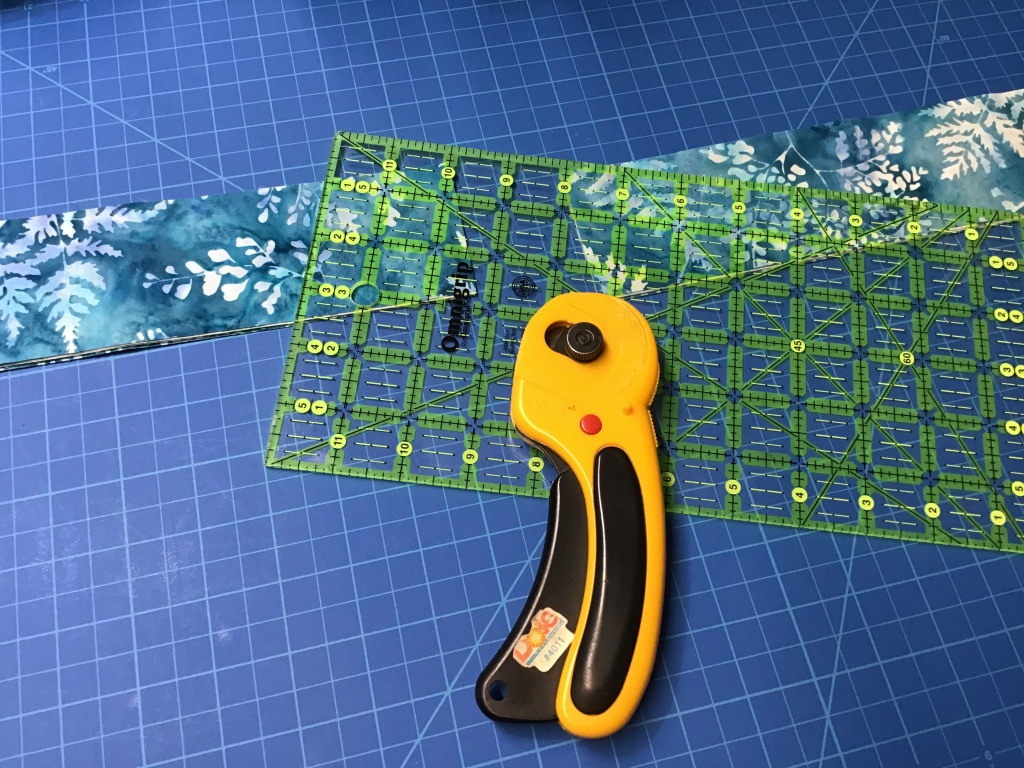
The rectangles are simple to cut with a basic 6″ or 6.5″ x 24″ ruler and an 18″ x 24″ cutting mat. Simply lay the fat quarter out on your mat with the 22″ side horizontal and the 18″ vertical. Cut strips according to the size in the pattern and then cut the strips into rectangles. I was able to comfortably layer 3 fat quarters at a time to cut — do likewise if you feel comfortable.

Did you know that if your rotary cutter starts skipping while you cut, it’s probably time to change your rotary blade?

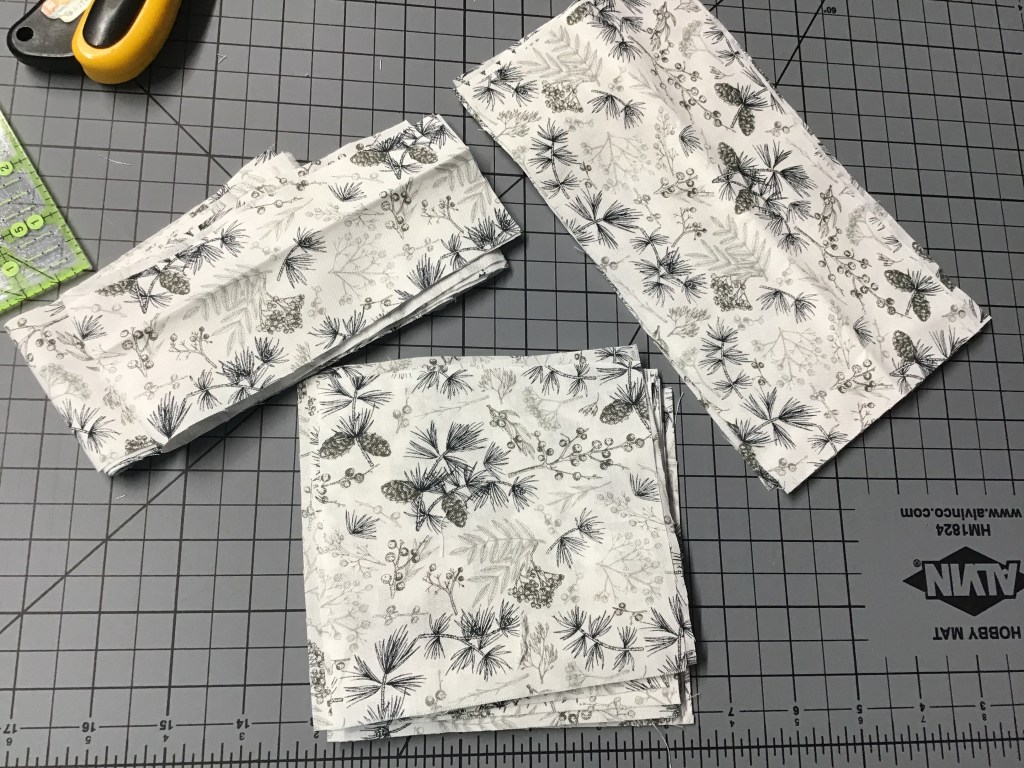
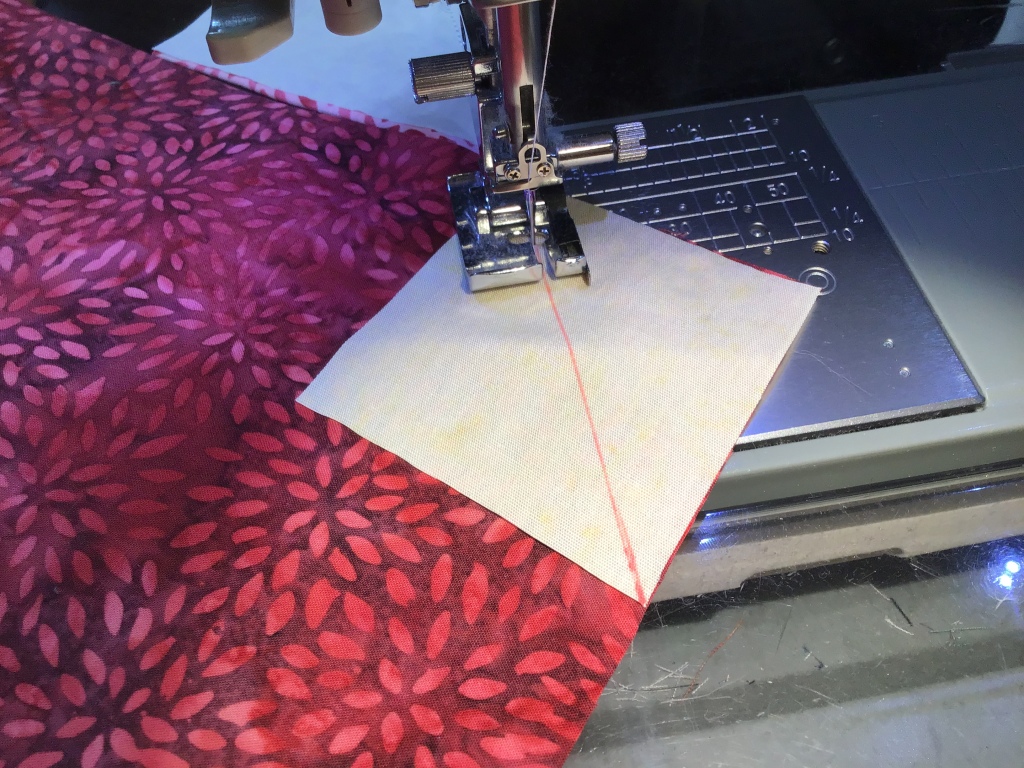
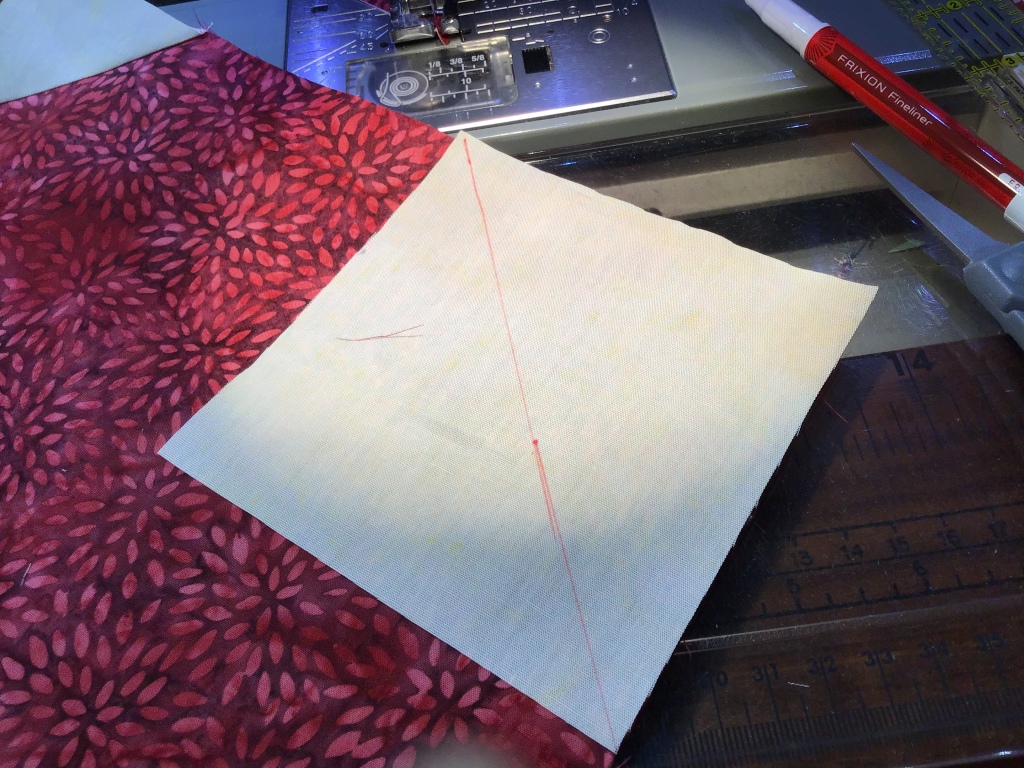
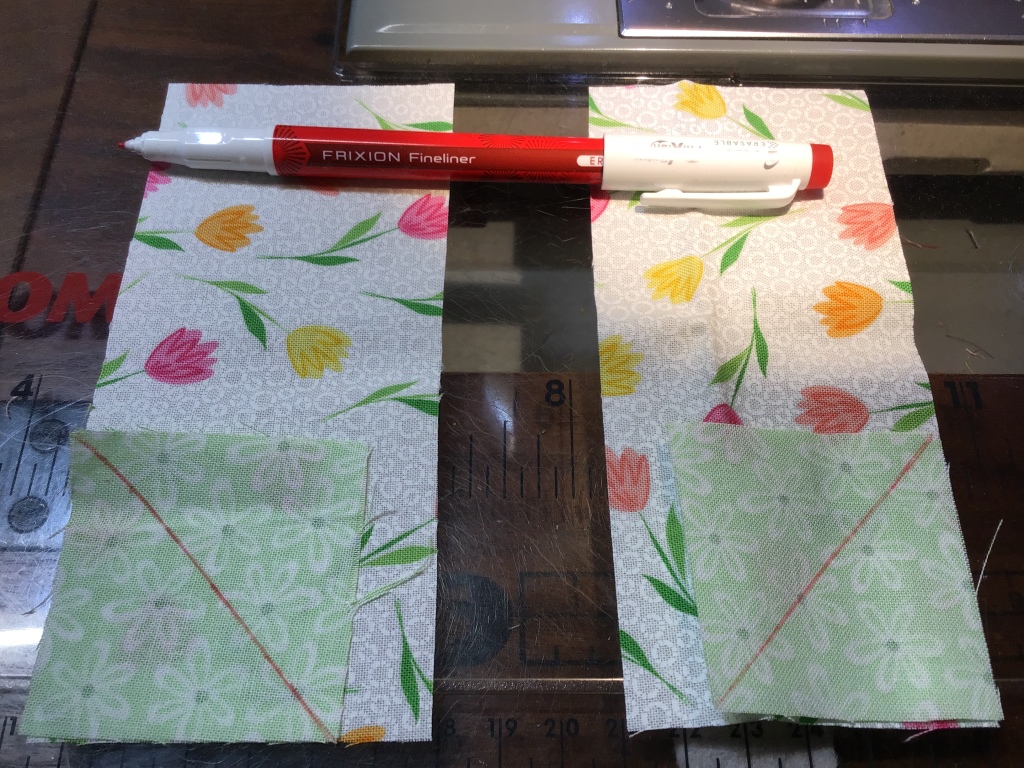
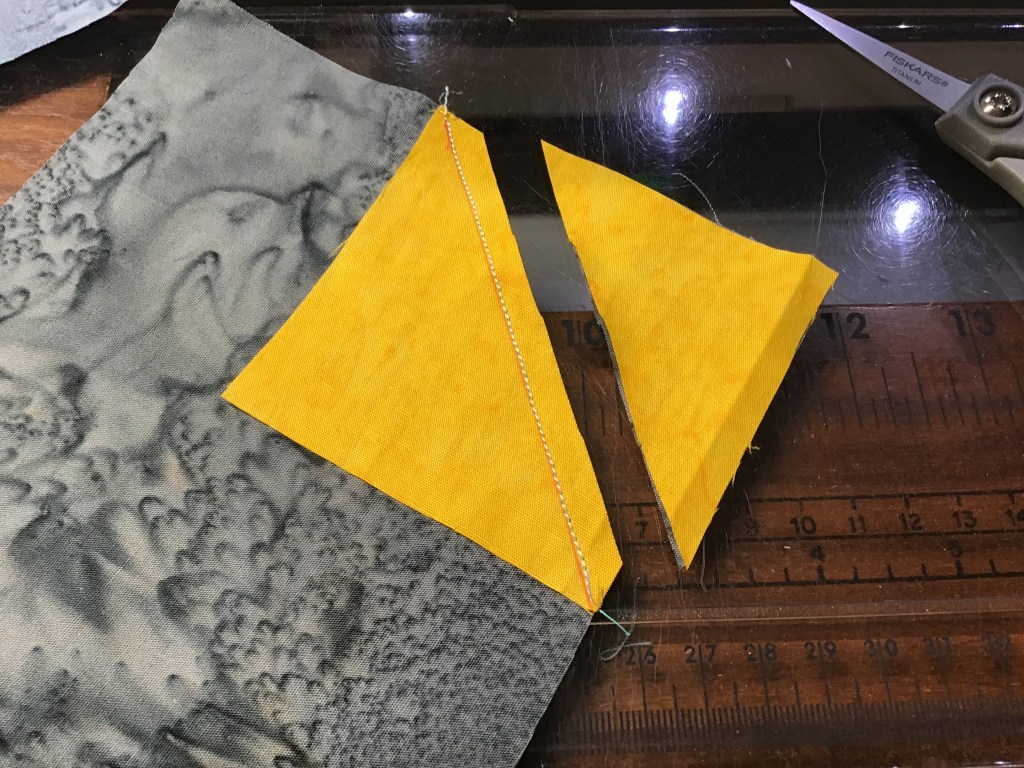
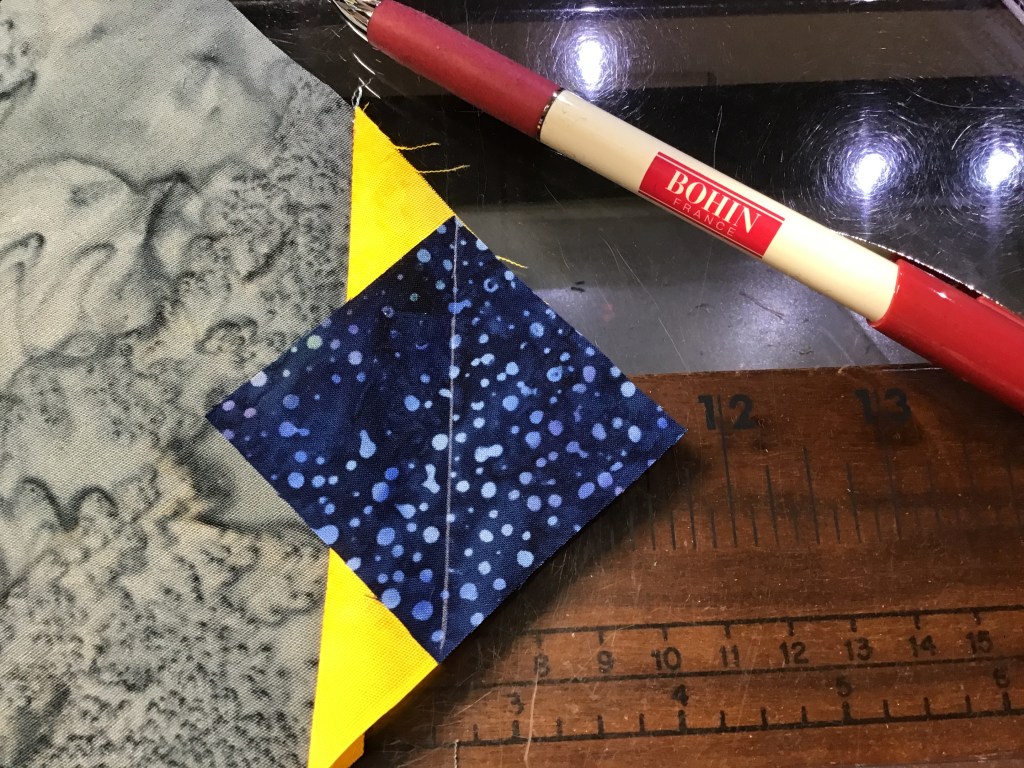
After cutting all of your fat quarters into rectangles, go ahead and cut your accent fabric into rectangles, too.

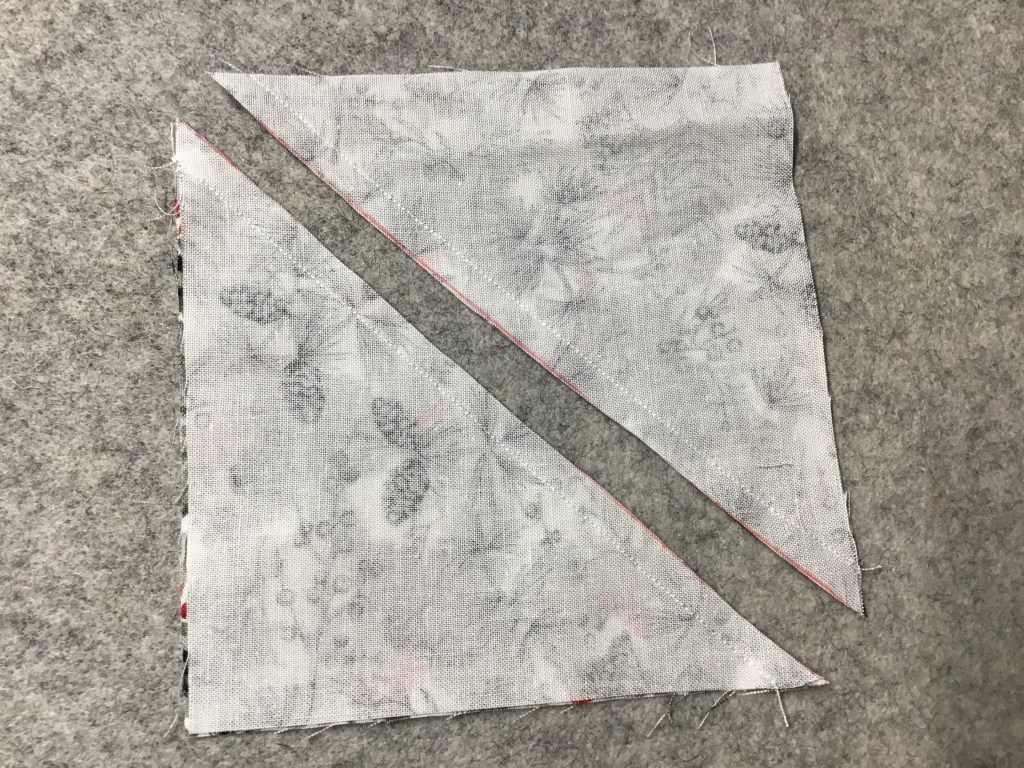
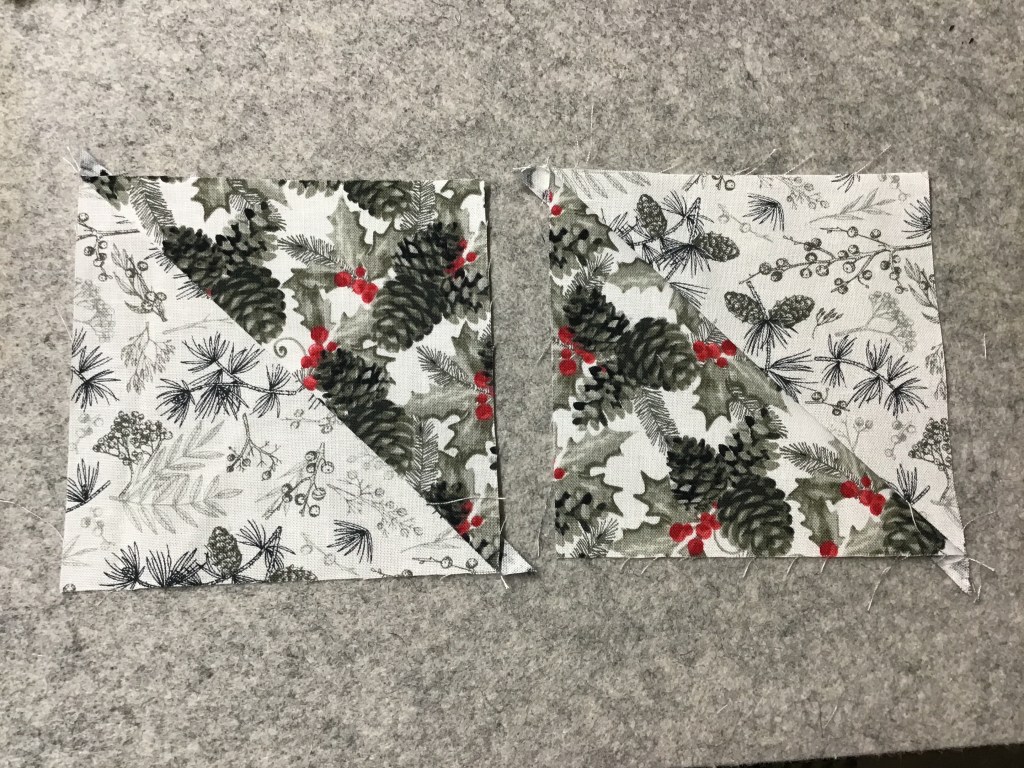
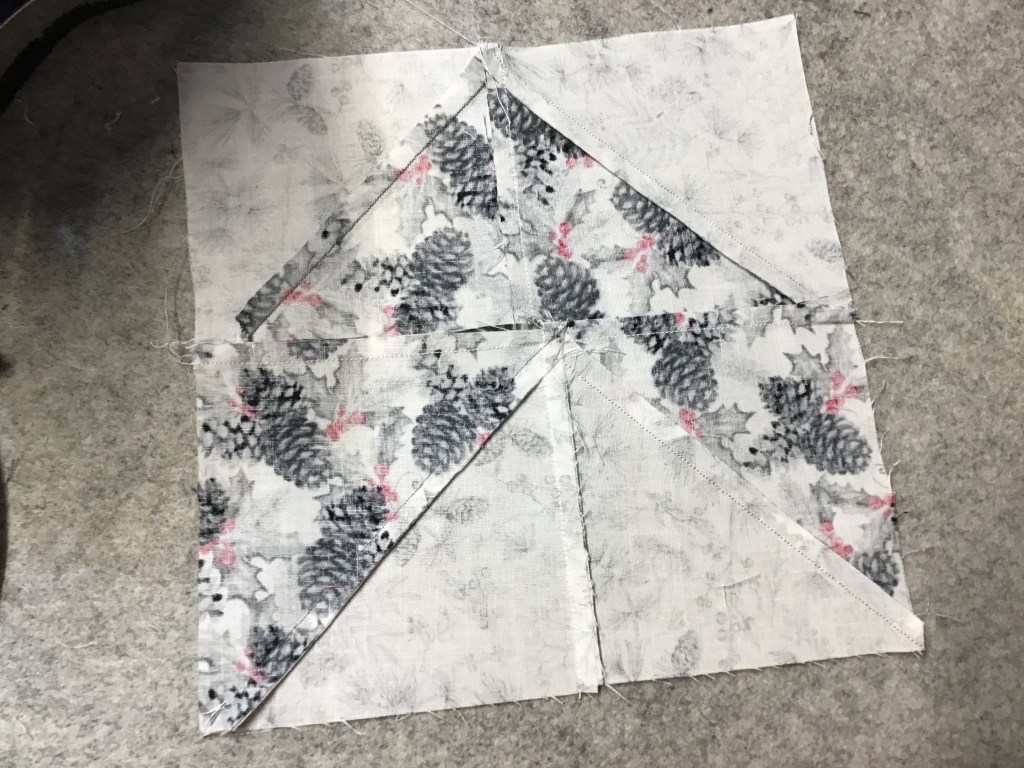
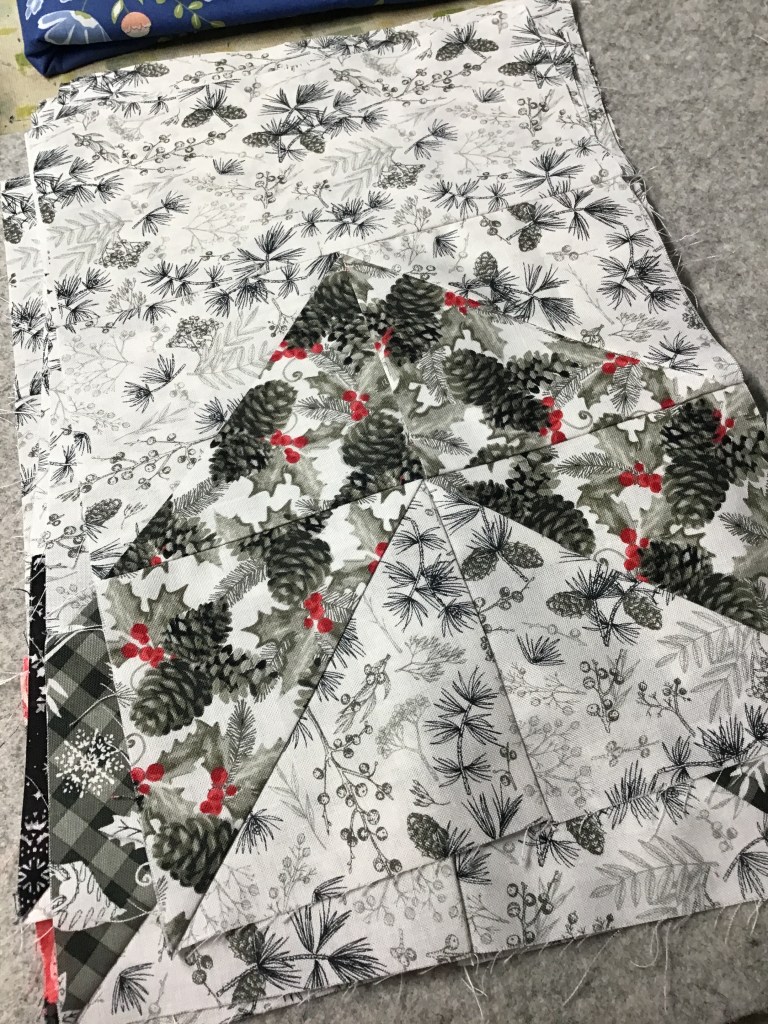
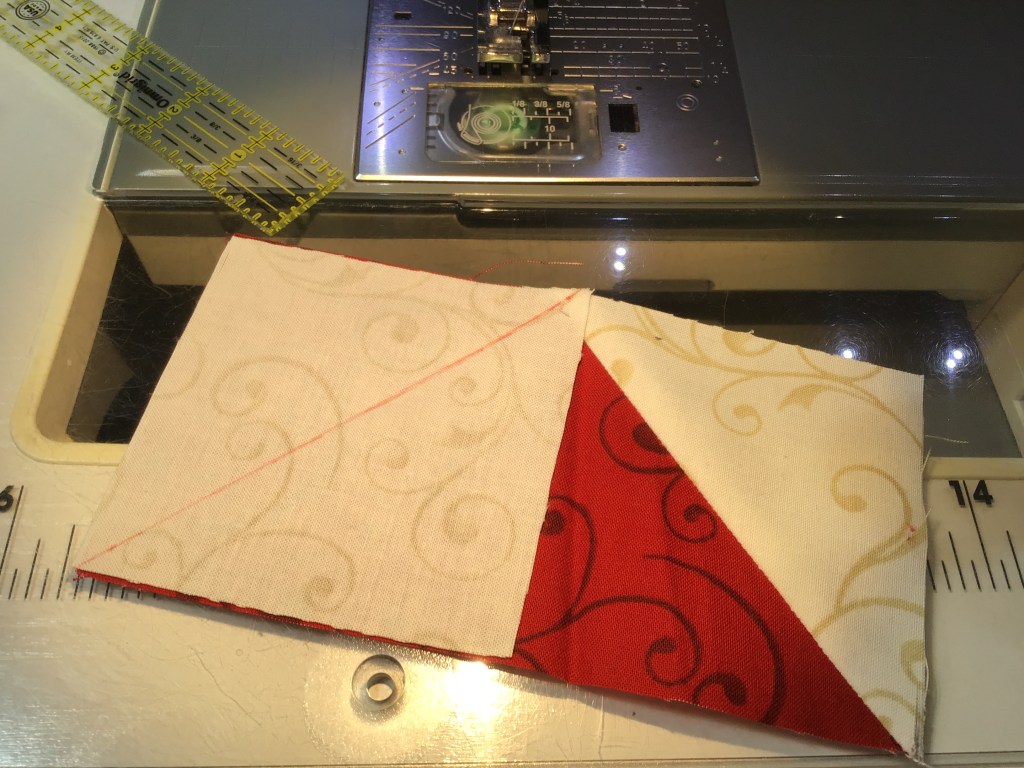
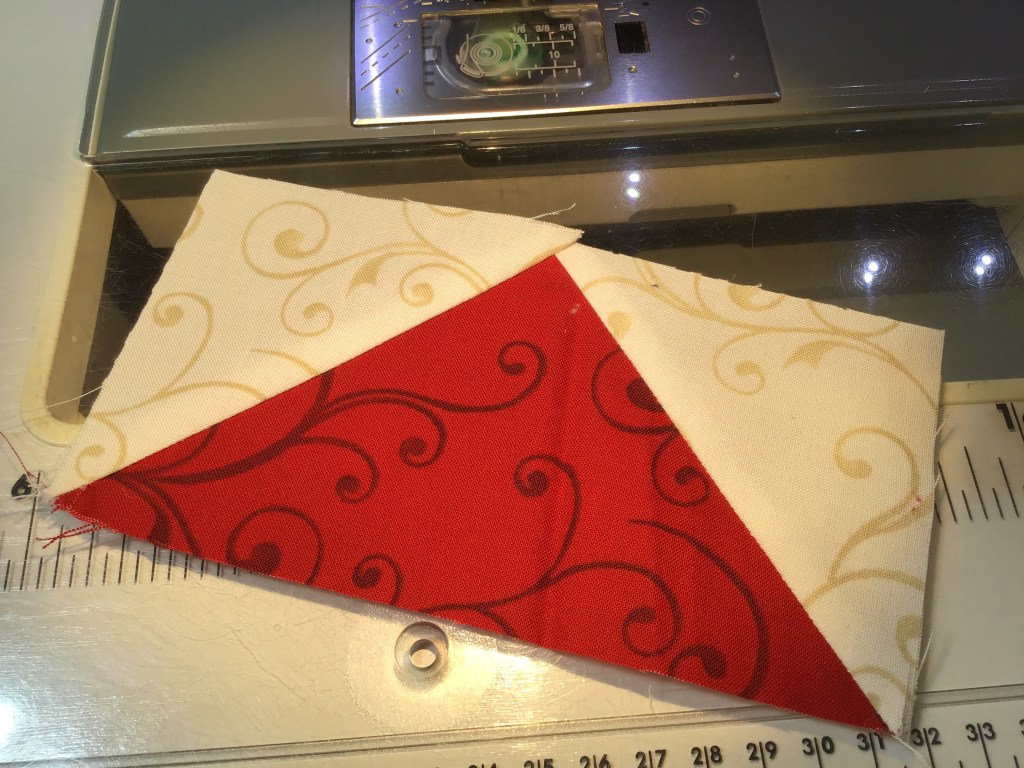
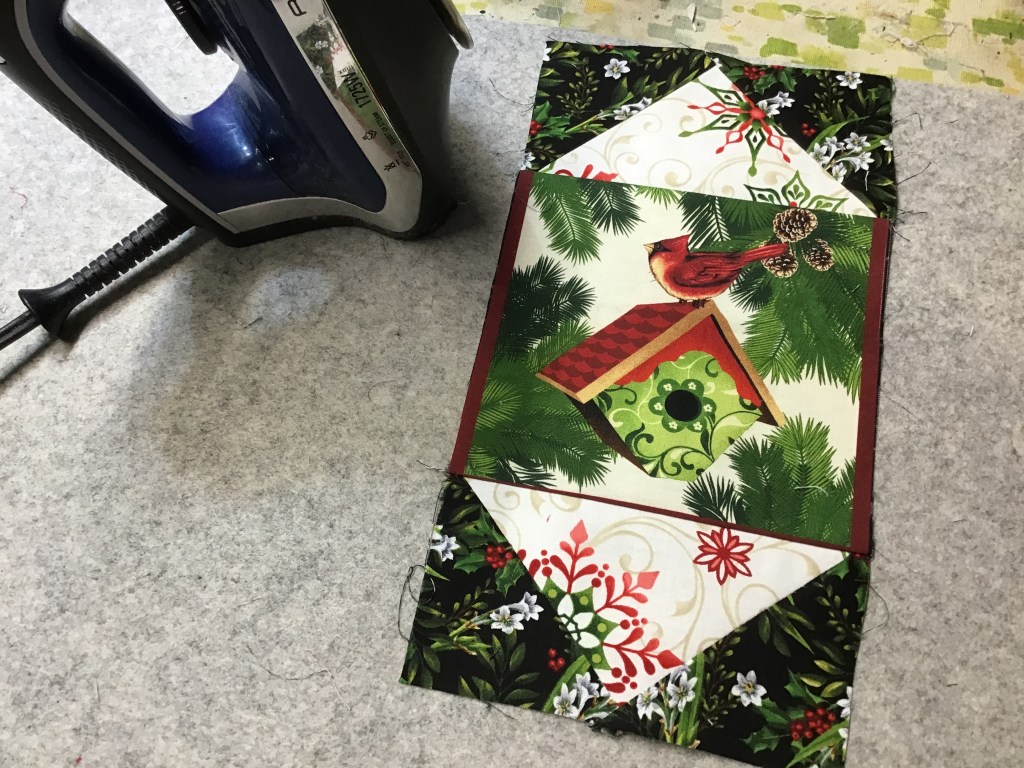
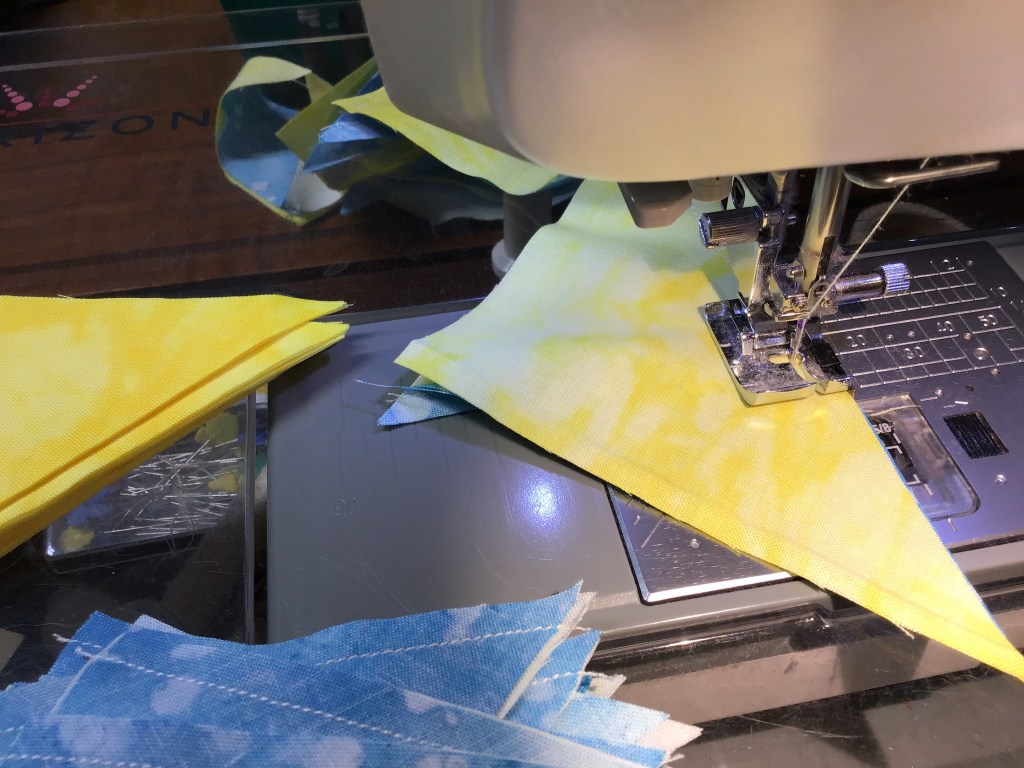
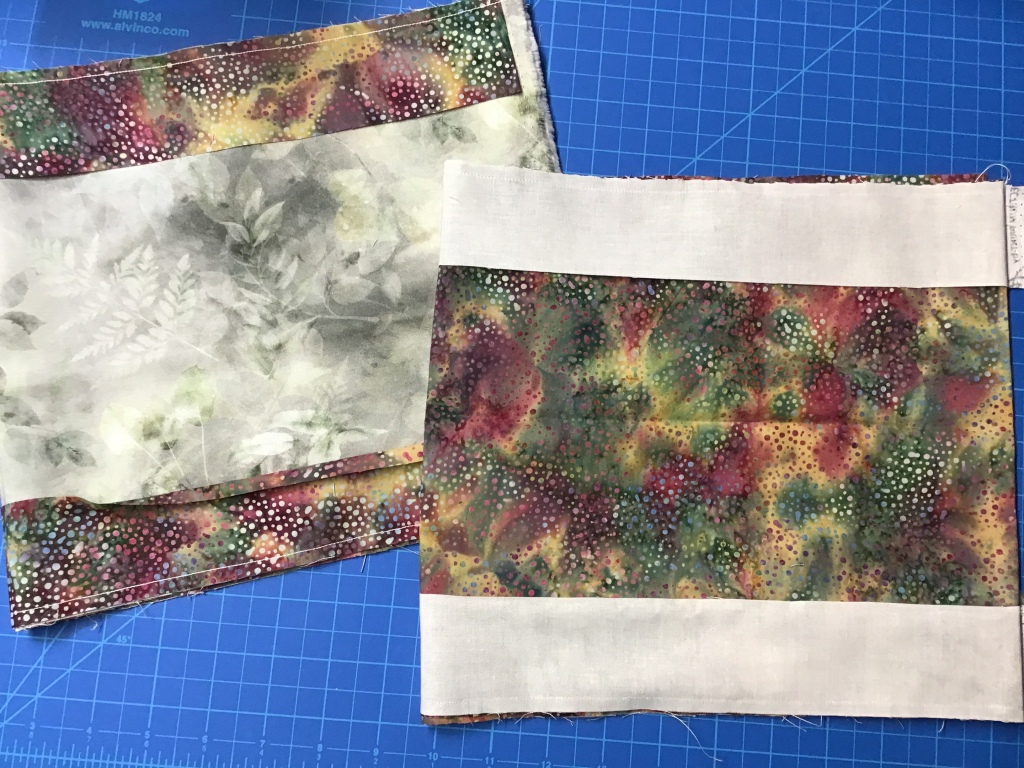
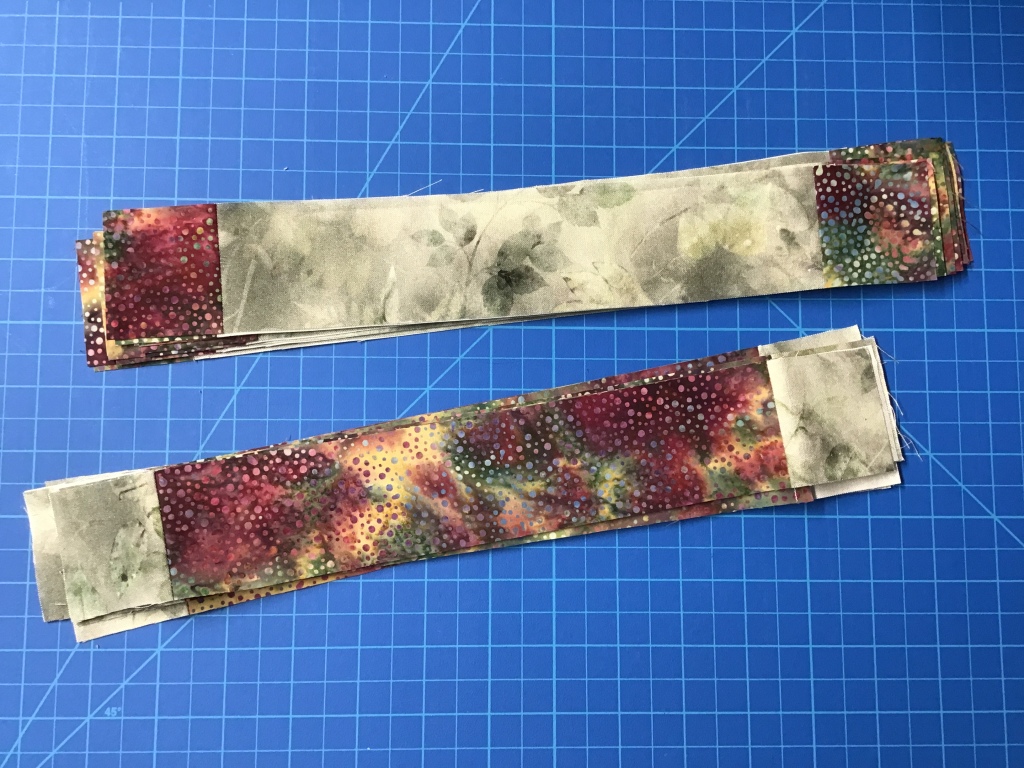
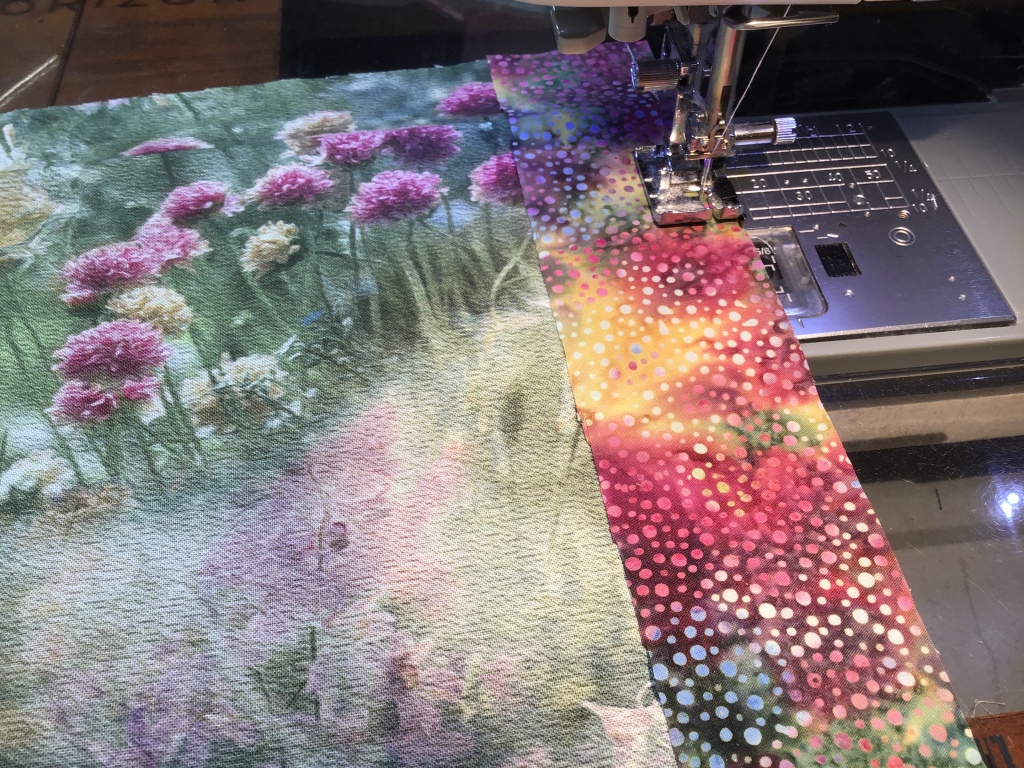
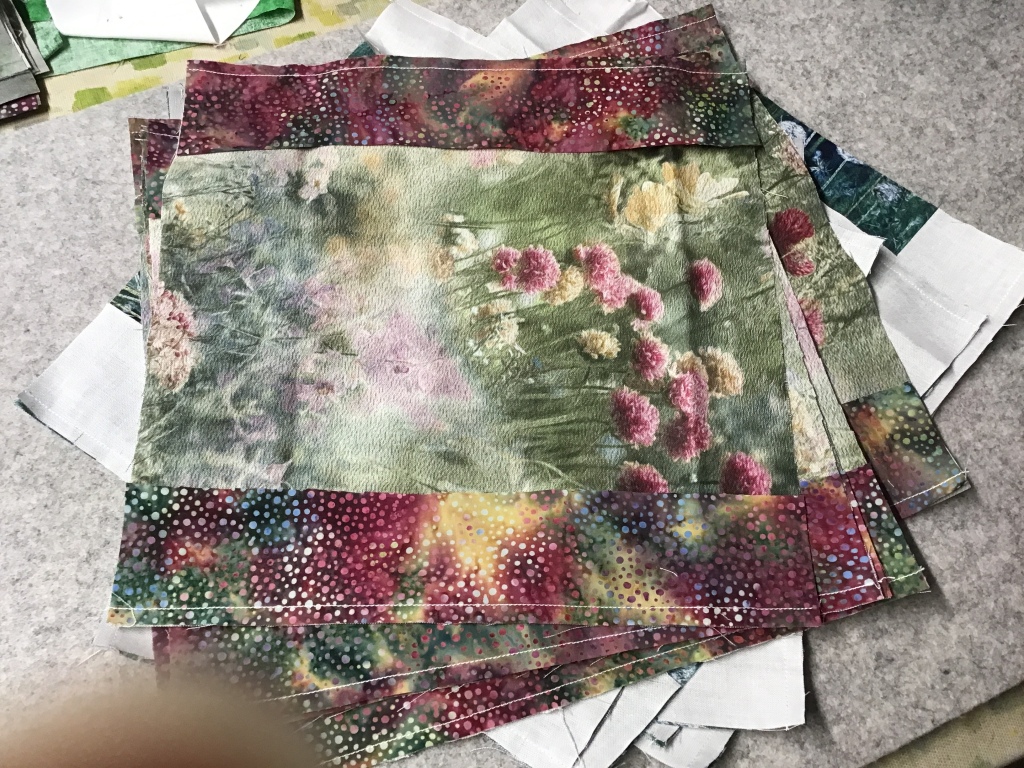
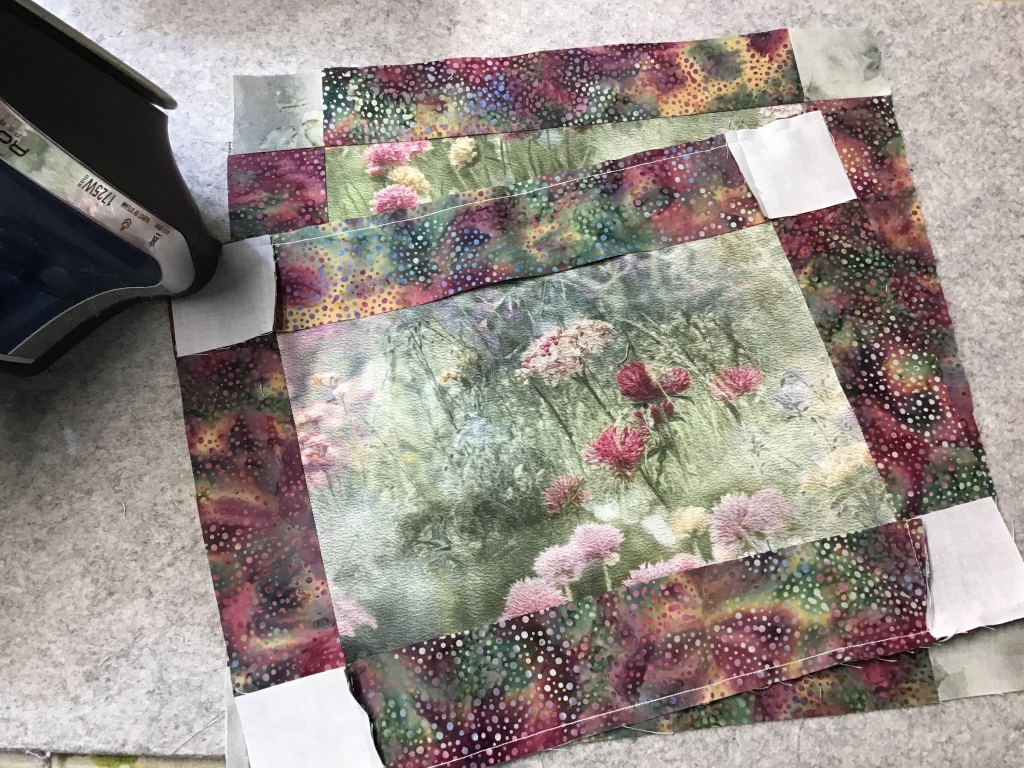
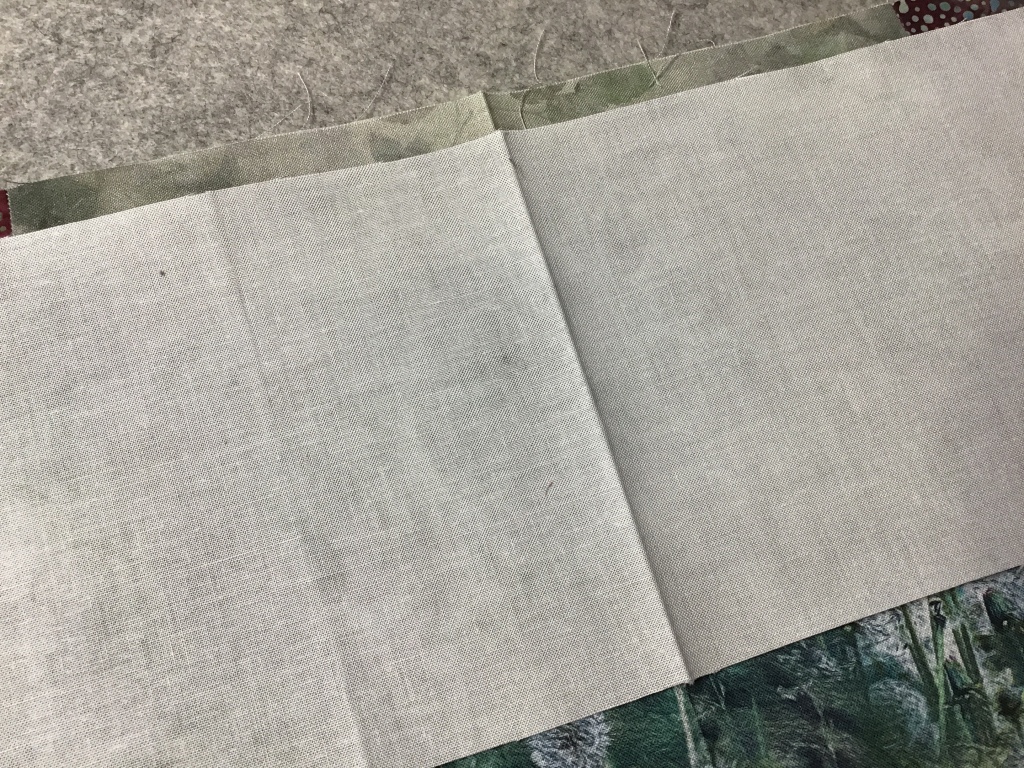
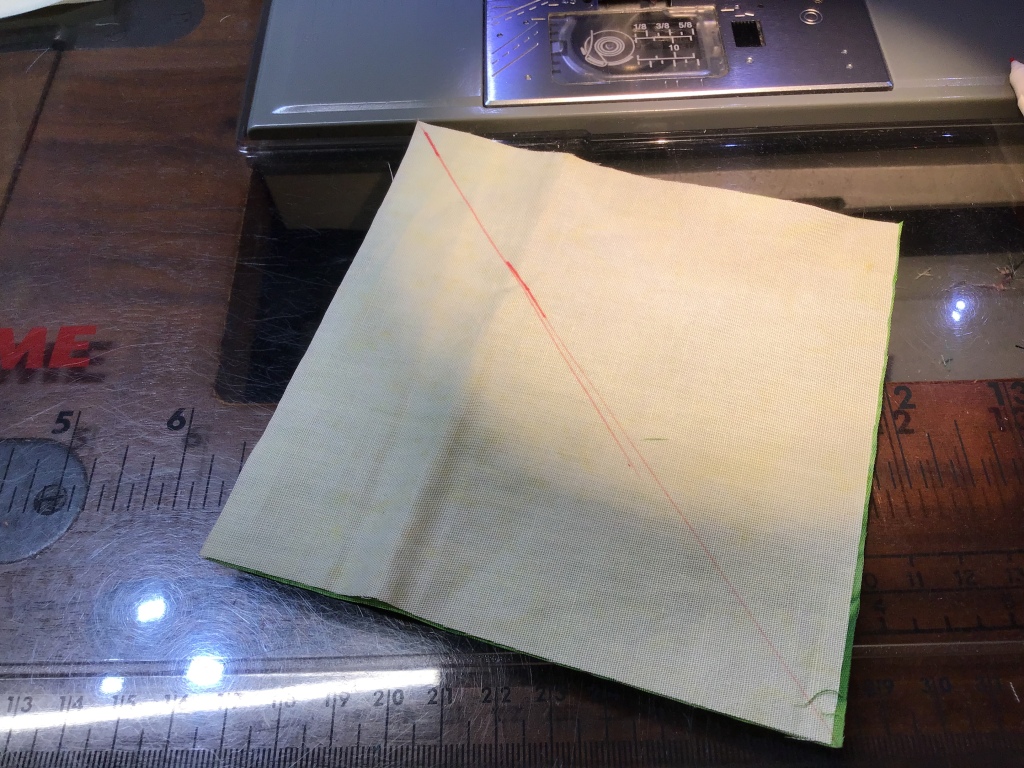
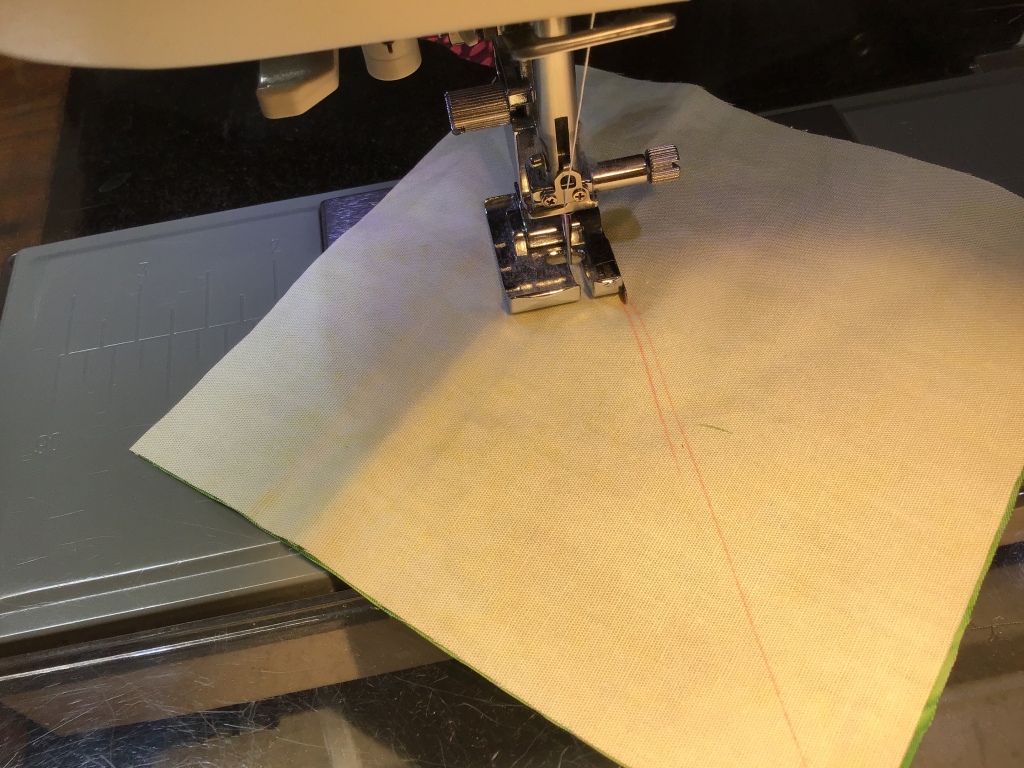
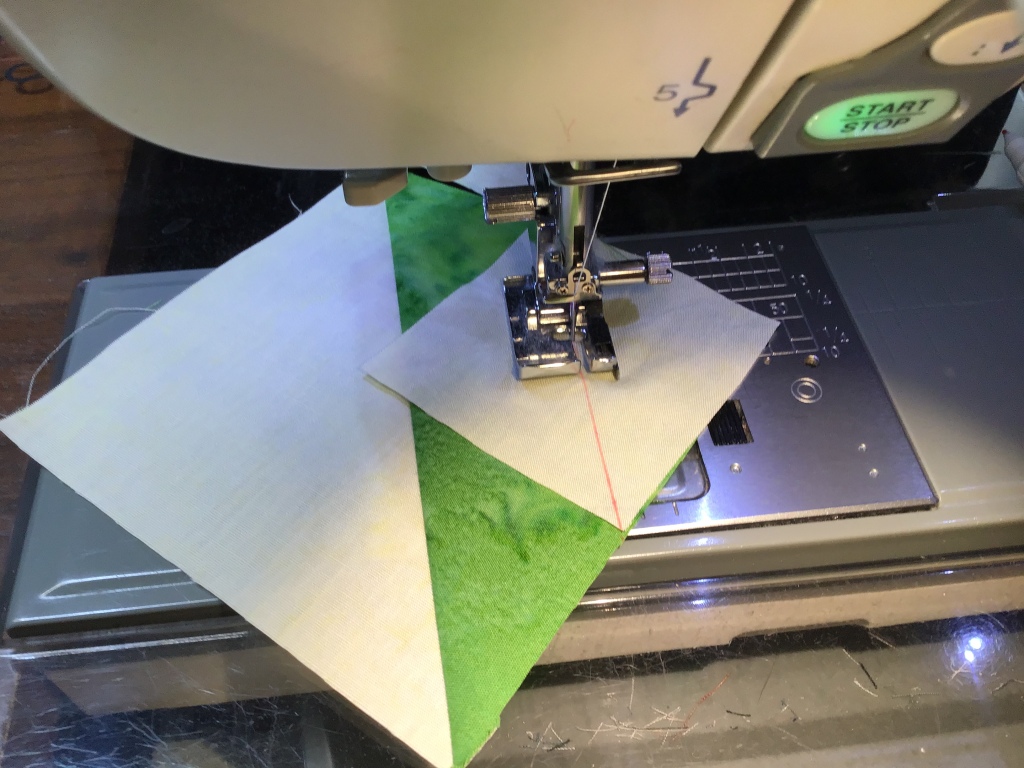
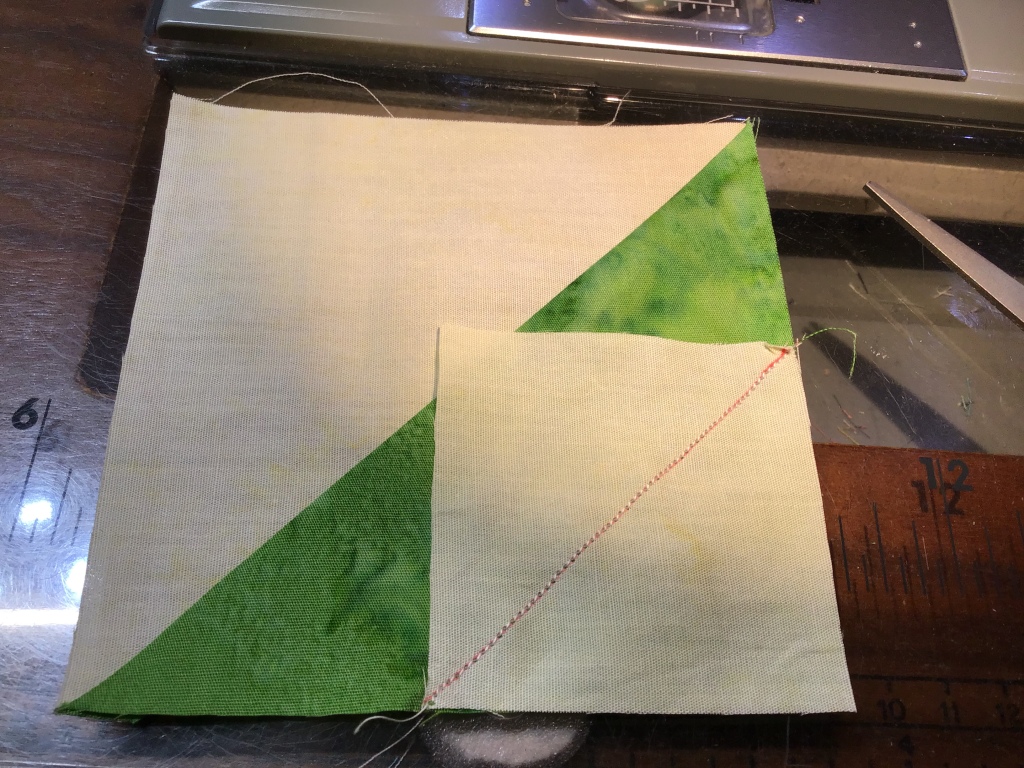
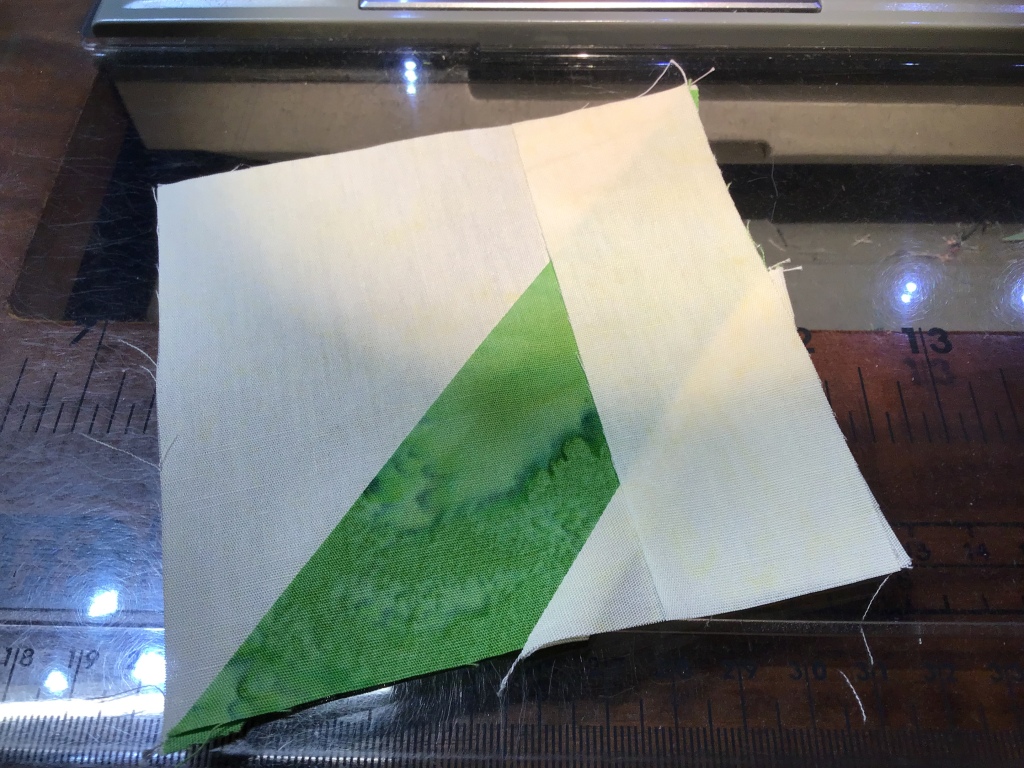
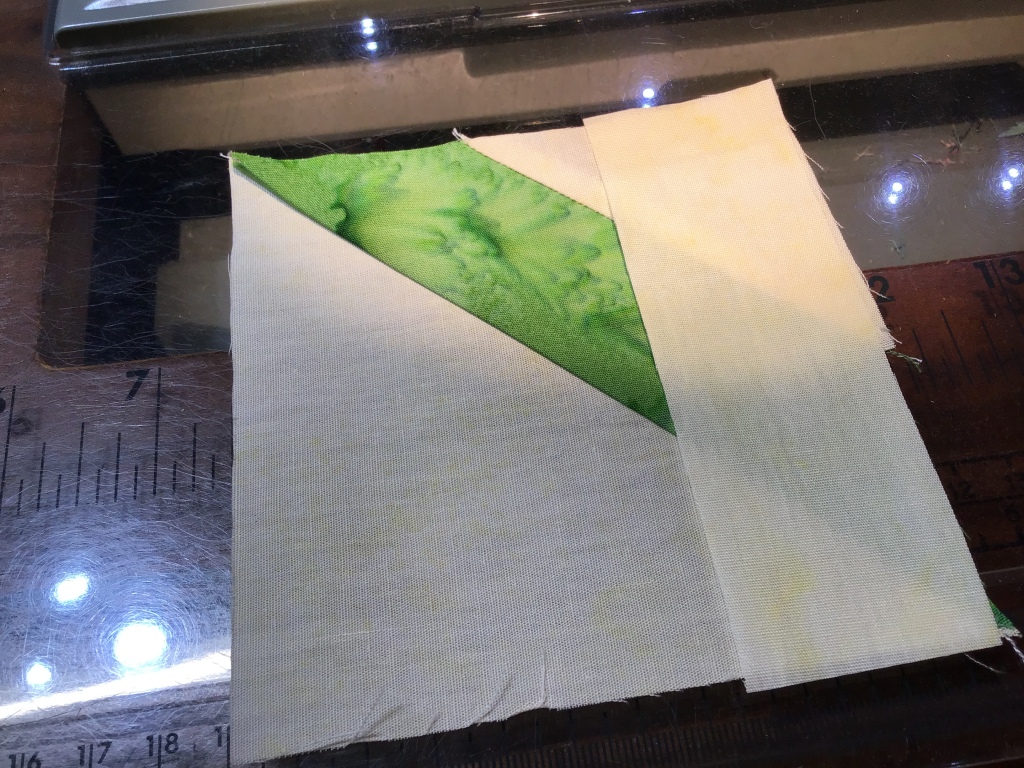
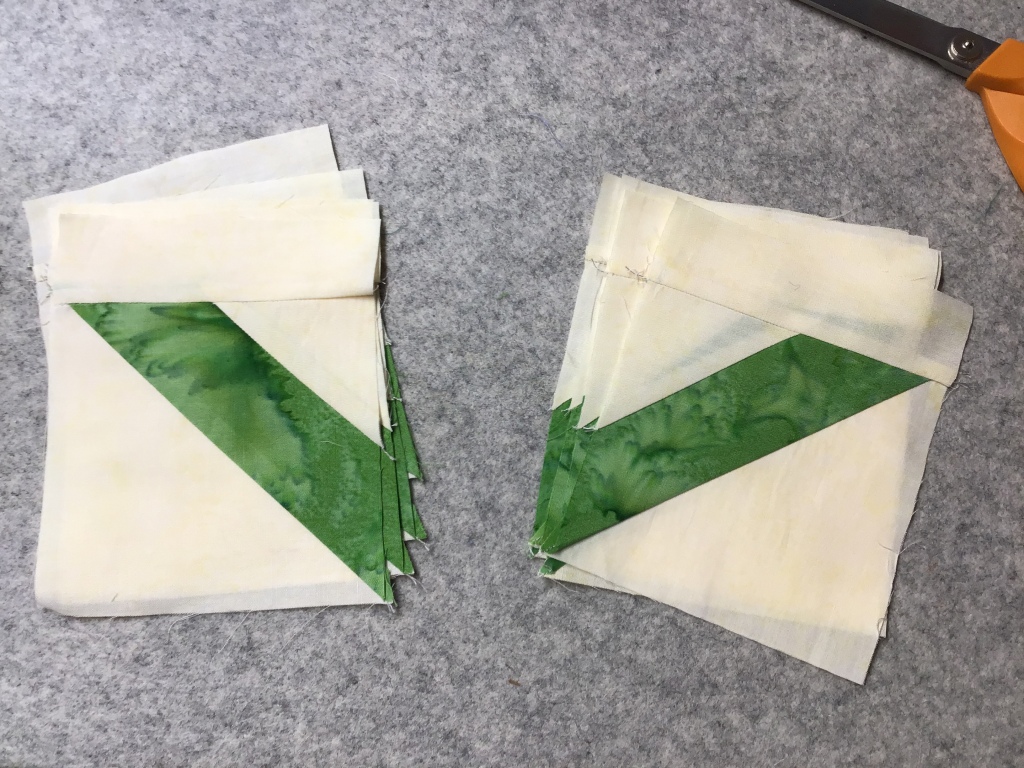
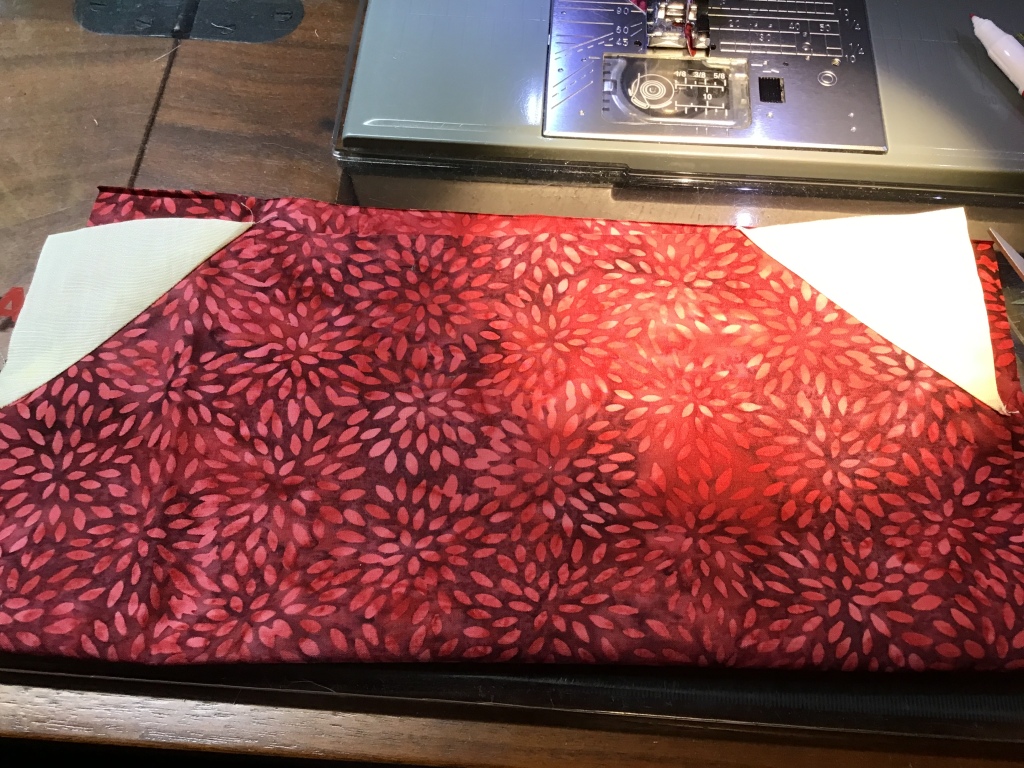
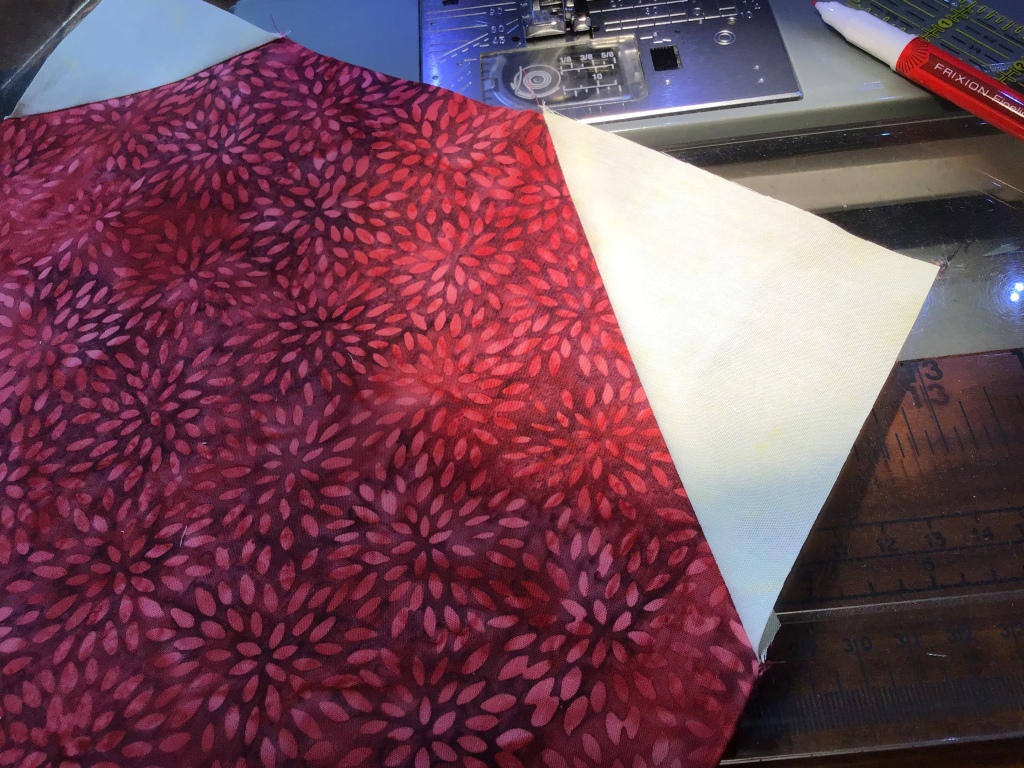
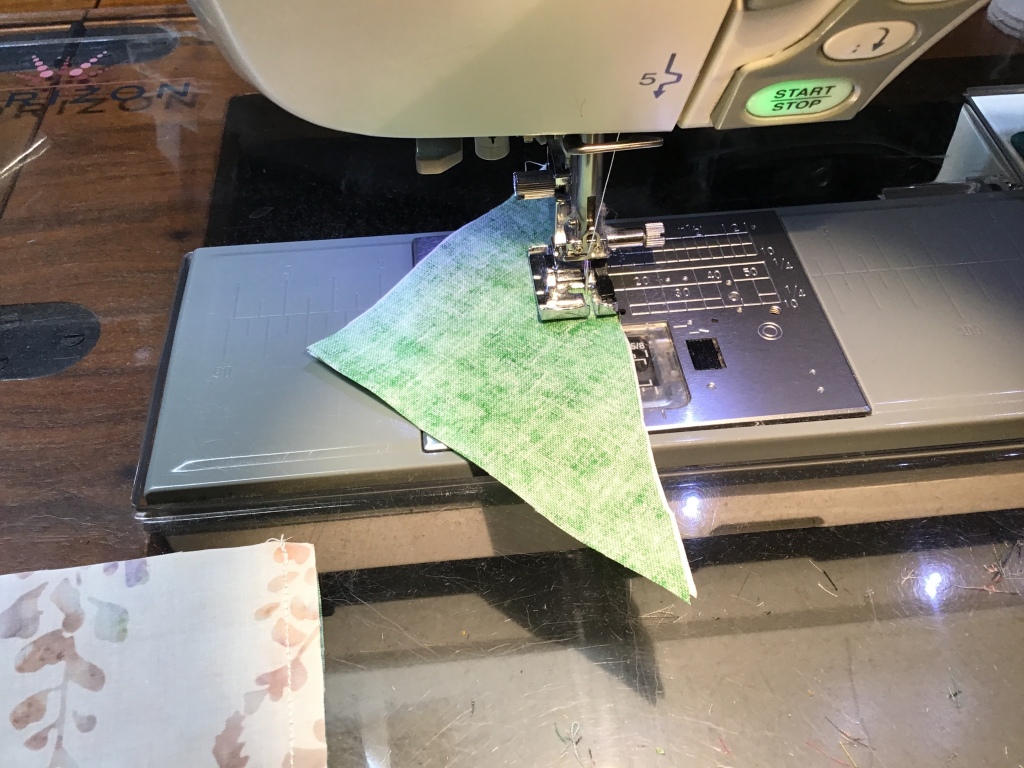
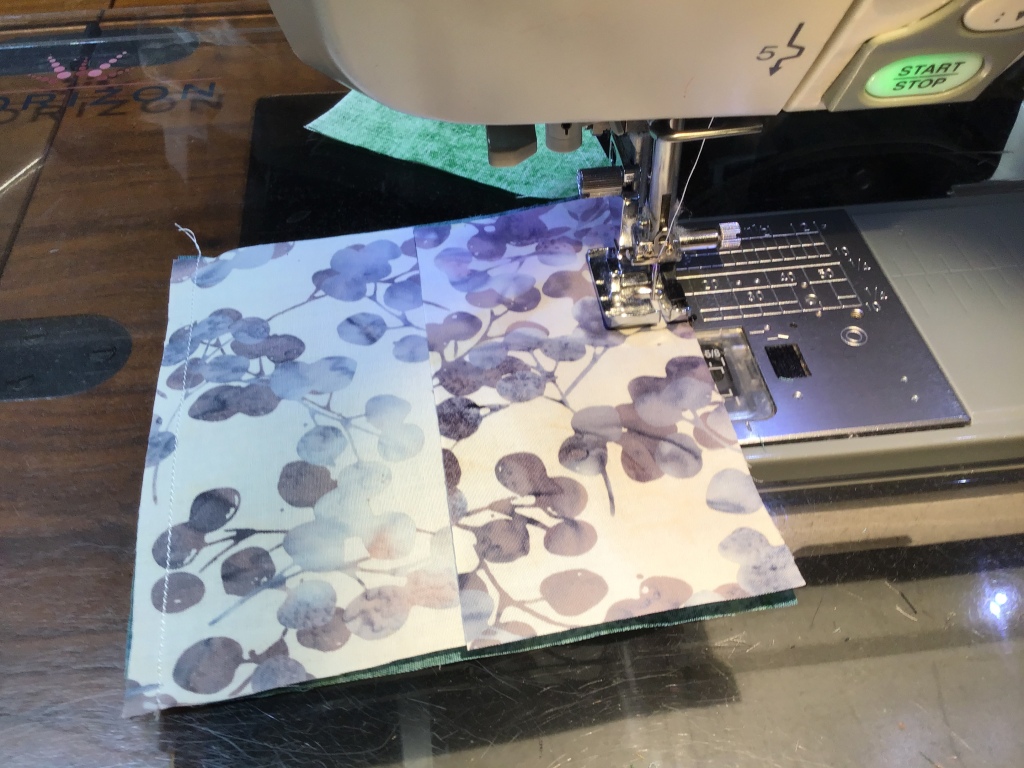
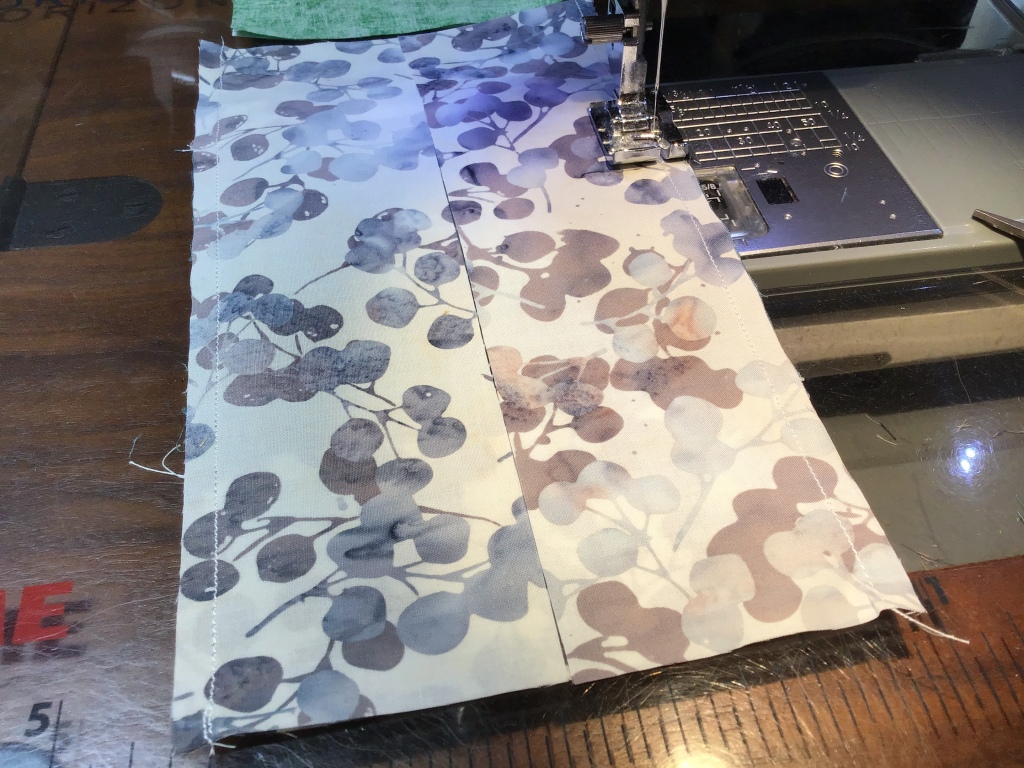
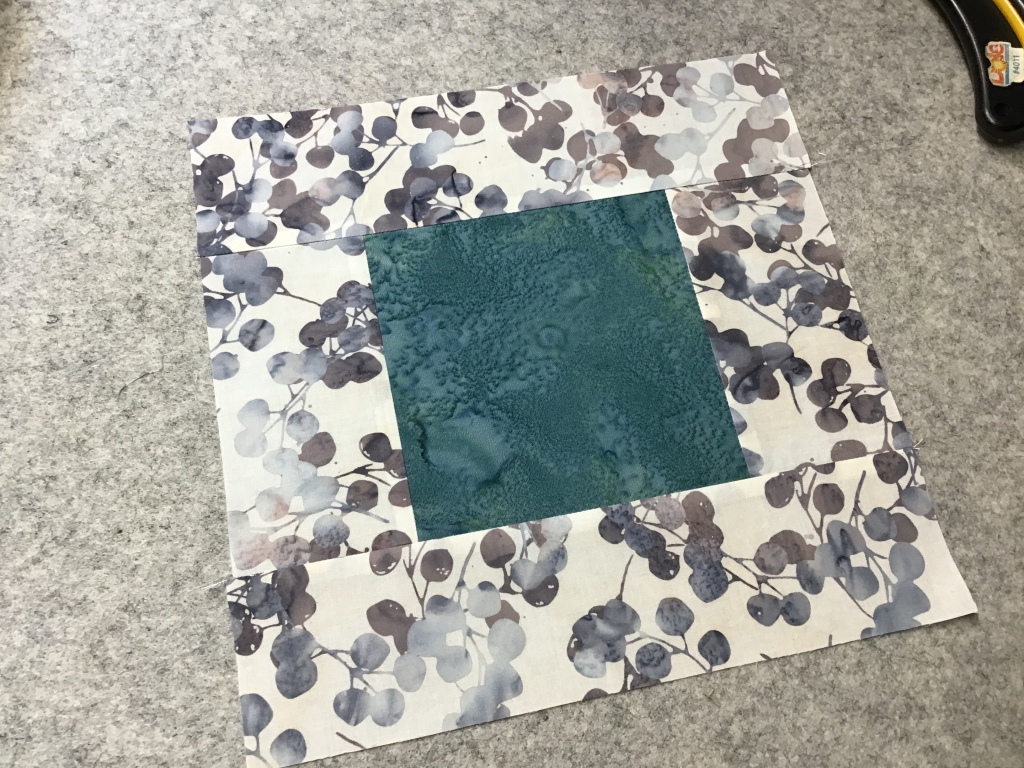
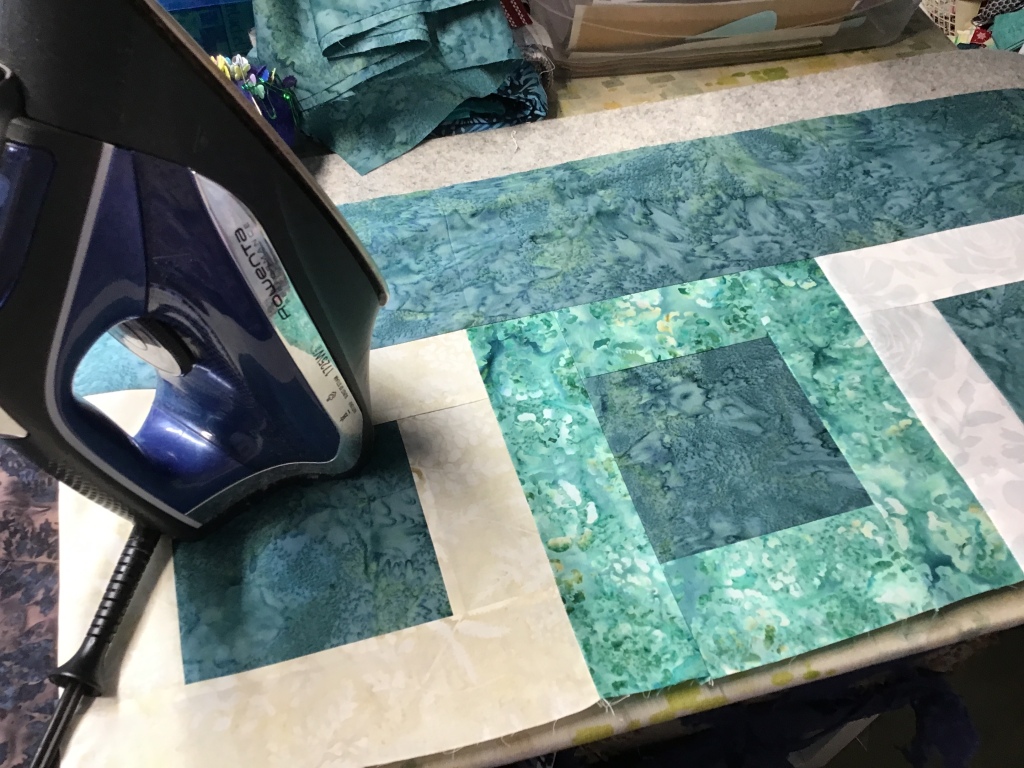
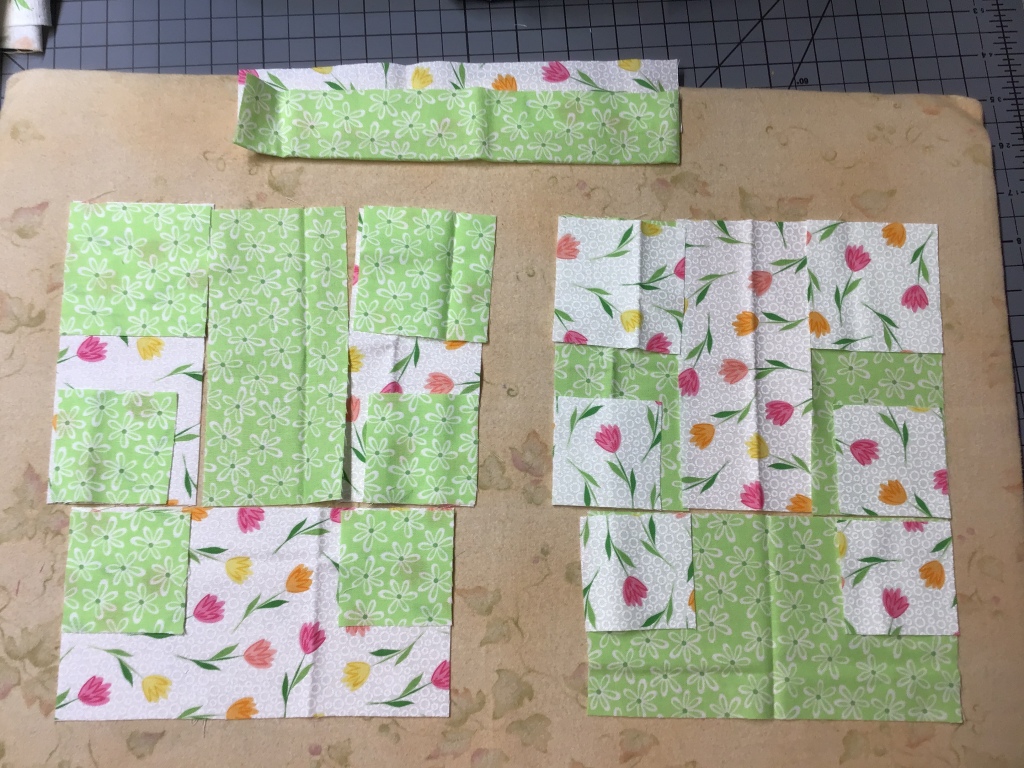
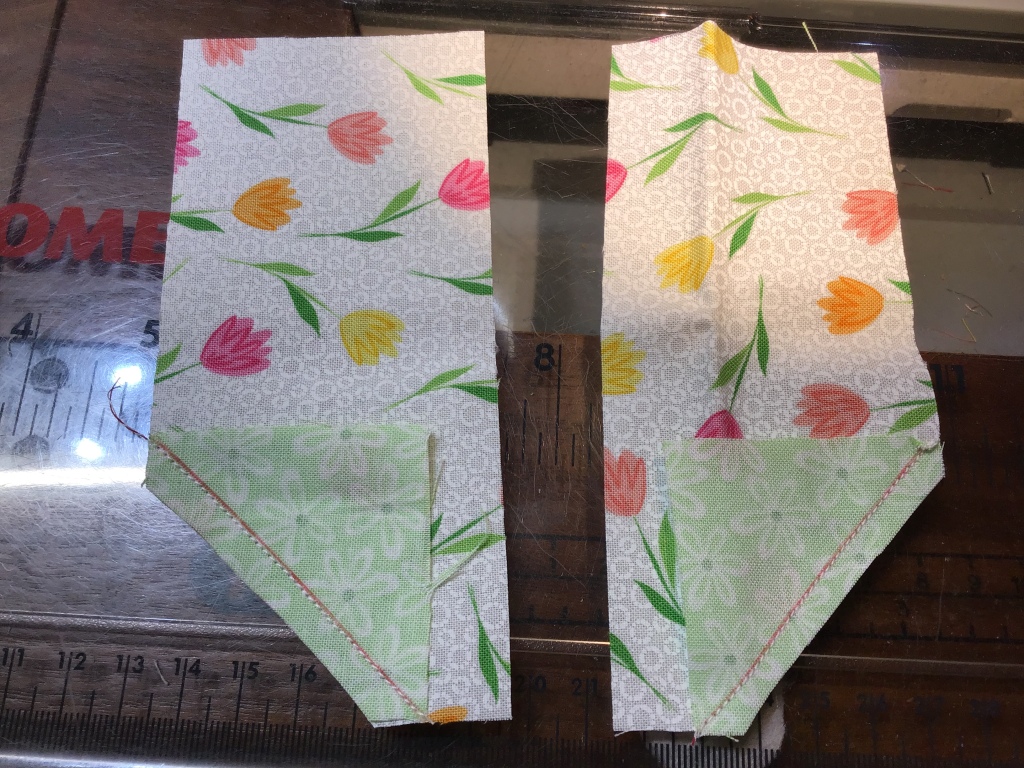
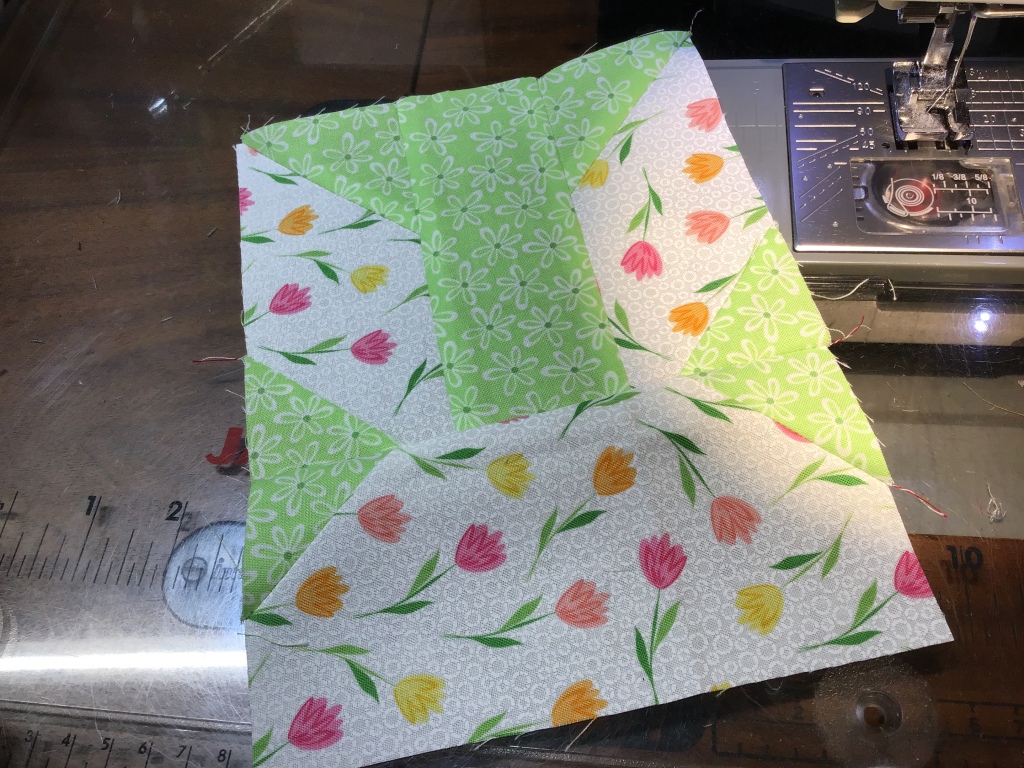
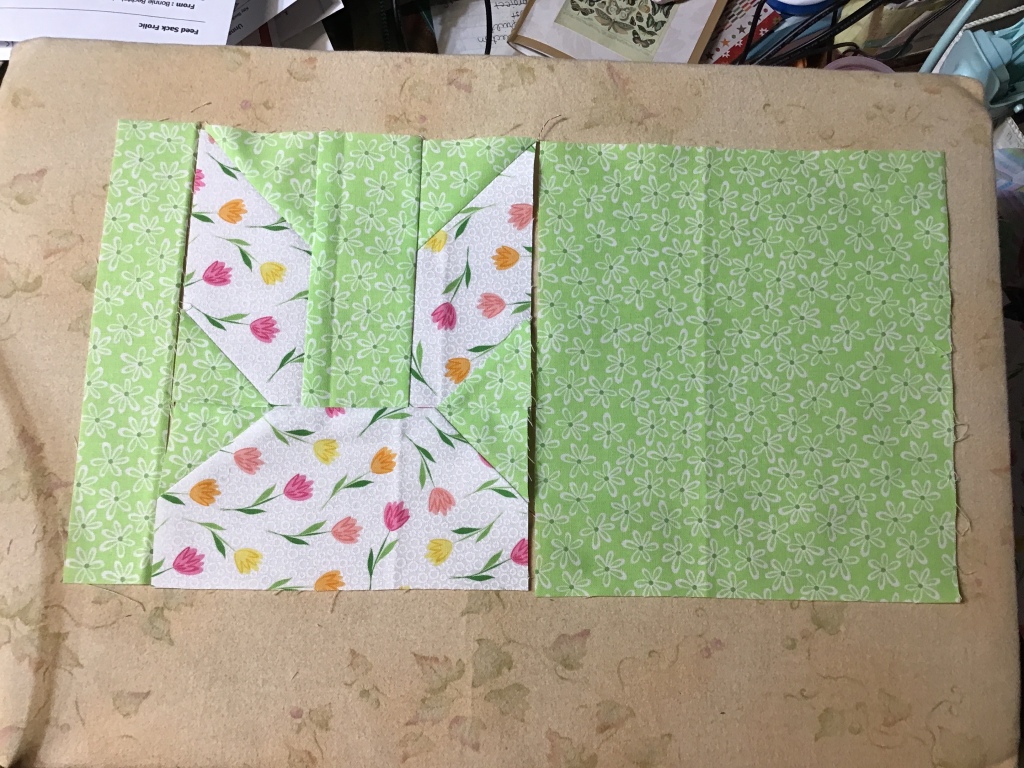
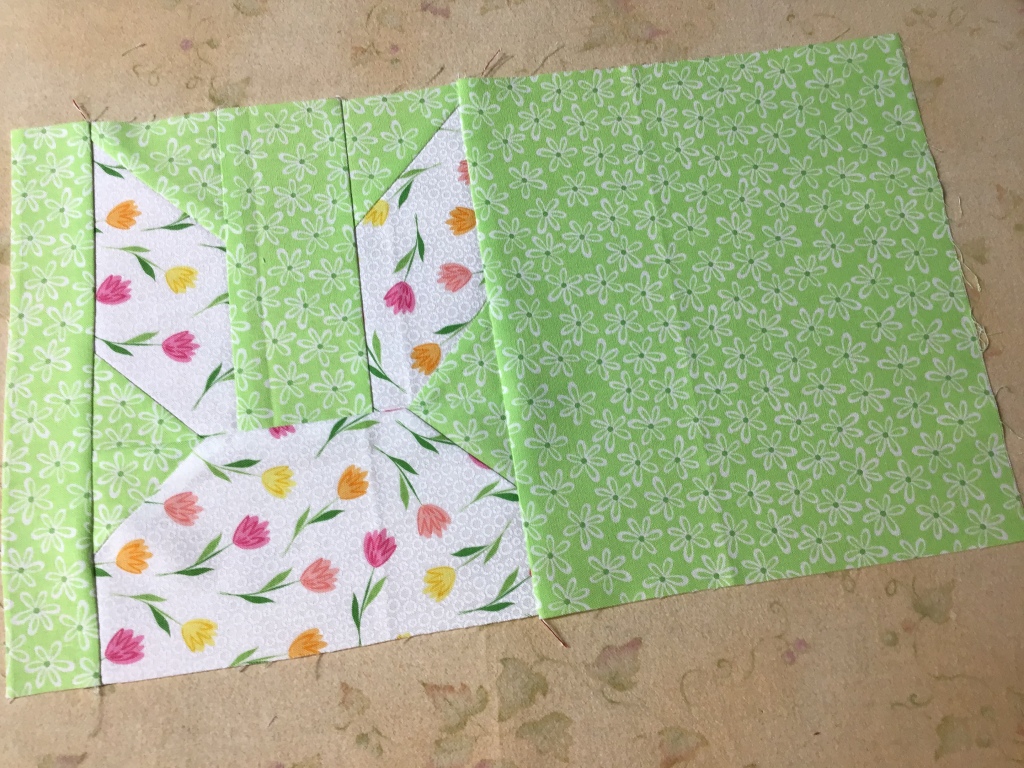
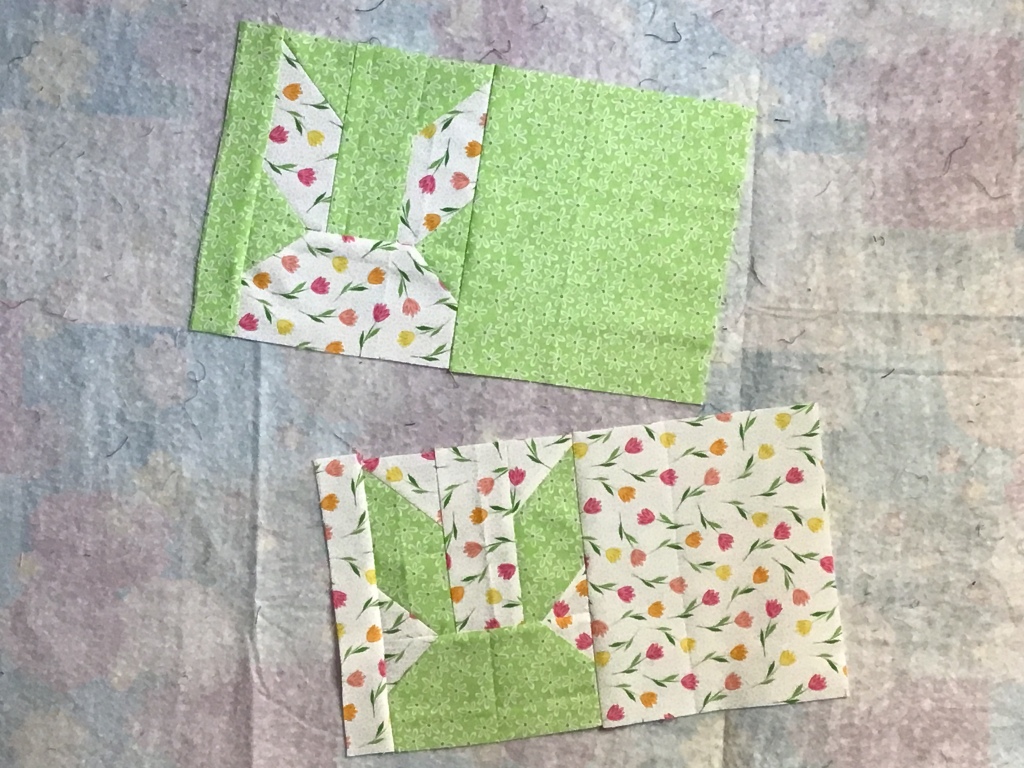
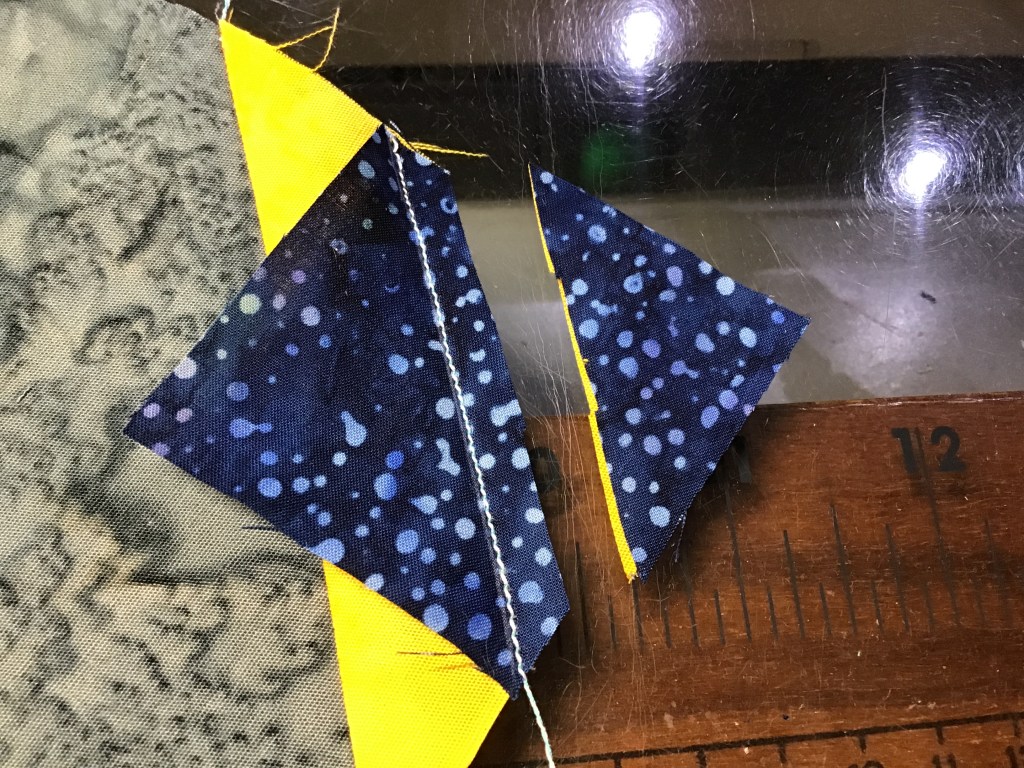
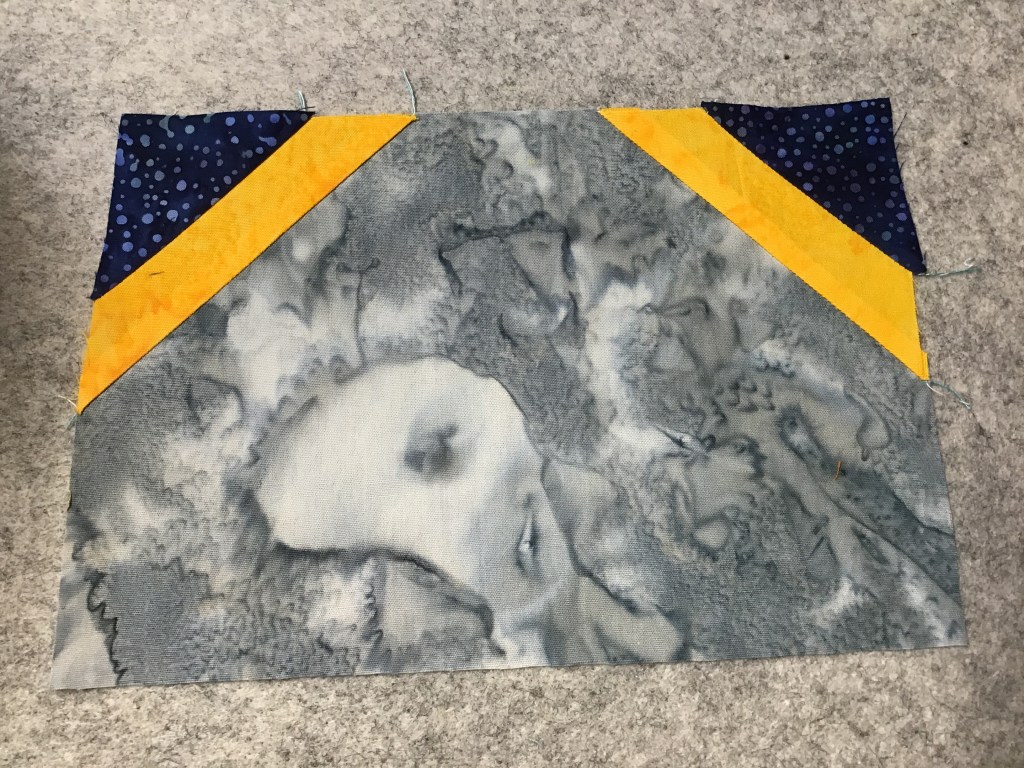
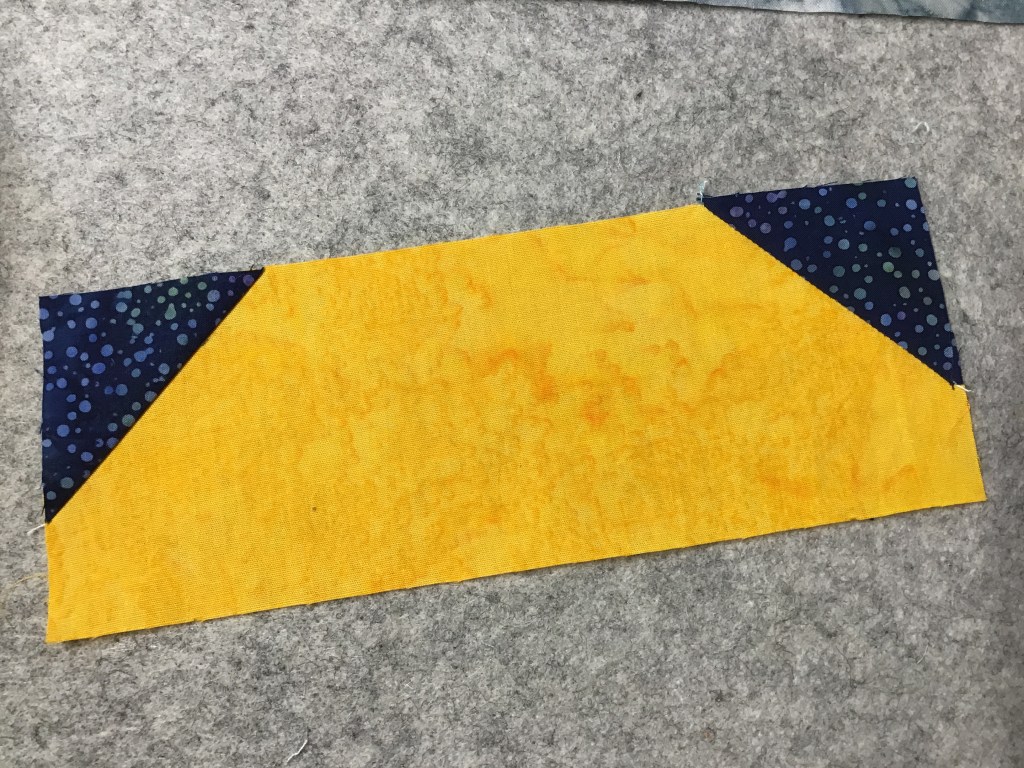
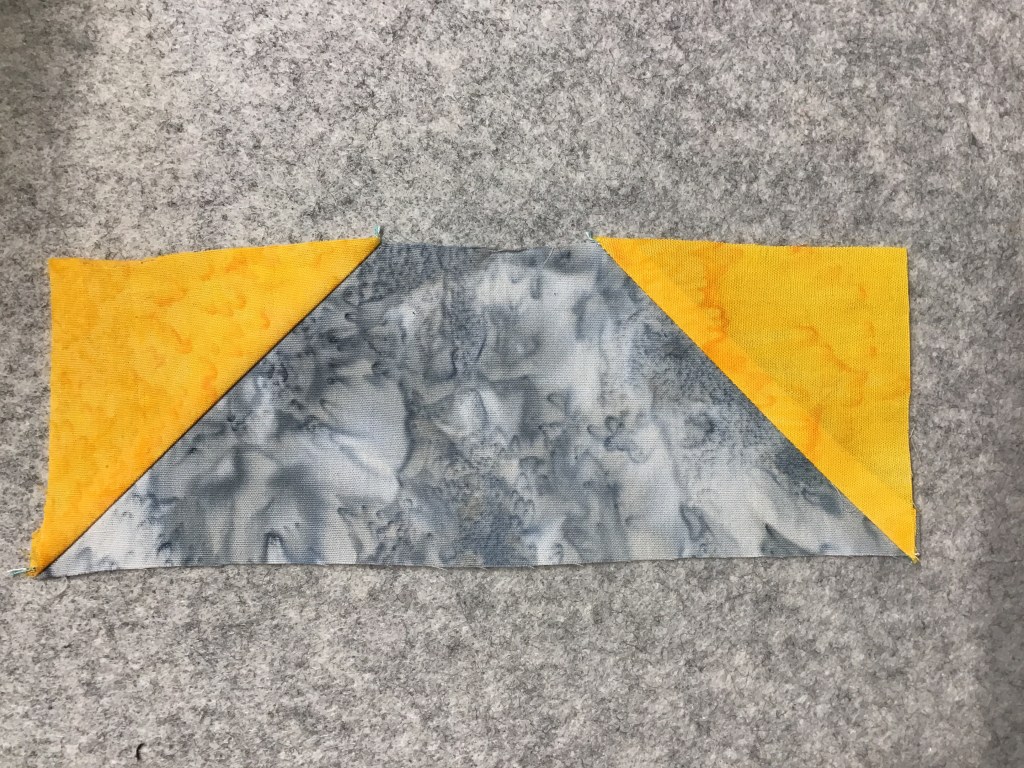
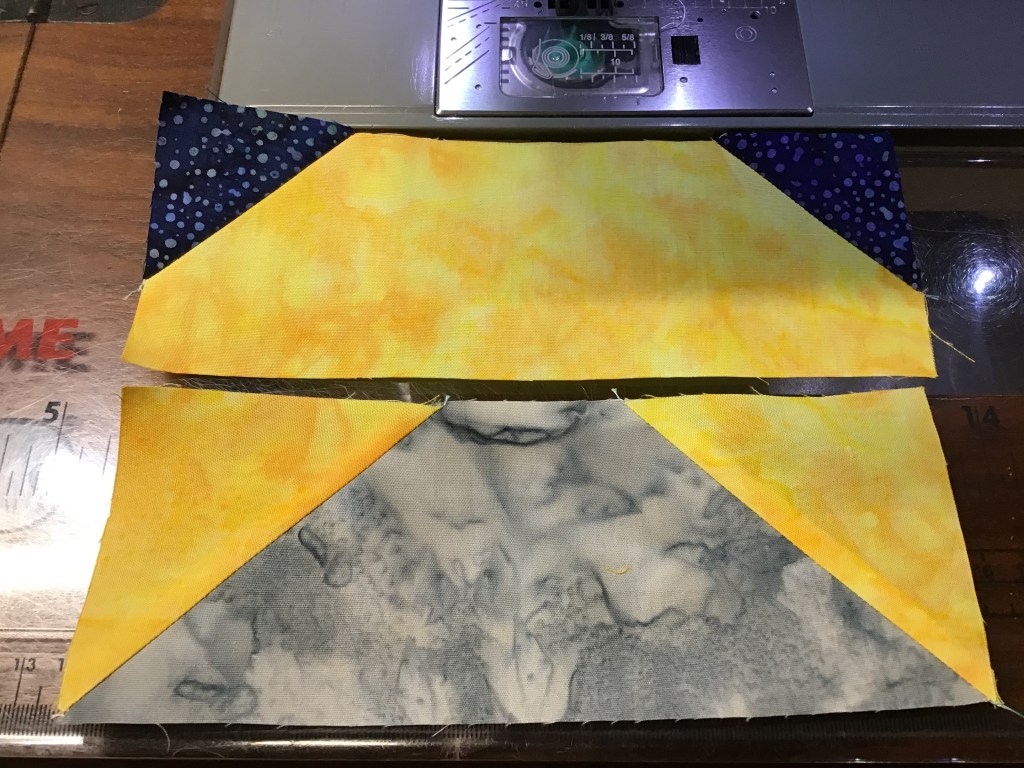
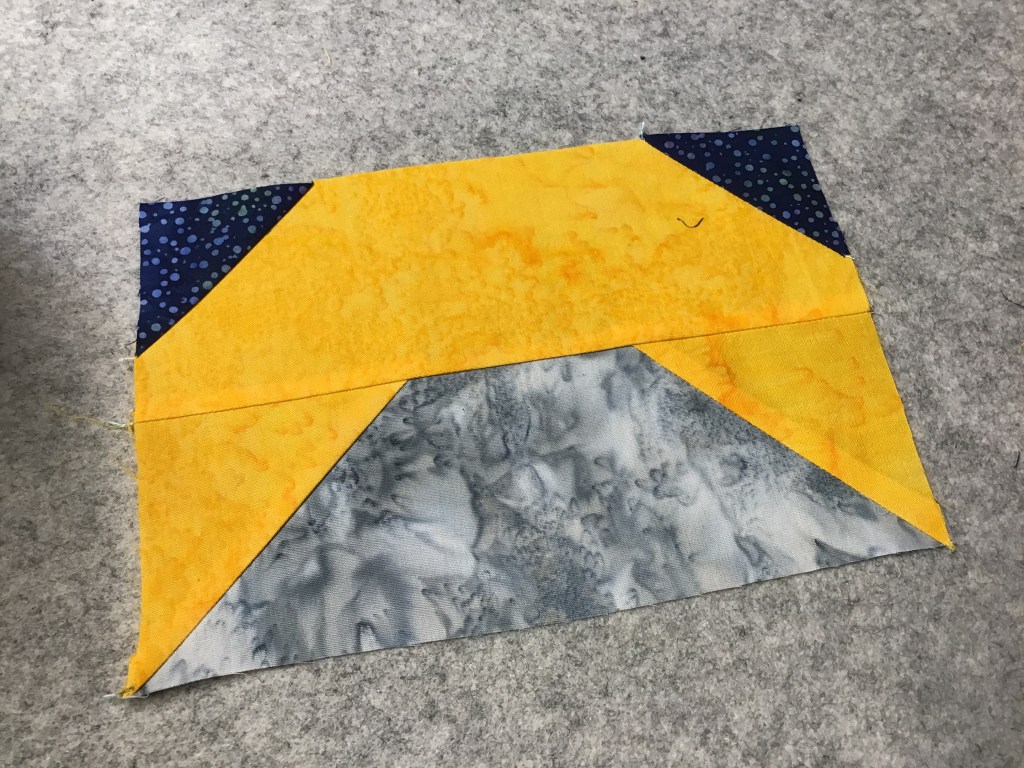
Now it’s time to sew the accent strips between matching rectangles. There are actually 2 different rows, so make sure to keep your fabrics straight.

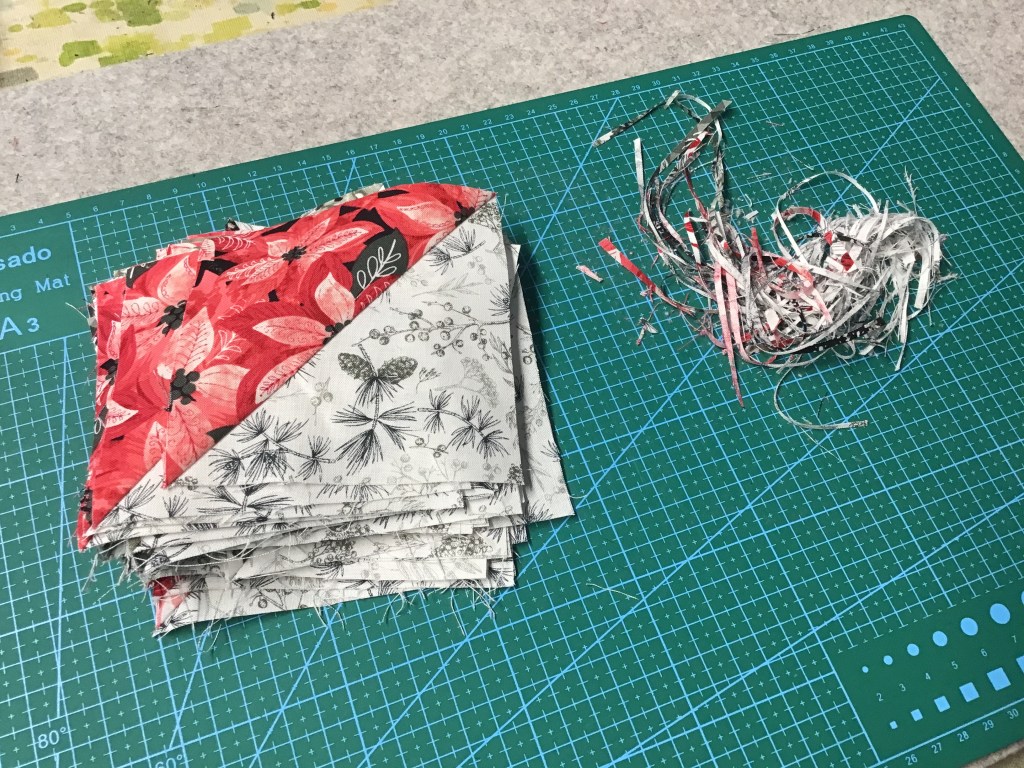
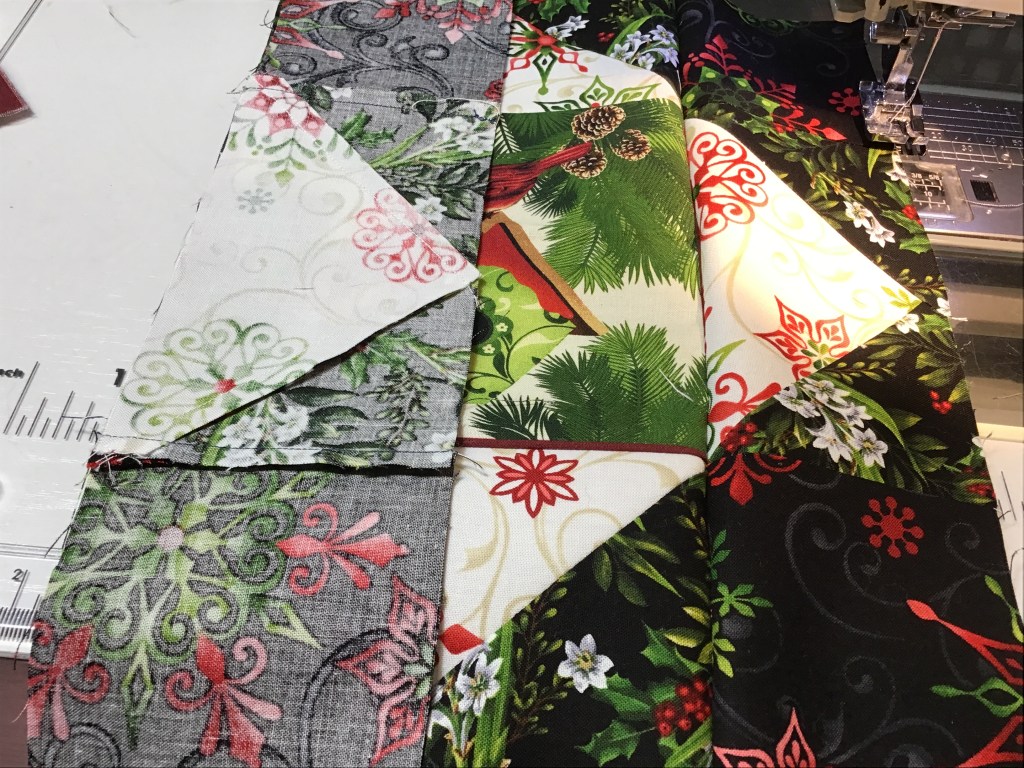
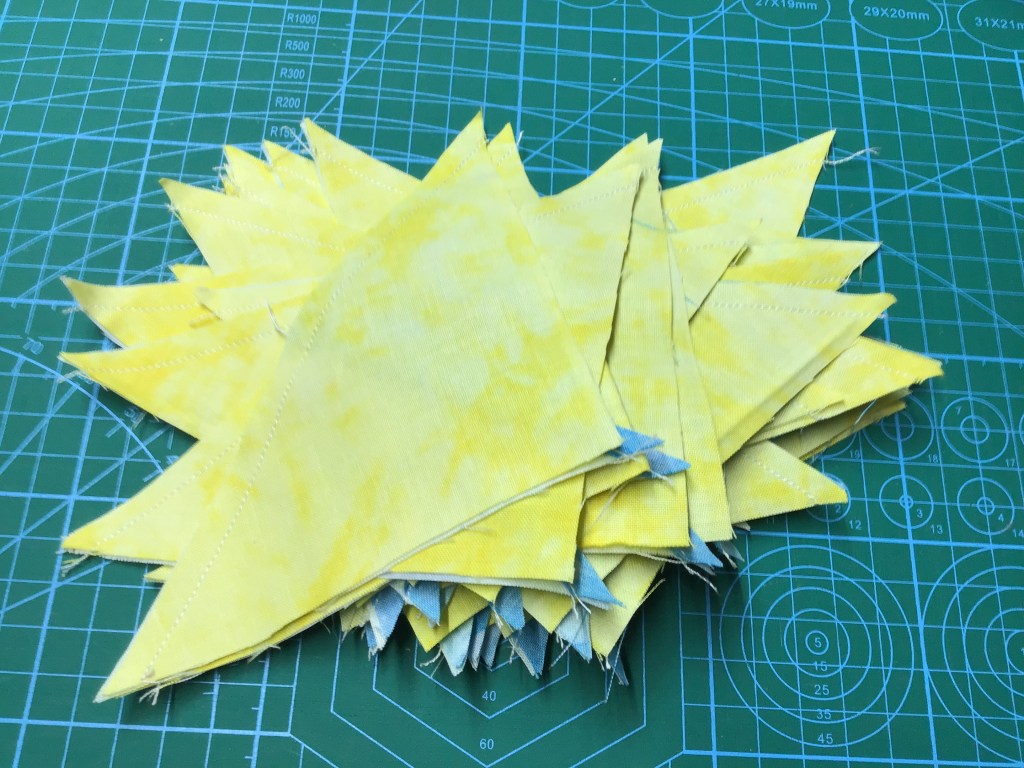
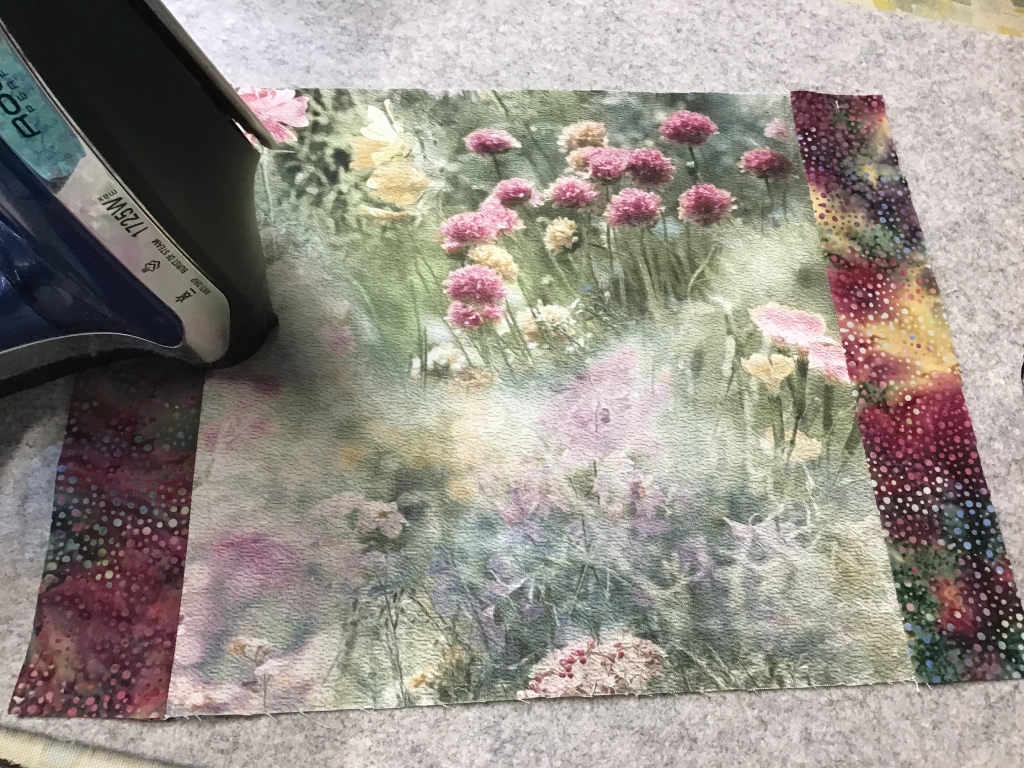
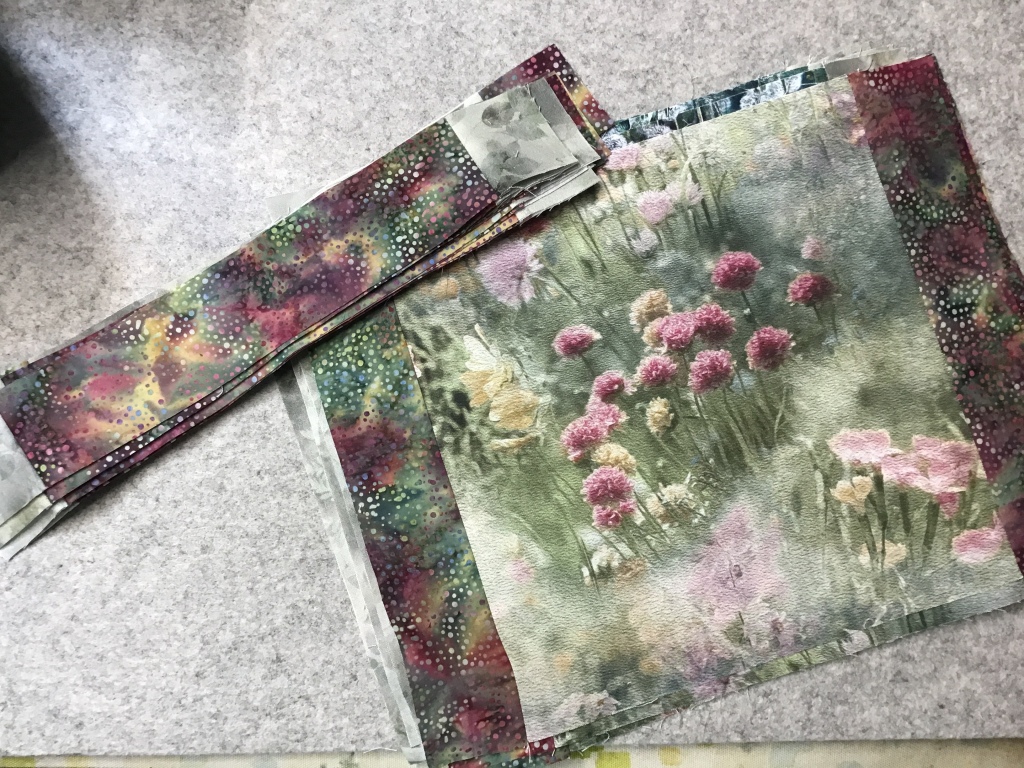
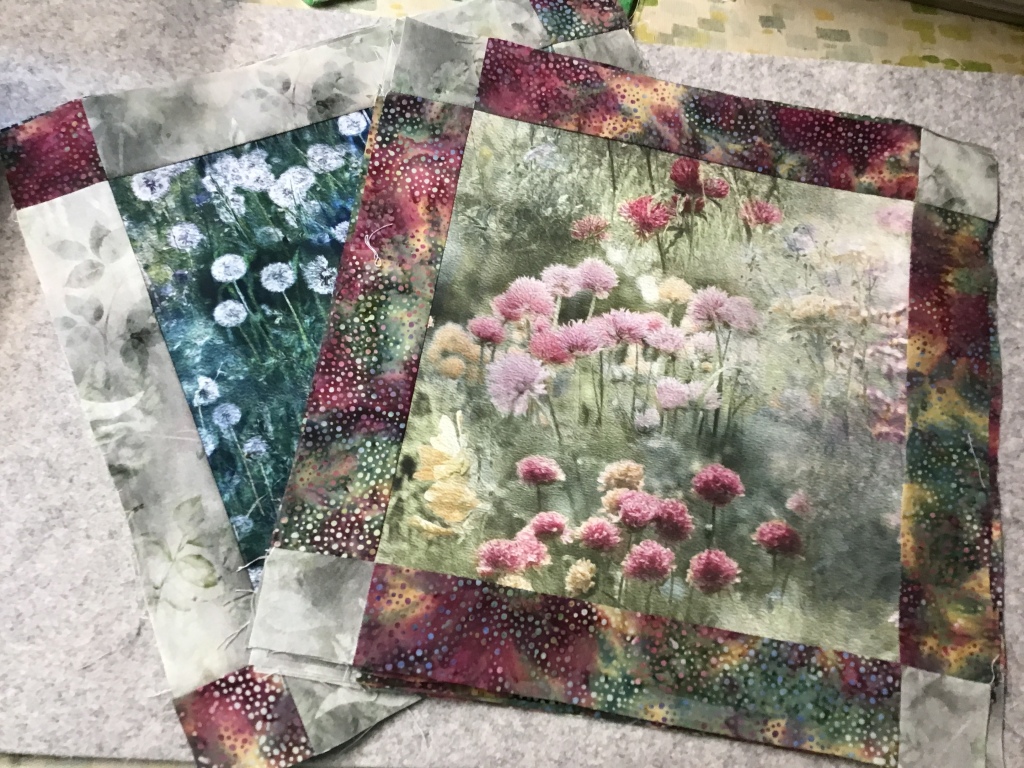
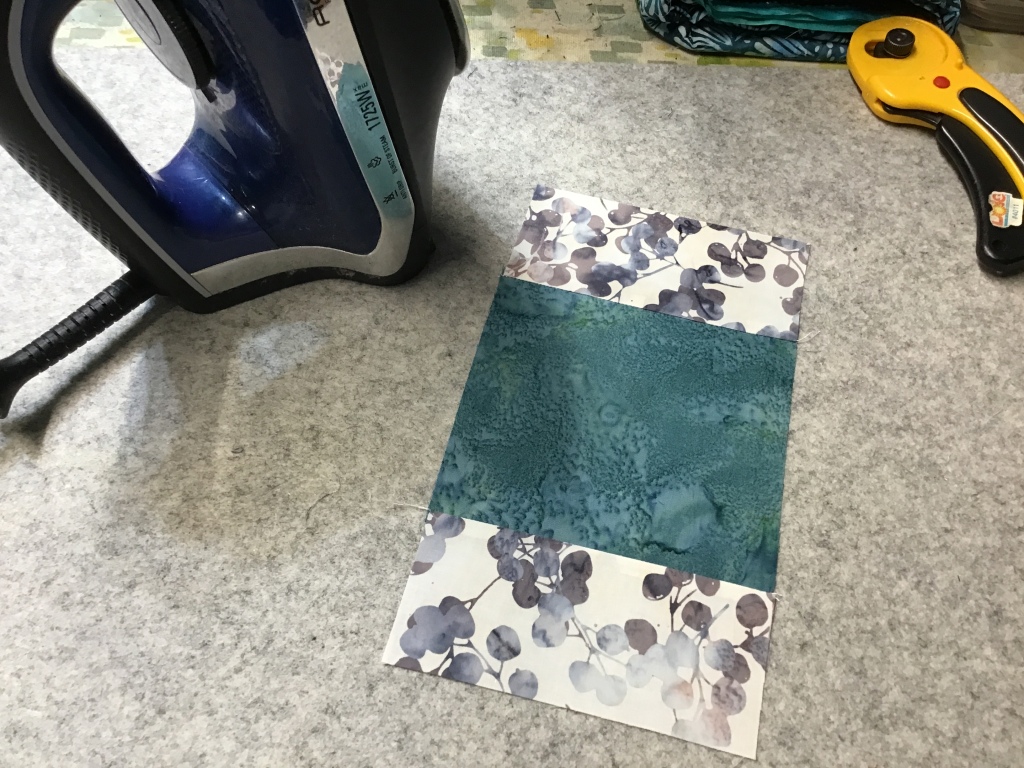
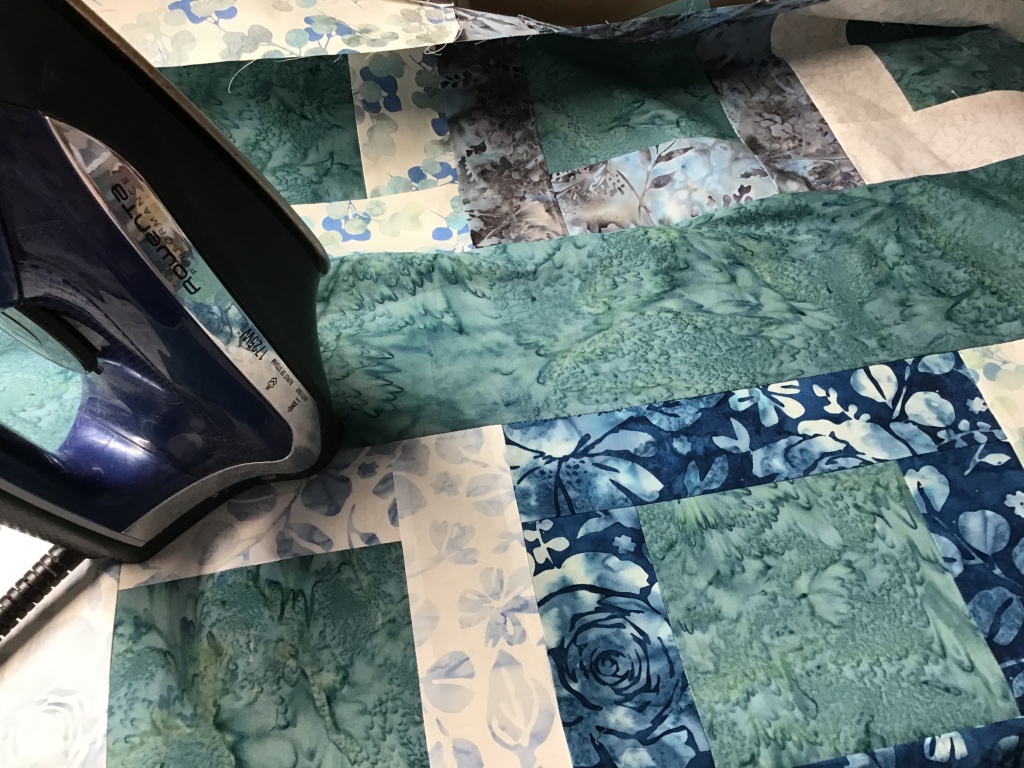
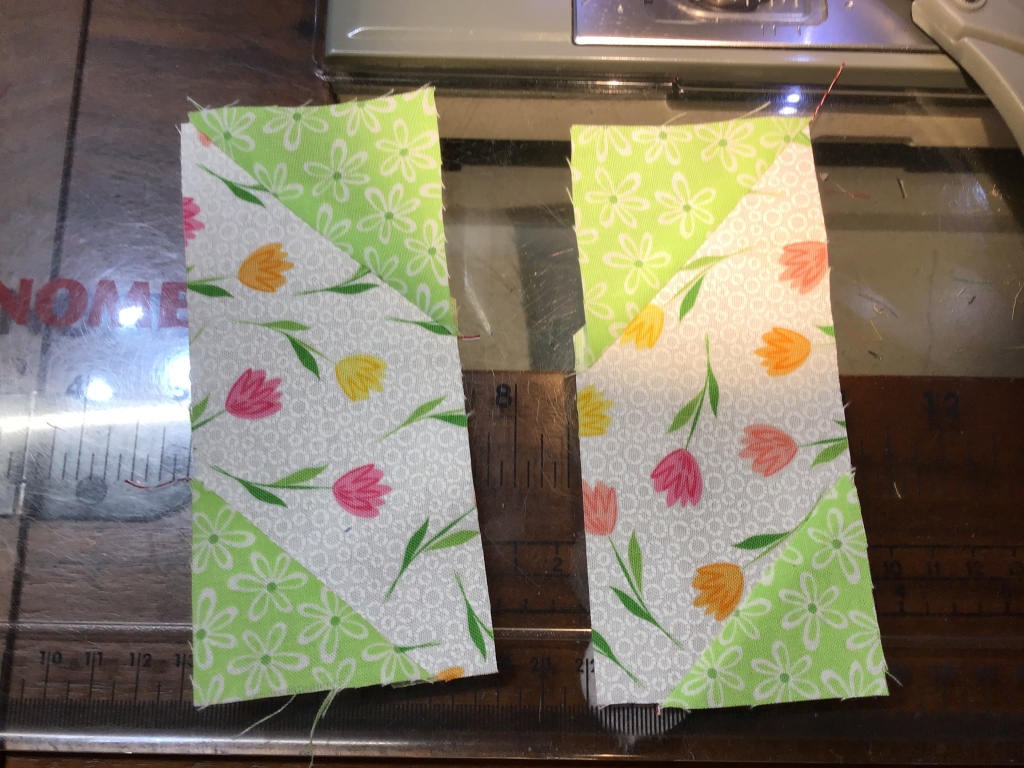
Then press your rows. The middle photo shows my pile of rows ready to get pressed (and maybe untangled! LOL!).

The great news is that it doesn’t really matter which way you press your seams because the seams are all offset when you sew the rows together. This is really great and makes Weave a beginner friendly project.

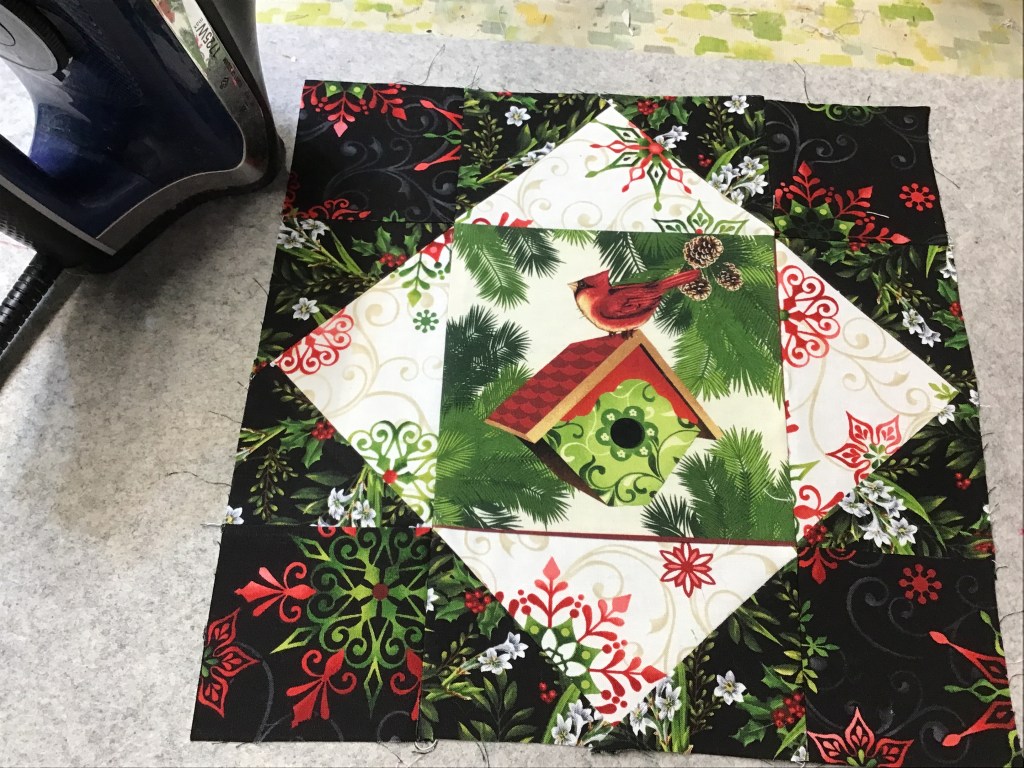
Just a quick tip — while I was pressing my rows, I folded each row in half and pressed a crease for the center of the row. That way, as I pin the rows together, I can match up the centers so my quilt will come out straight and not skewed or twisted.

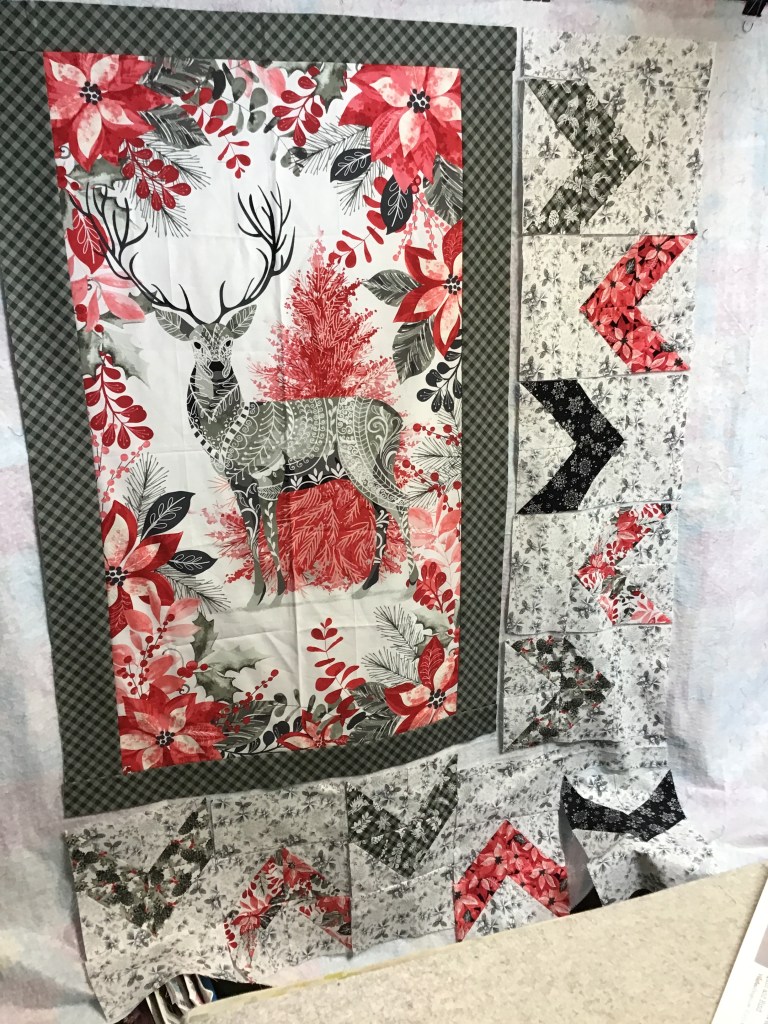
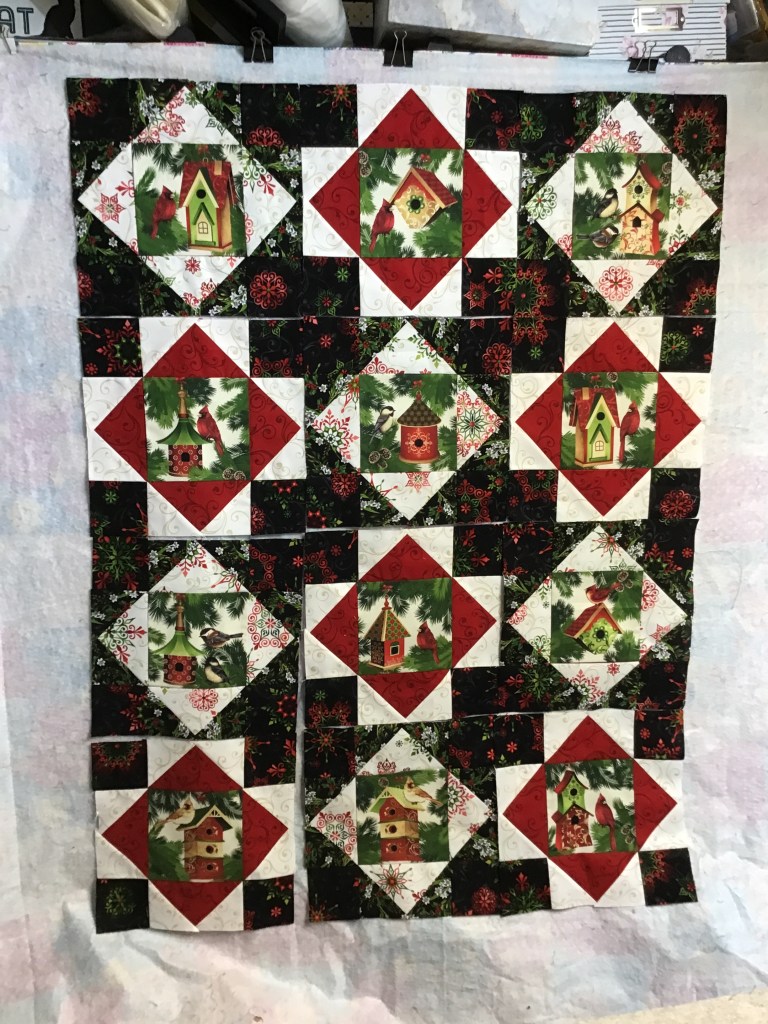
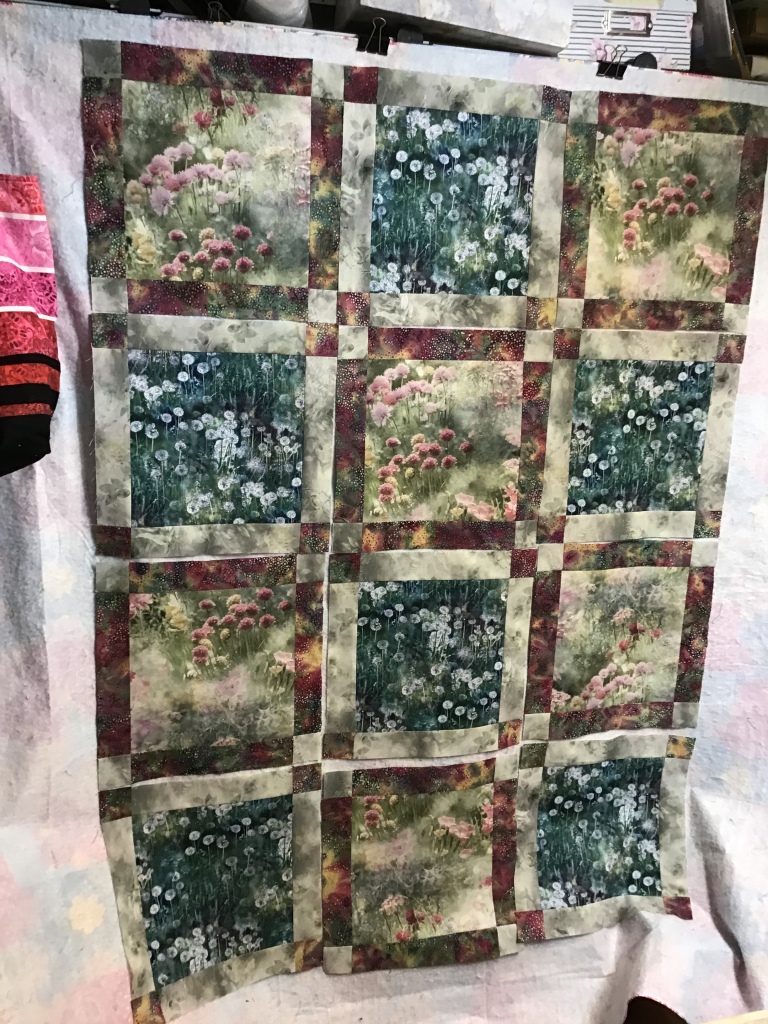
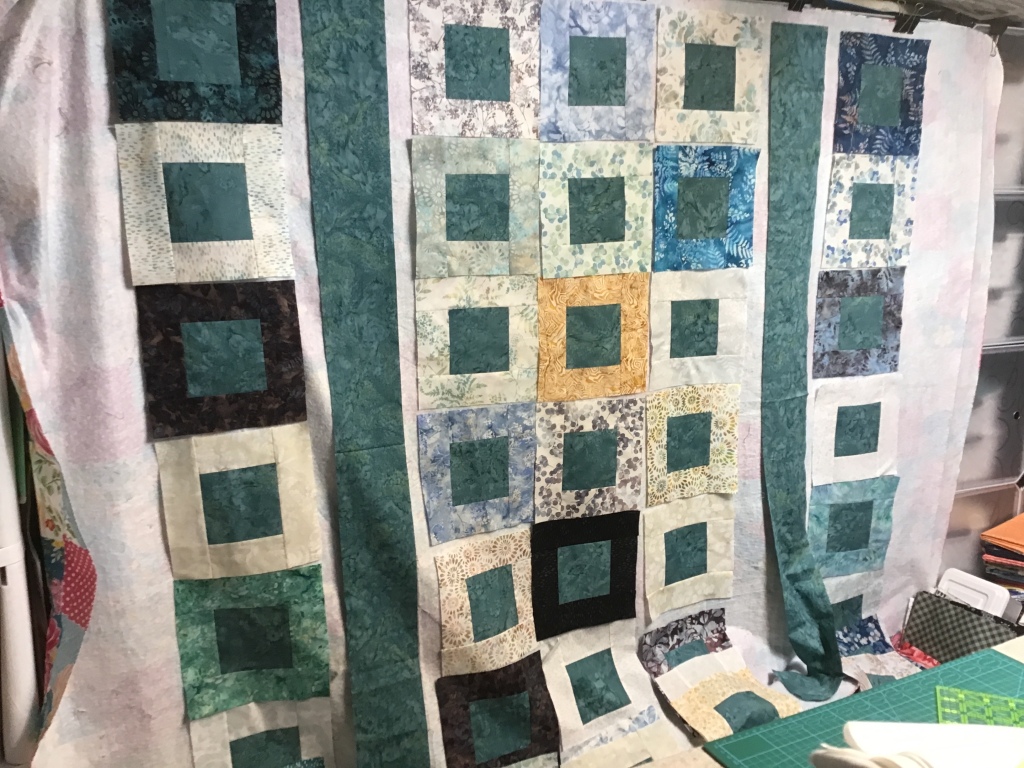
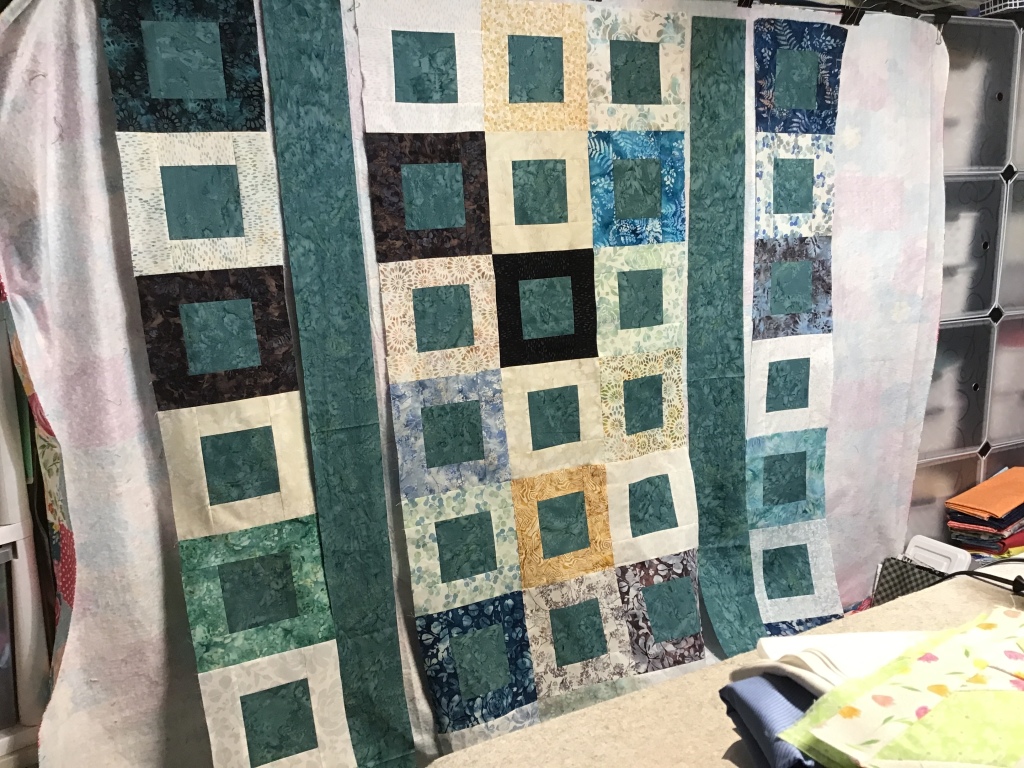
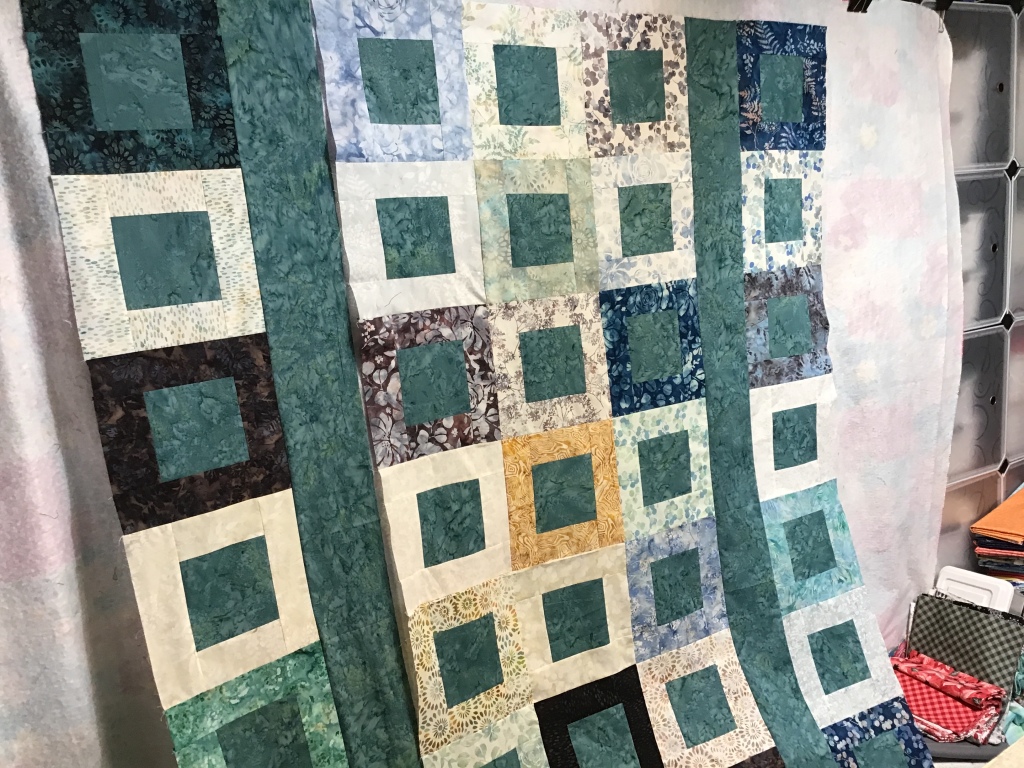
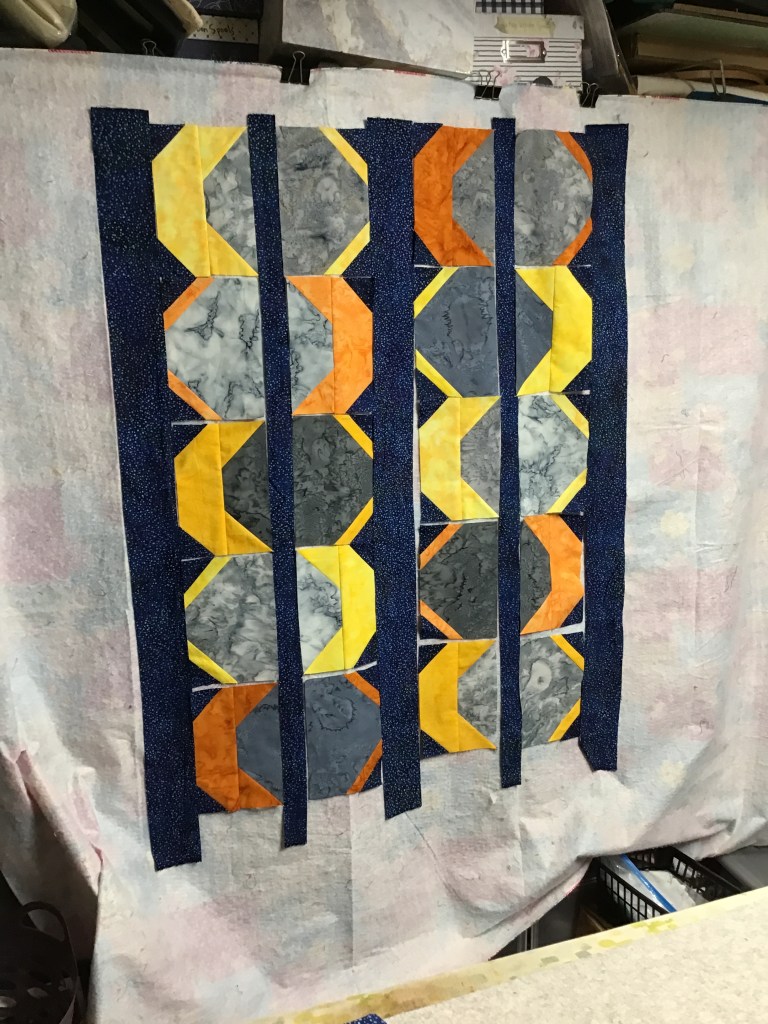
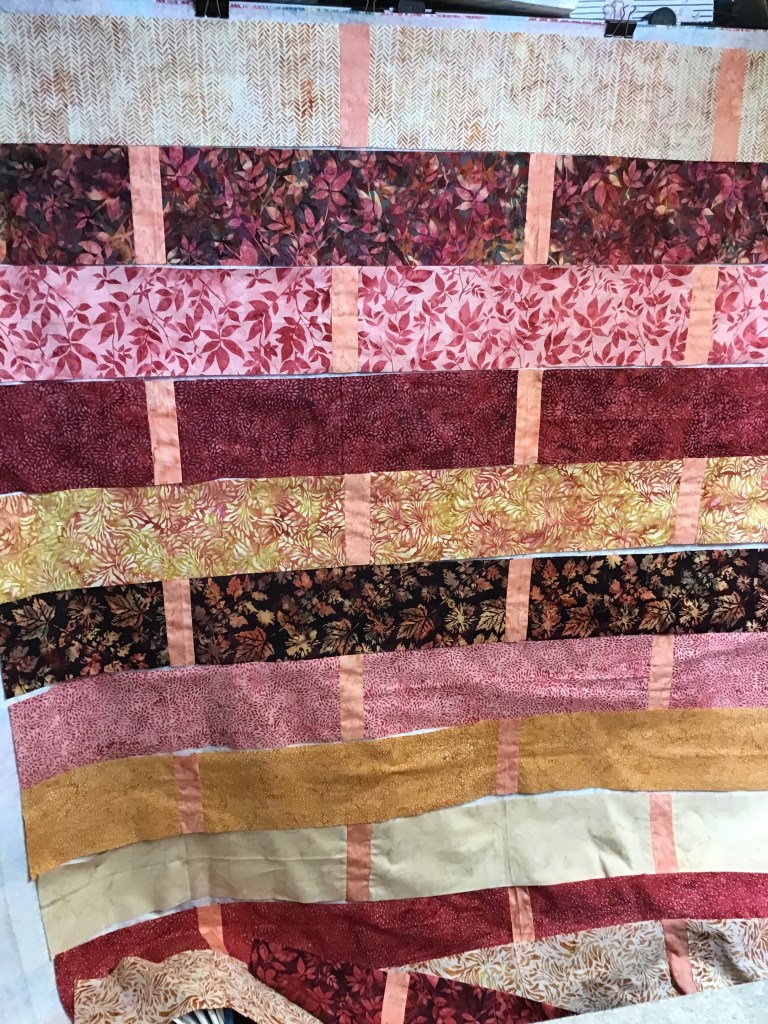
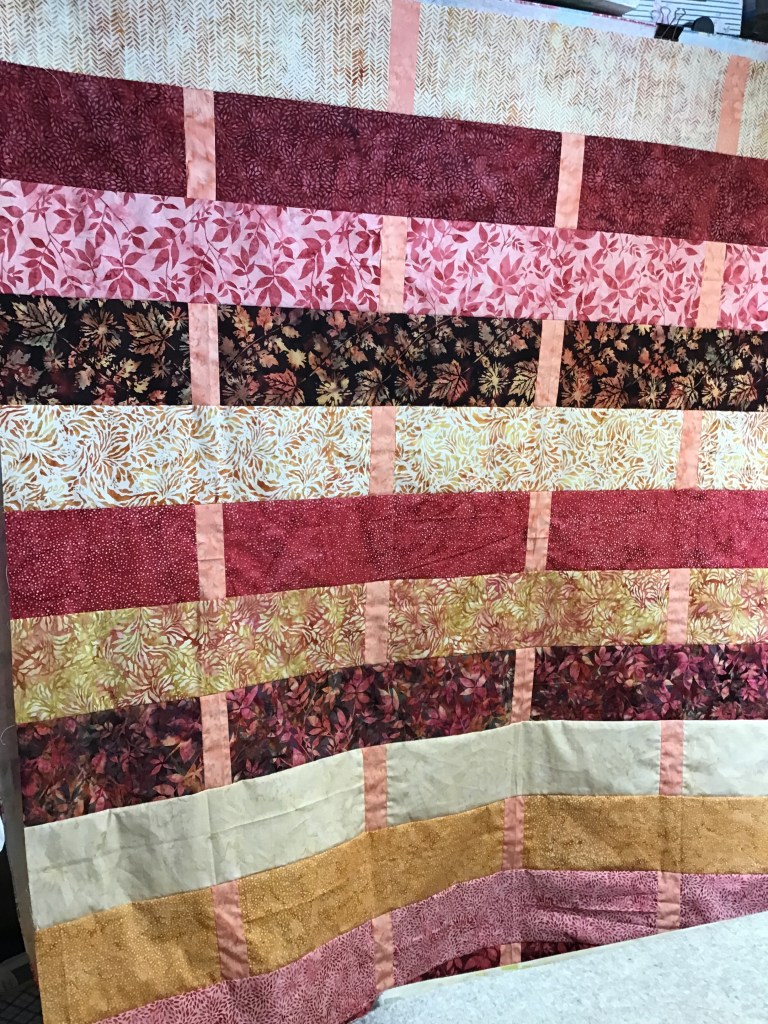
The rows are finished, so let’s put the rows up on the design wall. My plan, as I mentioned above is the alternate lighter and darker strips. Huh. A few strips up on my design board and I’m already rearranging.

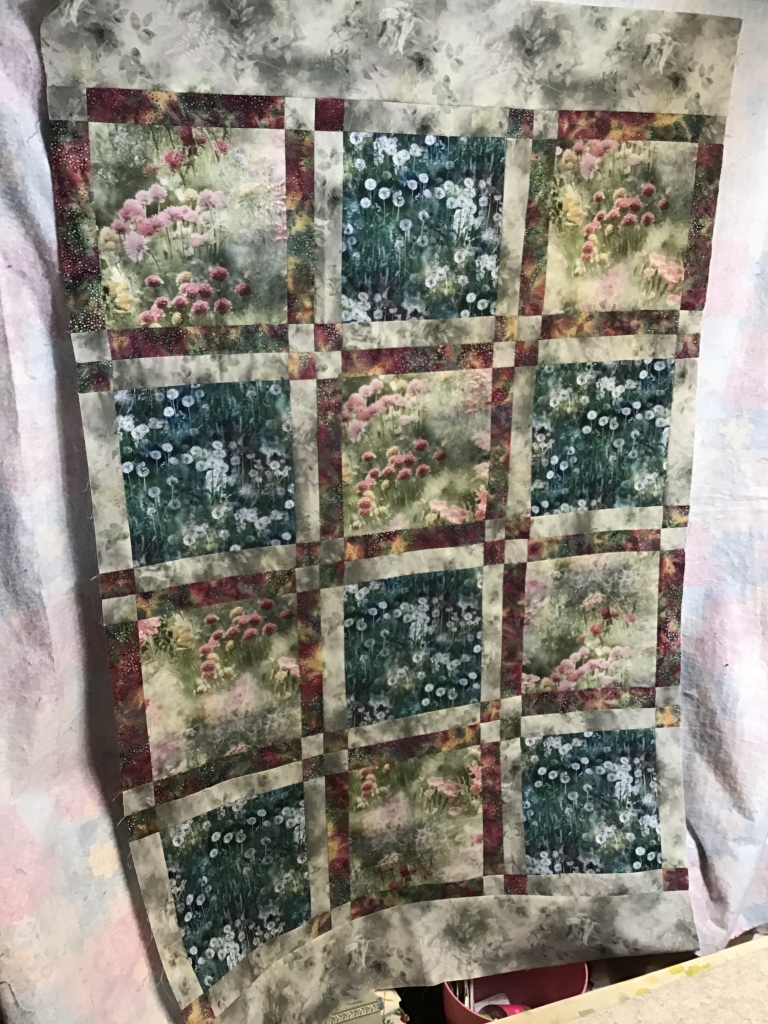
All the strips are up. Hmm. Not quite. Arrange some more. There are 12 rows in this quilt and I don’t like how the lights and darks are not completely balanced. Back to the drawing board……what can I do now?

Let’s try it again.

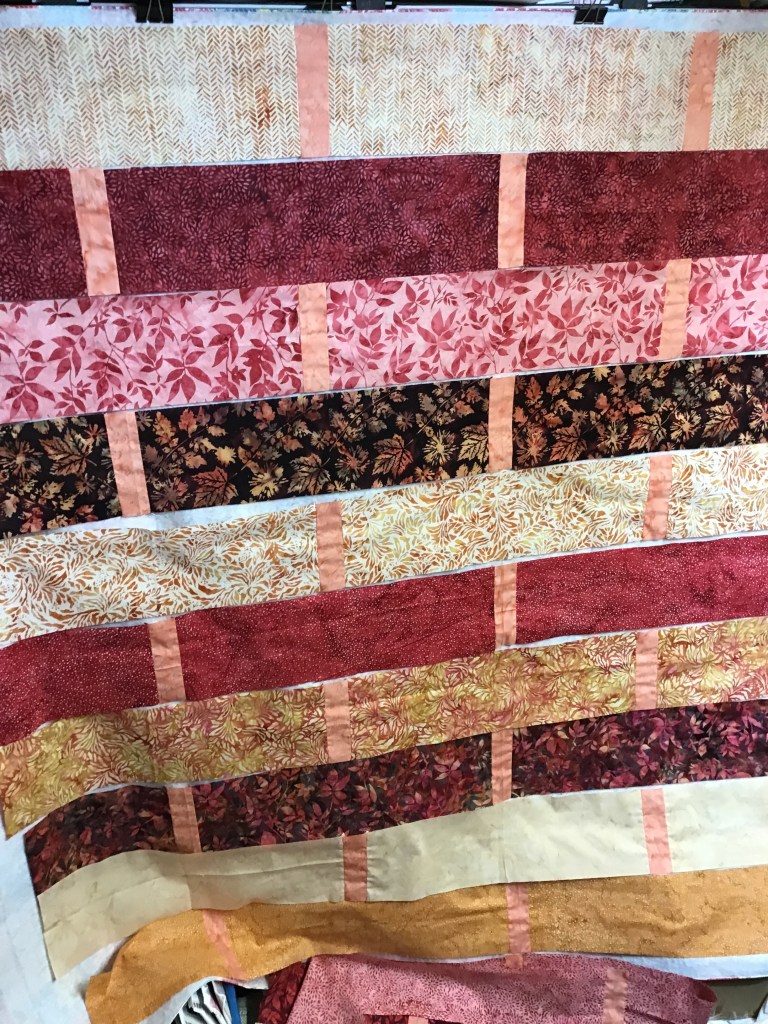
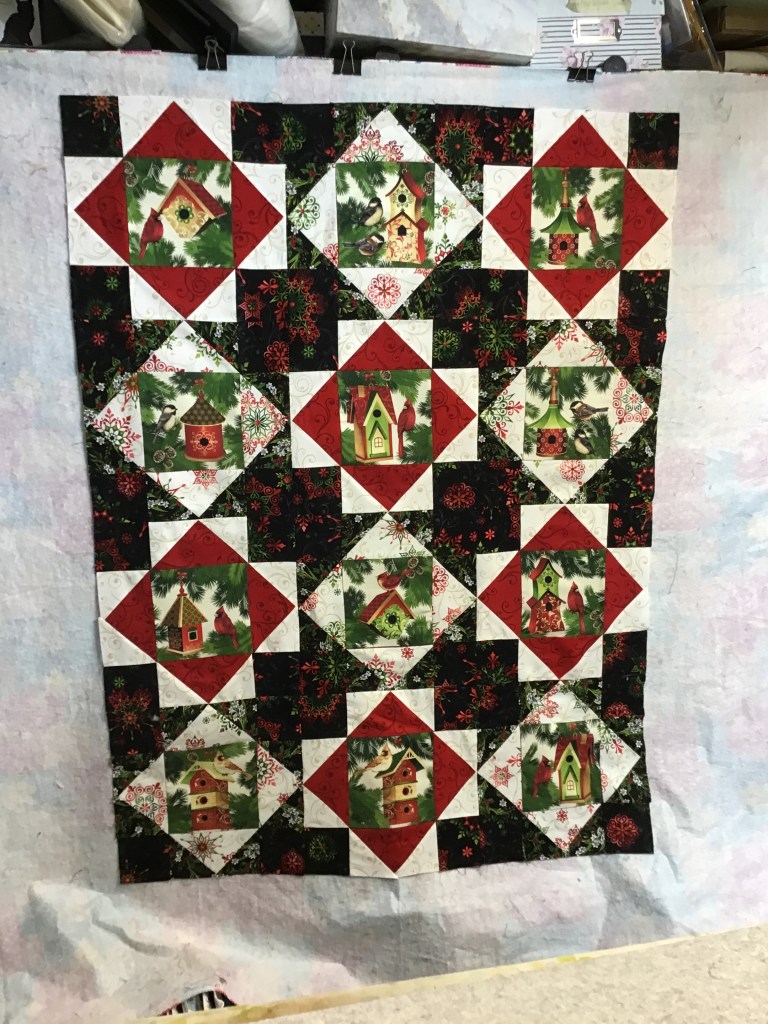
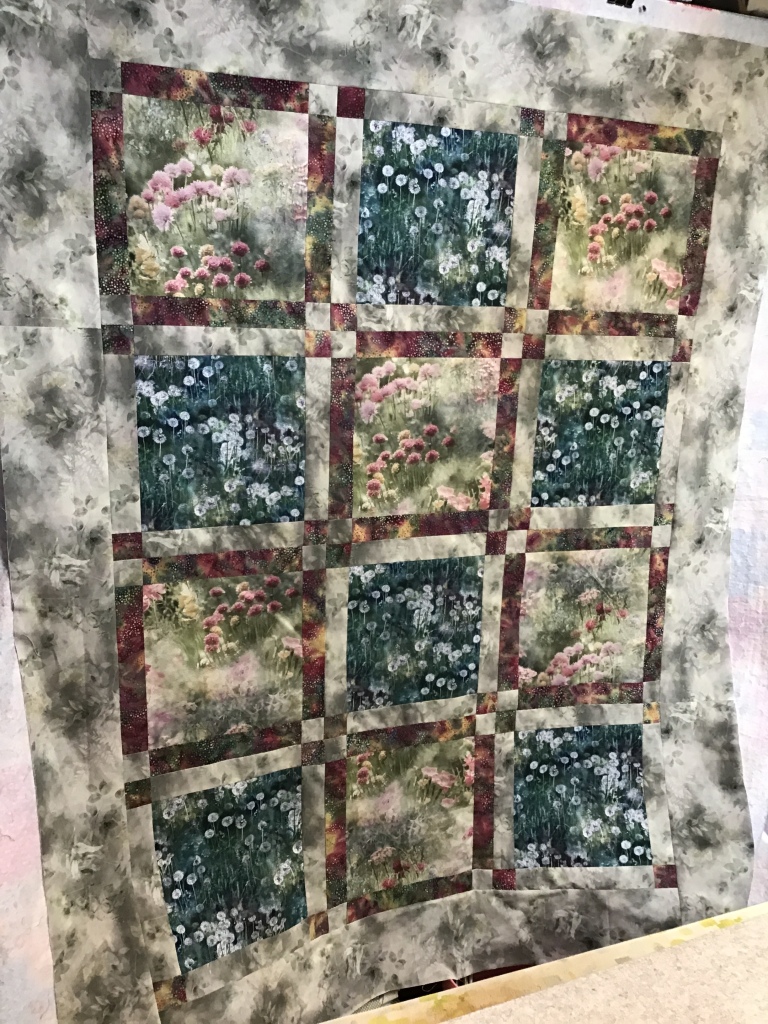
AHA! I know what I’m gong to do — I am going to add another light row to the bottom because I always find an odd number more pleasing than an . I have an extra fat quarter for the top row, which would give the illusion of a top/bottom border if they are the same as well as some leftover accent fabric. It would also give me some visual balance with lights at the top and bottom instead of a light at the top and a dark at the bottom. Let’s go with that!

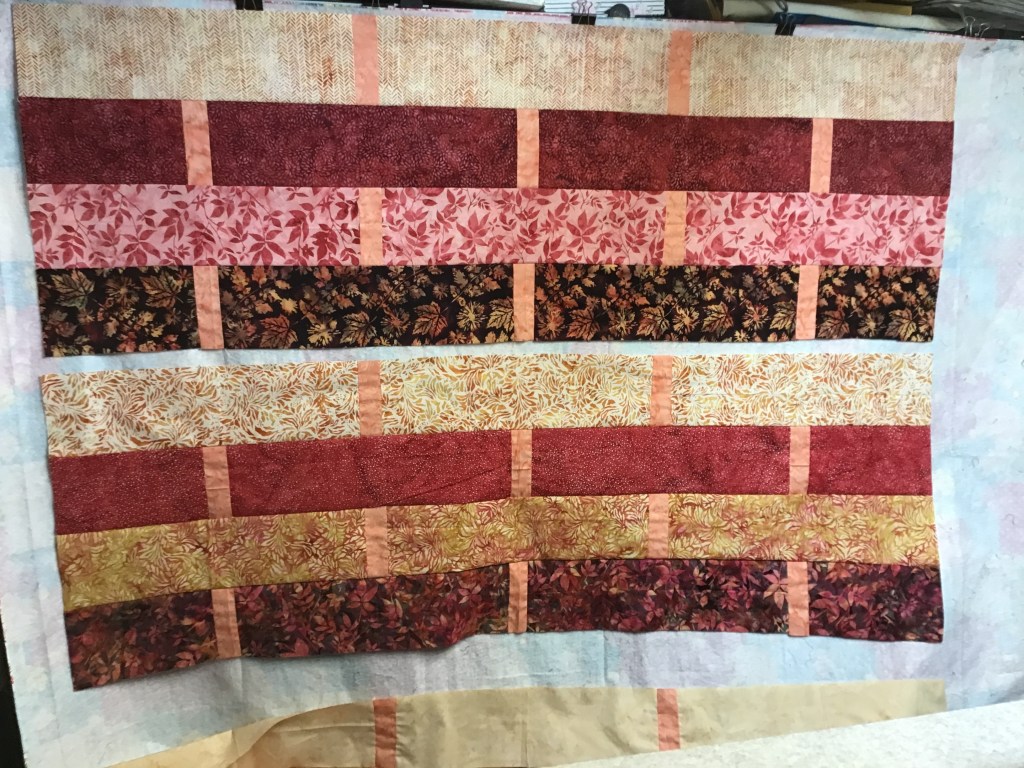
I know it’s hard to visualize right now, but trust me that the extra light strip at the bottom makes all the difference!

If I make this again in the future, I don’t think I’ll try to alternate lights and darks — I think random would probably be easier to put together.

Whew — I wasn’t sure I’d ever figure it out, but boy oh boy, am I glad that I did! Time to sew the rows together before I change my mind.

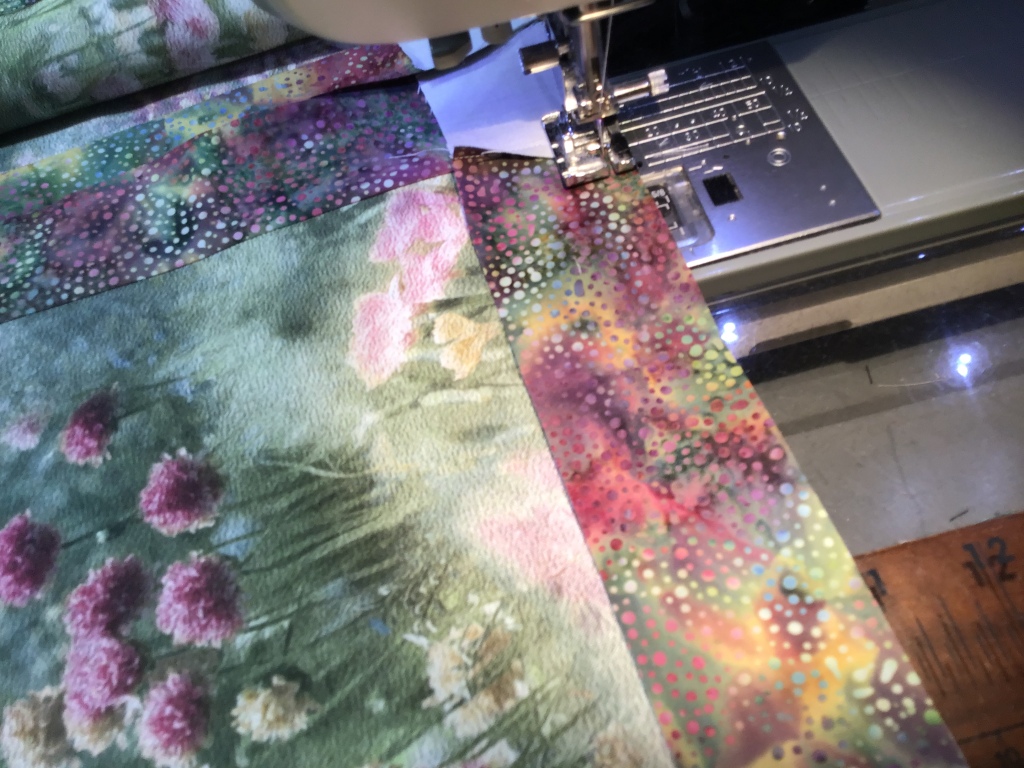
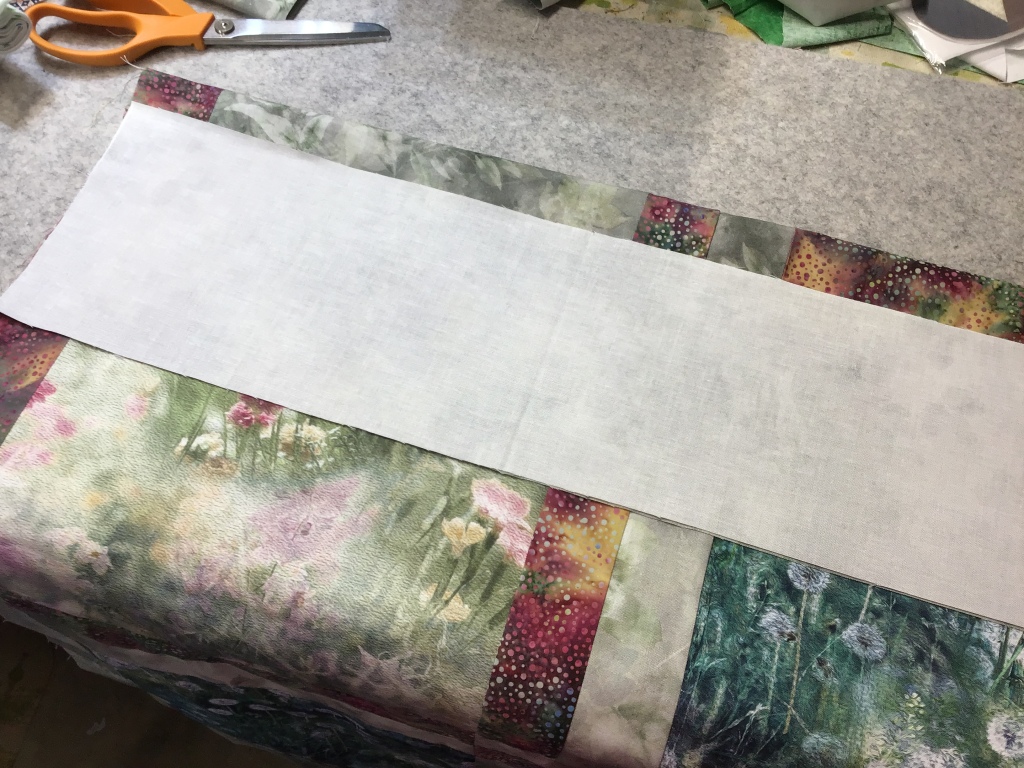
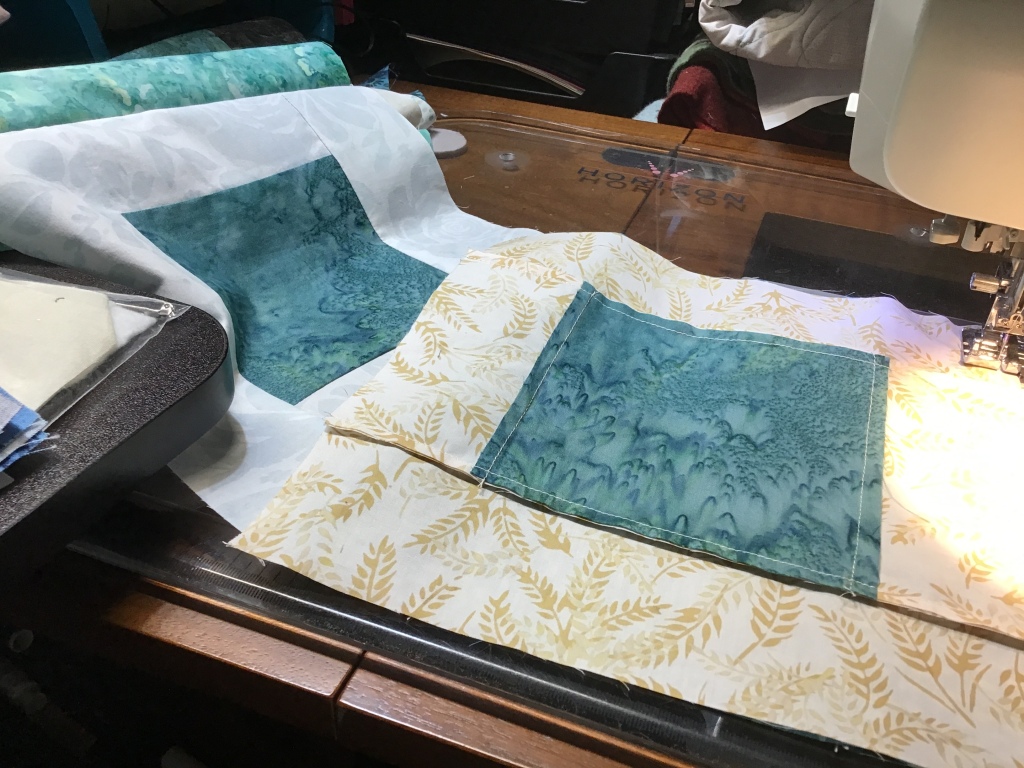
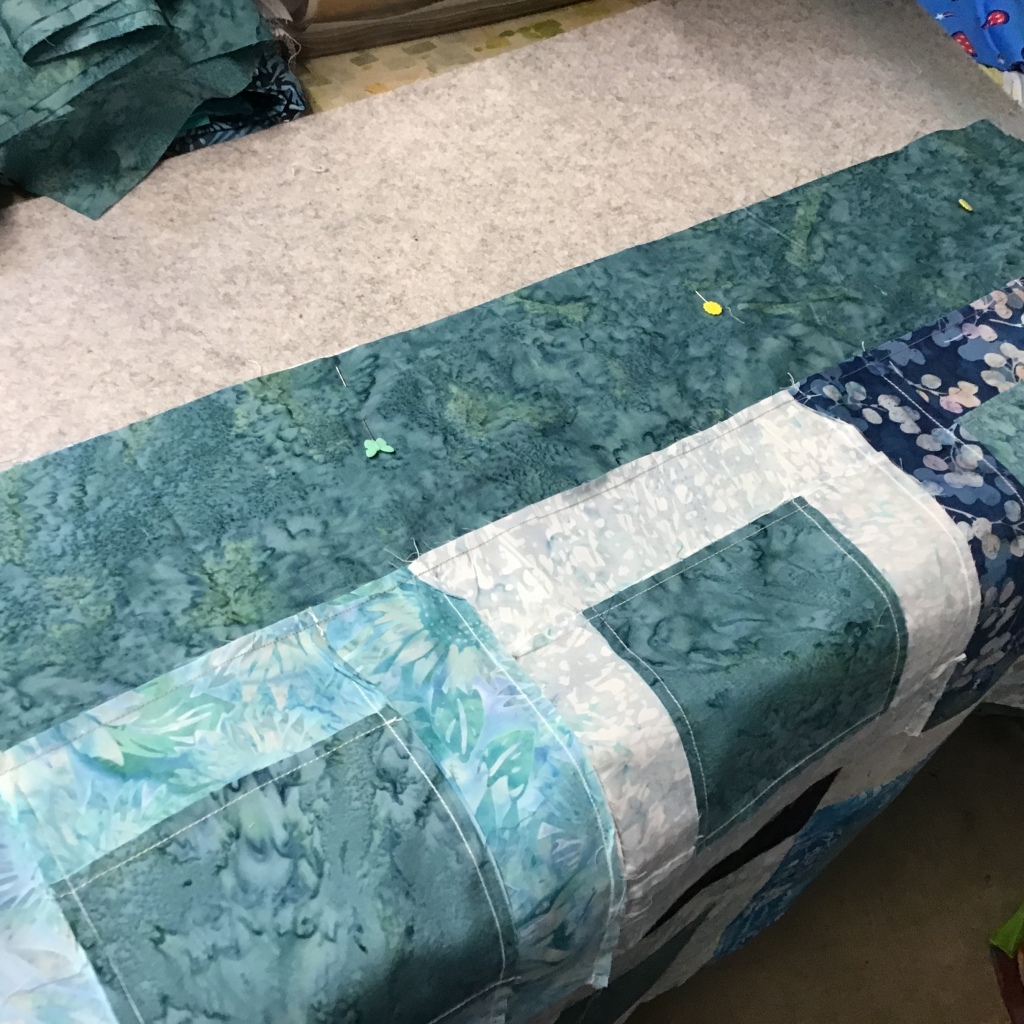
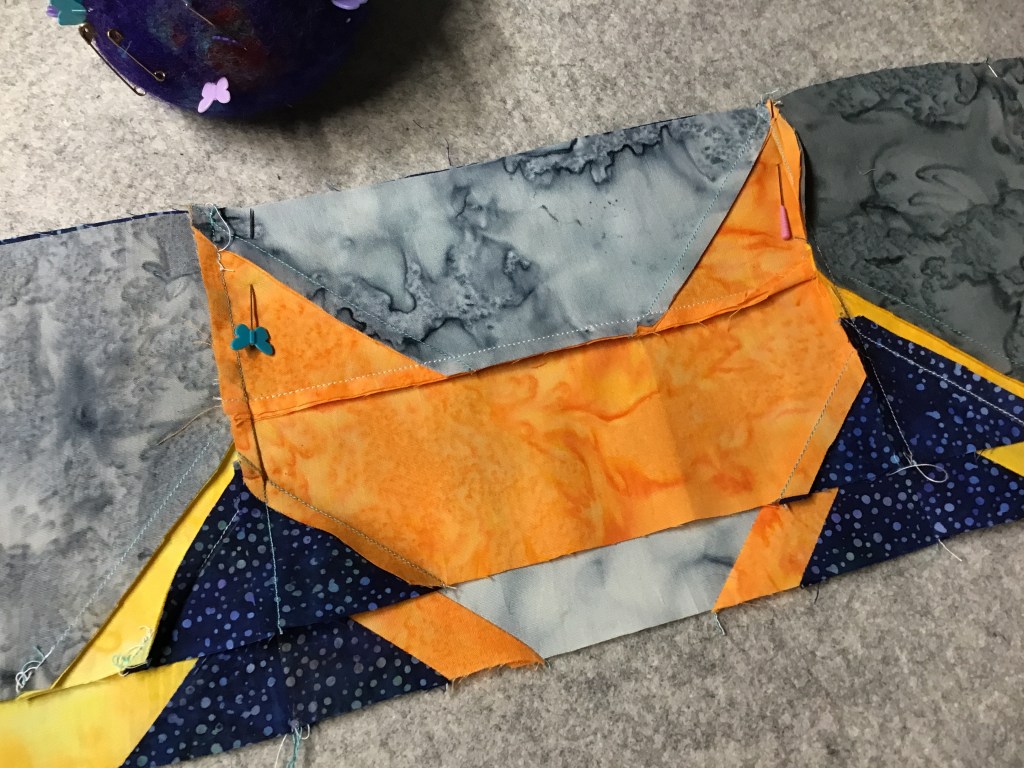
Remember when I pressed a crease in the center of each row? Now I am going to match up the centers of each row and then smooth the rows all the way to the ends. I put a pin in my center crease, and lined up the outside edges.

See the pin in the second photo, perpendicular to the edge at the end of the row? I think that’s probably the most important pin in the whole pinning the layers process — I keeps the rows square and keeps the rows from sliding and skewing when I am sewing. Thanks, Pat P. for teaching this important little trick to me when I was a beginning quilter.

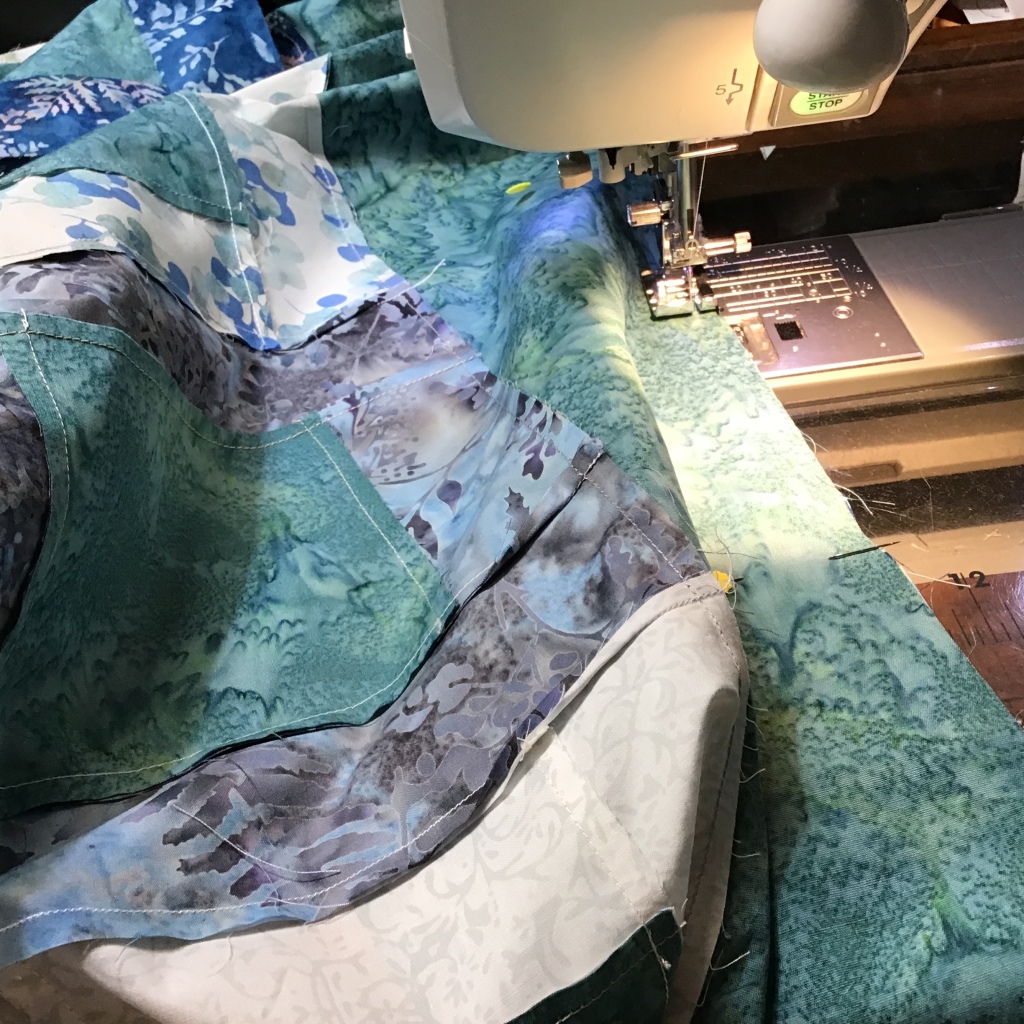
My plan is to sew the rows into pairs, sew the pairs into quads, and then sew the quads together. I will add the 13th row to the last quad (so it will actually have 5 strips in it before I sew it to the previous quad).

Yay! It too me less time to sew the rows together than it did for me to arrange the rows to my liking. Figures……..

Sorry, Weave is a bit too big for me to show you the whole thing on my design wall.
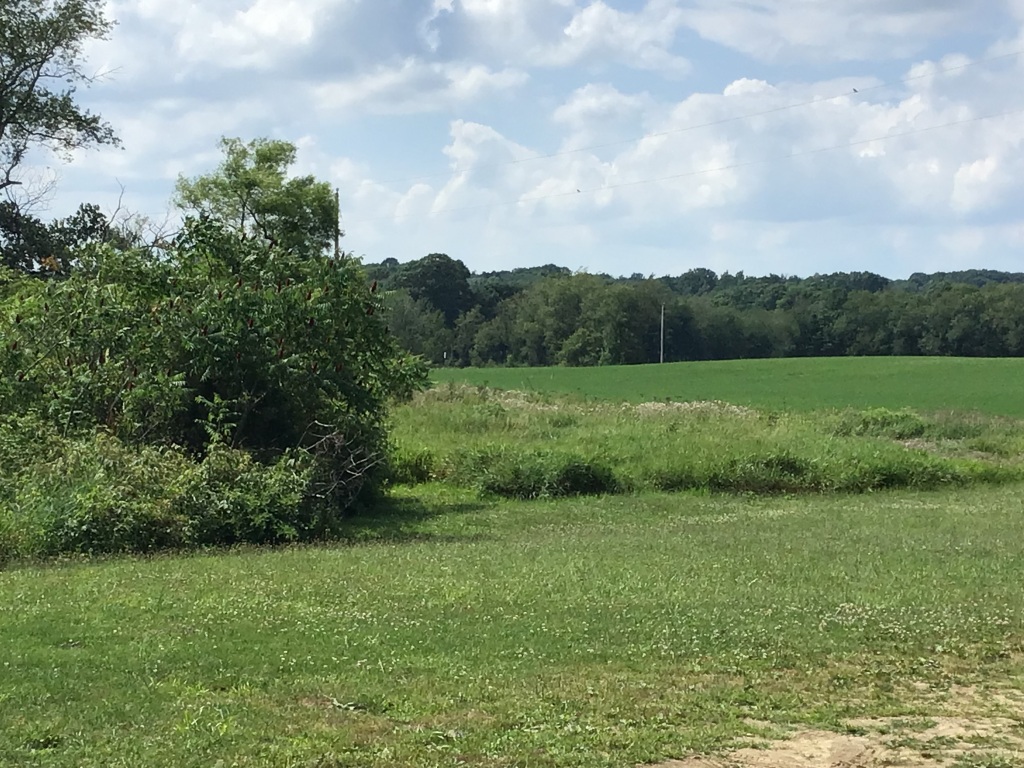
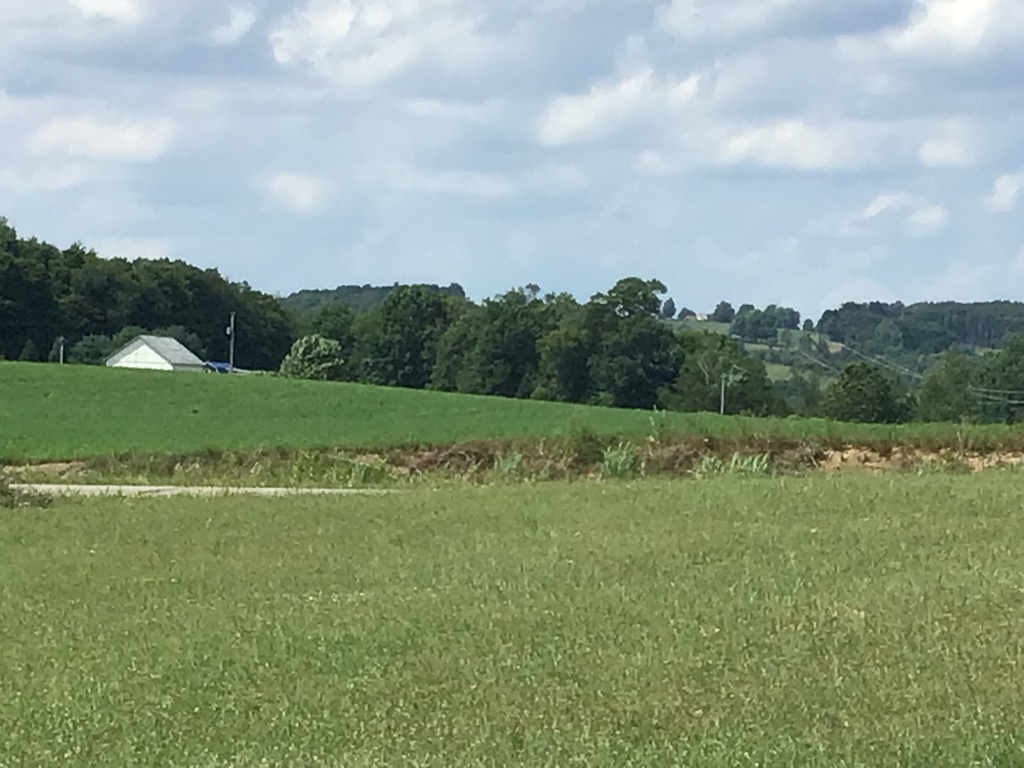
Let’s go outside!

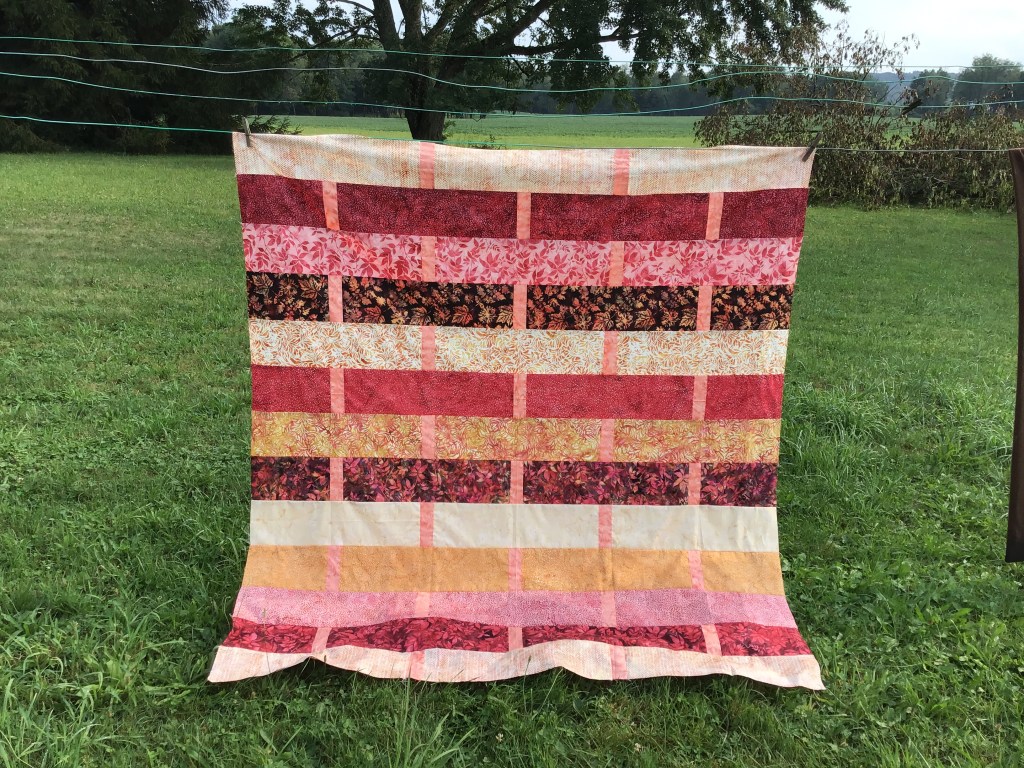
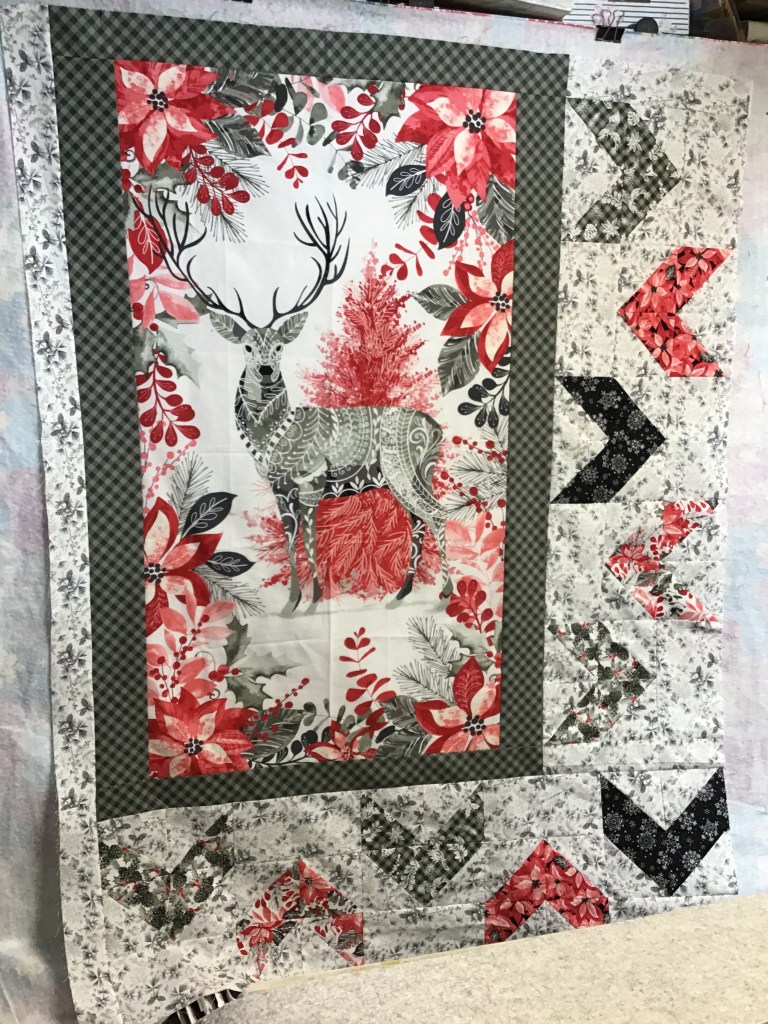
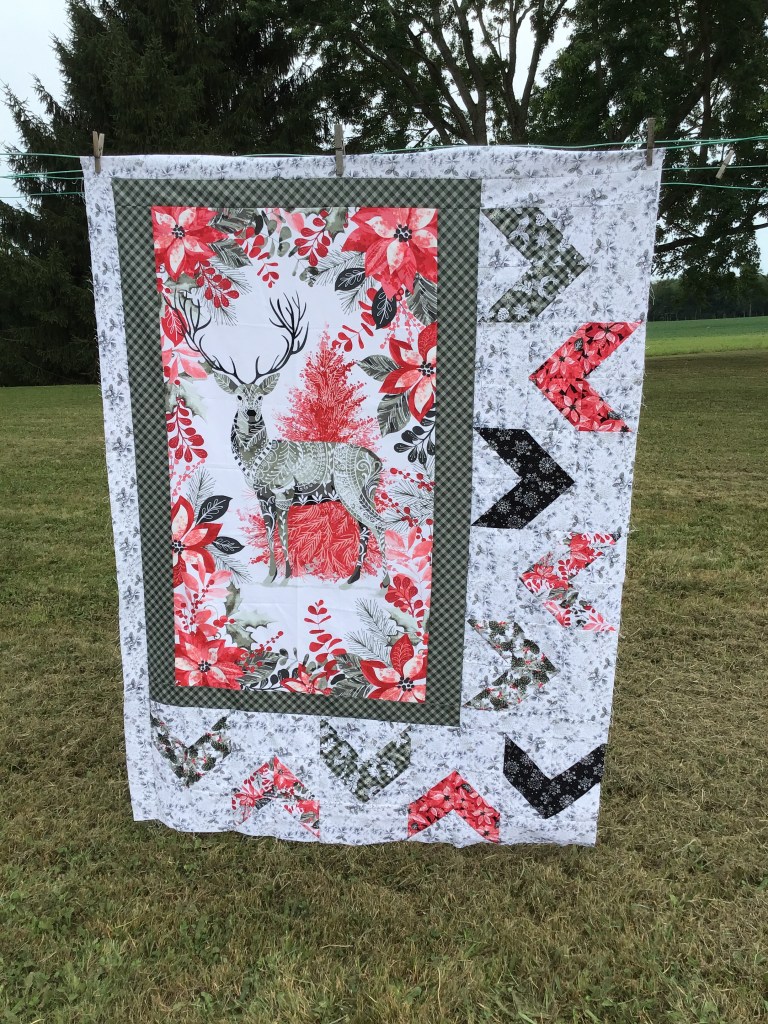
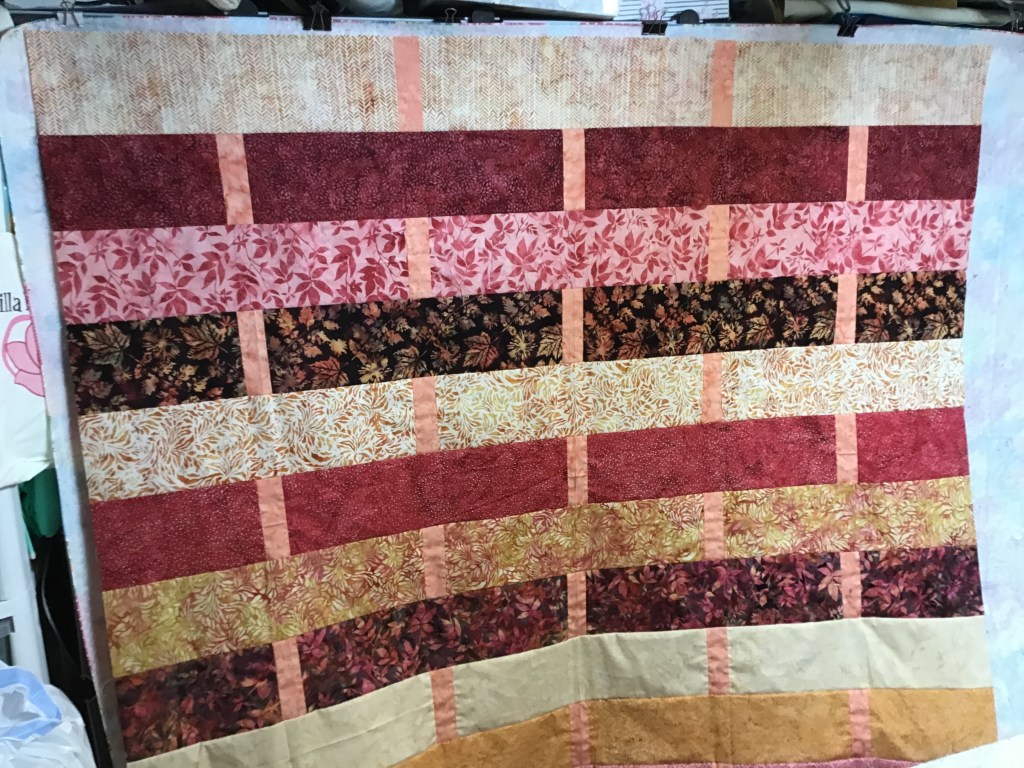
Here it is — Miss America. Ummmm, maybe not. Seriously, though, here is my Weave quilt top.

I love the warm saturated colors! Maybe I should have picked a slightly darker accent, but I do like its subtlety. It really is a late summer sun-kissed quilt. Now I just need to get it layered so I can quilt it……

Well, I think that’s about it for me this week.

Until next Thursday —

Always,

Tricia @ VRD

Quilting Partners · Rose Cards · Tutorials · villa rosa designs

VRD 31 (Thirty One) Quilt Tutorial

Happy Thursday to you!

I’m going to get right to our tutorial today because you are going to LOVE LOVE LOVE today’s quilt! And I can’t wait to show it to you.

31 is our project du jour. It was designed by Molly Cook. You can go HERE to read an interview I had with Molly last year if you’d like to get to know her a little bit. Occasionally she pops onto the blog, but it’s been a while, so I’ll have to remind her she has an open invitation to hang out with us anytime she wants. Isn’t it fun to get to know your favorite VRD designers? I know, I know — I need to get my tush in gear and get some more interviews with our lovely designers, don’t I?

31 is a fabulous asymmetrical panel quilt design and looks great in pretty much any fabric collection!

This week I’m continuing my “Christmas in July” theme. For this quilt, I’m using the new Holiday Style collection by Satin Moon for our quilting partner, Blank Quilting (in store now). This gorgeous collection is traditional (poinsettias) and modern at the same time (red, pink, black, white, and grey colorway)! Which is probably why I adore it. I’m not a huge fan of woodsy deer and bears and such, but the deer on the panel is lovely and delicate with a Scandi feel. The artwork is beautiful and invites a second and even a third look at all of the details.

And here are the companion fabrics I’m using for 31.

Let’s get to it!

The first thing we need to do is trim the panel to the correct size. I measured my panel and decided to completely remove the printed plaid panel border and start over from scratch. The problem I ran into once I removed the outer part was that my panel ended up a bit small. But never fear — that’s an easy fix we’ll talk about in just a minute.

Now to fix the size issue — I did the math and figured out I needed to add 1/2″ to my side border strips so my panel with the border would end up the correct size. Luckily, the pattern includes the figures to guide you through trimming your panel and adding the panel border. Take your time to make sure your panel with the border will be the right size before moving on.

Please note that if your panel with the border is too small, add another narrow border and then trim it to the correct measurements. Conversely, if your panel with the border is too big, simply trim it to the correct size.

Once I figured out the math for sure, then I cut my borders. I thought it was kind of funny to cut off the grey plaid on the panel only to replace it with a grey plaid border. Silly me, but now the math works out just right.

I sewed my side borders on first and then I sewed my top and bottom borders to the panel after that. And PRESTO! My framed panel was exactly the right measurement because I took the time to figure it out before I cut and sewed. Yay me!

Now let’s cut the rest of the fabric for the quilt.

All set! Background and prints are cut and we’re ready to move on.

Time to make some Half Square Triangles (HSTs)! Believe it or not, but I really like making HSTs — probably because they are building blocks for so many different quilt block patterns.

Layer a background and a print square right sides together (RST) and draw a diagonal line from corner to opposite corner. Using your 1/4″ seam, sew on both sides of the line. Then cut on the line to make 2 HSTs. Easy piezy!

I like to chain piece all my HSTs before I head to my iron to press them. If you are able, press half of each print/background combination seams towards the background and the other half towards the print. This way your HSTs will nestle together, snug as a bug.

After you’ve pressed all of the HSTs, it’s time to square them up and cut off the little dog ears, if needed. I literally just trimmed off slivers to get them to the right size.

Have you ever tried a Bloc Loc ruler for squaring up/trimming your HSTs — there is a little diagonal channel that sits over your seam and keeps everything from moving or sliding around. Very clever ruler that does one thing and does it very well. Of course, there are lots of different square rulers on the market for squaring up HSTs and other blocks. What are your favorites?

Yippee! Now let’s sew our HST’s into Arrow (or Chevron) blocks. Sew 4 matching HSTs together into a Four Patch block, turning the HSTs as shown. This is where having 2 HST seams towards the background and 2 towards the print really comes in handy so that your seams nestle together and help you to have nicer points with less bulk.

Repeat to make all the Arrow blocks for the quilt. Then head over to the iron to give them a good press.

Now sew background rectangles to the top of the Arrow blocks.

Yay! On to one of my favorite parts (sometimes anyway….LOL!) — laying out and arranging the blocks. Now that I use a flannel-backed table cloth hung up in front of my fabric storage cubes, it’s a lot easier than it used to be when I laid my quilts out on a bed. Ugh! When I was a novice quilter (and a lot younger than I am now), I used to lay them out on the floor. Not anymore, thank you!

Lay out the quilt according to the pattern diagram, flipping the Arrow blocks as shown. I played around with my color placement and decided I liked the arrangement in the second photo the best.

Next, let’s sew the blocks together on the right side of the panel. Please note you will need to add a background strip to the top and bottom of the section so that it will fit.

Okay, let’s sew the bottom row of blocks together and then sew the section to the bottom of the panel. Yes, the borders are added in a clockwise fashion instead of adding opposite sides at the same time.

Looking good! Let’s sew a background border strip to the left side next.

The top background border strip is last.

And here it! 31 is done! Isn’t it lovely??? The colors just glow, don’t they???

I am thinking about adding an outer border to make it a bigger throw quilt size, but haven’t quite decided yet. What do you think — should I add another border or finish it as is?

As I am writing this post, I have my 31 quilt top up on my flannel wall so I can just enjoy looking it at. It will stay there until I start my next summer tutorial.

That’s it for me this week.

Happy Summer and Happy Quilting!

Until next Thursday —

Always,

Tricia @ VRD

Quilting Partners · Rose Cards · Tutorials · villa rosa designs

VRD Duffy Quilt Tutorial

Happy Thursday to you!

Summer time. Summer time. Sum-sum-summertime.

Don’t you just love classic summertime songs, especially from the 1950’s and 60’s? I do! When I was a kid in the summertime, we camped every weekend and probably every Friday and Saturday night we were all hanging out around a campfire with our camping friends, sharing stories and roasting hot dogs, making s’mores and camper pies. We’d have the Saturday night oldies program (Cousin Brucie, I think?) blaring on the radio and we’d all be singing along.

Ahhhhh, those were the days……. Thinking back, my wonderful childhood memories growing up in the 1970’s and 1980’s, lead me to yet another classic song, Time in a Bottle.

Image created by moi in Photoshop

I am happy to share that my sewing machine is finally up and running again on my new-to-me Koala Quiltmate III sewing table. YAY! This table is such a better height for little short me (under 5′ 4″ on a tall day) and I feel more comfortable now with my chair lower along with more leg room under the table, too. My old cabinet was lovely but a bit too tall for me and there wasn’t much leg room so I always felt crowded.

Hooray! Let’s hear it for new-to-you sewing tables! OH! I also bought a new cover for my old sturdy sewing chair to freshen it up from its drab 1980’s dark green tweed. Now to finally get the arms taken off my chair which will make “bellying up” to my machine much easier.

Please excuse my mess in the photo, but I am still sorting out my sewing area. I’m getting there….slowly. The important thing is I CAN SEW AGAIN!

Now that I can sewing again, I’m thrilled to put together another Summer Tutorial for you! I chose Duffy for a several reasons —

  1. It’s super quick
  2. I had a new fabric collection from Studio E ready to go
  3. It’s July’s Top Along selection for Running Doe’s 2024 Top Along
  4. Who doesn’t love making Christmas Quilts in July?

Sew, let’s get started!

My fabric today is from one of our friends and quilting partners, Studio E — thank you! The collection is called ‘Tis the Season and it is shipping to quilt shops as I write this, so make sure to ask for it at your local quilt shop. Duffy is one of the featured patterns for Studio E’s ‘Tis the Season collection. Pretty cool, huh? VRD is popping up everywhere!

I’m using the gorgeous holiday birdhouse block fabric from the collection for my focal print in the blocks. Lucky me, the square are just the right size.

I don’t usually enjoy making swiss cheese out of my fabric (or, fussy cutting, if you prefer that term), but I didn’t mind with this project because I was cutting the printed blocks out, which really only left bits and pieces of the black swirl fabric between the blocks. I love that I even had a ruler to rotary cut the correct size square for the pattern.

The squares are ready, so let’s cut the rest of the fabrics.

Now it’s time to get down to the business of putting this delightful quilt together!

Please note there are 2 blocks in this quilt — the block is the same, but the fabrics are different in each one. As you make your own quilt, please make sure to keep your fabrics organized.

Let’s make our Flying Geese units for the first block. Layer a square RST on the right side of the Block 1 rectangle. Draw a line from the top left corner of the square to the opposite bottom corner and sew on the line. Cut 1/4″ away from the line. Feel free to save the cutaway triangles for another project (PSST! Sometime in the future I plan to create a pattern using all those cutoff triangles, so tuck them away until then). Open the unit and press towards the triangle.

Okay, let’s make the left side of our Flying Goose unit. Place the square RST on the left side of the rectangle this time. Draw a line from the bottom left corner of the square to the top right corner and sew on the line. Trim 1/4″ away from the line and save your cutoff triangles if you wish. Press open.

Voila! One Flying Goose unit.

Did you know that the center large triangle is the goose while the smaller outside triangles are the wings???

Now we are going to repeat the steps above to make Flying Geese units for the second block.

Check! Flying Geese units for both blocks are done.

Moving on, we are going to start making our quilt blocks. I told you this quilt goes together quickly, didn’t I?

Sew Flying Geese units to the sides (or in my case in the photos, the top and bottom) of the focal print square. I pressed my seams towards the center square.

Next sew Block 1 (OOPS! or 2 in my case — don’t ask me why I did things backwards here….) squares to the ends of 2 Flying Geese units. Then sew to the top and bottom (or sides in my case) of the focal print square. I pressed my seams towards the center. Make 6 Block 1s.

Okay, now on to Block 2 (or 1 in my case). Repeat the steps we did for Block 1 (or 2 for me). For Block 2, I pressed my seams towards the Flying Geese units, hoping that by doing so will make my seams nestle nicely together when I sew the blocks together. Make 6 Block 2s.

Woohoo! Super fast. Told you!

The blocks are done and let’s take a look at 2 variations of the quilt — all I did was change the placement of Block 1 and Block 2.

I bet there are lots of other variations, especially if you play around with your fabric placement.

These 2 are pretty much the same since it’s just switching the blocks, but which one do you like better? Which one do you think I chose?

If you guessed the second photo, you are right! Now it’s time to sew the blocks together.

I found that most of my seams did indeed nestle together. For the couple that were being stubborn, I forced them to behave.

It turned out really cute, don’t you think??? I really like the secondary designs that pop out. Because Duffy is baby quilt sized, I might just add an outer border to make it into a small throw-sized quilt because I just don’t have extra wall space for quilts.

Which brings me to some final thoughts for you about Duffy:

  1. Add a border (or 2) to make it bigger — I’m thinking maybe a 6″ finished border as I have another fabric from the collection that I didn’t use.
  2. Make more blocks to make the quilt bigger — just make sure you purchase enough fabric.
  3. You could use Duffy as a jumping off point and add a series of pieced or appliqued borders, using Duffy as the quilt center.
  4. You could add sashing between the blocks to give it an entirely different look and make it a bit bigger. When I add sashing to a quilt, I usually stick with cutting my strips 2 1/2″ wide.

Well, I hope you will have fun making your own Duffy quilt. I’d LOVE to see them so please share on our VRD Facebook Page.

Enjoy your summer! Do something fun with the ones you love. And don’t forget to squeeze in a little quilting.

See you next week, same time same place —

Always,

Tricia @ VRD

Rose Cards · Tutorials · villa rosa designs

VRD Lattice Table Runner Quilt Tutorial

Happy Thursday to you!

Photo by Jim Strasma on Unsplash

I hope you get the chance to enjoy some patriotic FUN FOOD and FIREWORKS! And please don’t forget to pause a moment to reflect on how the United States of America got here.

Last Friday, my quilty pal, Robin (Hey Robin!), and I did a road trip down to Pittsburgh to pick up my new gently-used sewing cabinet, which I found for sale online. Robin drove her truck because there wasn’t any way my new cabinet would fit into my Jeep. LOL!

I didn’t know who the maker was from the photos online, but it was exactly what I needed to upgrade my own sewing space! My current cabinet was an older Pfaff (maybe made by Arrow) — truly a gorgeous solid wood cabinet with a hand-operated machine lift and 4 drawers, but what it lacked was an extension on the back which would have made machine quilting A LOT easier for me. My new-to-me cabinet has 2 drawers in the sewing table along with a separate 3 drawer rolling caddy AND AN EXTENSION TABLE! Woohoo! And it’s white, my favorite finish. It really is my dream cabinet! Lucky me!

When the owner’s very kind patient husband loaded it into the truck, we discovered that it was a Koala Quiltmate III, which isn’t manufactured anymore. Fine with me, it’s perfect just the way it is.

After the cabinet was securely covered and literally tied into the back of the truck, Robin and I headed on to Ikea, where we, of course, had Swedish meatballs for lunch. Unfortunately, Ikea was right in the middle of updating a lot of their spaces for fall, so there weren’t as many “rooms” on display as usual. Bummer. But we had loads of fun just looking around at the rooms that were still on display and checking out the marketplace downstairs with all those awesome goodies. Do you have Ikea stuff in your sewing space? What item(s) do you use the most? I love there colorful carts and little drawer units on wheels.

After Ikea, we headed back home. On the way, we talked about how on earth we were going to get my cabinet off the truck and into my sewing dungeon. Robin ended up calling in reinforcements (her hubby and son — THANK YOU Rich and Ryan!) to help get the cabinet off the truck at my house and then my Dad and I rolled out my current cabinet and then rolled my new cabinet into my dungeon sewing room. It wasn’t as easy as it sounds, but it’s there now AND it fit through the doorway, which was a relief…… Thank goodness it had wheels!

Now I have the wonderful and awful task of cleaning out and rearranging my space so that I can have the extension up for machine quilting. I’ve been looking for a reason to begin my major studio clean up and purge. I now have a BIG reason and motivation to get things organized and cleaned up. Wish me luck. If you don’t hear from me next week, assume I’m buried under my stash and call the quilt police for me, okay?

Let’s get onto our next Summer Tutorial project — Lattice!

Lattice is a fun table runner with a really cool woven effect. You only need 3 fabrics — light, medium, and dark along with a coordinate for your border.

You can get the print Lattice pattern HERE or the digital Lattice pattern HERE.

My original sample for the pattern was made with one of my favorite color combinations — red, white, and black. Just love how striking it is! Today’s Lattice runner will be in summery blue and yellow. Just goes to show you that Lattice is a flexible pattern and looks great in a lot of different fabric combinations and styles.

Here are my fabrics for Lattice. The large print was on the sale rack at my local quilt shop and the yellow, blue, and background fabrics are from my stash.

Time to cut these pretty fabrics.

Once we cut the background fabric (white in the pattern) and the dark (black in the pattern) fabric into squares, we’ll need to cut them on both diagonals to make small triangles.

Next we need to cut the medium fabric (red in the pattern) into squares. This time, cut on only one diagonal to make large triangles.

Here are our triangles ready to go. That’s all we need to make ALL the blocks! Easy peasy!

Let’s sew the background and dark small triangles together. We need to sew a background and a dark triangle together along the shortest straight side, as shown in the 1st image so that they will make a larger triangle. Once we’ve stitched all the small triangles together, it’s time to give them a gentle press with the iron — be careful not to stretch this unit by pressing too hard because of the bias edges.

FYI — this unit is technically half of a Quarter Triangle Square (QTS).

Now let’s sew the large medium triangles to the pieced triangle units from above. Our blocks are coming together!

Next up is pressing our blocks and then snipping off those annoying little dog ears. Sure, you could just leave them, but I have found that snipping them off makes for more accurate sewing.

These blocks actually have a name — they are called Y Blocks. My friend, Cathey of Cathey Marie Designs (Hey Cathey!), is completely crazy about this block and all of its design possibilities. She loves it so much, she even created her own ruler, called the Y Block Ruler, which creates 4 identical units at the same time as well as a series of Y Block patterns. If you ever stop by her website, tell her Tricia sent you. LOL!

Now let’s sew our blocks together, 13 across by 2 down, turning them as shown below to get the Lattice effect.

But wait! There’s more. As I mentioned above, the Y Block is a really cool block with lots of design potential. So, let’s rearrange the blocks a bit to see what we get.

Which one is your favorite? They are all quite interesting, but my favorite is still the original Lattice layout. 🙂

Once you’ve decided on your setting and you’ve sewn your blocks together, it’s time to add the border. Sew borders to the short ends first and then sew borders to the long sides.

Sorry about the weird lighting – this was taken in my sewing dungeon.

As you can see, I haven’t had a chance to machine quilt this runner yet. Just as soon as I can get my space rearranged and my new sewing cabinet all set up, I’ll be catching up on my stack of projects waiting to be quilted. YAY!

Well, I guess that’s it for me. Feel free to get back to your July Fourth Festivities now! Save some watermelon for me!

Until next time —

Always,

Tricia @ VRD

Tutorials · villa rosa designs

VRD Angel Face Quilt Tutorial

Happy Thursday to you!

It’s summer time and the living is easy! After last week’s unusual heatwave here in NW PA, this week has been delightfully pleasant! I’ve enjoyed some quality time on the back porch hanging out with my pup, Bailly, and watching our local eagles. Breakfast on the porch? Yup! Lunch on the porch? Double yup!

As I’ve shown in photos before, the little valley where I live, tucked into the foothills of the Allegheny Mountains, truly is a little slice of paradise.

I hope you are able to slow down your pace a smidge in order to enjoy nature, too.

I’ve also been getting in some much-needed sewing as well. WHEW! I am so relieved that crazy has settled down a little bit for me in recent weeks! You’ll see some of my industriousness when the new July Rose Card patterns are revealed!

In the meantime, let’s get going on this week’s summer tutorial — Angel Face.

I’ve been a big fan of Villa Rosa Designs Rose Cards since my first Quilt Market in 2010 when I first met the amazing Pat Fryer, but Angel Face was one of the very first VRD patterns I’d seen in one of my local quilt shops way back when as they used it as the pattern for their beginner quilting series. Funny how little memory nuggets resurface, isn’t it???

You can find the Angel Face Print Pattern HERE or the Digital Pattern HERE.

Sew, let’s get this tutorial part started!!

Today I’m using fabric from the Dandelion Wishes digital collection and an 885 Dot Batik companion from our quilting pal, Hoffman. Love, love, love these fabrics — the colors are so so soft and gentle. There are 2 colorways — green and pink — and I used a little of both for this fun beginner quilt project.

Heads up! I did make a slight change to the pattern instructions. The pattern calls for a single main print, but I went with and alternated the 2 prints you see on the left side of the photo because I just couldn’t decide between them. Big surprise, there, huh?

First up is cutting out all the pieces, which doesn’t take because we’re going to do some strip sets, so no little pieces. Easy Piezy!

Let’s sew a couple strip sets together. Press the seams towards the narrow strips. Then we need to subcut our strip sets into units. Bet you can do this with both eyes closed, right?

Our next step is to sew the unpieced strips to opposite sides of our main print (or prints) squares.

Now that our strips are sewn to our squares, let’s give them a nice press. Press your seams towards the center square.

Remember those pieced units we cut from our strip sets? It’s time to sew them to the other 2 sides of the squares. There is a teeny bit of matching seams on the ends, but if you pressed the way I suggested above, the seams will nestle together nicely. Pin if you need to and just take your time.

Good to go! Time to give them a little press.

My next step because I used 2 different main prints is to slap my blocks up on my design wall so I can make sure to alternate the 2 blocks. I really like how it looks with 2 fabrics, don’t you? You could even use 12 different fabrics for the squares if you wanted to. Angel Face is a very versatile pattern.

Now let’s sew the blocks together into a quilt top. Remember, that there is some fidgety seam matching when you sew the blocks together, so pin if you need to and go slowly. I promise you, though, that Angel Face goes together super fast!

You can stop here and call your top finished. This size makes a wonderful baby quilt! Layer, quilt, lable, and bind.

OR, you can add a border to make Angel Face the perfect size for a throw quilt.

I’m going to add a border. In fact, I’m using the lighter of the 2 accent fabrics as my border. I think it will make the mottled purple accent strips really pop!

Go ahead and cut out your border strips for the quilt. I chose to add the top and bottom borders on first because the width of the quilt top is less than the width of my fabric, so I won’t have to piece the top and bottom borders.

To measure my top and bottom border strips for cutting, I found the center of my quilt vertically (up and down) and I line up the end of my 2 strips and then I match them up to the edge of the quilt. I pin everything together to keep the 2 borders and the quilt lined up. Then I smooth the strips across the width of the quilt center and cut them to match the width of the quilt top. No more measuring with a measuring tape or ruler for me when cutting border strips.

Then I find and make creases at the centers of the top and bottom borders and the centers of the top and bottom of the quilt. This little step makes it really easy to match up the centers to assist in keeping my borders nice and square instead of getting all crazy and wavy.

Match up the center creases and pin. Next match the ends of the border strips to the ends of the quilt. Pin.

Sew the borders to the top and bottom of the quilt.

For the side borders, you’ll need to piece the strips. Then measure and cut the side border strips. Crease the centers of the strips and the sides of the quilt. Match them up and pin. Match up the ends of the borders and quilt. Pin some more. Finally, sew the side borders to the quilt.

Isn’t it a really soft and pretty quilt???

Here’s a “beauty” shot on my back porch……….

I hope you enjoyed today’s tutorial. Angel Face is a wonderful project. Perfect for a beginner, yet fun and versatile for a more experienced quilter.

Don’t forget to stop and enjoy summer before it’s gone.

Until next week —

Always,

Tricia @ VRD

Quilt Stories · Quilting Partners · Rose Cards · Tutorials · villa rosa designs

VRD Berry-Licious Quilt Table Runner Tutorial

Happy Thursday to you!

Hope you enjoyed last week’s post about the quilt show I attended. I’m still smiling. 🙂 If you missed last week’s post, you can go HERE to see the fun slideshow I created with some of the amazing quilts on display at the quilt show.

Before we get to this week’s tutorial, Berry-Licious — which is lots of fun and very timely — let me tell you a little bit about the inspiration for this table runner. In my area of Northwestern PA, we always look forward to late spring/early summer for a lot of reasons, but one of my favorites are the local strawberries, which are only available for a few weeks in June. Yum, yum, yummy!

When I was a kid, my older sister and older cousins (I was too little) all worked at a local strawberry farm, picking berries. They would meet in town at like 6 AM, and someone from the farm would pick up the kids and drive them to the farm outside of town. Horrors! The kids actually road in the back of the truck to the farm! Then the kids would pick berries for hours, and got paid per quart that they picked. My sister only did it once because it was such hard work, but my older boy cousins did it every summer all through high school and were often the best pickers. The work only lasted 2 or maybe 3 weeks right after school was out for the summer. If you were a teen in my area, this was kind of a rite of passage. I don’t remember if when I was old enough to pick berries, kids didn’t do it anymore or if I just wasn’t interested, but picking strawberries was a rite of passage I never did.

Strawberries have always been one of my favorite fruits, though. When I was really little, we even had a tiered strawberry patch in the backyard. My Mom (Hey Mom!) would make the most delicious strawberry jam and we’d enjoy that all winter long. If I close my eyes I can almost taste it and my mouth is watering, just remembering….

Ahhhh, good times.

Have you made Berry-Licious yet? It’s a fun and very satisfying runner. You can grab your very own Berry-Licious Rose Card print pattern HERE or digital pattern HERE.

In the sample runner on the pattern, I used a fun collection of plaids, dots, and geometrics in delicious bright red for the strawberries.

For my tutorial example today, I am using fabric from the Garnet Glow Batik Collection by our pals Hoffman California-International Fabrics. Fun fact — did you know Hoffman’s been around since 1924???

Aren’t they just delish? The peachy fabrics makes me think of a strawberry not quite ripe yet.

I just love seeing how different fabrics look in the same pattern, don’t you? That’s one of my absolute favorite things about our VRD Facebook group.

Check out these Berry-Licious runners made by Renay Trolinger (Hi Renay!) in our VRD FB group! Aren’t they just too much fun??? I especially love the runner on the left — you know, the one with all the attitude. Great work, Renay!

Let’s get this tutorial going, shall we?

After I cut all the pieces for the runner, I layered my large green and background squares to make Half Square Triangles (HSTs) for the leaves on the stem. Layer those squares right sides together (RST), draw a diagonal line from one corner to the opposite corner, sew on both sides of the drawn line, cut apart on the drawn line, and press the HST open (I like to press my seams to the darker fabric, but that doesn’t always work all the time).

Then like magic you get 2 HSTs! You’ll need to make 10 HSTs. Don’t forget to trim off those little dog ears on the corners!

Wait! We’re not done with those HSTs yet. Now we’re going to use the small background squares to make “flippy corners” — yes, I’m using the professional term here — on the green triangles of our HSTs.

Layer a background square RST on the corner of the green triangle. Draw a diagonal line from the bottom left corner to the opposite corner on the background square. (Yup, LOVE my Frixion pens, especially the Fineliner ones. This red one has been my favorite for a while now and shows up on almost everything.)

Sew ON the line this time and cut 1/4″ away from the line. Open and press. Repeat with all 10 HSTs.

We’re still not done with these HSTs! Tehehe……

Now we need to sew a background rectangle to the top of each HST, but we need to make 5 left side leaves and 5 right side leaves (simply turn 5 of the leaves so they are mirror images).

Whew! Last step with the HST’s for now!

Sew a left leaf and a right leaf together with a green stem in between. Strawberry tops are done!

Now we’re going to make our strawberries — yum, the best part of the runner!

We’re going to make 2 small flippy corners on the top corners and 2 large flippy corners on the bottom corners. Repeat for all 5 strawberries.

Now let’s add the stems to the tops of the strawberries! Make 5 blocks.

Isn’t this just the cutest yummiest quilt block ever??????

Now the blocks are done, let’s put them together into a runner. You actually have 2 options — you can flip the second and fourth blocks upside down like I did in the original runner on the pattern front or you could have all the strawberries going in the same direction. Which way do you like better?

Which one do you think I chose?

The flipped block version. I just love how the blocks look arranged this way. Take a look at the “negative space,” isn’t it interesting?

Maybe when I go to quilt it, I’ll play around with those cool shapes created by the strawberries and stems. How would you quilt it? My original version was quilted with loopy loops.

I had some fabric left over so I made this fun little wall quilt or pillow — I haven’t decided yet. It’s about 21″ square, so it could go either way. What do you think?

Well, that’s it for me for this week. I hope you enjoyed this truly scrumptious (anyone know what movie this phrase was in???) Berry-Licious runner and I look forward to seeing yours on Facebook soon.

Come back next week to see my next summer tutorial! Hmmm…..what should I do next???

Until next week —

Always,

Tricia @VRD

Quilting Partners · Rose Cards · Tutorials · villa rosa designs

VRD Dusk Delight Quilt Tutorial

Happy Thursday to you!

I’ve been thinking about ideas for summer posts and I think I’ll do a series of Summer Quilt Tutorials. Creating tutorials gives me a reason for getting some sewing in AND I have a stack of wonderful kits just waiting for me to make into quilts. The only problem with making a bunch of tops will be getting them quilted. LOL!

I can’t promise one tutorial a week over the summer, but I will definitely try. I may need to alternate tutorials with text posts because sometimes making the top and doing the photography takes me longer than a week to get ready, especially as summers get busier and busier.

Well, let’s get to it.

I chose Dusk Delight as my first summer tutorial because this pattern has been on my mind recently. I’ve done a few “digital” quilt mock ups with it recently and it really resonated with me for some reason. Maybe because of the controlled scrappy look? Or perhaps the vertical arrangement? Whatever it was, I was itching to make this one. Isn’t it wonderful that I had a quilt kit to make one???

Dusk Delight goes together easily, but I will caution you that making a big stack of blocks does take a little time. The assembly is not difficult, but can take some time to get everything put together. I would call Dusk Delight a quilt that you can make in a long weekend.

Read on!

Get your Dusk Delight physical pattern HERE or your digital pattern HERE.

Here’s the fabric I’m using for my Dusk Delight quilt. I just love pairing Hoffman batiks with our VRD Rose Card patterns! I’m using an 1895 Watercolors batik for the block centers and the vertical strips and a Bayshore Bali Pop for the blocks. I can’t wait to see how this turns out because I just love these beachy colors!

The first thing we’re going to do is cut all of our fabrics. We need block centers, vertical strips, and 2 sizes of rectangles for the blocks.

Here’s a couple tips for working with batiks:

  1. Start with a new machine needle because a dull needle will only damage the fabric.
  2. Use leaders and enders so that your machine doesn’t try to eat your fabrics at the beginning of a seam. Want to know more about leaders and enders? Check out this post HERE.

For my leaders and enders, I ‘m using a stack of green and white triangle cut-offs from a previous project. Who knows? Maybe I’ll get another little project out of these cut-off triangles.

Okay, let’s make blocks! A lot of blocks….

  1. Sew a small block rectangle to the side of a block center.
  2. Sew a matching rectangle to the other side of the block center.
  3. Take a moment and press your unit so far. This helps to keep the block square as you add the next pieces.
  4. Sew a big rectangle to the side of the unit.
  5. Then sew the last matching rectangle to other side of the unit.
  6. Press your block and voila! One block done.
  7. Now make 39 more blocks! LOL!

Another tip — I made 5 or 6 blocks at a time so that I didn’t get the rectangles too mixed up as I sewed. This went faster than sewing a single block together at a time.

Oh goody! Now one of my favorite things — laying out the blocks. Of course, sometimes this part of the quilt-making process takes me longer than actually sewing everything together. The more I look at the arrangement, the more I move things around. But I do definitely love mixing and matching the colors….

To help me arrange the blocks, I put all the blocks and the vertical strips up on my handy dandy flannel board. It really is handy dandy — I use it way more than I ever thought I would. I have no idea why it took me so long to put one up. The only issue I ran into was that the quilt was longer than my board, so I had to do some creative layering at the bottom so I could see the bottom 2 block rows.

If you’re experiencing flannel board envy, let me tell you how to have your own handy dandy flannel board in a matter of minutes with very little cost. I stole this idea from my quilty pal, Mary Lee (Hi Mary Lee!), who has one up tacked to the top of a set of double doors that lead to her front enclosed porch (which she uses for storage).

Go ahead and get yourself a rectangular flannel backed tablecloth. You will want a heavy duty one with a thicker flannel on the back so that it will grab and hold your fabrics. They do come in different sizes — mine is 50″ x 72″ — so you can choose the one that fits your space. Now that it’s the good ol’ summertime, it’s the perfect time to find your very own flannel backed tablecloth.

There are lots of different ways to put your flannel backed tablecloth up. I use binder clips to clip my tablecloth to the top row doors of my cube storage wall. This way, I can remove it when I need to. If yours is removable like mine, you could even use it as a tablecloth so make sure to pick out a fun pattern on the front that matches your outside decor.

Well, I guess I’ve got the blocks arranged the way I want them…..maybe…….

So let’s sew them together before I change my mind again. LOL!

I’m going to sew the outside blocks together into rows before I tackle the center block section.

Now that the outer blocks are sewn together, I can no longer move them around.

Before I start the center block section, I need to piece my vertical strips together to make longer strips. I don’t want to forget to do this step or else my strips won’t be long enough.

Sew…..sew……sew. Press…..press…..pres…… Yay! The center section blocks are now sewn together. Of course, I had to play switcheroo a couple — or maybe a dozen — times before I sewed them together.

Wait! Which way do I want the center section? Gah! I’m still not done arranging, even though the blocks are sewn together. Which one do I like better — right side up in the left photo or upside down in the right photo. Decisions…..decisions…….

Which ever one I choose, this will be the final arrangement. Of course, I could flip the whole quilt upside down……ARGH!

I take it back, maybe arranging the blocks isn’t my favorite step after all!

Before I can sew the vertical sections together, I need to cut my vertical strips to the right length. Holding my breath here that it will be the perfect length. Of course it will, right?

Time to sew again. I pinned the vertical strip to the inside edge of each of the outer single block sections, matching centers and outside edges before stitching them together.

This part looks easy in the photos but it took me quite a while because my work space is so cramped right now. It was like wrestling an alligator from time to time.

I matched up the centers and ends of the left section with the left side of the center section. I crossed my fingers that the blocks would be decently lined up across the vertical strip.

Then I lined up, pinned, and sewed the right section to the right side of the center section.

Yay! Top done!

Wowzer! Why was I even worried??? It turned out great and the colors are just so calming. Ahhhhh! Now to get it layered with batting and backing (or with just fleece) so I can machine quilt it……someday!

I’d love to see your Dusk Delight quilts! If you haven’t joined our rockin’ fun and uber cool Facebook Group, please do! You can find the Group HERE. And post your Dusk Delights so we can all ooooh and ahhhh over them!

Back to my summer sewing, what fun! Next week’s tutorial will be a table runner, so stop back next Thursday to see which one.

Until next week —

Always,

Tricia @VRD

Quilting Partners · Rose Cards · Tutorials · villa rosa designs

Blog Hop Prizes Update and a VRD Bunny Ears Snack Mat Quilt Tutorial

Happy Thursday to you!

Another week has passed us by and the only things I’ve sewn recently are my samples for this Bunny Ears Snack Mat tutorial. LOL! I hope you had better luck this past week getting some sewing in. I keep gazing at my collection of VRD Rose Cards as well as petting my fabrics and my sewing machine looks lonely across from me as I write here at my desk, but I just can’t seem to find enough time to actually get something going on my machine. Somehow I need to find a pocket of time — maybe I should sleep less so I can quilt more. But, no, that won’t work for me these days as I really do need those 8 hours of sleep a night. Ho hum…..

I just wanted to let everyone know that we are still working on getting everything shipped to Blog Hop Prize Winners. So far the quilts have been shipped, digital pattern collection winners have received their patterns, and prizes graciously being shipped by our lovely sponsors should be in the mail. Physical pattern collections haven’t yet been shipped but should be going out in the next couple days. I have a stack of prizes that also need to get mailed as well as the Kaffe Collection and the Mystery Box.

You may be scratching your head, wondering why it’s taking us so long to get everything sorted out and to the winners. That, my friends, is a complicated topic:

  1. We had around 28 bloggers in addition to our own blog, which really makes 29. There were prize winners on ALL of the blog post. So that’s a lot of information to put together and organize! To make things even slower, we had some winners who never replied to their winner emails, so then we had to randomly select new winners and contact them to get their information. Egads! It literally took weeks to gets all the winners selected and confirmed. Really, I’m not kidding.
  2. Prizes are being shipped from multiple locations — the quilts were shipped from the VRD shop in CA, physical pattern collections will be shipped from our pattern shipping location in MO, digital pattern collections were emailed by moi here in PA, sponsors are shipping prizes from their warehouses and office locations all over the US, and I am shipping prizes and 2 of the Grand Prizes from my little studio here in PA.

It’s crazy when you think of the logistics involved in our Blog Hop — kind of like dancing Swan Lake en pointe while trying to juggle knifes — very sharp knifes!

Happily, we should have everything out in the mail very soon. Winners hare receiving their prizes. Please continue to be patient as we get everything on its way to you.

Now, how about a fun tutorial?

Nothing says spring like a pair of bouncy little bunnies with extra-long ears! But before I even begin the tutorial, I need to let you know there is an update on the cutting instructions for piece B — you should have enough fabric left over to cut the updated piece, though. Please check the Corrections Page HERE for the new cutting measurement for piece B. Yes, we do have a corrections section at the bottom of our website, villarosadesigns.com, so if you ever find something on a pattern that doesn’t quite look right to you, please check the corrections page for updates.

Get your own Bunny Ears Snack Mat Rose Card physical patterns HERE or digital patterns HERE.

All right! Let’s make some cute bunnies!

The first thing we need is 2 fat quarters. Yep, just 2 FQs makes 2 adorable little Bunny Ears Snack Mats.

I chose these bright and happy spring prints from Cherry Guidry’s Full Bloom collection for Benartex for my Snack Mats.

Time to cut all the pieces out — we’re actually doing the cutting for both Snack Mats at the same time. While I cut, I’m using my ancient homemade flannel board to keep my pieces from getting lost.

Did you miss my flannel board tutorial last week? You can find it HERE.

PSST! Don’t forget to switch your pieces before your start sewing so the bunny fabric in one block becomes the background in the other!

I know it doesn’t look like much yet, but here are my pieces all laid out for both blocks and ready to sew together. Having a small flannel board is great because I can just take it right to my sewing machine from my cutting table, without dropping or losing a thing.

As all the pieces are cut and ready to go, let’s start sewing these little Bunnies together!

Place a background square right sides together on the top left corner of the Bunny Head rectangle. Draw a diagonal line and sew on the line. Then cut 1/4″ away from the sewn line and press the “flippy triangle” open. Yup, that’s what I call them — “flippy triangles” — you know, I only use the technical terms here on the blog. LOL!

To make thing easier later, press the seam towards the Bunny.

Sew “flippy corner” on the top right corner and press this seam towards the Bunny Head too. Repeat to make identical “flippy corners” on the second mat.

Voila! Now we have 2 cute little Bunny Heads (with a crazy mess for Ears right now)!

Speaking of Bunny Ears, let’s make some! Place the background squares right sides together with the Bunny Ear rectangles, lining up the outside edges at the bottom. Draw diagonal lines as shown — keep in mind you are making mirror images. Sew on the lines and cut 1/4″ away from the drawn lines. Open the “flippy corners” and press the seams towards the background fabric.

Our Bunny Ears aren’t quite finished yet because we have to add some top “flippy corners,” too. The background squares used for the top of the Ears are larger than the squares used at the bottom in the previous step so be careful not to get the top and bottom squares mixed up.

Again, we are making mirror images. Repeat this step for the second block as well. Press the seams toward the background fabric.

We now have Bunny Ears! Yay!

Next, sew the background strip between the Bunny Ears and press the seams towards the center background strip. Repeat for the second block.

Almost there, just a few more steps!

Now sew the Ear section to the top of the Bunny Head for both blocks. If you pressed the “flippy corners” towards the Bunny Head in the first step, above, then your corners should nestle together nicely.

Ladies and Gents, we now have a Bunny, or rather 2 Bunnies!

Do you see how the green stands out and the floral fabric recedes? Aren’t fabrics so much fun to play with???

The last thing to do is sew the narrow background strip to the left side of the block and the large background piece to the right side of the block. Repeat for the second block.

And there you have it — Bunny Ears Snack Mats! Next up would be layering the Mats with batting and backing, quilting them, and adding binding.

Don’t forget to label your Snack Mats!

I hope you enjoyed this super cute tutorial and have fun making your very own Bunny Ears Snack Mats. They are quick and easy to make, using only 2 fat quarters, and are great little something-somethings for all your pals, quilty ones and non-quilty ones alike! Long live cute little Bunnies! Hurray!

Until next Thursday —

Always,

Tricia @VRD

Tutorials · villa rosa designs

A Tutorial for Making Your Own Quilt Block Flannel Board, What I’ve been Up To (No Good, Probably!), and a Giveaway!

Hello Quilty Friends!

Happy Thursday to you!

Now that we’re past the middle of April, spring is finally springing around here, although it’s still either cold or rainy. We’ve had so much rain here in NW PA, there is a lake in the field back behind my house. And the fun thing is that a small group (flock? gaggle?) of Canadian geese have claimed it as their very own little oasis! Silly goosies! But I do love to hear them honking out there to each other and it’s fun to see them waddling around. The lake is starting to dissipate, but we keep getting enough rain that it refills, so right now the geese are in luck.

Speaking of April, I know it’s spring when my Friday Quilt group starts meeting again. We skip January and February because those months are historically our snowiest months and usually start up again in March. I didn’t get a chance to mention my group back in March because we were all busy with the Blog Hop.

I know I’ve talked about these amazing quilting gals before and I’m so thrilled that we’re back together once a month again. I want to do a shout out to the Friday Gals — you know who you are — Hey Ladies! (If you want to know a little bit more about these Friday ladies, you can go HERE.)

You might wonder why I am talking about these gals, but for the last 2 years, we’ve been doing Villa Rosa Designs quilt projects. But his year, everyone wanted somethng a little different and everyone agreed that they wanted to go back to a sampler quilt again. It’s been quite a few years since we’ve done a year-long sampler project, so it’s time.

Farm Girl Vintage by Lori Holt of Bee in My Bonnet Co. was an easy choice for 2024 because of the fun blocks in both 6″ and 12″ finished sizes as well as a plethora of terrific projects in which you can mix and match blocks. In fact, Lori has 2 other books, Farm Girl Vintage 2 and Vintage Christmas which also use both 6″ and 12″ blocks. And guess what that means??? All the projects are interchangeable among these 3 books! WOW! In addition to some other fun quilt books, Lori has a bunch of super patterns and even a book about scrap quilting called Scrappiness is Happiness. If you’re not familiar with Lori’s designs, you should check them out.

She is a fabric designer for Riley Blake as well as an author and quilt designer. I’ve designed quilts using a few of her collections over the years — they were lots of fun. Very scrap happy and bright with a vintage vibe. You can find out more about Lori Holt HERE.

Beginning last month in March, we are going to work our way through the 12″ and 6″ blocks (as well as the delightful tractor block) in the book by making a mix of 6″ and 12″ blocks each month until December.

Here are blocks from our first get together.

I like to offer my own sampler layout when we do a year-long sampler quilt project, and this year is no different! I designed 2 different settings — one as a throw/twin and one as a full/queen. Of course, the Farm Girl Vintage book has lots of fun projects of all sizes, too, which means everyone has options! And boy, do I LOVE to have options!

I’ll give you a sneak peak at the center of my full/queen quilt (without the borders — I’ll get those on someday!). I chose a scrappy blue and white farmhouse-y color scheme and I really love how it turned out. What do you think?

After making VRD quilts for the last couple years, we couldn’t entirely abandon our VRD projects, of course, so for 2024 I set up a series of VRD quilt challenges. (You know, this could be a great idea for quilt guilds and groups or even quilt shops — just sayin’……)

Anyway, here is our challenge schedule:

June 2024 — Fat Quarter Project

August 2024 — Panel Project

October 2024 — 5″ or 10″ Charm Square Project

December 2024 — 2 1/2″ Strip Project

Of course, there are a few rules:

  1. You must complete a quilt top before we meet that month
  2. You may not use projects from classes 2022 or 2023

I’ll try to take photos when we have the Challenge quilt reveals, so you’ll have to stop back to see what VRD projects the Friday Gals create.

In our most recent meeting, our group made portable flannel boards to accommodate 12″ blocks so I thought I’d show you how we made them because everyone should have a small flannel board. This size is super to carry back and forth from your cutting area to your sewing machine or even to a quilt class, retreat, or sew day.

Here’s a flannel board I made maybe 15-20 years ago. This board has seen a lot of wear and tear and the corners are all bent up, but it’s definitely stood the test of time and use because the only thing I’ve really had to do is to tighten and re-tape the fabric on the back once or twice. This board is around 12″ x 18″ and is made out of a heavy duty cardboard. It is great for smaller blocks, but doesn’t quite hold the pieces for a 12″ block, so that’s why I had the idea to make one sized for 12″ blocks.

What You Need:

A piece of sturdy cardboard or a sheet of foam core board

A piece of neutral tonal or solid quality flannel fabric as large as the board you want to make plus an additional 3-4 inches all around.

Duct tape.

I chose to use a piece of foam core from Dollar Tree (LOVE Dollar Tree!) which will actually give me 2 boards about 15″ x 15″ and a leftover long rectangle for some other project. Because the boards aren’t exactly 30″ long long, my finished boards won’t be exactly 15″ square, but that’s okay, it’s close enough for jazz. If you want your boards to be perfect squares, go ahead and measure the length of your foam core board and divide that number in half. Use a ruler to draw lines to make 2 equal boards. If you want 1 big board, you can use the whole piece of foam core, just keep in mind it will be kind of clunky to carry back and forth from your cutting area to you sewing machine to your pressing area. But if it works for you, go for it.

One you’ve drawn your lines, time to cut on the lines with a utility knife or scissors. BE CAREFUL! We don’t need any accidents on this step.

Here’s 1 board around 15″ x 15″, which will allow me to lay out the pieces for a 12″ block (or smaller). Now let’s get our flannel fabric ready. I suggest pressing it so the flannel is nice and flat before you put it on your board.

Okay, lay your flannel fabric on a flat surface with the wrong side facing up. Center your board. Then fold one side up and tape it firmly to the board. Repeat for the opposite side. Make it smooth and taut before you tape it to the back of the board.

Next up, we are going to fold the corners in on 1 of the remaining 2 sides and then tape the side to the board. Repeat for the other side, pulling the fabric smooth and taut before taping that last side. I used an extra piece of tape on each side to help keep the flannel nice and tight.

Voila! Here it is — a board block big enough to layout a 12″ or smaller block!

Wasn’t that super easy? Now you know how to make a flannel board, you can make them in any size you want, just make sure that your flannel fabric is 3-4 inches bigger all the way around your board so you have enough to wrap around and tape. (Psst! Flannel boards are great activity and story activities for kiddos, too! Use left over fabric and felt to make letters, numbers, and story pieces to delight any kiddo.)

I’m excited to share some BIG NEWS with you — I just finished putting together my 6th book in print! Yippee! Kudos! AWESOME! (Go me!)

It’s called Plan Design Quilt and it is kind of like a workbook for designing quilts on paper. I do design a lot of my projects using Electric Quilt 8 software, but I also scribble blocks and quilt settings down whenever inspiration strikes. Usually I jot ideas down on snippets of paper, sticky notes, napkins, or whatever, and then I lose them only to find them at some later time after I have already forgotten all about that idea. Kind of disorganized, I know.

So I created this book for myself because it gives me someplace to do my little scribbles and keep them all in one place. It’s kind of cool to create a book that fulfills your own needs and then share it with the world. I tell myself that if it’s something I can use, then there are other quilters out there who might need this too. So I designed this workbook-style book with lots of space to doodle and draw quilt blocks and settings, to jot down notes, try out/add fabric swatches, and more. You can find Plan Design Quilt here. Woo Hoo!

But wait — there’s more!

To kick off this new book, I’m going to give away a copy of Plan Design Quilt right here on the VRD blog, Villa Rosa Quilts. All you have to do is leave me a comment telling me your favorite color scheme for making a quilt. I apologize, but this giveaway will be for US residents only. I haven’t decided yet if offering this book in ebook format would actually be helpful for people. Your thoughts?

Oh, almost forgot! You have from today, April 25th through Thursday, May 2nd to leave a comment. I will select a winner randomly.

Well, that’s it for me.

Take a little time to quilt this week!

Until next Thursday —

Always,

Tricia @VRD

Rose Cards · Tutorials · villa rosa designs

VRD Eclipses Quilt Tutorial and a Little More Quilt Math…

Happy Thursday to you!

Wow! I can’t believe that it’s been 2 weeks since the end of the Blog Hop. We are still getting all the winners organized, so please be patient with us. I promise, just as soon as all the winners have been notified and we have shipping information, then I can start getting prizes out to winners. It will probably be done in several stages, so hang in there if you have been notified that you are a winner. Thank you!

On another note, are you excited about next week’s eclipse on April 8th? Are you in a place to see it or are you traveling somewhere for viewing? I am very excited that NW Pennsylvania will be able to see it, so all I have to do is step outside and look up. Fingers crossed that it isn’t cloudy — that would be a total disappointment if we all can’t see it. Yes, I did finally get my eclipse-viewing glasses, so I’m all set now.

In celebration of this eclipse, I created my own version of Creative Sewlution’s Eclipses which was one of March’s new patterns. I had to hustle to get the top and photos done for today, but I did manage it. And, boy, am I glad I did — it is an amazing design and I can’t wait to show you how to put it all together!

Didn’t get your Eclipses pattern yet? You can find it HERE as a physical pattern OR you can find it HERE as a digital pattern.

But before we do (sorry about the teaser…), I have one more thing to talk about.

Have you ever looked at a big quilt and imagined it as a smaller size so you could use it on a wall? The Eclipses quilt finishes at 59″ x 75″, which is a throw quilt or a REALLY BIG wall quilt. I definitely do not have a big empty wall to hang a quilt of this size, but I really really wanted to make Eclipses.

So, what to do???

Why, I’ll make the quilt smaller so it fits my space! Brilliant!

Have you ever made a quilt smaller or larger than the pattern? There are lots of different ways to alter the size of a quilt, but I thought I’d tell you how I did it with Eclipses.

OH NO — IT’S MATH!!!!!!! RUN!!!!!!!! LOL!

Sorry, couldn’t resist. Teheheh…. You know how much I LOVE LOVE LOVE quilt math!

You can resize most simple quilt patterns by dividing each measurement by whatever fraction you want to make the quilt.

Let’s say I had a 60″ x 60″ quilt with 12″ blocks. No sashing, no borders. Just blocks. Why look, here it is!

Hmmm, that’s just too big. I want to make a nice little wall quilt exactly like the pattern, but half as big. So if the quilt pattern quilt finishes at 60″ x 60″, then I think cutting the dimensions in half to 30″ x 30″ would suit my needs.

So, here’s where the fun begins.

Time to divide all the measurements by 1/2. My 12″ blocks will now finish at 6″. I still need to make the same number of blocks, though, which is 25.

Our repeated block is actually a humble Shoofly block. Isn’t it interesting what happens when you put the blocks side by side without any sashing? Hmmmmmm. Something to play with another day.

There are a couple different ways to figure out the new cutting measurements to make the 6″ finished block.

  1. Redraw the block on graph paper
  2. Divide the original cutting measurements in half (for example a 4″ square would become a 2″ square)
  3. Recreate the quilt in Electric Quilt’s awesome Electric Quilt 8 software and the program will do the math for you!

I don’t usually use graph paper for designing. Most of the time I use a combination of #2 and #3. It also helps if you have some experience with quilt designing.

Shoofly is an easy one to resize, which is why I chose it for this illustration. Because it’s a Nine Patch block, we know that each of the 9 squares in the block will end up being the same size, so we will divide 6″ by 3 (3 squares across, 3 squares down) which equals 2″. Each “square” should finish at 2″. So, we will cut the squares at 2 1/2″ x 2 1/2″ (the 1/2″ is for the seam allowance, so the finished size of the square is 2″ x 2″).

Now what about the Half Square Triangle (HSTs) in each corner? They have to finish at 2″ x 2″ in order to fit properly into the 6″ finished quilt block.

Aha! You do need to know a little bit about quilt math here. Rule of thumb for HSTs is to add 7/8″ to the finished size (to make room for the seam allowance and cutting). So we’ll simply just add 7/8″ to our 2″ finished squares and we get a cutting measurement of 2 7/8″ x 2 7/8″ for our HSTs. Not sure how to sew HSTs? Check out our 2023 Quilt Block Basics Series HERE. Some folks even like to cut their squares a bit larger and then trim them down to the correct size. Do likewise if you prefer.

Something to remember — not all quilts can easily be resized. Who wants to work with pieces that end up needing to be cut 3 5/22″ in size??? Definitely NOT me!

Now that I’ve totally confused you (sorry, not sorry), let’s do the tutorial for Eclipses — the method of construction is the same whether it’s full-sized or mini.

Here are my yummy fabrics for my Eclipses quilt — 1895 Watercolors from Hoffman Fabrics with an 885 Dot rich blue for the background. I love the Dot batik for the background because it actually has little pops of other colors to add lots of interest.

So let’s get started by cutting out all the pieces for the quilt. I do like to cut everything for the blocks before I sew. I save cutting borders until the end if a quilt has borders, though. That way, I don’t have to stop between steps and keep cutting the fabrics I need next. It saves time for me as well as keeping all my pieces organized.

First up is to add yellow/orange “flippy corners” to my grey rectangles. I draw a diagonal line from corner to opposite corner and SEW ON THE LINE. I really like to use my Frixion Pens for this step. I love to have a lot of different pen colors to use on different colors of fabrics — besides, lots of colors just makes me happy. Here, I’m using red.

Trim 1/4″ away from the sewn line. Then open and press.

But wait! We’re not done with our “flippy corner” yet! We’re going to add another, smaller “flippy corner” to our yellow/orange corner.

Uh oh! Now what? I won’t be able to see my red Frixion pen on the blue background. Sadly, there isn’t a white Frixion pen, so I use my trusty Bohn Chalk Pencil, which is white so it will show up on the dark blue background square.

Okay, layer that background square on the yellow/orange corner. Draw a diagonal line from corner to opposite corner and SEW ON THE LINE once again. Trim 1/4″ beyond the line. Then open and press.

Go ahead and repeat for the all of the large grey rectangles on 2 sides.

Moving on, we have MORE “flippy corners to do”. In fact, we have to add “flippy corners” to ALL of the rectangles. Add background corners to the yellow/orange rectangles and yellow/orange rectangles to the narrow grey ones.

Sew the 2 units above together into a block. Repeat for all the narrow rectangles.

Yay! Here’s my favorite part — slapping them up on the design wall and rearranging them until I like what I see. Make sure to follow the diagrams on the pattern so your blocks are lined up correctly. Don’t forget the sashing and side borders.

I like what I see — the orange is distributed nicely and adds a good pop of color. Let’s SEW! I am going to start with the left side of the quilt, but I am taking the left background sashing down until I’m ready for it in a few steps.

I’m going to sew the blocks bottom to top to make a vertical row (which might feel a little weird if you’re used to sewing horizontal rows). Don’t forget to press your row. (One thing I really like about working with batiks is that they press so crisply that I don’t need any pressing spray to flatten them, which saves a bit of time). I am going to go ahead and repeat this step with the right side blocks.

Now I’m going to sew the narrow background sashing strip between my vertical block rows. I’ll look one more time before I start pinning so that everything is lined up.

I like to make a crease in the center of my pieced strip and the sashing strip because it helps keeps things aligned. Then I match up the center creases and put in a pin. Next I pin the ends together and add a few pins in between the center pin and the end pins. This helps to distribute any fullness and make my pieces more plumb.

After pressing the seam towards the background sashing strip, I’m going make a center crease in the right side pieced strip. Then I’ll use those center creases again to line up the right side pieced vertical strip with the narrow background sashing strip. By lining up the center creases again, this will help to make sure both sides of the pieced strips are across from each other and not skewed.

In the photo below you can see how well my blocks are lining up by matching the center creases.

WOW! It’s coming together and starting to look like the cover quilt. Yippee!

Now let’s add wide background sashing strips to the left and the right of my quilt section. Again, crease and line up the centers.

Whew! First section of the quilt is done, now let’s repeat for the right half of the quilt.

Almost there……….now I’m going to sew the right section to the center wide background sashing, creasing those centers and matching them up so everything fits together nicely.

VOILA! Here is my wall quilt sized Eclipses quilt top. I wonder if I can get it finished by Monday the 8th?

I really like how it turned out! What do you think?

Well, that’s it for me this week. I hope you get to see the eclipse on Monday, April 8th. Here’s hoping the skies won’t be cloudy so we can all breathlessly witness time standing still for a moment.

Until next week —

Always,

Tricia @VRD