Quilting Partners · Rose Cards · Tips and Tricks · Tutorials · villa rosa designs

Spring into Spring Tutorial Series: Pretty Posies, 6 Quilts in 6 Weeks Challenge Invitation, and a Fabric Acquisition Road Trip (FART)

Happy Thursday to you!

We literally have SEW much to do today, so I’m going to jump right in with both feet.

I’m really excited to be hosting the 6 Quilts in 6 Weeks challenge on the blog again! If you didn’t get the chance to participate last fall in the challenge, you’ll want to join us next week!

6 Quilts in 6 Weeks Challenge

A stack of colorful quilts with various patterns, featuring text promoting the '6 Quilts in 6 Weeks Challenge' and the website 'villarosaquilts.com' set against a blue sky background.

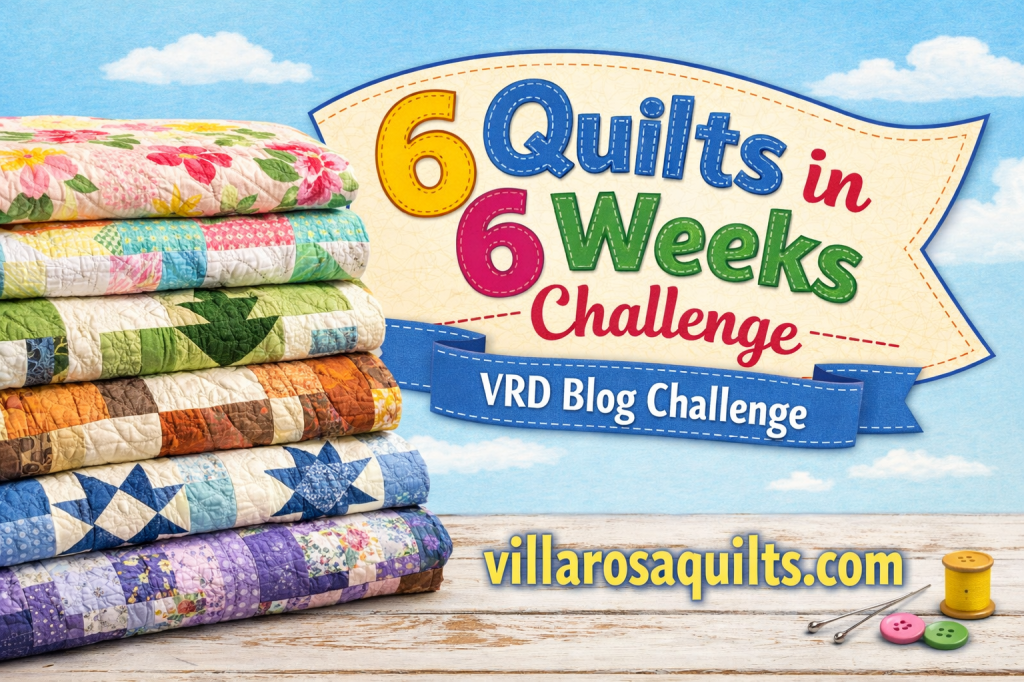
Here’s how the whole 6 Quilts in 6 Weeks idea got started last fall:

With my teetering stacks of unfinished quilt tops (or flimsies), I decided some kind of serious intervention was required. Hey – what if I challenged myself to complete one quilt a week? What if I made myself accountable by posting a before and after photo each week? It sounded a little daunting to me, but I was up for a new challenge last fall. Then I had one of those why not? moments – why not invite all of you to join me? And a fun new blog challenge was born.

So here’s the schedule of events and all the info:

The Dates:

Week 1 – 4/10

Week 2 – 4/17

Week 3 – 4/24

Week 4 – 5/1

Week 5 – 5/8

Week 6 – 5/15

The Rules and All the Details of the Challenge:

Each week for 6 weeks, participants will post before/after photos of weekly UFOs to our VRD Facebook page or if you prefer, you can email the photos to me at tricia@villarosadesigns.com.

I will post my before/after photos on the blog, villarosaquilts.com, each week and I will try to post them on the VRD Facebook page.

All quilt tops/projects must be VRD patterns – this is the VRD blog, after all. Quilts must be quilted and bound to be eligible for prize drawings. No size requirements (I have UFOs from snack mats up to large throw quilts). It doesn’t even have to be a quilt – we have some great accessory, table runners, place masts, and snack mats.

Each week, I’ll draw a name randomly from those participants who posted before/after photos by each weekly deadline. The winner will get a surprise quilty good in the mail after the Challenge ends. Goodies might be from me or from one of our lovely quilting partners.

This Challenge is open to all, but please note that International winners will receive a selection of VRD digital patterns.

PSST! You can even use the next six weeks to make a NEW VRD quilt each week if you want – hey, maybe you don’t have any unfinished VRD tops just sitting around. So go ahead – pick your favorite VRD pattern and get moving. Wouldn’t this be a great opportunity to get some of your holiday sewing done early??? I am not quite that organized, I’m afraid, but maybe you are.

You might be wondering what happens if you don’t post a before/after photo for a weekly Challenge or you miss the deadline. It’s pretty simple – your name won’t go into that week’s prize drawing – that’s okay because life gets busy. I’m not kicking you out of the challenge, though – feel free to participate any or all weeks. Your name will go into each weekly drawing that you participate in.

Seriously, I want to encourage all of you as well as myself to finish projects, not to stress about them. LOL!

I think that’s all the important info. I hope I’ve answered any questions you had. If not, feel free to email me.

Wanna join me in this challenge?

Send me your name and email address at tricia@villarosadesigns.com to officially join the challenge and be eligible for weekly prizes. Your name and email will only be used for this Challenge, I promise you. Then get sewing! And don’t forget to have some fun!!!

Okay, let’s move on to our new Spring tutorial for this week.

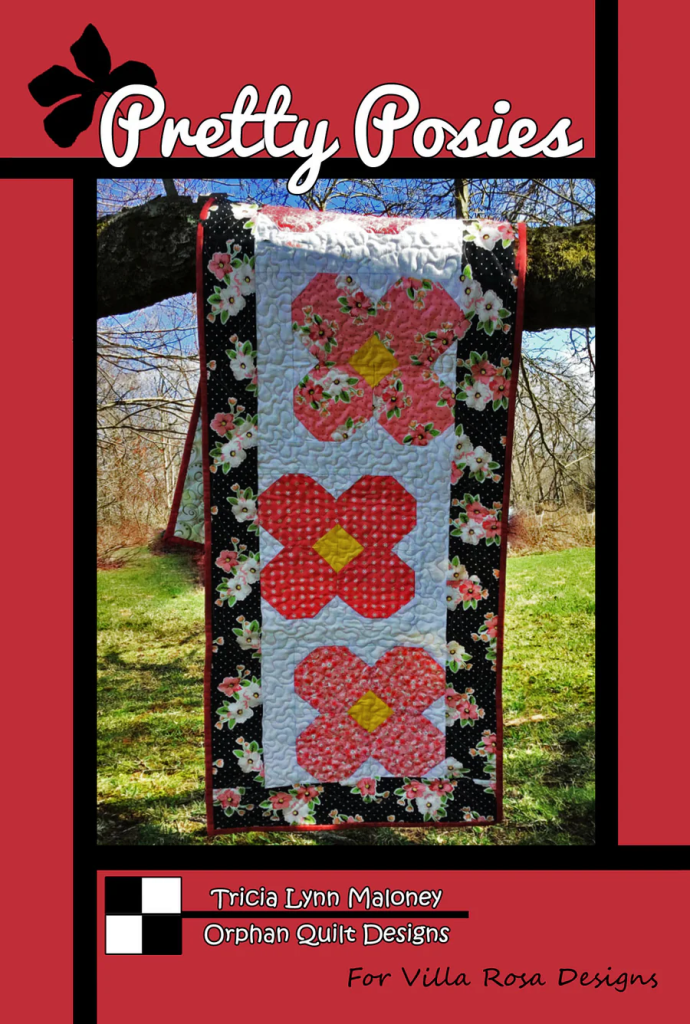
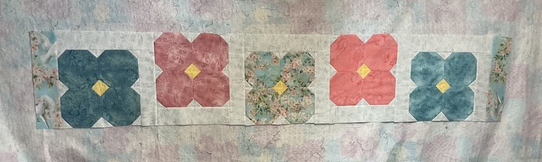
Spring into Spring Quilt Tutorial: Pretty Posies

Pretty Posies is totally a perfect table runner for spring with its slightly tossed sweet blooms. I just love the perky yellow centers of the flowers – to me, they look like a little springy hello. 🙂

A quilt titled 'Pretty Posies' featuring large colorful floral patterns, hanging on a tree branch in a natural setting. The quilt design incorporates pink, red, and yellow flowers, with a black and white floral border.

Get your digital pattern HERE or your print pattern HERE

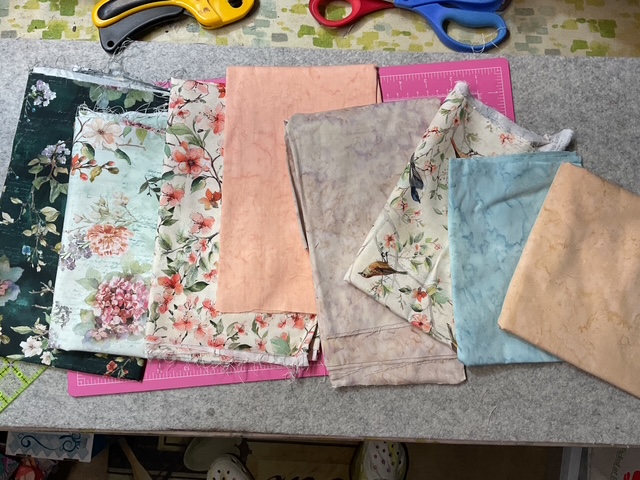
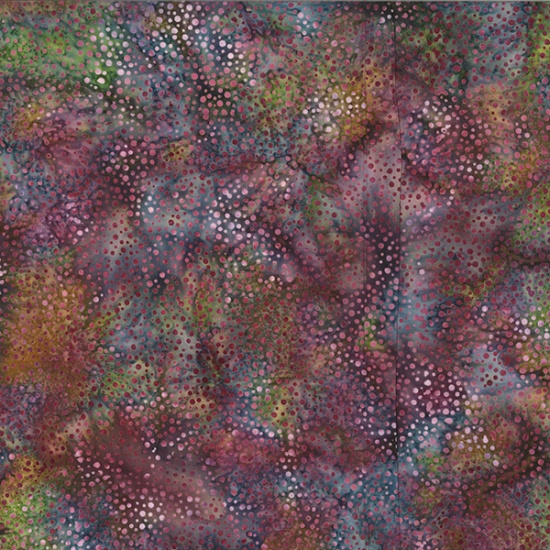
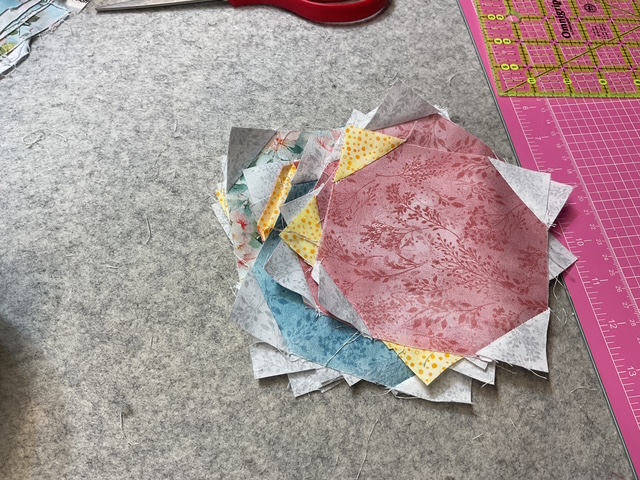
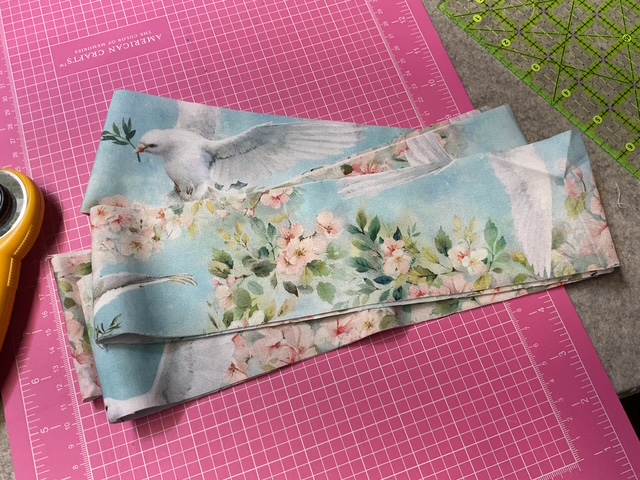
1. Our first step is always to gather up our fabrics. Today I’m using lovely sample fabrics from our quilty pals over at Hoffman Fabrics. SHHH! This fabric isn’t even available yet, so you’re getting a sneak peak!

It’s an upcoming new collection called Blushwing and there are some lovely sweet 1895 Watercolors batik fabrics and a fun 885 Dot batik, too. Quilt shops will be able to order this fabric next month and it will ship to shops in September. So ask your favorite retailer to order Blushwing!

A collection of fabric pieces in various colors and patterns, including floral designs with birds and solid colors, spread out on a crafting surface.

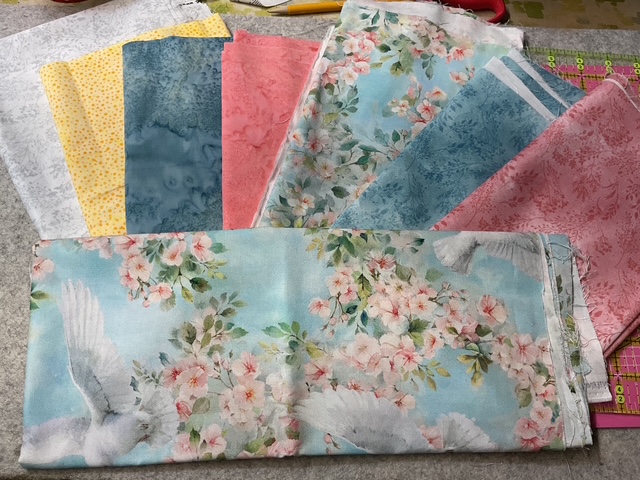
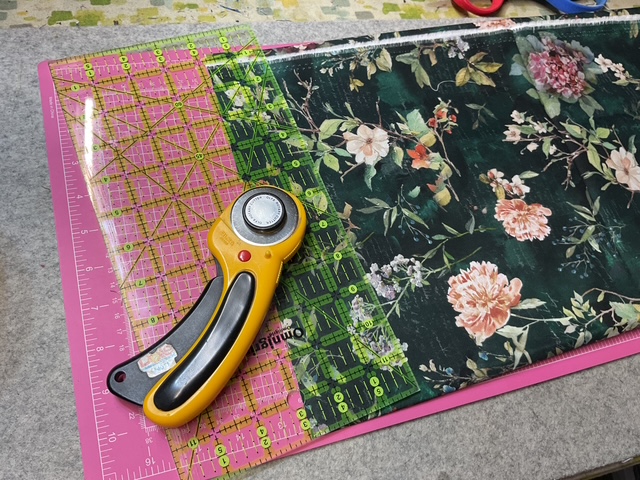
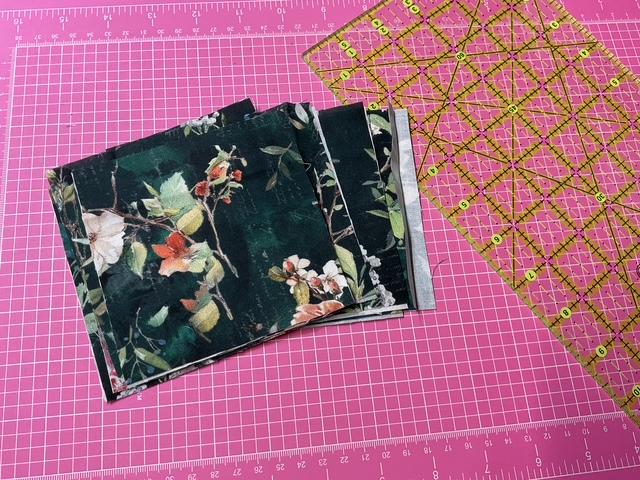
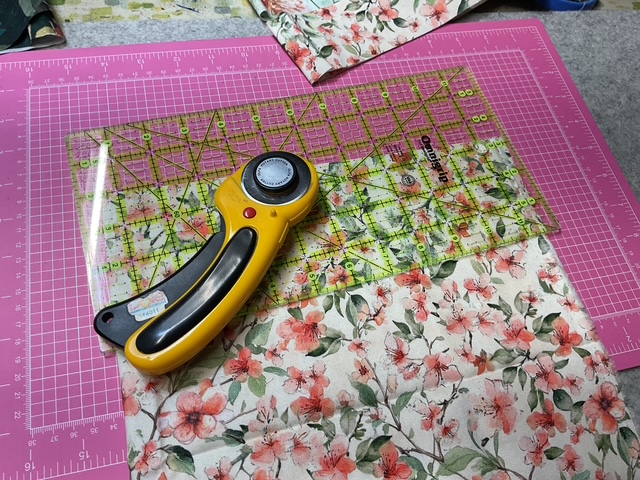
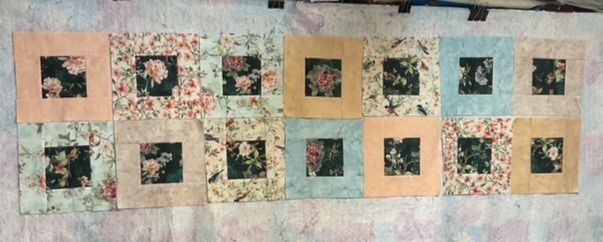
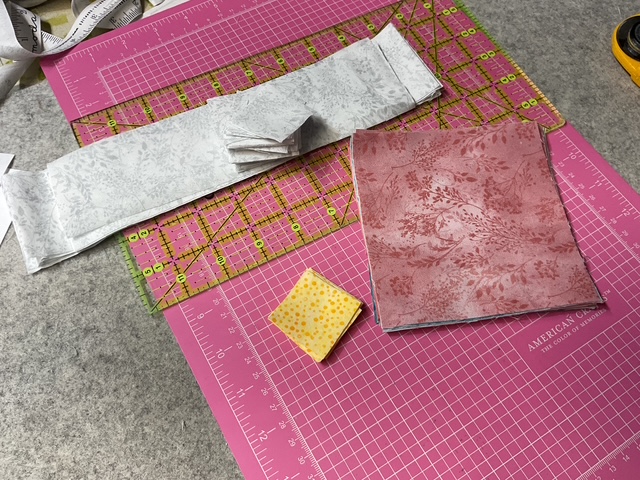
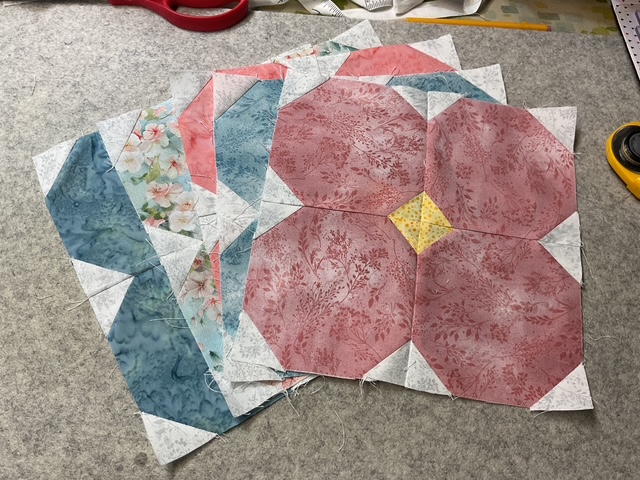
2. Let’s get started at my cutting station (which doubles as my pressing station, too). There’s some simple cutting to do for this runner – cutting strips then cutting the strips into rectangles and squares. There’s nothing difficult or tricky with the cutting, just follow the instructions on your pattern. Instead of showing cutting images for each fabric, I’m just going to show you all the pieces cut and ready to move on to sewing.

Various fabric pieces arranged on a pink cutting mat, including a long strip of white fabric, a square of reddish fabric, and a small yellow square with a polka dot pattern.

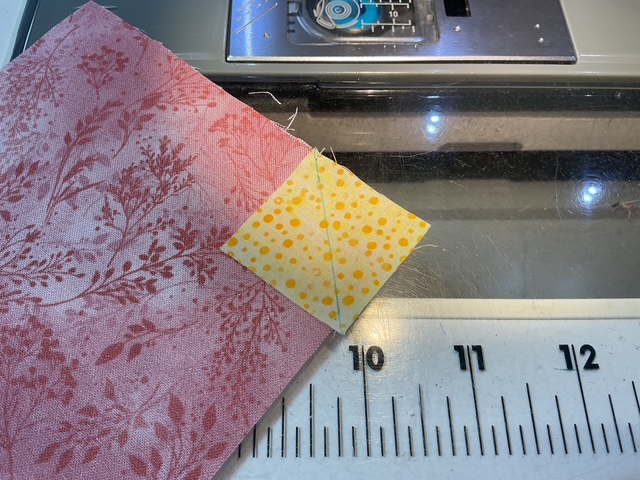
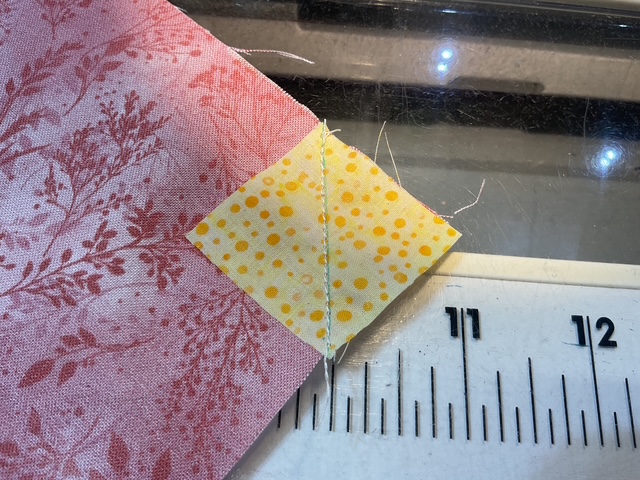
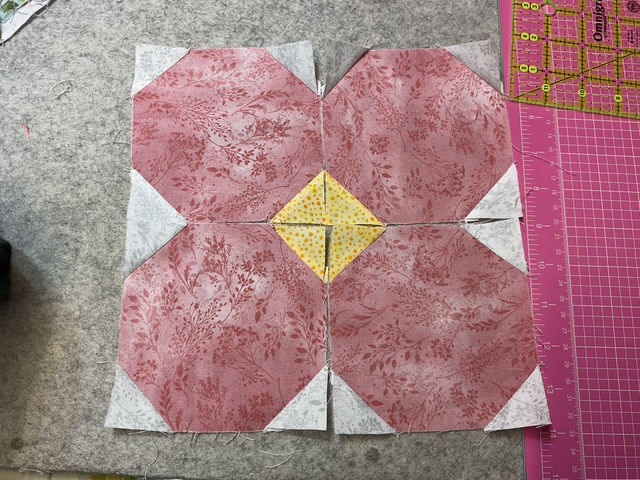
3. Now we’re headed to the sewing machine. We are going to use the Stitch and Flip method to add a triangle to each corner of the flower squares. I’ve been calling this method the “flippy corner” method for a while now, but I recently discovered it is called more often the “Stitch and Flip” method, so I’ve decided to use this more common name going forward so I don’t confuse anyone (or myself).

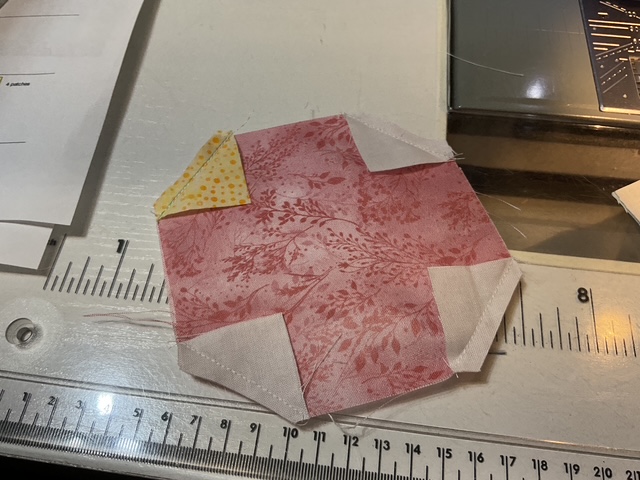
One corner of each flower will have a yellow triangle while the other 3 corners of each flower square will be background fabric triangles.

Let me show you how the Stitch and Flip method works.

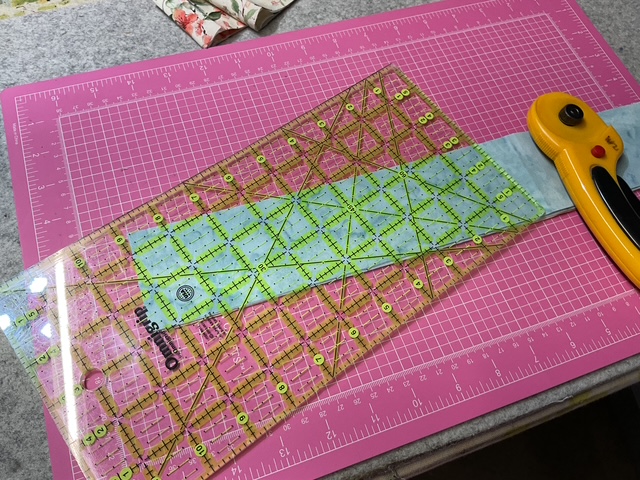
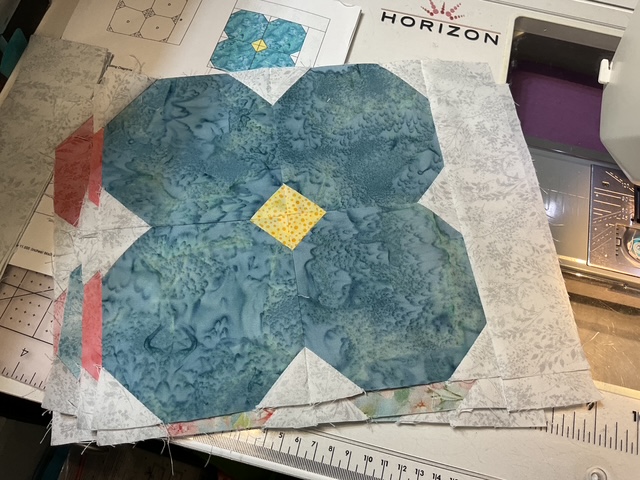
Layer a small square RST (right sides together) on one corner and draw a diagonal line. Then sew on the line. Cut off the excess fabric about 1/4″ away from the sewn line.

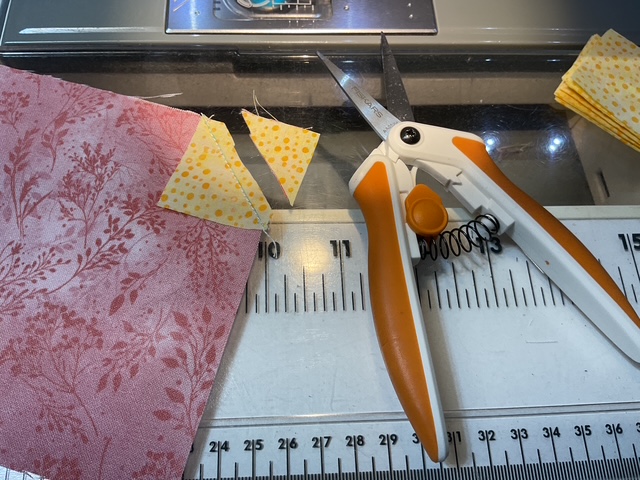
We will repeat the Stitch and Flip method to make background triangles for the other 3 corners of each flower square.

A partially sewn octagonal patchwork piece made of various fabrics, including pink and yellow, on a sewing table with measuring tools.

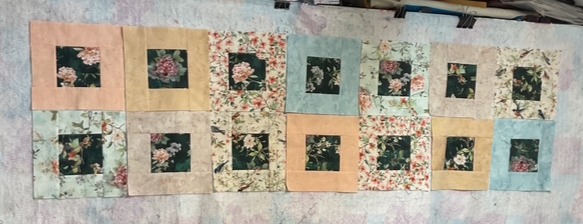
3. Back to my cutting and pressing station to press open all of the Stitch and Flip triangles.

A note about pressing: I suggest you press the triangles for 2 of the flower squares for each complete flower (you need 4 matching flower squares for each complete flower) towards the triangle and the other 2 towards the flower square. This will make sewing the flowers together a lot easier as the seams will nestle.

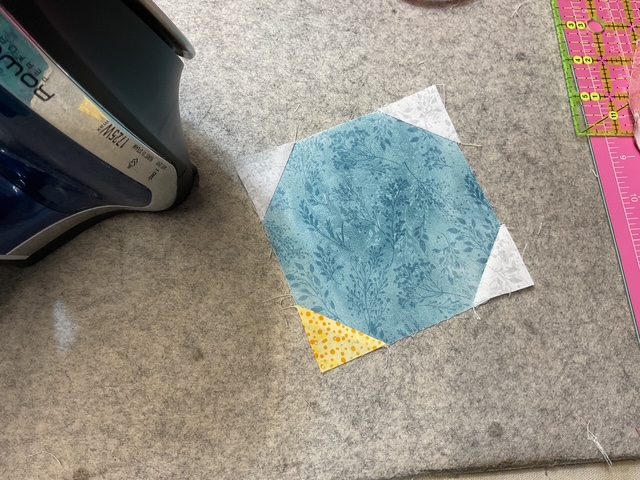
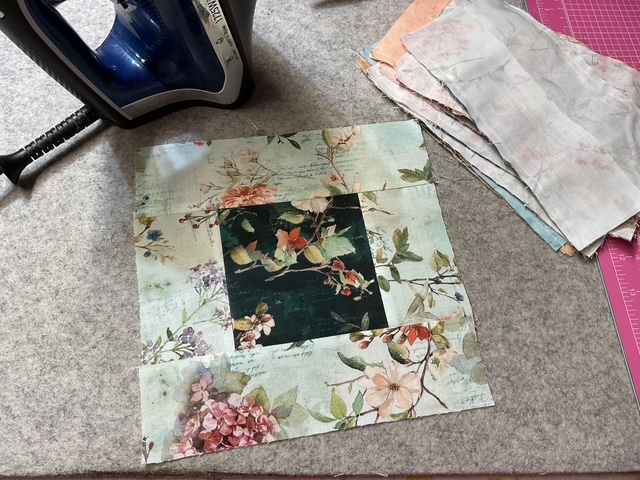
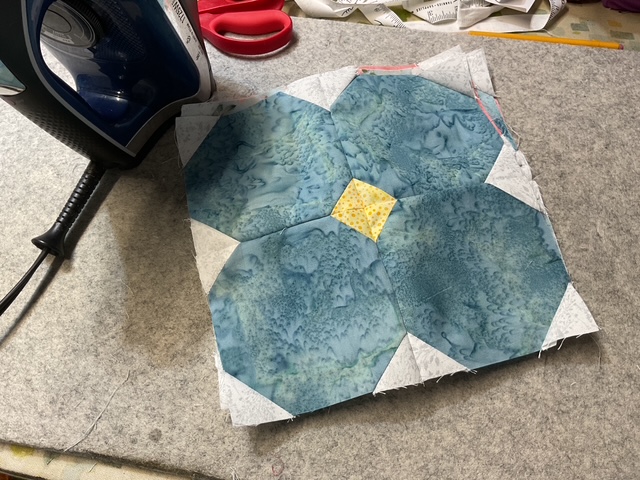
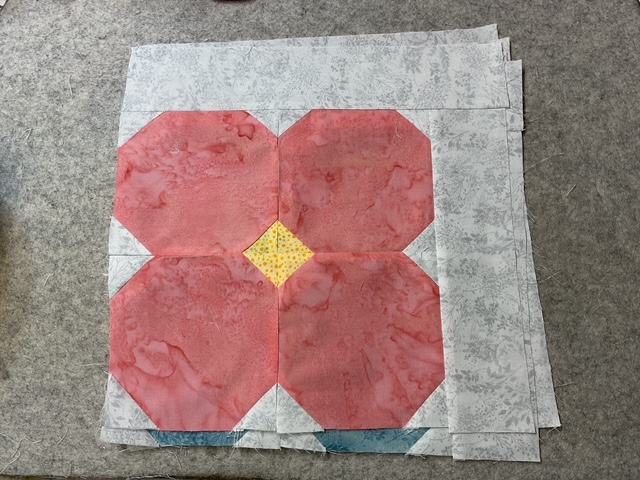
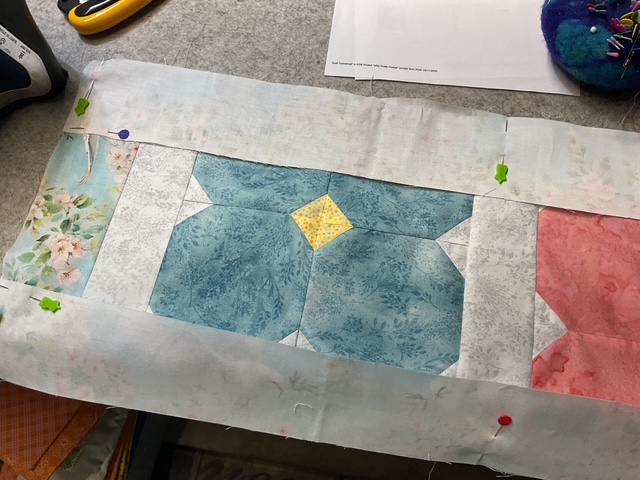
4. Back to my sewing machine. I’m going to lay out and sew each flower together with the yellow triangles towards the middle to create the flower center.

I’m going to sew the top 2 squares together and the bottom 2 squares together. Then I’m going to sew the top section and the bottom section together to make a complete flower.

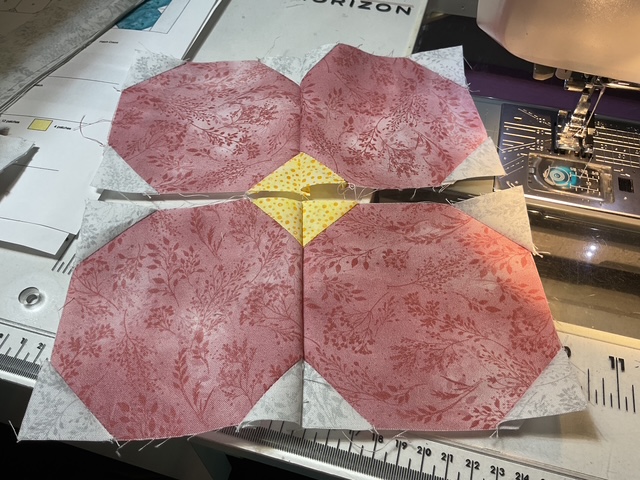
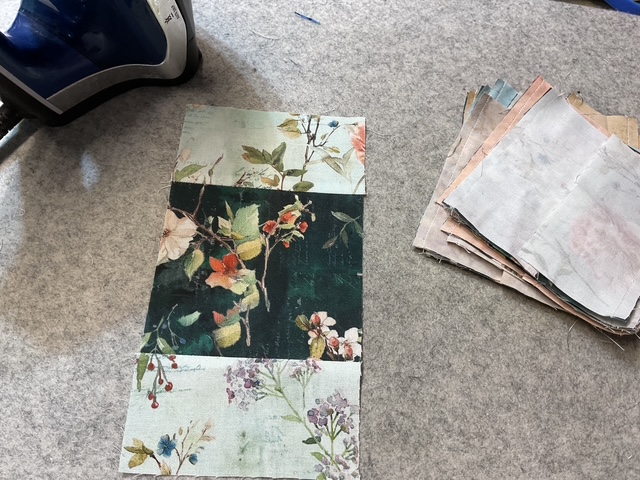
5. Sigh……back to the iron to give the blocks a nice press.

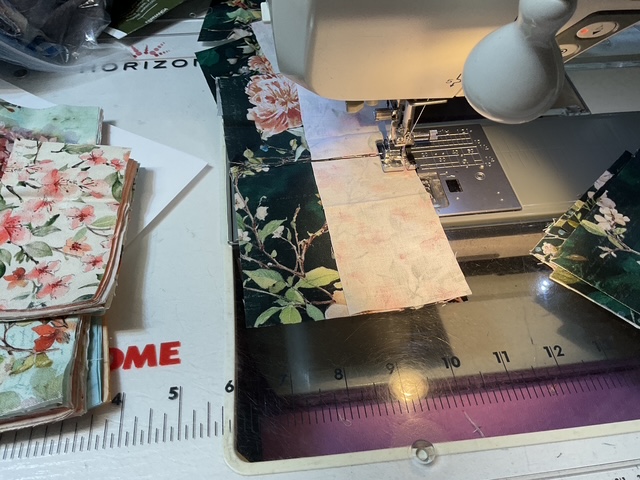
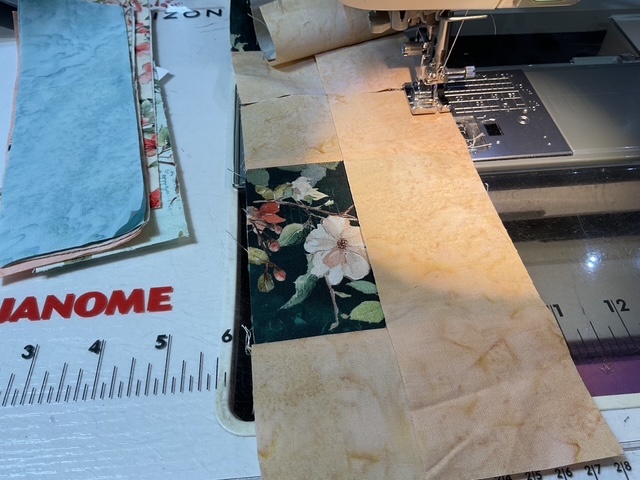
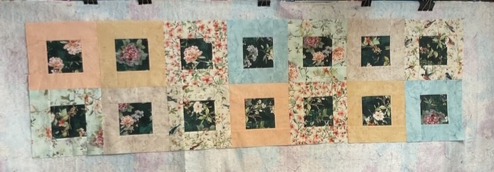
6. Next we’re going to add the half sashing to each flower block. This is what creates the movement in the runner. It’s one of my favorite easy peasy techniques.

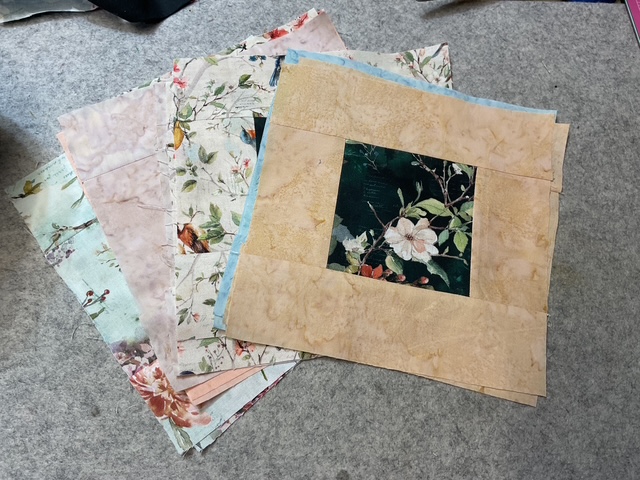
Back to the machine. First we add a background strip to the side and then we add the second background strip to the top. A quick press and our blocks are finished.

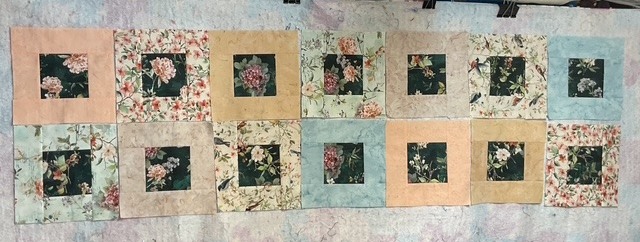
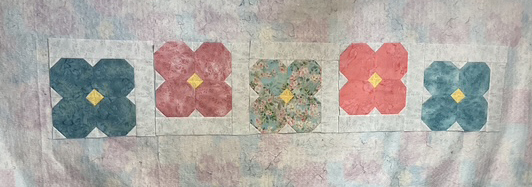
7. Yay! Time to sew the blocks together. Sooooo, back to the machine. I think I’m starting to feel a bit like a pogo stick. My cutting and pressing station is near my sewing area, but I have to get up and go around the corner of my shelf unit in order to cut or press. Sigh…..I definitely need to take some time and do a little rearranging to make it easier to go from one to the other.

Because I am using 3 blue fabrics and 2 pink/mauve fabrics, I already knew how I wanted to lay out the blocks. You, however, might need to explore some different options until you find the arrangement you like the best. Flip and turn the blocks however you like.

A fabric quilt with five large floral blocks arranged in a row, featuring colors of blue, pink, and a floral pattern, set against a pastel background.

8. Now it’s time to cut border strips. Do you cut all your fabrics before you start a project or do you cut as you go along? When I have a border on a project, I usually wait until after I get the center made before I cut my border strips.

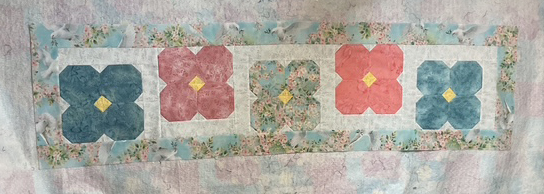
Isn’t this just the prettiest fabric for the border? So soft and gentle.

A stack of fabric strips featuring a pastel design of doves and floral patterns, placed on a pink cutting mat with a rotary cutter nearby.

9. I like to measure my quilt before I cut the border strips to size, even if a pattern gives the measurements. I just like to be on the safe side. So I measured my runner through the center both horizontally and vertically to get my final border sizes. I’m going to sew the borders to the short ends first.

I really love how the border pulls out the center blue floral flower, don’t you?

A quilt panel featuring a series of five floral patterns in varying colors including blue, pink, and green, with yellow accents in the center of each flower.

10. All right, now I’m going to pin my long borders to the runner. I would imagine every quilter has their own method for doing this step. For me, I begin by pinning the center of the border strip to the center of the runner side. Then I smooth each side of the border towards the end of the runner, where I pin the corners of the border strip to the corners of the runner. Finally I add a few more pins between the center and the ends to help keep everything lined up. What’s your method for sewing on long borders?

A patchwork quilt segment featuring blue, pink, and floral patterned fabrics with pinned sections ready for assembly.

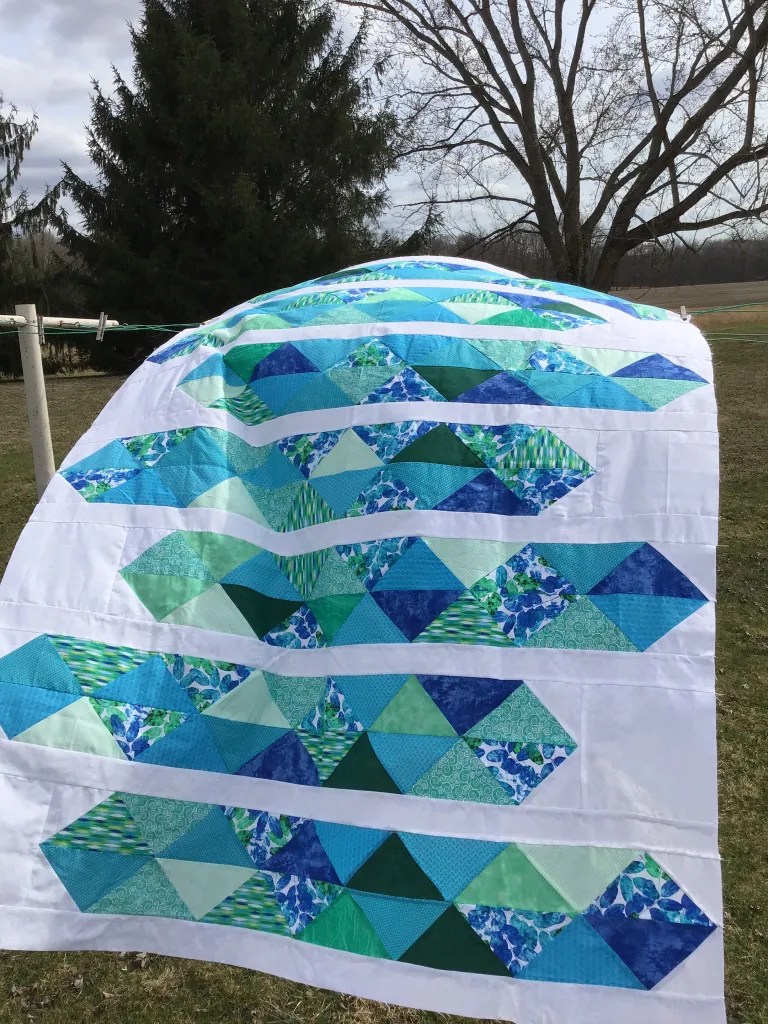
VOILA! A finished Pretty Posies runner top. I just love how it turned out. Perfect for Spring.

A patchwork design featuring four large flower motifs in pink, red, and blue against a light floral background.

Now to layer it with batting and backing. Machine quilt it. Bind it and add a label.

WHEW! I think it’s time to take a break from sewing and go shopping!

A Fabric Acquisition Road Trip (FART)

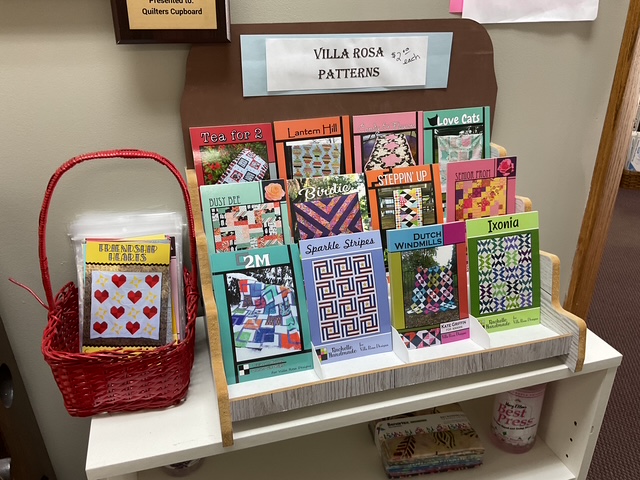
On Saturday, friends Robin, Mary Lee, and I piled into my cute little red Jeep Compass and went on a fun laughter-filled FART to one of our area shops. Quilter’s Cupboard is located in Seneca, PA. Big SHOUT OUT to owners Shirley and Brenda!

Their shop is cozy and welcoming. You step inside the shop to see rows of colorful bolts of fabric and a wall filled with notions, patterns, and fabric panels. One of my favorite firs tstops are their precut shelves with assorted precuts, fun little goodies, and precut patterns. I of course grab some 5″ squares and 2.5″ squares.

The hallway boasts more bolts of fabric with tons of great rulers on the opposite wall. The first room has seasonal fabrics and flannel. The hallway then branches left into a large bright classroom with many samples gracing the walls with the kits nearby and ample space to have classes. The right branch of the hallway leads to an exit and another room filled with ByAnnie patterns and supplies with the most amazing (and inspiring) samples. I grabbed a new ByAnnie pattern, some mesh, and zippers. We’ll see if I get brave enough to tackle that project.

By the way, the shop is totally crazy about Villa Rosa Designs Rose Card patterns! They have VRD samples galore as well as fantastic kits for all of their samples and of course VRD Rose Card patterns.

A display stand showcasing various quilting patterns from Villa Rosa, featuring designs such as 'Tea for 2', 'Lantern Hill', 'Love Cats', and more. A red basket with additional pattern booklets is also visible.

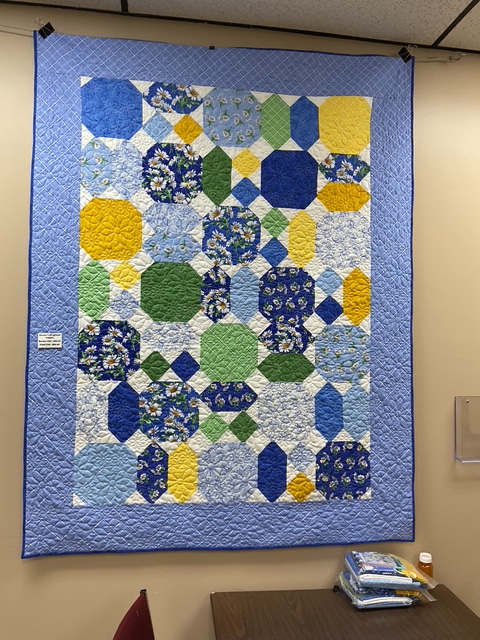
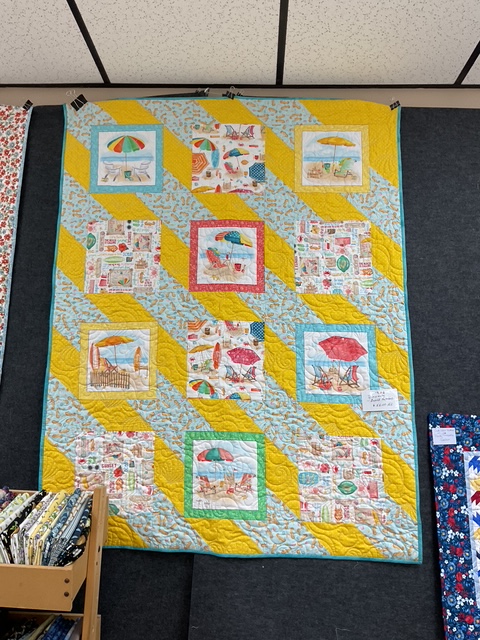
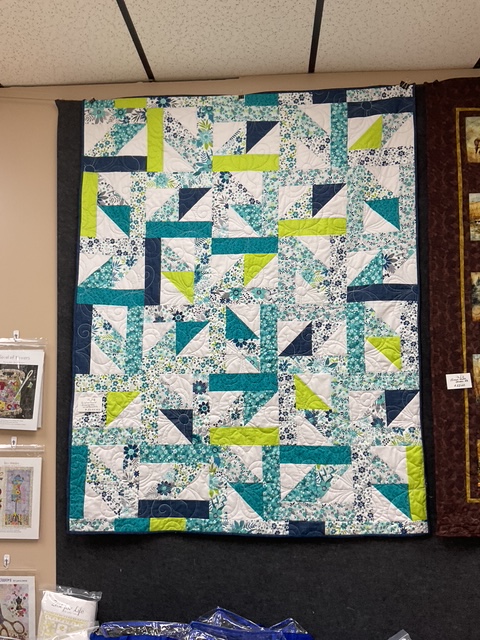
Here are some of the super VRD samples on the walls.

A wall hanging quilt featuring various nature-themed fabric squares including images of animals and birds, bordered with a dark brown fabric and yellow highlights.

Gridwork with a few adaptations. Get your digital pattern HERE or print pattern HERE

A colorful quilt hung on a wall, featuring a patchwork design with blue, yellow, green, and floral patterns.

Pavers – get your digital pattern HERE or your print pattern HERE

Colorful quilt featuring beach-themed blocks with umbrellas, beach chairs, and seaside illustrations, arranged in a diagonal pattern against a yellow and light blue background.

Dinomite – get your digital pattern HERE or your print pattern HERE

A colorful quilt featuring a geometric pattern with shades of teal, navy, green, and white, displayed on a wall.

Sisterhood (I totally love this colorway, don’t you?) – get your digital pattern HERE or your print pattern HERE

Here’s a great selection of VRD table runners!
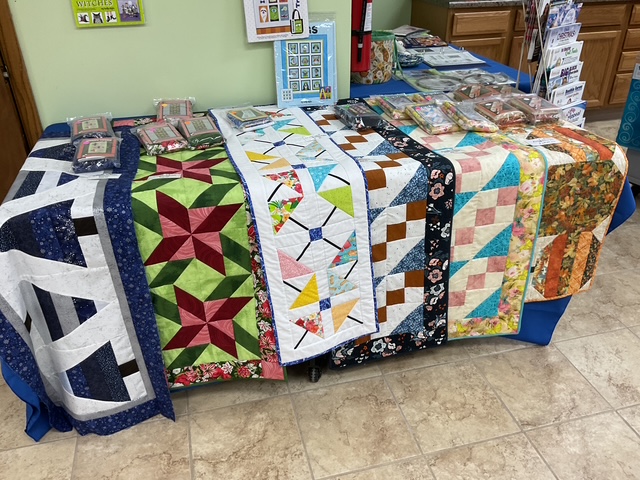
A display of colorful quilts on a table, showcasing various patterns and fabrics, with sewing supplies and patterns arranged nearby.

From left to right:

Merry Trees – get your digital pattern here or your print pattern HERE

Poinsettia – get your digital pattern here or your print pattern HERE

Lil Umbrellas – get your digital pattern here or your print pattern HERE

Bespoke (2 options shown) – get your digital pattern here or your print pattern HERE

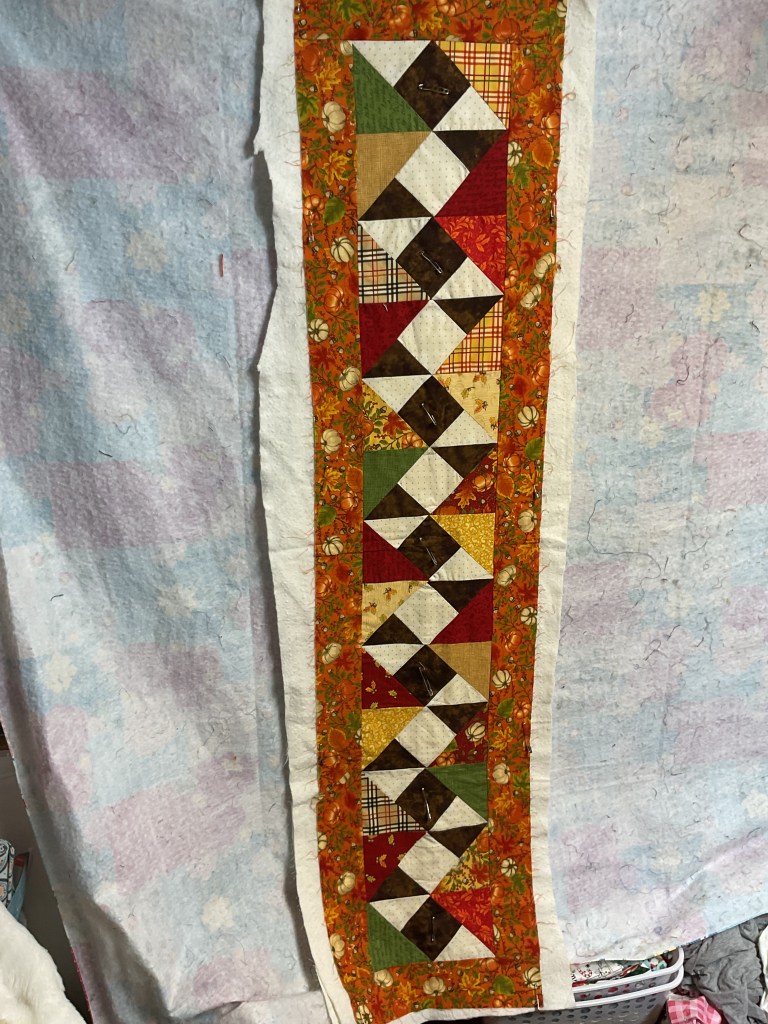
Pumpkin Hollow – get your digital pattern here or your print pattern HERE

And seasonal snack mats!

Two handmade quilted placemats displayed on a wooden surface. The top placemat features a green and plaid patchwork design with shamrocks, while the bottom placemat showcases a bee and beehive pattern in black, yellow, and white.

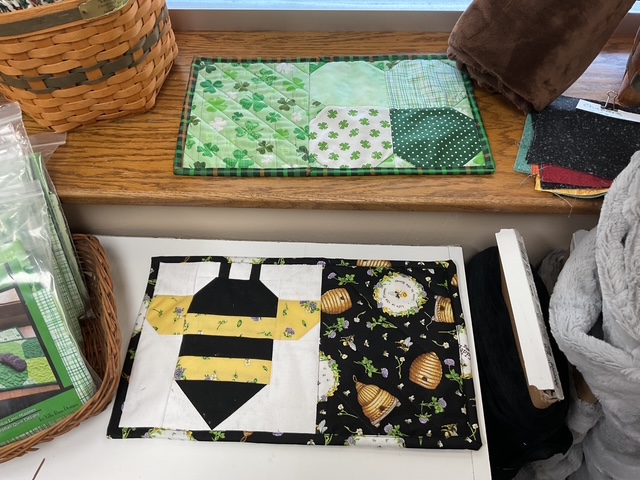
Top: Shamrock – get your digital pattern HERE or your print pattern HERE

Bottom: Buzzy Bee – get your digital pattern HERE or your print pattern HERE

Or get all 12 Seasonal Snack Mat Patterns HERE.

What fun trip! Mary Lee spent the most and Robin spent the least. After we shopped, the three of us headed over to The Log Cabin restaurant for lunch.

Last stop was to Ollies to poke around to see what interesting and fun things we could find. Beside, Mary Lee had never been there before.

All in all, our FART was a welcome break from the minutia of our every day activities. And spending time with quilty pals is always a good time. When was your last FART?

WHEW, that’s it for today’s post. Don’t forget to join me for the 6 Quilts in 6 Weeks Challenge which begins next week.

See you then!

Always,

Tricia @ VRD

Rose Cards · Tutorials · villa rosa designs

Spring into Spring Quilt Tutorial Series: VRD Rose Card Pattern Honey

Happy Thursday to you!

Spring literally starts a few days, which is probably why we have snow on the ground again and it was like 16 degrees last night. BRRR! Regardless, I’m definitely thinking spring! So I thought it would be fun to leap into some fun spring quilt tutorials to get me into the spirit even if the weather doesn’t cooperate with the season.

I’m also thinking it’s time for a spring 6 Quilts in 6 Weeks Challenge. Anyone up for that? I did a 6 in 6 last fall and we had great time. It was incredible to finish one VRD quilt a week for 6 weeks. 6 completed quilts at the end. Which was rockin’ awesome! Especially considering all the tutorial sample tops that I’m accumulating. LOL! So……who’s in? I’m thinking to start this the first week of April, 2 weeks from now. It would last for 6 weeks. Right now, I’m just putting feelers out to see who wants to join me for this 6 in 6 challenge? I figure if I do this challenge twice a year in spring and fall, we can all get up to 12 quilts finished in a year.

There are a few rules, though, I’d better mention –

1) Quilts must be made from VRD patterns

2) You must post a before and an after photo on our Facebook page or email them to me if you’re not on FB to be entered in the weekly drawings

3) Anyone can participate

4) If you don’t have stacks of VRD UFOs like I do, no problem – you are welcome to make new VRD quilts/accessories to participate

I think that’s pretty much it for the rules to get started.

If you’re interested, you have 2 weeks to email me your name and email address at tricia@villarosadesigns.com. I promise your email address will only be used by me to notify you if you win a prize.

Now….on to our first Spring into Spring VRD quilt tutorial!

VRD Quilt Pattern Tutorial Honey

There’s nothing like a new table runner to add a touch of spring to you space! Have you ever made Honey before? If not, you’re in for a treat because this runner goes together quick as bunny and looks great in just about any group of fabrics you want to use.

A patchwork quilt with a mix of floral and checkered patterns in yellow, blue, and black, displayed on a dark background with the title 'Honey' and credits to Tricia Lynn Maloney from Orphan Quilt Designs.

Get your digital pattern HERE or your print pattern HERE

Let’s get started!

1. Time to gather up our fabrics. I’m using lovely sample fabrics from our quilty pals over at Hoffman Fabrics today. SHHH! This fabric isn’t even available yet, so you’re getting a sneak peak!

It’s an upcoming new collection called Nesting Hour and there are some lovely sherbet-y 1895 Watercolors batik coordinates, too. Quilt shops will be able to order this fabric next month and it will ship to shops in September. So ask your favorite retailer to order Nesting Hour!

A collection of various fabric swatches in floral and solid colors, arranged on a cutting mat with sewing tools in the background.

2. All right! Let’s get some cutting done. First, I’ll cut strips for the block centers and then I’ll cut the strips into squares.

3. Next I’ll cut the strips for the frames and then subcut the strips into the needed smaller pieces.

4. All the pieces are cut, organized by shape, and ready to sew. Yay!

Three pieces of fabric with floral designs laid out on a pink cutting mat.

5. We’re headed to the sewing machine to make the blocks. I’m going to sew the short strips onto opposite sides of the center square. When I’m sewing the same step over and over, I really love chain piecing because it saves both time and thread.

6. After I sew the matching short strips to opposite sides, I’m headed over to the ironing station to press my block so far before adding the next strips. I don’t always press in the middle of sewing a block together, but today I am because I want the blocks to turn out really crisp.

A piece of fabric with floral patterns laid on gray felt, alongside a stack of assorted fabric swatches and an iron.

7. Then back to the sewing machine to add the long matching strips to opposite sides of the center square to complete the frame for each block.

Close-up view of a sewing machine with fabric pieces being stitched together, featuring floral patterns and pastel colors, on a quilting mat.

8. And back to the iron to press the completed blocks so they will be nice and crisp. I’ve noticed that when I press blocks on my wool pressing mat, I don’t have to use pressing spray to get sharply pressed blocks.

Right now I have an 18″ x 60″ mat on my 24″ X 60″ ironing station. My Dad designed and made the ironing board for me years ago. My lovely big board sits on top of an Ikea Kallax 8 cube shelf on casters and it’s the perfect height for me!

The 18″ wide mat just seems too narrow for me now, so I’m thinking of upgrading. I see mats are now available in 22″ x 60″ and 24″ x 60″, which is really great. Maybe I won’t run off the edge anymore. Definitely worth thinking about now if they have the exact size I need.

A square fabric patch featuring floral designs laid out on a work surface, with an iron and additional fabric pieces beside it.

9. Yay! My blocks are all pressed!

A stack of quilt fabric squares in various floral patterns, including a central square featuring a dark background with floral designs.

10. Next up is putting my blocks up on my design wall so I can rearrange them. Here’s a few photos showing how I’m moving things around. Sometimes this step takes more time than I’d like, but it is a really important one because nobody wants a visually lopsided quilt.

A patchwork quilt layout featuring floral and pastel fabric squares arranged in a grid pattern.

11. Here’s the arrangement I decided upon. Then it was back to the sewing machine to sew the blocks together. Next up with be layering, quilting, adding a label, and binding…….sometime.

A colorful quilt layout featuring floral patterns with squares of light pastel colors and dark floral prints.

I really like how it turned out, don’t you? So soft and fresh. I can’t wait for the fabric to be available in quilt shops come September 2026.

Your homework for the next couple weeks is to decide whether you want to join me in a Spring 6 Quilts in 6 Weeks Challenge. Drop me an email (tricia@villarosadesigns.com) if you want in. I’ll post more info next week.

Let’s get quilting and finishing together! YEAH!

See you right here next week for another Spring into Spring tutorial.

Always,

Tricia @ VRD

2025 6 Quilts in 6 Weeks Challenge · Quilting Partners · Rose Cards · villa rosa designs

6 Quilts in 6 Weeks Challenge – Week 4

It’s hard to believe it’s Week 4 of our 6 Quilts in 6 Weeks Challenge already, isn’t it? How many of you have been following our VRD Project Finishers on our VRD Facebook page? I know I have! I really love how supportive everyone is on the VRD FB page, too, it’s a great place to hang out if you’ve never visited before.

I’m really hoping this “finish 1 project a week” concept will stick with me and I’ll continue after the Challenge is over because I literally have STACKS of flimsies (quilt tops) waiting impatiently to get quilted, bound, and finished. I think it would be a great accomplishment for me (or any of you) to shrink those stacks of unfinished projects before the end of the year.

Wouldn’t it be awesome to jump into 2026 with a plethora of new project ideas without the guilt of that sad stack of unfinished projects sitting there, judging us? Besides, finishing projects will make more room in our quilting spaces for new projects!

Okay, how about our Week 3 Challenge winner now (selected using a random number generator)?

Congrats to Robin M!

Prizes for our Weeks 1-3 winners will be in the mail shortly, so enjoy your quilty surprises sponsored by our good friends over at QT Fabrics. Thank you, QT!

Now we’re ready to jump into our Week 4 Challenge!

My finish this week was a really fun one – Helix by our talented VRD designer, Molly Cook. Have you ever tried this pattern before? Helix is fat quarter friendly and finishes at a nice 50″ x 66″. You could add a border all around to make it larger if you wanted to.

It is definitely a more challenging project – I would consider it more intermediate/advanced. There’s a lot of matching points and seam intersections in this one. The finished quilt is gorgeous, though, with its eye-catching geometry. A very cool quilt.

A quilt design titled 'Helix' by Molly Cook, featuring vibrant patchwork in various shades of blue, green, purple, and brown, set against a patterned background.

Get your digital pattern HERE or your print pattern HERE

When I searched for this tutorial on the blog, I discovered – gasp! – it was from 2023! Huh. How time flies! You can find the Helix tutorial HERE.

If you’ve never made this one before, I really do suggest you check out the tutorial because all those intersecting points can be a challenge if you’ve never done them before.

Here’s my BEFORE photo:

A completed quilt with geometric patterns in shades of blue and green, displayed outdoors against a backdrop of trees and a cloudy sky.

Apparently when I took the photo back in 2023, it was a really windy day!

And here is my AFTER photo:

A completed quilt featuring geometric patterns in shades of blue, green, and teal, displayed outdoors against a grassy background.

See the interesting plaid markings showing through the quilt (the sun was behind the quilt when I snapped the photo)? That is courtesy of the fun blue/teal plaid fleece on the back. Yep, another fleece-backed throw with no batting – just the way I like ’em! Fleece-backed throws are perfect all year around as they are lightweight yet cozy and soft.

I’m really pleased with how this quilt turned out. The crisp white background was the perfect companion to set off all of the blues, greens, teals, and turquoises. I quilted it with my usual allover meander, but this time I used a very subtle variegated thread, Seamist by YLI. I thought, why not? My Helix has a lot of white space so I thought the variegated thread in blues and teals (I swear there’s a bit of green and lavender, too) would really compliment the quilt. I love how it turned out, but the thread color variations were very very subtle.

Close-up view of a quilt showcasing intricate patchwork patterns in shades of teal, green, and white, with a soft quilted texture.

I found a blue fabric in my stash that had narrow white lines to give it a subtle plaid look for the binding. I machine stitched the binding on to save time and it definitely went better than last week – my corners were much neater on this one. And of course, I added my label dated 2025, even though I started the quilt in 2023. It’s the end that counts, not the beginning.

Yay! Another finish from my towering stack of UFOs. Hmmm. Which one will I finish next?

I’m going to change the subject in honor of National Cat Day (October 29th).

How many of you have a kitty partner in crime when quilting (or knitting, crocheting, garment sewing, crafting, etc.)?

Right now as I type this post, my furry buddy, Griffin (age 4), is sprawled across my desk. Only recently has he started doing that again. I love it, but sometimes we end up playing tug o’ war over my mouse pad area. LOL! He really really likes to stretch out pretty much across my whole desk top. Sometimes when I’m trying to use my mouse (which I do A LOT), Griffy will claim my mouse pad and mouse (and sometimes my hand) as his. Silly boy. Of course, as he sprawls over my desk, he knows I just can’t resist scratching him in his favorite spots. Smart boy!

A gray cat lying on a desk cluttered with papers and a pink mouse pad, looking intently at the camera.

Here’s my handsome Griffy. You can see that he has control of the mouse pad in the photo. ARGH! We take turns winning our game of tug o’ war. LOL!

I have another cat, Pip, but at 15, she doesn’t come downstairs to my studio dungeon anymore. She is our upstairs diva. Then there’s Bailly, my 3 year old Shih Tzu. She’s a heartful, but also a handful. And she thinks she’s a cat.

So Happy National Cat Day to you and your furry feline companions. Maybe they’ll help you (or hinder you, depending on their mood) get your project finished for next week’s Week 5 of our 6 Quilts in 6 Weeks Challenge.

See you right here next week for more VRD fun and Week 5 of our 6 Quilts in 6 Weeks Challenge.

Until then –

Always,

Tricia @ VRD

2025 6 Quilts in 6 Weeks Challenge · Rose Cards · Tutorials · villa rosa designs

6 Quilts in 6 Weeks Challenge – Week 3 and a Fun VRD Snack Mat Tutorial

How are you this fine October Thursday? My thoughts are definitely turning towards cozy quilts, good books, and hot tea right now as the October winds howl outside, swirling the leaves in mini cyclones around the yard.

I’ve been really enjoying our 6 Quilts in 6 Weeks Challenge and I hope you’ve been tuning in to the finished projects on our VRD Facebook page. If you signed up for the Challenge, please make sure to write that your before/after photos are for the 6 Quilts in 6 Weeks Challenge so we can all ooooh and ahhhh over your completed project (this also makes it easier for me to note who finishes a project each week during the Challenge).

I’ve heard that it takes about 30 days to build a new habit so if we finish 1 quilt each week for 6 weeks, hypothetically we are building a new habit. At least, that’s my hope, anyway. LOL!

Before we get much further, though, let’s all congratulate Mary Q as our Week 2 winner. Yay you, Mary! Keep up the great work!

I wonder who will be our Week 3 winner next week??? Maybe Y O U ????

For Week 3, I chose to complete one of my recent blog tutorial quilts from last month – Busy Bee. I was sew in love with the Hoffman digital fabrics I used for my tutorial that I just had to finish this one as part of the challenge. Busy Bee is fat quarter friendly and finishes at 45″ x 54″, which is a nice kids quilt, baby quilt, or small throw. If you want it bigger, you can easily add more blocks or an outer border (or both).

If you missed the Busy Bee tutorial, you can find it HERE.

A colorful quilt design titled 'Busy Bee', featuring various fabric patterns including floral, geometric, and handwritten text, set against a light green background. The quilt is bordered at the bottom with a decorative design and includes the logo 'Villa Rosa Designs'.

Don’t have Busy Bee yet?

Get your digital pattern HERE or your print pattern HERE.

Here’s my BEFORE photo:

A patchwork quilt hanging on a clothesline, featuring a mix of floral and patterned fabric squares in shades of pink, green, and white.

Here’s my AFTER photo:

A cozy quilt featuring a patchwork design with pink, green, and floral patterns, draped over a chair outdoors.

I backed my quilt with a lovely dusty rose textured fleece and free motion quilted the quilt with an allover meander design in a pretty pink thread.

I had a question recently on the blog about using fleece on the back of quilts, so I thought I’d address it here. I do not use batting when I use fleece on the back. I generally only use fleece on the backs of my throw quilts, although my quilty cuz, Kim, is using her fleece scraps on the back of her table runners and smaller projects, too. As for quilting a fleece backed quilt, I try to stay away from designs that cross over because the fleece is really stretchy and the quilt top isn’t (or at least it shouldn’t be) and crossing over lines potentially runs the risk of getting pleats and folds at intersections. I find wiggly line and meandering my designs of choice when quilting fleece backed quilts.

For more tips when quilting fleece, you can check out a blog post HERE from a few years ago.

The binding is Riviera, a Dot batik from our quilting partner, Hoffman , and it’s the absolute perfect finish. I stitched the binding on by machine again to save time. It turned out okay, but a few of my corners had minds of their own and were trying to do the salsa. Sheesh! I even had to rip one out and force it into submission. Corners can be so tricky!

A colorful batik fabric design featuring a blend of deep reds, purples, greens, and pinks with a dotted pattern throughout.
Riviera Dot batik from Hoffman

Now to decide which quilt to finish for Week 4……..

Recently, Chris from Needlepointers.com reached out to us to share a really fun idea and tutorial using our VRD Snack Mat patterns and I’m thrilled to share it with you. If you haven’t ever checked out Needlepointers.com, you should! Chris and her daughter Annette have been sharing craft tutorials and projects for the last 20 years on their website.

If you’re like me, you’re on the lookout for fun and fast Holiday gift ideas because the holidays are almost upon us. Snack Mats, of course, are an AWESOME quick and easy gift idea and as a bonus, each pattern makes 2 Snack Mats. You can find all the VRD Snack Mat patterns HERE. Snack Mat patterns are available in both digital and print formats.

Thanks, Chris, for sharing this GREAT IDEA with us!

Have you made anything fun using any of our VRD patterns and put together a tutorial online? We’d love to see it.

Please note that if you are thinking about creating a tutorial of your favorite VRD project (or you’ve done one already):

  1. You may show the front of the pattern, but never the back where the instructions are
  2. Do not give any cutting dimensions or measurements out verbally or in writing as part of your tutorial

Please keep in mind that all VRD patterns are protected by copyright law. Thank you for kindly respecting our VRD designers, their creativity, and their hard work.

Well, I’d better get to work on my Week 4 Challenge Project. I’ll show it off next week. You’d better get yours going, too.

See you then.

Have a great week. Get SEW much done!

Always,

Tricia @ VRD

2025 6 Quilts in 6 Weeks Challenge · Rose Cards · villa rosa designs

6 Quilts in 6 Weeks – Week 2 and an Accessory Challenge

Hello Quilty Friends!

How are you this fine Thursday?  Getting some quilts finished, I hope?

I’ve been having a great time checking out the finished quilts for Week 1 of our 6 Quilts in 6 Weeks Challenge.   It’s almost like, in 1 week, I’ve completed a lot of quilts!  Yay!  But I didn’t actually have to do all the work.  To me, that’s a perfect scenario!

So, if you finished a quilt for Week 1, pat yourself on the back and get ready to repeat this week!

And our Week 1 drawing winner is…………… Jill S.

Want to get in on the action?  It’s not too late – just email me at tricia@villarosadesign.com to join for the remaining 5 Weeks of the Challenge.  

You can get all the info HERE.

Now let’s jump into Week 2 of our Challenge.

I knew I wasn’t going to have a lot of extra time this week, so I decided to tackle one of my table runners UFOs for Week 2,  Steppin’ Up.

Cover image for the 'Steppin' Up' quilt pattern by Tricia Lynn Maloney, featuring a colorful quilted table runner with various patterned fabrics, displayed against a porch backdrop.

Don’t have Steppin’ Up yet?

Get your digital pattern HERE or your print pattern HERE

My Before Photo (layered and ready to quilt):

A quilted table runner featuring a colorful pattern with autumn-themed fabrics, pinned and layered, ready for quilting against a backdrop of soft fabric.

My After Photo (Done and Done!):

A colorful autumn table runner quilt displayed hanging from a tree, featuring diamond shapes in shades of red, orange, yellow, and green with a floral border.

I made this Autumn version of Steppin’ Up a few years ago when my Friday Quilt group did a whole year of VRD Table Runners.  Of course, I made the top as a class sample and never finished it.  I don’t remember the name of the collection anymore as the fabrics were left over from another project from way back when.  Of course, if you want to make an Autumn version yourself, now’s the time to gather up a gorgeous selection of warm fall fabrics.

I backed it with a neutral backing fabric and a layer of thin cotton batting.  I free motion quilted it with an allover loop design (one of my absolute favorite designs which also quilts up really fast – you can see how I do loops HERE).  I machine stitched the brown tonal binding on and guess what – it actually turned out pretty well.  Last, of course, I added a label.

Have you ever made Steppin’ Up?  It’s a really fun one if you haven’t.  You can actually arrange the blocks in a lot of different ways to make your runner your way.

So, what are you finishing for Week 2?  You have until Friday at midnight to email or post your before/after photos of your Week 2 projects to be entered in our Week 2 drawing.

Speaking of my Friday group, this past week for our October meeting, we had a group challenge reveal – VRD Accessory patterns.  Have you ever made any of our really fun Accessory patterns?  You can find all of them HERE.  I’m excited to tell you that we are going to be adding NEW Accessory patterns going forward.  In fact, I’m working on a few ideas right now.

So, my quilty pals rose to the October Accessory Challenge.  Check out their makes, below. Of course, they all rolled their eyes at me when I started snapping pictures because they just knew I was going to show off their projects on the blog. Sorry, not sorry…….

Gaynel made the Olivia Jane pattern.  Gaynel discovered that Olivia Jane was the perfect tote to hold a 12”x 12” rotating cutting mat.

A woman holding a handcrafted patchwork bag, displaying various fabric patterns and colors, in a sewing space filled with quilting materials and supplies.

Mary Lee made Catrina Jane, a 2 Pocketed VRD Rose Card Pattern Keeper. You can’t tell in this photo which shows the inside, but her outside fabric is a really cool African batik, which is more like an embossed fabric than the usual batiks we are familiar with.

An open 2-pocket pattern card holder made from colorful autumn-themed fabric, showcasing a floral design, next to the pattern cover titled 'Catrina Jane'.

Robin made the Dinner Party Place Mats.  She did alter them a bit by making 4 identical mats instead of swapping the fabrics in each place mat. Find the digital pattern HERE or the print pattern HERE.

A stack of finished dinner party placemats with festive fabric featuring Santa Claus and holiday decorations, placed on a wooden table next to a beverage bottle.

Donna made not only 1, but 4 tote bags using the Tabitha Jane pattern.  Here is the one she made herself.  The other 3 will be holiday gifts. Good thinking, Donna!

A woman wearing a floral shirt and a gray cardigan is holding a colorful tote bag with a scenic design, smiling at the camera.

Kim made a set of these uber adorable Buzzy Bee Snack Mats.  You can find the digital pattern HERE and the print pattern HERE.

A person holding a quilted item featuring bee patterns and floral designs, trimmed in yellow.

There would no way at all I could choose a favorite from their projects because in my book, they are all winners because they finished their projects, so everyone got to pick out a fat quarter as a prize.

I hope these fun Accessory projects will inspire you to make some of your own – HEY!  You could even make some as part of our 6 Quilts in 6 Weeks Challenge – we have 4 more weeks to go yet.  You could make some great holiday gifts, or maybe a little something something for yourself.

Okay, time to get back to work on your Challenge projects.  And mine too.

Have a great week. Get SEW much done!

Always,

Tricia @ VRD

2025 6 Quilts in 6 Weeks Challenge · Rose Cards · villa rosa designs

6 Quilts in 6 Weeks Challenge – Week 1 and NEW October VRD Quilt Patterns

Happy Thursday to you!

There’s a lot to do on today’s blog post, so let’s just jump in with both feet!

Logo of 3 Aunts Quilt Shop featuring a stylized bee and ants on a bright blue background.

First, I want to congratulate our very own Cook family – Molly, Heidi, and mom Tamara – on taking on the former Villa Rosa Designs physical quilt shop. They’ve renamed the shop 3 Aunts Quilt Shop and you can find it HERE. Please extend them your congratulations!

I am absolutely THRILLED that 20 intrepid quilters have joined in with me for the 6 Quilts in 6 Weeks Challenge. Please post your before photo (unfinished quilt top or pile of fabric with the pattern if you’re making new projects) and after photo (completed project, quilted and bound [if you are doing Accessory projects, it may not actually have quilting and/or binding and that’s okay]) on our VRD Facebook page or you can email them to me at tricia@villarosadesigns.com if you prefer.

Your before/after photos must be on the Facebook page or emailed to me by each Friday at midnight EST during the 6 Week Challenge.

If you have any questions, please drop me an email.

All right! Wanna see my finished project for Week 1????

Here is my Before photo:

A vibrant quilt featuring warm autumn colors such as orange and brown, displayed outdoors on a sunny day, with trees and grass in the background.

And here is my After photo:

A colorful quilt draped over a chair, featuring autumn-themed fabrics in shades of orange, yellow, and brown, with a patchwork design.

This VRD quilt is the Alassio pattern. I did this one as a tutorial in August 2023 (when I first wrote this sentence I thought it was from last year, then I checked and found out it was from 2023 – yikes!) and it went into my UFO (unfinished Object) pile. I thought it would a great one to start out the Challenge because it has a lovely warm fall vibe with the yummy batiks from Hoffman. I backed the quilt with cozy orange fleece and free motion quilted it with an allover meander design. I added the binding and machine-stitched it down. I’m not the greatest at finishing binding by machine, but it sure does go a lot faster than doing it by hand. I then added my label to the back. As this isn’t one of my patterns, I added VRD and the name of the pattern to my label along with my name, city and state, and the year the quilt was finished. Even though I started it in 2023, I didn’t complete it until now, so 2025 goes on the label.

Cover image for the Alassio quilt pattern by Villa Rosa Designs, featuring a colorful patchwork design with various fabrics in squares and rectangles.

Don’t have Alassio???

Get your digital pattern HERE or your print pattern HERE

Find the VRD Alassio tutorial HERE

I’ve already picked my project to complete for Week 2, but you’ll have to wait until next week to see it.

Now it’s your turn – post your photos before midnight. I’ll keep track of everyone who has posted (or sent me) their before/after photos for each week. Then I’ll randomly select that week’s winner from those folks who completed their weekly challenge. Please bear with me as I line up the prizes as this past weekend was International Quilt Market and this week is Festival so many of the companies I work with are a bit preoccupied right now.

If you don’t post a before/after photo for a weekly Challenge or you miss the deadline, your name won’t go into that week’s prize drawing. And that’s okay because life gets busy. I’m not kicking you out of the challenge – just make sure to post your photos for the next week to get your name in the next week’s drawing. Easy peasy.

I want to encourage all of you as well as myself to finish projects, not to stress about them.

I hope I’ve answered any questions you might have had. If not, feel free to email me.

Now let’s take a look at the new October quilt patterns!

As many of you already know, I just love the Thursday after the first Friday of every month because I get to show off our new patterns! If you’re new to Villa Rosa, you might not yet know that we offer at least 5 (but sometimes 6 or even 7) NEW patterns each and every month. It’s crazy, right? And nobody else does that, except VRD.

An overview of five new quilt patterns for October 2025, including 'Enchanted Forest,' 'Gabriella,' 'Maple Syrup,' 'Fennimore,' and 'Phyllis.' Each pattern features unique designs and colors, showcased in a collage format.

Get All 5 print patterns HERE

Enchanted Forest is Melissa’s new pattern just in time for Fall Quilting……or Spring…….or Summer. Her “happy trees” are right at home in any season! You can find a kit at Molly and Heidi’s newly named 3 Aunts Quilt Shop, HERE.

Gabriella is Pat’s newest Tim Holtz Palette quilt and features 3 lovely stars amongst the lavender and purple prints. 3 Aunts Quilt Shop still has kits available HERE.

Maple Syrup is Heidi’s latest foody quilt featuring a lovely panel and side borders of a coordinating printed stripe. 3 Aunts has kits in stock HERE.

Fennimore is Rachelle’s new modern pattern for October. It features a very interesting block. You can find Fennimore kits at 3 Aunts HERE.

Phyllis is Catherine’s October pattern and shows you a unique way to make the large star blocks. You can find 3 different kit options at Catherine’s shop, Running Doe Quilts, HERE.

There’s one more quilt for this month and it’s a real fun one!

Boscobel is a small or wall quilt sized project by Rachelle. You can use the cut off triangles from Fennimore for this project or your favorite stack of 5″ squares. This small quilt would also make a great table quilt!

A vibrant quilt titled 'Boscobel' featuring colorful triangles on a white background, designed by Rachelle for Villa Rosa Designs.

Get your digital pattern HERE or your print pattern HERE.

Yes, you probably noticed that yours truly did not have a new pattern for October. You’ll just have to wait for November!

I wanted to let you know that I’m still reading book 5 in the Quilt City series. The story is moving along swiftly, but I just haven’t had a lot of time to read this past week.

Well, it’s time for me to get back to my Challenge project for next week. Happy quilting to all of you!

See you right back here next week for more VRD fun and Week 2 of our 6 Quilts in 6 Weeks Challenge.

Until then –

Sew. Laugh. Repeat.

Always,

Tricia @ VRD