Hello Quilty Friends!
Happy Thursday to you!
Welcome to Week 2!
I’m super excited to be hosting (and participating in!) our 6 Quilts in 6 Weeks Challenge. It’s been such a great motivator for me to start moving some quilt tops out of my to-be-finished pile and into my DONE pile… and that’s a big win in my book.
One thing I’m noticing already is how much easier it feels to focus on one quilt at a time instead of staring at my whole teetering stack of UFOs. (Because let’s be honest… those unfinished projects have a way of quietly judging us from across the room. Yours do that too, right? )
I’ve been having sew much fun seeing all the amazing finished quilts popping up on Facebook and in my inbox. Keep them coming! One of my favorite parts of this challenge is seeing what everyone else is working on. It’s so inspiring to watch these quilts come together… and it’s definitely keeping me motivated too.
Ready to see my Week 2 finish???
6 Quilts in 6 Weeks Challenge Week 2
Drum roll please…………………
Pacific Grove is my Week 2 finish. I made the Pacific Grove top for a tutorial here on the blog a while back (yeah……just found it on the blog and it was from 2024, sheesh!). You can find the Pacific Grove tutorial HERE.
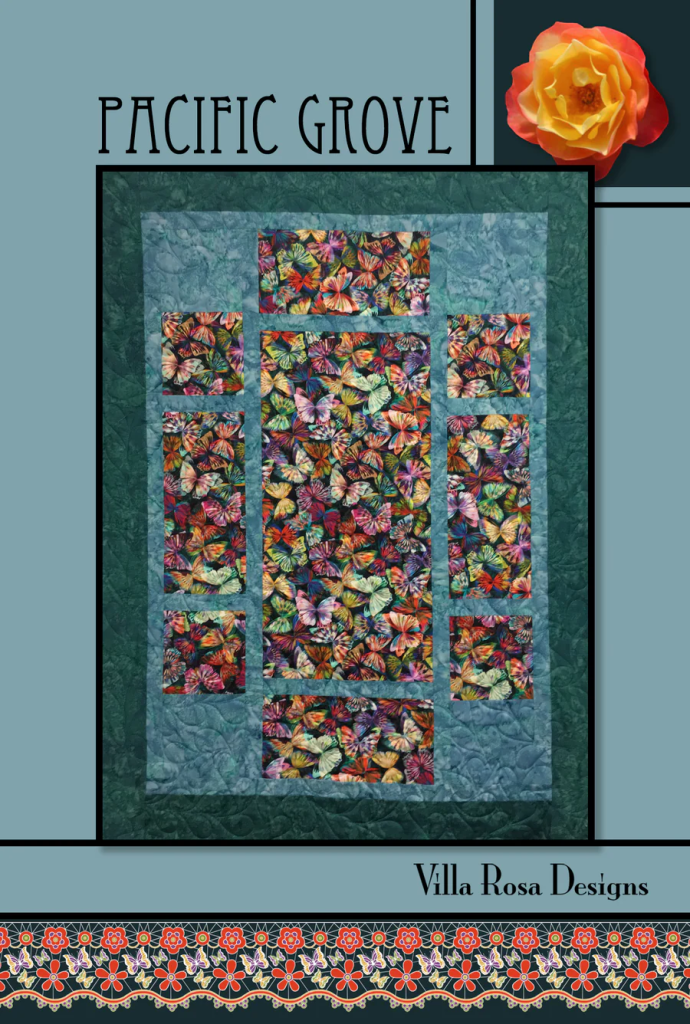
Get your digital pattern HERE or your print pattern HERE
Here is my BEFORE photo:
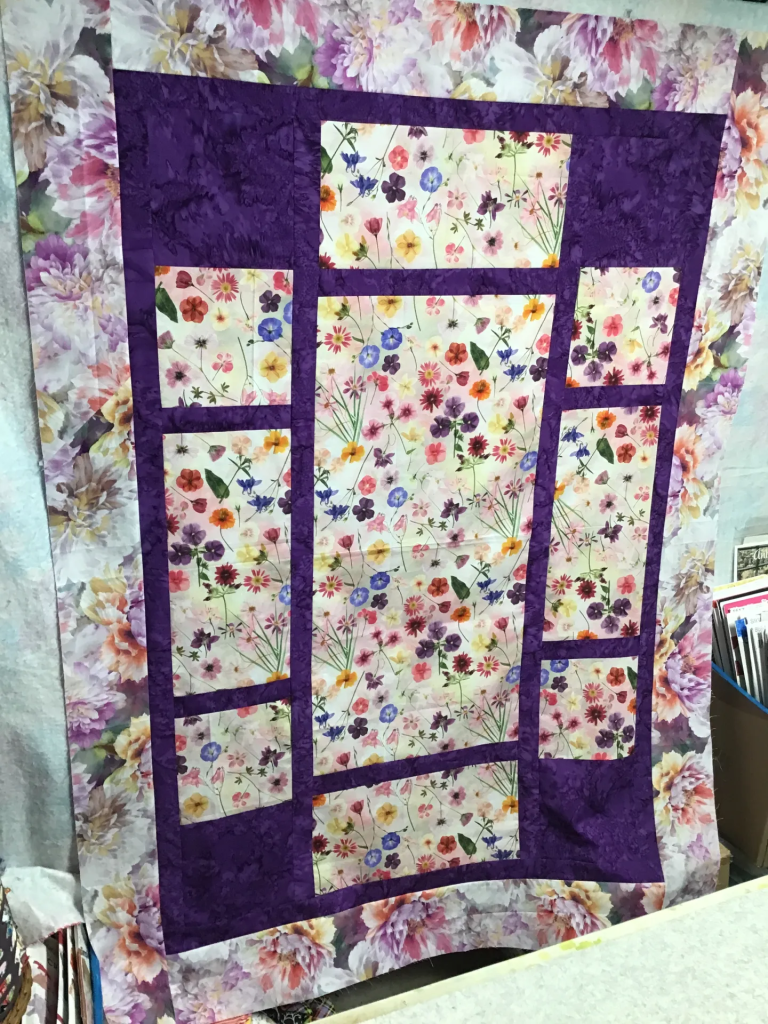
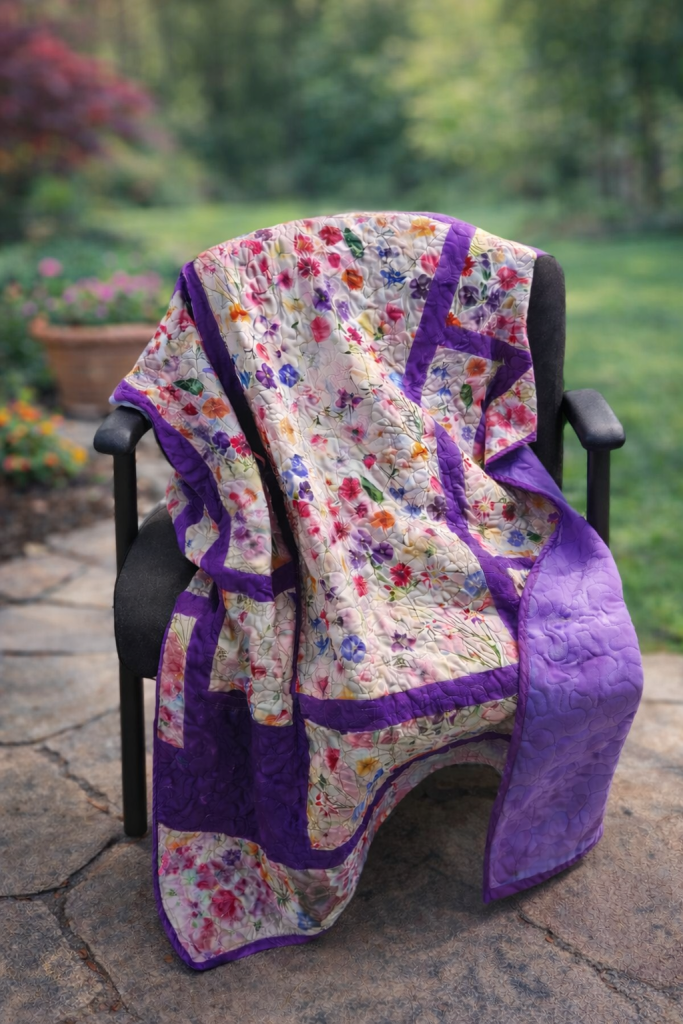
My version of Pacific Grove, featuring gorgeous digital floral prints from our friends over at Hoffman, is like looking through a pretty framed window at a gorgeous flower garden. I just really love it. I wish I had finished it sooner, but…………..Life always gets in the way, doesn’t it?
And here’s my FINISHED Pacific Grove quilt!
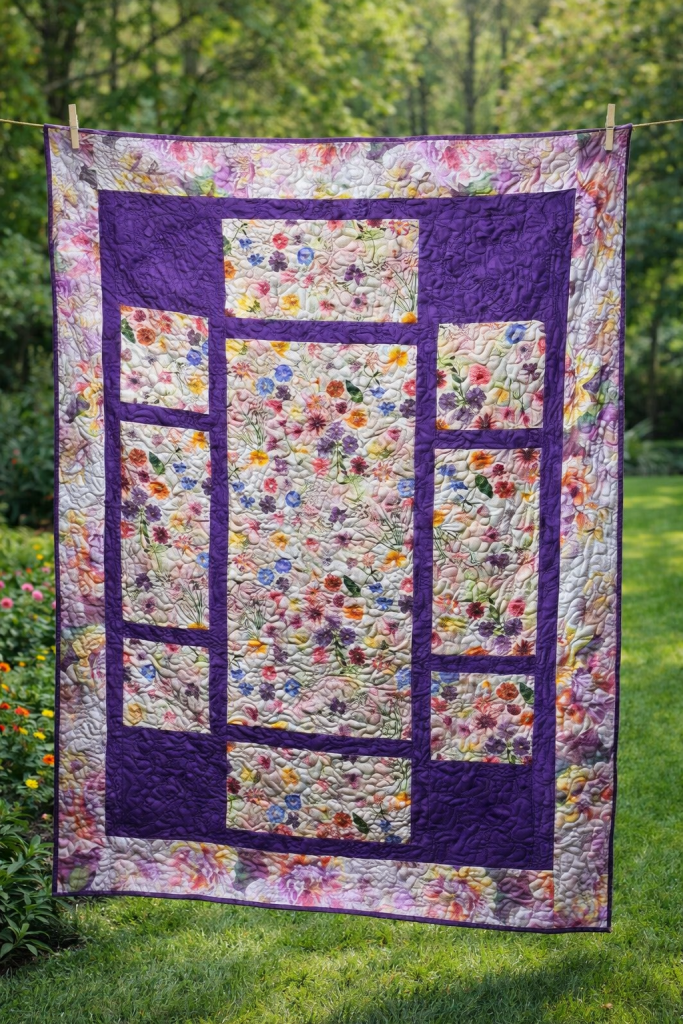
Love how it turned out! I machine quilted it using a medium purple 100% cotton thread in a big open meander allover design which looks good on anything and is quick to quilt, too. I used a marbled purple fleece for the back, no batting. And I machine-stitched my binding again. I think I’m getting a little better at the corners. I figured out that if I folded the fabric the opposite way I normally do for hand-binding, it doesn’t get caught while I’m machine stitching the corners. Huh. Live and learn.
Just have to share another photo of my quilt. I wanted you to be able to see the pretty purple fleece on the back. And the great texture the big open meandering makes on the fleece. Have you ever tried using fleece on the back of a throw quilt instead of batting and backing?
6 Quilts in 6 Weeks Week 1 Winner
Our Week 1 winner for the 6 Quilts in 6 Weeks Challenge is…
Kim C. in Washington
Woohoo!
Throw the confetti! 🎉
Congratulations, Kim!
Here’s Kim’s Week 1 finished quilt:
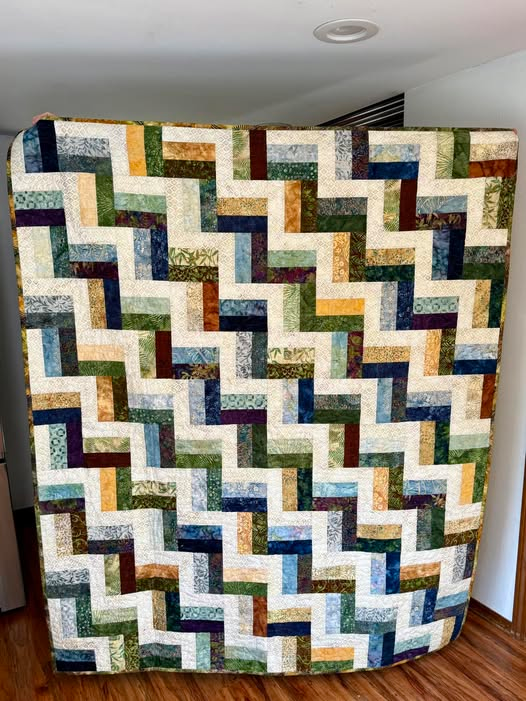
Kim’s quilt is the Rail Fence pattern.
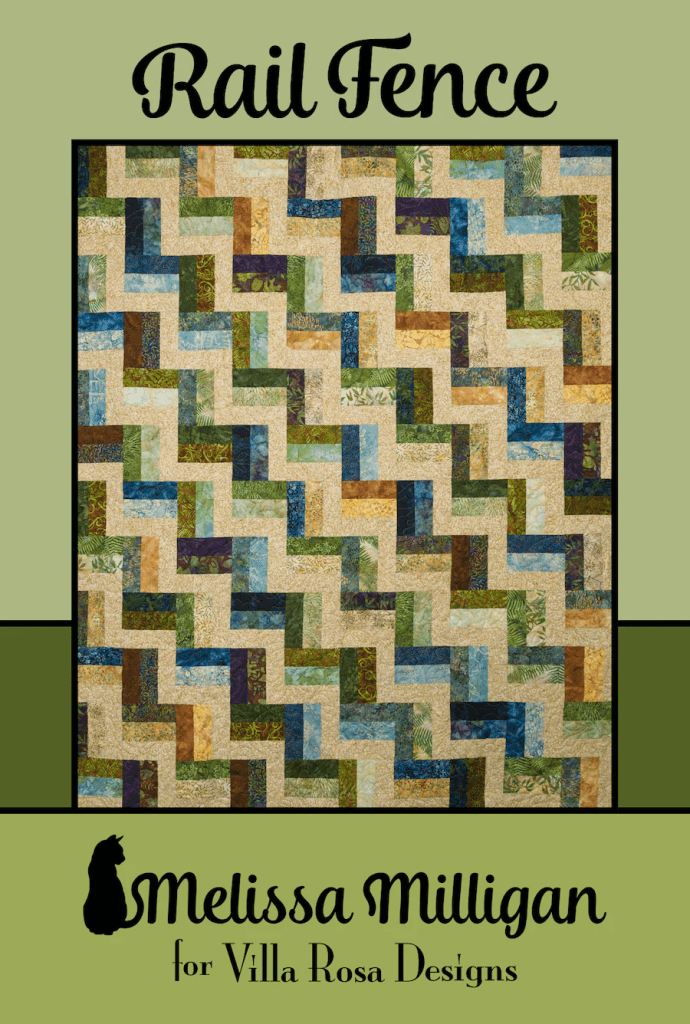
Get your digital pattern HERE or your print pattern HERE
So what quilt are you finishing for Week 2 of our Challenge??? You have until Friday, 4/17 midnight EST to post your before/after photos on our VRD Facebook page or email them to me at tricia@villarosaquilts.com. Can’t wait to see them!
10 Tips for Fast Finishing Quilts
After Week 1, I know a lot of you are already feeling that little spark of momentum… and maybe also realizing that finishing quilts can sometimes take longer than we’d like. We start with the best intentions, and then life, perfectionism, or just plain overwhelm sneaks in.
So for Week 2, I wanted to share some of my favorite tried-and-true tips to help you get your quilts across the finish line a little faster. These aren’t about cutting corners… they’re about quilting smarter, keeping things manageable, and actually enjoying the process from start to finish.
Let’s do this! Together.
1. Machine stitch your binding
Yep, we’re skipping the hand stitching. It’s faster, it’s sturdy, and honestly… most people will never flip your quilt over to check. I’m one of those people who sews it to the front and then flips it to the back, but some of my pals prefer sewing the binding to the back and flipping it to the front. There is no wrong or right way to machine stitch your binding. Do what feels the most natural to you.
2. Learn to machine quilt your own quilts
Straight lines, wavy lines, loops… it all works. The goal here is finished, not heirloom show judging. It sure beats waiting your turn at the long arm quilter’s to get your quilt quilted.
If your new to machine quilting, take a class or pair up with a friend who is already doing it. Start out with smaller projects until you feel comfortable and then move on to bigger projects.
For myself, I still send my really big quilts off to the machine quilter while I do my own machine quilting for my throws and smaller projects.
Trust me, if I can machine quilt, so can you. Just remember 3 little words – practice, practice, practice. (Check out our 2025 Beginner Free Motion Quilting Series over on the right side of the blog.)
3. Keep your quilting simple
This is not the time for feathers and custom everything. Save that for another quilt. Today, we finish. My favorite 2 go-to allover quilting designs are meandering and loopy loops. These designs go with everything and they quilt quickly.
Check out our Basic Quilting Skills for Beginners: Quilt as Desired HERE.
4. Press as you go (yes, really)
I know, I know… but skipping this step will come back to haunt you later. A quick press now saves a lot of “why won’t this line up?!” later. And it’s a lot easier to quilt individual blocks and make them behave than saving all the quilting to the end and then trying to get all the blocks to behave. Trust me…..blocks can get very unruly at times (I should know…….I am guilty of saving my pressing to the end now and then).
You can find some help with pressing HERE.
5. Square it up before adding your binding
Crooked quilt tops lead to cranky bindings. A quick trim makes everything behave so much better. I never skip this step, ever because who wants quilts that ripple when there isn’t any breeze? I use a big square ruler on each corner to square up my corners first, then I use a long ruler to straighten the sides so everything is nice and square. I even double check by folding my quilts either on the diagonal (square quilts) or into fours (rectangular quilts) to make sure my corners and sides are even.
Squaring up questions? Get help HERE.
6. Use spray baste, fusible batting, or less pins if you pin baste your quilts
Less pinning, less wrestling, more quilting. Your back (and your patience) will thank you later. I prefer pin basting, but I do not over pin. I take the time to make sure my quilt backing/batting (or fleece) is taped down to my table/flat surface so it’s flat and taunt before I place my quilt top on the batting/backing. Then I use pins sparingly to keep everything together, maybe a pin every 10-12 inches. I first pin diagonally, then horizontal and vertical and finally I add any extra pins if needed to keep things nice and square.
Find out more info on layering quilts HERE.
7. Don’t over-quilt it
Dense quilting is lovely… and slow. Looser quilting still looks great and gets you to the finish line faster. If you’re not sure how loose you can make your quilting design – take a look at the batting you are using. The package will tell you how far apart you can quilt that particular batting.
Quilting bigger takes less time and actually uses less thread is an important lesson I shared with my students when I taught Free Motion Quilting.
8. Batch your boring tasks
Cut all your binding strips at once. Wind extra bobbins. Prep your label ahead of time. Future you will be delighted. Listening to some music or your favorite audio book also makes those boring tasks move a little bit faster.
9. Go with a slightly wider binding for machine stitched bindings
A 2½” strip is more forgiving and easier to catch when stitching down by machine. When I hand-stitch my binding, I cut my strips at 2 1/4″ wide, but I’ve found that the little extra in a 2 1/2″ binding for machine stitching makes a huge difference. With the 2 1/2″ cut binding, I find I have just what I need to wrap my binding to the other side and to catch it with my machine stitching.
10. Work in short, focused bursts
Set a timer, sit down, and just start. Even 30 minutes moves you forward… and forward is the whole point. Not perfect. Forward. I’ve found this technique to be really helpful when I am feeling overwhelmed with everything I have to do. So set the timer and quilt. You will be amazed at how much you can get done.
And a bonus tip or two-
Instead of a zig zag stitch or straight stitch for machine stitching your binding, try using a Triple Zig Zag stitch (also sometimes called a multi-step zigzag or 3-step zigzag). It’s stitch #11 on my Janome Memory Craft 8900QCP. Molly Cook (Big shout out to Molly!) shared this tip with me a couple years ago, and this is the stitch I use for machine binding. I also match my thread color to my binding, too.
Finally……………………A Little Reminder
Finished quilts don’t come from perfection… they come from momentum. Done is cozy. Done is usable. Done is something you can actually enjoy.
Well, that’s it for me this week. I’m off to do some quilting for Week 3.
PSST! What VRD quilt will you finish for Week 3???
Sew. Laugh. Finish. Repeat.
Always,
Tricia @ VRD