Hello Autumn! Here it is — the season I’ve been waiting for all year. I don’t really know what it is about autumn, though, that inspires me so much. The colors? The sounds? The smells? Warm days and cool nights? Sweaters and fuzzy socks? Hot tea and a little snack in the afternoon? Huh! I think it’s all of the above!
Image bymoi
Many of you already know that Villa Rosa Designs partners with other companies in the quilt industry. You can see our quilting partners on the far right side of the blog (just click on the company to be directed to their website). Perhaps you’re wondering how that all came about? Well, the easiest and quickest answer to that question is that our wonderful fast and fun VRD Rose Card patterns pair beautifully with pretty much any fabric collection and we have patterns for just about any fabric cut or style. Rose Card patterns also provide a terrific way to feature and showcase new fabric collections because VRD patterns really are all about the fabrics, not fussy cutting or piecing. Yay, Rose Card patterns — you rock ! Want to check out our entire catalog of 650+ Rose Card patterns? Print Patterns HERE or Digital Patterns HERE
One of the really FUN things I get to do is work closely with fabric companies to match our patterns to their collections. If you’ve visited any fabric company websites recently to check out their newest fabric collections, you might have seen some of our Rose Card patterns hanging out there. How cool is that???
Hoffman California International Fabrics is one of the companies that we partner with. It’s really fun playing with digital fabrics in their new collections paired with our VRD Rose Card patterns. You know how a lot of quilters make quilts in their heads while others make quilts with fabric? I get to make quilts on a computer screen with digital files! Neat-o!
Did you know that Hoffman has been in business since 1924? Wowzer! That’s 100 YEARS!!! Imagine all the amazing fabrics they have produced in 100 years! It’s positively mind-boggling!
Let’s all sing Happy Birthday to Hoffman. On the count of 3 — 1…….2…..3! Sing! Happy Birthday to you…………..
SPeaking of Hoffman, I LOVE using yummy Hoffman batiks and stunning digitally-printed fabrics for blog tutorials. One of my all-time favorite tutorials is Hillside Charm featuring the Wading with Water Lilies collection from a couple years ago. Do you have a favorite tutorial? If so, which one?
You can find the Hillside Charm print and digital patterns HERE. There are some pretty cool kits available too!
If you missed the Hillside Charm tutorial, you can find it HERE.
PSST! We still have a few Wading with Waterlilies fabrics at the VRD shop, including a couple panels! You can find them HERE.
I certainly hope everyone is in the mood for a little Fall inspiration today because I’m going to share some with you whether you’re ready or not! LOL! I’m really excited to share Hoffman’s Fall 2024 Project Catalog with you. It is literally HOT OF THE PRESS! I just saw it the other day and I totally knew I had to share it with you. Yep, it’s that good!
Take your time and enjoy flipping through the catalog. I guarantee you will find A LOT of inspiration here. Pay special attention to our VRD patterns in the catalog because you might just see some of them in the future as blog tutorials. Just sayin’………
I hope you enjoyed the catalog. Stay tuned for lots of exciting things coming soon, including new blog tutorials. Who doesn’t love tutorials???
I hope you are all getting some sewing and quilting tucked in around your busy fall schedule. I don’t know about you, but if I don’t get regular access to my sewing machine, I get — well, grumpy. I am not kidding. I have found over the years that if I don’t get time to devote to my creative endeavors, I become out of sorts — you can ask my family. LOL! So when I get short-tempered, the best cure is sewing and quilting, even if it’s only a half hour here or twenty minutes there, I absolutely have to have time to be creative.
So I must say that using the excuse of creating a series of fall quilt tutorials with all these glorious Hoffman batik fabric collections, I am feeding my creative soul AND at the same time, I have rekindled my interest in getting back into quilting after basically taking the summer off. Of course, the next part of my making a quilt top or two a week, is to actually get them layered, quilted, bound, labeled — FINISHED. I have started this process by going to my local quilt shop, Homespun Treasures, to pin three of the recent quilts, and now they are ready for machine quilting. I use the tables in the classroom to layer my quilts and maybe I check out the new fabrics while I’m there….
But first, I have another Villa Rosa Designs Rose Card quilt tutorial, Beatrice, for you!
VRD Beatrice Quilt Tutorial
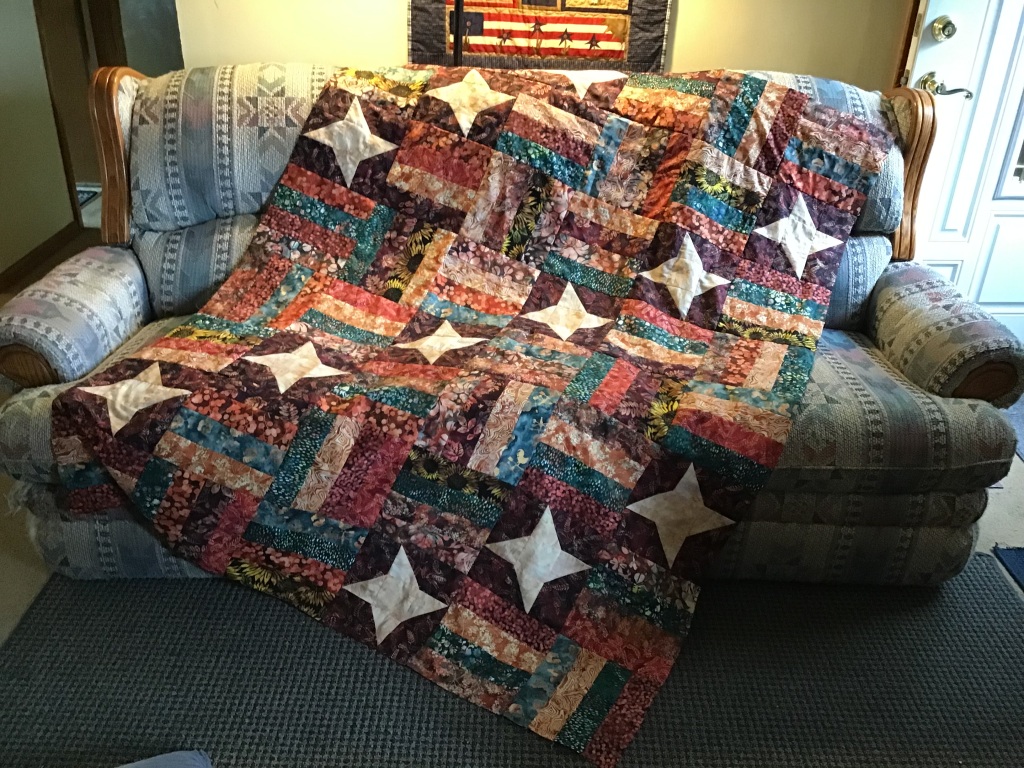
Ever since Beatrice came out earlier this year, I’ve been eager to make it. I love that it pairs two classic blocks — a Rail Fence and a Friendship Star (which is really a Nine Patch block in disguise) — together. You can check out our Rail Fence post and Nine Patch post, which are part of our Quilt Block Basics series, for more block fun and inspiration.
I also love how the Friendship Star blocks are arranged in diagonal rows cascading through woven Rail Fence blocks in a less-than-typical arrangement. Beatrice finishes at a generous 54″ x 72,” which is a very nice-sized throw quilt.
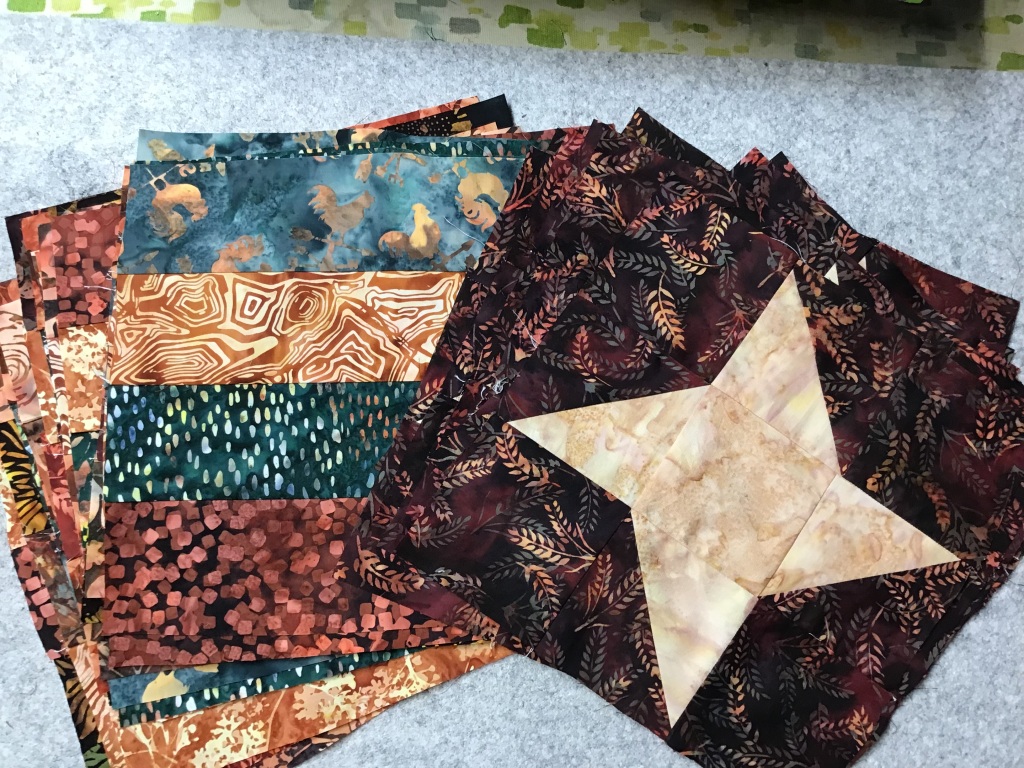
Let’s take a look at the gorgeous Hoffman Bali Batik collection, Homestead, I am using for my Beatrice quilt. Ask for it at your favorite quilt shop or online retailer!
Isn’t this collection delicious? I added an 1895 Watercolor batik as my star fabric — can you find it?? (Hint: it’s the lightest fabric….)
Ready? Set. Go! Let’s get started on Beatrice!
1. We’re going to cut all of our fabrics before we start to sew. Do you do that or do you cut your pieces out as you sew? Or do you make a sample block before you cut everything out? For my VRD quilts, I feel totally comfortable just jumping in — no need to make a sample block to make sure everything fits together properly because I know that everything will fit together perfectly. Just another thing I love about our Rose Card patterns.
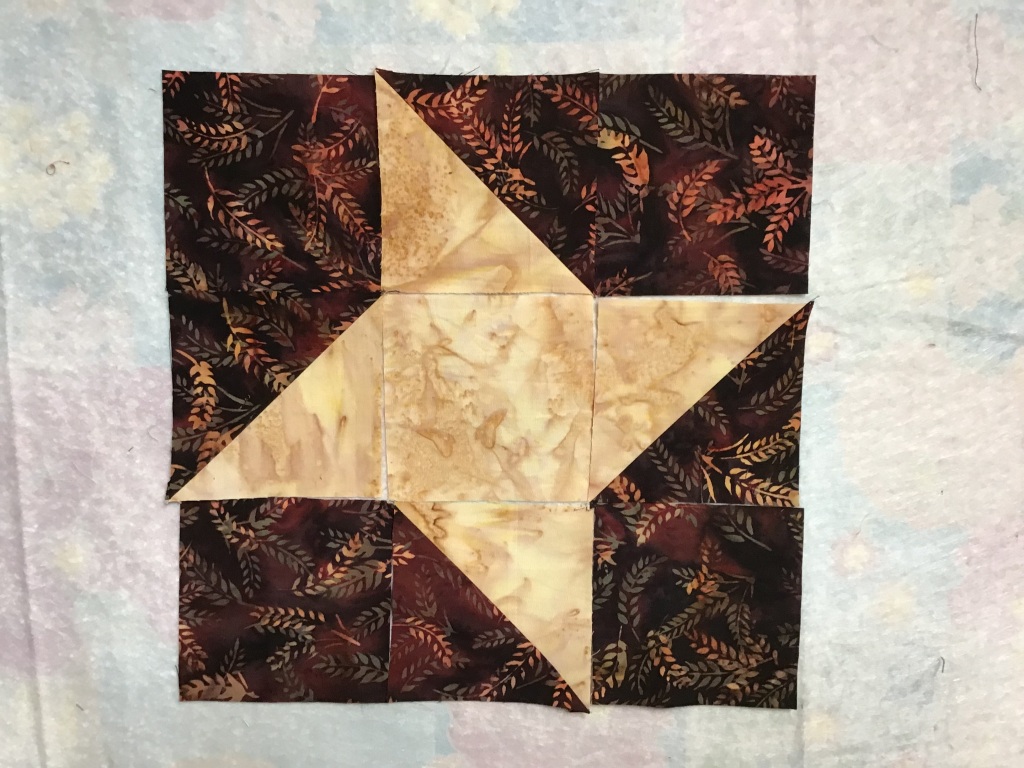
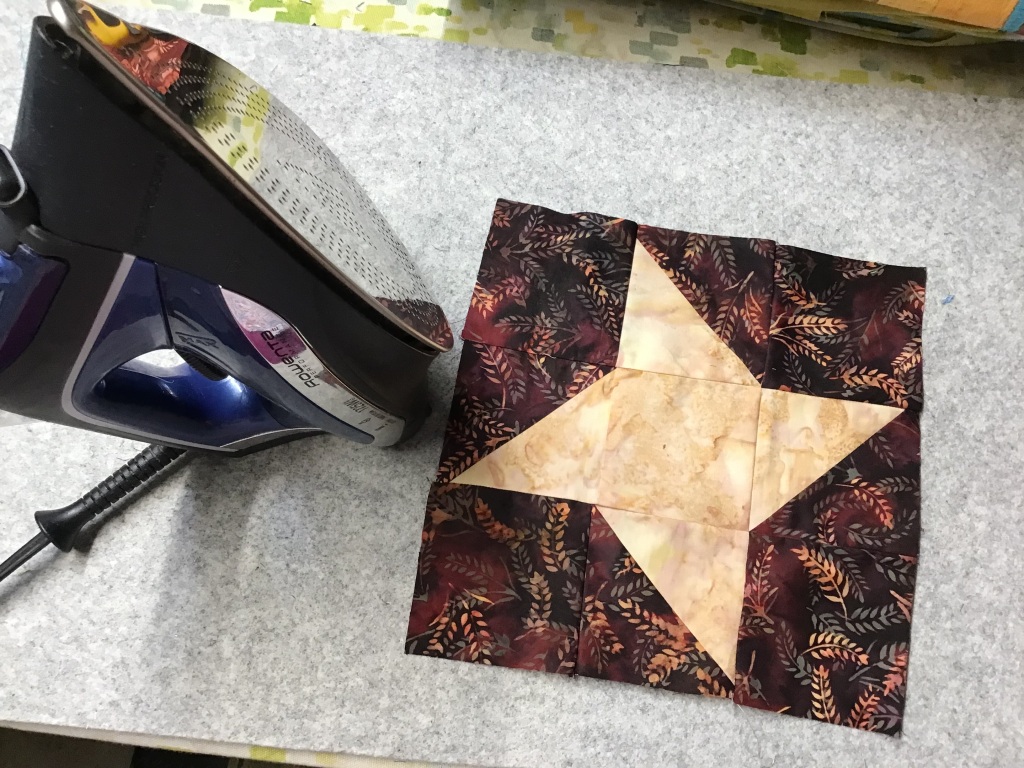
2. Now let’s sew some Friendship Star blocks! The first thing we need to do is make some Half Square Triangles (HSTs) for the star points. When I first started quilting, I did not enjoy making HSTs, but the more I made them (so many quilt patterns use HSTs!), the more I found I actually liked them. Of course, the more I made them, the more accurate my HSTs became, too.
Layer your squares right sides together (RST). Draw a diagonal line from corner to corner. Sew 1/4″ away from both sides of your drawn line. Cut on the drawn line to make 2 HSTs. Press the blocks open. And don’t forget to trim off your little dog ears at the corners (this will help the accuracy of your piecing — trust me).
3. Next we’re going to lay out a Friendship Star block, which is a Nine Patch block with HSTs. That way, we know how the block should look. With Friendship Star blocks, it’s easy to turn the HSTs the wrong way, which makes for some wonky stars. I actually kept this block layout up on my flannel wall so I could use it as my reference as I sewed the blocks together.
4. Time to sew the blocks together. I am happy to say, I only stitched one block wrong, which of course meant that I had to unsew it and then sew it back together the right way. Mea culpa. Press your blocks. Stars done — yay!
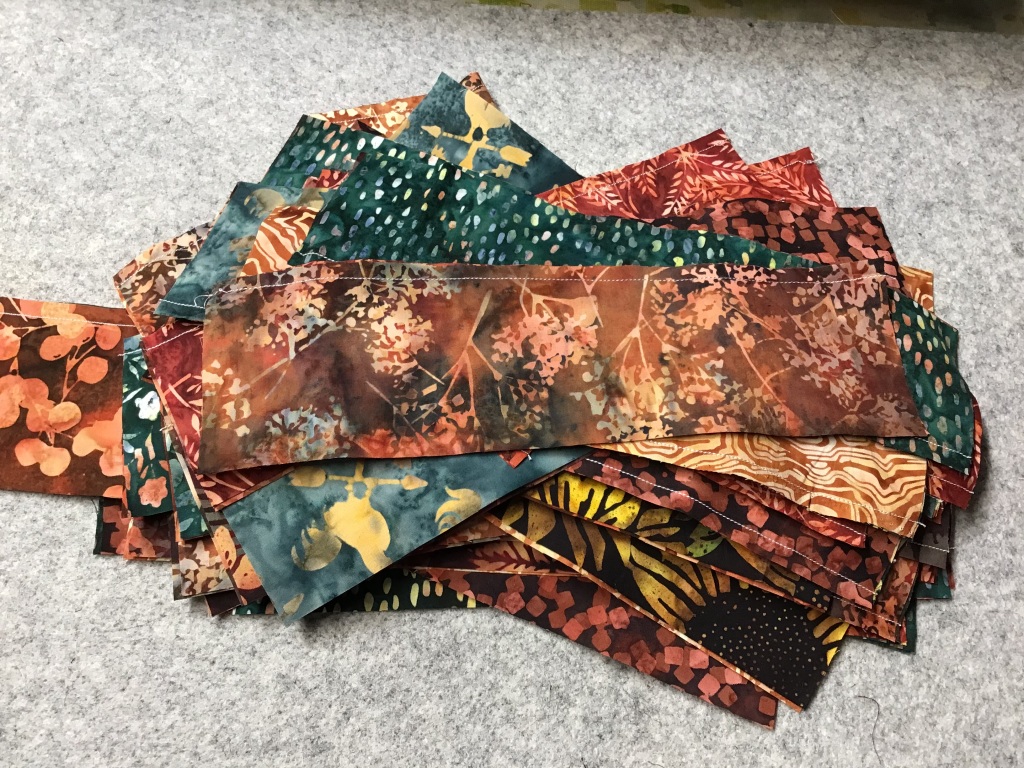
5. Moving right along — let’s make some Rail Fence blocks. Now, the pattern walks you through sewing strip sets together and then sub-cutting the strip sets into the units for the Rail Fence blocks.
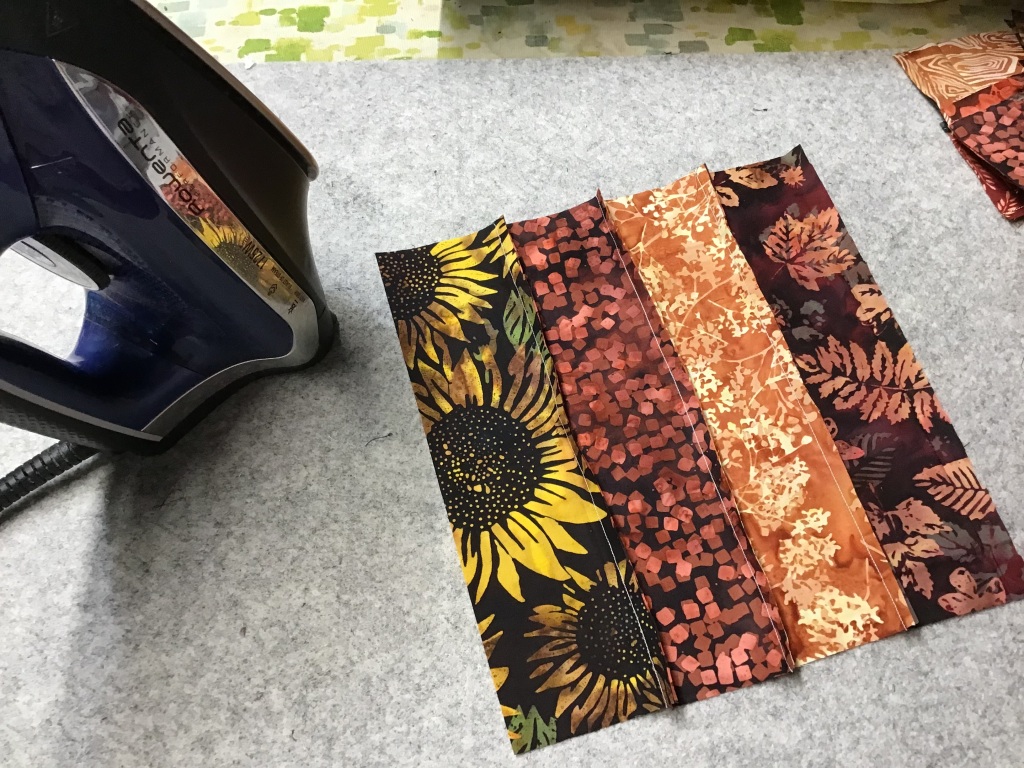
I prefer cutting my fabrics before sewing them together. I used to do the strip set method, but I always had a problem keeping my strips straight — mine would bow like a rainbow. This, of course, affected the accuracy of my piecing. This frustration is what led me to determining what the (unfinished) length of the unit would be and then cutting all my pieces before sewing the units. The easiest way to figure out the length is to look at the size of the unit you’re cutting out of the strip sets — usually that measurement is what you need.
Here are my rectangles ready to sew together into Rail Fence blocks.
6. Time to sew the Rail Fence blocks together. First, I sew the rectangles into pairs, then I sew the pairs into quads. Another thing I like better about sewing the rectangles together versus strip piecing is that I get a lot more variety in my blocks. After all the blocks are pieced, go ahead and press them. Rail Fence blocks done. Yippee!
7. All the blocks are finished!
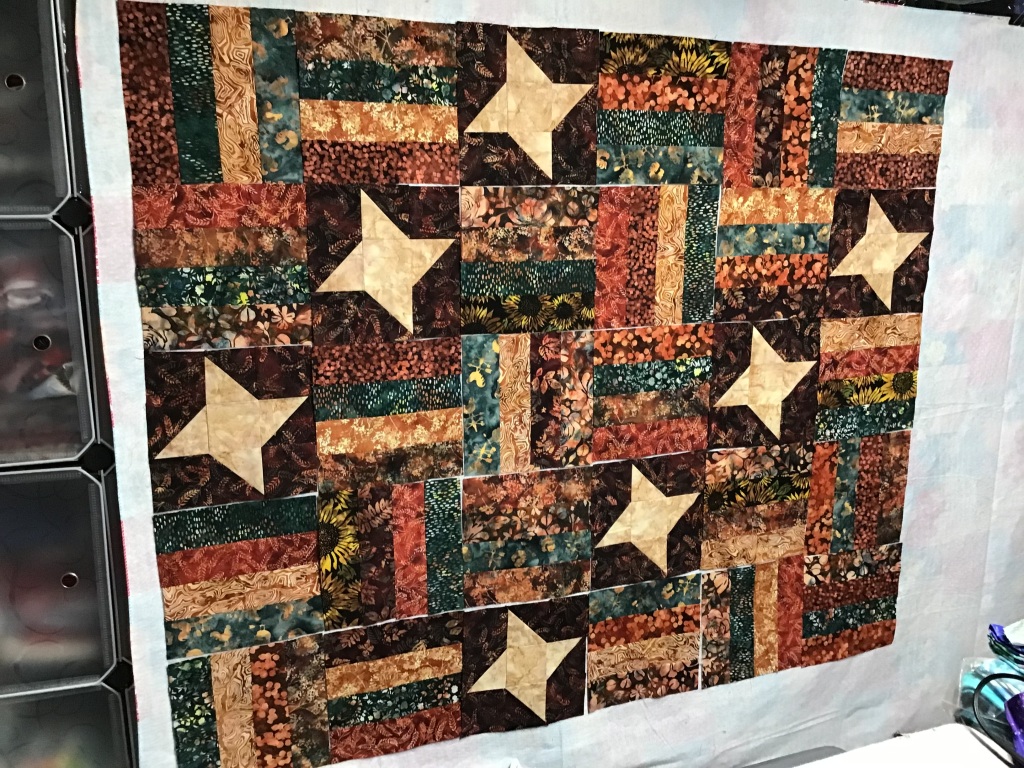
8. Boy, am I glad that I have my handy dandy flannel backed table cloth already clipped up on my fabric storage cubes because the next step is to lay out the blocks according to the diagram on the pattern. Whoever discovered that fabric sticks to flannel was a genius! Thank you, thank you!
This quilt is big and I can’t get the entire thing arranged on my flannel wall so I will have to divide the quilt into sections and then sew the sections together. While the blocks are up in the first larger section, I moved a few things around so that the fabrics are well-distributed throughout and not concentrated in any one area.
I will say that these fabrics from the Homestead collection definitely make a gorgeous quilt! It just looks so warm and inviting, like a cup of hot apple cider. Where’s my doughnut??? Boston creme, if you please….
9. I sewed the blocks into rows and then I sewed the rows together into the top section of the quilt.
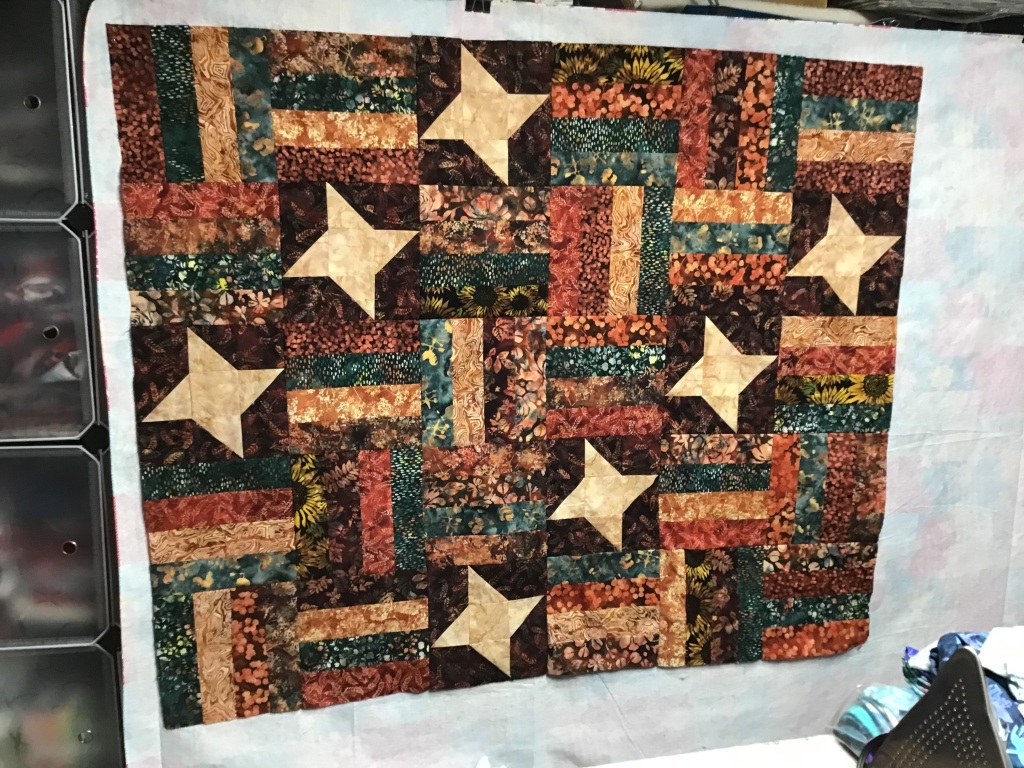
10. I folded the top section in half and moved it to the top of my flannel wall to make room at the bottom the last rows. That way, I will still be able to move blocks around in the bottom rows if needed. Next I sewed the blocks into rows and the rows into the bottom section. Finally I sewed the bottom section to the top section.
11. Here is my Beatrice quilt top, or flimsy. Yay! I am very happy with how it turned out. It is simply beautiful!
While I was sewing Beatrice together, I kept wondering how it would look in patriotic colors (the quilt diagram on the back of the pattern is done in red, white, and blue). But for this quilt to be large enough to be a Quilts of Valor quilt, you would have to add a border or another column of blocks because it’s not quite wide enough.
Adding a 4″ finished border all the way around would make the quilt 62″ x 80″ which is a wonderful size for a QOF quilt as well as a twin-sized quilt. You would need about 1 1/4 yards fabric for the border (cut strips 4 1/2″ wide) and a total of 5/8 yard for the binding for this larger size.
Who knows, maybe Beatrice will be my next QOF quilt project to make and donate. You’ll have to check back later to see if it is. LOL!
I look forward to seeing your Beatrice quilts! You can post them on our VRD Facebook page. Hope to see you there!
Speaking of Hoffman Fabrics, the new Fall 2024 catalogs have just come out. Check out the Project Book, filled with loads of inspiration and Villa Rosa Design Rose Card patterns featuring the latest Hoffman collections. Truly, a feast for the eyes. Ask at your favorite quilt shop or online retailer for the patterns, fabrics, or maybe even kits. ENJOY!
Wow! We’ve got lots to talk about today — I hope you are ready!
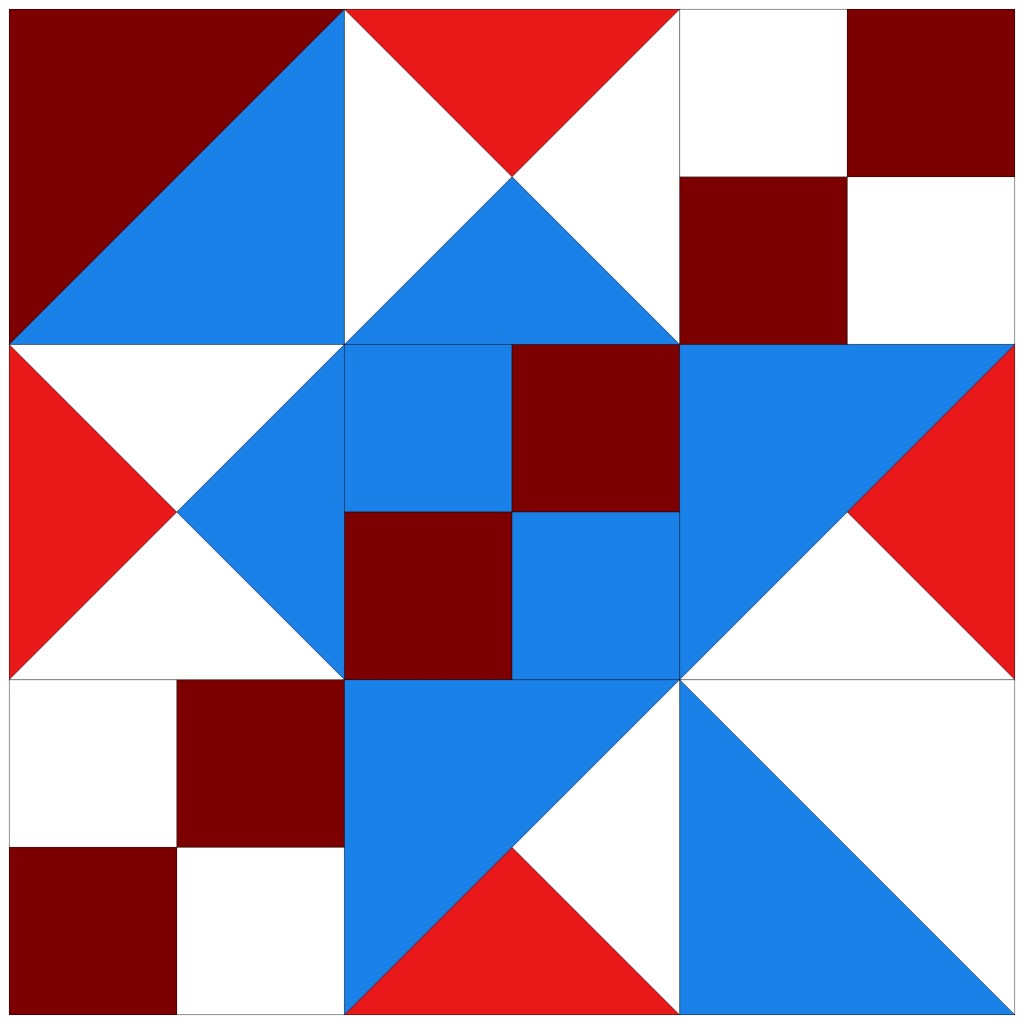
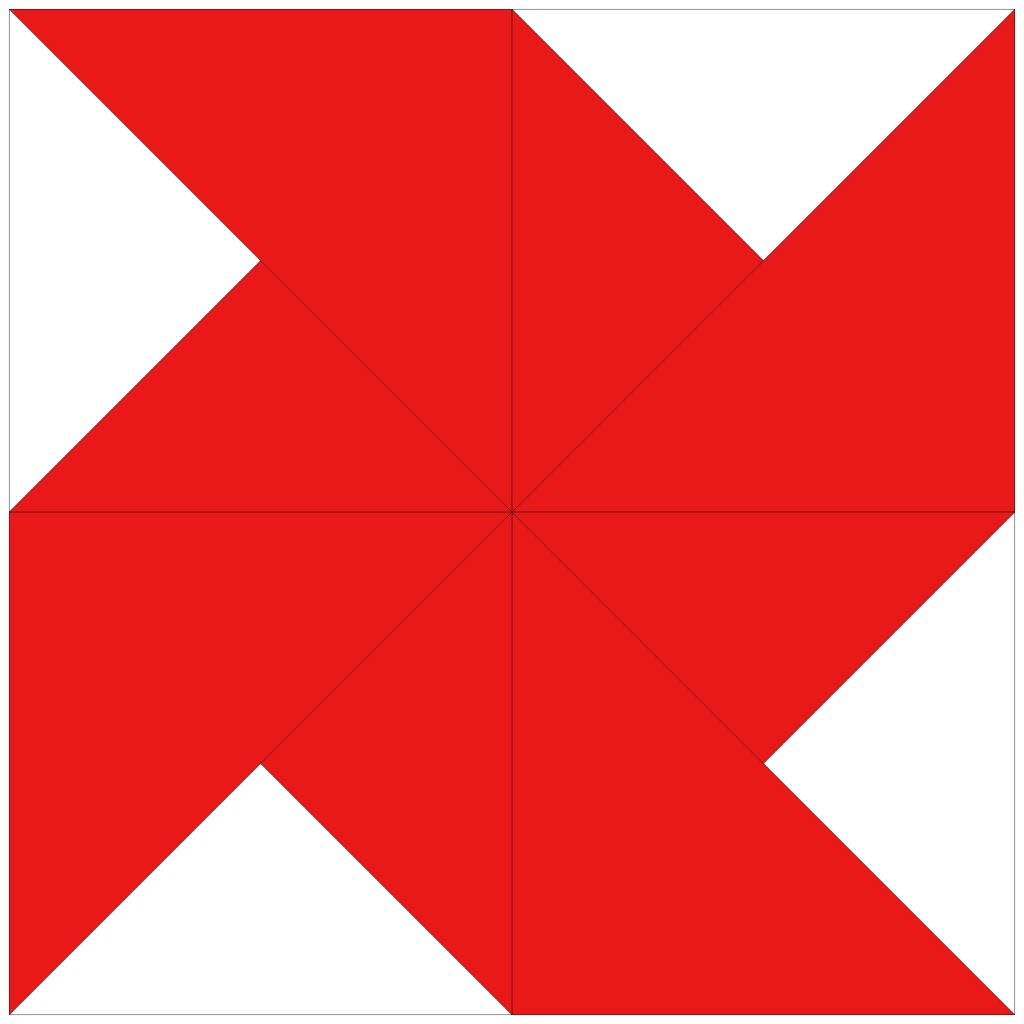
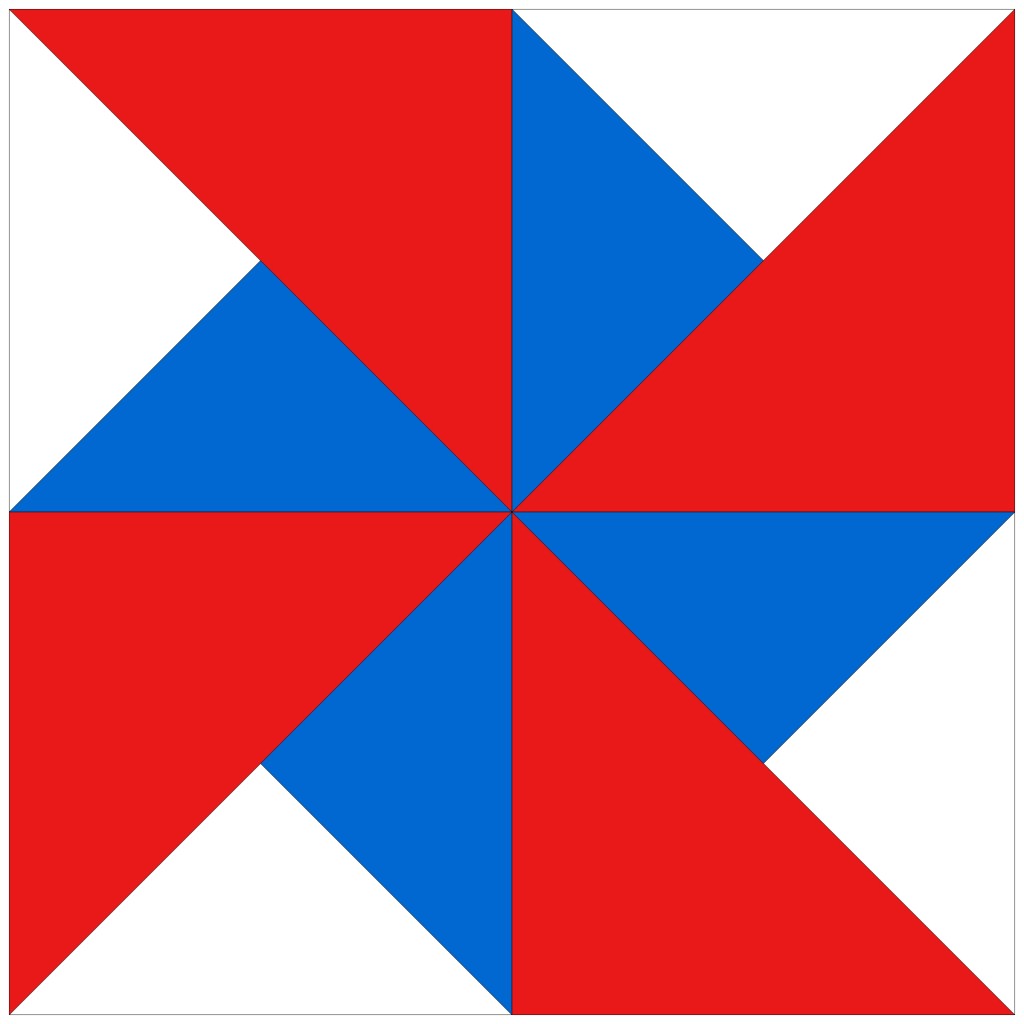
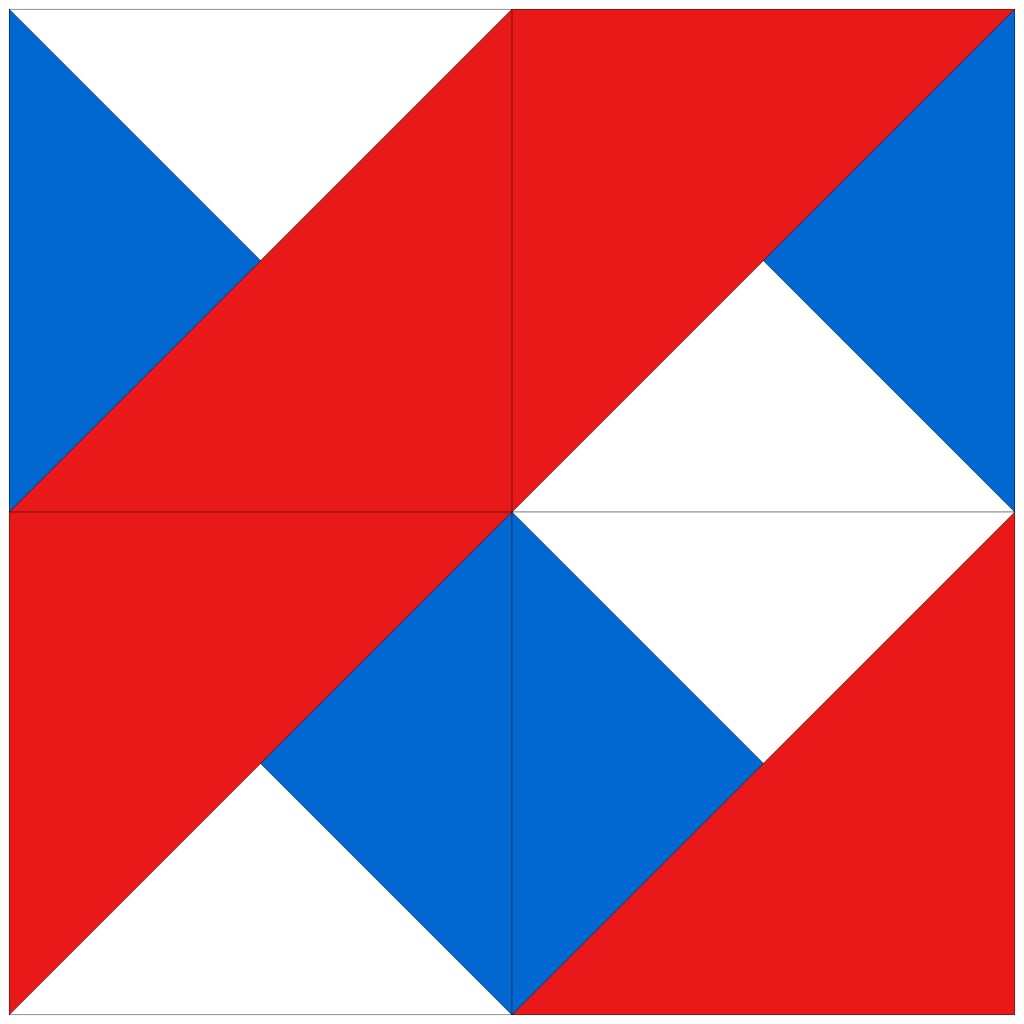
Let’s start off with our Quilt Blocks Basics first — today we are taking a good look at the Y BLOCK!
I did the HSTs and QSTs before tackling the Y block because a Y block is a combination of a QST and an HST. Sounds weird, I know, but really, that’s what it is.
There are other names for the Y block unit, but for the purpose of this post, we’ll stick with calling it the Y block.
Bet you’ve never heard of most of these blocks — they were pretty new to me, too.
Now let’s play a little bit with this very versatile quilt block unit. We are going to use 4 Y block units together in a 4 Patch configuration.
Let’s see what happens when we flip the Y block units around in the block:
Wow! We can really come up with some fun blocks that will make interesting quilt designs!
I think you can see the versatility of the Y block unit in the block variations above. Just imagine what you could come up with if you started changing out the fabrics as well as moving the units about. This is only a 4 patch block frame — what about a 9 patch frame? What if you combined this unit with other units like HSTs, QSTs, or others?
It is simply mind-boggling, isn’t it???
Electric Quilt 8 Software makes it sew easy to play with these units! I can get lost for hours playing with blocks in EQ….
How to Make a Y Block
There are several different ways to tackle the construction of the Y block unit. I decided not to reinvent the wheel because there are so many different ways to make a traditional Y block.
Here’s a great traditional Y block tutorial from Scissortailquilting.com just like the way I would demonstrate how to make it. YAY MATH! They even include the math formulas for you as well as a cutting chart.
The traditional method works great for putting together Y block units, except for one little thing — you make 4 units with mirror images, which is terrific if you want mirror images, but what if you need a Y block unit but not its mirror image?????
Seriously, though, who wants to make twice as many blocks as they need to, which takes twice as much time and twice as much fabric???
My friend, Cathey Laird, of Cathey Marie Designs, was fascinated with the Y block unit and pondered the mirror image issue for a long time until she came up with a solution. Cathey invented a cool Y block ruler which eliminated the mirror image problem — instead of mirror images, you get 4 identical Y block units!
Well, I see new Y block designs for VRD in the future! LOL!
Speaking of Rose Cards, I wanted to share something very cool with you!
Rose Card Tracker
Did you know VRD has a printable list of ALL the Rose Cards????? This might be new to you because it is actually located on the wholesale website, but the list is for everyone who loves Rose Cards.
It is updated every month to include each month’s new patterns, too.
Not too long ago, I finally got all my Rose Cards organized and alphabetized in small clear plastic crates with lids. Yay me!
So next I decided to figure out which Rose Cards I was missing in my collection.
I easily printed out the list (3 pages long as of right now) and sorted through all my Rose Cards to find out which ones I did not have. Then I ordered all the ones I was missing. LOL! As long as I keep up with the new cards, I will have a complete collection of VRD Rose Cards.
It really didn’t take me too long to go through the list because it is in alphabetical order, just like my Cards. Below, you can see that I used red Xs to mark the ones I had. Then, when I did my order, I just ordered all the ones without a red X. I put a small dot in the empty spaces as I went along so I knew which ones I had already added to my order (in case I had to stop at some point and go back to it later).
As of right now I have 3 of the plastic storage boxes almost full with my Cards, so I will probably be adding a 4th as soon as my new Cards arrive. I plan to keep my Cards organized that way, then it will be a snap to find any Card I am looking for.
Yay! Three cheers for organization!!!! How many Rose Cards do you have? How many do you need to complete your collection?
Check Out Our VRD Rose Card Patterns in the NEW Hoffman Spring Project Book
We’ve been working with Hoffman Fabrics for a while now. Their new Spring catalogs are out and I’m excited to share the new Spring 2023 Project Book with you. It is simply drool-worthy!!!!
I can’t believe that a week has passed since we began our very first VRD Blog Hop. It’s been SEW MUCH FUN, hasn’t it?
Our participating bloggers have shared their VRD quilts, tips and tricks, and inspiration by the boatload — just what we all needed in the middle of January to help us jump start a new fun project! You can visit Villa Rosa Designs HERE to see our catalog of over 500 Rose Card patterns for even more inspiration.
Here’s the special VRD Rose Card collection used for this very Fast & Fun Blog Hop:
An enormous HUG goes out to our amazing bloggers for participating in the Blog Hop and showing us their own spin for the VRD Rose Card patterns above. Thank you, Bloggers, for taking the time to be part of the Blog Hop!
I’m bummed that the Fast & Fun Blog Hop is wrapping up today. Sadly, all good things much come to an end sometime. And this Blog Hop really was a “good thing,” wasn’t it?
I really enjoyed reading each participating blogger’s post each day, didn’t you? I must confess that I read them over breakfast because I honestly couldn’t wait to see which quilt each blogger created! And I absolutely loved reading the comments on our VRD post as well as the comments on the other blogs. What fun!
THANK YOU to everyone who took the time to hop from blog to blog this past week. It really warms my heart that so many folks came along for our Fast & Fun Blog Hop ride!
If you haven’t finished reading all the posts for the Hop and leaving comments to register for prizes, you have through Sunday, January 29th to do so. Use the links above to visit each participating blogger to catch up on your reading and your prize entries.
I just have to do a quick shout out to my cousin, Robin, a fellow quilter. Robin had her knee replaced yesterday and after waking up from anesthesia and while she had a little lunch, she made sure to read Wednesday’s blog posts for the Hop. Now that’s real dedication! Heal fast, Cuz.
Winners will be drawn next week, notified, and prizes will be shipped in February. We will also be posting the winners in February, so stay tuned — it could even be you.
One Last VRD Fast & Fun Blog Hop Giveaway
Let’s review all the prizes that are up for grabs for this Blog Hop:
Everyone is eligible to win prizes. Please note that winners outside the USA will receive a digital set of the 2023 Blog Hop Rose Card pattern collection.
There are several opportunities for you to win prizes during the blog hop:
Individual bloggers may be hosting giveaways on their blogs for you to win. Please visit these bloggers to find out about their giveaways and how to register.
Villa Rosa Designs is giving away a 2023 Blog Hop Rose Card pattern collection on each participating blog.
Sponsor prizes have been donated by our lovely Sponsors, above, and even from some of the bloggers, too! These prizes are divided into 2 different categories —
Grand Prize Boxes (of which there are 2) are filled with tons of quilting goodies including books, fabric, precuts, notions, patterns, and more.
Individual Prizes (each blogger will select 3 winners on their blog) which may be books, patterns, fat quarter bundles, 5″ squares, 2 1/2″ strips, 10″ squares, notions, and more.
No purchase is necessary to participate in the Blog Hop or to win prizes.
You have up to 3 chances to win the quilts listed above on this blog post.
1. Leave a comment onthis post and tell us your thoughts about the VRD Fast & Fun Blog Hop.
2. Become a blog follower/subscriber and leave a comment on this post telling us that you are a blog follower/subscriber.
3. Join our VRD Facebook group and leave a comment on this post telling us you joined our FB group.
Ready! Set! GO!
Please note that in order to leave a comment on this blog post to be registered for prizes, you will need to click on the comments link just under the blog title at the top of this blog post. After you click the “comments” link found to the right side, you need to scroll all the way down to the bottom of “comments” in order to find the “Reply” box to leave your own comment. Be patient — there may be a lot of comments to go through until you get to the bottom.Thank you.
Don’t forget — registration for prizes closes Sunday, January 29th.
Winners will be selected randomly on Monday/Tuesday January 30th/31st.
PLEASE MAKE SURE TO INCLUDE AN EMAIL ADDRESSSO WE CAN CONTACT YOU IF YOU ARE A WINNER!
Well, Quilty Friends, I thank you for hopping along with us this past week. Hope you had as much fun as we did!
I hope you are ready to come along on a fun quilting adventure, otherwise known as our very first Blog Hop here at Villa Rosa Designs. We’re calling it the Fast & Fun Blog Hop, and I know you’ll understand why very soon.
We have a super group of bloggers ready to share some awesome quilts made with Villa Rosa Designs (VRD) Rose Card patterns.
In fact, we’ve put together a special collection of 5 patterns just for this Blog Hop!
Here are the 5 patterns in the 2023 Fast & Fun Blog Hop Collection:
Lucky you! You can purchase a set of these 5 patterns HERE. Or visit our website HERE for even more great Rose Card patterns (over 500 of them).
Or you might just win a set. READ ON to find out how!
Villa Rosa Designs is the brainchild of owner and Rose Queen, Pat Fryer. Pat wanted to create Fast & Fun, affordable, and high quality patterns for quilters featuring precuts like 1/2 yards, fat quarters, 10″ squares, 5″ squares, 2 1/2″ strips, fat eighths, and fat sixths as well as other fabric cuts like panels and novelty fabrics.
Since its launch in 2010, VRD has become much more than a handful of easy-to-make quilt patterns. Rose Cards, Villa Rosa’s signature postcard-sized patterns, combine great design with simple packaging and an attractive price, making Rose Cards one of the best selling pattern brands on the market today! And since 2010, Villa Rosa Designs has grown to include a collection of very talented designers, each with their own unique style.
Now that you know a little bit about Villa Rosa Designs, let me tell you about the VRD Fast & Fun Blog Hop!
Let’s HOP!
We’ve teamed up with an awesome group of bloggers, who have accepted the challenge to create 1 of the 5 Blog Hop Rose Card patterns above. To see which blogger has created which pattern, you’ll have to visit EACH blogger during the blog hop which runs from today, January 19th through next Thursday, January 26th.
You will have the opportunity to win lots of great prizes during the blog hop! All you have to do is hop from blog to blog every day from January 19th through January 26th to see which quilt each blogger made and to find out how to register for prizes on each blog.
Registration for prizes will close on Sunday, January 29th.
Before I jump into all the cool prizes you might win, I want to take a moment to thank all of our incredible sponsors, who donated all kinds of quilting goodies for you to win. Thank you Sponsors! Without you, this Blog Hop wouldn’t be happening.
Everyone is eligible to win prizes. Please note that winners outside the USA will receive a digital set of the 2023 Blog Hop Rose Card pattern collection.
There are several opportunities for you to win prizes during the blog hop:
Individual bloggers may be hosting giveaways on their blogs for you to win. Please visit these bloggers to find out about their giveaways and how to register.
Villa Rosa Designs is giving away a 2023 Blog Hop Rose Card pattern collection on each participating blog.
Sponsor prizes have been donated by our lovely Sponsors, above, and even from some of the bloggers, too! These prizes are divided into 2 different categories —
Grand Prize Boxes (of which there are 2) are filled with tons of quilting goodies including books, fabric, precuts, notions, patterns, and more.
Individual Prizes (each blogger will select 3 winners on their blog) which may be books, patterns, fat quarter bundles, 5″ squares, 2 1/2″ strips, 10″ squares, notions, and more.
WOW! That’s a lot of prizes if you do the math.
Please note that to leave a comment on this blog to be registered for prizes, you will need to click on the comments link just under the blog title at the top of the blog. After you click the “comments” link, you need to scroll all the way down to the bottom of “comments” in order to find the space to leave your own comment. Be patient — there are a lot of comments to go through until you get to the bottom. Thank you.
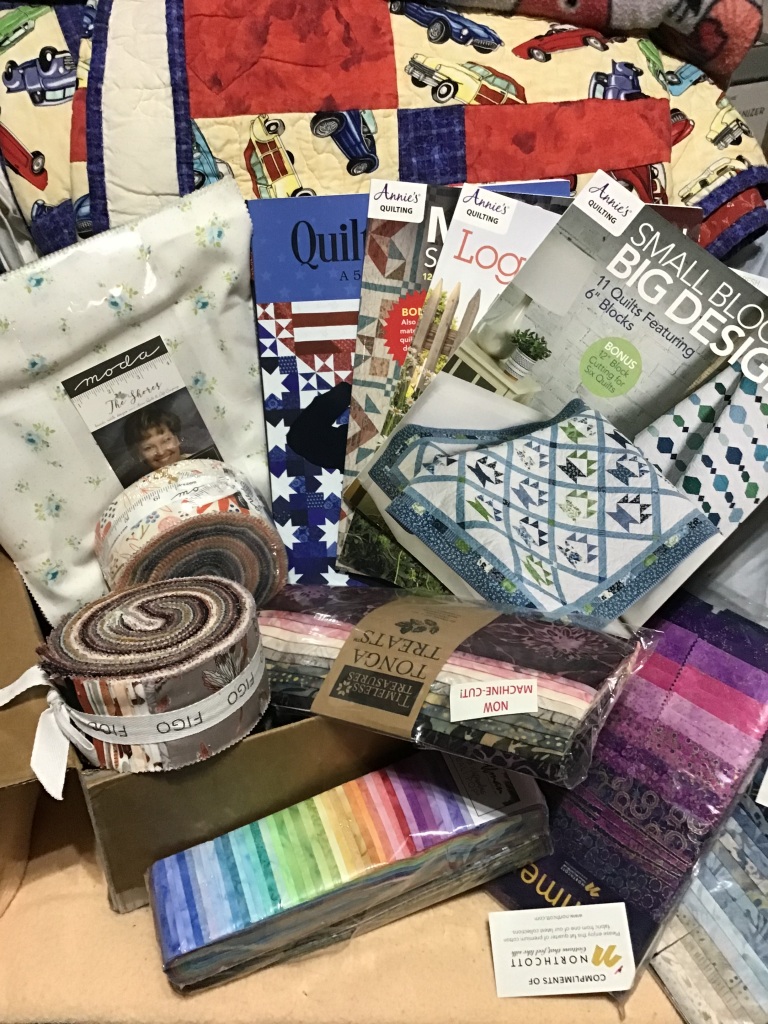
Here are some photos of the prizes to get you motivated! LOL!
Photo 1 (left) shows a Grand Prize Box. Oh my — look at all those quilting goodies!
Photos 2 and 3 (center and right) show an assortment of Individual Prizes just waiting for you to win — books, 10″ squares, 2 1/2″ strips, 5″ squares, fat quarter bundles, half yard bundles, notions, and patterns.
Sooooo, how do you win?
Hop from blog to blog from January 19th through January 26th and register for prizes at each blog. The more participating blogs you visit and register at, the more chances you have to win prizes! It’s really that easy, I promise.
Winners will be selected randomly. Each blogger will select 2 names to go into the Grand Prize Box drawing and 2 winners will be selected randomly to win. Each blogger will also randomly select 3 winners for the Sponsored Individual Prizes.
Prize registration closes Sunday, January 29, 2023.
Winners will be announced the beginning of February 2023. Prizes will be shipped in February 2023.
No purchase is necessary to participate in the Blog Hop or to win prizes.
Villa Rosa Designs Thursday January 19th Giveaway
Thank you for reading all the way through this post! As a reward, you can register to win QUILTS!
Here’s your chance to win one of these 3 Quilts made from VRD Rose Card patterns. These 3 quilts are completely finished — machine quilted and bound — and ready for you to enjoy. Awesome!!!
You have up to 3 chances to win the quilts listed above on this blog.
1. Leave a comment on this post and tell us what your favorite Rose Card pattern is (or one you would like to make if you’re new to VRD).
2. Become a blog follower/subscriber and leave a comment on this post telling us that you are a blog follower/subscriber.
3. Join our VRD Facebook group and leave a comment on this post telling us you joined our FB group.
Ready! Set! GO!
Please note that to leave a comment on this blog to be registered for prizes, you will need to click on the comments link just under the blog title at the top of the blog. After you click the “comments” link, you need to scroll all the way down to the bottom of “comments” in order to find the space to leave your own comment. Be patient — there are a lot of comments to go through until you get to the bottom.Thank you.
Don’t forget — registration for prizes closes Sunday, January 29th.
Winners will be selected randomly on Monday/Tuesday January 30th/31st.
PLEASE MAKE SURE TO INCLUDE AN EMAIL ADDRESSSO WE CAN CONTACT YOU IF YOU ARE A WINNER!
Well, Quilty Friends, I thank you for reading the whole way to the end.
Good luck to each of you and please enjoy the Blog Hop!
I am SEW EXCITED to tell you all about our very first Villa Rosa Designs Blog Hop. We’re calling it the “Fast & Fun” Blog Hop because as most of you already know, Villa Rosa Designs Rose Cards are fast and fun for real!
What is a Blog Hop?
It’s a group of bloggers who write about a specific topic or theme. The participating bloggers write and share their posts during a specific period of time. During the blog hop, people can read the posts each day of the hop and register for prizes. YES! I said prizes!
Have you ever gone on a Quilt Shop Hop? It’s a lot like that except you hop from blog to blog from the comfort of your home instead of from store to store.
Our blog hop will be January 19-26, 2023 and we have a great group of participants who will be telling you all about their Fast & Fun VRD projects. We will also be offering a special Blog Hop Rose Card Collection for sale on the website and of course, we will be giving away sets of these 5 awesome Rose Card patterns, too.
Sew…..mark your calendars for January 19-26 and tell all of your quilting pals!
Here are our participating blog partners for the blog hop as of today:
You might want to take a little time and explore our blog partners so you’re all set for the Blog Hop and can register for prizes on all participating blogs.
Speaking of registering for prizes, as of today, we have the following companies and businesses sponsoring our Blog Hop:
Many of our blog partners will be sponsoring their own giveaways on their blogs, too!
The blog hop is sounding more and more fun, isn’t it? Don’t forget to mark your calendars for January 19-26. The Blog Hop will kick off here at our Villa Rosa Designs blog,Villa Rosa Quilts, on January 19th!
We’ll have more information next week, so stop back then!