Warm temps are here……..finally! Maybe a bit too much too fast, but I’ll take it! The sun is shining, the sky is blue, it’s actually warm in the upper 80s, but there’s a nice breeze to make the heat tolerable. Believe it or not, I’m sitting here in shorts and a t shirt as I write this blog post. Last week, I was wearing a fleece jacket and long pants. Oh, the difference a week can make. I hope you are having some nice weather wherever you are, too.
I thought we’d kick off the gorgeous weather here in my little corner of the world with a fun quilt tutorial.
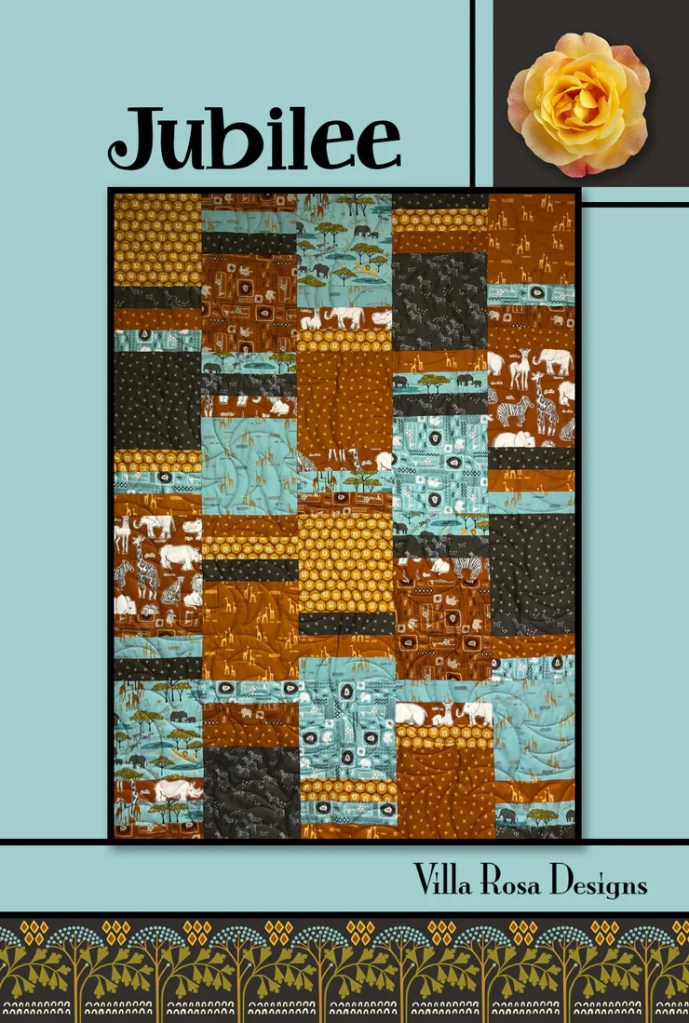
VRD Jubilee Quilt Tutorial
Let’s make Jubilee today. It’s a super fast and fun fat quarter quilt and it’s a great option when you need a quilt in a hurry. Looks great in just about any fabric. Perfect for summer quilting. Make it in the afternoon and still have time for dinner and s’mores around the campfire in the evening.
Get your digital Jubilee pattern HERE or your print Jubilee pattern HERE
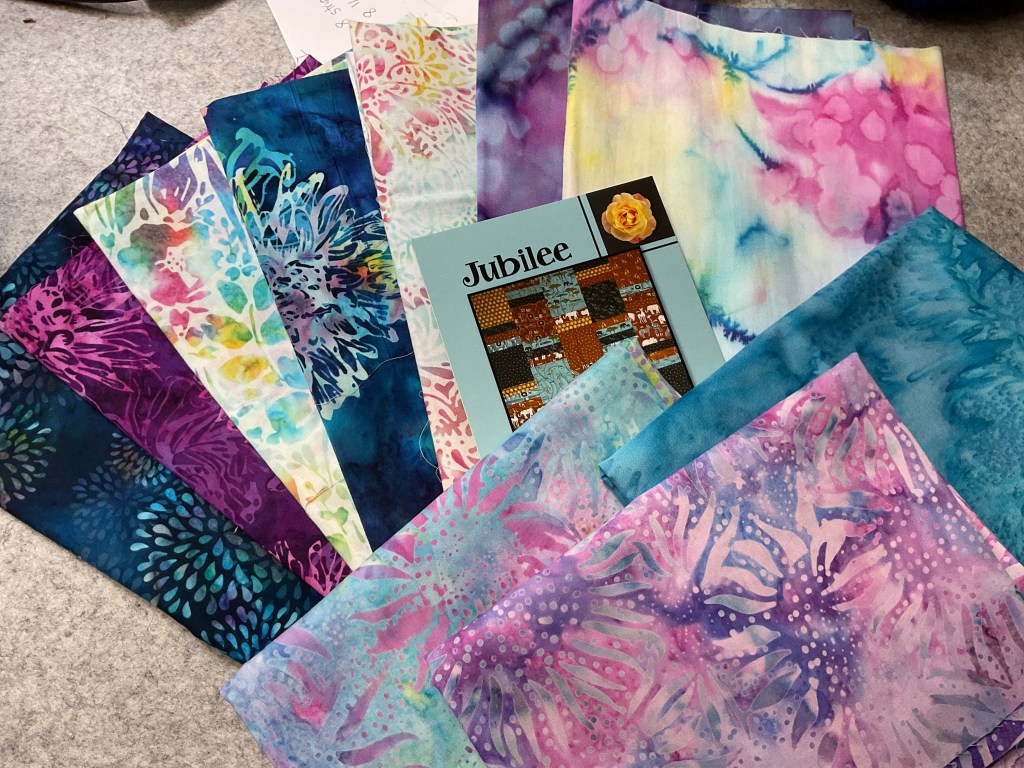
The first thing we need is fabric! YAY FABRIC!
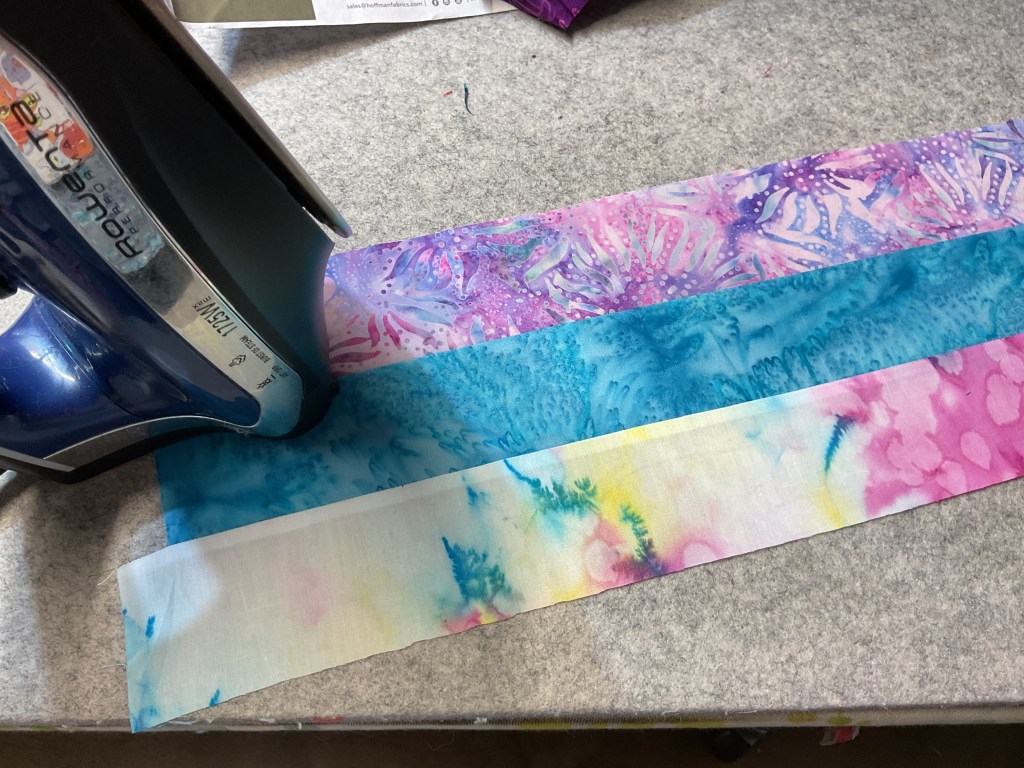
Today I’m using batiks from the Sweet Shoppe collection by our friends at Hoffman Fabrics. Aren’t these fabrics yummy? I can’t wait to see how the quilt turns out!
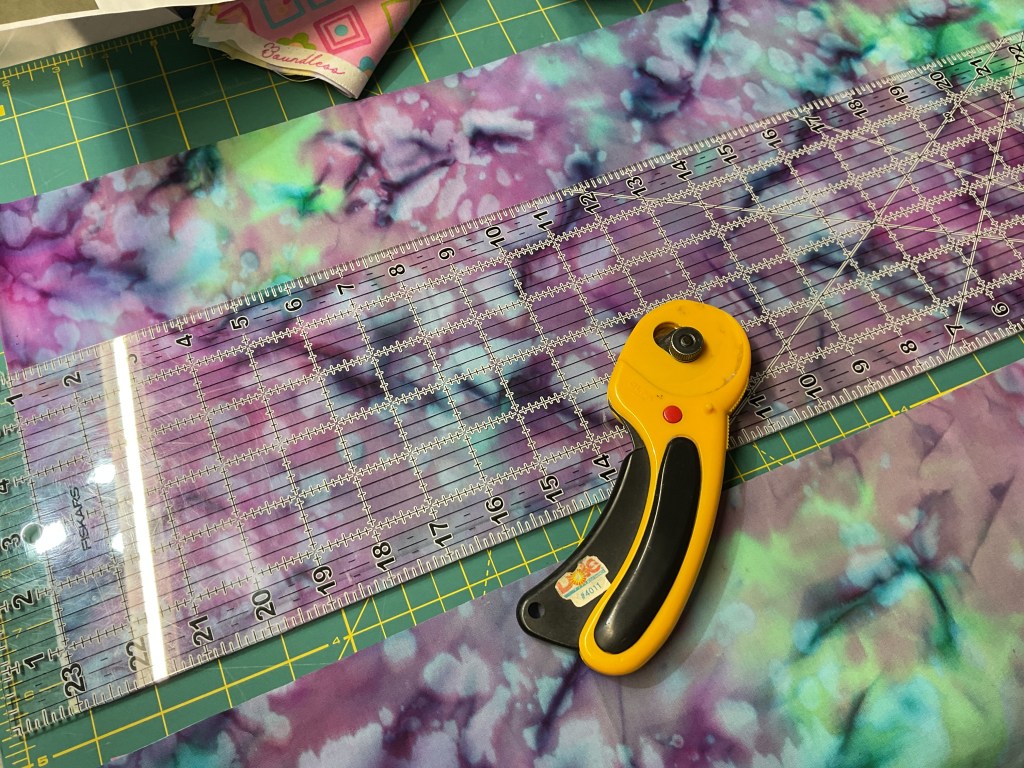
Of course, we need to do some cutting before we can sew. Let’s get to it.
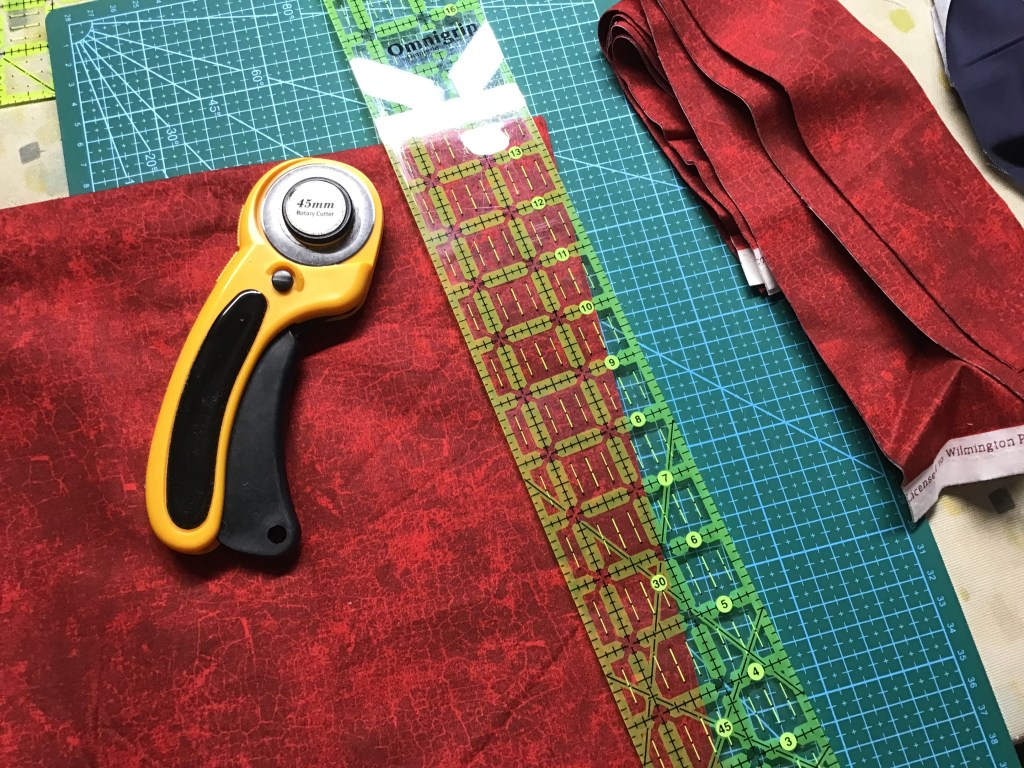
In the left photo, below, you can see how many layers I’m cutting at once. I find batiks to be great for layering for cutting as the fabric is finer. When I’m cutting thick or slippery fabrics, I only cut one layer at a time.
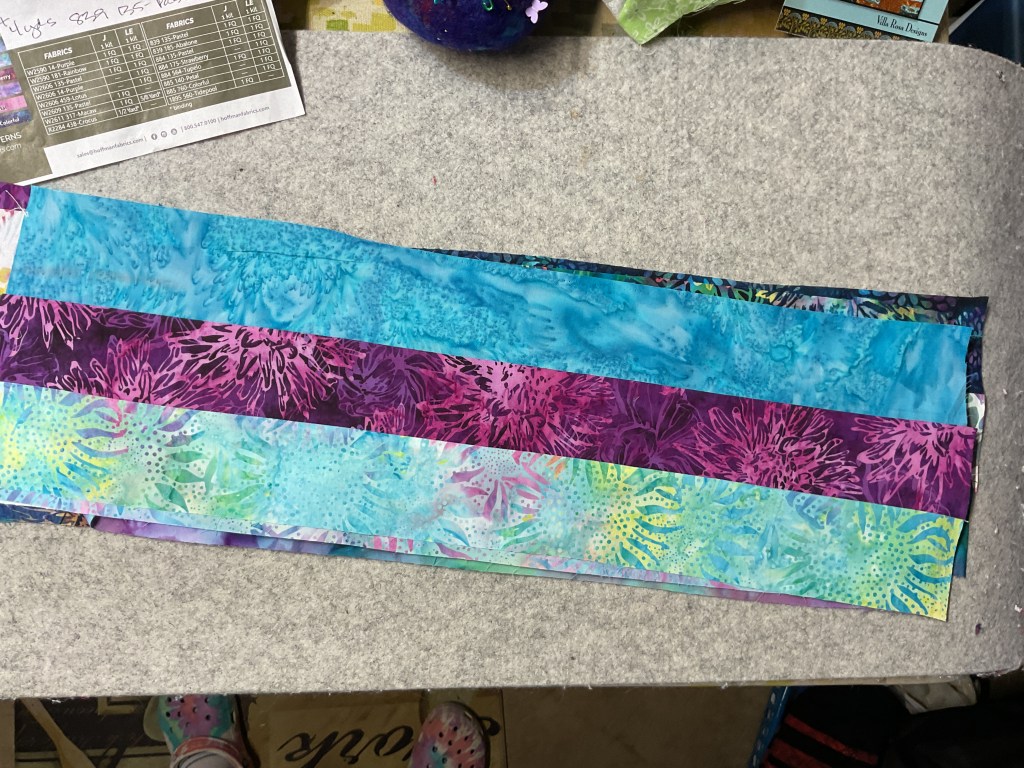
Let’s get the rest of the fabrics cut. For Jubilee, we only need 2 different shapes, which is one thing that makes this quilt go together so quickly. Wow! That was fast!
Time to start sewing the strips together so we can make strips sets and then we’ll cut the strip sets down into the block size we need.
I like to set all my strips to the left of my machine while I sew. Then I select strips randomly to sew together, making sure I don’t grab 2 of the same strip. We want these strip sets to be as scrappy as possible.
Once I’ve sewed 2 strips together for the required sets, I then go back and add the third strip to all of the sets. I find it more efficient to complete each step for all the pieces at once before moving onto the next step.
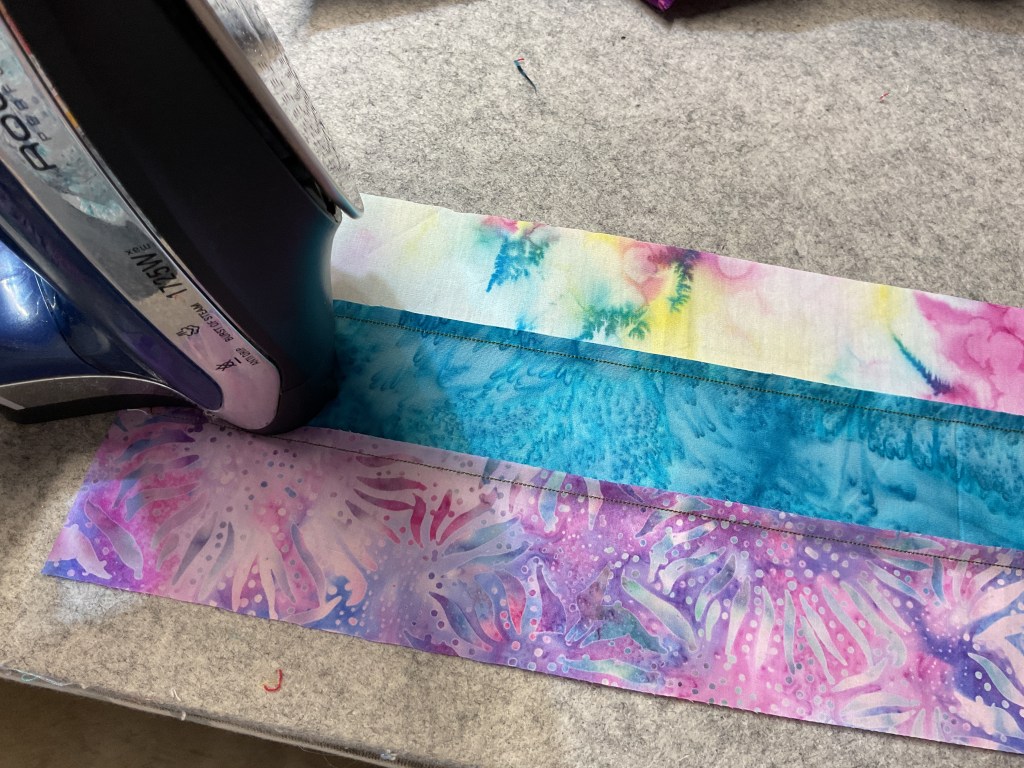
Once our strip sets are sewn together, it’s a good idea to press them before we begin cutting out the blocks.
Do you struggle with which way to press your seams on the back of your blocks? Me too. More often than not I end up flipping the seams in the other directions when I go to assemble blocks. Oy vey!
The good news with Jubilee is that it doesn’t matter which way you press your seams because the blocks do not line up and the seam do not cross – another reason why Jubilee is quick as a wink.
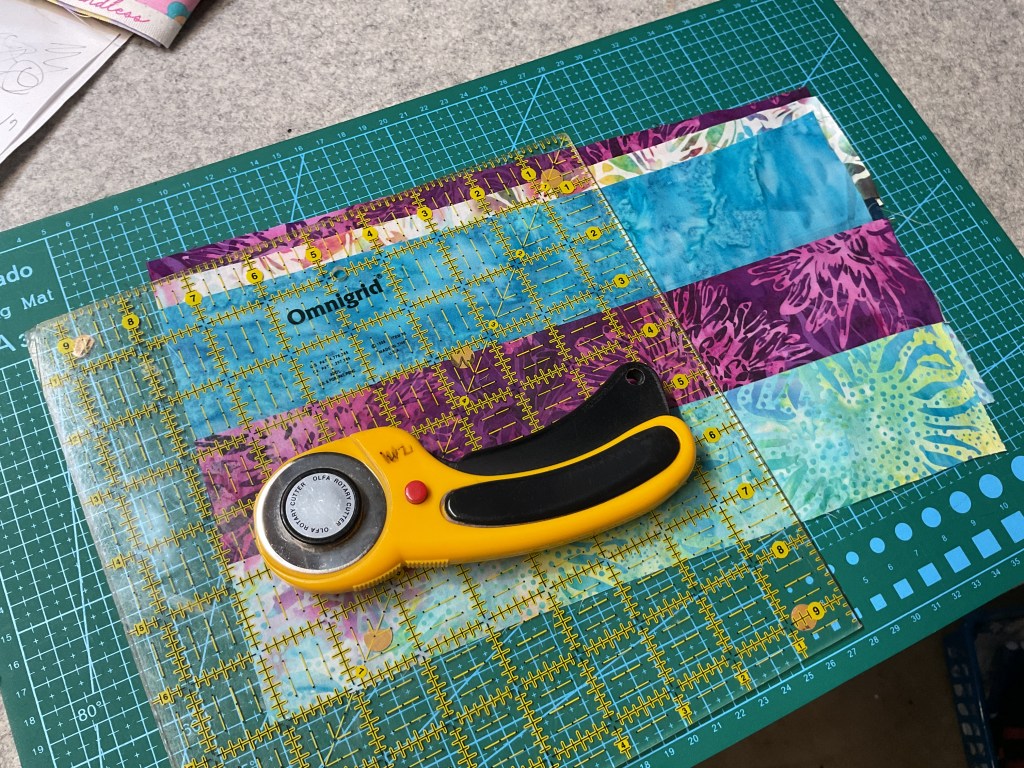
Next we need to cut our strippy blocks from our strip sets. I’m layering 3 strip sets on top of each other for cutting. To do this, I line then up on the left edge (or the right edge if you cut from that side), but I stagger them a bit top to bottom so the seams are not sitting right on top of each other because stacked seams make a big lump. It’s not a good idea to attempt to cut through lumpy seams or you might accidentally miscut something.
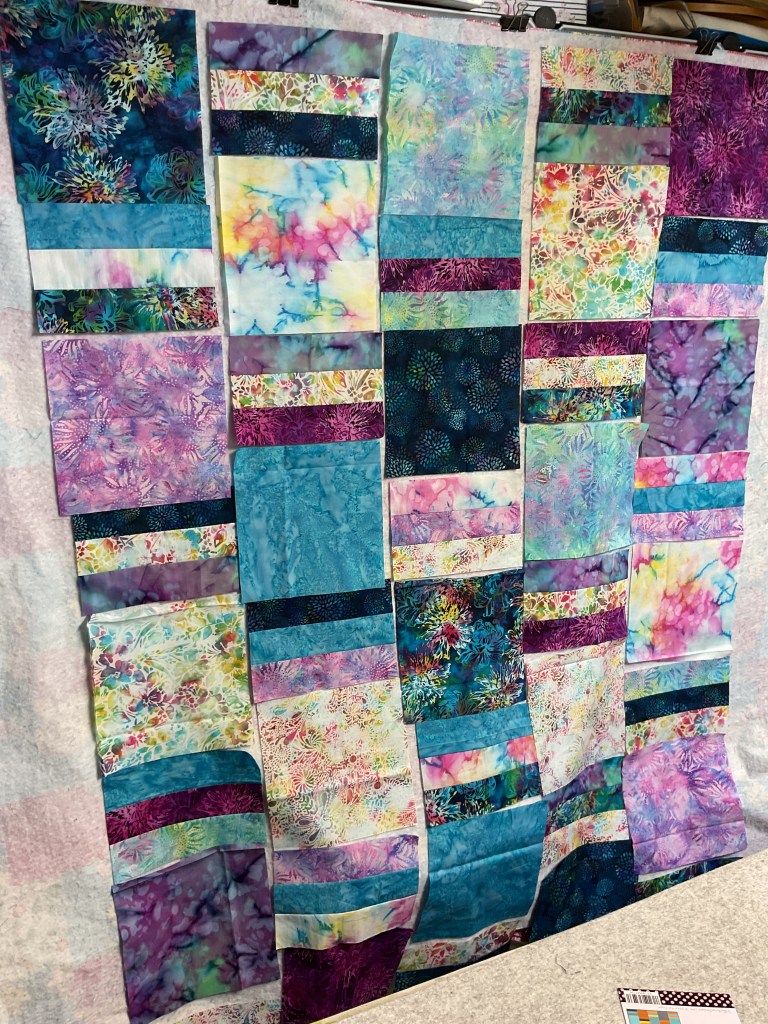
Awesome applesauce! All of the blocks are pressed, cut, and ready to go. Time to head to my flannel wall to lay them out.
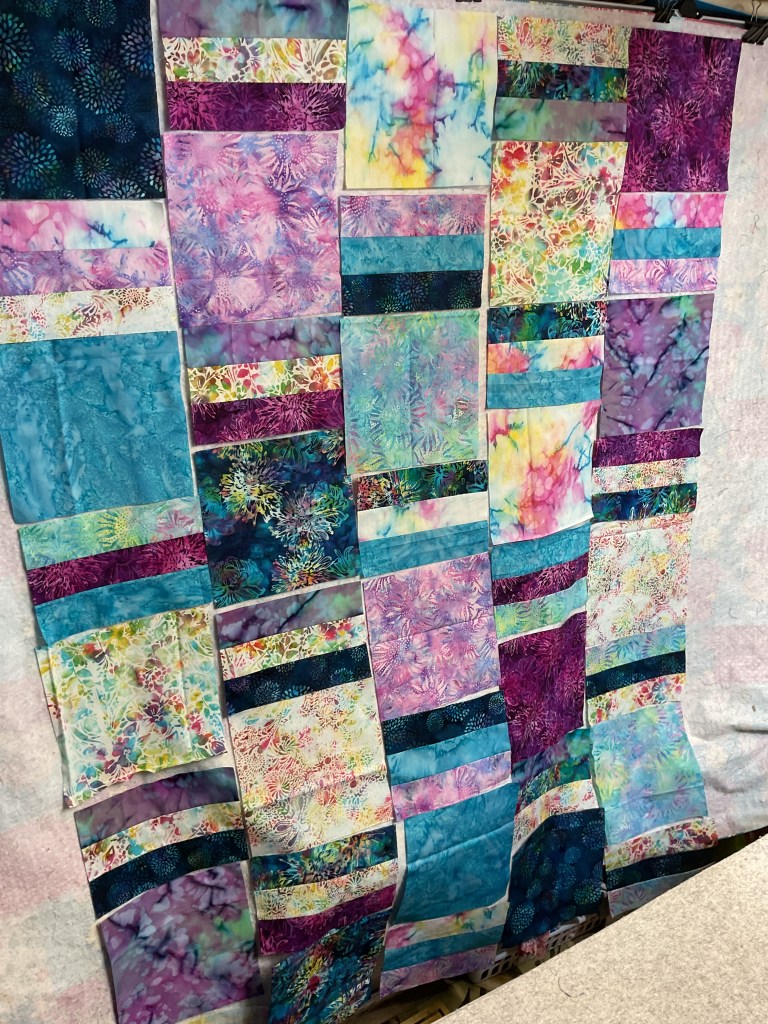
I’m going to put the blocks up, alternating the squares with the pieced blocks. I’m just going to slap the blocks up randomly and then I’ll shuffle them around to distribute both colors and fabrics until I find a layout that pleases me. When you are putting blocks together, what is your process?
Below are 3 photos showing shuffled blocks. Sometimes this step takes longer than actually making the whole quilt top (eye roll here).
Here is my final layout.
Because the blocks don’t line up horizontally, we’re going to sew the blocks into columns and then sew the columns together.
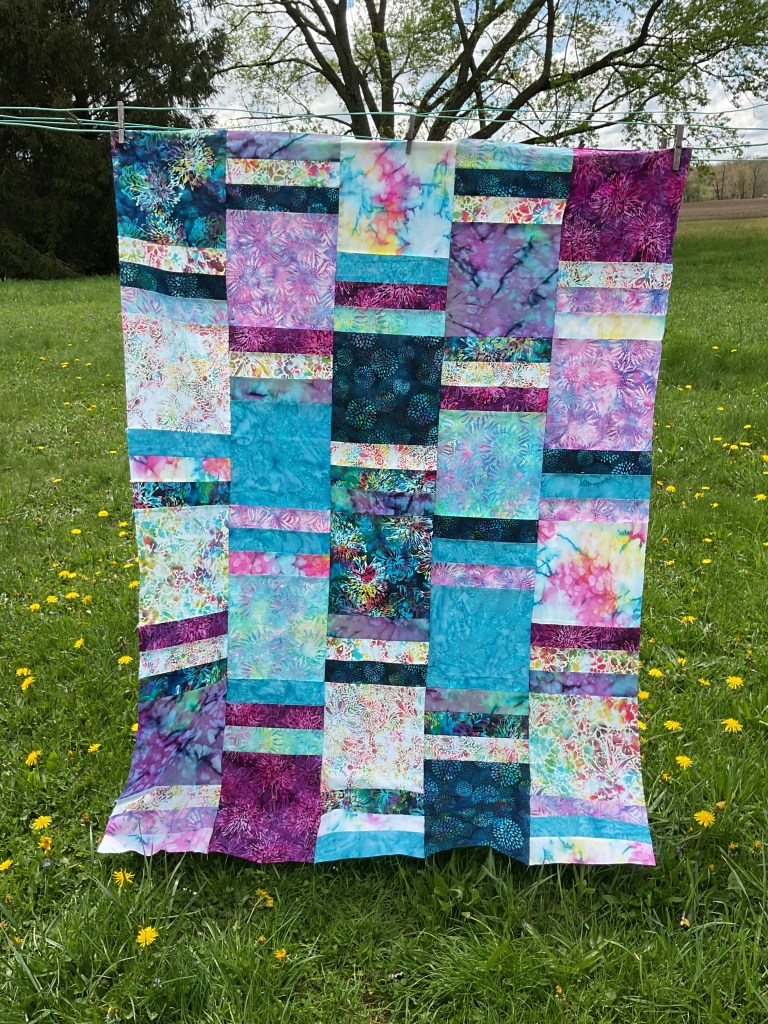
And done! Here is the finished quilt top. Isn’t it pretty? I love that the blocks are large so one can enjoy the beauty of the batik fabrics. It turns into a nice throw at 45″ x 60″, but it would be easy to make the quilt larger by adding a border or additional blocks.
Now I just have to layer, quilt, and bind it.
Looking for info on finishing your quilts? Check out these posts in our Basic Quilting Skills blog series:
I am thrilled to tell you that we’ve had a little bit warmer temperatures for a couple days in row here in NW PA. I’m talking above 32 degrees! Actually it’s been in the 40’s, which feels so balmy compared to last week’s temperatures in the single digits and teens. Whew! But I don’t think winter is over yet for us, though, as the beginning of March is looking cold again. Spring can’t get here soon enough!
PSST! While we’re waiting for Spring to arrive, it is a great time to work on our Free Motion Quilting (FMQ) skills, don’t you think? So far we’ve talked about tools, equipment, and resources; doodling, making loops, and using cursive writing as a quilting design.
This week for Lesson 5, we are venturing beyond the Loopy design.
If you missed any of the earlier lessons, you can find them below:
You might be wondering what exactly I mean by “going beyond loops”. Talk a deep breath — there is no need to panic. I promise we are not jumping right into Feathers. Relax, Feathers are ahead of you sometime in the future, but today is not the day. Instead, we are going to add some fun elements to our quilting to change up our basic Loopy FMQ design.
#1Snowflakes with Loops
This design is absolutely one of my favorites, hands down! It is quite flexible and looks great on a lot of different quilts. Depending on the theme of the quilt, it can look like a snowflake, a star, fireworks, a starburst, or even a cool funky flower. Wow! That’s a lot of options for a single element, isn’t it?
Here is an example of the Snowflake and Loop design on a Christmas/winter place mat I created years and years ago for a magazine pattern.
Please notethis place mat design was featured in Quilter’s World magazine some years ago and is a copyrighted design.
Grab your dry erase markers and let’s practice drawing Snowflakes or whatever you would like to call them on our white boards. You can decide how many spokes/rays you want your Snowflakes to have. You can even vary the number in your design to add more interest.
Next let’s add Loops to the Snowflakes and practice drawing our new Loopy variation design. Ready, set, go!Do you see how I surrounded each of the Snowflakes with my Loops? I like to use the Snowflakes as an accent, not the primary design. The primary design, of course, is the Loops. Additionally, I like to give my Loops lots of space to breathe.
Go ahead and practice drawing this design a couple times. Experiment with the Snowflakes (do you want 6 or 8 or more spokes/rays?).
Next, we’re going to FMQ this design on a practice square on our sewing machines. Are you ready? Take a deep breath and just do it.
To get you started, here’s a little video I made for you, showing how I create my Snowflake and Loop variation.
Here is a little example of quilting the Snowflake and Loop design.
Now it’s your turn to practice this design. Enjoy playing with it! Just imagine all the different kinds of quilts you can use it on!
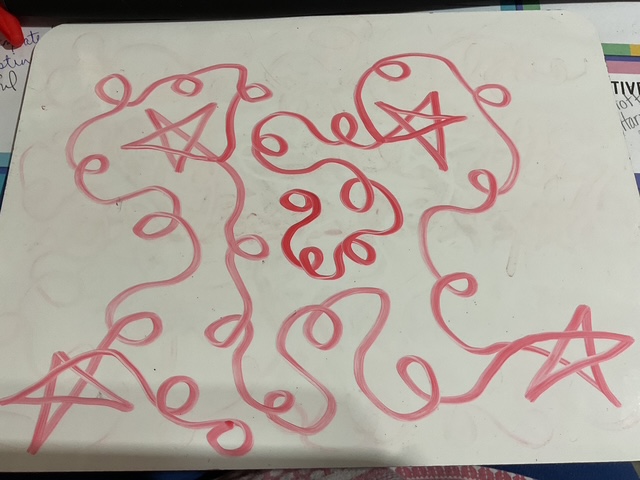
#2Kindergarten Star with Loops
Do you remember when you first learned how to make a five-pointed star? Probably around kindergarten, I should think. Can you remember how to make it now?
Here’s a little tutorial to jog your memory. Keep in mind that I am left-handed so you might draw your star differently than I do. Remember, you do you.
Kindergarten stars aren’t too much different from the Snowflake element above. And once you get comfortable making a five point star again (believe me, it will take some practice for some of you to remaster this shape), the design will flow more easily. Go ahead and draw some Five Pointed Stars on your white board. Make as many as you can fit onto the board. Make them all different sizes, too.
Now let’s practice drawing Kindergarten Stars combined with our FMQ Loop design. Feel free to do this several times until it feels more natural to you.
I bet by now (that is if you’ve been practicing) you are probably finding alternating the direction of the loops to be easier than when you first started several weeks ago. Go you!
Keep practicing on your white board until you can draw the five point stars without thinking about each line. Then I want you to practice making those stars upside down and sideways or else your design will come out very linear with stars lined up going the same direction.
This design looks amazing on patriotic quilts and on children’s quilts, too. What other kinds of quilts would look great with Kindergarten Stars and Loops?
Next up, we’re going to try quilting this design with our machines. Before we do, though, here’s a quick little video showing how I FMQ Kindergarten Stars and Loops.
Let’s make five point Kindergarten Stars!
Okay, now it’s your time to practice quilting Kindergarten Stars paired with Loops! This is fun, isn’t it?
#3Hearts and Loops
Hearts will be our last design for today. So, how are you at making hearts? I have discovered that I can rarely make both sides of a heart exactly the same, so in my quilting (drawing and cutting, too), I intentionally make the sides of my hearts different. It lends a quirky funky look to my Hearts and Loops design, and that works just fine for me. LOL!
I have found that there are 2 basic ways to quilt hearts. Maybe you’ll come up with a different one and if you do, I hope you with share.
Anyway, the first way starts at the top center point and curves down and stops briefly at the bottom point before swooping back up and around to the center point once again. Remember, I’m a lefty so I usually move counterclockwise. Do what is comfortable for you.
The second way is one continuous line which might make it easier for you to FMQ hearts. It starts at the bottom point then curves up and around to the center point where you pause briefly before doing the second top bump and then swooping back down to the bottom point. This heart reminds me more of a heart shaped balloon – you’ll see this more when I quilt it.
So go ahead and practice your stars on your white board. Which style do you like better?
Now that I’ve mentioned both styles, I’m going to show and use the second style Heart design. I find that it can flow better with the loops than the first Heart style.
Now it’s your turn to practice drawing the Heart and Loop design on your white board. Repeat as many times as you want, experimenting with your Hearts.
Notice how I crossed the bottoms of the hearts in the design.
Let’s head back to our sewing machines and try FMQ Hearts and Loops. Here’s a quick video of how I do FMQ my Hearts and Loops.
Check out this cute little Hearts and Loops design!
Well, that’s it for me today. I hope you keep practicing your Loops and adding these fun elements to change up your designs. Next week I’ll have a few more Loop design variations to share with you. So stay tuned!
Another week has passed us by and the only things I’ve sewn recently are my samples for this Bunny Ears Snack Mat tutorial. LOL! I hope you had better luck this past week getting some sewing in. I keep gazing at my collection of VRD Rose Cards as well as petting my fabrics and my sewing machine looks lonely across from me as I write here at my desk, but I just can’t seem to find enough time to actually get something going on my machine. Somehow I need to find a pocket of time — maybe I should sleep less so I can quilt more. But, no, that won’t work for me these days as I really do need those 8 hours of sleep a night. Ho hum…..
Update on Blog Hop Prizes
I just wanted to let everyone know that we are still working on getting everything shipped to Blog Hop Prize Winners. So far the quilts have been shipped, digital pattern collection winners have received their patterns, and prizes graciously being shipped by our lovely sponsors should be in the mail. Physical pattern collections haven’t yet been shipped but should be going out in the next couple days. I have a stack of prizes that also need to get mailed as well as the Kaffe Collection and the Mystery Box.
You may be scratching your head, wondering why it’s taking us so long to get everything sorted out and to the winners. That, my friends, is a complicated topic:
We had around 28 bloggers in addition to our own blog, which really makes 29. There were prize winners on ALL of the blog post. So that’s a lot of information to put together and organize! To make things even slower, we had some winners who never replied to their winner emails, so then we had to randomly select new winners and contact them to get their information. Egads! It literally took weeks to gets all the winners selected and confirmed. Really, I’m not kidding.
Prizes are being shipped from multiple locations — the quilts were shipped from the VRD shop in CA, physical pattern collections will be shipped from our pattern shipping location in MO, digital pattern collections were emailed by moi here in PA, sponsors are shipping prizes from their warehouses and office locations all over the US, and I am shipping prizes and 2 of the Grand Prizes from my little studio here in PA.
It’s crazy when you think of the logistics involved in our Blog Hop — kind of like dancing Swan Lake en pointe while trying to juggle knifes — very sharp knifes!
Happily, we should have everything out in the mail very soon. Winners hare receiving their prizes. Please continue to be patient as we get everything on its way to you.
Now, how about a fun tutorial?
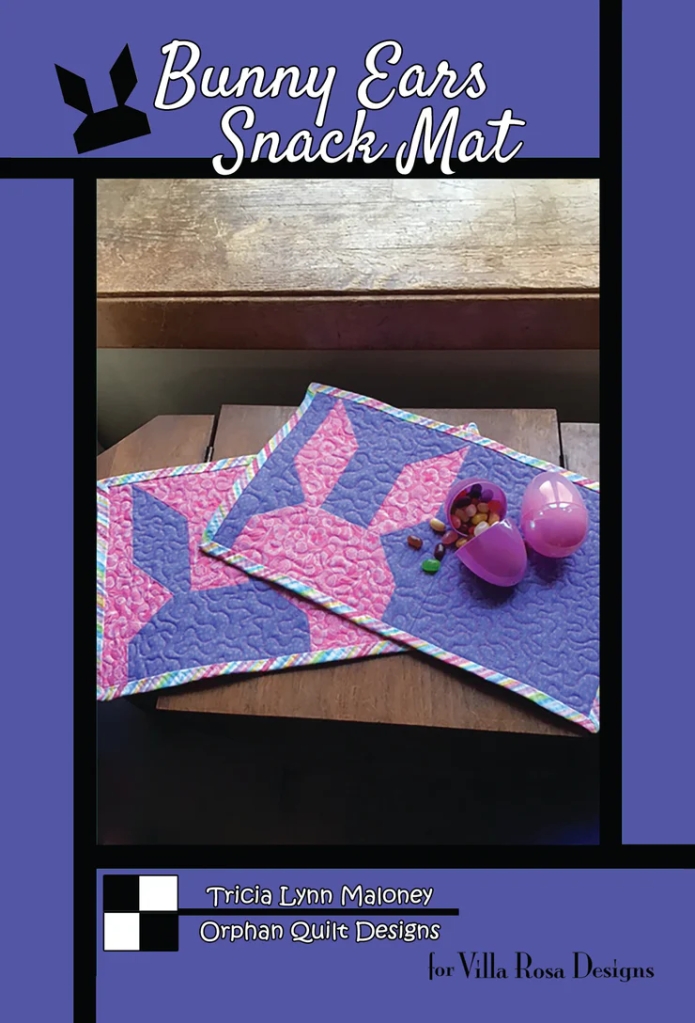
VRD Bunny Ears Snack Mats Tutorial
Nothing says spring like a pair of bouncy little bunnies with extra-long ears! But before I even begin the tutorial, I need to let you know there is an update on the cutting instructions for piece B — you should have enough fabric left over to cut the updated piece, though. Please check the Corrections Page HERE for the new cutting measurement for piece B. Yes, we do have a corrections section at the bottom of our website, villarosadesigns.com, so if you ever find something on a pattern that doesn’t quite look right to you, please check the corrections page for updates.
Get your own Bunny Ears Snack Mat Rose Card physical patterns HERE or digital patterns HERE.
All right! Let’s make some cute bunnies!
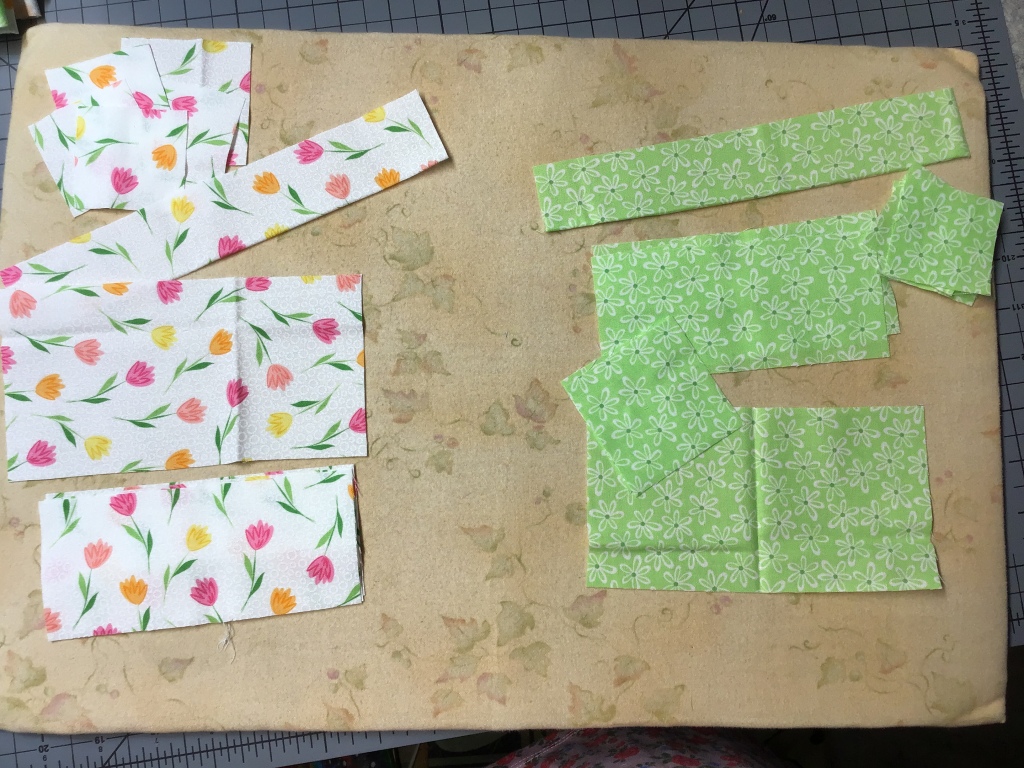
The first thing we need is 2 fat quarters. Yep, just 2 FQs makes 2 adorable little Bunny Ears Snack Mats.
Time to cut all the pieces out — we’re actually doing the cutting for both Snack Mats at the same time. While I cut, I’m using my ancient homemade flannel board to keep my pieces from getting lost.
Did you miss my flannel board tutorial last week? You can find it HERE.
PSST! Don’t forget to switch your pieces before your start sewing so the bunny fabric in one block becomes the background in the other!
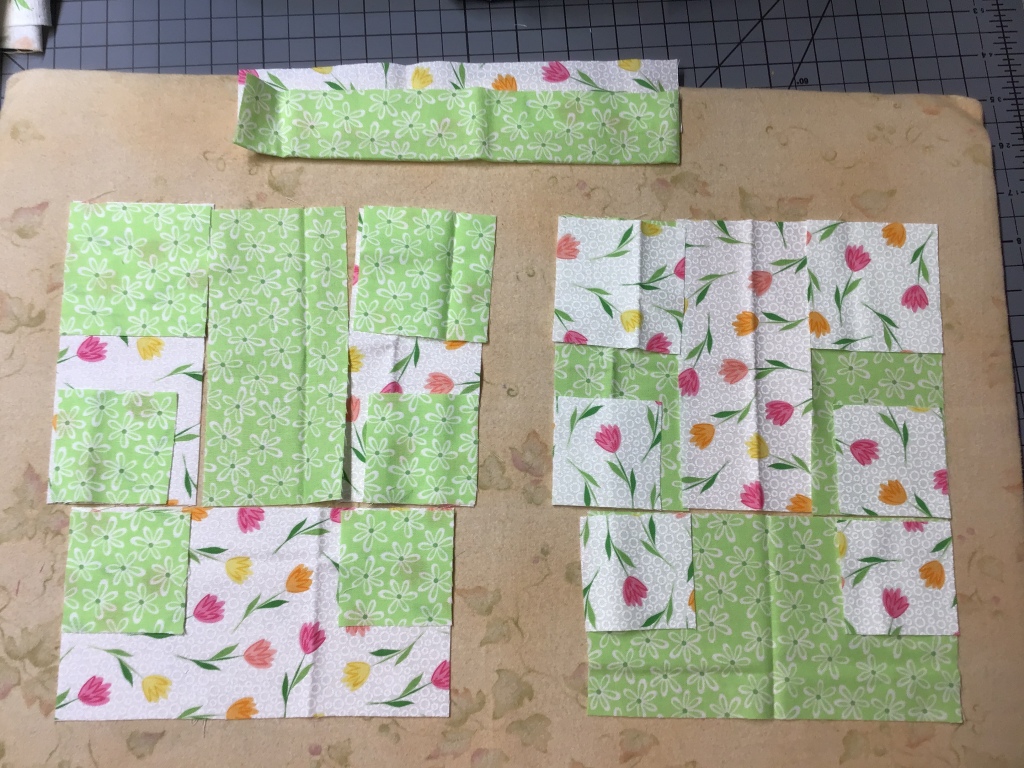
I know it doesn’t look like much yet, but here are my pieces all laid out for both blocks and ready to sew together. Having a small flannel board is great because I can just take it right to my sewing machine from my cutting table, without dropping or losing a thing.
As all the pieces are cut and ready to go, let’s start sewing these little Bunnies together!
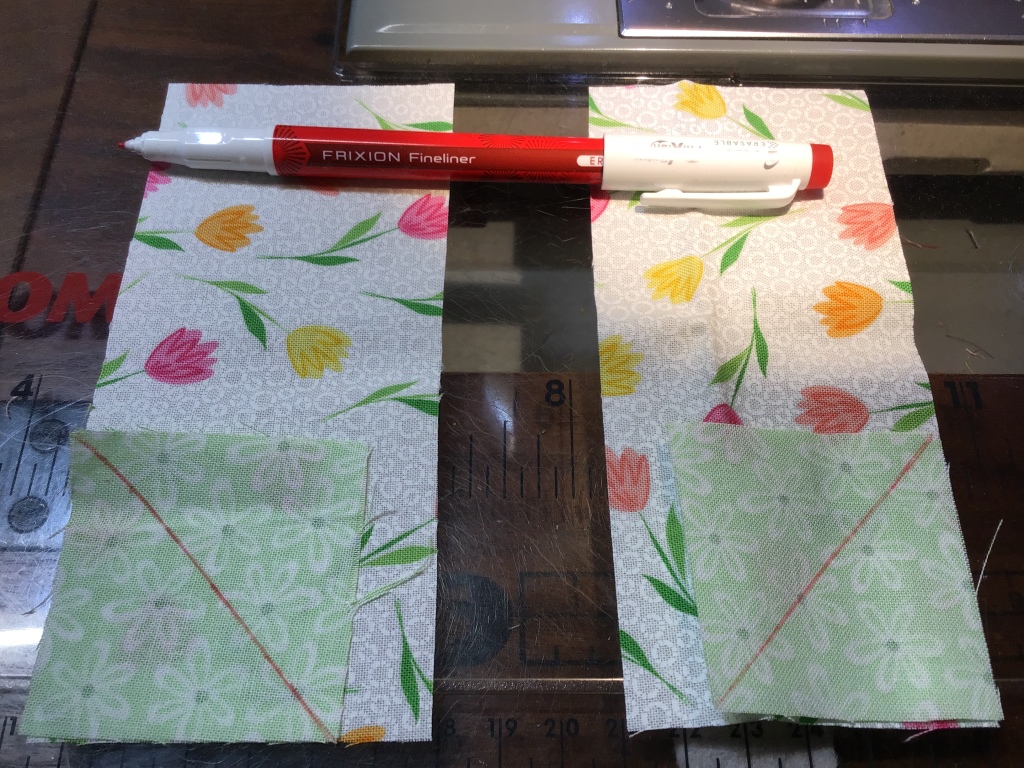
Place a background square right sides together on the top left corner of the Bunny Head rectangle. Draw a diagonal line and sew on the line. Then cut 1/4″ away from the sewn line and press the “flippy triangle” open. Yup, that’s what I call them — “flippy triangles” — you know, I only use the technical terms here on the blog. LOL!
To make thing easier later, press the seam towards the Bunny.
Sew “flippy corner” on the top right corner and press this seam towards the Bunny Head too. Repeat to make identical “flippy corners” on the second mat.
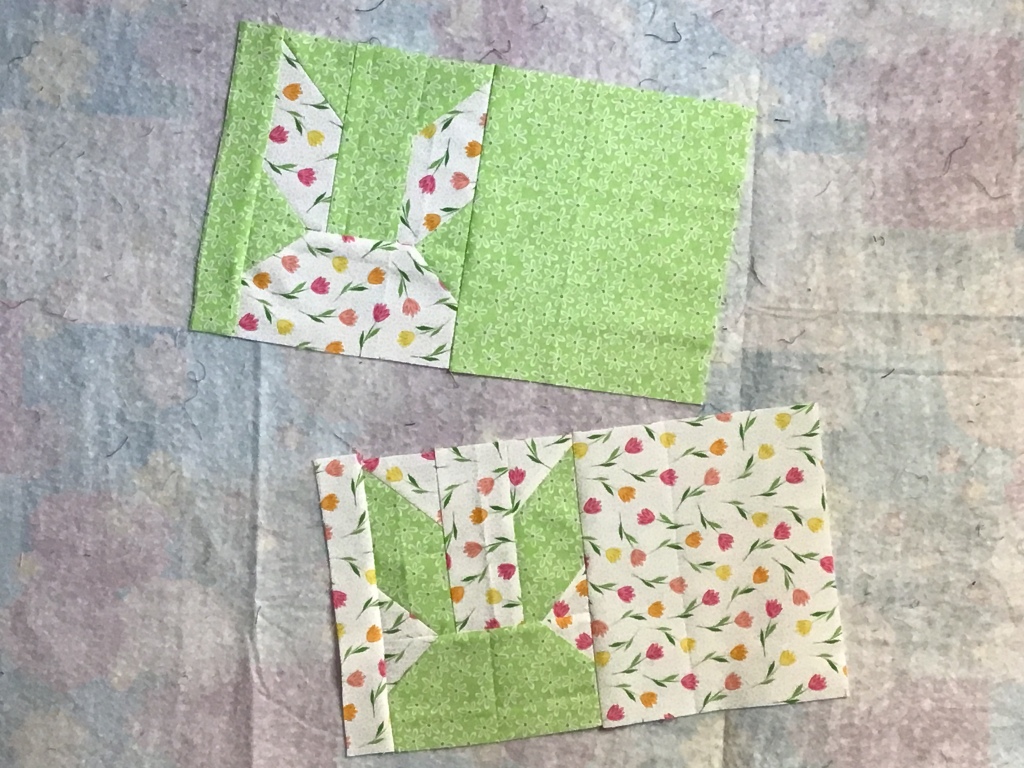
Voila! Now we have 2 cute little Bunny Heads (with a crazy mess for Ears right now)!
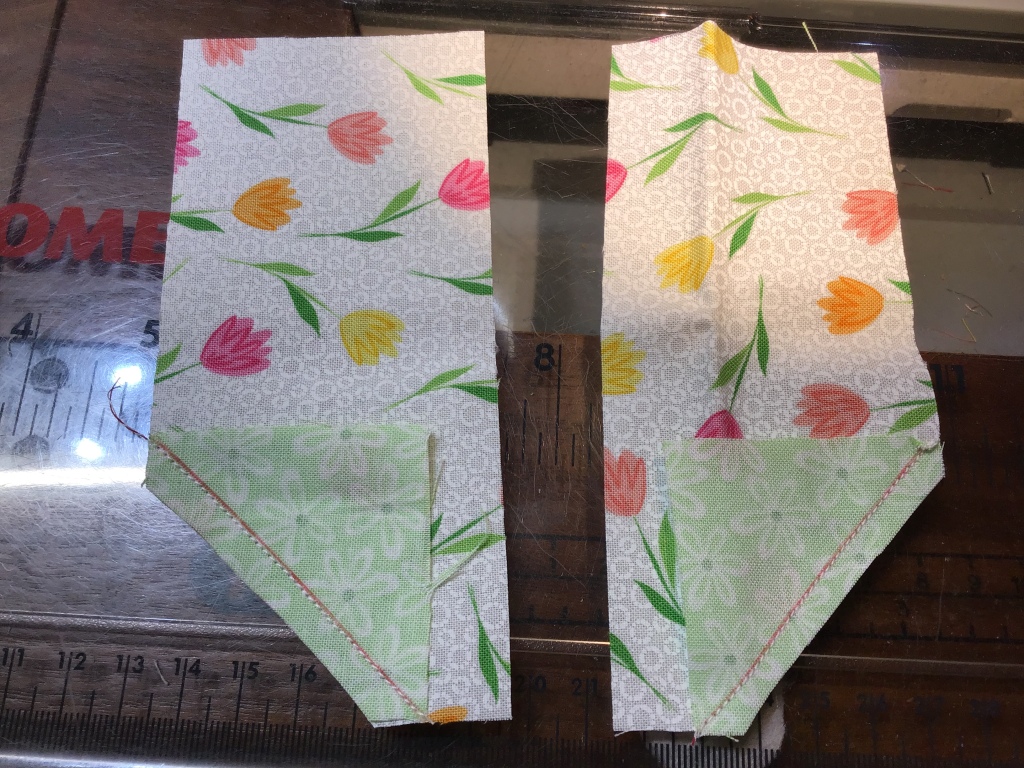
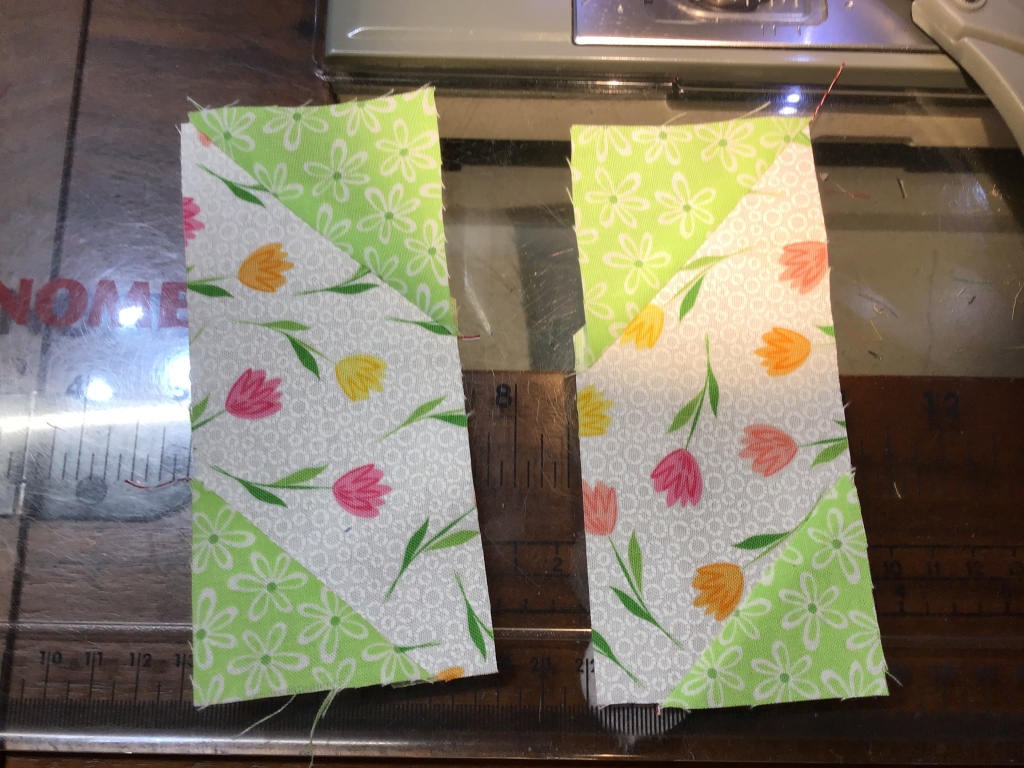
Speaking of Bunny Ears, let’s make some! Place the background squares right sides together with the Bunny Ear rectangles, lining up the outside edges at the bottom. Draw diagonal lines as shown — keep in mind you are making mirror images. Sew on the lines and cut 1/4″ away from the drawn lines. Open the “flippy corners” and press the seams towards the background fabric.
Our Bunny Ears aren’t quite finished yet because we have to add some top “flippy corners,” too. The background squares used for the top of the Ears are larger than the squares used at the bottom in the previous step so be careful not to get the top and bottom squares mixed up.
Again, we are making mirror images. Repeat this step for the second block as well. Press the seams toward the background fabric.
We now have Bunny Ears! Yay!
Next, sew the background strip between the Bunny Ears and press the seams towards the center background strip. Repeat for the second block.
Almost there, just a few more steps!
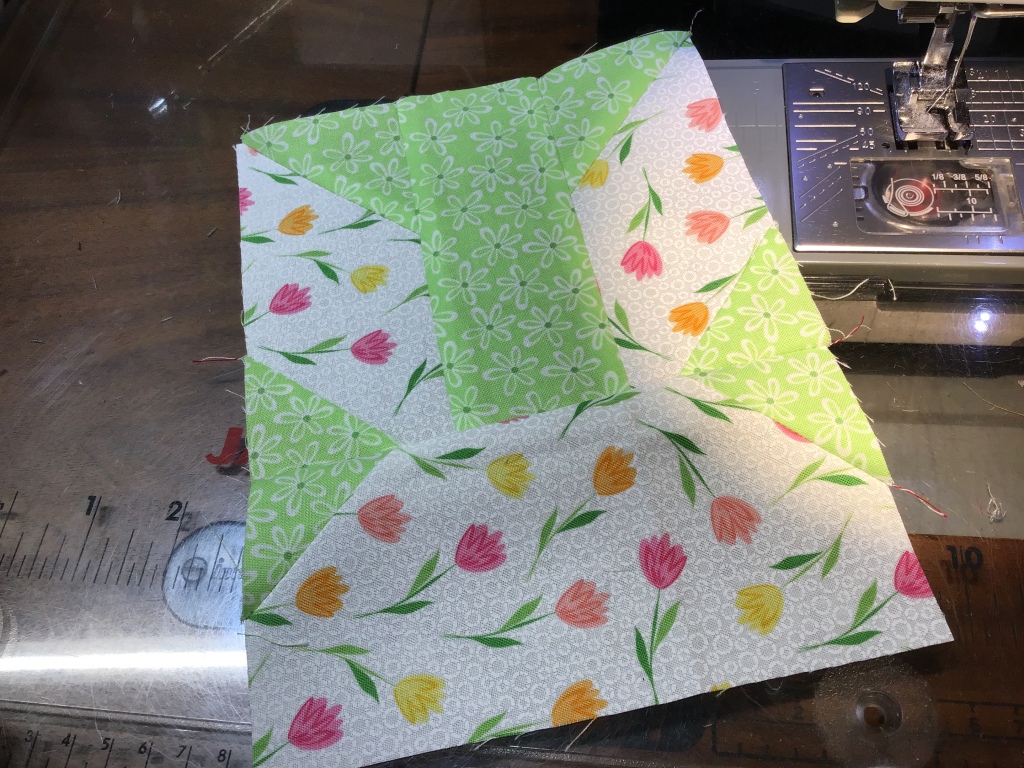
Now sew the Ear section to the top of the Bunny Head for both blocks. If you pressed the “flippy corners” towards the Bunny Head in the first step, above, then your corners should nestle together nicely.
Ladies and Gents, we now have a Bunny, or rather 2 Bunnies!
Do you see how the green stands out and the floral fabric recedes? Aren’t fabrics so much fun to play with???
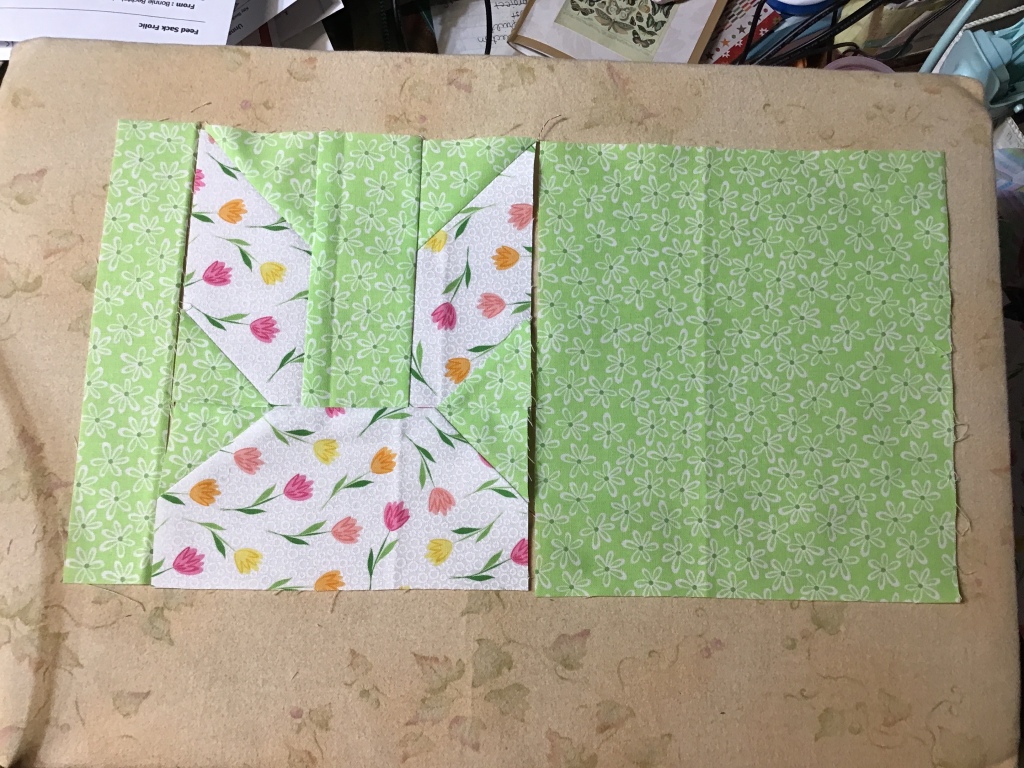
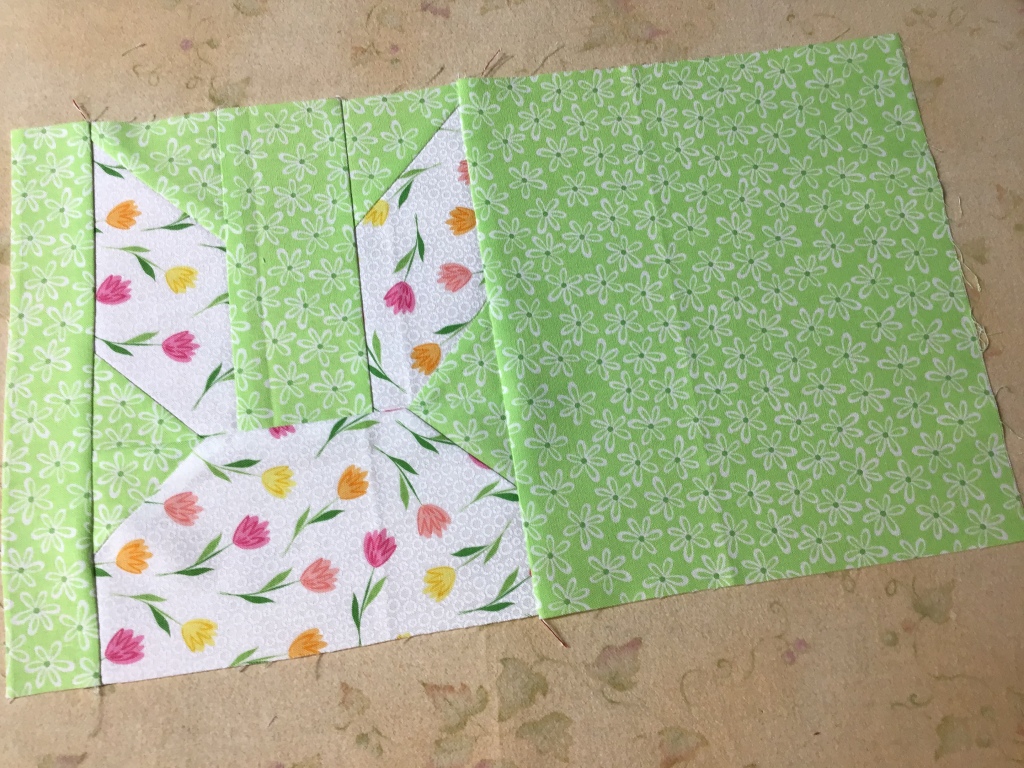
The last thing to do is sew the narrow background strip to the left side of the block and the large background piece to the right side of the block. Repeat for the second block.
And there you have it — Bunny Ears Snack Mats! Next up would be layering the Mats with batting and backing, quilting them, and adding binding.
Don’t forget to label your Snack Mats!
I hope you enjoyed this super cute tutorial and have fun making your very own Bunny Ears Snack Mats. They are quick and easy to make, using only 2 fat quarters, and are great little something-somethings for all your pals, quilty ones and non-quilty ones alike! Long live cute little Bunnies! Hurray!
Another week has zoomed by and I am not getting anything accomplished! Or at least it feels that way. We’ve had some lovely February weather here in northwest Pennsylvania and I’m getting those “Spring into Spring” feelings when I want to clean, sort, and organize everything! Hah! I wish I could find an extra 2 hours in every day to get started on that ginormous undertaking, but I do need to sleep at least a few hours every night. You would think working from home, I’d have so much extra time to work on stuff, but sadly that is not the case for me. ARGH!
I want to start with my studio because it kind of looks like a fabric store/flea market threw up. I totally serious here. One of my local quilt shops hosts a “fabric yard sale” every year and I think it’s time to get signed up for it! I wasn’t planning on it this year because of a few time conflicts, but now those conflicts have been postponed, so I am calling today to get my space reserved. Even with less time than usual to prepare, this will inspire me to do some purging in my fabrics and such.
What do you do when your studio gets taken over by fabric, notions, patterns, books, rulers, scraps, and everything else?
VRD Blog Hop Grand Prize Winners
Okay, you’ve all been waiting to hear who won the 2 Grand Prize boxes from the Blog Hop.
Drum roll please………….
Congratulations to:
Joy from Oregon
and
Charlene from Georgia
Here’s a photo from the blog hop showing some of the fun quilting goodies in the boxes:
As for the rest of the prizes, they are being shipping out this week, so if you are a winner and you haven’t received your prize yet, you should have it shortly.
Wow! I think I’ve gone through 3 rolls of tape preparing all the packages! But you know what? I smile while I put on the labels because I know how much each winner is going to enjoy their prize from the Blog Hop.
VRD Bella Vista Panel Quilt Tutorial
Recently, I decided to make a special quilt for a cousin of mine who is having some rough times. I knew I wanted to use a panel because panel quilts go together so quickly, so I thought I’d give our new Bella Vista pattern a go.
This is a fabulous pattern for those horizontal panels. Sometimes it can be hard to find a pattern that uses this type of panel, so Bella Vista is a great pattern to have up your sleeve. It also works with ANY style of horizontal panel and can work with different sizes, too, as long as you measure as you go instead of cutting everything out first.
Don’t want to use a panel? You could replace that section of the quilt with blocks, appplique, or even a novelty fabric. Just keep in mind, you might have to do a little math. Yay math! Love math!
Looking for a panel to jump-start a new project? You can go HERE and check out Villa Rosa’s large selection of panels.
Let’s get started on our quilt project!
So, the first thing I did was gather up my fabrics. My cousin loves eagles so I chose this flying eagle panel and a coordinating eagle print along with a light grey (I decided not to use the medium grey you see in the photo) texture, red tonal, and a blue tonal for the binding. My plan will be to back this quilt with fleece to make a cozy quilt for my cuz, so it will be like wrapping him up in a warm hug when he needs one.
Quilts are one of the BEST forms of therapy for folks going through tough times in their lives, wouldn’t you agree?
You all know how much I love The Quilts of Valor Foundation and the impact they are making one quilt at a time. To learn more about the Quilts of Valor Foundation, go HERE.
My cousin does not have a military background, but he loves red, white, and blue and is very patriotic, so an eagle quilt will be a good fit for him.
Now I have all the fabrics ready, it’s time to get going on this quilt project. The first thing I’m going to do is trim off the selvedges on the panel. This panel is bigger than the dimensions of the panel in the pattern, but I don’t really need to cut it down. Instead, I will measure as I go before I cut my fabrics.
Here I am cutting the red strips for the first border.
Next I measured the panel through the center horizontally. Those who know me won’t be surprised when I share this little Lazy Quilter hint about measuring. Tehehe……
I don’t use a ruler or a measuring tape. Nope, not at all to measure when I’m putting a quilt together. Instead I use my fabric or border strip or whatever I’m sewing together in order to get the right measurement. I’m a pretty consistent quilter, so this works well for me. I will say that this technique may not work for everyone, so use it at your own risk. LOL!
I folded my panel in half horizontally and laid it on my flat surface. I smoothed it all out nice and flat with the edges even. Then I gathered up my border strips which were already sewn end to end to make longer strips. These will be sewn to the top and bottom as per the directions.
I carefully laid the border strips out along the folded center. Then I smoothed the strips and lined up the edge of the strip to the edge of the panel. I usually put a pin at the edge to keep things from sliding around. Finally, I took a deep breath and cut the border strips to the width of the panel. I repeat this process all over again for the side borders, too, except that I use the vertical center to measure with, instead of the horizontal. I hope this makes sense…….
Now let’s sew the border strips onto the top and bottom of the panel.
Let me tell you how I do that, too, because I have another little trick up my sleeve.
First, I find the middle of the panel and the middle of the strip, match them up, and put a pin in the centers. Next I smooth the border strip along the edge of the panel and pin the outside, matching up the edges of the strip to the panel edges. I also put a pin at the bottom outside edge of the strip in a horizontal fashion (see this trick in the photo below on the left side). This helps to keep the strip square to the panel. Such a simple little thing can really make a difference. I learned this tip from an experienced quilter when I a beginner.
Then I add some more pins between the center and the ends before I head to the sewing machine.
Here is the panel with the first red border sewn onto all four sides. Don’t you just love the cool framed and matted effect of the printed borders in brown and navy around the edge of the panel.
So far, so good. Let’s keep moving.
I cut my second border strips using the light grey fabric. Next, I sewed 2 strips together to make a longer border strip. I decided to sew my border strips together with a straight seam instead of doing a diagonal seam for this project. It’s quicker and has less fabric waste, but mainly the tonals will hide the straight seam. I like to press my seam open to reduce the bulk. (I did the same with the first red border, but didn’t do a photo of it.) Take a look at the last photo in this group and you can hardly see on the front side of the border strip where I sewed the seam.
Now to measure the grey border strips against the panel just like I did above with the first red border. Time to pin, pin, pin. Then sew, sew, sew. Oops, sewing over my pins………
Here’s the quilt so far with the first red border and the second grey border on all four sides. Looking good!
Now I’m going to add the third border, which only goes on the top and bottom of the quilt.
You know, if you wanted to, you could sew the next borders together before sewing the border strip sets to the top and bottom of the quilt center. Just sayin’…….
Anyway, let’s add the top and bottom red borders.
I can’t believe how big this quilt is getting to be! It will be a really nice size when it’s finished.
I think for the eagle print border strip and the last red border, I am going to sew the strips together and then sew the border strip sets to the top and bottom of the quilt center. I wish I would have done this when I sewed the previous red border to the top and bottom (as I hinted to all of you, above, which was really after the fact). I think it would have been a bit easier. Did I mention this quilt is getting big? LOL.
I had to be careful when I was sewing the eagle print strips together into a longer border strip because it is directional and I didn’t want my eagles flying in different directions. There’s just something wrong with eagles flying backwards……
Then I had to watch when I was sewing the outer red border strips to the eagle print border strips because of the eagle print’s directionality — I really didn’t want my eagles flying upside down when I sewed them to the quilt center.
So if you are working with a directional fabric, take your time and double check placement before you sew, that way you don’t have to rip out your stitches.
Okay, the border strips are sewn together and now I need to sew them to the panel quilt. Again, I have to make sure I’m sewing the right border strip set to the right part of the quilt, or my eagles will be belly up. Deep breath….here goes!
YAY! All the eagles are flying straight and true! I am so relieved about that.
(Psst. In the bottom right corner of the above photo, you can see prizes in priority mailers getting ready to be mailed — they took over my comfy chair in my studio!)
Here’s a couple more photos of the finished Bella Vista top. I headed outside for these photos, even though it was a bit breezy. I just love to see quilts swaying in the breeze on a clothesline on a nice day, don’t you? Right now I can close my eyes and smell the clean fresh outside smell of quilts (and laundry) hung outside to dry on a breezy spring or summer day. Ahhhhhhh.
I mentioned above that my plan was to back this quilt with cozy fleece. When I put fleece on the back of a quilt, I do not use batting because it makes the quilt too heavy and too thick. I will most likely machine quilt it simply, probably with a large meander. I have learned over the years, that when quilting fleece, it’s not a good idea to cross over lines when you are machine quilting because fleece stretches and the cotton fabric on the front of the quilt doesn’t stretch like that. I definitely don’t want bunchy areas and pleats on the back of my quilt.
I’ll have to head over to one of my local quilt shops so I can use the tables in the classroom to layer and pin this quilt. Of course, I’ll probably do a spot of shopping while I’m there…………. Sorry, not sorry.
Again, THANK YOU for following our Basic Quilting Skills for Beginners series. We are all thrilled with your interest to this series of posts. Sadly, this series will come to an end next week with Labeling Your Quilt.
So, I thought I’d ask — are there any other topics you’d like to see here? If so, please leave a comment or you can email your suggestions to me at tricia@villarosadesigns.com. I’d love to have your thoughts and ideas so our blog will continue to be relevant to you, our VRD fans and followers.
Now let’s get to BINDING!
The good news is that once you reach the binding stage, you are totally in the homestretch of having a finished quilt.
Yay you!
This week for our binding tutorial, we’ll use my Halloween Ice Jam table runner again. If you didn’t order the pattern last week, you can order it HERE.
There’s a couple of things we have to go over before we can do our binding.
How wide do I cut my strips?
You could ask a bunch of different quilters this same question and you would get multiple answers, I’m afraid — it’s not a one size fits all situation.
A lot of quilt patterns and quilters prefer to cut binding strips 2 1/2″ wide. As this seems to be the most common size in the quilting world, I too use this width for my patterns, but I personally find 2 1/2″ a bit too floppy, so when I do my own binding, I cut my strips 2 1/4″ wide, which for me makes a nice full binding. Of course, you will have to try both to see which one you prefer.
Yes, I use 2 1/4″ for almost all of my binding, but I must confess that there are a few types of projects I actually cut 2″ wide binding strips for — miniature quilts and any other tiny little quilty projects. Again, you’ll just have to try different widths on different projects to find out what works best for you.
Here’s a little something to consider — I have found that if your 1/4″ seam is a “fat” 1/4″ seam, then you’ll probably like using 2 1/2″ or if you’re like me and you use a “scant” 1/4″ seam, then 2 1/4″ might be a better fit.
As for mini quilts and such, you’ll probably want to use a slightly narrower width than what you use for your regular-sized quilts. You’ll just have to try things out to see what you like better because trial and error is all part of learning, isn’t it?
How do I know how many strips to cut for my binding?
Sometimes you get lucky and your quilt pattern will include the number of strips to cut and it might even suggest a specific width. But, if your pattern doesn’t specify how many strips to cut, read on my friend!
If you don’t know the dimensions of your quilt, you will need to measure the width and the length using your tape measure.
Let’s use my Halloween Ice Jam measurements for this example — it measures 18″ wide x 54″ long, so we need to add together 2 widths and 2 lengths to get the total inches around the outside of the quilt (otherwise known as the circumference).
18+18+54+54=144
Now we are going to divide 144 by 40.
This number will tell us how many strips to cut because we are dividing the total inches by the inches in the width of fabric.
Please understand I didn’t just pull a random number out of the air — ha ha! — 40 is the average width of fabric that I and a lot of other quilt designers use to determine yardage requirements for our patterns. Fabric can vary in width so it helps to use an average number maybe a little smaller than the actual width and 40 does that when fabric generally ranges from 42″ – 45″ wide. Besides, that little extra also helps to make sure you don’t run out of fabric by accident.
So, let’s continue.
144÷40=3.6
Let’s round that number up to 4 — I need 4 strips of fabric for my binding. That little extra is helpful to make room for the corners and joining our binding ends. There’s nothing worse than getting close to the end of sewing on your binding to find you are 3 inches short. When in doubt, add an extra strip.
But what do you do when you get a whole number instead of a fraction for the number of strips needed? Me, I definitely add an extra strip because I don’t want to run out of binding before I get to the end.
Yay! Quilt Math to the rescue again! Three cheers for math! Want to read my post about quilting and math? Check it out HERE.
Moving on……
Cut the required number of strips and then cut off all the selvedges. The selvedges are those tightly woven long sides of the fabric which usually have little holes in them. Off with the selvedges, I say, off with those selvedges!
Now we’re heading back over to the sewing machine.
There are a couple different ways to sew your binding strips together.
The first way is to layer 2 strips right sides together with the ends lined up. Use a 1/4″ seam to sew the strips together, just like in piecing. Press the seam allowance open to reduce bulk in the binding — nobody wants a lumpy binding. LOL!
The second way to join the strips is on the bias or diagonal. Lay a strip right sides up on your flat surface. Place a second strip perpendicular to (NO, not another math word! Horrors!!!) and on top of the first strip with the wrong side up, that way the strips are right sides together. Next, draw a diagonal line from corner to corner.
Then — you guessed it! — sew on the line. Does this sound familiar? It should because quilters use this technique for making triangles (HSTs) and flippy corners.
The next thing you need to do is find the end of the strip that is on top. Turn the strip over so it is now facing right side up. This is really important or else your binding will not have all the seams on the back of the strip. Take another strip and place it perpendicular to the second strip with the right side down, again making them right sides together. Draw a diagonal line and sew on the line again. Repeat this until you’ve sewn all the strips into one long binding strip.
Clip the threads in between the strips if you chain-piece and then cut off the waste triangles where the strips meet, leaving a 1/4″ seam allowance.
Time to press our binding strips. Let’s head back to the ironing board.
Place your binding strip right side down on your ironing board. Using your iron on a cotton or hot setting, fold the strip in half with the wrong sides together, pressing as you go. Remember, you are pressing, not ironing here. We just want to make sure the strip gets folded and creased.
When you come to a seam, press the seam allowance open like we did when we joined our strips into one long binding strip. Then fold, press, and keep going.
Almost done now. Just keep folding and pressing until you get to the end of the very long strip. Keep in mind the bigger the quilt you are working on, the longer the strip and the more time it will take to do this step.
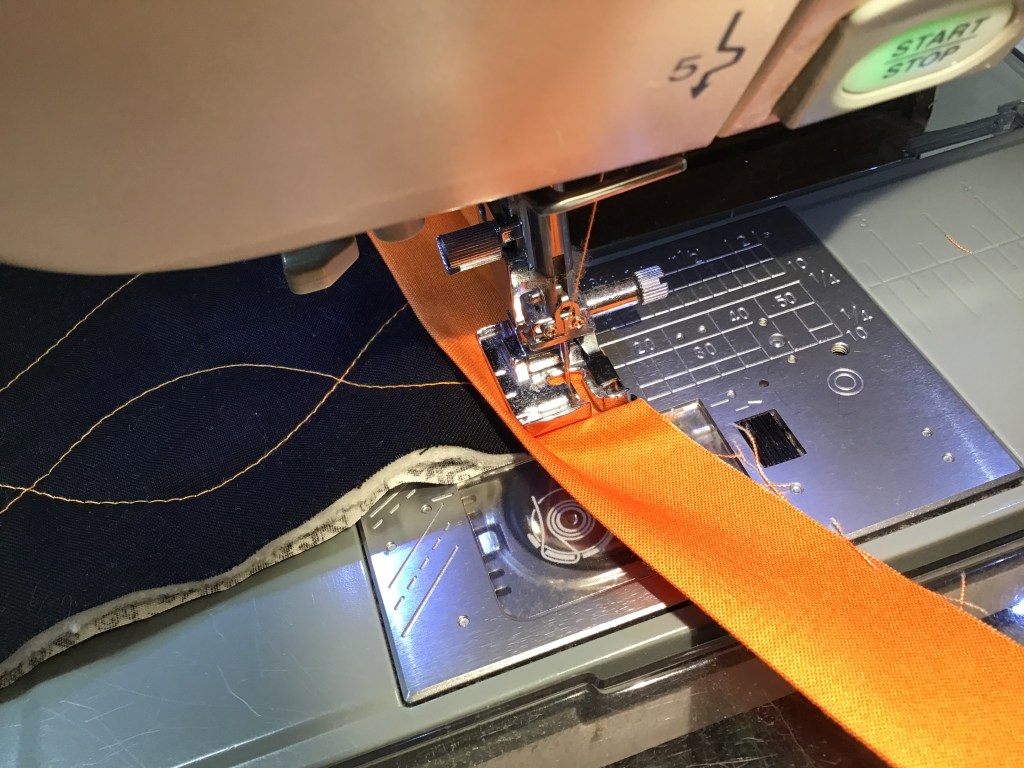
Let’s head back to the sewing machine once again because it’s time to sew the binding onto your quilt. I know this seems like a lot of steps, but writing/reading about it takes longer than actually doing it. After some practice, it will become second-nature and you won’t even have to think about it, you’ll just do it.
Lay your binding on top of the right side of your quilt with the raw edges lined up. I usually start my binding somewhere towards the middle of a long side. Be careful here because you want to avoid placing binding seams at your corners because the added bulk can make your corner turn out weird. Trust me on this. Been there, done that. It’s okay if you want to pin your binding all the way around your quilt, but with a little practice, you’ll have a fairly good idea how to avoid the dreaded seam allowance at the corner issue.
Pin the layers together about 10-12 inches from where the binding strip starts. Then place a pin through the quilt right before the binging begins, but not through the binding, only the quilt. This second pin right before the binding starts is a marker you will need later.
Start sewing at the pin 10-12 inches from the beginning of the binding strip. Backstitch a few stitches, and….GO.
Most people use a 1/4″ seam for sewing on their binding, but I personally use about a 3/8″ seam because I like a nice full binding. Try both ways to see which one works best for you.
Sew until you get to about 1/4″ from the corner.
When you get to 1/4″ from the corner — STOP and backstitch to secure the stitching. Cut your thread and pull your quilt out from under the needle.
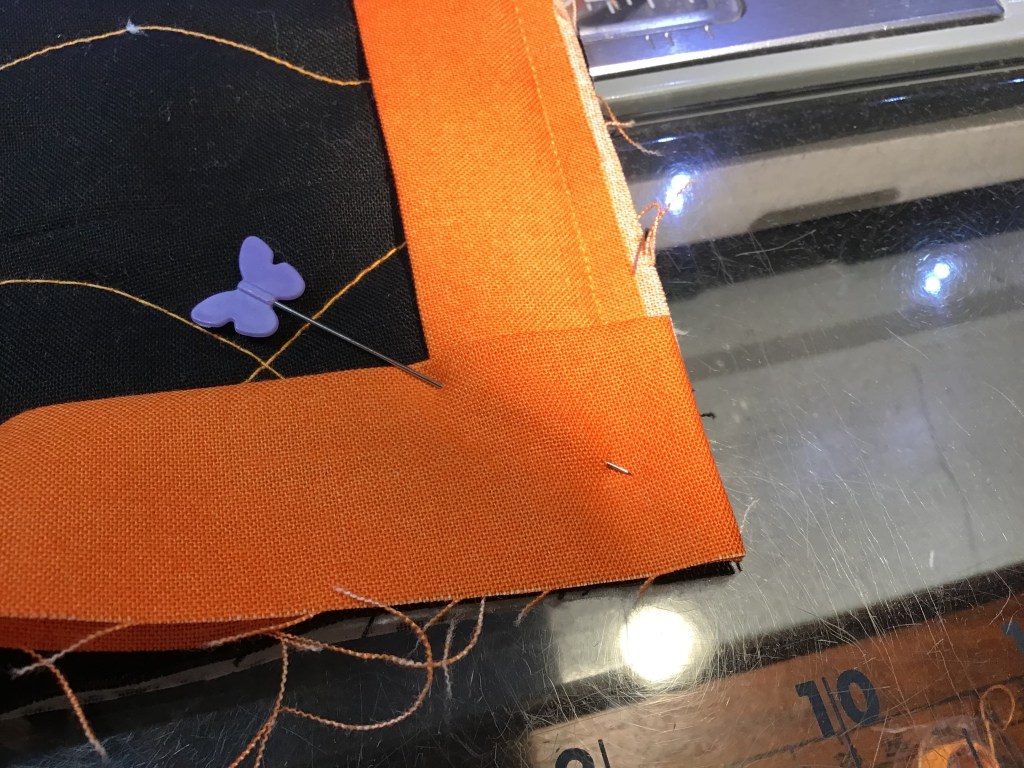
GULP! Here comes the scary part — making a French fold mitered corner. Cue the scary music….
Fold your binding strip at a 45 degree angle towards the right.
Now fold the binding strip back over itself to the left. Place a pin if you need to. This little fold here makes you able to overlap the binding into a nice miter on the back which will give you a really nice square corner.
Turn your quilt and start sewing at the corner, backstitch a couple stitches and sew until you get to 1/4″ from the next corner. Not scary, easy peasy!
Repeat the mitered corner fold, turn your quilt again, and keep going. When you finish the fourth corner, keep your eye out for the pin marking the place where the binding strip began. Stop sewing 3-4 inches before that pin and backstitch to secure the stitching. Once you’ve backstitched, cut your threads and pull your quilt out from under the needle.
Here’s a helpful little video from Alex Anderson and Ricky Tims about mitering corners.
Now we’re going to sew the ends of our binding strip together. This next part is really a leap of faith, but it does work, I promise you. Just stick with me, I won’t steer you wrong.
Smooth your binding strip over and beyond where the marker pin is (move the loose beginning binding tail out of your way). Use a ruler and measure from the marker pin the length of how wide you cut your binding strip. For a lot of you, that would probably be 2 1/2″ but for me and some others, that will be 2 1/4″. Draw a line with a fabric pen at that measurement from the marker pin and cut on the line.
Next open both ends of the binding, overlap them with the the ends right sides together at an angle, and then pin the binding layers together. Draw a diagonal line if you like or just eyeball it.
Please note that this technique isn’t the only one out there. If you want to learn other ways of doing binding, you can do an Internet search.
Sew on your drawn line and trim away the waste triangles 1/4″ beyond your sewing line.
Finger press the seam open to reduce the bulk and refold the binding with wrong sides together again.
Your binding strip should now lay nice and snug against your quilt. Yay! Next pull out the pins and use them to keep the rest of the binding lined up with the quilt.
Now it’s time to finish sewing the binding on. Start where you stopped before we sewed the ends of the binding together until you overlap where you originally started sewing the binding on. Backstitch at the both the beginning and the end of your stitching line.
Finishing Binding by Hand or Machine?
While doing this series about beginning skills, I have discovered that I am an “old school” quilter. It pains me that I am starting to show my age, but I know these tried and true methods work. Feel free to explore different methods to do any of these skills, but keep in mind that it’s important to know the old skills before you can learn the new skills — you have to have somewhere to start. So, maybe I’m not as antiquated as it sometimes feels these days. LOL! But that’s okay, those old skills serve me well and keep me making quilt after quilt with excellent results.
That being said, there are 2 ways to finish your binding on your quilt — by hand or by machine.
I finish all my binding by hand. After writing multiple books and making oodles of samples for magazines and patterns, I know I’ve probably hand-sewn miles and miles and miles of binding. But that’s okay. I like how a hand-stitched binding looks.
If you are interested in learning to finish your binding by machine, here’s a nice video from Jenny at Missouri Star Quilting. It’s actually a complete binding tutorial and shows you how you can sewn it down by machine.
If you prefer finishing your binding by hand, you can check out this video by Quilting in the Rain as she shows you how to sew a hidden blind stitch.
You might wonder why I’m giving you videos here, but I learned a long time ago that as a lefty, there are just some things I can’t teach to righties and sewing down binding is one of them!
BIG SHOUT OUT to my pal, Cathey Laird of Cathey Marie Designs, the inventor of the Y Block Ruler.
Long long ago, I tried to teach Cathey how to do mitered corners like I did, she found out hours later that a lefty can’t teach a righty how to do that because we fold our corners in different directions. Oops, sorry, Cathey!
Anyway, I don’t want to confuse anyone, so here’s a righty doing the hidden blind stitch for you. If you are a lefty and need a little help from a lefty, just shoot me a message and I’d be glad help you.
Here is my cute little Halloween Ice Jam table runner! Now all I have to do is sew the binding down and put a label on it.
Whew! I’m totally worn out now! I guess that’s about it for binding, folks. I can’t think of anything else to add.
If you have any questions, though, just ask. Did you know you can send us a message on the blog? You can go to our Contact Us page and scroll down to the bottom to find a form to fill out.
Stay tuned for next week’s post about labeling your quilt.
Here’s hoping we all have a productive autumn season — especially with our quilting.
I don’t know if you’re like me or not, but I tend to quilt less in the summer months. First, of course, it’s summer and I want to be busy doing other summer-y things and going places. Second, my Sewing Dungeon, er….Studio, is not air conditioned, so for a couple of months out of each year, it’s hard to sew with sweat dripping down into my eyes and onto my projects.
Yup, here’s my dungeon! LOL! Cue the creepy music, please! Image by upklyak on Freepik
Needless to say, I look forward to the cooler fall months when I feel more productive in my studio and I get excited again about new projects.
What the Heck is “Quilt as Desired”???
If you’re new to quilting, you might have seen the phrase “quilt as desired” at the end of some of your quilt patterns. But what does it really mean? It’s a designer’s way to say quilt your quilt any way you want to.
On our Villa Rosa Designs Rose Cards, we take it a step further and say “Quilt and bind as desired.” Gee, that makes all the difference, doesn’t it? NOT!
If you’re a beginner, how are you supposed to know what to quilt or how to quilt your quilt to finish it?
Never fear — I’m here to help!
The first thing you need to consider after you complete the quilt top is what kind of quilting are you going to do? Machine quilting? Hand quilting? Or even tying/tacking?
Okay, let’s say you want to machine quilt your quilt yourself (sorry, I’m not into hand quilting, so you’re stuck with machine quilting). Here’s a little video I put together a while back about some basic free motion quilting skills and information.
Wiggly lines are just one way you can quilt your project. Here are some of my other free motion quilting favorites.
Straight Lines
If you haven’t tried quilting simple straight lines on a project, it’s way past time you did! To get your lines relatively straight, you will probably want to use a walking foot or an even-feed foot on your sewing machine. A walking foot or even-feed foot moves the top and bottom layers under the needle at the same time so your sewing lines are less likely to pucker and you won’t get those annoying tucks on the back of your quilt.
Here’s a great example of what straight lines can do for your quilt — this is only the backside and it’s unwashed! Cool, huh? Straight lines add a lot of texture. And if you look closely, you’ll see that my lines aren’t really all that straight, but by repeating the lines over and over about the same distance apart, it looks pretty awesome. Now imagine what this table runner will look like after I wash it and it crinkles up beautifully! You’ve just got to try straight lines!
Straight lines look great quilted on anything modern as well as children’s quilts. But I wouldn’t recommend straight lines on your Civil War reproduction quilt. LOL!
Loopy Loops
Loops are probably my all-time go-to design. I usually use this design edge to edge but sometimes I will use loops in the quilt center with something different in the borders. It depends on my mood, how much time I have, and what the quilt needs to be completed. (Yes, quilts talk to me — I am a quilt whisperer…)
As a free motion quilting teacher for a lot of years, I have discovered that loopy loops are more beginner-friendly than stippling/meandering. You have permission to cross over your lines in loopy loops, whereas in stippling/meandering you do not cross lines at all. Loopy loops are less stressful and I find them lots of fun to do.
Below, here’s an example of loopy loops. Neat, huh? See how all the loops are not the same shape or size? That’s what makes this design look easy-breezy. You can also use loopy loops as a jumping off point for A LOT of other variations.
I tend to quilt my loops big and open, which of course uses less thread and takes less time than quilting itty bitty loops. My rule of thumb is to quilt my lines of quilting no closer than a finger’s width. Of course, if I’m quilting a doll quilt, I’m going to quilt this design smaller and closer together than if I am quilting a throw quilt. Adapt the size and density of your quilting to the project you are quilting.
Loopy loops look pretty great on almost any project! Maybe not your Civil War repro quilt, though. (Maybe you should try hand-quilting for that one, just sayin’.)
Stippling/Meandering
All beginner quilters want to learn how to stipple/meander. I have found over the years that a lot of intro to free motion quilting classes start with stippling/meandering. This is not really a true beginner design, in my humble opinion. I think it is better suited for a more advanced machine quilter. Why? Because you cannot cross over your lines and that is hard to do (or not do) while you are trying to get all the other 101 free motion skills and information all at the same time — beginning free motion can be a bit overwhelming, and that’s without having to worry about not crossing over your stitching lines! Ugh!
Sadly, intro free motion classes keep trying. And mostly failing. Then beginners get frustrated and upset when they can’t quickly pick up stippling/meandering in a couple hour class. Then many of them just quit. I’m sorry to tell you, but stippling/meandering takes most people a lot of practice to master. So I recommend that beginner free motion quilters start with straight lines, wiggly lines, and loopy loops before even attempting stippling/meandering. Most of us have to crawl before we walk….
By the way, in case you wondered, stippling and meandering are pretty much interchangeable terms at this point, although once upon a time they were slightly different. I am using both at the same time so as not to cause any confusion for anyone. 🙂
To me, stippling/meandering is a lot like loopy loops except you are not crossing over any lines. That difference can be very daunting to a beginner, however. If the idea of not crossing lines terrifies you, then please do try straight lines, wiggly lines, and loopy loops before moving on to stippling/meandering. I still try to use my rule of thumb of leaving at least a finger’s width between my lines of stitching.
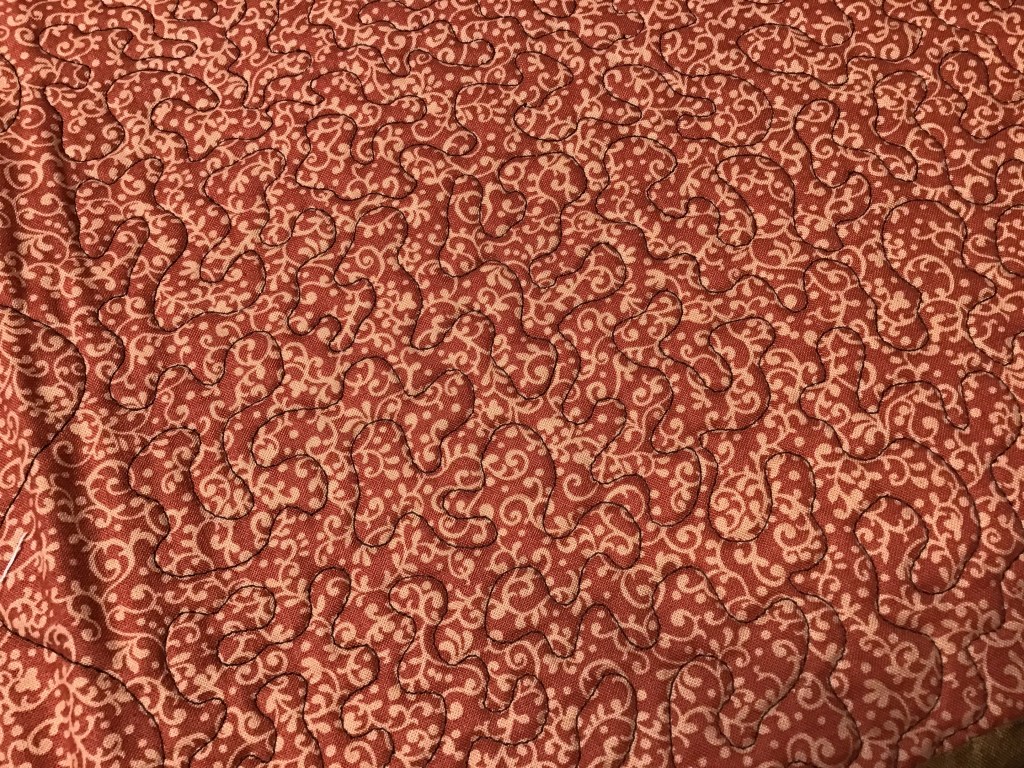
Here’s an example of stippling/meandering. I apologize that it might be hard to see my brown thread on the swirly-printed pink backing fabric on this place mat. Aha! Here’s another one of my tips: Use a busy fabric on the back of your quilt because it helps to hide your quilting stitches — this is particularly helpful when you are a beginner. It will help you to feel more confident about your developing quilting skills!
Probably the most important thing to remember about machine quilting is RELAX and HAVE FUN! Because quilting shouldn’t be like a job or chore, it should be relaxing and fun or else why would we be doing it???
You can check out some of my other favorite quilting tips HERE.
Next week we are going to tackle Binding, so stay tuned!
Happy Thursday to you! I hope you all are having a wonderful summer so far.
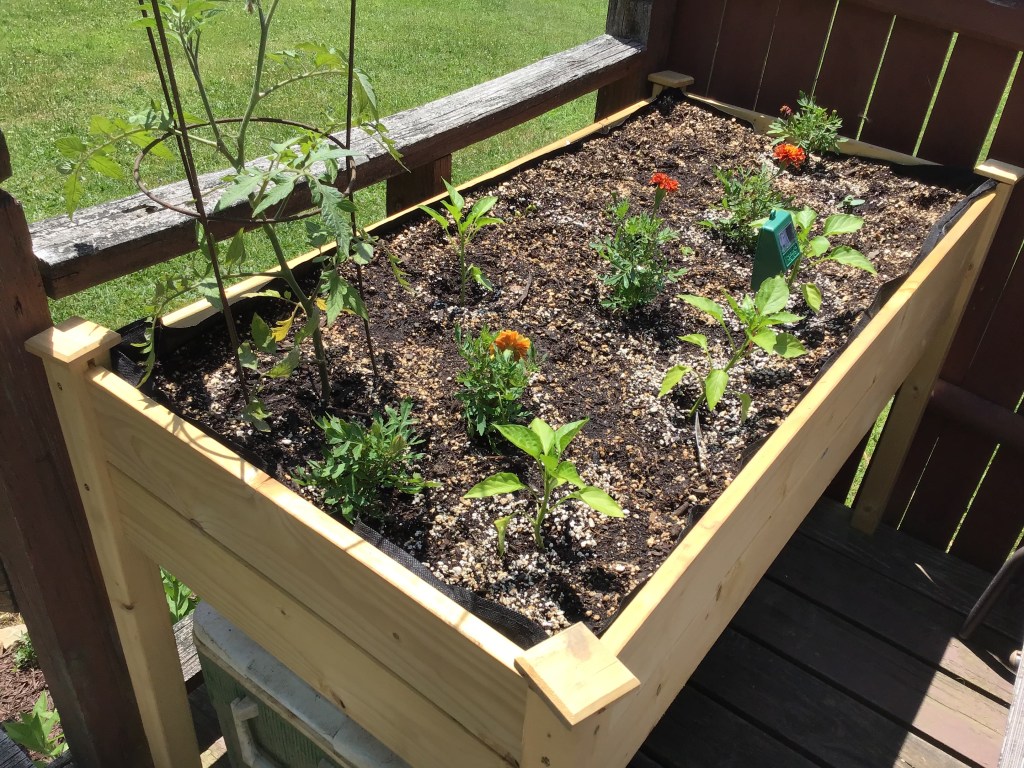
My summer just got a whole lot better! Just recently my family got in gear and finally got our little back porch raised garden planted. And our flowers, too. We may be running a little behind, but I have hopes that in late summer/early fall we’ll be enjoying some fresh veggies picked right out of our little garden pf goodness. If it goes well, next year we are going to add a second raised bed garden.
I used to be an avid gardener way back when, but gave up the year I planted my garden twice and the critters ate everything before it even had a chance to grow. That was it.
But now I’m excited to try container gardening. Besides, ”container gardening” sounds so trendy, don’t you agree?
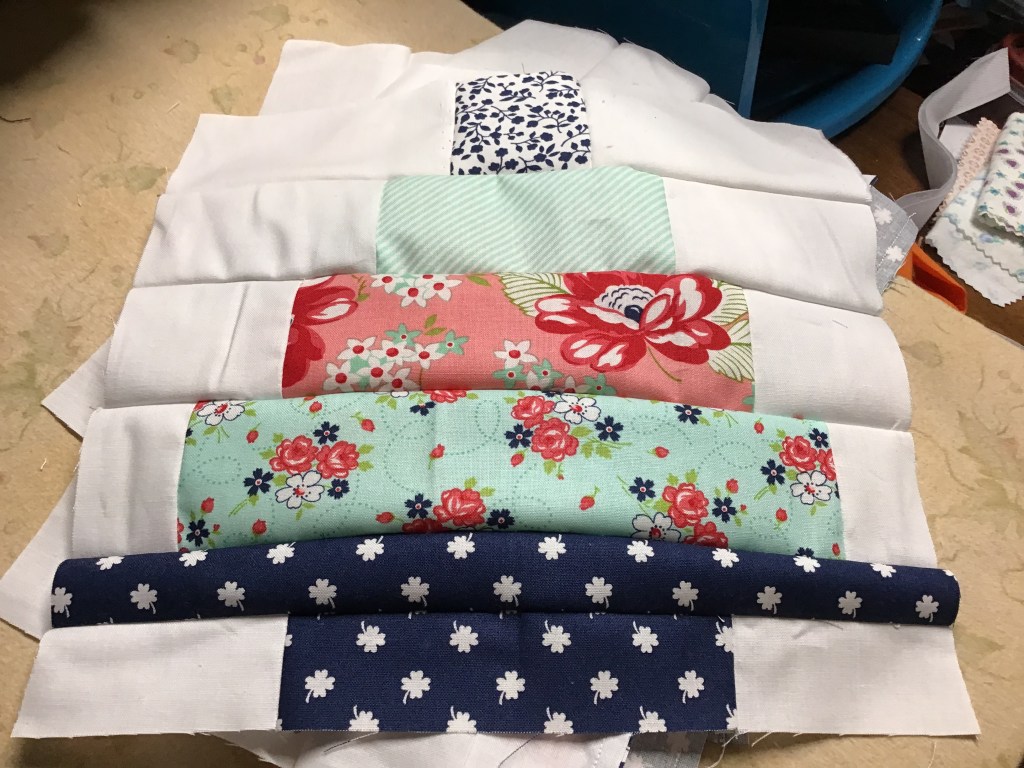
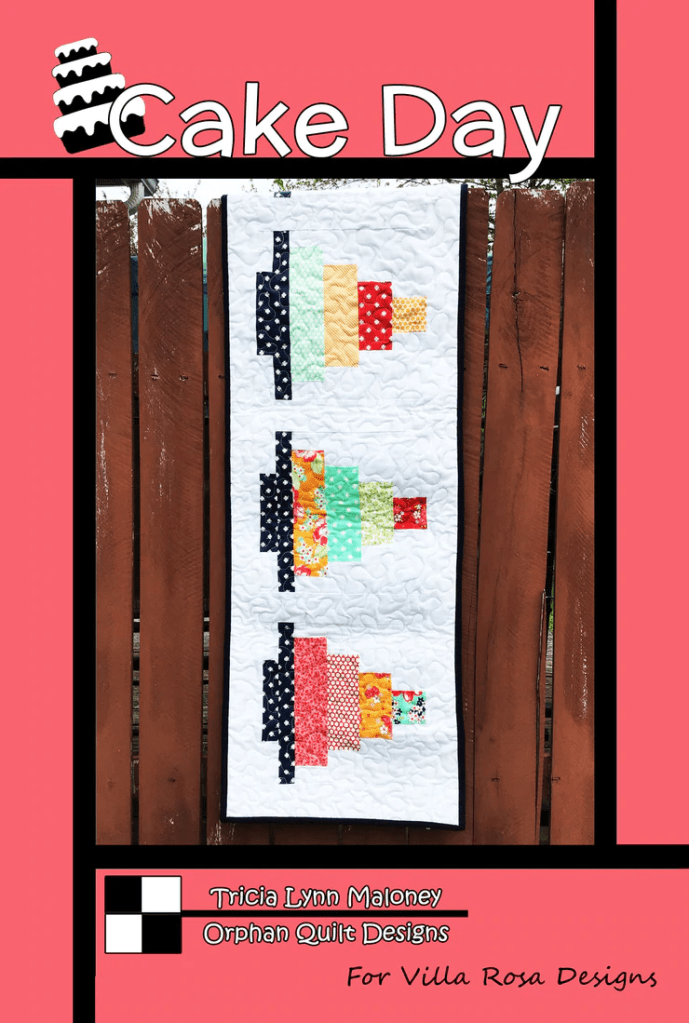
Cake Day Quilt Block Assembly Tips
I thought I’d share a quick tutorial on how I put the Cake Day table runner quilt block together along with some of my favorite piecing tips.
Cake Day Table Runner Rose Card Pattern
You can get your own Cake Day Table Runner Rose Card pattern HERE.
Often, I prefer to cut out all my pieces for the blocks before I start sewing. I find this is usually quicker than cutting and sewing one block at a time.
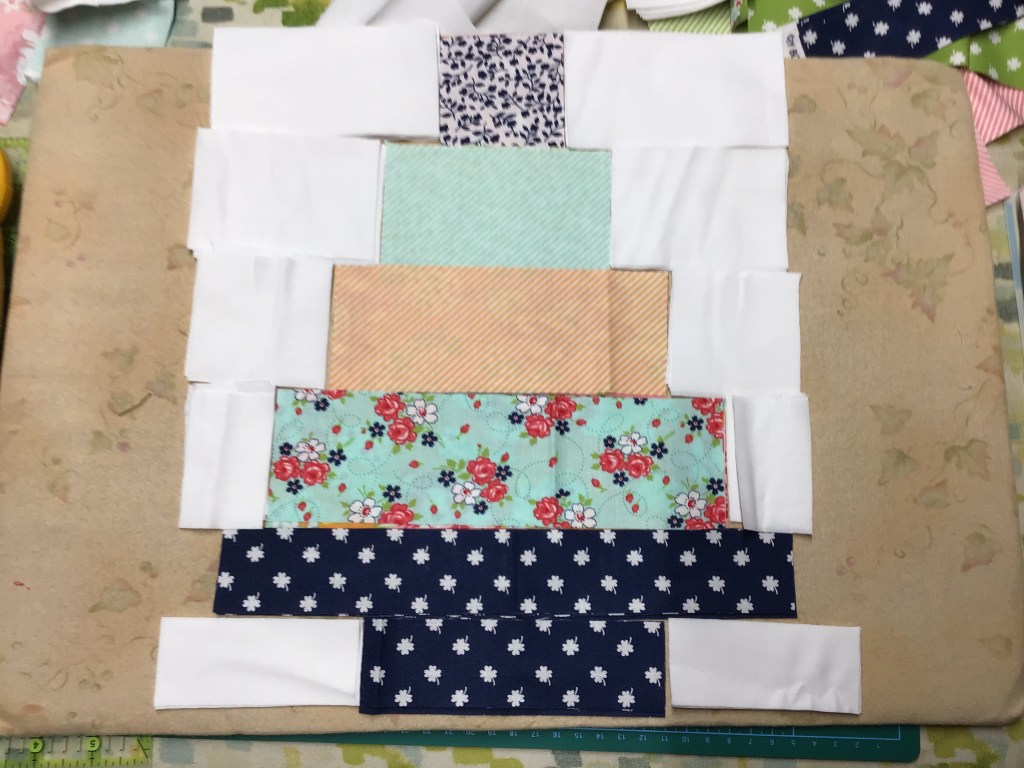
Here you can see the pieces all laid out in the right order (all four blocks are stacked) on a flannel board and then I can simply take everything to my sewing machine. This works well if you have to stop in the middle and come back to your project later. Everything stays right where you left — unless of course, you have gremlins or leprechauns or some other little mischievous creatures running around your sewing room when you are not looking.
I have also found that laying out and stacking the pieces in order makes sewing them together faster and easier because I don’t have to stop and figure out where each piece goes.
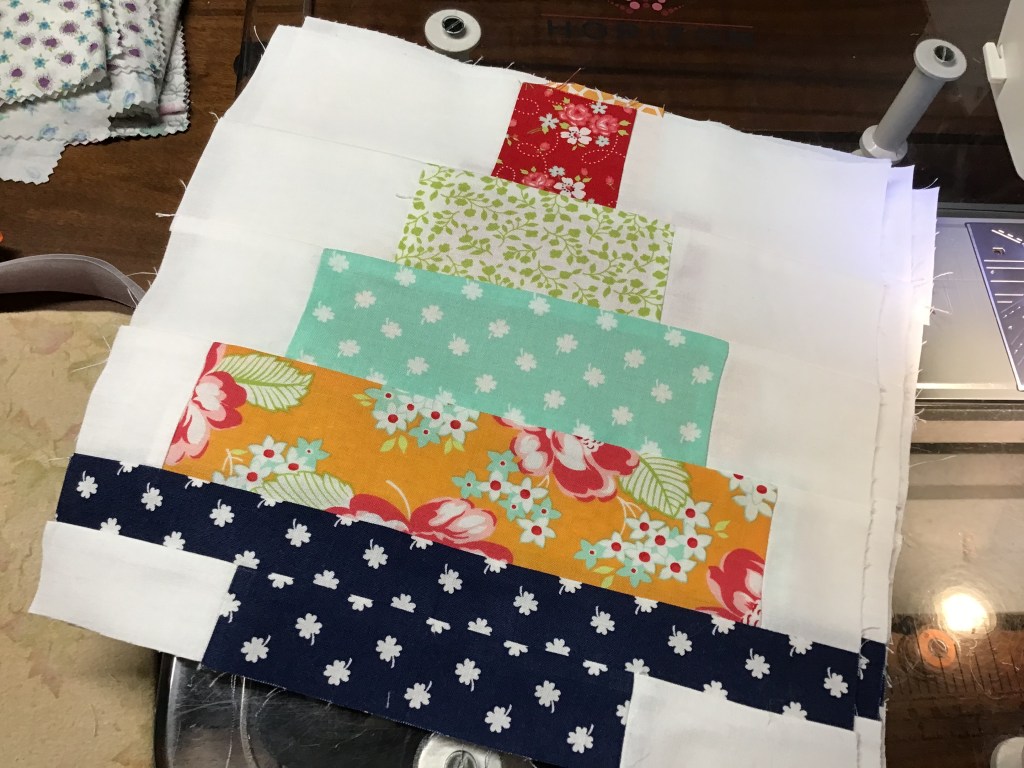
With all the pieces cut and laid out right sides up, sewing them together is a breeze, especially when I chain-stitch the units one right after the other without cutting my thread in between the units.
Nope! No need to head to my ironing board after clipping the thread between the units, I just kept sewing and chain-stitched the other side too.
I have discovered that the less I press as I’m putting together quilt blocks, the less the blocks stretch or get distorted, which of course improves the accuracy of my sewing.
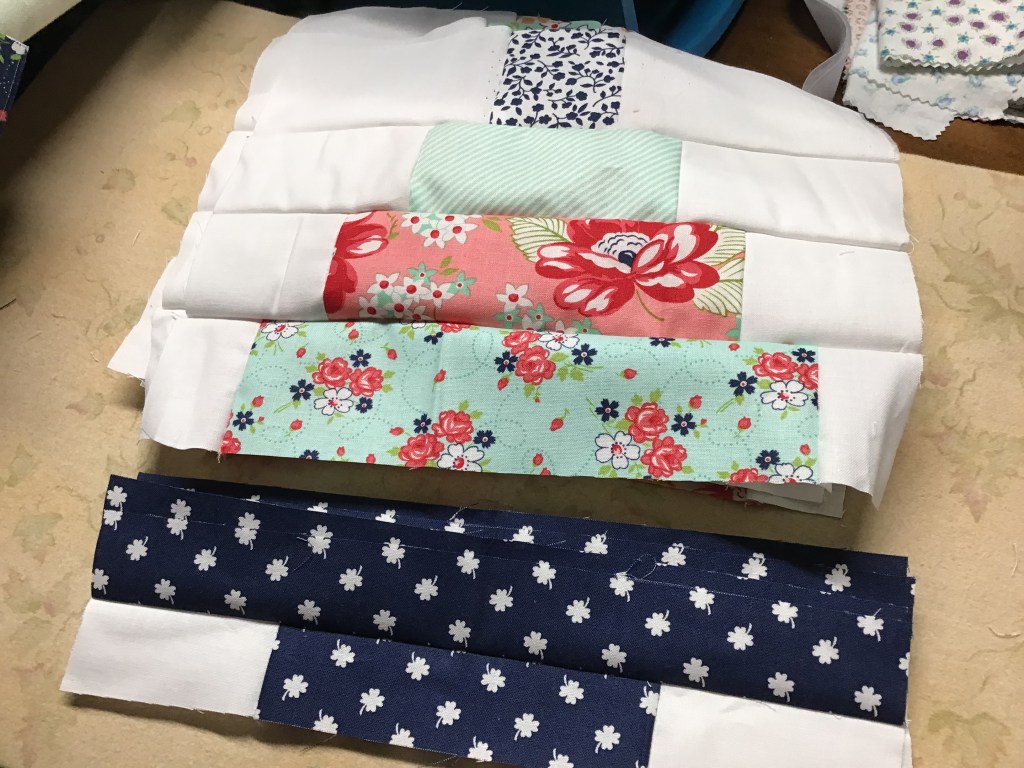
In the next photo you can see I have the left side background sewn to the Cake print rectangles. Now it’s time to sew the right side.
All right! All the units are sewn together and I’ve clipped the threads between them. I made double sure I layered the units again exactly the same as when I started — we’re ready for the next step.
Again, I’m going to ignore my iron (it must be getting lonely). Time to sew the units together. More chain piecing.
Want to know what happens when I get to seams (remember I haven’t done any pressing at this point)? I’ve already decided which way I wanted my seams to go so as I sew, I hold them down and keep on sewing. Pedal to the metal!
In this next photo you can see I sewed the top unit to the second unit. We’re on a roll — let’s keep sewing.
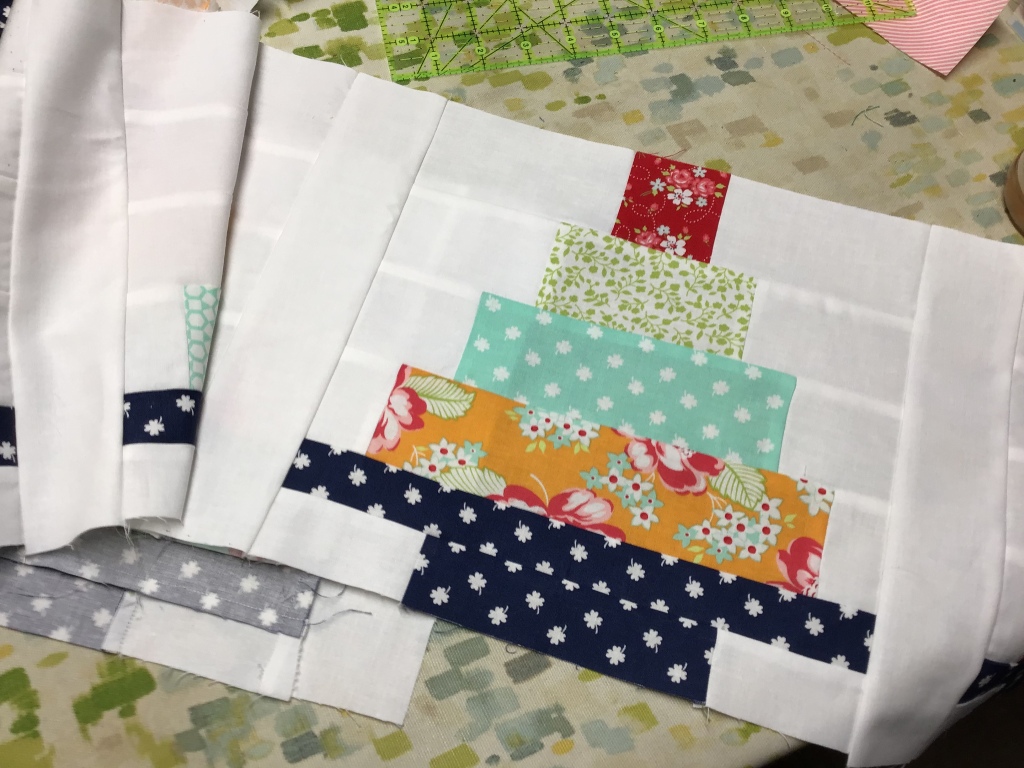
Okay, we’re almost there! I sewed the rest of the units all together and presto — all 4 of our blocks are now complete and I didn’t even have to get up from my sewing machine.
All right, all right, I relented and finally pressed my blocks — my iron was getting a little dusty from disuse.
Voila! Here is a finished Cake Day block. It’s a cutie, isn’t it?
My 4 blocks are now ready to assemble into a runner. There are sew many possibilities for this runner — birthdays, weddings, showers, parties, and the list goes on and on.
Welcome to another Thursday — the first Thursday in June. Summertime, right? The kids are out of school or will be soon. Life will get crazy. Fun. And more crazy.
Are you kidding? I thought it was still March.
At least, it should still be March, don’t you think?
Que sera, sera.
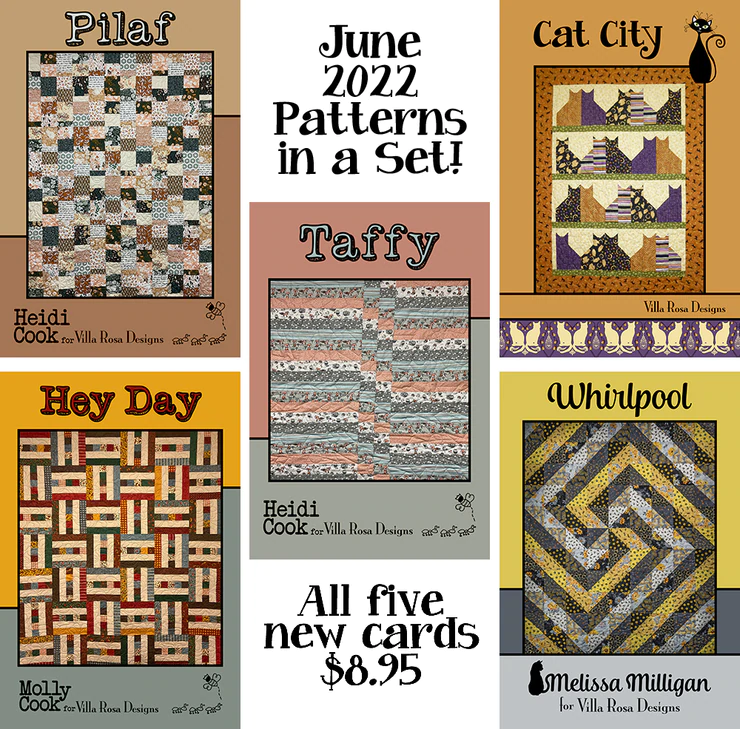
OH! Did you see the new Rose Cards for June yet???? As always, our VRD designers didn’t let you down.
Did you know you can actually join the Rose Card Pattern Club and get the new monthly Rose Cards delivered right to your mailbox every month without you having to do a thing????
If you live out of the USA, you can sign up for the digital Rose Cards, which will be delivered to your inbox without you having to do a single thing.
There are even several different Pattern Club options to consider. Cool, huh?
Another really AWESOME thing about Villa Rosa is that we create a lot of kits using our Rose Card patterns. You can find kits for this month’s new patterns AND you can find kits for lots of other favorites, too. You can visit the websiteHERE to see what our selection of kits are. Please remember that we add new kits all the time, with all kinds of different fabric, so make sure you stop in often to see what’s new.
A Little Bit of Free Motion Quilting and a Video Demo
How many of you are a little bit afraid of free motion quilting on your own domestic sewing machine?
Be honest!
Okay, that’s better, I see a lot of hands raised and heads nodding out there.
Well, I’m here to tell you that you don’t have to be afraid anymore. I’ve been teaching free motion quilting (FMQ) for more than 10 years and I haven’t lost anyone yet!
Here’s my TOP 12 TIPS for FMQ:
1. Find a teacher at your local quilt shop to show you how and to guide you so you feel safe. Don’t try to teach yourself by using YouTube videos.
2. Start out small — the smaller the project the better for beginners. Potholders, table runners, place mats, wall quilts, or other small projects.
3. Start with a beginner-friendly design like wavy lines or loops. Meandering and stippling are NOT beginner-friendly.
4. Try to relax. The more tense you are, the worse your quilting will be.
5. Play music while you quilt, something with a beat. A beat will help you find your rhythm for FMQ on your own machine.
6. Keep practicing, every day if you can, even if it’s only for 10 minutes. The more you practice, the more comfortable you will feel, and the better your quilting will get.
7. Practice machine quilting with a friend. You can encourage each other and laugh together.
8. Try machine quilting gloves. There are a lot of different types of gloves out there, so you might have to try different kinds to find the ones that work for you. Machine quilting gloves will help you get a good grip on the fabric so you can move the quilt more easily when you are quilting.
9. Doodle. Doodle a lot. Practice drawing the designs before you quilt them — this builds some muscle memory between your hands and you brain.
10. Practice…….practice……..practice…….
11. Practice……practice…..practice……. (I can’t stress this one enough)
12. HAVE FUN!
Here’s a little video I put together demonstrating how to free motion quilt wiggly lines on last week’s Ying Yang Cats. Enjoy!
I hope this video inspires you to try free motion quilting some wiggly lines on your own little project.