Happy Memorial Day Week end to you too! What are your plans for this unofficial kick off to summer? For me, I am hustling to put together a garage sale for Friday and Saturday as this is THE BEST weekend all year to have a sale where I live. Fingers crossed that I’m not pulling an all-nighter Thursday to have everything ready for Friday. Wish me luck!
I am SEW EXCITED to share some AWESOME NEWS about Villa Rosa so I’m going to jump right in.
Exciting VRD NEWS!
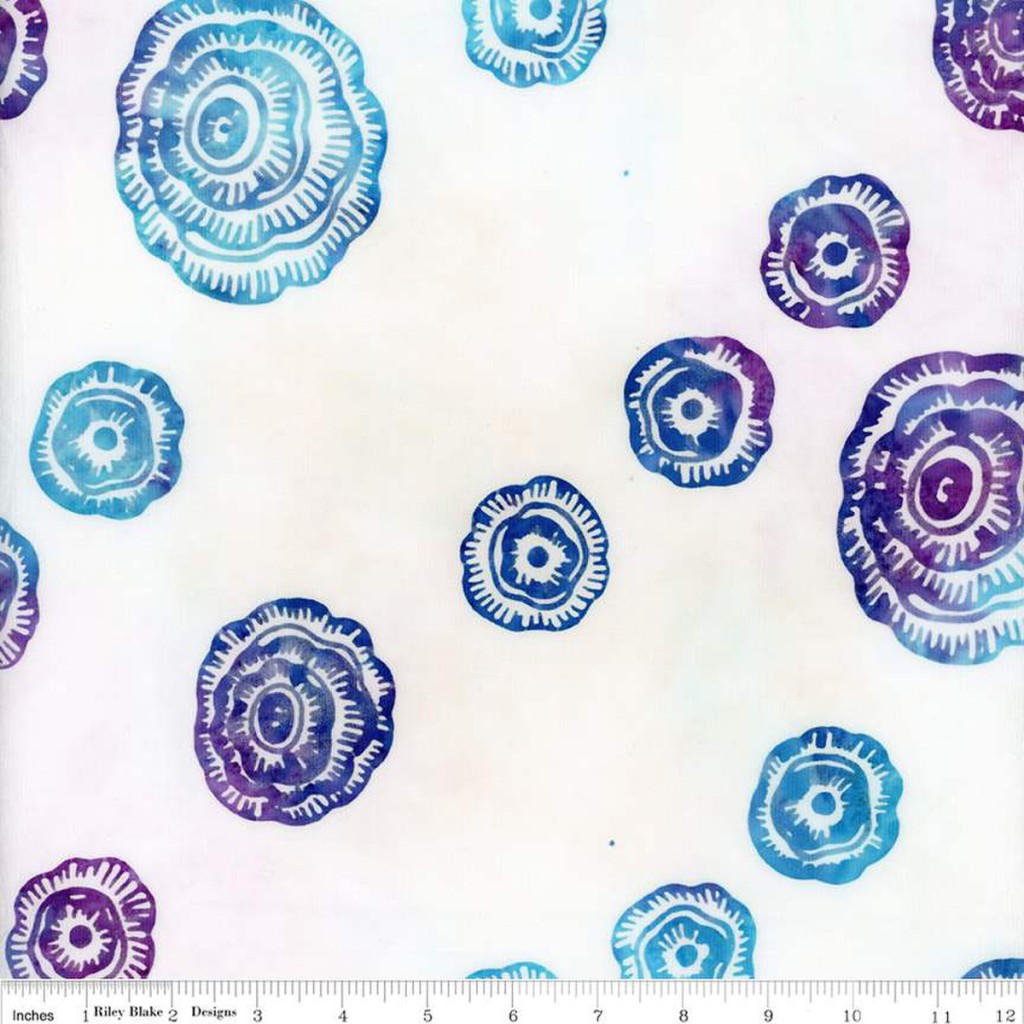
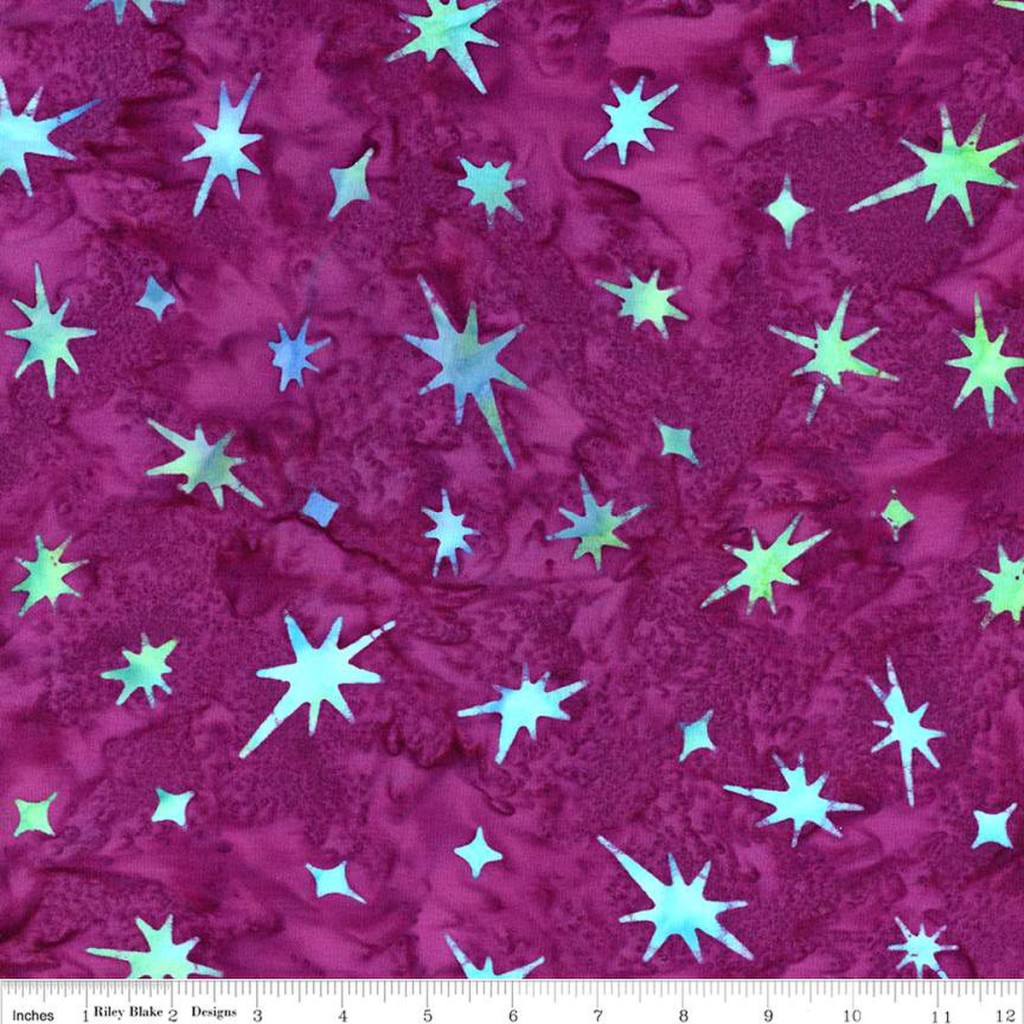
Our Rose Queen and VRD owner, Pat Fryer, has a brand new fabric collection coming out with Riley Blake Designs! It’s called Bedazzled! and I can’t wait to share it with you! It will be available at your local quilt shops and at our online shop, villarosadesigns.com, in December! So mark your calendars now AND ask for it at your local shops.
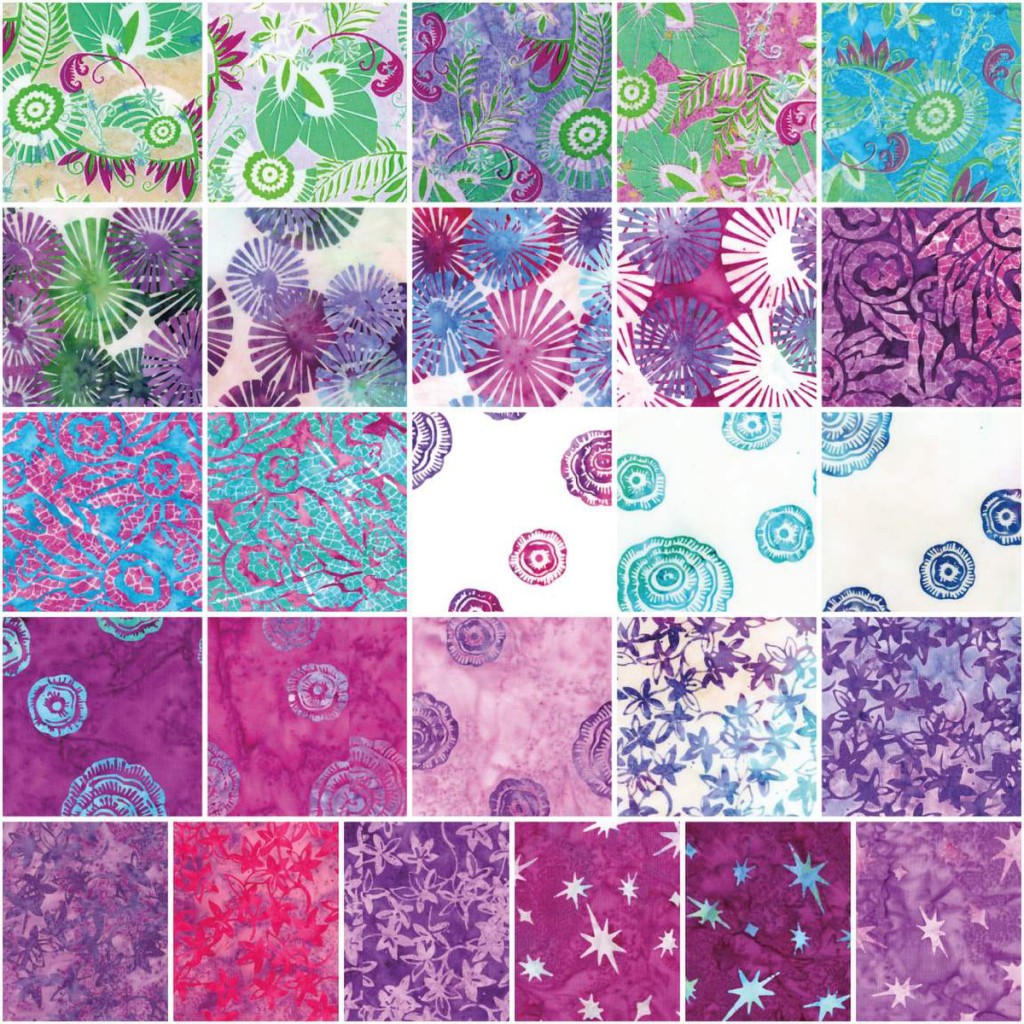
Bedazzled! is a batik collection and is part of the Riley Blake Expressions line. It has 26 fabrics in rich saturated eye-popping colors! It’s fun and whimsical too!
Here is the entire collection:
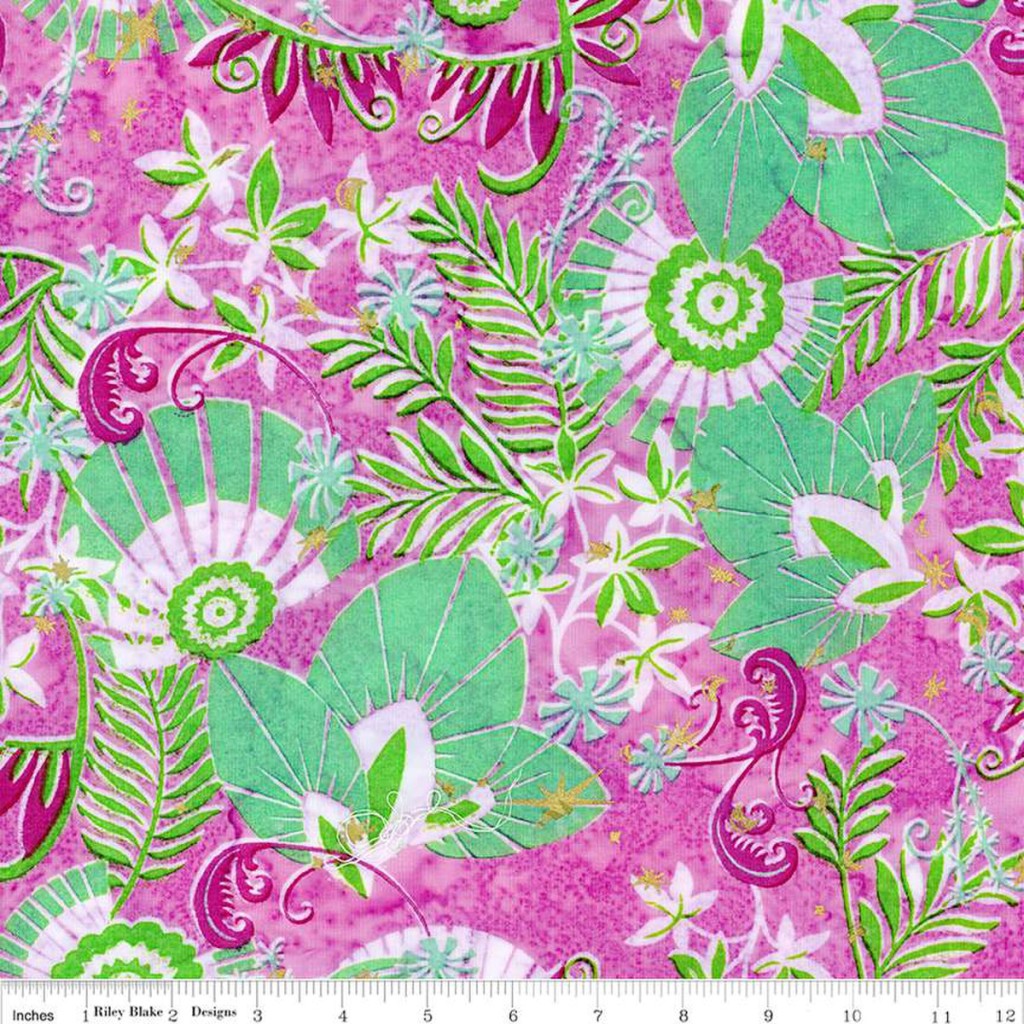
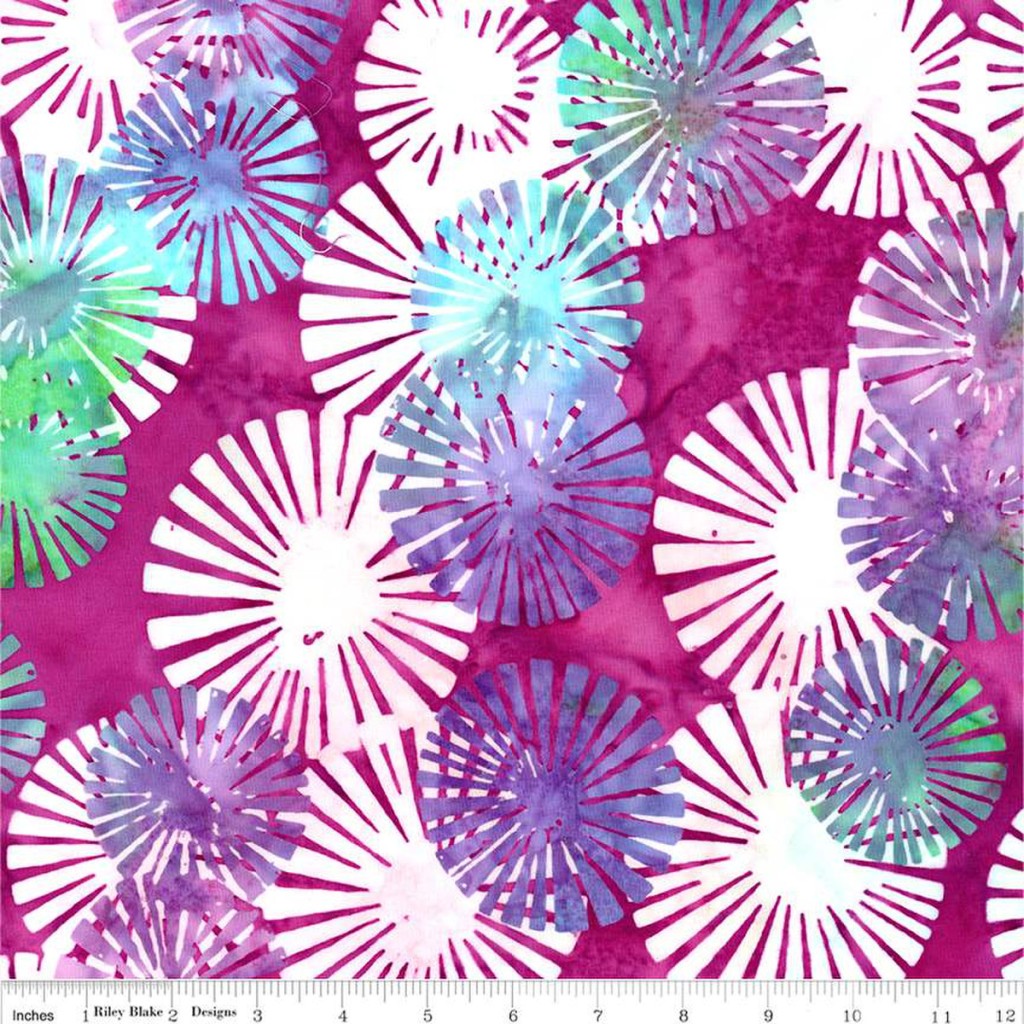
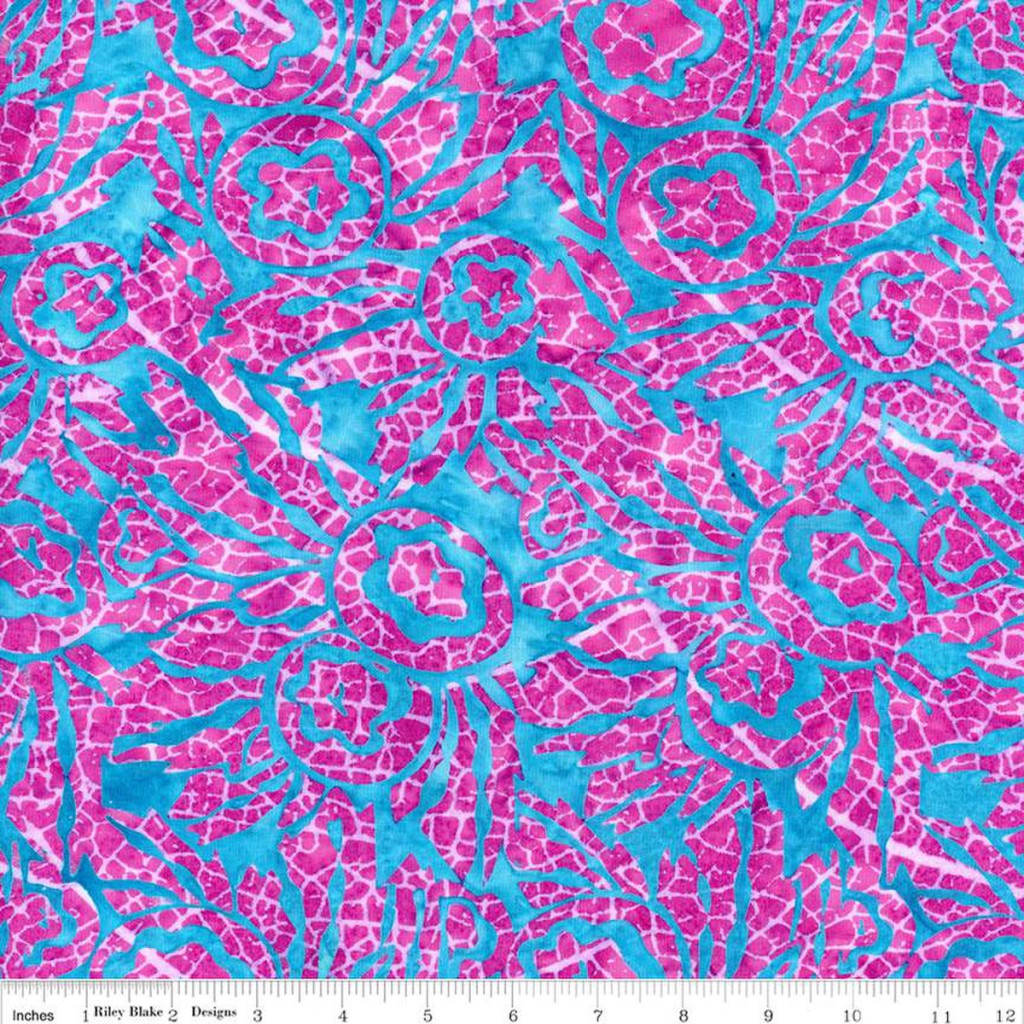
Here are some larger images of each different pattern so you can see just how yummy the fabrics are:
Of course, Bedazzled! will be available in precuts — 5″ squares, 10″ squares, 2.5″ strips, and fat quarter bundles, so the collection will shine in lots and lots of VRD Rose Card patterns!
Speaking of VRD Rose Cards, here are the patterns Riley Blake Designs has selected to showcase with the collection.
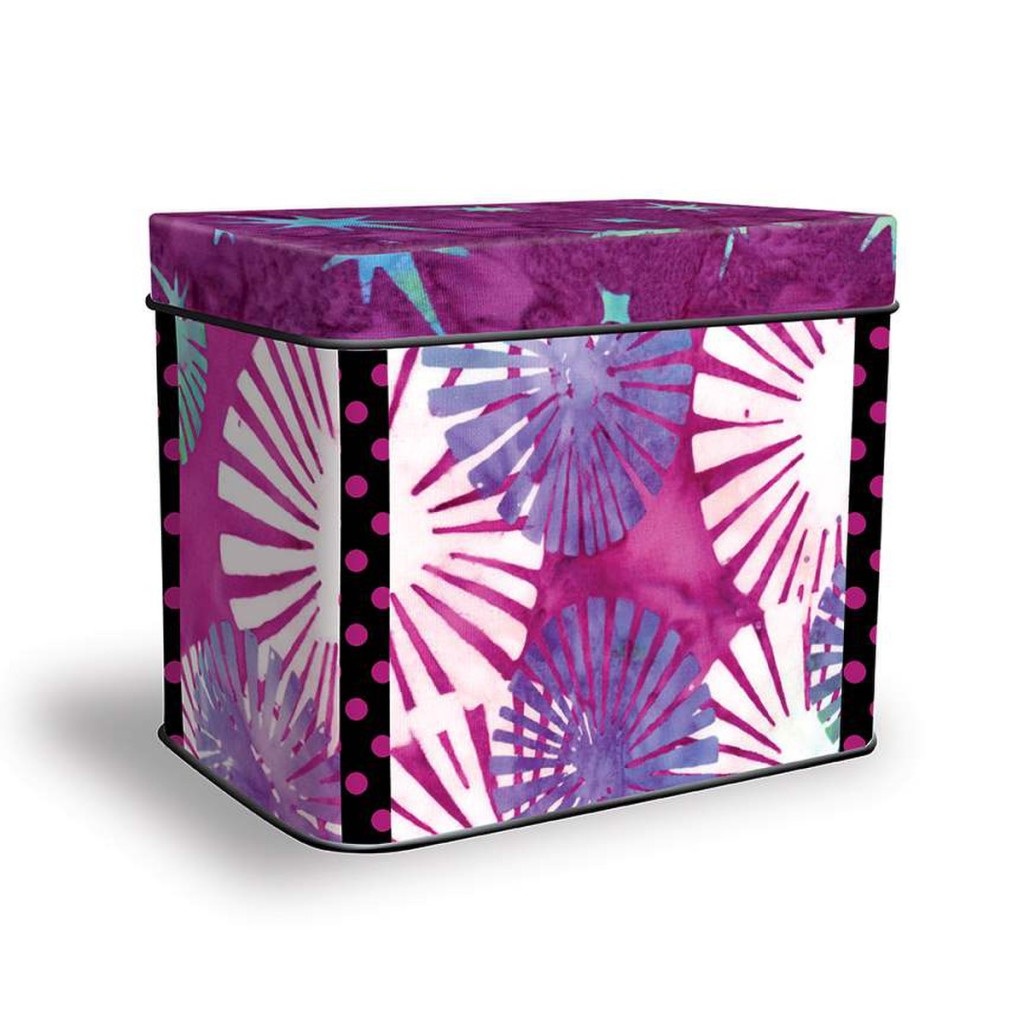
And if that’s not enough — Riley Blake Designs has created a SUPER SPECIAL Rose Card Pattern Storage Tin! Finally!!! We’ve talked about storage ideas for your Rose Card collections many times in the past here on the blog and I know the topic comes up frequently on the Facebook group.
Thank you Riley Blake Designs for creating a solution for storing our Rose Card collections!
I am really excited about this tin and can’t wait to order several. I imagine we’ll carry them at villarosadesigns.com, but make sure you request these tins at your local quilt shop! I think they’ll go fast, so make sure you get yours in December.
Are you getting EXCITED yet???? Remember, Bedazzled! will be in stores in December, just in time for Christmas! I know what I’ll have on my Christmas list this year. Just sayin’ . . . .
One More VRD Update For You
Do you watch (and shop) Pat’s Fry-Day VRD Live Shows on Facebook? Or maybe you didn’t even know we had a weekly Live Show and Sale.
Here’s the info:
FRY-DAY HAPPY HOUR
Join us every Friday at 4pm PST on our Facebook Page for our Fry-Day Happy Hour.
Watch as we show new fabric and last-chance items – and comment to buy directly from the video.
I just wanted to let you know the show will now be available on the website due to some changes with the platform. We’re trying a few different things out right now in order to pick the new format that will be easiest for you, the shoppers and fans, so please be patient with us.
For now, you will be able to find the Fry-Day VRD Live Shows under the Live Shows tab at the top of the website. Please reach out if you have any questions.
Well, I guess that’s it for me this week. I’m off to work on getting my garage sale ready. If you find yourself in Crawford County, Pennsylvania, stop on over — I’d love to meet you in person.
Take care and be safe this Memorial Day Weekend. Don’t forget to kick back and relax, too.
My days are getting busier and busier and I have less and less time to spend quality time with my sewing machine and I don’t even have kids at home. What about those of you who do? College kids are graduating. Younger kids will be off for summer vacation soon. And so on and so on. . .until school starts up again in August and September. So what’s a quilter supposed to do???
Or maybe you’re a new quilter just learning how to sew a 1/4″ seam and how to safely use a rotary cutter? Sometimes it’s hard to find patterns that match your developing skills.
Or maybe you want to teach someone how to quilt? How do you pick out a project that will be satisfying but doable? Something fun and not boring?
I’m glad you stopped right here at the VRD blog because I’m going to show you a curated collection of Rose Card quilt patterns perfect for the beginning quilter as well as the super busy person who also happens to be a quilter (yep, I mean YOU).
I haven’t created a curated list of Rose Cards for a while so I thought it would be fun to share some of the fastest, most fun, and satisfying projects in our Villa Rosa Designs Rose Card collection.
Here’s my criteria for this curated list:
Only squares and/or rectangles
Simple design with easy execution
No more than 2 different simple blocks per project
It was really hard to choose the above Rose Card patterns even with such specific criteria because VRD has so many pattern that are fast and fun. I really had to make some hard decisions based on difficulty because I wanted to keep the patterns beginner-friendly.
I hope you enjoyed this list — some are oldies but goodies while others are fresh of the press, so to speak. Here’s hoping you maybe found a few new-to-you Rose Card patterns to add to your own growing collection of cards. Pick out a couple patterns and make plans to work on them over the summer. You might just be surprised at how much you can get done when you use one of these VRD Rose Card patterns.
What a gorgeous day here in NW PA! I woke up to bright sunshine and happy bird song. I love mornings like this! We’ve had a couple wonderful summery days and it makes me so glad that I have a nontraditional career where I can get outside anytime I want to drink in the lovely weather. Lucky me….
We have so much to do today, we’d better get started.
The Last Blog Hop Prize Update
Hip! Hip! Hooray! I just shipped the last bunch of prizes yesterday — all 41 of ’em! I know those of you who won prizes and haven’t received them yet are probably getting a little anxious by now and today I’m happy to say the last of the Blog Hop prizes will be arriving shortly.
If you won a prize during the Blog Hop and do not receive it within the next couple weeks, please email me at tricia@villarosadesigns.com so I can look into it.
Again, thanks for your patience. I hope all of you winners enjoy your prizes!
Let’s keep moving!
And the Winner Is……….
Congratulations to Barbara in MA! She is our giveaway winner.
Thanks everyone for telling me about your favorite color combinations. Like you, I have lots of different combinations and it’s hard to pick just one. Wink, wink……..
If you didn’t get your own copy of Plan Design Quilt yet, you can find it HERE.
My Recent Copyright Issue
I love being a quilt designer and author, but sometimes things happen that make me so so frustrated. Recently, I had a copyright issue and I’d like to tell you about it.
I’ve talked about copyright and quilters a couple times before and you can find links to those posts here:
I also want to remind you that I am not an expert in the field of US Copyright Law. What I’ve learned, I’ve learned by reading, researching, talking to others, and experiencing issues first hand. If you need expert advice or information about US Copyright Law, please seek the help of a Copyright lawyer.
Recently, a quilter familiar with our VRD Rose Card patterns emailed us with a screenshot showing the back of one of my Rose Card patterns — the instructions — posted on Facebook. The kicker was that the poster actually covered up the copyright information at the bottom of pattern, which indicated the person posting my pattern knew exactly what they were doing. Please don’t assume they just didn’t know that it was wrong or what they were doing was violating US copyright Laws — if they covered up the copyright info, then this was done completely intentionally.
I tried to check it out on FB, using the info on the screenshot to guide me, but I found out that the group was private. Now what? I ended up having to join the group so that I could address this copyright infringement. While waiting for my membership in the group to be active, I was able to look up the person who posted my copyrighted pattern instructions and I wrote a very firm message to them. I also found out that person was — of all people — an administrator of the Group!
When I was finally accepted into the group later the same day, I then posted a super firm comment showing the front of my pattern and telling all 3000+ members that I owned the copyright and I did not give permission to share my pattern instructions and that by doing so AND covering up the copyright information intentionally was a violation of US Copyright Law.
I also found out how to make an intellectual property complaint to Facebook, which I promptly did.
You can find Facebook’s Intellectual Property article which also includes a link to the form for reporting Intellectual Property abuse HERE.
Finally, the original post was taken down in the Group before Facebook even had the chance to do it (which told me that at least one of the administrators of the group knew it was wrong and deleted it before the group could get in trouble from Facebook). But it wasn’t deleted before over 3000 people had the opportunity to save/print/copy/repost my pattern. THEN I got grief from another one of the administrators who not only deleted my public posts in the group about copyright law and my rights as the copyright owner, but also told me that I should contact the guilty administrator and not post to the entire group. Seriously??? Not one person accepted responsibility for this nor did anyone even offer an apology! I am still seething about this experience.
You might wonder why this upsets me so much. Let me explain.
Sure, maybe that person originally purchased my VRD pattern for $2 before posting it on Facebook, but that did not give them the right (legally or morally) to share it with over 3000 people for free. They did not ask my permission to post my copyrighted pattern instructions — I would NEVER have given my permission to post it on Facebook anyway.
Copyright laws are there to protect intellectual property for many good reasons, including a copyright owner’s ability to earn income on their own intellectual property.
I design quilt patterns as part of my livelihood. By posting the instructions of my pattern for free on the FB Group, that person so kindly helped me (and VRD) to lose potential income — possibly more than $6000 in pattern sales, if each of the 3000+ group members had purchased their own pattern at $2 per pattern.
This all makes me second guess my desire to design and publish new quilt patterns. If designers stopped creating new quilt patterns, new quilt books, and new quilt magazine patterns featuring new techniques, new fabric collections, new tools, and new ideas then the quilt world would suffer greatly. Eventually the sale of fabric, notions, tools, rulers, etc. would suffer, which would then hurt fabric companies, publishers, advertisers, quilt shops and other quilt-related businesses. People could lose their jobs and companies and businesses could eventually go out of business. Do you see the domino effect here? Ultimately, it would hurt you, the quilter, who just wants to make beautiful quilts.
Copyright law protects ALL of us.
I appreciate you taking the time to hear my latest copyright story. And now I’ll jump off my soapbox.
Time to check out the NEW May patterns!
NEW May 2024 VRD Rose Card Patterns
Yep, it’s the Thursday after the first Friday in May, which means — NEW PATTERNS!
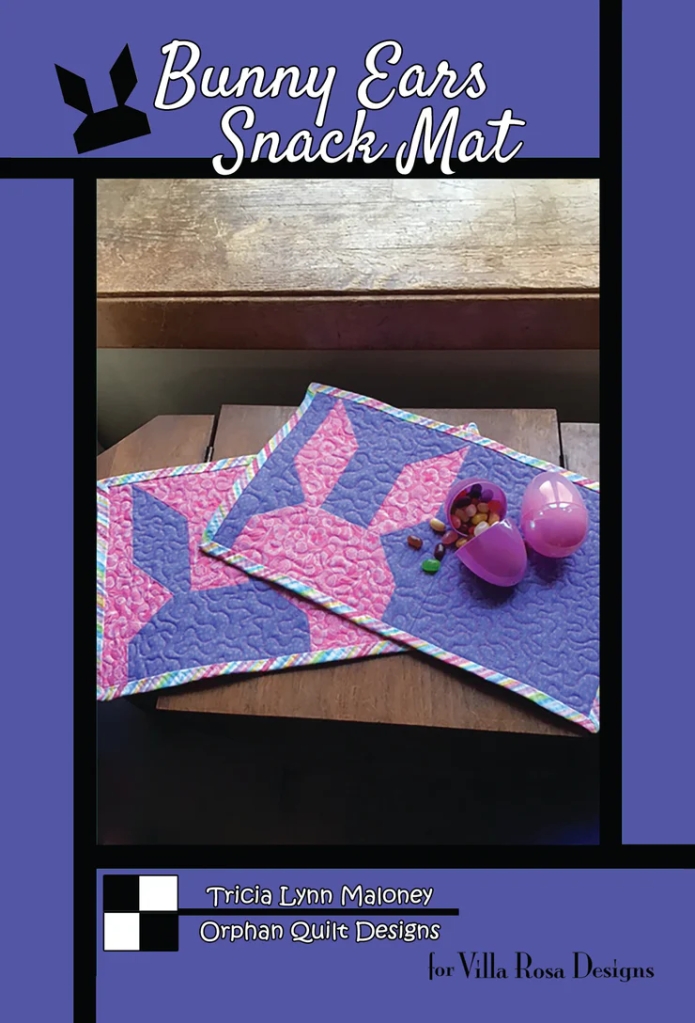
There are 7 — count ’em — 7 NEW patterns this month — the set of 5 that you know and love along with a table runner and a snack mat. Definitely something for everyone in this month’s patterns.
YAY! Aren’t they Fab??? You can get the set of 5 physical patterns for the special price of $8.95 HERE
I’m sorry, but we don’t offer the set as a digital pattern collection. However, the good news is that each pattern is individually available as a digital format. You can find the patterns by name on our website, villarosadesigns.com.
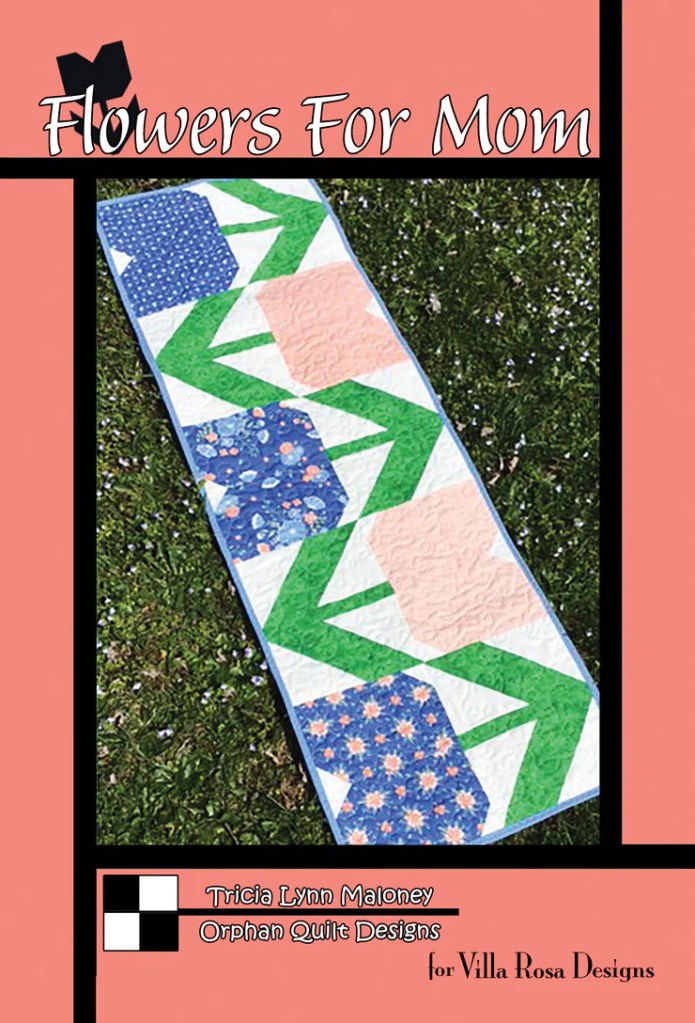
Here’s a pretty flower runner, perfect to whip up for Mother’s Day or just for spring — I can see you already picking out your favorite colors and fabrics for this one. You can find the runner physical pattern HERE or the digital pattern HERE.
And here’s a very spring-y fun Snack Mat pattern. Don’t you just love pinwheels??? They are so fun and happy! You can find Pinwheelies the physical pattern HERE or the digital pattern HERE.
So, which one are YOU going to make first???
Well, I’m off to take my sweet and crazy little Shih Tzu, Bailly, out for a walk to enjoy this gorgeous day. Ta Ta!
Here’s my 1 1/2 year old cutie, Bailly, who needs a haircut and a shave right now….LOL! Don’t you love her happy grin???
Another week has passed us by and the only things I’ve sewn recently are my samples for this Bunny Ears Snack Mat tutorial. LOL! I hope you had better luck this past week getting some sewing in. I keep gazing at my collection of VRD Rose Cards as well as petting my fabrics and my sewing machine looks lonely across from me as I write here at my desk, but I just can’t seem to find enough time to actually get something going on my machine. Somehow I need to find a pocket of time — maybe I should sleep less so I can quilt more. But, no, that won’t work for me these days as I really do need those 8 hours of sleep a night. Ho hum…..
Update on Blog Hop Prizes
I just wanted to let everyone know that we are still working on getting everything shipped to Blog Hop Prize Winners. So far the quilts have been shipped, digital pattern collection winners have received their patterns, and prizes graciously being shipped by our lovely sponsors should be in the mail. Physical pattern collections haven’t yet been shipped but should be going out in the next couple days. I have a stack of prizes that also need to get mailed as well as the Kaffe Collection and the Mystery Box.
You may be scratching your head, wondering why it’s taking us so long to get everything sorted out and to the winners. That, my friends, is a complicated topic:
We had around 28 bloggers in addition to our own blog, which really makes 29. There were prize winners on ALL of the blog post. So that’s a lot of information to put together and organize! To make things even slower, we had some winners who never replied to their winner emails, so then we had to randomly select new winners and contact them to get their information. Egads! It literally took weeks to gets all the winners selected and confirmed. Really, I’m not kidding.
Prizes are being shipped from multiple locations — the quilts were shipped from the VRD shop in CA, physical pattern collections will be shipped from our pattern shipping location in MO, digital pattern collections were emailed by moi here in PA, sponsors are shipping prizes from their warehouses and office locations all over the US, and I am shipping prizes and 2 of the Grand Prizes from my little studio here in PA.
It’s crazy when you think of the logistics involved in our Blog Hop — kind of like dancing Swan Lake en pointe while trying to juggle knifes — very sharp knifes!
Happily, we should have everything out in the mail very soon. Winners hare receiving their prizes. Please continue to be patient as we get everything on its way to you.
Now, how about a fun tutorial?
VRD Bunny Ears Snack Mats Tutorial
Nothing says spring like a pair of bouncy little bunnies with extra-long ears! But before I even begin the tutorial, I need to let you know there is an update on the cutting instructions for piece B — you should have enough fabric left over to cut the updated piece, though. Please check the Corrections Page HERE for the new cutting measurement for piece B. Yes, we do have a corrections section at the bottom of our website, villarosadesigns.com, so if you ever find something on a pattern that doesn’t quite look right to you, please check the corrections page for updates.
Get your own Bunny Ears Snack Mat Rose Card physical patterns HERE or digital patterns HERE.
All right! Let’s make some cute bunnies!
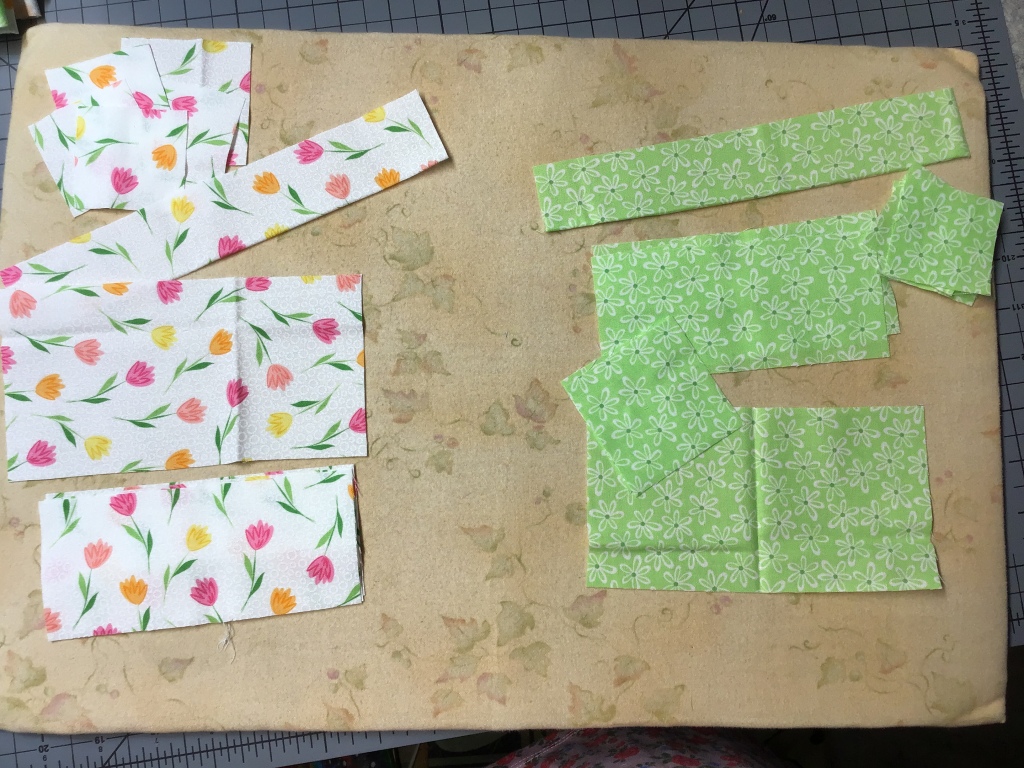
The first thing we need is 2 fat quarters. Yep, just 2 FQs makes 2 adorable little Bunny Ears Snack Mats.
Time to cut all the pieces out — we’re actually doing the cutting for both Snack Mats at the same time. While I cut, I’m using my ancient homemade flannel board to keep my pieces from getting lost.
Did you miss my flannel board tutorial last week? You can find it HERE.
PSST! Don’t forget to switch your pieces before your start sewing so the bunny fabric in one block becomes the background in the other!
I know it doesn’t look like much yet, but here are my pieces all laid out for both blocks and ready to sew together. Having a small flannel board is great because I can just take it right to my sewing machine from my cutting table, without dropping or losing a thing.
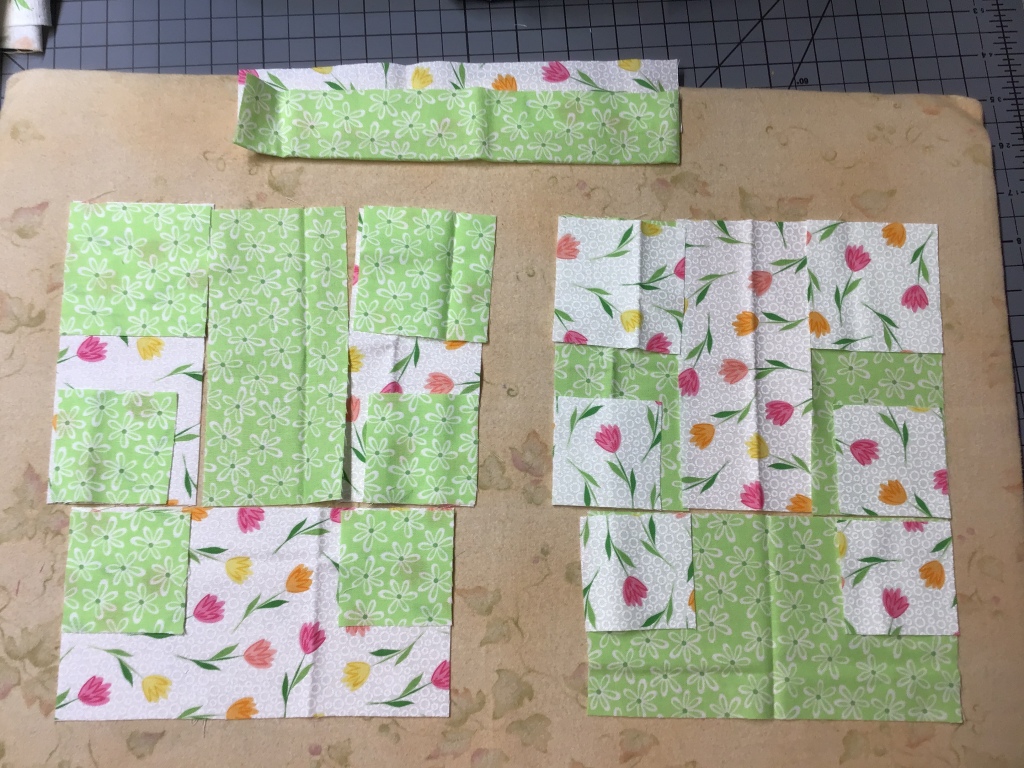
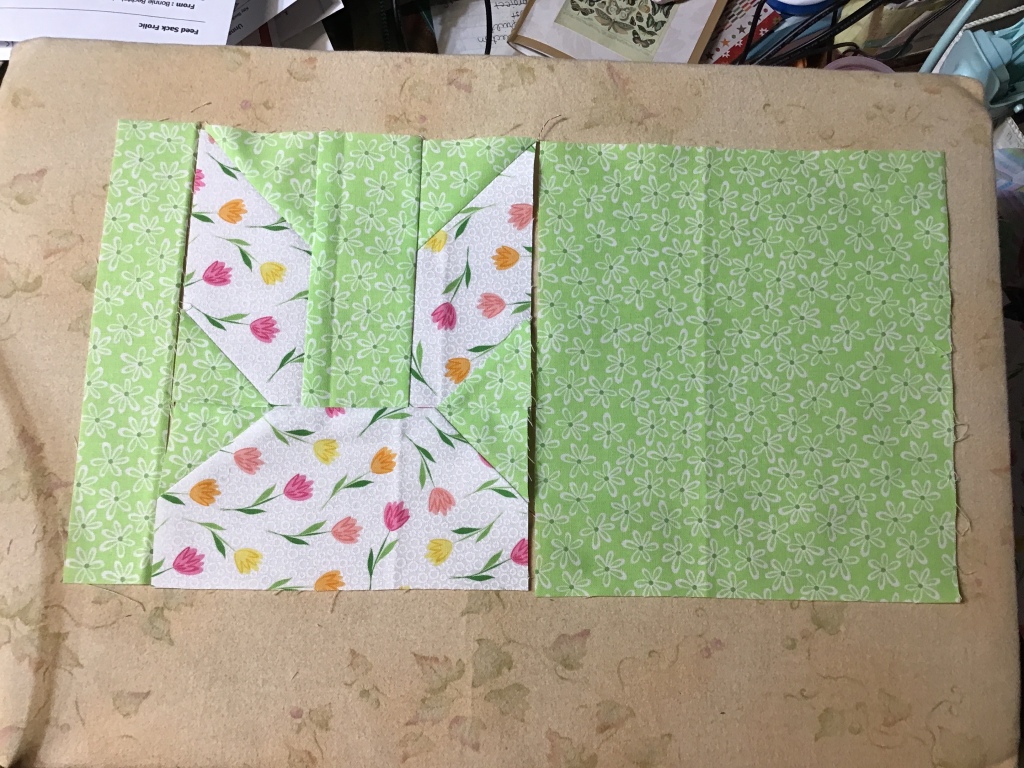
As all the pieces are cut and ready to go, let’s start sewing these little Bunnies together!
Place a background square right sides together on the top left corner of the Bunny Head rectangle. Draw a diagonal line and sew on the line. Then cut 1/4″ away from the sewn line and press the “flippy triangle” open. Yup, that’s what I call them — “flippy triangles” — you know, I only use the technical terms here on the blog. LOL!
To make thing easier later, press the seam towards the Bunny.
Sew “flippy corner” on the top right corner and press this seam towards the Bunny Head too. Repeat to make identical “flippy corners” on the second mat.
Voila! Now we have 2 cute little Bunny Heads (with a crazy mess for Ears right now)!
Speaking of Bunny Ears, let’s make some! Place the background squares right sides together with the Bunny Ear rectangles, lining up the outside edges at the bottom. Draw diagonal lines as shown — keep in mind you are making mirror images. Sew on the lines and cut 1/4″ away from the drawn lines. Open the “flippy corners” and press the seams towards the background fabric.
Our Bunny Ears aren’t quite finished yet because we have to add some top “flippy corners,” too. The background squares used for the top of the Ears are larger than the squares used at the bottom in the previous step so be careful not to get the top and bottom squares mixed up.
Again, we are making mirror images. Repeat this step for the second block as well. Press the seams toward the background fabric.
We now have Bunny Ears! Yay!
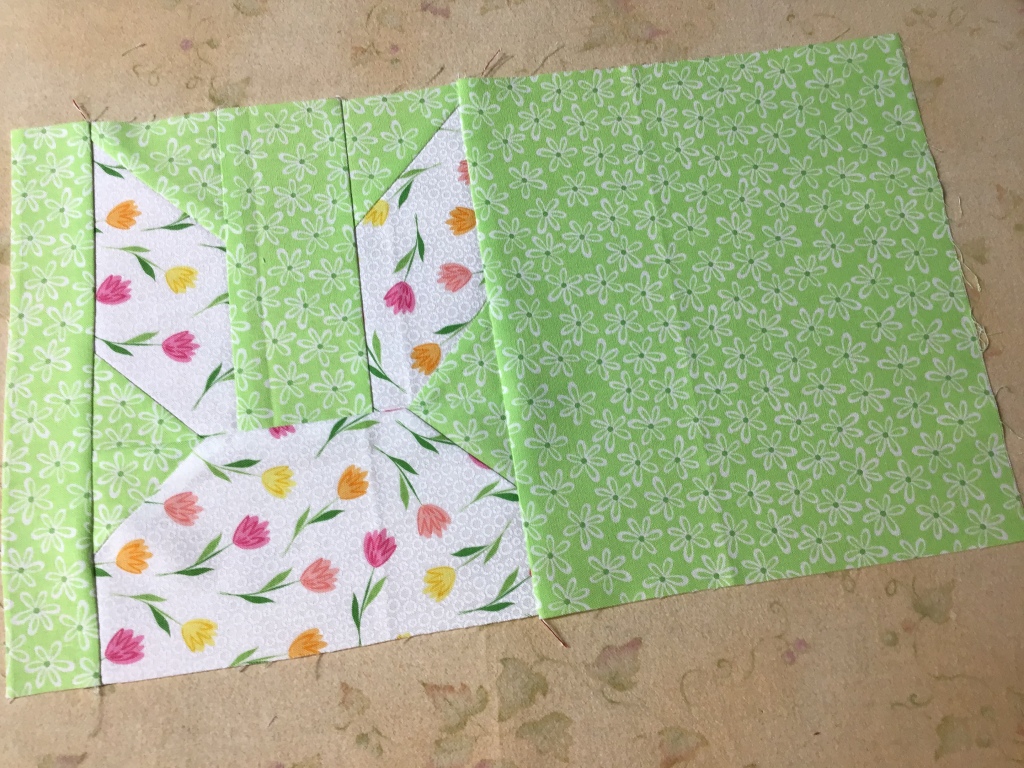
Next, sew the background strip between the Bunny Ears and press the seams towards the center background strip. Repeat for the second block.
Almost there, just a few more steps!
Now sew the Ear section to the top of the Bunny Head for both blocks. If you pressed the “flippy corners” towards the Bunny Head in the first step, above, then your corners should nestle together nicely.
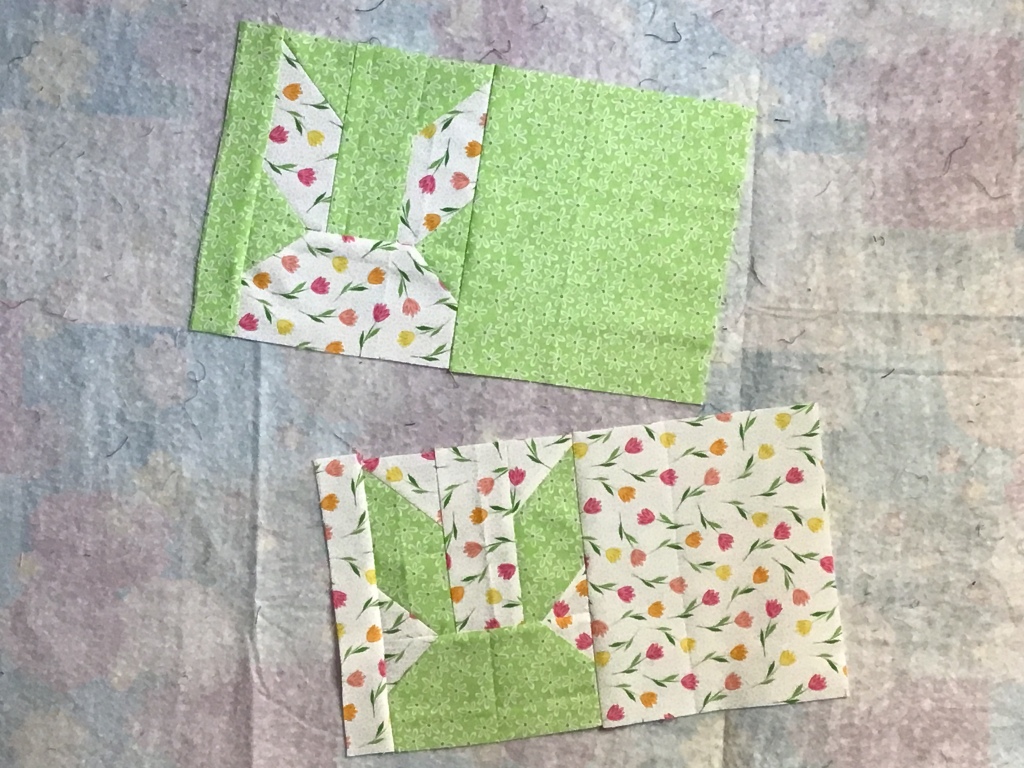
Ladies and Gents, we now have a Bunny, or rather 2 Bunnies!
Do you see how the green stands out and the floral fabric recedes? Aren’t fabrics so much fun to play with???
The last thing to do is sew the narrow background strip to the left side of the block and the large background piece to the right side of the block. Repeat for the second block.
And there you have it — Bunny Ears Snack Mats! Next up would be layering the Mats with batting and backing, quilting them, and adding binding.
Don’t forget to label your Snack Mats!
I hope you enjoyed this super cute tutorial and have fun making your very own Bunny Ears Snack Mats. They are quick and easy to make, using only 2 fat quarters, and are great little something-somethings for all your pals, quilty ones and non-quilty ones alike! Long live cute little Bunnies! Hurray!
Now that we’re past the middle of April, spring is finally springing around here, although it’s still either cold or rainy. We’ve had so much rain here in NW PA, there is a lake in the field back behind my house. And the fun thing is that a small group (flock? gaggle?) of Canadian geese have claimed it as their very own little oasis! Silly goosies! But I do love to hear them honking out there to each other and it’s fun to see them waddling around. The lake is starting to dissipate, but we keep getting enough rain that it refills, so right now the geese are in luck.
Speaking of April, I know it’s spring when my Friday Quilt group starts meeting again. We skip January and February because those months are historically our snowiest months and usually start up again in March. I didn’t get a chance to mention my group back in March because we were all busy with the Blog Hop.
I know I’ve talked about these amazing quilting gals before and I’m so thrilled that we’re back together once a month again. I want to do a shout out to the Friday Gals — you know who you are — Hey Ladies! (If you want to know a little bit more about these Friday ladies, you can go HERE.)
You might wonder why I am talking about these gals, but for the last 2 years, we’ve been doing Villa Rosa Designs quilt projects. But his year, everyone wanted somethng a little different and everyone agreed that they wanted to go back to a sampler quilt again. It’s been quite a few years since we’ve done a year-long sampler project, so it’s time.
Farm Girl Vintage by Lori Holt of Bee in My Bonnet Co. was an easy choice for 2024 because of the fun blocks in both 6″ and 12″ finished sizes as well as a plethora of terrific projects in which you can mix and match blocks. In fact, Lori has 2 other books, Farm Girl Vintage 2 and Vintage Christmas which also use both 6″ and 12″ blocks. And guess what that means??? All the projects are interchangeable among these 3 books! WOW! In addition to some other fun quilt books, Lori has a bunch of super patterns and even a book about scrap quilting called Scrappiness is Happiness. If you’re not familiar with Lori’s designs, you should check them out.
She is a fabric designer for Riley Blake as well as an author and quilt designer. I’ve designed quilts using a few of her collections over the years — they were lots of fun. Very scrap happy and bright with a vintage vibe. You can find out more about Lori Holt HERE.
Beginning last month in March, we are going to work our way through the 12″ and 6″ blocks (as well as the delightful tractor block) in the book by making a mix of 6″ and 12″ blocks each month until December.
Here are blocks from our first get together.
I like to offer my own sampler layout when we do a year-long sampler quilt project, and this year is no different! I designed 2 different settings — one as a throw/twin and one as a full/queen. Of course, the Farm Girl Vintage book has lots of fun projects of all sizes, too, which means everyone has options! And boy, do I LOVE to have options!
I’ll give you a sneak peak at the center of my full/queen quilt (without the borders — I’ll get those on someday!). I chose a scrappy blue and white farmhouse-y color scheme and I really love how it turned out. What do you think?
After making VRD quilts for the last couple years, we couldn’t entirely abandon our VRD projects, of course, so for 2024 I set up a series of VRD quilt challenges. (You know, this could be a great idea for quilt guilds and groups or even quilt shops — just sayin’……)
Anyway, here is our challenge schedule:
June 2024 — Fat Quarter Project
August 2024 — Panel Project
October 2024 — 5″ or 10″ Charm Square Project
December 2024 — 2 1/2″ Strip Project
Of course, there are a few rules:
You must complete a quilt top before we meet that month
You may not use projects from classes 2022 or 2023
I’ll try to take photos when we have the Challenge quilt reveals, so you’ll have to stop back to see what VRD projects the Friday Gals create.
In our most recent meeting, our group made portable flannel boards to accommodate 12″ blocks so I thought I’d show you how we made them because everyone should have a small flannel board. This size is super to carry back and forth from your cutting area to your sewing machine or even to a quilt class, retreat, or sew day.
Make Your Own Quilt Block Flannel Board
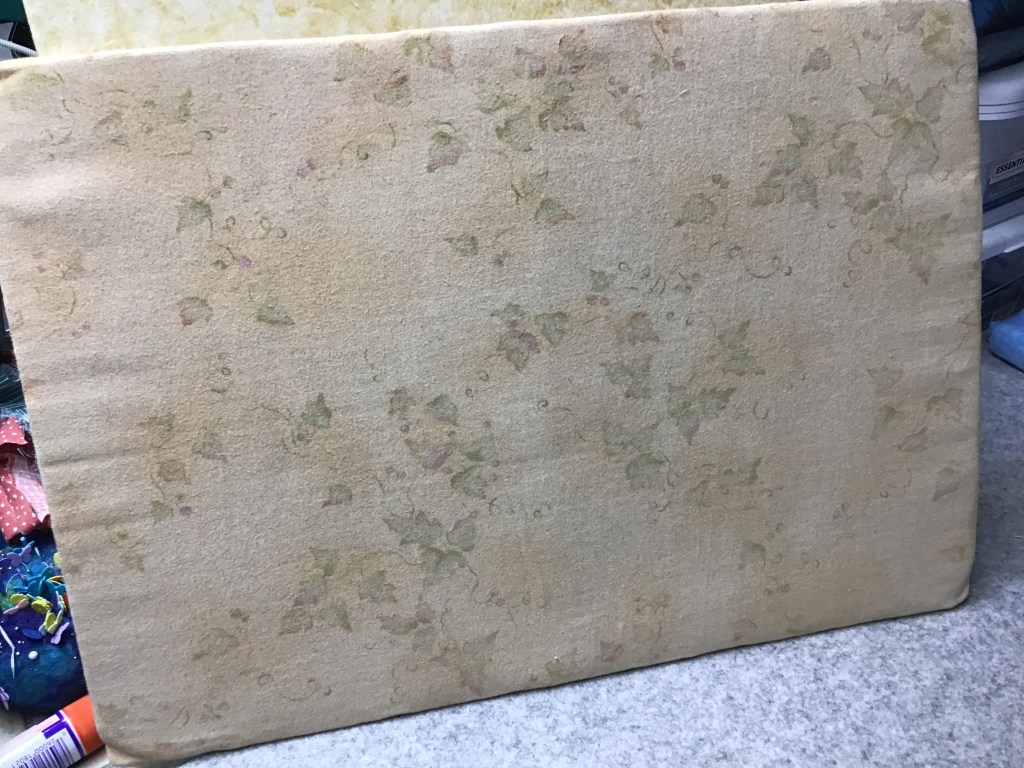
Here’s a flannel board I made maybe 15-20 years ago. This board has seen a lot of wear and tear and the corners are all bent up, but it’s definitely stood the test of time and use because the only thing I’ve really had to do is to tighten and re-tape the fabric on the back once or twice. This board is around 12″ x 18″ and is made out of a heavy duty cardboard. It is great for smaller blocks, but doesn’t quite hold the pieces for a 12″ block, so that’s why I had the idea to make one sized for 12″ blocks.
What You Need:
A piece of sturdy cardboard or a sheet of foam core board
A piece of neutral tonal or solid quality flannel fabric as large as the board you want to make plus an additional 3-4 inches all around.
Duct tape.
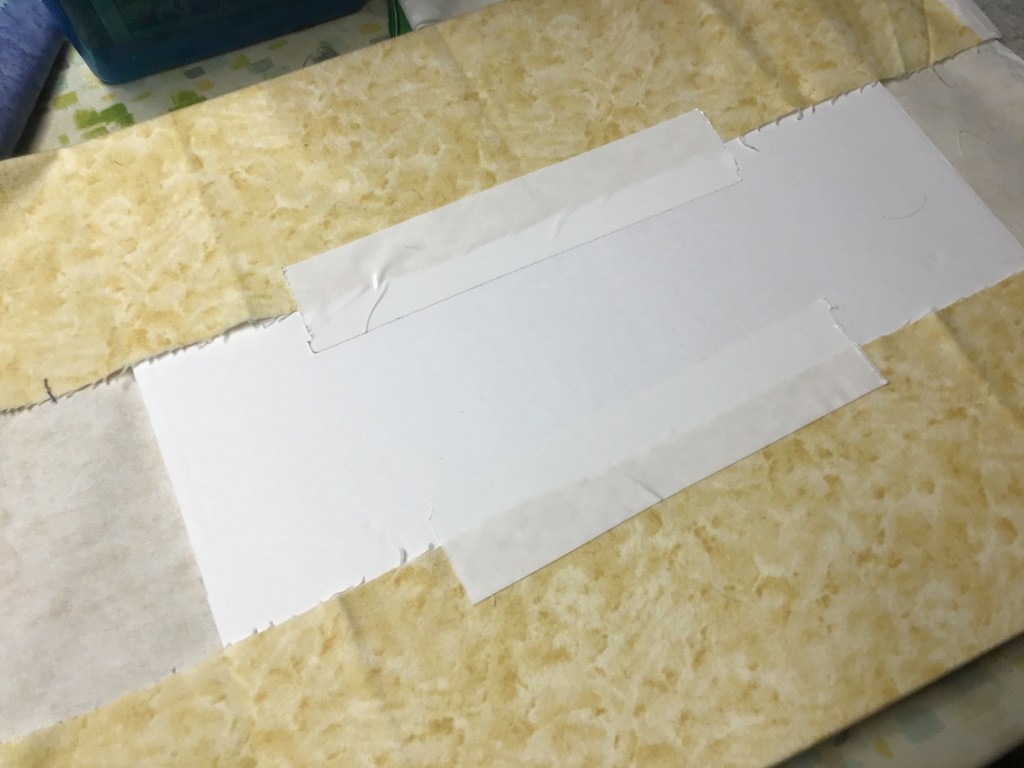
I chose to use a piece of foam core from Dollar Tree (LOVE Dollar Tree!) which will actually give me 2 boards about 15″ x 15″ and a leftover long rectangle for some other project. Because the boards aren’t exactly 30″ long long, my finished boards won’t be exactly 15″ square, but that’s okay, it’s close enough for jazz. If you want your boards to be perfect squares, go ahead and measure the length of your foam core board and divide that number in half. Use a ruler to draw lines to make 2 equal boards. If you want 1 big board, you can use the whole piece of foam core, just keep in mind it will be kind of clunky to carry back and forth from your cutting area to you sewing machine to your pressing area. But if it works for you, go for it.
One you’ve drawn your lines, time to cut on the lines with a utility knife or scissors. BE CAREFUL! We don’t need any accidents on this step.
Here’s 1 board around 15″ x 15″, which will allow me to lay out the pieces for a 12″ block (or smaller). Now let’s get our flannel fabric ready. I suggest pressing it so the flannel is nice and flat before you put it on your board.
Okay, lay your flannel fabric on a flat surface with the wrong side facing up. Center your board. Then fold one side up and tape it firmly to the board. Repeat for the opposite side. Make it smooth and taut before you tape it to the back of the board.
Next up, we are going to fold the corners in on 1 of the remaining 2 sides and then tape the side to the board. Repeat for the other side, pulling the fabric smooth and taut before taping that last side. I used an extra piece of tape on each side to help keep the flannel nice and tight.
Voila! Here it is — a board block big enough to layout a 12″ or smaller block!
Wasn’t that super easy? Now you know how to make a flannel board, you can make them in any size you want, just make sure that your flannel fabric is 3-4 inches bigger all the way around your board so you have enough to wrap around and tape. (Psst! Flannel boards are great activity and story activities for kiddos, too! Use left over fabric and felt to make letters, numbers, and story pieces to delight any kiddo.)
One More Thing Before You Go…..And a Giveaway!
I’m excited to share some BIG NEWS with you — I just finished putting together my 6th book in print! Yippee! Kudos! AWESOME! (Go me!)
It’s called Plan Design Quilt and it is kind of like a workbook for designing quilts on paper. I do design a lot of my projects using Electric Quilt 8 software, but I also scribble blocks and quilt settings down whenever inspiration strikes. Usually I jot ideas down on snippets of paper, sticky notes, napkins, or whatever, and then I lose them only to find them at some later time after I have already forgotten all about that idea. Kind of disorganized, I know.
So I created this book for myself because it gives me someplace to do my little scribbles and keep them all in one place. It’s kind of cool to create a book that fulfills your own needs and then share it with the world. I tell myself that if it’s something I can use, then there are other quilters out there who might need this too. So I designed this workbook-style book with lots of space to doodle and draw quilt blocks and settings, to jot down notes, try out/add fabric swatches, and more. You can find Plan Design Quilthere. Woo Hoo!
But wait — there’s more!
To kick off this new book, I’m going to give away a copy of Plan Design Quilt right here on the VRD blog, Villa Rosa Quilts. All you have to do is leave me a comment telling me your favorite color scheme for making a quilt. I apologize, but this giveaway will be for US residents only. I haven’t decided yet if offering this book in ebook format would actually be helpful for people. Your thoughts?
Oh, almost forgot! You have from today, April 25th through Thursday, May 2nd to leave a comment. I will select a winner randomly.
I just can’t believe that it’s past the middle of April! How did that happen? Time is just flying by! It’s like no sooner do I get up and have breakfast and then I’m preparing for bed. I wish the days would slow down a little bit. I can remember when I was a kid, those lazy summer days seemed to last forever….
I must admit that I am still playing catch up for the prize winners for the Blog Hop in March. All of the winners have now been contacted and I have everyone’s information. Now it’s time to get those prizes out in the mail! Some of you winners will be receiving prizes directly from some of our lovely Sponsors, so be on the lookout soon. Thanks for your patience as I get everything wrapped up.
Ironically, I feel like the faster I try to do things, the slower I’m actually going. I think I’m taking after my niece, Morgan’s African tortoise, Carl. Slow and steady, but never quite fast enough. On second thought, I think Carl might actually be faster than I am, especially when it’s his meal time….LOL!
I couldn’t leave you hanging here without seeing my cute little tortoise grand nephew (who is really not all that little). Here’s Carl celebrating his 9th birthday recently. My goodness, he’s gotten so big! When Morgan adopted him, he was so tiny — about the size of a Matchbox car — and fit in her pocket!
No, your eyes are not playing tricks on you — Carl really is wearing a t-shirt as well as a diaper. He is a free range house tortoise (have you ever tried to potty train a tortoise???). Carl is also Mr. Personality. He doesn’t say much, but he has a way of getting his point across. See how happy he is, playing with his balloon?
Sorry, I digress. I’m supposed to be talking about the Blog Hop Winners today.
VRD Blog Hop Winners
Break out the champagne! Throw the confetti! Let’s hear it for our Blog Hop Winners! WAHOO! HUZZAH! CONGRATULATIONS!
We had winners from 31 US States, 4 Canadian Provinces, and 2 European Countries. There were also some super lucky folks who won prizes on different blogs. I just hope I didn’t accidentally leave anyone off this list….
YEAH! Let’s give a great big CHEER for our winners!
Grand Prize Winner — $100 Hancock’s Gift Certificate
Nancy M.
Grand Prize Winner — Kaffe Collection Winner
Andrea A.
Grand Prize Winner — Big Box of Mystery Quilt Goodies
Rita S.
VRD Quilt Winners
Anne-Marie, IN
Kathryn, FL
Kate, TX
Susan, MN
Jill, NE
Robin, PA
Pattern Set Winners
Nancy, MO
Nadja, AK
Deb, OH
Renea, IA
Anne, TN
Pam, MI
Debbie, IN
Darlene, UT
Elaine, TX
Sara, SD
Krista, TX
Carmen, TX
Bonnie, Saskatchewan, Canada
Patience, MI
Nikki, VA
Margaret, TX
Donna, Saskatchewan, Canada
Samantha, MS
Diane, NM
Mary, WI
Eva, Germany (sorry Eva!)
Pat, MI
Rita, NC
Cindy, TX
Jannette, Ontario, Canada
Lori, Newfoundland, Canada
Sponsor Winners
C.J., Netherlands
Donna, Saskatchewan, Canada
Mary Anne, Ontario, Canada
Carol, ID
Lisa, KY
Pat, NY
Renea, IA
Diane, NM
Lizzy, NM
Terri, CO
Nancy, CA
Rachel, IA
Jill, NE
Ann, WI
Sharon, VA
Mayme, MI
Samantha, MS
Julie, AR
Debbie, IN
Lisa, KY
Cindy, TX
Mary, WI
Barb, NE
Pat, MI
Kim, British Columbia, Canada
Terry, MA
Anita, GA
Joanne, British Columbia, Canada
Connie, VA
Joy, OR
Nancy, OH
Lee, MI
Carol, WI
Diann, CO
Deb, FL
Sherry, TN
Johnna, OH
Anne, TN
Bonnie, Saskatchewan, Canada
Karen, PA
Margaret, TX
Carol, NC
Donna, PA
Beth, AL
Sandra, FL
Donna, FL
Jeanie, TX
Kathleen, IA
Kim, GA
Anne-Marie, IN
Sharon, MS
Pam, HI
Krista, TX
Patricia, MN
Pam, WI
Cindy, LA
Julie, MN
Kathy, NC
Amy, WI
Deb, NY
Jennifer, NY
Julie, GA
Christi, NC
Diana, PA
Brenda, VA
Darlene, UT
Leslie, OR
Anna, MI
Of course, our Blog Hop wouldn’t have been a success without our AWESOME Bloggers and our VERY GENEROUS Sponsors. Thank you! Thank you!
And finally, our Blog Hop was a success because of YOU, our VRD enthusiasts and followers. Thank you for supporting Villa Rosa Designs and our Fast & More Fun Blog Hop! I hope this Blog Hop introduced you to many more wonderful quilt blogger friends.
Well, that’s it for me today! I have to get back to weighing and labeling packages……
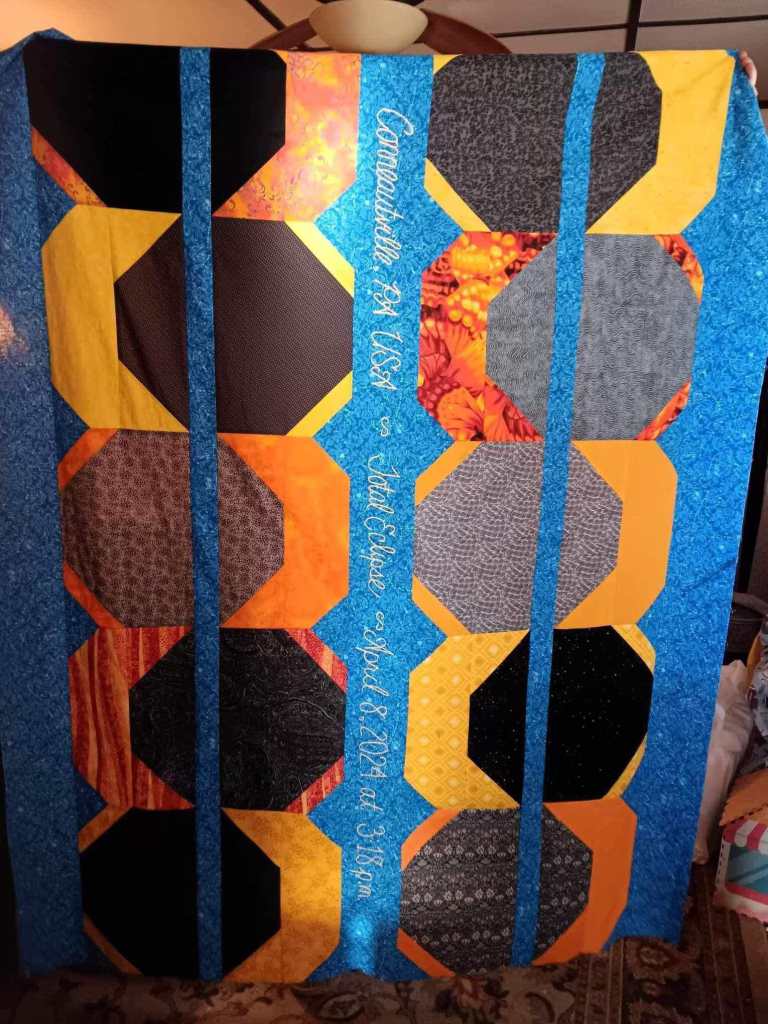
How many of you had the chance to see Monday’s solar eclipse? Could you see it from your own area? Or did you travel somewhere to see it?
Our area was overrun with people coming from all over to see the Eclipse — hotels and restaurants were full and the highways were all backed up. I was lucky that I could hang out on the back porch to see it — there was no need to go anywhere. Believe me, I was very happy not to have to go anywhere else, too.
My Mom (Hi Mom!) was super excited about the eclipse and had been for days. She put The Weather Channel on early on Monday so that we wouldn’t miss a thing as the eclipse arced across the US until it reached us here in northwest Pennsylvania. I popped outside frequently to watch as the moon’s shadow was creeping across the sun. I couldn’t stay outside for long, though, because my dog, Bailly (who was safely inside), would scratch crazily at the glass sliding door every time I went outside. My Dad (Hi Dad!) got in the spirit and came out from time to time to check it out, too. And yes, we all wore our special eclipse glasses.
It was so fascinating to watch the moon’s shadow slowly covered up the sun until almost totality, but, much to our disappointment, clouds covered the sun just as the eclipse moved into totality. We saw glimpses of it through openings in the clouds off and on, but we never did get to see complete totality in our location. WHat a bummer.
Of course, we had seen it on TV in other locations, but it wasn’t quite the same as seeing it yourself. Luckily, my oldest niece, Meg (Hi Meg!) took a great video of totality in our area and she shared it on Facebook, so I did get to see secondhand what I had missed.
Did you make your version of the Eclipses quilt?
Did you even get your Eclipses pattern yet? You can find it HERE as a physical pattern OR you can find it HERE as a digital pattern.
Here’s my Eclipses quilt top.
Mine was not the only Eclipses quilt in my area to celebrate the total Eclipses! My friend Kristine (Hi Kris!) and my cousin, Robin (Hi Robin!), made their own Eclipses quilts, too.
Kristine even machine-embroidered the center strip of her quilt with the Eclipse information and her location. What a great idea!
Kristine’s Eclipses quilt.
Robin made a wall-sized version like me. We even used the same fabrics, so they look similar, but not exact because of our fabric placement.
Robin’s wall quilt version of Eclipses.
What a fun project! I hope you will share your Eclipses projects on our VRD Facebook Group. Did you miss the Eclipses tutorial last week? You can find it HERE.
Now, guess what today is??? If you’re a new follower (Hey! Thanks for becoming a follower!), you probably have no idea why I’m so excited, do you? Let me explain —
This is the Thursday after the first Friday of the month and that means NEW Rose Card Patterns!
NEW VRD Rose Card Patterns for April 2024
Cue the trumpets and the confetti! Yay! Here they are!
Aren’t they great? What a lovely variety of patterns! I love that this group has new quilt patterns from multiple designers and you can see each designer’s own flavor. Which one do you want to make first?
You can get your own set of the 5 April patterns HERE for the low price of $8.95.
But wait……..there’s more! (Of course there is, did you even have a doubt?) Although there is no new table runner pattern this month (I’m sorry, the Blog Hop kept me hopping!), you are going to love the new Snack Mat — Bunny Ears!
Don’t you love it??? Yes, I know that Easter was actually at the end of March this year, but Easter is usually in April and bunnies are such a fun spring theme. You can get your own Bunny Ears pattern HERE.
Blog Hop Update
I just wanted to take a moment to let you know that all the winners have now been selected and contacted. Congratulations if you are one of them!
We did have a few folks who did not respond, so we had to randomly select new winners for those prizes. So the process takes longer than you’d expect it to. Now that everyone has responded, we will be starting to ship out prizes to the winners. Some of you will be receiving your prizes directly from some of our Sponsors. Thank you for your patience!
Next week’s post will be all about celebrating and announcing the winners of the Blog Hop — they are from all over the US and beyond.
Thanks for hopping with us! Here’s to more quilting adventures for us to share together in the future!
Wow! I can’t believe that it’s been 2 weeks since the end of the Blog Hop. We are still getting all the winners organized, so please be patient with us. I promise, just as soon as all the winners have been notified and we have shipping information, then I can start getting prizes out to winners. It will probably be done in several stages, so hang in there if you have been notified that you are a winner. Thank you!
On another note, are you excited about next week’s eclipse on April 8th? Are you in a place to see it or are you traveling somewhere for viewing? I am very excited that NW Pennsylvania will be able to see it, so all I have to do is step outside and look up. Fingers crossed that it isn’t cloudy — that would be a total disappointment if we all can’t see it. Yes, I did finally get my eclipse-viewing glasses, so I’m all set now.
In celebration of this eclipse, I created my own version of Creative Sewlution’s Eclipses which was one of March’s new patterns. I had to hustle to get the top and photos done for today, but I did manage it. And, boy, am I glad I did — it is an amazing design and I can’t wait to show you how to put it all together!
Didn’t get your Eclipses pattern yet? You can find it HERE as a physical pattern OR you can find it HERE as a digital pattern.
But before we do (sorry about the teaser…), I have one more thing to talk about.
A Teeny Tiny Bit of Quilt Math
Have you ever looked at a big quilt and imagined it as a smaller size so you could use it on a wall? The Eclipses quilt finishes at 59″ x 75″, which is a throw quilt or a REALLY BIG wall quilt. I definitely do not have a big empty wall to hang a quilt of this size, but I really really wanted to make Eclipses.
So, what to do???
Why, I’ll make the quilt smaller so it fits my space! Brilliant!
Have you ever made a quilt smaller or larger than the pattern? There are lots of different ways to alter the size of a quilt, but I thought I’d tell you how I did it with Eclipses.
OH NO — IT’S MATH!!!!!!! RUN!!!!!!!! LOL!
Sorry, couldn’t resist. Teheheh…. You know how much I LOVE LOVE LOVE quilt math!
You can resize most simple quilt patterns by dividing each measurement by whatever fraction you want to make the quilt.
Let’s say I had a 60″ x 60″ quilt with 12″ blocks. No sashing, no borders. Just blocks. Why look, here it is!
Hmmm, that’s just too big. I want to make a nice little wall quilt exactly like the pattern, but half as big. So if the quilt pattern quilt finishes at 60″ x 60″, then I think cutting the dimensions in half to 30″ x 30″ would suit my needs.
So, here’s where the fun begins.
Time to divide all the measurements by 1/2. My 12″ blocks will now finish at 6″. I still need to make the same number of blocks, though, which is 25.
Our repeated block is actually a humble Shoofly block. Isn’t it interesting what happens when you put the blocks side by side without any sashing? Hmmmmmm. Something to play with another day.
There are a couple different ways to figure out the new cutting measurements to make the 6″ finished block.
Redraw the block on graph paper
Divide the original cutting measurements in half (for example a 4″ square would become a 2″ square)
I don’t usually use graph paper for designing. Most of the time I use a combination of #2 and #3. It also helps if you have some experience with quilt designing.
Shoofly is an easy one to resize, which is why I chose it for this illustration. Because it’s a Nine Patch block, we know that each of the 9 squares in the block will end up being the same size, so we will divide 6″ by 3 (3 squares across, 3 squares down) which equals 2″. Each “square” should finish at 2″. So, we will cut the squares at 2 1/2″ x 2 1/2″ (the 1/2″ is for the seam allowance, so the finished size of the square is 2″ x 2″).
Now what about the Half Square Triangle (HSTs) in each corner? They have to finish at 2″ x 2″ in order to fit properly into the 6″ finished quilt block.
Aha! You do need to know a little bit about quilt math here. Rule of thumb for HSTs is to add 7/8″ to the finished size (to make room for the seam allowance and cutting). So we’ll simply just add 7/8″ to our 2″ finished squares and we get a cutting measurement of 2 7/8″ x 2 7/8″ for our HSTs. Not sure how to sew HSTs? Check out our 2023 Quilt Block Basics Series HERE. Some folks even like to cut their squares a bit larger and then trim them down to the correct size. Do likewise if you prefer.
Something to remember — not all quilts can easily be resized. Who wants to work with pieces that end up needing to be cut 3 5/22″ in size??? Definitely NOT me!
Now that I’ve totally confused you (sorry, not sorry), let’s do the tutorial for Eclipses — the method of construction is the same whether it’s full-sized or mini.
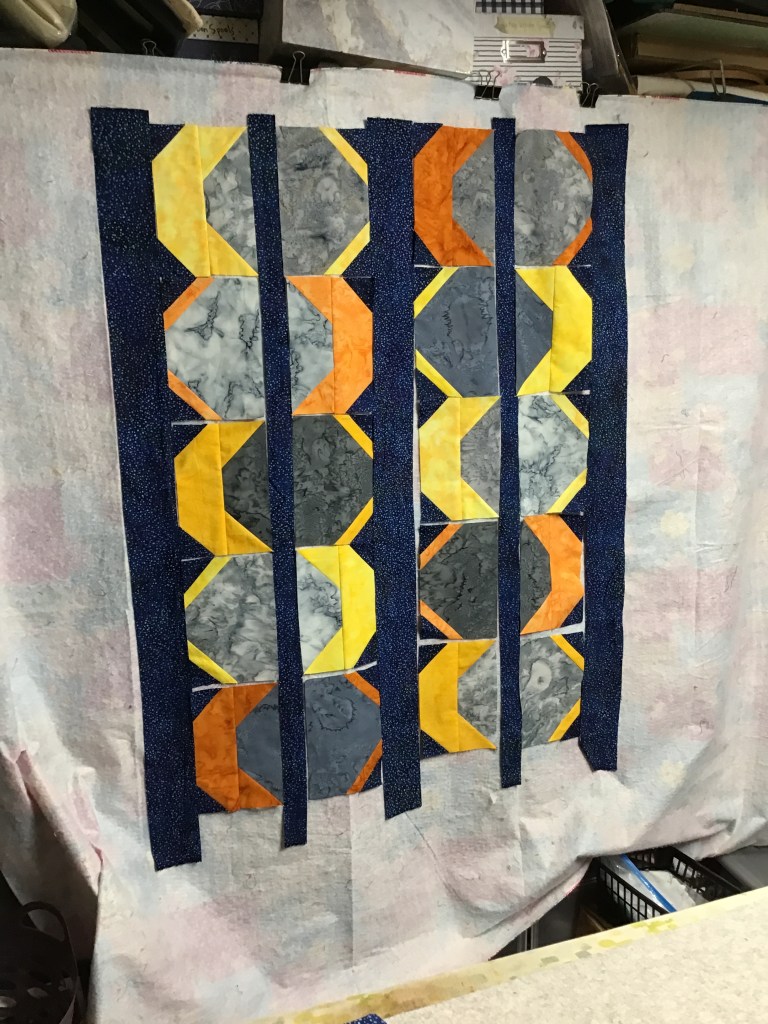
VRD Eclipses Quilt Tutorial
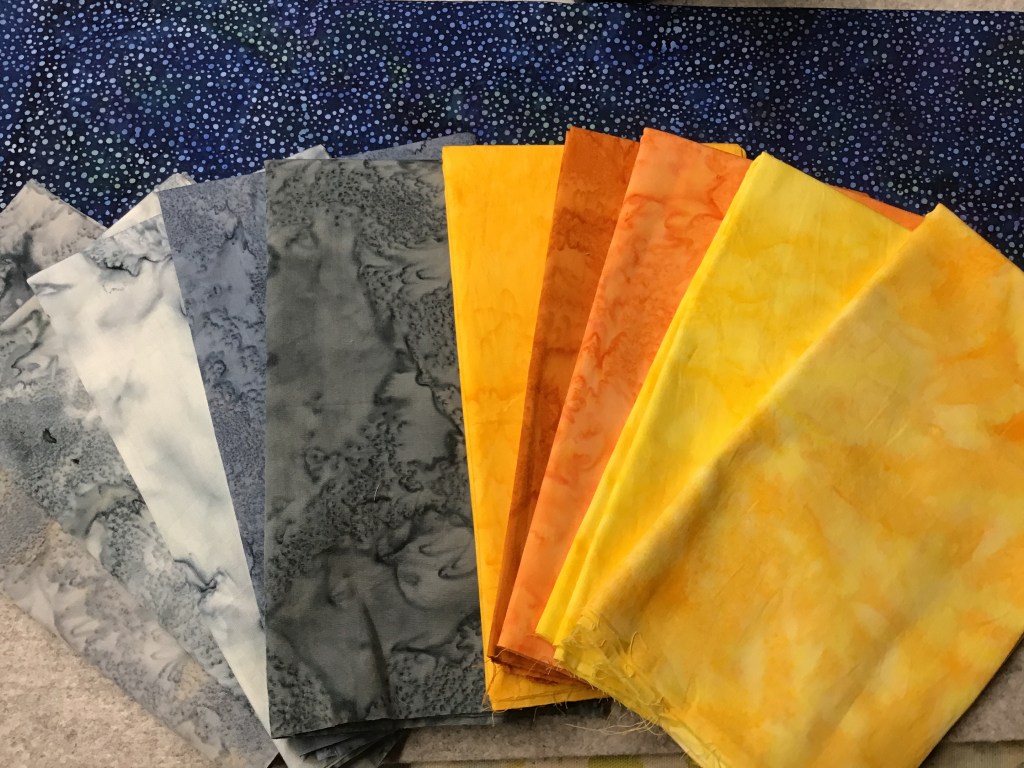
Here are my yummy fabrics for my Eclipses quilt — 1895 Watercolors from Hoffman Fabrics with an 885 Dot rich blue for the background. I love the Dot batik for the background because it actually has little pops of other colors to add lots of interest.
So let’s get started by cutting out all the pieces for the quilt. I do like to cut everything for the blocks before I sew. I save cutting borders until the end if a quilt has borders, though. That way, I don’t have to stop between steps and keep cutting the fabrics I need next. It saves time for me as well as keeping all my pieces organized.
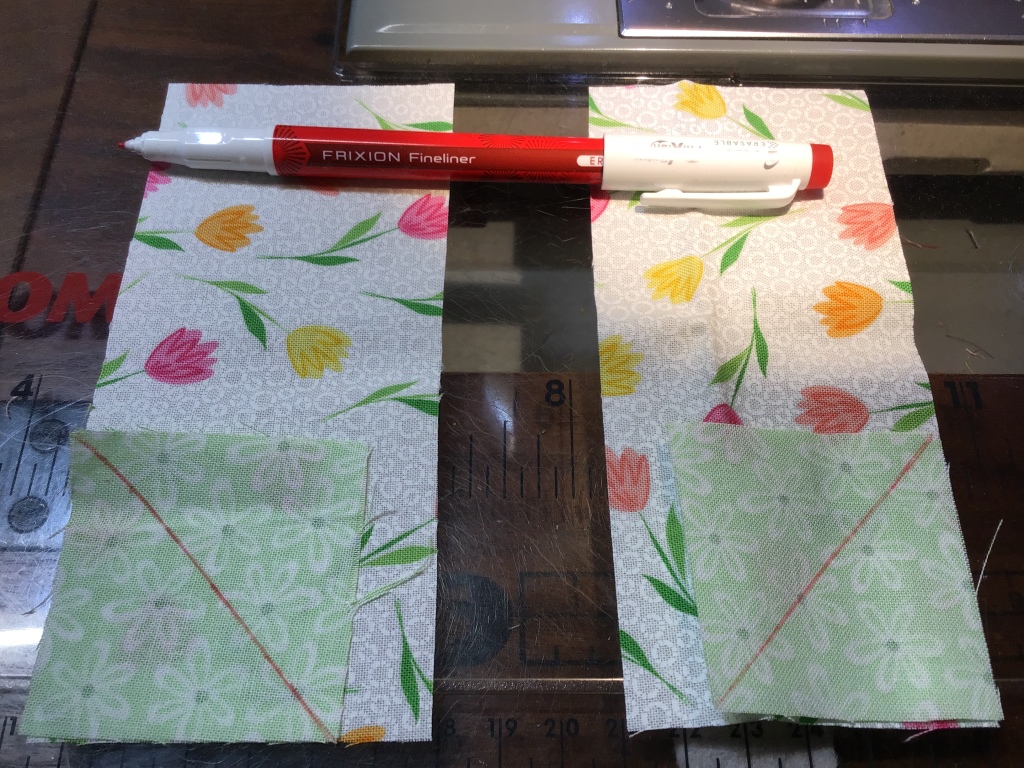
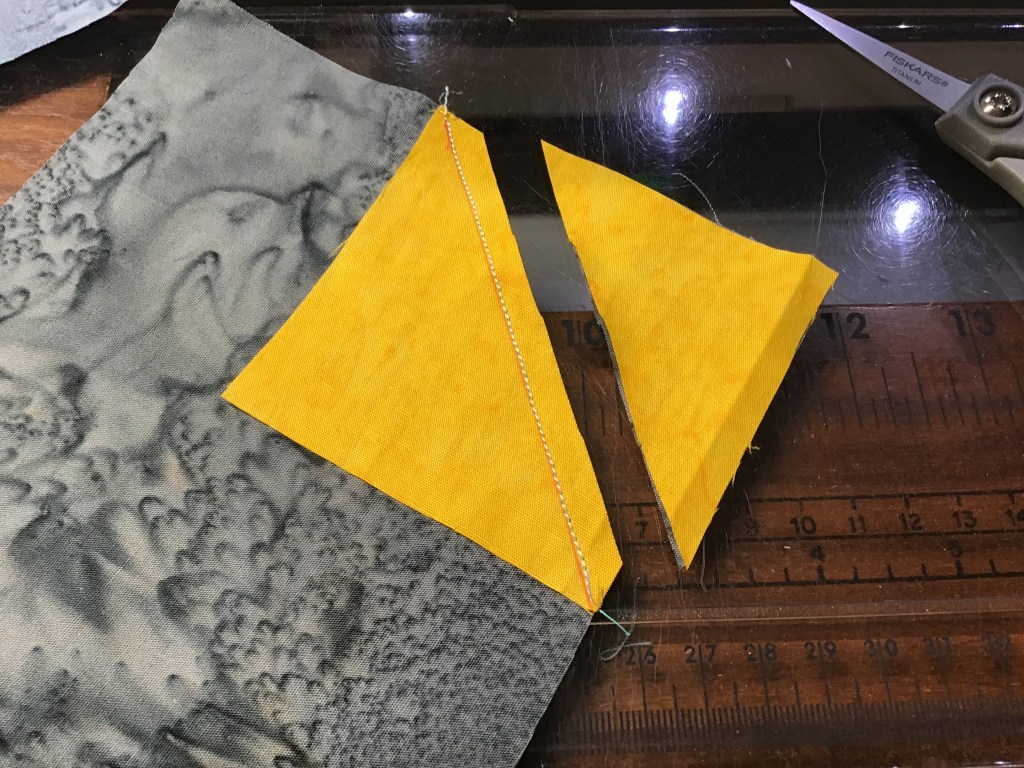
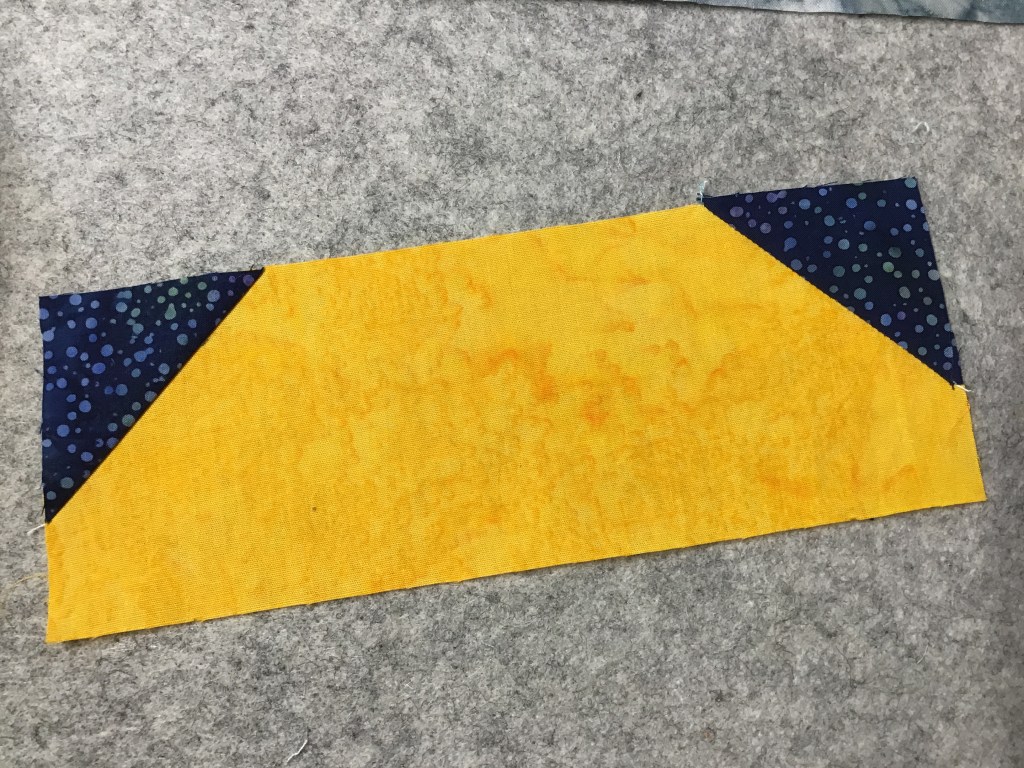
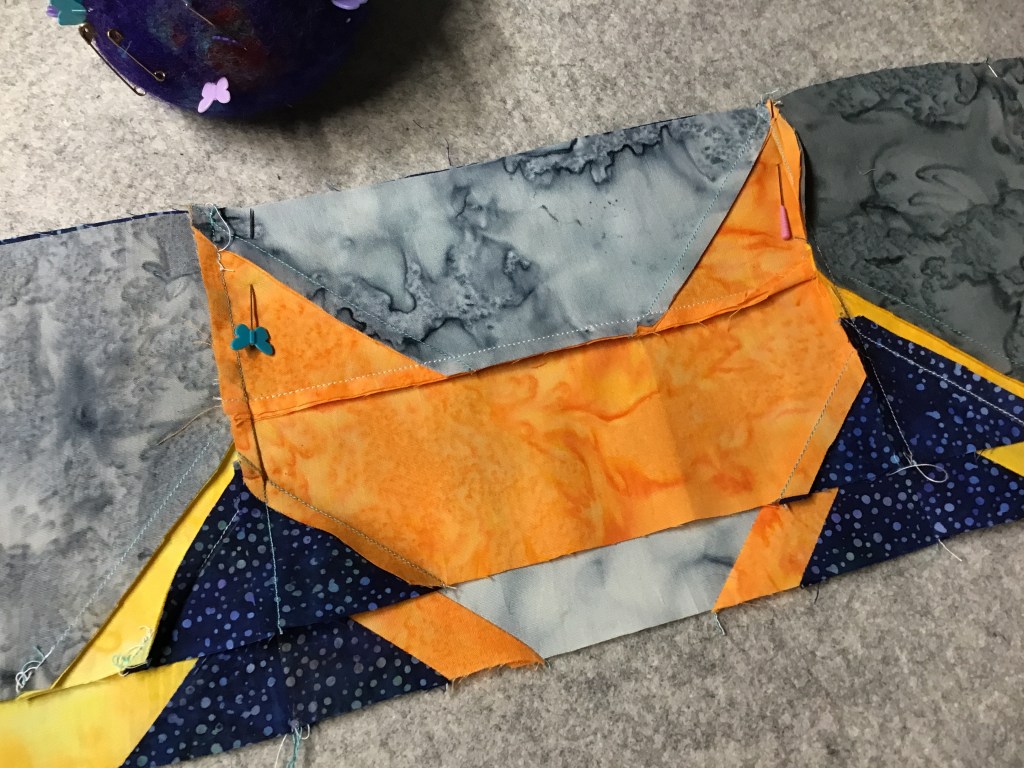
First up is to add yellow/orange “flippy corners” to my grey rectangles. I draw a diagonal line from corner to opposite corner and SEW ON THE LINE. I really like to use my Frixion Pens for this step. I love to have a lot of different pen colors to use on different colors of fabrics — besides, lots of colors just makes me happy. Here, I’m using red.
Trim 1/4″ away from the sewn line. Then open and press.
But wait! We’re not done with our “flippy corner” yet! We’re going to add another, smaller “flippy corner” to our yellow/orange corner.
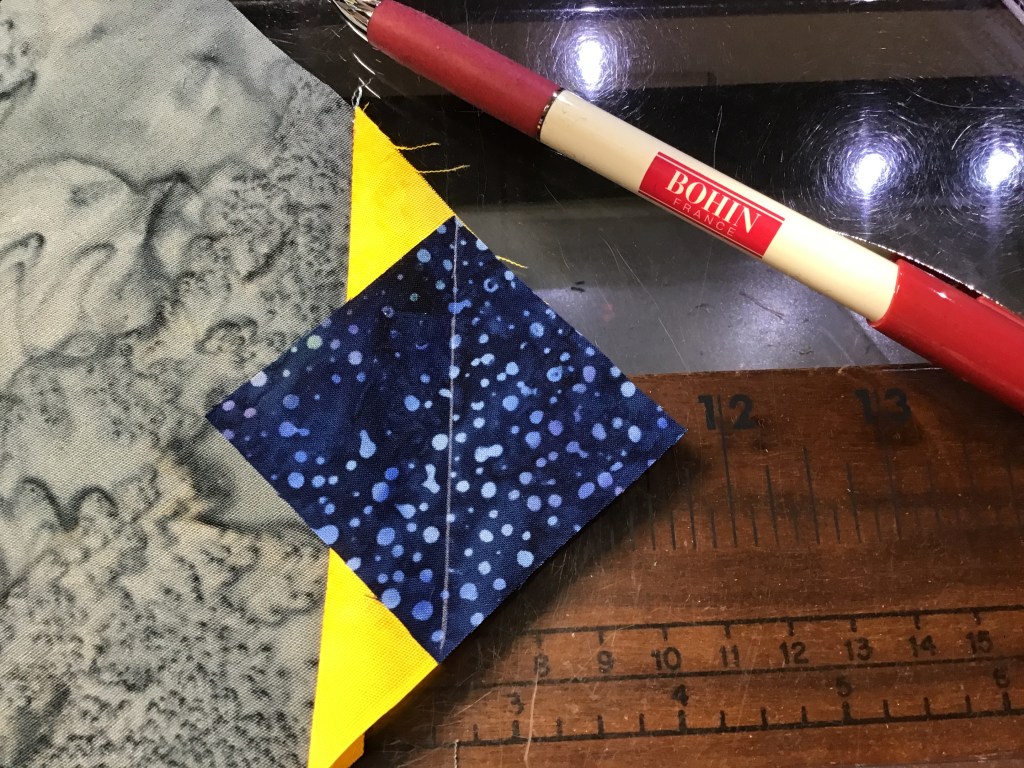
Uh oh! Now what? I won’t be able to see my red Frixion pen on the blue background. Sadly, there isn’t a white Frixion pen, so I use my trusty Bohn Chalk Pencil, which is white so it will show up on the dark blue background square.
Okay, layer that background square on the yellow/orange corner. Draw a diagonal line from corner to opposite corner and SEW ON THE LINE once again. Trim 1/4″ beyond the line. Then open and press.
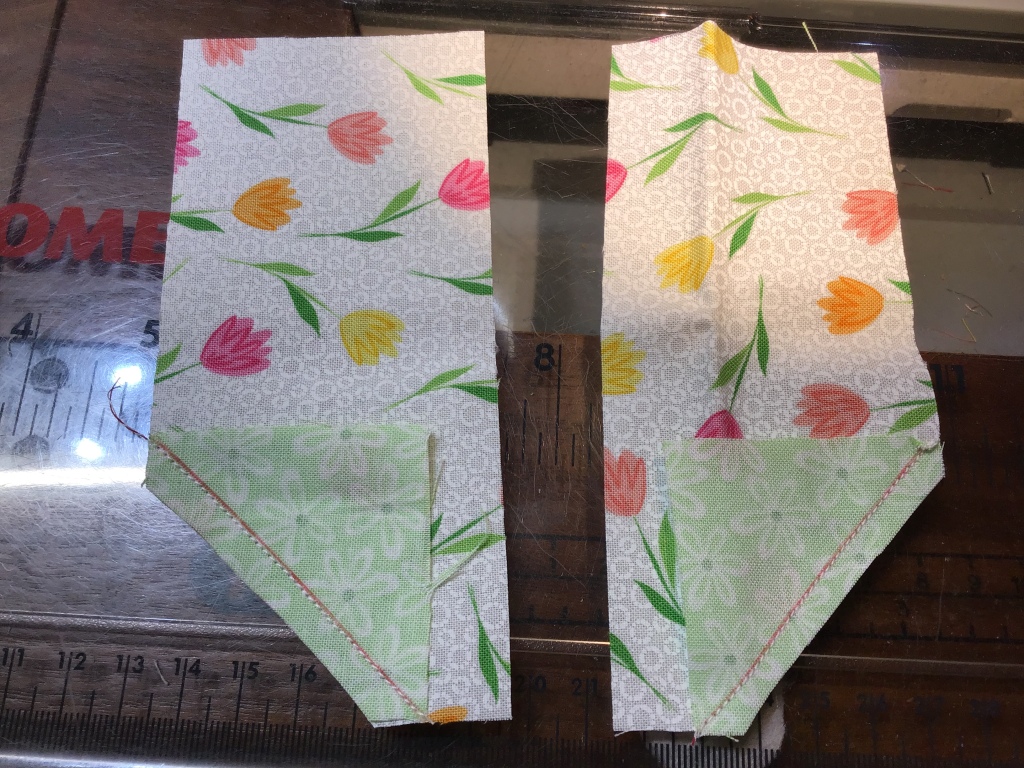
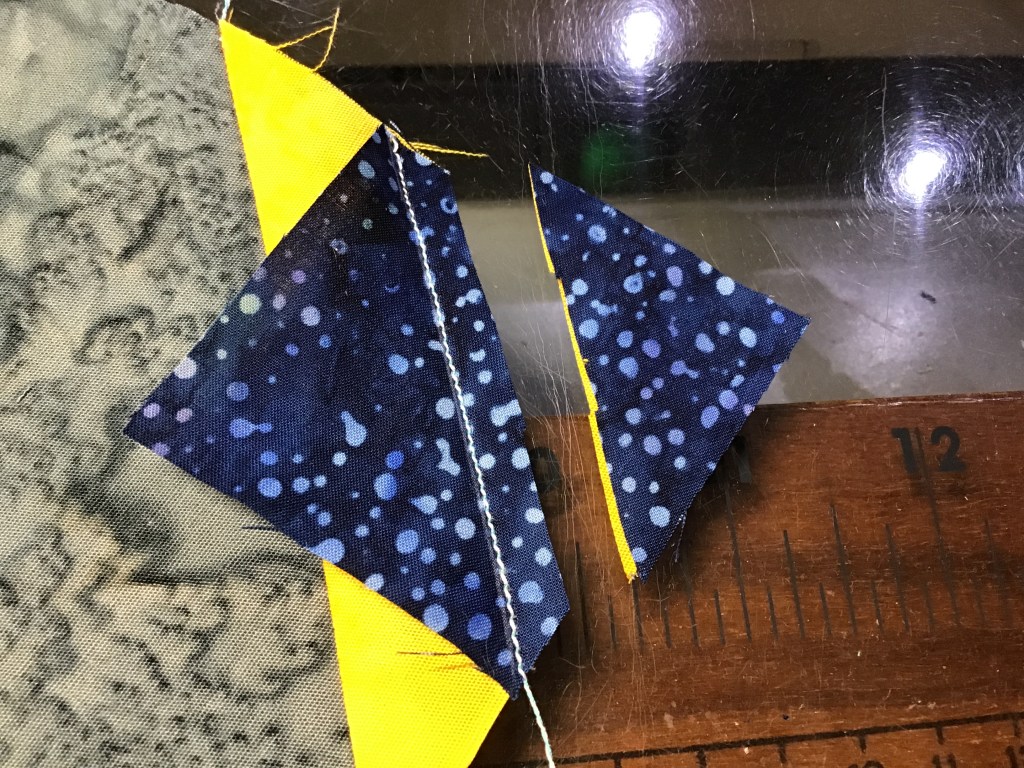
Go ahead and repeat for the all of the large grey rectangles on 2 sides.
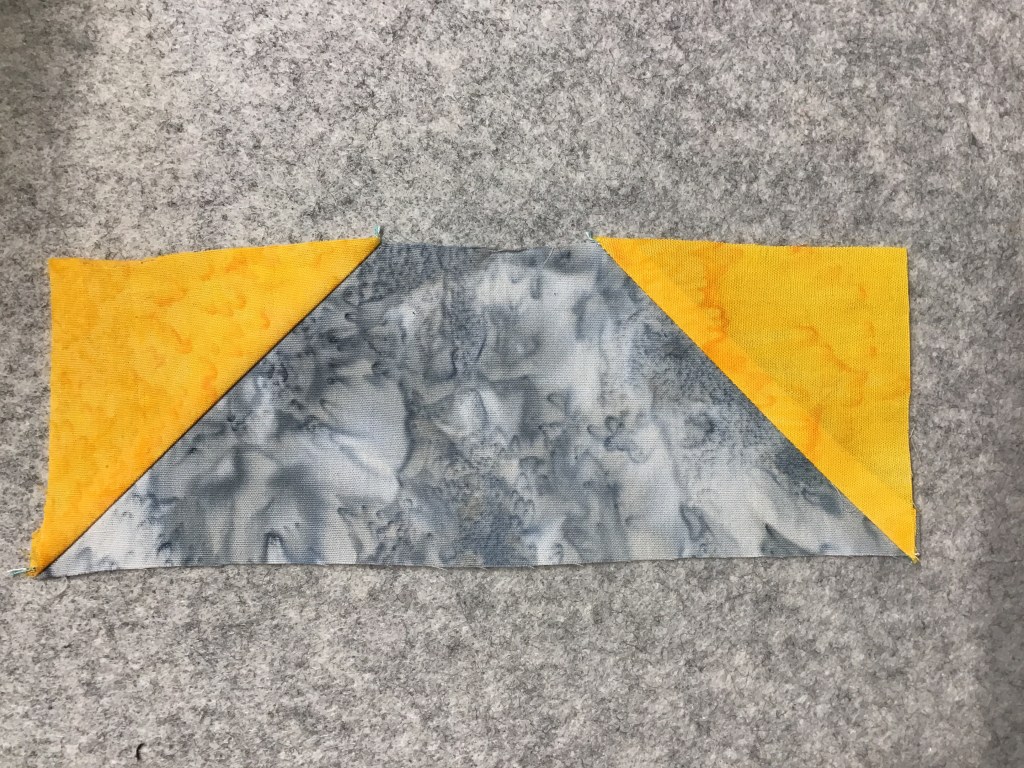
Moving on, we have MORE “flippy corners to do”. In fact, we have to add “flippy corners” to ALL of the rectangles. Add background corners to the yellow/orange rectangles and yellow/orange rectangles to the narrow grey ones.
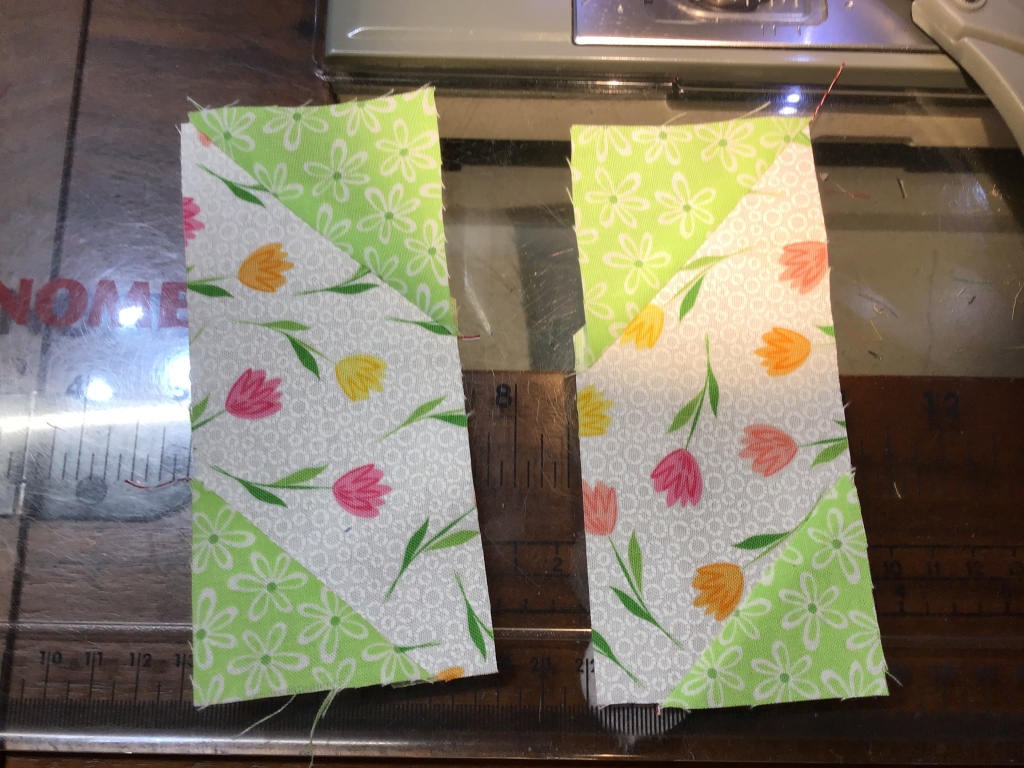
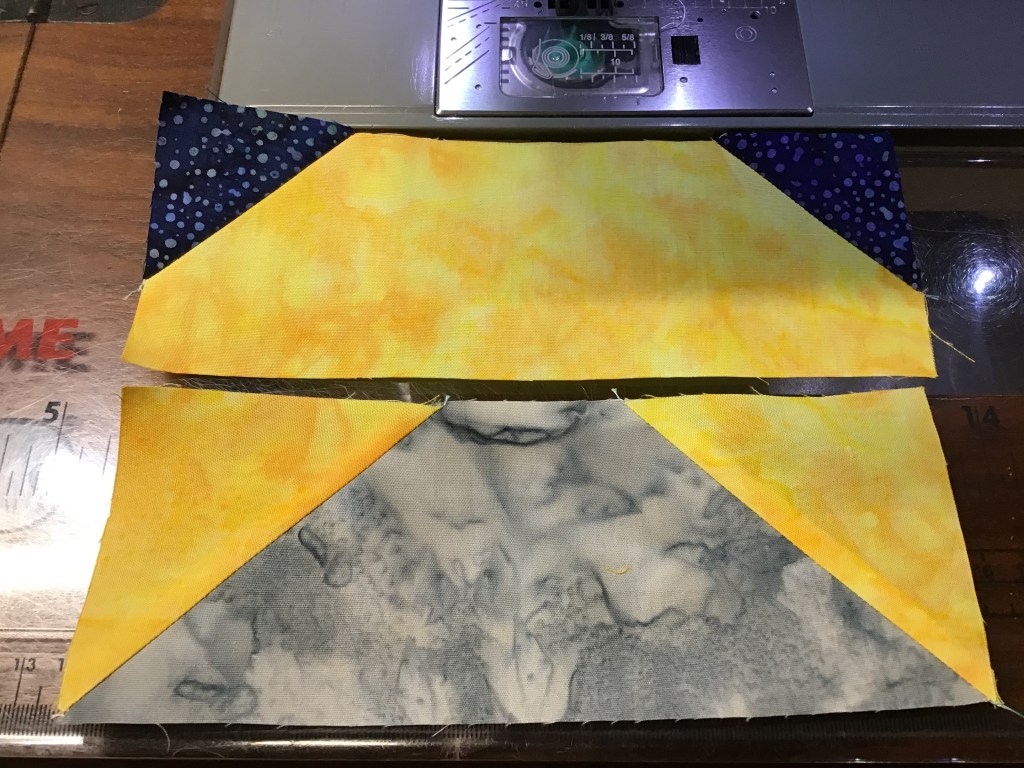
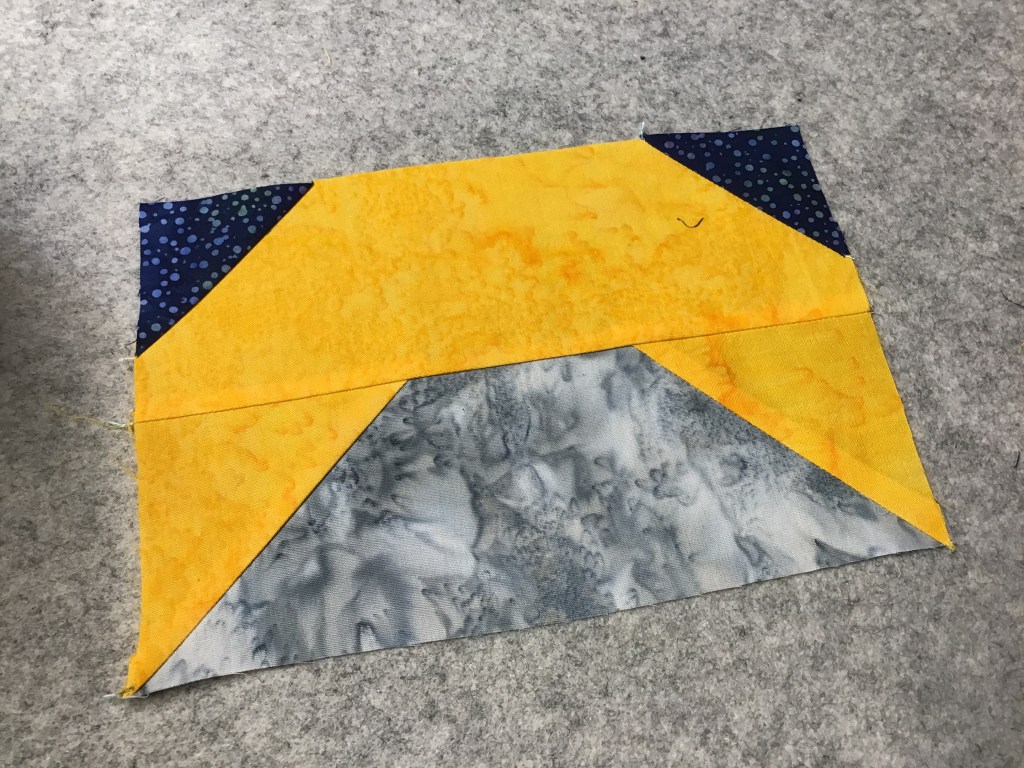
Sew the 2 units above together into a block. Repeat for all the narrow rectangles.
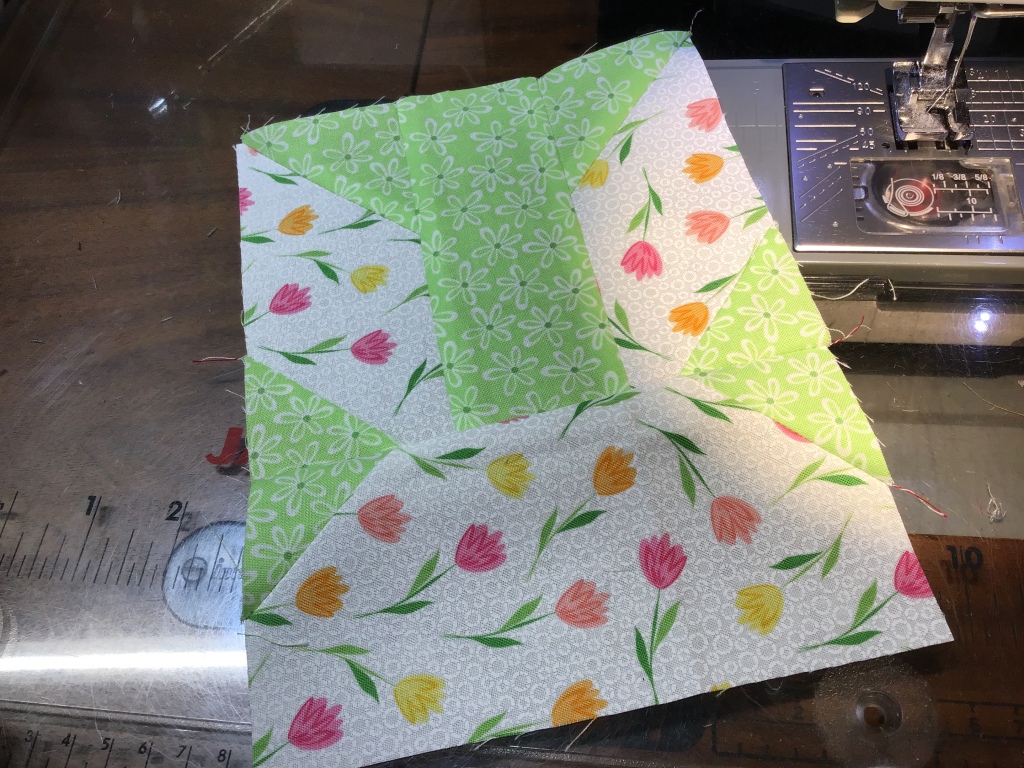
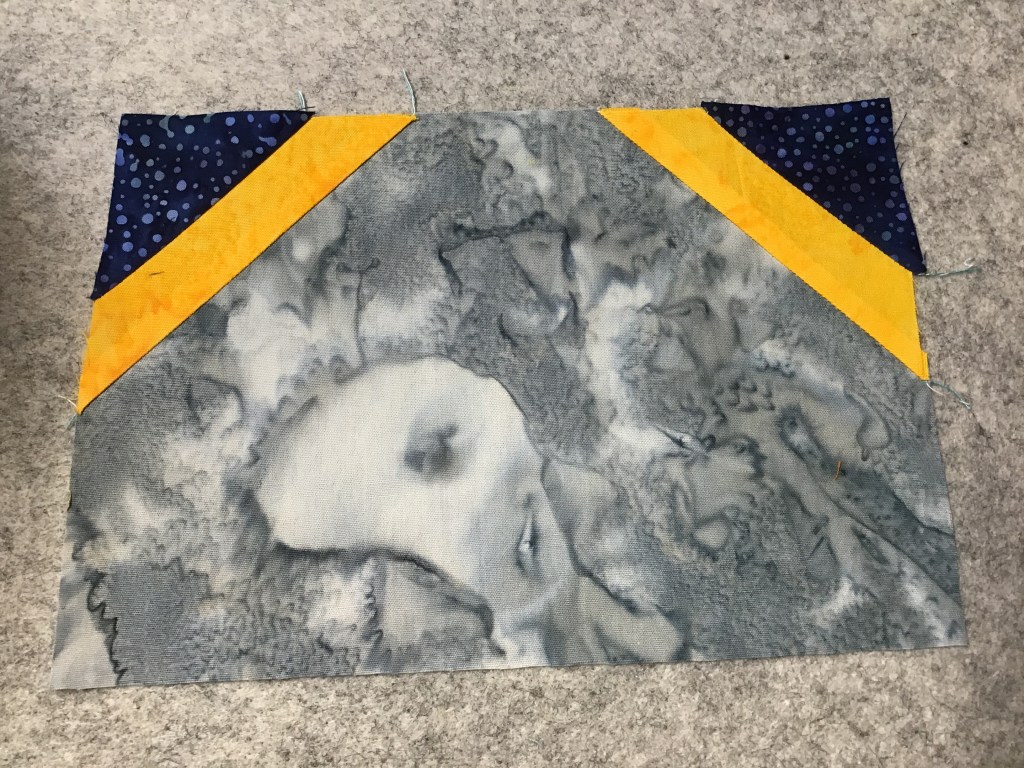
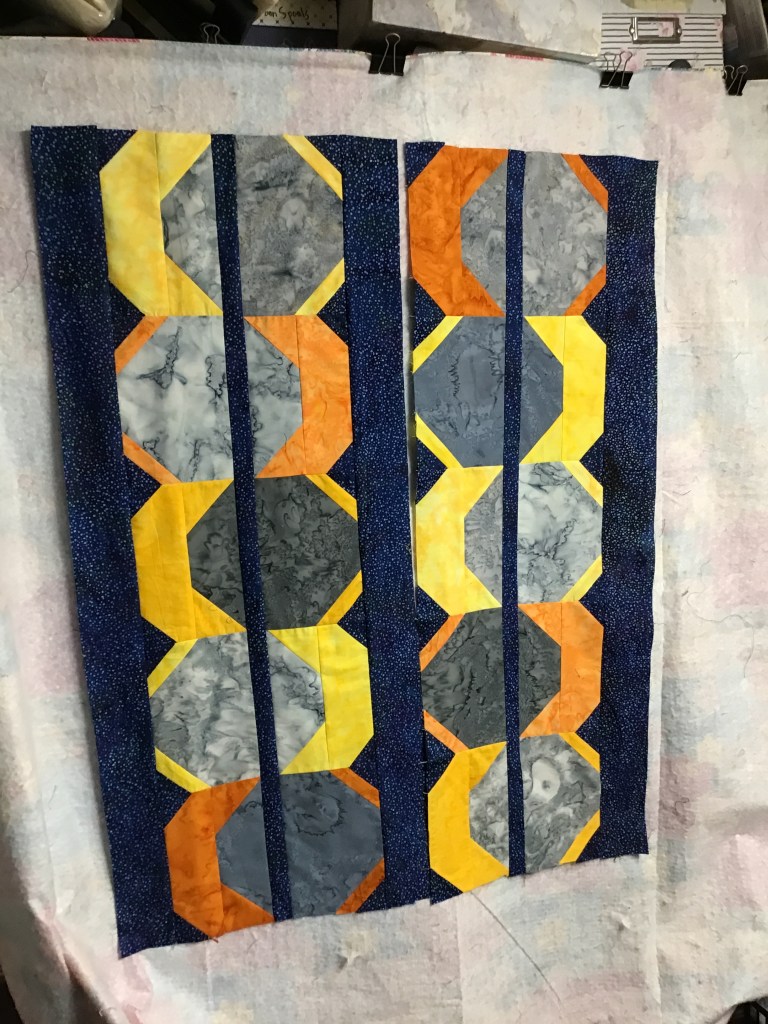
Yay! Here’s my favorite part — slapping them up on the design wall and rearranging them until I like what I see. Make sure to follow the diagrams on the pattern so your blocks are lined up correctly. Don’t forget the sashing and side borders.
I like what I see — the orange is distributed nicely and adds a good pop of color. Let’s SEW! I am going to start with the left side of the quilt, but I am taking the left background sashing down until I’m ready for it in a few steps.
I’m going to sew the blocks bottom to top to make a vertical row (which might feel a little weird if you’re used to sewing horizontal rows). Don’t forget to press your row. (One thing I really like about working with batiks is that they press so crisply that I don’t need any pressing spray to flatten them, which saves a bit of time). I am going to go ahead and repeat this step with the right side blocks.
Now I’m going to sew the narrow background sashing strip between my vertical block rows. I’ll look one more time before I start pinning so that everything is lined up.
I like to make a crease in the center of my pieced strip and the sashing strip because it helps keeps things aligned. Then I match up the center creases and put in a pin. Next I pin the ends together and add a few pins in between the center pin and the end pins. This helps to distribute any fullness and make my pieces more plumb.
After pressing the seam towards the background sashing strip, I’m going make a center crease in the right side pieced strip. Then I’ll use those center creases again to line up the right side pieced vertical strip with the narrow background sashing strip. By lining up the center creases again, this will help to make sure both sides of the pieced strips are across from each other and not skewed.
In the photo below you can see how well my blocks are lining up by matching the center creases.
WOW! It’s coming together and starting to look like the cover quilt. Yippee!
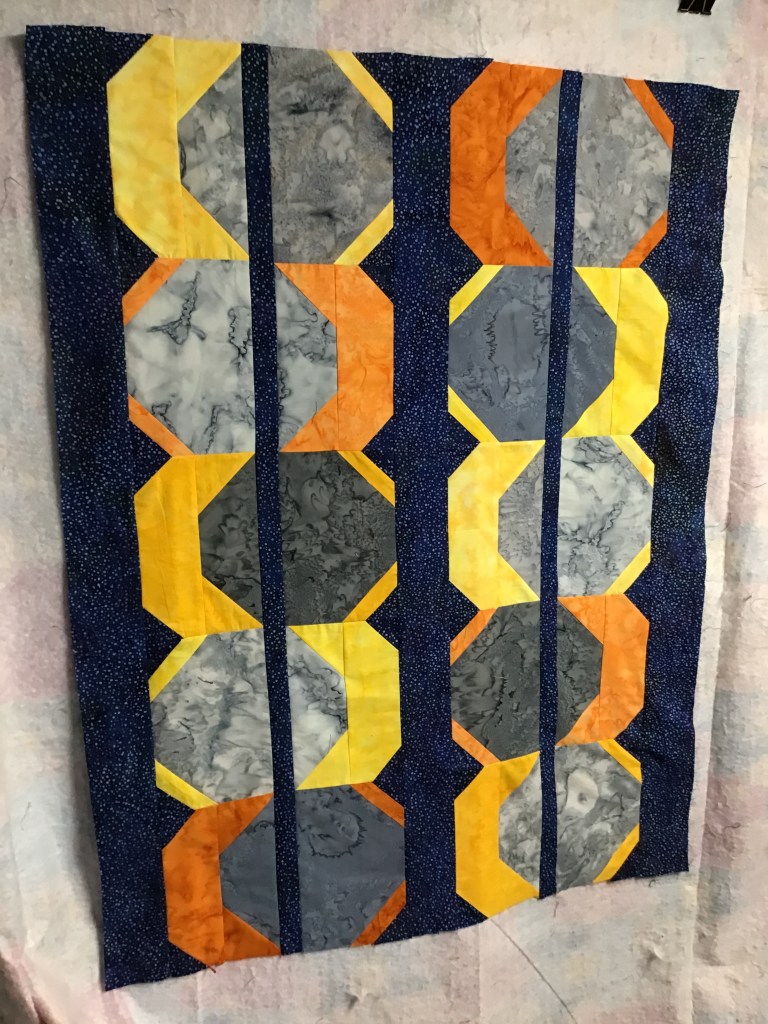
Now let’s add wide background sashing strips to the left and the right of my quilt section. Again, crease and line up the centers.
Whew! First section of the quilt is done, now let’s repeat for the right half of the quilt.
Almost there……….now I’m going to sew the right section to the center wide background sashing, creasing those centers and matching them up so everything fits together nicely.
VOILA! Here is my wall quilt sized Eclipses quilt top. I wonder if I can get it finished by Monday the 8th?
I really like how it turned out! What do you think?
Well, that’s it for me this week. I hope you get to see the eclipse on Monday, April 8th. Here’s hoping the skies won’t be cloudy so we can all breathlessly witness time standing still for a moment.
I can’t believe that a week has passed since we began our second VRD Blog Hop. It’s been Sew Much Fun! And FAST, too!
Our participating bloggers have shared their VRD quilts, tips and tricks, and inspiration by the boatload — just what we all needed to help us jump-start a new fun project! You can visit Villa Rosa Designs HERE to see our catalog of over 600 Rose Card patterns for even more inspiration as well as kits and fabric galore.
Here’s the special VRD Rose Card collection curated for our Fast & More Fun Blog Hop:
Get your own Pattern Set HERE or you can comment on all the participating blogger sites to register to win your own set.
Interested in seeing the patterns we selected for our very first Blog Hop in 2023? You can see them HERE.
While we are still Hopping, let me show you one of my next blog tutorial projects. I am planning to make 31 with this brand new collection by Satin Moon Designs for Blank Quilting. The collection is called Holiday Style and it is coming to a quilt shop near you in May 2024, so start planning your projects now.
You’ll have to stop back to check out my 31 tutorial sometime after the Blog Hop is all wrapped up and all the prizes are shipped.
Hey! Did you know we do tutorials on this blog??? You can see which VRD patterns we’ve done so far by finding the Tutorials link under the Blog Topics category over on the right side of the blog. Want to see a tutorial for a specific VRD Rose Card pattern that we haven’t done yet? Just ask and we’ll see what we can do.
Bloggers and Sponsors
GROUP HUG! An enormous hug goes out to all of our 28 amazing bloggers for participating in the 2024 Blog Hop and showing us their own spin for the VRD Rose Card patterns above. Thank you, Bloggers, for taking the time to be part of the second VRD Blog Hop!
PSST!A quick reminder from the bloggers — if you posted a comment as “anonymous” and/or did not include an email address, then PLEASE PLEASE PLEASE revisit the blogs where you posted and leave another comment with a contact email address. Sadly, with no email address, there is no way to contact you if you win. Comments will close midnight on Sunday, March 24th.
Here is our Blog Hop Schedule again in case you missed any participating blogs or need to add last-minute comments:
NEWSFLASH! — There’s ONE MORE blogger surprise just for you! Our lovely sponsor, Hancock’s of Paducah, just created a blog to share their delight and excitement about Villa Rosa Designs Rose Card Patterns. You can stop over to cheer them on HERE. They aren’t able to accept comments at this time, but they know that you’ve been registering on all the other blogs for prizes. Enjoy one last stop….
And of course, need I mention all the prizes up for grabs??? See below for MORE PRIZES!
We couldn’t have done this Blog Hop without the support and generosity of our sponsors. Please join me in offering a round of applause for each of these lovely sponsors —
I’m bummed that our Fast & More Fun Blog Hop is wrapping up today. Sadly, all good things must come to an end sometime. And this Blog Hop really was a SUPER GOOD THING!
I really enjoyed reading each participating blogger’s post each day, didn’t you? I must confess that I read them over breakfast because I honestly couldn’t wait to see which quilt each blogger created! And I absolutely loved reading the comments on our VRD post as well as the comments on the other blogs. What fun!
THANK YOU to everyone who took the time to hop from blog to blog with us this past week. I hope you really enjoyed the Fast & More Fun Blog Hop with more quilts, more inspiration, and of course more prizes. And I hope that you discovered new quilty friend bloggers to visit on the ‘Net.
If you haven’t finished reading all 28 blog posts for the Hop and/or leaving comments on each to register for prizes, you have through Sunday, March 24th, to do so. Use the links above to visit each participating blogger to catch up on your reading and your prize entries.
Winners will be drawn next week and notified. Please be patient with us as we navigate the shipping process. And we will post all the winners just as soon as the winners are selected and prizes are shipped.
One Last VRD Fast & Fun Blog Hop Giveaway
Let’s review all the prizes that are up for grabs for our Blog Hop:
Everyone, Everywhere is eligible to win prizes and there are several opportunities for you to win prizes:
Individual bloggers may be hosting giveaways on their blogs for you to win. Please visit these bloggers to find out about their giveaways and how to register.
Villa Rosa Designs is giving away a 2024 Blog Hop Rose Card pattern collection on each participating blog (International card set winners will receive a digital collection of the patterns).
Sponsor prizes have been donated by our lovely Sponsors, above, and even from some of the bloggers, too! These prizes are divided into 2 different categories —
5 Grand Prizes — Yup, I added another one to the Grand Prize list!
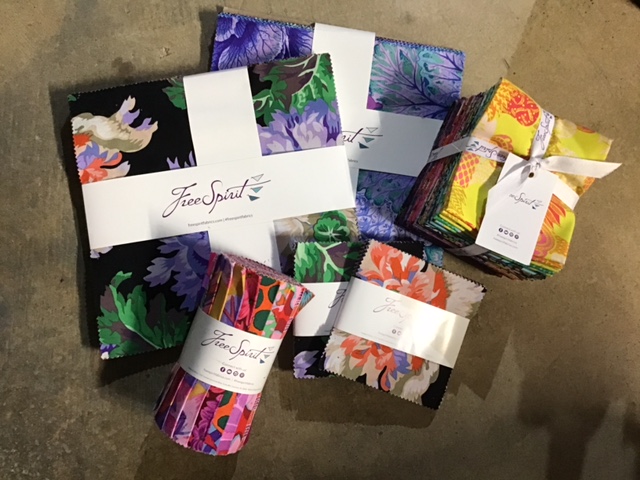
Kaffe Fasset Precut Collection
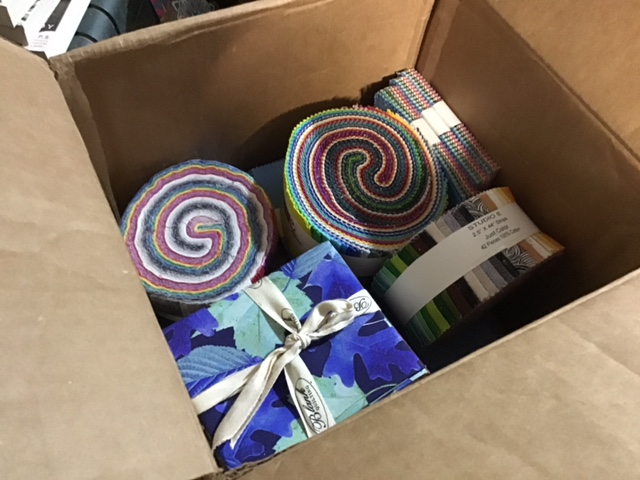
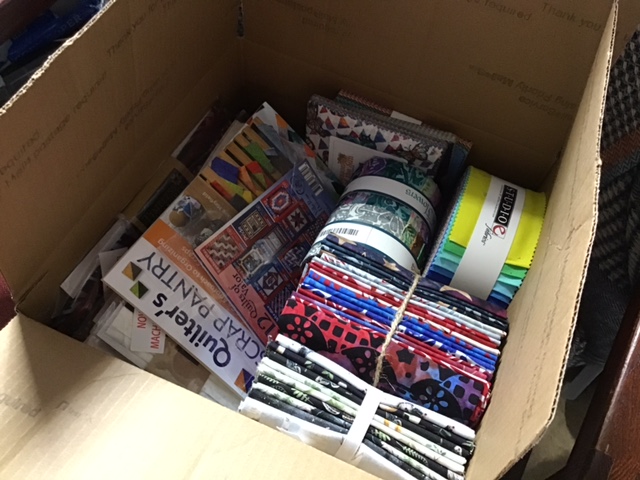
Big Box filled with mystery quilty goodies
$100 digital gift certificate to Hancock’s of Paducah
Electric Quilt 8 Download (winner to be selected on the EQ blog HERE)
An Eversewn Sparrow 25 Sewing Machine from Jaftex (winner will be selected on Scott’s blog HERE) — this was a happy surprise addition to the Hop Prizes, so make sure you get registered
Individual Prizes (each blogger will select 3 winners on their blog) which may be precuts, books, notions, or other cool quilty goodies.
WOWZER! That’s a lot of chances to win prizes so I hope you comment on ALL the blogs to increase your chance of being a winner. No purchase is necessary to participate in the Blog Hop or to win prizes, but please make sure you leave your email address on your comment or else we can’t contact you if you are a winner
Now, how about ONE LAST GIVEAWAY???
3 MORE QUILTS!!!
Left: Jubilee 45″ x 60″
Middle: Kalinda 45″ x 54″
Right: Star Spangled 48″ x 60″
In addition to the 3 quilts above, we will be giving away a set of the Fast & More Fun Rose Card Patterns and 3 commenters will be added to the Grand Prize drawings.
Here’s how to win one of these finished quilts:
You have up to 3 chances to win the quilts listed above on this blog post. Please leave a single comment for EACH of these categories (if you comment that you loved the hop, you are a blog follower, and hang out at VRD on Facebook all in one comment, it will only count as one chance to win).
1. Leave a comment onthis post and tell us your thoughts about the VRD Fast & More Fun Blog Hop.
2. Become a blog follower/subscriber and leave a comment on this post telling us that you are a blog follower/subscriber ( if you already follow — thank you — just leave a comment letting us know).
3. Join our VRD Facebook group and leave a comment on this post telling us you joined our FB group (if you are already a member — thank you — just leave a comment letting us know).
Ready! Set! GO!
Please note that to be registered to win any prizes on this blog, you first must leave a comment. To leave a comment, you will need to click on the comments link just under the blog title at the top of the blog OR you can find a comments link along the side of the blog post towards the bottom right. After you click the “comments” link, you need to scroll all the way down to the bottom of the comments in order to find the space to leave your own comment. Be patient — there may be a lot of comments to go through until you get to the bottom.Thank you.
Don’t forget — registration for prizes closes Sunday, March 24th.
Winners will be selected randomly next week and will be announced once all winners have been contacted.
PLEASE MAKE SURE TO INCLUDE AN EMAIL ADDRESSIN YOUR COMMENTSO WE CAN CONTACT YOU IF YOU ARE A WINNER!
Well, Quilty Friends, I thank you for hopping along with us this past week. I sincerely hope you had as much fun as we did! And I invite you to come back and visit the Villa Rosa Designs blog, Villa Rosa Quilts. We have SEW much fun here!
Let me rephrase that — Happy Blog Hop Kickoff Day to you!
Hi there! I’m Tricia, your Villa Rosa host for the Blog Hop. All of us at Villa Rosa Designs are tickled pink (and all the colors of the rainbow) that you are here to come along on a fun quilting adventure — our second Blog Hop here at Villa Rosa Designs. We’re calling it the Fast & MORE Fun Blog Hop.
You all know the saying — “Go big or go home?” We’re going B – I – G this year just for you! More Bloggers! More Fun! More Quilts! More Inspiration! More Prizes!
We have a super talented group of bloggers ready to share some awesome quilts made with Villa Rosa Designs (VRD) Rose Card patterns.
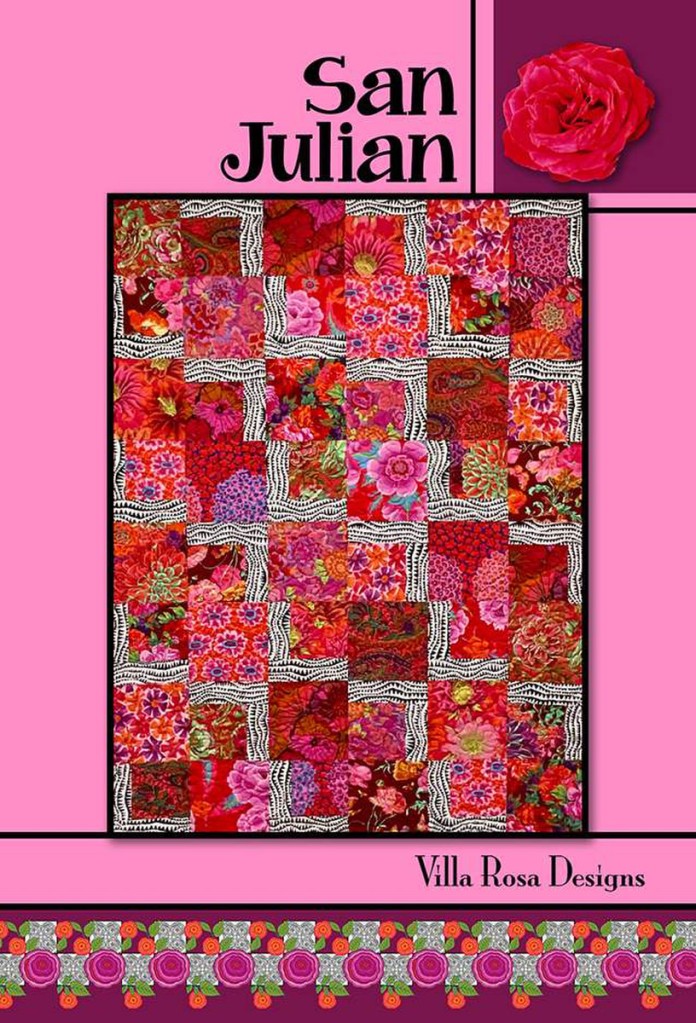
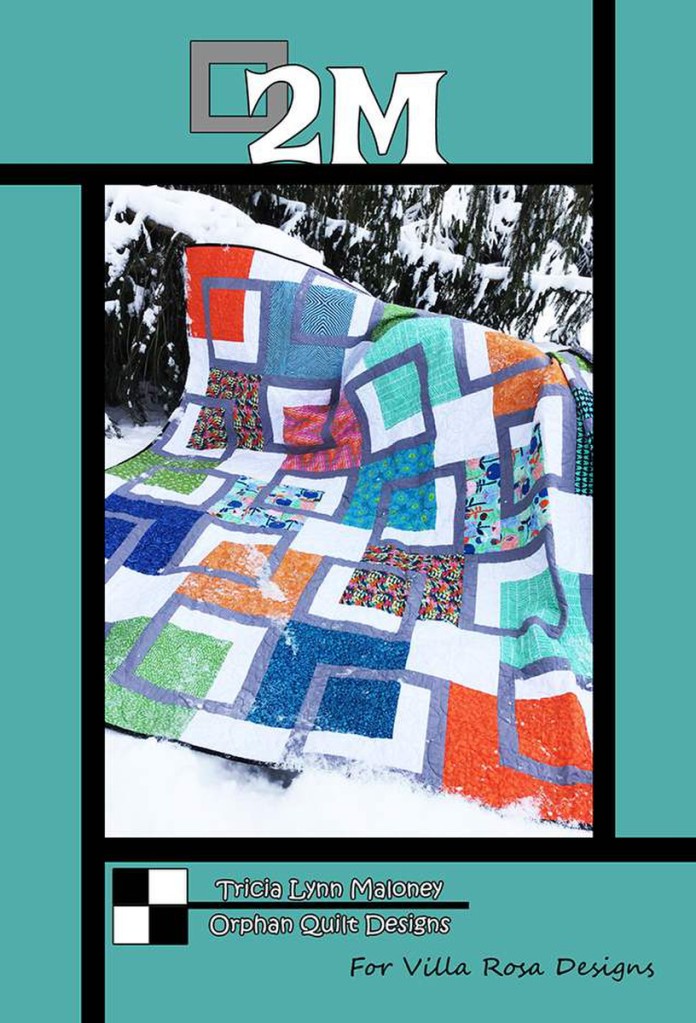
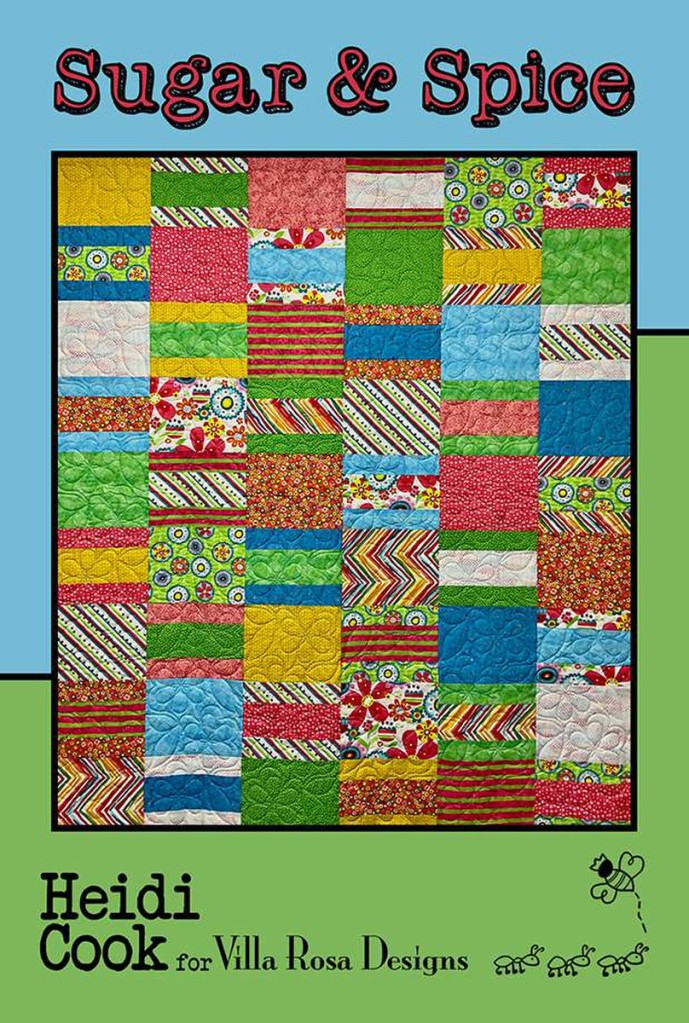
In fact, we’ve put together a special collection of 5 patterns just for this Blog Hop!
Here are the 5 patterns in the 2024 Fast & Fun Blog Hop Collection:
Lucky you! You can purchase a set of these 5 patterns HERE. Or visit our website HERE for even more great Rose Card patterns (over 600 of them).
Or you might just win a set. READ ON to find out how!
Villa Rosa Designs is the brainchild of owner and Rose Queen, Pat Fryer. Pat wanted to create Fast & Fun, affordable, and high quality patterns for quilters featuring precuts like 1/2 yards, fat quarters, 10″ squares, 5″ squares, 2 1/2″ strips, fat eighths, and fat sixths as well as other fabrics like panels and novelties.
Since its launch in 2010, VRD has become much more than a handful of easy-to-make quilt patterns. Rose Cards, Villa Rosa’s signature postcard-sized patterns, combine great design with simple packaging and an attractive price, making Rose Cards one of the best selling pattern brands on the market today! And since 2010, Villa Rosa Designs has grown to include a collection of very talented designers, each with their own unique style.
Now that you know a little bit about Villa Rosa Designs, let me tell you about the VRD Fast & More Fun Blog Hop!
What the Heck is a Blog Hop???
Good question and an easy one to explain. Most of you probably already know what a shop hop is (and may have participated in one before), where you travel to each shop participating in the event. There’s usually giveaways and a special pattern to collect at each shop.
A blog hop is very similar to a shop hop — instead of going from shop to shop, though, you go from blog to blog. You will usually find some kind of theme to a blog hop with opportunities to win prizes. And you can even hop from blog to blog in your jammies from the comfort of your own home. Yippee! Count me in!
Let’s HOP!
We’ve teamed up with the most awesome group of bloggers! They have accepted the Blog Hop challenge to create at least 1 of the 5 Blog Hop Rose Card patterns above. To see which blogger has created which pattern, you’ll have to visit EACH blogger during the hop which runs from today, March 14th through next Thursday, March 21st.
You will have the opportunity to win lots of great prizes during the blog hop! All you have to do is hop from blog to blog every day from March 14th through March 21st following the Blog Hop Schedule, above, to see which quilt each blogger made and to find out how to register for prizes on each blog.
Registration for prizes will close on Sunday, March 24th.
Before I jump into all the cool prizes you might win, I want to take a moment to thank all of our incredible sponsors, who donated all kinds of quilting goodies for you to win. Thank you Sponsors! Without you, this Blog Hop wouldn’t be possible.
It is free to participate in the Hop and there is no purchase necessary. Everyone Everywhere is invited to Hop along with us this week and register to win prizes.
There are many opportunities for you to win prizes during the blog hop:
Individual bloggers may be hosting giveaways on their blogs for you to win. Please visit individual blogs to find out about their giveaways and how to register.
Villa Rosa Designs is giving away a 2024 Blog Hop Rose Card pattern collection on each participating blog. International winners will win a digital set of patterns.
Sponsor prizes have been donated by our lovely Sponsors, above, and even from some of the bloggers, too! These prizes are divided into 2 different categories —
Grand Prizes (each blogger will select 3 entries to go into the Grand Prize drawings):
Kaffe Fasset Precut Collection
$100 digital Gift Certificate to Hancock’s of Paducah
A BIG BOX of mystery quilty goodies
An Electric Quilt 8 download — the winner for this prize will be selected on the EQ blog, so you will need to register there for this prize
Individual Prizes (each blogger will select 3 winners on their blog) which may be books, patterns, fat quarter bundles, 5″ squares, 2 1/2″ strips, 10″ squares, or notions — it will be a fun surprise, I promise!
WOW! That’s A LOT of prizes if you do the math!
Here are some photos of prizes to get you motivated! LOL!
Left: A Box filled with Individual Sponsor Prizes Center: The Kaffe Fasset Precut Collection Grand Prize Right: The Mystery Box of Goodies Grand Prize (most likely we’ll be adding more items before the Hop is over)
Sooooo, how do you win?
Hop from blog to blog using the schedule and links above from today, Thursday March 14th through Thursday March 21st and register for prizes at each blog you visit. The more participating blogs you visit and register at, the more chances you have to win prizes! It’s really that easy, I promise.
Winners will be selected randomly. Each blogger will select 3 names to go into the Grand Prize drawings and then 3 winners will be selected randomly to win from the bloggers’ entries. Each blogger will also randomly select 3 winners for the Sponsored Individual Prizes and 1 winner for a set of the Blog Hop patterns.
Prize registration closes Sunday, March 23 2024.
Winners will be announced just as soon as all winners have been notified. Prizes will be shipped as soon as possible. Please be patient if you are a prize winner, this process can take a little time.
Villa Rosa Designs Thursday March 14th Giveaway
Thank you for reading all the way through this post! As a reward, you can register to win QUILTS!
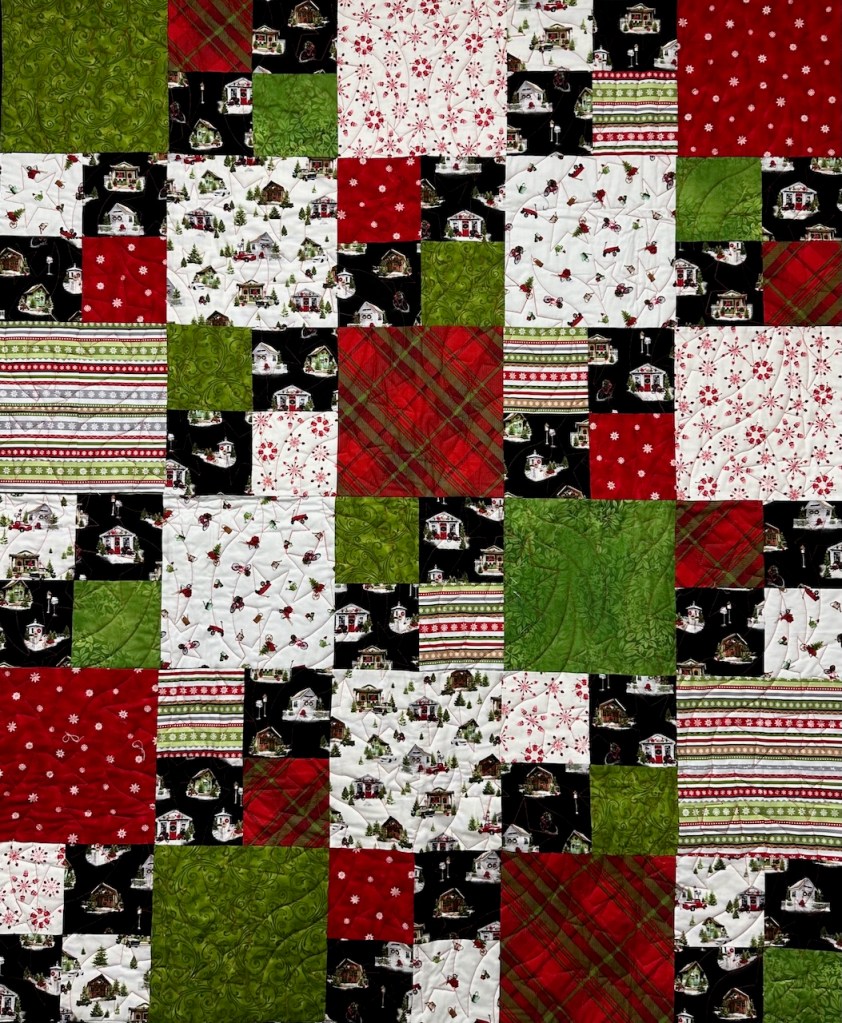
Left: Eden Rose 41×48 Center: Gingersnap 45×61 Right: Hey Day 60×80
These 3 quilts are made from Villa Rosa patterns and are completely finished — machine quilted and bound — and ready for you to enjoy. Awesome Applesauce!!!
Here’s how to win one of these quilts:
You have up to 3 chances to win the quilts listed above on this blog. Please do a separate comment for each of the following 3 opportunities — if you answer all of them in one comment, then it only counts as one comment. So sorry if this was not clear.
1. Leave a comment on this post and tell us what your favorite Rose Card pattern is (or one you would like to make if you’re new to VRD).
2. Become a blog follower/subscriber and leave a comment on this post telling us that you are a blog follower/subscriber (if you already subscribe — thank you — just leave a comment and let us know).
3. Join our VRD Facebook group and leave a comment on this post telling us you joined our FB group (if you are already a member of our FB group — thank you — just leave a comment and let us know).
In addition to the 3 quilts above, we will be giving away a set of the Fast & More Fun Rose Card Patterns and 3 commenters will be added to the Grand Prize drawings.
Please note that to be registered to win any prizes on this blog, you first must leave a comment. To leave a comment, you will need to click on the comments link just under the blog title at the top of the blog OR you can find a comments link along the side of the blog post towards the bottom right. After you click the “comments” link, you need to scroll all the way down to the bottom of the comments in order to find the space to leave your own comment. Be patient — there may be a lot of comments to go through until you get to the bottom.Thank you.
Ready! Set! GO!
Don’t forget — registration for prizes closes Sunday, March 23rd.
PLEASE MAKE SURE TO INCLUDE AN EMAIL ADDRESSSO WE CAN CONTACT YOU IF YOU ARE A WINNER!
Well, Quilty Friends, I thank you for reading the whole way to the end.
Good luck to each of you and please enjoy the Blog Hop! Don’t forget to stop back each day of the Hop to follow the links to bloggers for that day.