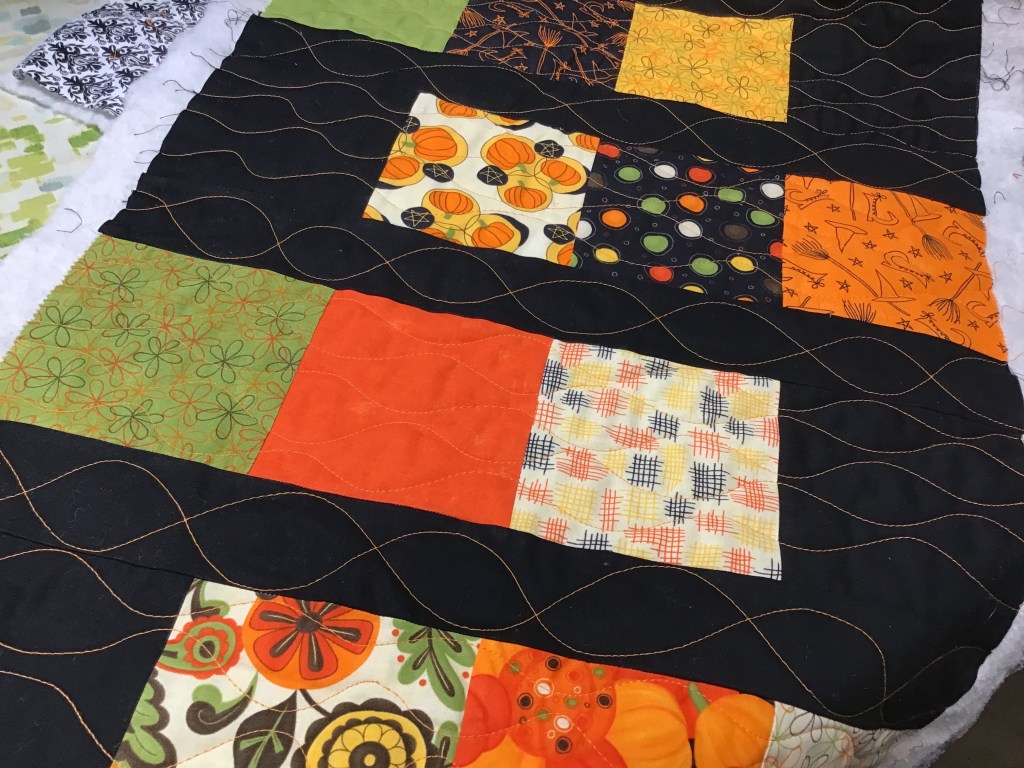
I was so excited after last week’s post about Panels and our Villa Rosa Rose Card patterns that work for panels, I just had to play with my stuff! I decided to go ahead and get the top done for Hypnotized, using my adorable Halloween Gnomes,. Who doesn’t love gnomes???? I just had to, I didn’t want to wait until next year, although I might not get it quilted and bound until next Halloween.
If you missed last week’s Panel Post, you can find it HERE.
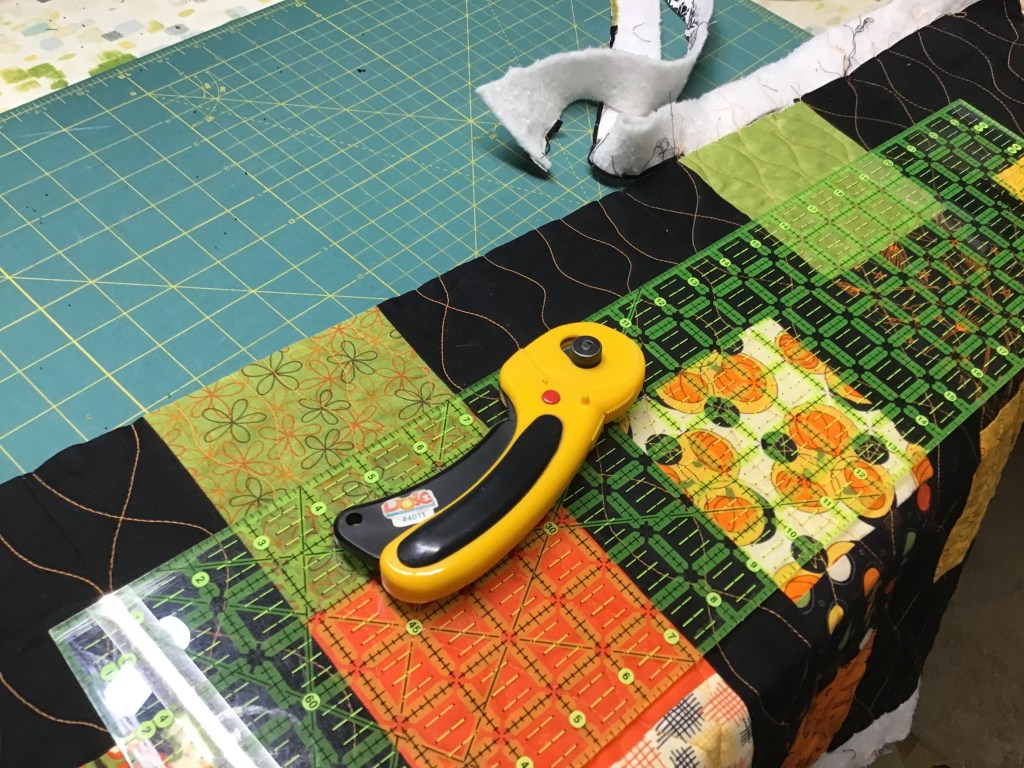
The first thing you need to do is to cut out your pieces. I used this adorable Halloween Gnome novelty fabric from Northcott instead of a panel. The cool thing about quilt patterns made for panels is that you can usually substitute a novelty print as long as you cut it to the right dimensions.
YAY! GNOMIES! (That’s what my sister, Tracy, calls them.)
I did not cut the pieces for the inner and outer border out yet. I like to wait until I have the center of the quilt made because sometimes my measurements don’t exactly match the measurements given in the pattern.
If this happens to you too, don’t cut the border strips until you can measure your quilt center. That way you can cut the border strips (and piece the strips together if needed) to your specific measurements, not someone else’s.
Remember when we talked about the “perfect” quarter inch seam allowance? Go HERE if you need a refresher. There really isn’t one. Basically, everyone’s quarter inch seam is a touch different, either a bit smaller or bigger than that elusive quarter inch. Anyway, as each of us use a slightly different quarter inch seam, the dimensions of our quilts are going to be slightly different too. That makes sense, doesn’t it?
So sew with your best quarter inch seam — accuracy is more important than a perfect quarter inch seam in most cases — and measure your quilt before you cut the borders.
Let’s keep moving!
After you’ve cut your pieces, sew strips to the sides of the small square. Then sew strips to the top and the bottom.
You know, I photographed every step of this process, but for some reason all my photos are not on my iPad. Methinks my cat Griffin might have deleted photos when he was painting on his iPad cat painting app.
A cat that paints? No, that’s not strange at all……. What’s strange is that he scratches at my iPad (covered with a protective screen cover) and gets out of his painting game and into other apps somehow. Kids….
Anyway, sew strips to the sides of this block and then add the strips to the top and bottom. Voila! This is your center square. Make 1. (Sorry for the EQ images, but the photos are gone!) Silly Griffy!
Now sew strips to the side of your other 8 squares. Then add the longer strips to the top and the bottom. Make 8.
Here are all my blocks ready to go. Aren’t they fun???
Wow! This quilt is coming together fast. Now to add some background rectangles to our quilt blocks.
Sew a background rectangle to the top of a Framed block. Make 3.
Please Note: If your fabric is not directional, you can skip adding background rectangles to various sides of the Framed square blocks. Instead, sew background rectangles to one side of each of the 8 Framed square blocks.
Sew a background rectangle to the bottom of a Framed block. Make 3. (Sorry, these photos are gone, too.) Argh….Griffin…….
Now sew a background rectangle to the left side of a Framed block. Make 1.
Lastly, sew a background rectangle to the right side of a Framed block. Make 1.
Whew! That was a little confusing, I know, but now we get to put things together!
Sew 2 top facing background rectangle units with a bottom facing background rectangle unit in the center. Then sew a long background rectangle to each end of the row. Make 1 row.
Make the bottom row pretty much the same as the top row, above, but reversed — sew 2 bottom facing background rectangle unit with a top facing background rectangle unit in the center. Then sew large background rectangles to the ends of the row. Make 1 row.
Now for the middle row — sew a right facing background rectangle unit, the single center block, and a left facing background rectangle unit at the end. Make 1 row.
Next sew the 3 rows together.
Isn’t this quilt top adorable so far? The orange frame in the center block really pops, don’t you think? Can’t wait to get the borders on next!
Now sew the inner border strips to the sides of the quilt center. You’ll probably have to piece the strips so they’re long enough. Add the top and bottom inner border strips, piecing them too.
Almost there! It’s time to add outer border strips to the sides — piece those border strips carefully, please. Finally! Our last step for the top — sew on the top and bottom borders, piecing your strips.
Houston….we have a problem!
I just discovered I don’t have enough border print fabric to sew borders on all 4 sides of the quilt.
Whatever can I do???
Why, just add borders to the top and bottom of the quilt! Good solution on the fly. That’s how I roll.
Yay! Mission accomplished — adorable Halloween Gnomies quilt top completed before Halloween! (Sorry the photos of the quilt as it gets put together aren’t very good — I am limited on space for working with larger quilts, so here I’m hanging the quilt top on a clothesline strung in the basement. Hey, we do what we have to do, right?)
What do you think?
As I write this post, I’m crazily packing my stuff to head to International Quilt Market in Houston, TX. I haven’t been to Market since 2019 — before the Pandemic. I’m really excited as this will be my first time being part of the Villa Rosa team.
If you’re headed to Market, stop by the booth, we are Booth #747, right behind the center Info booth on the main walkway. VRD is also doing 2 Schoolhouse lectures on Friday, Oct 28th. If you’re headed to Quilt Festival, Villa Rosa Designs will have a booth there, too. We’d love to say “hi.”
Sigh….Back to my packing.
Stay tuned — next week’s post will be all about my Quilt Market trip. The sights, the sounds, the food….
After our 8 week Basic Quilting Skills for Beginners series, I find I’m ready for something new. How about you???
I thought it would be fun to talk about quilt panels and what quilts you can make with them. I must admit that I have a big stash of quilt panels. I know that admitting you have an addiction is the first step to recovery, right?
SHHHHH! My super secret stash of panels!
I’ve collected panels for a long time, but I rarely seem to use them or make anything out of them. Sure, I’ve slapped borders around some of them and whipped up a quick baby quilt or simple wall hanging, but does that really count? When I taught free motion quilting classes in the past, I even used a panel as a project so students would actually be quilting a “real” quilt, but not something they’d worked on for hours and hours.
If the quilt police showed up at my front door and asked me about my fabric stash and all my panels, I would say: Who me?? I have no idea where these panels and all this fabric came from. I think fabric is like rabbits and multiplies when you’re not looking. That makes sense, doesn’t it? But would it work?
Well, I’m hear to tell you that Villa Rosa Designs has a lot of GREAT patterns specifically for quilt panels — for vertically printed panels, horizontal panels, and even panels with printed “quilt squares.” Yay! Villa Rosa to your rescue — and mine, too!
Let’s take a look at some of the panel quilt Rose Card patterns. You can find ALL of these patterns on the website, www.villarosadesigns.com
Vertical panels seem to be the most common type of quilt panel and we have quite a few Rose Card patterns to choose from.
One of my absolute favorite Rose card patterns for vertical panels is Hillside Charm! I know I’ve mentioned this one before, but it is an awesome pattern and I have to show it off again! You’ll probably read about it later in the future too. Sorry, not sorry.
Isn’t this just the coolest pattern? Aren’t you already mentally going through your panel stash to see what you can use for Hillside Charm? I know I am….
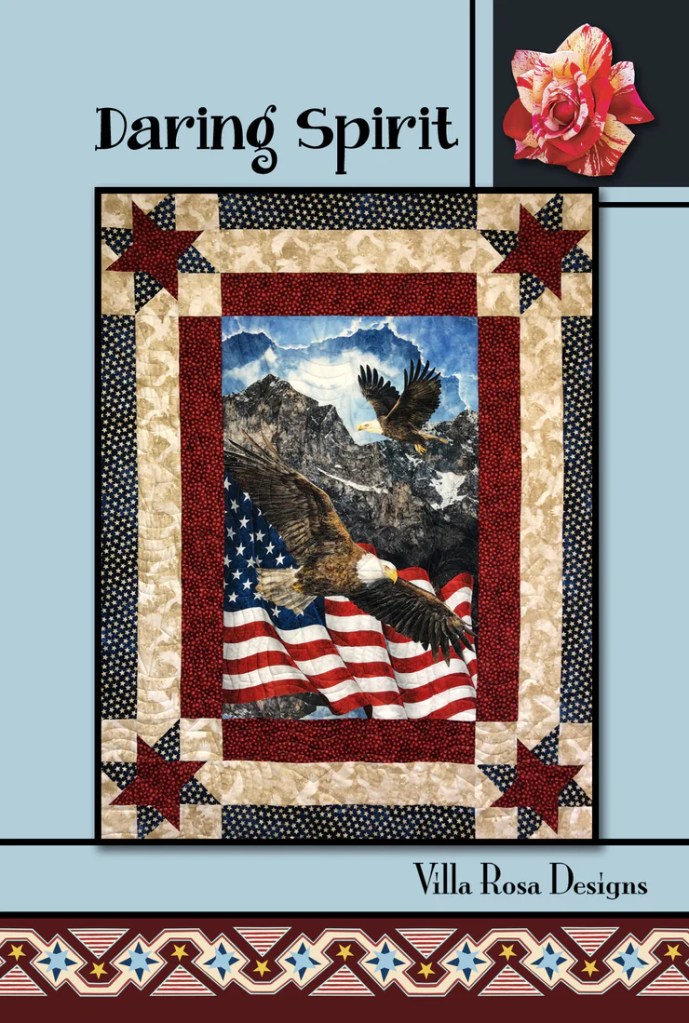
Another one of my favorites is Daring Spirit — the perfect quilt for a Quilt of Valor as long as you add a narrow border around it to meet the minimum width requirement for a Quilt of Valor. You can check out my Daring Spirit tutorial HERE and my Quilts of Valor presentation post HERE.
Take a look at these terrific Rose Card patterns for vertical panels. Grab ’em while they’re hot!
Did you know Villa Rosa has Rose Card patterns for horizontal panels, too? This is awesome because patterns for horizontal printed panels can be hard to find!
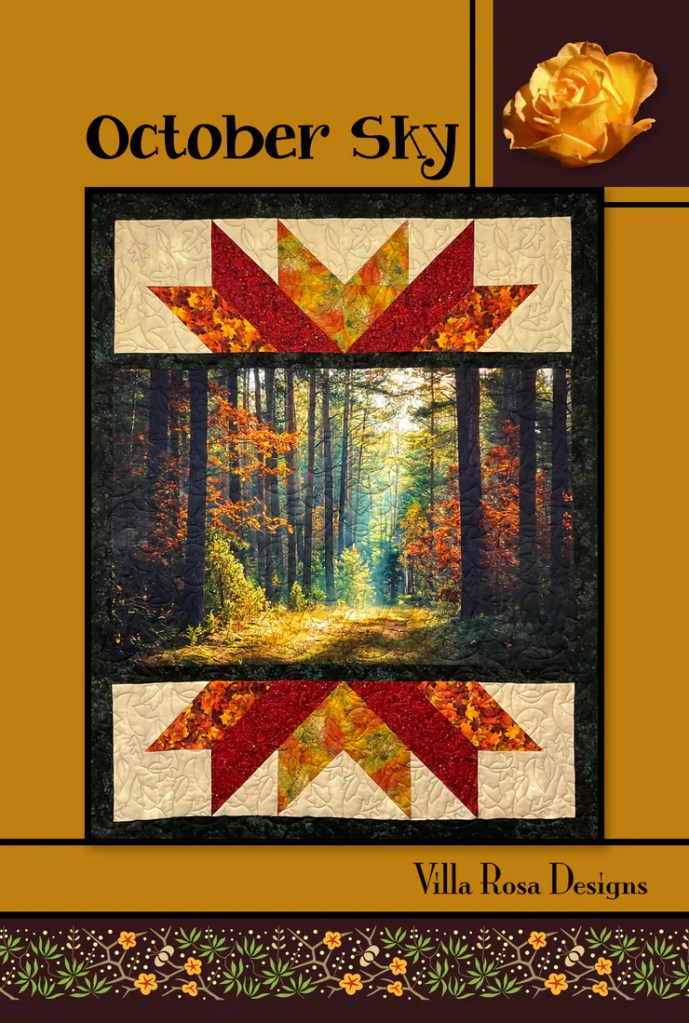
October Sky is one of our most popular patterns. I bet you can see why! The really cool thing is that the top and bottom star sections are made with half square triangles, which go together like a snap when you take a little extra care to place your colors correctly.
Shh! Don’t tell anyone and when you make your October Sky quilt, everyone will be in awe at seeing your amazing quilting skills. I can’t wait to make one of these for myself.
Here are some more Rose Card patterns for horizontal panels. Nice!
We even have Rose Card patterns for quilt panels with printed blocks or squares!
Hypnotized is one of our new Rose Cards this year. I just love the look of this quilt — it looks difficult to make, but I know it won’t be because it’s a Rose Card pattern.
I’m all set to make Hypnotized. The only problem is that by the time I get to my project, it will be too late for Halloween this year so I guess I’ll have to say it’s early for next year.
Here’s my fabric for the Hypnotized Rose Card pattern — don’t you love it??? Instead of panel squares, though, I’m going to cut the squares from the gnome print and I’m going to use the stripe for my border. You’ll have to stay tuned for this quilt coming soon, or at least some time before Halloween 2023. LOL!
Yay! More Rose Card patterns for panels with printed squares/blocks. Of course, you can always substitute squares of any novelty fabric you love in these patterns, which makes them very versatile.
BUT WAIT THERE’S MORE!
I think you know me by now (and how much I like saying that phrase), so of course there’s more.
You know those really big panels that measure roughly 36″ x 42″? Well, we even have a couple patterns for these big panels, too.
And if you know anything about Villa Rosa Designs, you can bet we’ll be adding new patterns for panels in the future. In fact, I have a few ideas of my own.
That’s it for today. I’m off to play with my panels.
Fall is in full swing here in northwestern Pennsylvania. We haven’t quite gotten to peak viewing for fall leaves in my area yet, but it should be very soon. There’s nothing like the crunch of leaves underfoot, cooler nights and warm sunny days, colorful leaves sparkling in the autumn sun, and there’s always something crisp about the autumn air. Yes, I admit it — Fall is my most favorite time of the year.
After the “dog days of summer” I am so ready for Fall. It’s time to wrap up old projects and get started on new ones. It’s only a few months until Christmas, so it’s time to start my Christmas crafting and sewing. Fall inspires me to clean, organize, and declutter, getting ready for the upcoming winter season. It’s time to pull out warmer clothes and put the quilts on the beds. I just love sleeping under a quilt or when it’s really cold, under several quilts. There’s nothing like the comfort of sleeping under the cozy weight of a quilt — it’s better than any weighted blanket.
Embrace Fall wherever you are — jump in a pile of leaves with your kids, sit in silence and watch the leaves drift down, go for a hayride, take a walk in the park, go to the farmer’s market, carve a pumpkin, pick apples and make apple pie, drink apple cider and eat doughnuts (an old tradition where I live), go to a Halloween parade or festival. Celebrate the season.
Labeling Your Quilt
There are lots and lots of different ways to label your quilt, but today I’m going to show you my favorite way of labeling ALL my quilts from table runners to baby quilts to bed-sized quilts. It took me a lot of experimenting with different kinds of labels over the years before I finally found this simple, fast and easy label method.
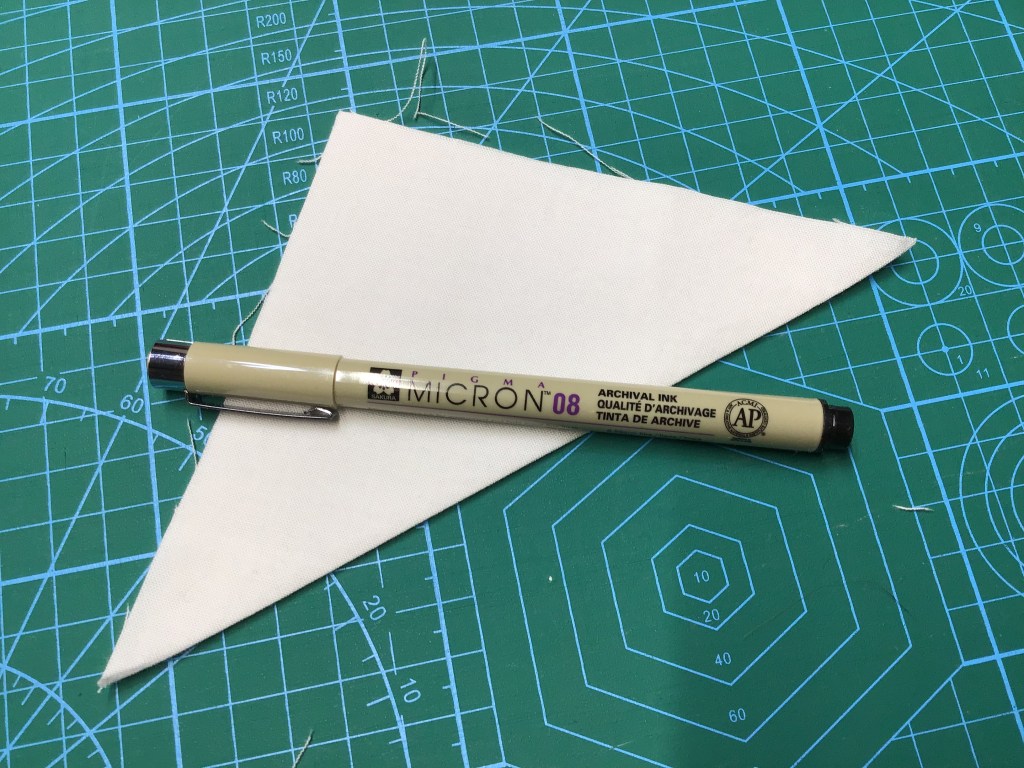
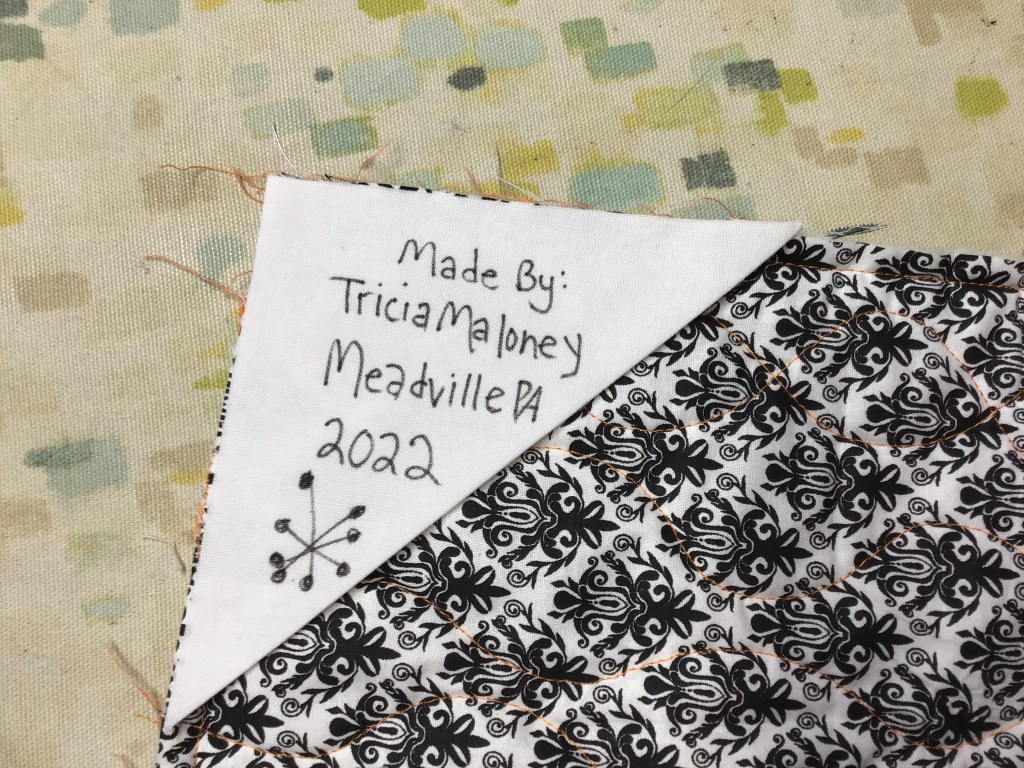
First I start with a square of white cotton solid fabric. For table runners, I might use a 4″ square, for baby quilts maybe 5″, and for bed quilts 6″ works great. Of course, the more information you want on your label, the larger you need to cut your square. The square below is actually 5″. I’m going to put put this label on my Halloween Ice Jam table runner, my sample I’ve been using for the last couple weeks. Normally, a 4″ square works great for a table runner, but I had a 5″ square just sitting there so I thought I’d use it. The size of your square really doesn’t matter, as long as it is large enough for all the writing you plan to do.
The next thing I do is fold my square on the diagonal to make a triangle. With solid fabrics, it usually doesn’t matter which way you fold as both sides are pretty much the same, but if you are using some kind of printed fabric, fold the wrong sides together.
Press your triangle with a hot iron on the cotton setting and let it cool down for a moment or two before moving on to the next step. You want a nice flat wrinkle-free triangle to work with.
Now grab your fabric pen. I use a Sakura Pigma Micron pen in black size 05 or 08 for writing my labels. The ink is archival quality and doesn’t bleed.
Before you write your information, take a moment to decide what it is you want to write on your label. A basic label includes the maker of the quilt, the quilter if different from the maker, a date, the recipient, and maybe a location. Imagine a hundred years from now, if someone finds your quilt and they see your label. They could do research to discover more about you, the quiltmaker, and perhaps even the recipient. The more information that is on the label, the more “valuable” someone may consider your quilt and its provenance, or history.
As an antique quilt and textile collector, I cannot stress this enough — label EVERY quilt. I have so many pieces in my collection without any information. Sure, quilts and textiles can give you some clues about their history, but without a maker, the story is always incomplete. Don’t let this happen to your quilts and your story. If you have family quilts without labels, please please please make sure to add a label to the quilt with any information you have or that quilt’s story might get lost forever.
You can add whatever you want to your label. Here are some other ideas — the story behind the quilt, the occasion, the quilt pattern if it’s not your pattern, the name of the quilt if you name your quilts like I do, a favorite quote, the inspiration behind the quilt, or whatever your heart desires. This is why I said above that you can make your label as large or small as you want, just make sure there is enough space to add all the details that you want to add. If you like to draw or doodle, you can even add artwork to your label. It’s your label, make it a special part of your quilt. Good at calligraphy? Why not make your labels extra special with unique lettering?
Here is a typical label for me. I write my name, my location, and the year I made the quilt. Sometimes I have enough room to add my characteristic starburst design, like in the first example. Often I write the name of the quilt above my name like in the second example, but not always.
After you write out your label, make sure to press it again with your hot iron on the cotton setting.
Now it’s time to pin the label to a corner of my Halloween table runner. It doesn’t really matter to me in which corner I put the label, but it usually ends up in the top left corner, particularly on larger quilts. I add my label to my quilts after I have machine-stitched the binding to the quilt, but before I have sewn the binding down. That way the binding helps to hold the label in place and it eliminates most the the fussy hand-sewing that is the norm for labels. This fussiness is probably why so many people do not bother labeling their quilts.
I usually place 3 pins in the label to hold it in place for machine stitching — one in the center and one in each corner. Keep in mind that you will need to flip your quilt over for sewing, so when you place the pins think about where you are putting them as that will be the back as you sew. This idea might sound kind of confusing right now, but hang in there and it will become much clearer in just a moment.
I next flip the quilt over with the front of the quilt facing up and the label now on the back. The pins keep the label from shifting.
Time to sew the label onto the quilt. Do you seethe line of stitches where I sewed the binding on in last week’s post? Did you miss last week’s post called Binding 101??? You can find it HERE.
Be careful sewing the label on the back — remember the pins? Begin before the first pin on the side. Back-stitch a few stitches, then continue to sew. Make sure you stay in the seam allowance of the binding, or else the bound edge of your quilt will not be straight and square. Sew until you get close to the fold in the corner, back-stitch a couple stitches and stop. Cut your thread. You don’t want sew into the fold or your beautiful French-folded corner will not be so beautiful anymore. It’s a good idea to pin the fold out of your way.
Take the pin in the fold out. Now turn the quilt and begin sewing again at the edge, making sure to stay in the binding seam allowance. Begin sewing and do a few back-stitches then sew until you go beyond the 2nd pin in the corner of the quilt. Back-stitch again and cut your thread.
Voila! Your label is sewn onto your quilt and when you sew down the binding either by hand or machine, the raw edges of the label will be sandwiched between the quilt and the binding. Later you can hand-stitch the folded edge down to the quilt if you want to, but it really isn’t necessary because the label isn’t going anywhere. I do strongly suggest you take that extra time to sew down the folded edge on baby, young child, and pet quilts.
As labels go, that was fast and easy, wasn’t it?
I hope you will go forward and label each and every one of your quilts, preserving your quilt story for the future.
NEW October 2022 Villa Rosa Rose Card Patterns
They’re here! They’re here! I’m always really excited at the beginning of every month because that’s when Pat, our Villa Rosa Designs Rose Queen, debuts our newest Rose Card patterns.
Aren’t they AWESOME! Every month our VRD designers just blow me away with their creativity. Quilting is one of the few areas in the world where you can keep reinventing the wheel. Our VRD designers do that every month!
You can order all five of the new October Rose Cards for the special price of $8.95 HERE. Wow! These patterns normally sell for $2 each on the website, so you’re getting a great deal at $8.95. Besides, why would you want only a few cards, when you can order ALL of them?!?
If you missed a monthly set or are just looking for a fun little surprise for yourself or your quilting buddy, you can check out our other Rose Card sets HERE, we have lots!
But wait….there’s MORE! (You know how much I love saying this! LOL!)
We have two — yep that’s TWO new table runners this month. Yippee!
Heidi revisited her bestselling Gummies pattern (you can get the Gummies pattern HERE if you missed it) and she came up with this delicious table runner using 5″ squares.
Interested in receiving the NEW patterns each month to your postal box (international quilters get digital patterns delivered right to their inbox) every month?
You can go HERE to sign up for our Monthly Pattern Clubs.
Don’t forget — patterns ship FREE!
Well, that’s it for me this week. And this is the end of our Basic Quilting Skills for Beginners series. Do you have any other special topics you’d like to see on the blog? Drop us a message or email and we’ll do our best.
Again, THANK YOU for following our Basic Quilting Skills for Beginners series. We are all thrilled with your interest to this series of posts. Sadly, this series will come to an end next week with Labeling Your Quilt.
So, I thought I’d ask — are there any other topics you’d like to see here? If so, please leave a comment or you can email your suggestions to me at tricia@villarosadesigns.com. I’d love to have your thoughts and ideas so our blog will continue to be relevant to you, our VRD fans and followers.
Now let’s get to BINDING!
The good news is that once you reach the binding stage, you are totally in the homestretch of having a finished quilt.
Yay you!
This week for our binding tutorial, we’ll use my Halloween Ice Jam table runner again. If you didn’t order the pattern last week, you can order it HERE.
There’s a couple of things we have to go over before we can do our binding.
How wide do I cut my strips?
You could ask a bunch of different quilters this same question and you would get multiple answers, I’m afraid — it’s not a one size fits all situation.
A lot of quilt patterns and quilters prefer to cut binding strips 2 1/2″ wide. As this seems to be the most common size in the quilting world, I too use this width for my patterns, but I personally find 2 1/2″ a bit too floppy, so when I do my own binding, I cut my strips 2 1/4″ wide, which for me makes a nice full binding. Of course, you will have to try both to see which one you prefer.
Yes, I use 2 1/4″ for almost all of my binding, but I must confess that there are a few types of projects I actually cut 2″ wide binding strips for — miniature quilts and any other tiny little quilty projects. Again, you’ll just have to try different widths on different projects to find out what works best for you.
Here’s a little something to consider — I have found that if your 1/4″ seam is a “fat” 1/4″ seam, then you’ll probably like using 2 1/2″ or if you’re like me and you use a “scant” 1/4″ seam, then 2 1/4″ might be a better fit.
As for mini quilts and such, you’ll probably want to use a slightly narrower width than what you use for your regular-sized quilts. You’ll just have to try things out to see what you like better because trial and error is all part of learning, isn’t it?
How do I know how many strips to cut for my binding?
Sometimes you get lucky and your quilt pattern will include the number of strips to cut and it might even suggest a specific width. But, if your pattern doesn’t specify how many strips to cut, read on my friend!
If you don’t know the dimensions of your quilt, you will need to measure the width and the length using your tape measure.
Let’s use my Halloween Ice Jam measurements for this example — it measures 18″ wide x 54″ long, so we need to add together 2 widths and 2 lengths to get the total inches around the outside of the quilt (otherwise known as the circumference).
18+18+54+54=144
Now we are going to divide 144 by 40.
This number will tell us how many strips to cut because we are dividing the total inches by the inches in the width of fabric.
Please understand I didn’t just pull a random number out of the air — ha ha! — 40 is the average width of fabric that I and a lot of other quilt designers use to determine yardage requirements for our patterns. Fabric can vary in width so it helps to use an average number maybe a little smaller than the actual width and 40 does that when fabric generally ranges from 42″ – 45″ wide. Besides, that little extra also helps to make sure you don’t run out of fabric by accident.
So, let’s continue.
144÷40=3.6
Let’s round that number up to 4 — I need 4 strips of fabric for my binding. That little extra is helpful to make room for the corners and joining our binding ends. There’s nothing worse than getting close to the end of sewing on your binding to find you are 3 inches short. When in doubt, add an extra strip.
But what do you do when you get a whole number instead of a fraction for the number of strips needed? Me, I definitely add an extra strip because I don’t want to run out of binding before I get to the end.
Yay! Quilt Math to the rescue again! Three cheers for math! Want to read my post about quilting and math? Check it out HERE.
Moving on……
Cut the required number of strips and then cut off all the selvedges. The selvedges are those tightly woven long sides of the fabric which usually have little holes in them. Off with the selvedges, I say, off with those selvedges!
Now we’re heading back over to the sewing machine.
There are a couple different ways to sew your binding strips together.
The first way is to layer 2 strips right sides together with the ends lined up. Use a 1/4″ seam to sew the strips together, just like in piecing. Press the seam allowance open to reduce bulk in the binding — nobody wants a lumpy binding. LOL!
The second way to join the strips is on the bias or diagonal. Lay a strip right sides up on your flat surface. Place a second strip perpendicular to (NO, not another math word! Horrors!!!) and on top of the first strip with the wrong side up, that way the strips are right sides together. Next, draw a diagonal line from corner to corner.
Then — you guessed it! — sew on the line. Does this sound familiar? It should because quilters use this technique for making triangles (HSTs) and flippy corners.
The next thing you need to do is find the end of the strip that is on top. Turn the strip over so it is now facing right side up. This is really important or else your binding will not have all the seams on the back of the strip. Take another strip and place it perpendicular to the second strip with the right side down, again making them right sides together. Draw a diagonal line and sew on the line again. Repeat this until you’ve sewn all the strips into one long binding strip.
Clip the threads in between the strips if you chain-piece and then cut off the waste triangles where the strips meet, leaving a 1/4″ seam allowance.
Time to press our binding strips. Let’s head back to the ironing board.
Place your binding strip right side down on your ironing board. Using your iron on a cotton or hot setting, fold the strip in half with the wrong sides together, pressing as you go. Remember, you are pressing, not ironing here. We just want to make sure the strip gets folded and creased.
When you come to a seam, press the seam allowance open like we did when we joined our strips into one long binding strip. Then fold, press, and keep going.
Almost done now. Just keep folding and pressing until you get to the end of the very long strip. Keep in mind the bigger the quilt you are working on, the longer the strip and the more time it will take to do this step.
Let’s head back to the sewing machine once again because it’s time to sew the binding onto your quilt. I know this seems like a lot of steps, but writing/reading about it takes longer than actually doing it. After some practice, it will become second-nature and you won’t even have to think about it, you’ll just do it.
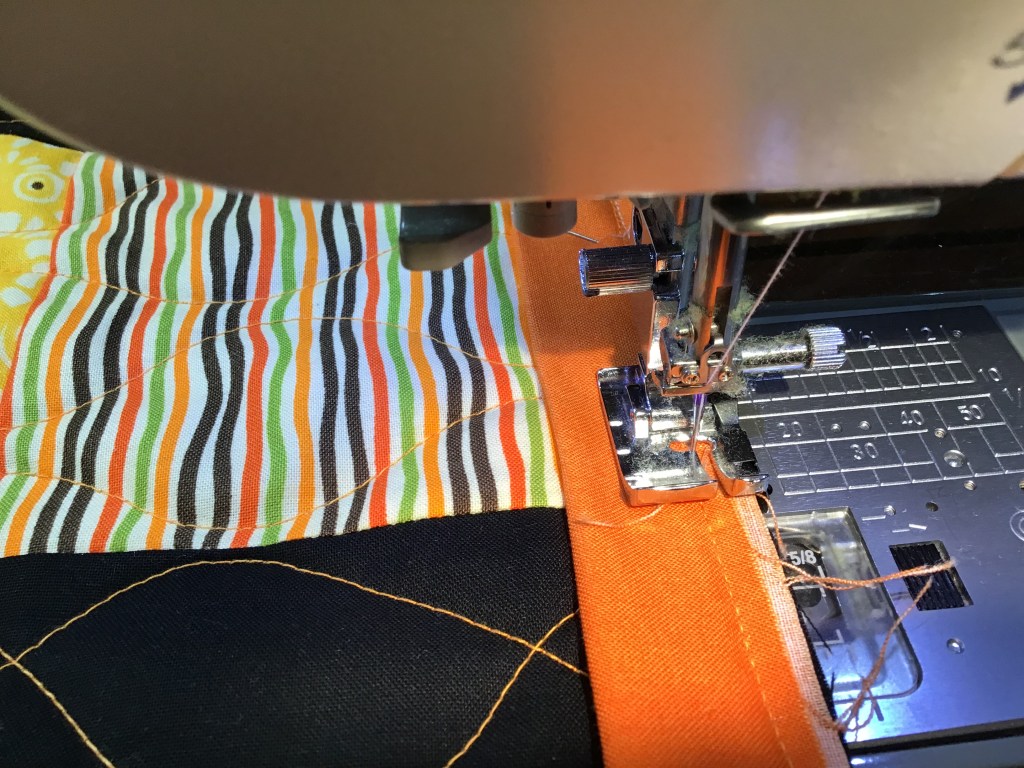
Lay your binding on top of the right side of your quilt with the raw edges lined up. I usually start my binding somewhere towards the middle of a long side. Be careful here because you want to avoid placing binding seams at your corners because the added bulk can make your corner turn out weird. Trust me on this. Been there, done that. It’s okay if you want to pin your binding all the way around your quilt, but with a little practice, you’ll have a fairly good idea how to avoid the dreaded seam allowance at the corner issue.
Pin the layers together about 10-12 inches from where the binding strip starts. Then place a pin through the quilt right before the binging begins, but not through the binding, only the quilt. This second pin right before the binding starts is a marker you will need later.
Start sewing at the pin 10-12 inches from the beginning of the binding strip. Backstitch a few stitches, and….GO.
Most people use a 1/4″ seam for sewing on their binding, but I personally use about a 3/8″ seam because I like a nice full binding. Try both ways to see which one works best for you.
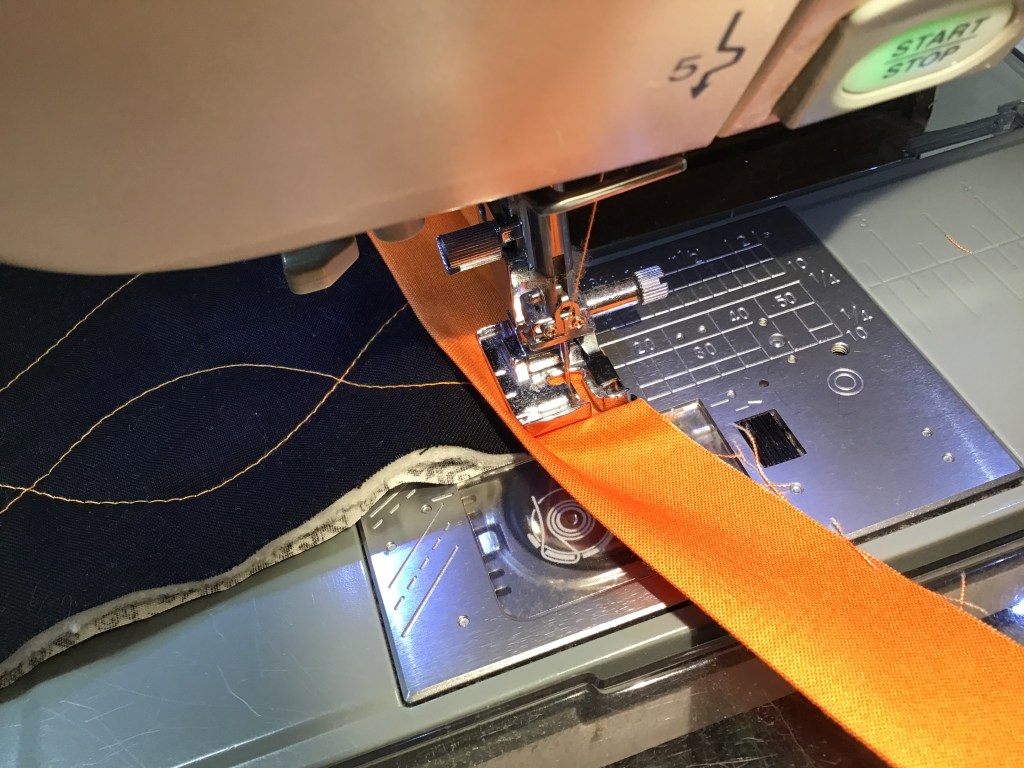
Sew until you get to about 1/4″ from the corner.
When you get to 1/4″ from the corner — STOP and backstitch to secure the stitching. Cut your thread and pull your quilt out from under the needle.
GULP! Here comes the scary part — making a French fold mitered corner. Cue the scary music….
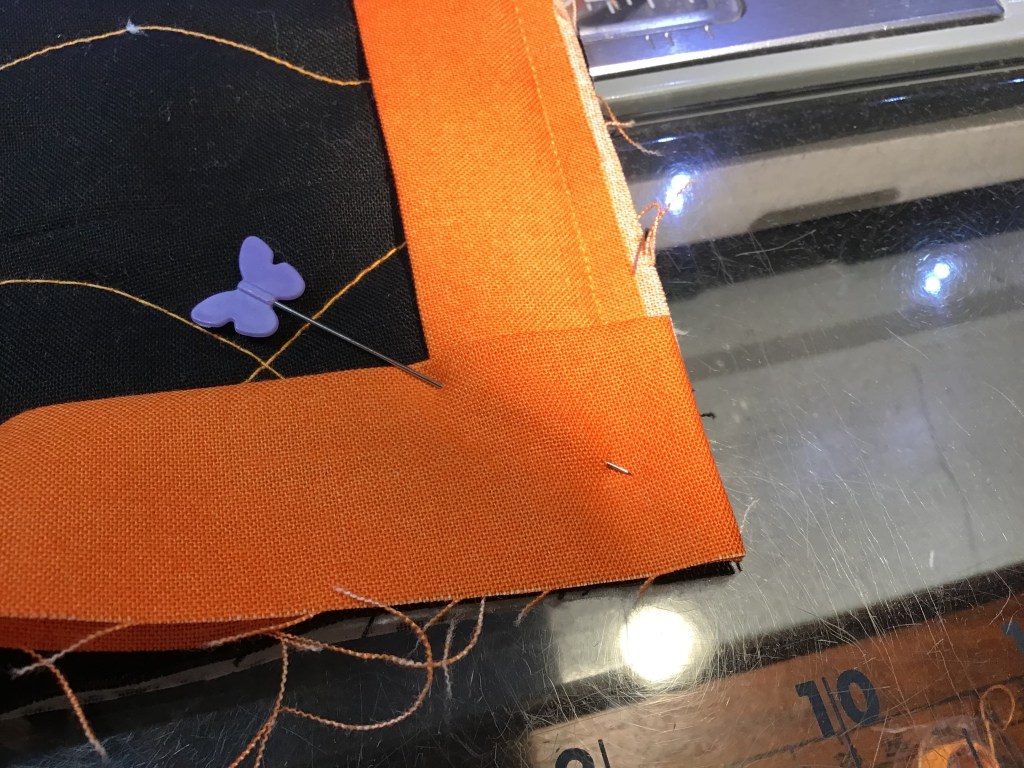
Fold your binding strip at a 45 degree angle towards the right.
Now fold the binding strip back over itself to the left. Place a pin if you need to. This little fold here makes you able to overlap the binding into a nice miter on the back which will give you a really nice square corner.
Turn your quilt and start sewing at the corner, backstitch a couple stitches and sew until you get to 1/4″ from the next corner. Not scary, easy peasy!
Repeat the mitered corner fold, turn your quilt again, and keep going. When you finish the fourth corner, keep your eye out for the pin marking the place where the binding strip began. Stop sewing 3-4 inches before that pin and backstitch to secure the stitching. Once you’ve backstitched, cut your threads and pull your quilt out from under the needle.
Here’s a helpful little video from Alex Anderson and Ricky Tims about mitering corners.
Now we’re going to sew the ends of our binding strip together. This next part is really a leap of faith, but it does work, I promise you. Just stick with me, I won’t steer you wrong.
Smooth your binding strip over and beyond where the marker pin is (move the loose beginning binding tail out of your way). Use a ruler and measure from the marker pin the length of how wide you cut your binding strip. For a lot of you, that would probably be 2 1/2″ but for me and some others, that will be 2 1/4″. Draw a line with a fabric pen at that measurement from the marker pin and cut on the line.
Next open both ends of the binding, overlap them with the the ends right sides together at an angle, and then pin the binding layers together. Draw a diagonal line if you like or just eyeball it.
Please note that this technique isn’t the only one out there. If you want to learn other ways of doing binding, you can do an Internet search.
Sew on your drawn line and trim away the waste triangles 1/4″ beyond your sewing line.
Finger press the seam open to reduce the bulk and refold the binding with wrong sides together again.
Your binding strip should now lay nice and snug against your quilt. Yay! Next pull out the pins and use them to keep the rest of the binding lined up with the quilt.
Now it’s time to finish sewing the binding on. Start where you stopped before we sewed the ends of the binding together until you overlap where you originally started sewing the binding on. Backstitch at the both the beginning and the end of your stitching line.
Finishing Binding by Hand or Machine?
While doing this series about beginning skills, I have discovered that I am an “old school” quilter. It pains me that I am starting to show my age, but I know these tried and true methods work. Feel free to explore different methods to do any of these skills, but keep in mind that it’s important to know the old skills before you can learn the new skills — you have to have somewhere to start. So, maybe I’m not as antiquated as it sometimes feels these days. LOL! But that’s okay, those old skills serve me well and keep me making quilt after quilt with excellent results.
That being said, there are 2 ways to finish your binding on your quilt — by hand or by machine.
I finish all my binding by hand. After writing multiple books and making oodles of samples for magazines and patterns, I know I’ve probably hand-sewn miles and miles and miles of binding. But that’s okay. I like how a hand-stitched binding looks.
If you are interested in learning to finish your binding by machine, here’s a nice video from Jenny at Missouri Star Quilting. It’s actually a complete binding tutorial and shows you how you can sewn it down by machine.
If you prefer finishing your binding by hand, you can check out this video by Quilting in the Rain as she shows you how to sew a hidden blind stitch.
You might wonder why I’m giving you videos here, but I learned a long time ago that as a lefty, there are just some things I can’t teach to righties and sewing down binding is one of them!
BIG SHOUT OUT to my pal, Cathey Laird of Cathey Marie Designs, the inventor of the Y Block Ruler.
Long long ago, I tried to teach Cathey how to do mitered corners like I did, she found out hours later that a lefty can’t teach a righty how to do that because we fold our corners in different directions. Oops, sorry, Cathey!
Anyway, I don’t want to confuse anyone, so here’s a righty doing the hidden blind stitch for you. If you are a lefty and need a little help from a lefty, just shoot me a message and I’d be glad help you.
Here is my cute little Halloween Ice Jam table runner! Now all I have to do is sew the binding down and put a label on it.
Whew! I’m totally worn out now! I guess that’s about it for binding, folks. I can’t think of anything else to add.
If you have any questions, though, just ask. Did you know you can send us a message on the blog? You can go to our Contact Us page and scroll down to the bottom to find a form to fill out.
Stay tuned for next week’s post about labeling your quilt.
First, I want to give each of you a great big THANK YOU hug!
Thank you for reading our Villa Rosa Designs quilt blog, Villa Rosa Quilts. This past week, the number of views has exploded and we’ve added new followers, too. And it’s all because of you, our VRD fans and followers. We are thrilled that you find our blog to be informative, fun, and worthwhile.
Did you know you can follow our blog and never miss a Thursday Post? All you need to do is type in your email address and click the subscribe button just to the right of the blog post towards the top and you’ll get each new post delivered right to your email inbox every Thursday!
Now let’s hop right into this week’s Basic Quilting Skills for Beginners post — Squaring Up.
You cut, you sewed, you quilted, and now it’s time to square up your quilt. I was planning to do both Squaring Up and Binding in this post, but I decided it would probably be better to separate the two topics, otherwise the post was going to be too long, too wordy, and probably too boring and we can’t have that.
Forgive me, but you’ll have to wait until next week for Binding.
Squaring Up
Before you can do the binding, you first must square up your quilt.
Why should I square up my quilt? Can’t I just slap on the binding and be done?
That’s a good question — sure, you could just slap on the binding, but you probably wouldn’t be satisfied with the results. Things can get distorted as you handle your quilt, press (or maybe you iron), quilt it, tug, pull, crumple it up and throw it on the floor — well, you get the picture. Think of squaring up like pre-binding.
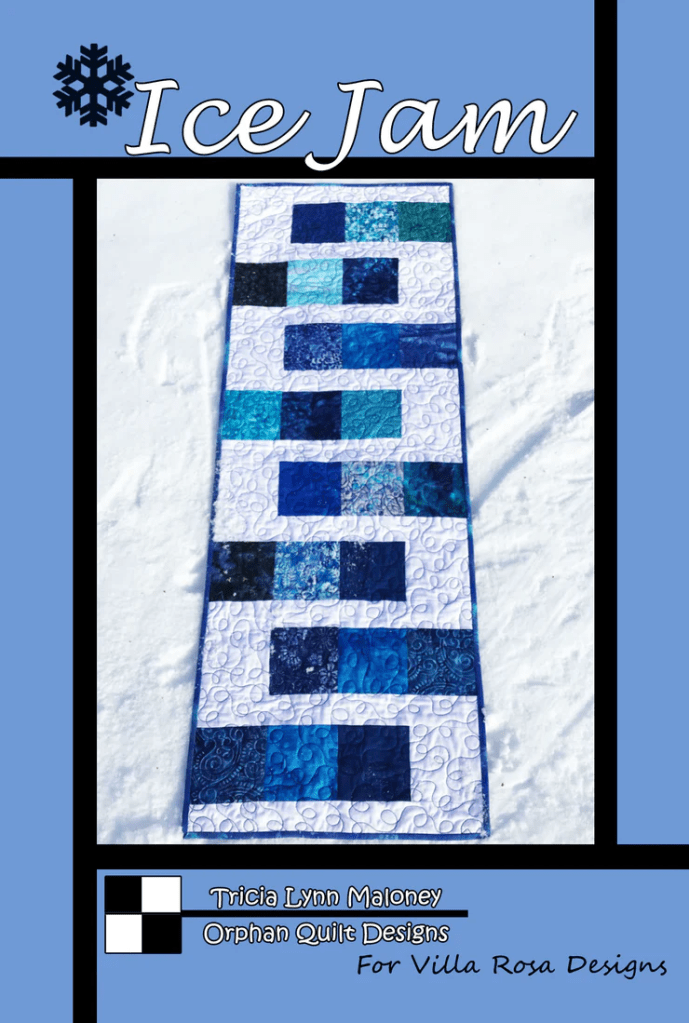
My quilt “volunteer” today is a new Halloween version of my Ice Jam VRD pattern. I made this runner a couple months ago as a sample project in my 2022 Villa Rosa Rose Card Table Runner a Month class, but never finished it.
BIG SHOUT OUT to all my awesome class buddies — Mary Lee, Sherry, Missi, Debbie, Anita, Robin, Kim, Gaynel, Jean, Donna and Gayle (the owner of my local shop, Homespun Treasures, where my class meets). Homespun Treasures, of course, has lots of Rose Card patterns in stock. Just sayin’….
Here’s the Ice Jam Rose Card pattern. It’s a super fast and fun table runner which measures 18″ x 54″ and uses 5″ charm squares. It’s a very versatile pattern and will look great in any style or theme. So, try it out.
Here’s the pattern cover with the original wintery blues.
What!?! You don’t have the pattern? You can order it HERE.
Just a quick note about the machine quilting. If you missed our Quilt As Desired post last week, you can find it HERE. I added my wiggly lines free motion quilting video to last week’s post and I just wanted to point out my fun wiggly squiggly lines on this table runner.
Okay, okay……let’s get back to squaring up.
You might want to press your quilt before squaring it up. Pressing your quilt will help everything lay nice and flat.
Next lay your quilt out on your cutting mat, centering one corner of the quilt on the mat because we will square up the corners before cutting the sides. If you are working on a large quilt, it helps to support the weight of the quilt on a table or chair. The problem with larger quilts is that if the quilt is hanging off your cutting mat/table and down to the floor, the weight of the quilt can pull things out of whack . Oops! Gravity works. Now if you lived on the moon, you wouldn’t have to worry about this issue…. (wink, wink)
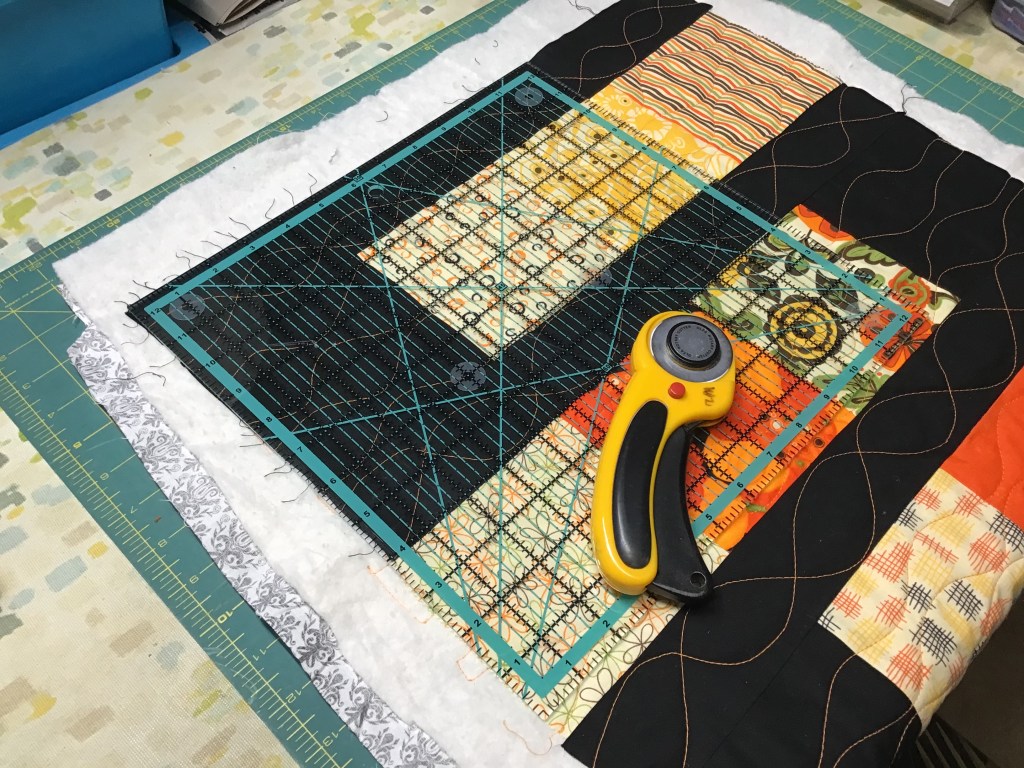
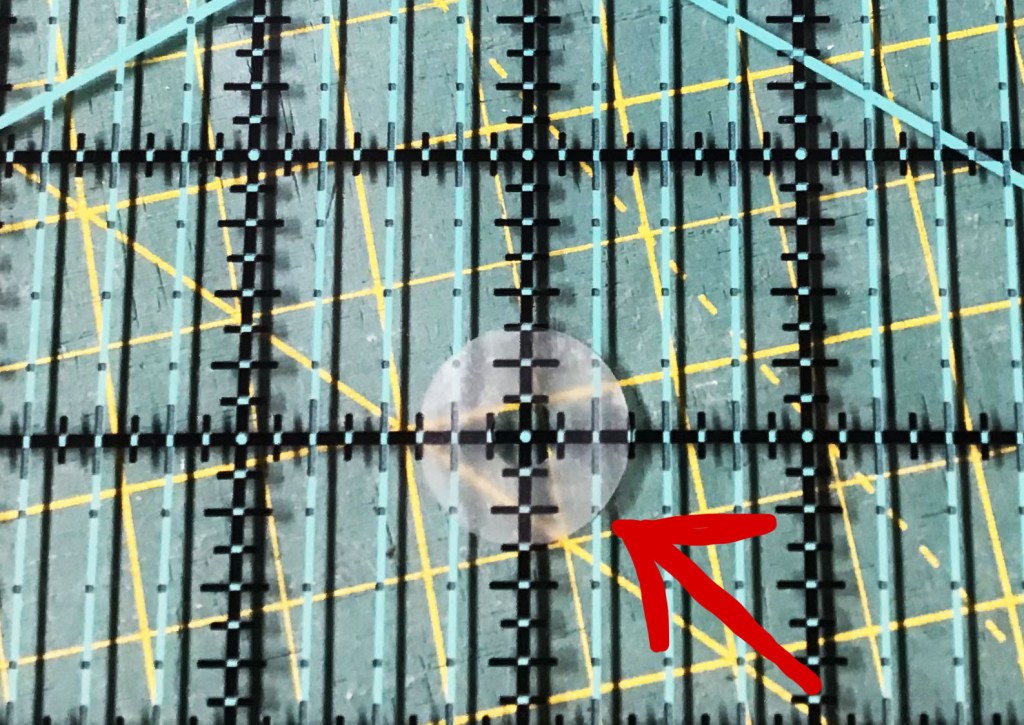
Use the biggest square ruler you have for cutting your quilt corners, the bigger the ruler, the easier it is to square up your corners. I personally love my 12 1/2″ square for working with table runners and smaller quilts, but I also have 15″ and 18″ square rulers to use for larger quilts.
Once you’ve smoothed your quilt out flat, lay your square ruler down on a corner of your quilt. Adjust the square as needed to make the corner 90 degrees, sliding a little this way and that way until it’s square.
Don’t worry if batting, backing, and even slivers of your top are beyond the edges of the ruler. If you see too much of the front of the quilt beyond your ruler edge, though, wiggle the ruler around some more until there is very little of the quilt top showing beyond the ruler. You don’t want to cut much from your quilt edges, especially if you have triangles all the way to the edge of the quilt because you will probably cut off your triangle points and that will not make you very happy.
Take your time here because once you cut, you can’t go back. Hold the ruler down with one hand using good solid pressure — be careful not to shift the ruler – and cut on the 2 outer sides of the ruler, thus making this corner square.
Let’s move on to the next corner. Line up the ruler, adjust it gently for another nice square corner, then cut. Repeat for corners 3 and 4. Yep — you’re going to have weird strips of batting/backing hanging off your quilt. That’s okay. We’ll take care of that in the next step. In the meantime, think of it like quilt spaghetti.
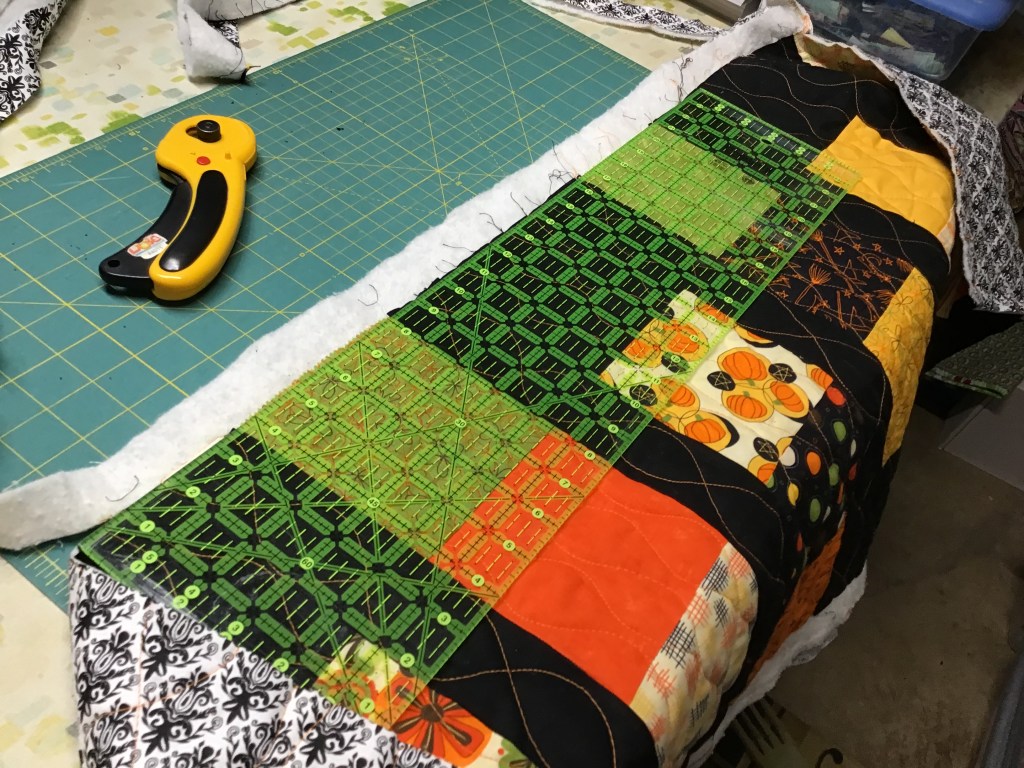
Now it’s time to position the quilt on the cutting mat so we can cut the long edges and remove all that quilt spaghetti. I use my 6″ x 24″ ruler for this part. Again, if you’re working on a big quilt, support the weight so the quilt doesn’t slide off your mat/table or skew your cutting.
Please be patient and take your time with your squaring up (I know it’s hard but trust me — I have the attention span of a four year old, so if I can do it, you can do it) because if you don’t square up properly during this step, your quilt will never be square, no matter how much you tug and pull later down the road. Wonky quilts don’t lay well on tables or beds nor do they look nice hung up on walls.
Start at one nicely squared up corner and line up the long ruler. Again, don’t worry if you see bits of your quilt top sticking out beyond the ruler edge as that is completely okay and to be expected. Once things are lined up to your satisfaction, cut with your rotary cutter along the ruler edge, stopping before you reach the end of the ruler so you don’t accidentally cut into your quilt. Gently slide the ruler across the quilt edge so you don’t distort your nice straight edge or your square corner. Make sure that the ruler is still lined up with your fresh cut quilt edge. Cut again. Continue doing this until you can line up your ruler from your freshly cut edge to your next squared up corner and cut. Yay you! Only 3 more sides to go.
Go ahead and repeat for the other 3 sides. Luckily with a table runner, I usually only have to cut the 2 long sides this way as the short sides get squared up when I use my 12 1/2″ square ruler for the corners. Not so lucky with big quilts — sometimes it’s like wrestling an octopus, but keep at it, you will be the winner.
Here it is! My squared up quilt. Yay!
Ice Jam runner in Halloween fabrics
Let’s do a quick check to make sure things are all square before we move on.
Fold your quilt in half, lining up the edges and corners as best as you can, use a few straight pins if you need to. If things are nice and square, everything should line up pretty well (there really is no such thing as perfect, so if things aren’t 100% exact, that’s okay). If corners or edges are not lined up, then you need to check the squareness of your corners with your large square ruler again and make any necessary minute adjustments to square up those corners. Then check the long sides again using your long ruler to make sure things are nice and straight, only cutting away slivers of quilt to make things more square and straight.
Fold your quilt again, lining up corners and edges, to check your squareness. Repeat until things are as square and straight as you can get them.
Well, I think that’s it for today. Next week I promise we will attack the Binding in our Basic Quilting Skills for Beginners series.
Here’s hoping we all have a productive autumn season — especially with our quilting.
I don’t know if you’re like me or not, but I tend to quilt less in the summer months. First, of course, it’s summer and I want to be busy doing other summer-y things and going places. Second, my Sewing Dungeon, er….Studio, is not air conditioned, so for a couple of months out of each year, it’s hard to sew with sweat dripping down into my eyes and onto my projects.
Yup, here’s my dungeon! LOL! Cue the creepy music, please! Image by upklyak on Freepik
Needless to say, I look forward to the cooler fall months when I feel more productive in my studio and I get excited again about new projects.
What the Heck is “Quilt as Desired”???
If you’re new to quilting, you might have seen the phrase “quilt as desired” at the end of some of your quilt patterns. But what does it really mean? It’s a designer’s way to say quilt your quilt any way you want to.
On our Villa Rosa Designs Rose Cards, we take it a step further and say “Quilt and bind as desired.” Gee, that makes all the difference, doesn’t it? NOT!
If you’re a beginner, how are you supposed to know what to quilt or how to quilt your quilt to finish it?
Never fear — I’m here to help!
The first thing you need to consider after you complete the quilt top is what kind of quilting are you going to do? Machine quilting? Hand quilting? Or even tying/tacking?
Okay, let’s say you want to machine quilt your quilt yourself (sorry, I’m not into hand quilting, so you’re stuck with machine quilting). Here’s a little video I put together a while back about some basic free motion quilting skills and information.
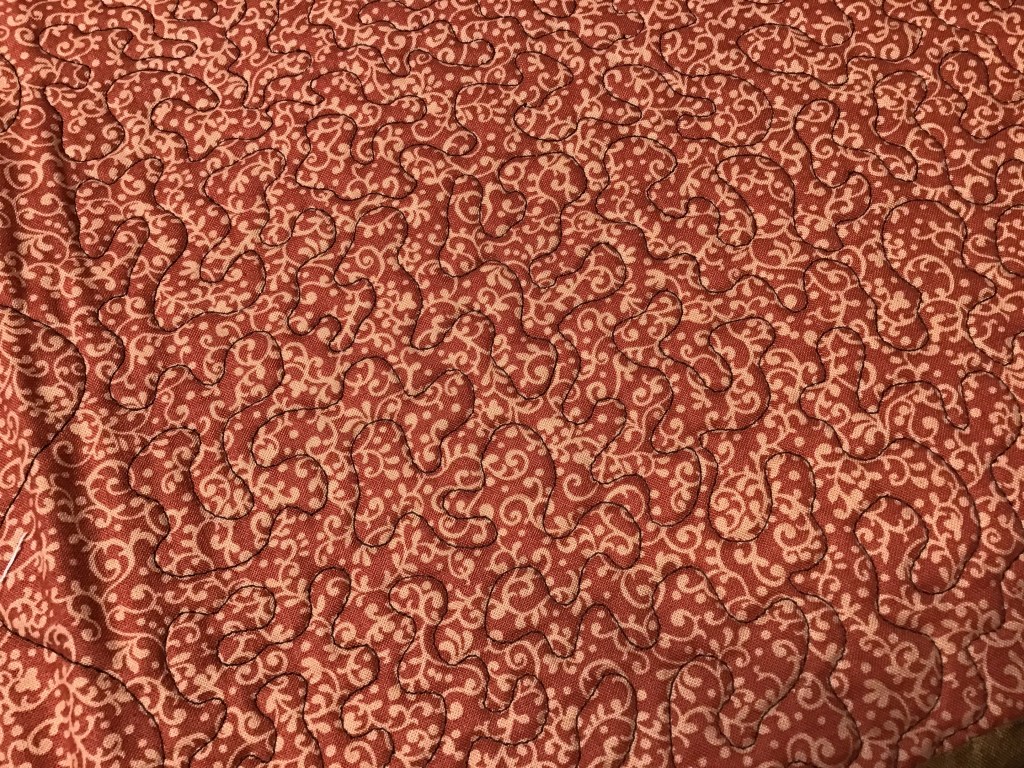
Wiggly lines are just one way you can quilt your project. Here are some of my other free motion quilting favorites.
Straight Lines
If you haven’t tried quilting simple straight lines on a project, it’s way past time you did! To get your lines relatively straight, you will probably want to use a walking foot or an even-feed foot on your sewing machine. A walking foot or even-feed foot moves the top and bottom layers under the needle at the same time so your sewing lines are less likely to pucker and you won’t get those annoying tucks on the back of your quilt.
Here’s a great example of what straight lines can do for your quilt — this is only the backside and it’s unwashed! Cool, huh? Straight lines add a lot of texture. And if you look closely, you’ll see that my lines aren’t really all that straight, but by repeating the lines over and over about the same distance apart, it looks pretty awesome. Now imagine what this table runner will look like after I wash it and it crinkles up beautifully! You’ve just got to try straight lines!
Straight lines look great quilted on anything modern as well as children’s quilts. But I wouldn’t recommend straight lines on your Civil War reproduction quilt. LOL!
Loopy Loops
Loops are probably my all-time go-to design. I usually use this design edge to edge but sometimes I will use loops in the quilt center with something different in the borders. It depends on my mood, how much time I have, and what the quilt needs to be completed. (Yes, quilts talk to me — I am a quilt whisperer…)
As a free motion quilting teacher for a lot of years, I have discovered that loopy loops are more beginner-friendly than stippling/meandering. You have permission to cross over your lines in loopy loops, whereas in stippling/meandering you do not cross lines at all. Loopy loops are less stressful and I find them lots of fun to do.
Below, here’s an example of loopy loops. Neat, huh? See how all the loops are not the same shape or size? That’s what makes this design look easy-breezy. You can also use loopy loops as a jumping off point for A LOT of other variations.
I tend to quilt my loops big and open, which of course uses less thread and takes less time than quilting itty bitty loops. My rule of thumb is to quilt my lines of quilting no closer than a finger’s width. Of course, if I’m quilting a doll quilt, I’m going to quilt this design smaller and closer together than if I am quilting a throw quilt. Adapt the size and density of your quilting to the project you are quilting.
Loopy loops look pretty great on almost any project! Maybe not your Civil War repro quilt, though. (Maybe you should try hand-quilting for that one, just sayin’.)
Stippling/Meandering
All beginner quilters want to learn how to stipple/meander. I have found over the years that a lot of intro to free motion quilting classes start with stippling/meandering. This is not really a true beginner design, in my humble opinion. I think it is better suited for a more advanced machine quilter. Why? Because you cannot cross over your lines and that is hard to do (or not do) while you are trying to get all the other 101 free motion skills and information all at the same time — beginning free motion can be a bit overwhelming, and that’s without having to worry about not crossing over your stitching lines! Ugh!
Sadly, intro free motion classes keep trying. And mostly failing. Then beginners get frustrated and upset when they can’t quickly pick up stippling/meandering in a couple hour class. Then many of them just quit. I’m sorry to tell you, but stippling/meandering takes most people a lot of practice to master. So I recommend that beginner free motion quilters start with straight lines, wiggly lines, and loopy loops before even attempting stippling/meandering. Most of us have to crawl before we walk….
By the way, in case you wondered, stippling and meandering are pretty much interchangeable terms at this point, although once upon a time they were slightly different. I am using both at the same time so as not to cause any confusion for anyone. 🙂
To me, stippling/meandering is a lot like loopy loops except you are not crossing over any lines. That difference can be very daunting to a beginner, however. If the idea of not crossing lines terrifies you, then please do try straight lines, wiggly lines, and loopy loops before moving on to stippling/meandering. I still try to use my rule of thumb of leaving at least a finger’s width between my lines of stitching.
Here’s an example of stippling/meandering. I apologize that it might be hard to see my brown thread on the swirly-printed pink backing fabric on this place mat. Aha! Here’s another one of my tips: Use a busy fabric on the back of your quilt because it helps to hide your quilting stitches — this is particularly helpful when you are a beginner. It will help you to feel more confident about your developing quilting skills!
Probably the most important thing to remember about machine quilting is RELAX and HAVE FUN! Because quilting shouldn’t be like a job or chore, it should be relaxing and fun or else why would we be doing it???
You can check out some of my other favorite quilting tips HERE.
Next week we are going to tackle Binding, so stay tuned!
We’re going to jump right into our topic today — batting, backing, and preparing a quilt for quilting. There’s a lot to cover, so grab your cup of coffee and let’s get to it. I apologize in advance, but this post will be text-heavy. Sorry……..
Batting
If you’re new to quilting, you might not know what the filling inside of a quilt is called. Here in the USA, we call it “batting” or you might see it as “batt.” If you are in Europe or Canada, you might hear it called “wadding.” Whatever it’s called, we are talking about the layer between the top of the quilt and the back (or bottom layer) of the quilt.
If you’ve looked at batting options out there, you might be a little overwhelmed. There’s cotton, polyester, cotton/poly blends, wool, recycled, bamboo, natural, bleached, white, black, etc., etc. How do you know what batting is the best?
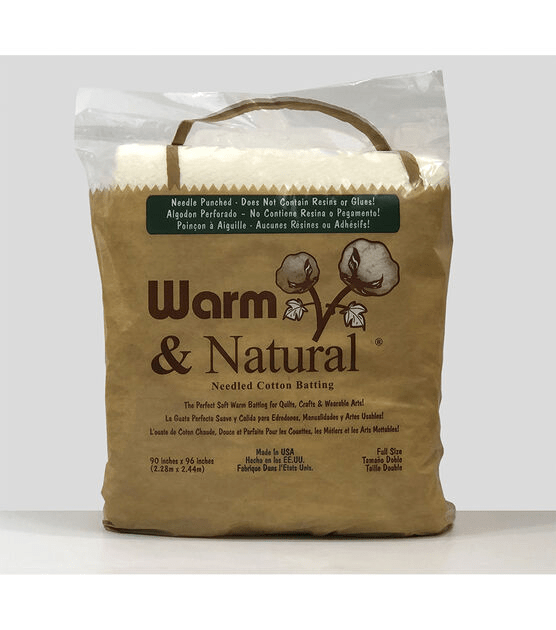
I’m here to to tell you that there isn’t only 1 “best” batting out there. A lot of what batting you choose depends on your project as well as your personal likes/dislikes or even possibly allergies. Classic favorites include: Warm and Natural, Hobbs, and Mountain Mist, but there are many more companies offering batting today.
Warm and Natural
Hobbs
Mountain Mist
So your best bet is to try some different samples of batting. Do you like the feel of cotton? Or a blend? Or polyester? Or silk? Or…? Which batting is easier to work with? Are there differences/similarities in the same fiber contents but different companies? If you’re going to quilt your own quilt, how does each sample quilt? Hand quilting or machine? Maybe you are tying your quilts?
Eventually, you will find the batting that you prefer and that’s probably the one you’ll use over and over again in your quilts. If you are interested in reading detailed articles about choosing quilt batting, there are LOTS on the Internet, just type “how do I choose quilt batting” into your favorite search engine and go from there.
What if the pattern I’m using doesn’t tell me how much batting to buy for my quilt?
I’m so glad you asked! You can figure out how much batting you will need with a simple formula.
1. You need to know how big the finished quilt will be ( be aware if you are adding or subtracting blocks or borders, your finished size might be different from the size listed on the pattern).
2. You will add 8 inches to both the length of the finished size and the width of the finished size.
Why 8 inches? Most professional quilters ask that your batting and backing be at least 4″ bigger on each side of your quilt top. If you are quilting the quilt yourself, you can sometimes get along with less, but it’s better to have too much batting and backing around the sides than not enough. If you are getting your quilt quilted by someone else, make sure to ask if 8 inches is enough for them, they may want more.
So, let’s do a few examples.
Quilt A is 57″ wide by 75″ long. Let’s add 8″ to each measurement for a total of 62″ x 83″ — this is the minimum batting size you need for your quilt.
Quilt B is 21″ wide by 52″ long. Let’s add 8″ to each measurement for a total of 29″ x 60″ — this is the minimum batting size for this table runner.
Great, but I can’t go to the quilt shop and buy exactly 62″ x 83″ or 29″ x 60″ of batting. So now what?
You can usually purchase batting by the yard or by the package at your favorite retailer. A yard of batting would be 36″ long by whatever width the batting is, which could range from 45″ – 120″!
Batting by the Yard
Okay, for Quilt A we need to buy a piece at least 62″ x 83″. At Quilt Shop X, we can buy batting that is 90″ wide, so that would be long enough if we turn the quilt sideways (83″ wide x 62″ long). Now what would be the closest yardage amount for 62″? 1.75 yards equals 63″. I would probably buy 2 yards of the 90″ wide batting, just to be on the safe side — it would give me 72″ x 90″, which is larger than what I need, so that’s good. Done.
Batting by the Package
Instead of batting by the yard, Quilt Shop Z offers a selection of prepackaged batting in different sizes. Here’s what you might find:
Craft – 34″ x 45″
Crib – 45″ x 60″
Throw – 60″ x 60″
Twin – 72″ x 90″
Full – 81″ x 96″
Queen – 90″ x 108″
King – 120″ x 120
Keep in mind that these measurements might be slightly different depending on the manufacturer.
Okay, for Quilt B our table runner, we need at least 29″ x 60″. Hmmm. A Crib or Throw size might work because they are both 60″, but that might be cutting it a little close, so I would probably go up to the next size, which is a Twin at 72″ x 90″. Of course, I will have leftover batting, but I can save that and use it for another project (or 2 or 3…).
Backing
Getting the correct size of backing for your project is pretty much the same process as I described above for quilt batting — you will want the backing to be at least 4″ bigger than the quilt top all the way around, or just add 8″ to the finished width and length of the quilt. Mostly, you’ll buy backing fabric by the yard, but there are more and more shops that are offering precut pieces of extra wide backing, usually in 2 or 3 yard pieces by the extra wide width, usually 108″, but you might find 120″ as well.
It’s really easy to figure out how much backing you need if you plan to buy the extra wide fabric. Buying extra wide fabric is a huge time and effort saver.
But, some of the time the fabric you want for the backing is the regular width of 42″ – 45″ wide.
How do I figure out how many yards of fabric to buy if the pattern doesn’t tell me?
A great question! Let’s use our Quilt A example from the Batting section.
Quilt A is 57″ wide by 75″ long. Let’s add 8″ to each measurement for a total of 62″ x 83″ — this is the minimum backing size you need for your quilt (we figure this just like the batting).
We know that a yard of fabric is 36″ long. The average width of regular-width quilt fabric on the bolt is about 44″ wide. But because fabric can vary a bit in width, I usually use 40″ as my width measurement.
For Quilt A — I know I need it to be at least 62″ x 83″. There are 2 main ways to piece a backing fabric together: vertical or horizontal, but sometimes one will work better than the other. In Quilt A, we will need to piece the backing vertically because horizontally there wouldn’t be enough fabric as 40″ + 40″ is only 80″ and we need at least 83″).
A vertically-pieced backing
Using the 40″ width, I would need 2 widths to get at least 62″ wide. I know I need at least 83″ for the length. So that means I would need to sew together 2 pieces of fabric each at least 40″ x 90″ (I chose 90 as it’s greater than 83″ and it’s 2.5 yards). So I would buy 5 yards of regular width fabric. Cut the 5 yards into two 2.5 yard pieces (90″) and sew them together down the middle using a 1/2″ seam (instead of a 1/4″ seam) to add some durability. Then press the seams open and press out the wrinkles and creases. DONE!
Here are my favorite tips for selecting backing fabric:
Use quilting weight fabric, just like what you used for your quilt top. Backing a quilt with a sheet may result in a stiff quilt that does not drape well.
Choose a backing fabric that compliments the front of your quilt.
Make sure the fabric for your backing is big enough.
Use a busy printed backing fabric as it will not only look really good on the back of your quilt, it also can hide the quilting stitches — this is particularly great when you are just starting out either hand or machine quilting.
In the first example, the black thread really sticks out like a sore thumb on the grey backing fabric. The thread and backing look fine together, but if you flipped over your quilt to the back, any mistakes or wobbles in the quilting would really jump out at you!
In the second example, the grey thread blends in more with the multicolored argyle backing fabric, which would help to hide or at least make less noticeable any mistakes or wobbles in your quilting.
5. One of my favorite places to find fabric for backing is in the discounted or clearance section, where you’re sure to find a selection of great quilting fabrics that are older and are being sold at a discount to make room for newer fabrics.
Preparing Your Quilt for Quilting
Now that we have our quilt top completed, we have batting that is 8″ wider and 8″ longer than our quilt top, and we have a busy backing fabric that is also 8″ wider and 8″ longer than our quilt top, it’s time to get it ready for quilting.
First you have to make some decisions before you go any further:
Hand quilting or machine quilting? (or perhaps tying the quilt?)
If hand quilting, are you doing it yourself?
If machine quilting, are you doing it yourself?
So, let’s say we have decided to send our Quilt A to Sally who is a reputable long arm machine quilter in the area.
You should ask the long arm quilter how to prepare your quilt for quilting, but here are some general suggestions:
Carefully press the top of the quilt and the backing of the quilt
Turn the quilt top so that the underside is up and trim any and all strings and threads
If your batting was folded or wadded up in a package, you may need to lay out the batting so the creases can relax. You can speed this up by tossing the batting into the dryer on low or air fluff (so it doesn’t shrink)
It wouldn’t hurt to press the quilt top and backing one more time, but be careful not to distort or stretch the quilt top
Sally the long arm quilter will load the backing, batting, and quilt top onto her frame and will quilt the layers together using whatever design the two of you decided upon. You may also be able to select the thread color you want used on your quilt. White, ecru, or grey are always safe choices, but colors like red, orange, pink, blue, or purple can really give your quilt that little extra something-something.
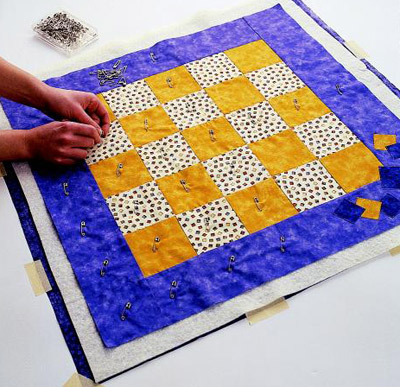
If you are going to quilt your quilt yourself, you will need to layer your backing, batting, and quilt top.
Lay your wrinkle-free backing fabric wrong side up on a flat surface. Tape the edges of the backing fabric down to the table, making adjustments until the backing fabric is perfectly smooth and flat without any wrinkles or bumps. You will need to stretch the backing gently to make it nice and flat, but be careful not to overstretch the backing as this can skew the fabric.
Center your batting on top of your backing and smooth it out until it is wrinkle-free.
Now center your quilt top right sides up on top of the batting. You should see at least 4″ of batting and backing around all the edges of the quilt top. Smooth your quilt top so it is perfectly flat with no bumps or wrinkles.
Using pins, a basting tool, or needle and thread, baste the 3 layers together. If pinning, place pins about every 4-5 inches (some quilters like their pins closer together and some like them farther apart). I like to pin across the center horizontally and vertically and then pin in diagonal lines from the center out to the corners. If needed, I add extra pins here and there. You can check out http://www.AllPeopleQuilt.comHERE for a good article about different ways to layer and baste your quilt.
Photo from AllPeopleQuilt.com
WHEW! I know this was a lot of information to absorb. You may need to read it more than once. LOL!
There are also lots of great resources about this topic online, in quilting books, and in the back of your favorite quilting magazines.
I am thrilled to show you our NEW September Rose Card patterns! I can’t wait until the first Fry-Day (Friday) of each month when the new set of patterns is released — it’s always great to see what our awesome VRD designers have come up with. You can see the new patterns first if you have joined the email list to receive our VRD email newsletters.
What??!! You don’t get our newsletter??? You can sign up for our newsletter HERE.
Of course, I follow up with the newest patterns on the next Thursday after the patterns are released each month here on the blog in case you missed them in the newsletter.
Well, here they are! Cue the trumpets! Throw the confetti! Applause!
September’s NEW Rose Cards
You can order all 5 cards HERE for the low low price of $8.95.
But WAIT…….there’s MORE! (Sorry, not sorry — you know how much I love saying this.)
There are also kits for some of the September Rose Cards — did someone say KITS??? Each kit comes with the fabric for the top and binding as well as the pattern. You can find kits below, for as long as they last.
Of course, our website, www.villarosadesigns.com, is always stocked with great kits. You can see our current kit offerings HERE. You’re sure to find one…..or maybe a hundred that you can’t live without.
Pressing Techniques
Let’s dive right back into our Basic Quilting Skills for Beginners with Pressing Techniques101.
I bet you never really thought about the concept that there are different kinds of pressing techniques for different types of projects. Well, I’m here to tell you that how you use an iron for quilting is different than how you use an iron to iron your shirts or pants.
There’s ironing. And then there’s pressing.
According to the Merriam-Webster Dictionary:
(to) iron
1a : to smooth with or as if with a heated iron iron a shirt
1b : to remove (something, such as wrinkles) by ironing
(to) press
5 : to exert pressure (this is the closest definition for pressing with an iron I could find)
You can see a little difference between the two definitions, can’t you? Ironing requires moving the iron around while pressing is more of an up and down motion.
I found this pretty decent YouTube video from Hobby Lobby about the difference between pressing and ironing along with some tips. You can check out the video HERE.
Over the years, I’ve tried a lot of different irons from cheap travel models to expensive specialty irons. Some irons are hotter than others. Some have more weight so you don’t have to press down as hard. Some have longer cords or are larger models. Some have continuous steam or bursts of steam. So many choices, but it all depends on what you want out of your iron and what your budget is. So look around, test out different models and brands. Find the one you like the best, for what you want to do, don’t just go for the most expensive or the least expensive.
Pink Oliso Iron
One of the coolest irons in my opinion is the Oliso iron. It lifts up after so many seconds so there’s no chance that you will burn your fabric or project by pressing too long or forgetting about the iron in the down position. AND they come in a bunch of really pretty colors! You can usually find Oliso irons at your local quilt shop or your favorite online vendor.
Here’s a great YouTube video by SewVeryEasy about what to look for in an iron as well as lots of tips and tricks. You can check out the video HERE.
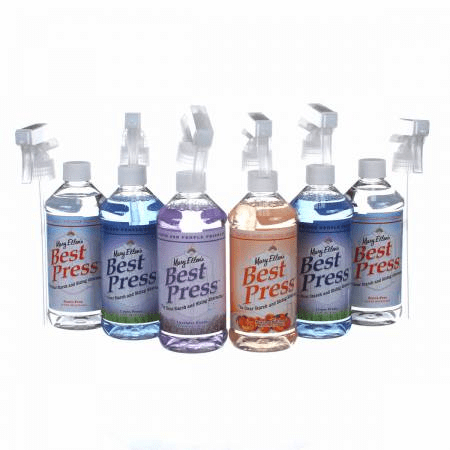
Some quilters swear by using the steam function of their iron for pressing. Me, I like a dry hot iron for quilting AND I love to use Mary Ellen’s Best Press Starch Alternative. A long time ago, I used spray starch in the can, but got tired of the little flakes and the shiny spots on my fabrics, so when I found Best Press, it was a total game changer for me.
Mary Ellen’s Best Press Spray
A little spritz is all you need. Best Press helps me to get crisper flatter seams without having to work very hard, which then helps my quilt fabrics to stay square and not to stretch out of shape. An added bonus is that Best Press comes in many fun scents and also comes in unscented, too. My personal favorite scent is Peaches and Cream. You can find Best Press at your local quilt shop or favorite online vendor.
I hope these pressing techniques and tips are helpful! Stay tuned for next week’s post all about batting, backing, and preparing a quilt for quilting.
I hope you had a chance to read our first post in a multi-part series called “Basic Quilting Skills for Beginners.” Last week’s post was all about the quilter’s 1/4″ seam allowance. Did you miss it? You can find it HERE. This week we’re going to talk about the Basics of Rotary Cutting.
First, let’s talk a little about the history of rotary cutting — YES! There is a history of rotary cutting (there is a history of everything, if you’re interested enough to find it). The rotary cutter was invented in 1979. Originally it was used in the garment industry, but once quilters saw its potential to speed up cutting and increase accuracy, they stole it and by the early 1980’s. the rotary cutter was all the rage. Before the rotary cutter, quilters made templates for each piece of a quilt, traced around the shape over and over, and then cut the shapes out using scissors. With rotary cutters came acrylic rulers and templates and of course self-healing cutting mats.
Here’s a cardboard triangle that was used by a friend of mine to cut out hundreds if not thousands of triangles.
Rotary Cutting Tools
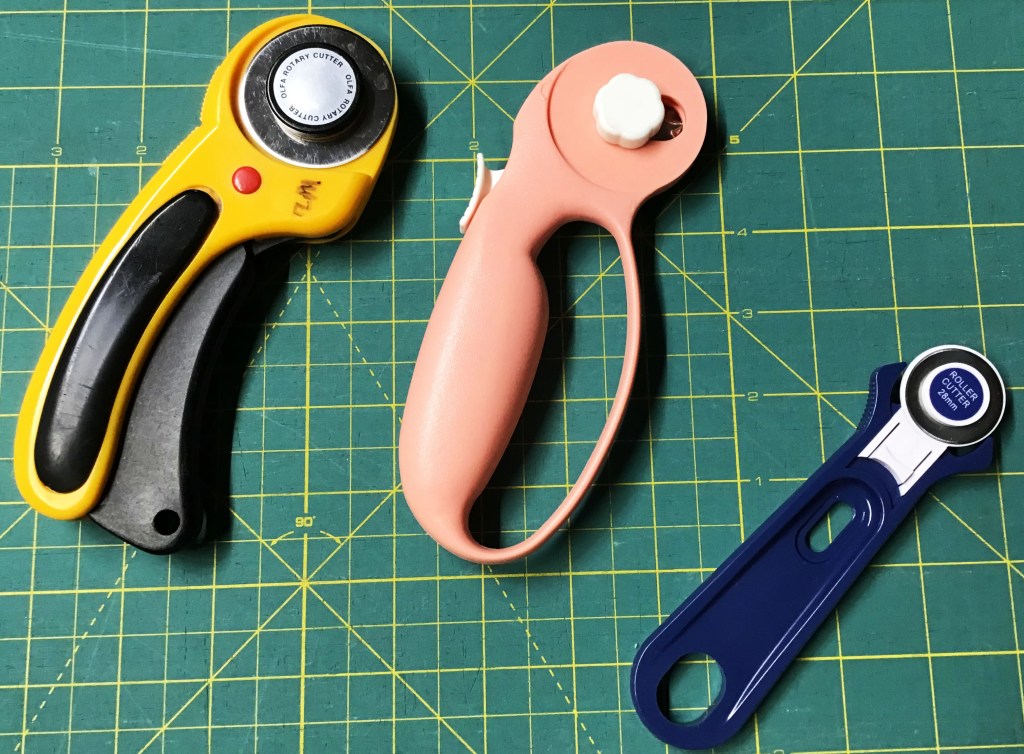
When I first started quilting back in 1996, I started with a beginner’s quilting set which included an 18″ x 24″ mat, a 45mm rotary cutter, and a 6″ x 24″ acrylic ruler. These tools worked great for me until I started working part-time in a quilt shop and had the opportunity to try out different cutters and rulers. When I discovered the yellow Olfa ergonomic cutter, below, I was in love (believe it or not, but this is actually my original Olfa and I’ve been using it for around 20 years)!
Keep in mind you might need to try out different rotary cutters until you find the one that fits you and is the most comfortable. What works for a right-handed quilter might not be the best choice for a lefty and vice versa. You want it to be comfortable because you’ll be spending a lot of quality time with your rotary cutter (and don’t forget, you will need to change your rotary cutting blade regularly, just like your sewing machine needle).
Rotary cutting basic set
Some different examples of rotary cutters
These basic tools worked for me for a quite a while, but over time as my skills grew, I began adding more rulers. And I upgraded to a larger mat — I really like my 24″ x 36″, which fits the top of my antique Hoosier cabinet bottom beautifully (and the storage is outstanding, of course). I also have a rotating mat as well as some smaller mats for working with smaller cutting projects or projects on the go. Even though I’ve tried out lots of different tools and made some changes, I’m still just as in love with my Olfa cutter (above, left) as I was the first time I used it.
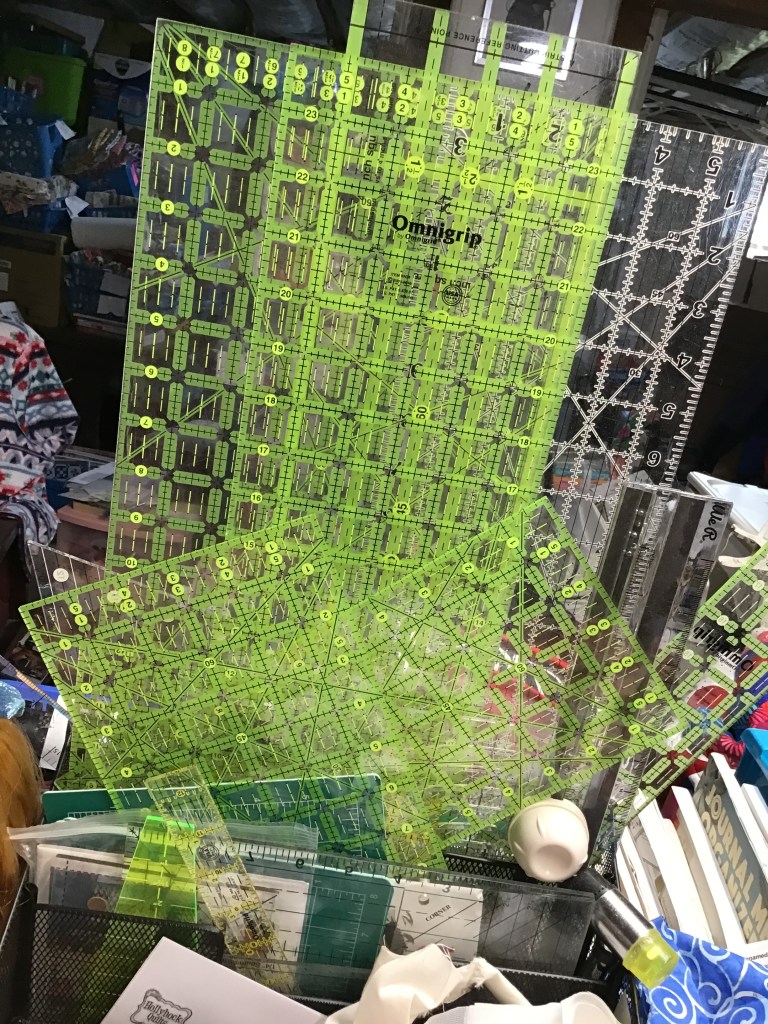
Here’s my stash of rulers — well, some of my stash of rulers, anyway…….
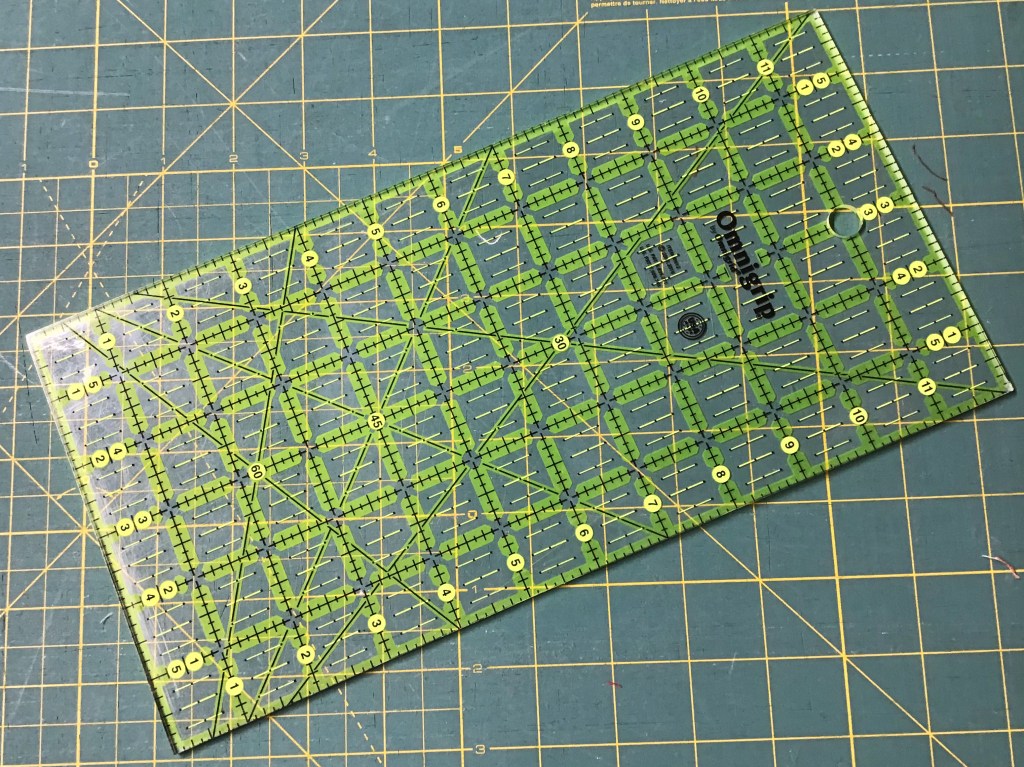
Nowadays there are so many ruler choices. Two of my favorites are the 6″ x 12″ ruler and the 12 1/2″ square ruler. A 6″ x 12″ ruler is a great companion to the 6″ x 24″ because sometimes you just don’t want to mess with that full 24″ length, especially if you’re working in a tight space or cutting small pieces. The 12 1/2″ ruler just makes sense — it will square up blocks and cut squares up to 12 1/2″ square.
As you go along and your skills increase, you’ll probably add lots of rulers and acrylic templates, too. Some of those rulers will do a lot of different things (why they can’t do the dishes, though, is beyond me….) while others will do one thing and do it well.
a 6″ x 12″ rulera 12 1/2″ square rulersticky dots on the back help to keep my ruler from sliding
There are lots of different companies out there making rulers today. Keep in mind, though, that not all rulers are created equal. Measurements might be slightly different between different manufacturers. The markings of one ruler might be easier to see on light fabrics while another might show up better on dark fabrics. Some rulers have textured bottoms so they don’t slide while others are as slippery as a Slip and Slide (you might need to add some textured dots to the back of a slippery ruler to help hold it in place while you cut — see the third photo, above). You will need to try different rulers to find the ones you like the best. And once you find a manufacturer you like, stick with that one.
Rule of Thumb: Finish a project with the same ruler(s) you started the project with.
Why? Because as I stated earlier, not all rulers are created equal. Switching rulers midstream could affect the accuracy of your project. Imagine this — you’re making a quilt that has thirty-five 12″ (finished) blocks with 5 blocks across by 7 blocks down. You cut out part of the quilt with one ruler and then switch to a different ruler made by a different manufacturer and you keep cutting out your squares and triangles. Then you go to sew them together and suddenly not everything fits together exactly right — you’re cutting off some triangle points while others are perfect. You check your 1/4″ seam allowance. Huh…..that’s not it. Then you check a few of your cut pieces. Depending on which ruler you are using ( the first one, the second one, or even an altogether different ruler), your pieces might be exactly the right size, too big, or too small. You can see how this snowball is rolling downhill and getting bigger and bigger, can’t you?
Here’s our beautiful quilt, which won’t be so beautiful if we don’t figure out what is happening and find a way to fix it ASAP. If you keep plowing ahead without figuring things out, your blocks might end up being different sizes, which will then make it hard to sew the blocks together into rows and the rows together into the finished quilt top. If your blocks are only 1/8″ different, that will add up across and down your quilt. By the time you sew all the rows together, your quilt is off across the width by 5/8″, which is more than a half inch while the length is now off by 7/8″, which is nearly an inch! And if you’re adding borders — well, I don’t even want to think about how those borders might stand up and wave back at you….
Accuracy……Accuracy…..Accuracy.
Consistency…….Consistency………Consistency.
There is so much to remember when you are a beginner! But I promise you, if you take the time to learn the basics, they will become part of you. Like the Force.
How do you actually cut with a rotary cutter???
Since I am not physically by your side to guide you in rotary cutting skills, I am not going to try to teach you how to actually cut with your rotary cutter. Instead, I will give you some tips that I have learned over the years.
If you are new to rotary cutting and do not have an experienced quilter to help you learn how to use it, sign up for a class on rotary cutting. Maybe it’s at your local quilt shop or maybe it’s online. But sign up and learn how to be safe and how to cut accurately.
KEEP YOUR FINGERS OUT OF THE WAY OF THE BLADE! This means, you have to pay attention to what you are doing. ALWAYS. Keep your fingers of your non-cutting hand back away from the edge of the ruler as you cut. There are rulers out there with special raised edges to keep your fingers safe. There are special gloves you can get to put on your non cutting hand to keep your hand safe. Use them if needed, there is no shame in keeping yourself safe. Ask my Mom about rotary cutting safety and she’ll tell you how she spent Mother’s Day one year in the emergency room with me when I had a bit of a rotary cutting accident……Don’t worry, I was okay……
DO NOT GET DISTRACTED WHEN YOU ARE HOLDING A ROTARY CUTTER IN YOUR HAND. Do not look up to watch an exciting part of the TV program or movie. In fact, it’s safer not to have the distraction of the TV while you are cutting. Ignore the telephone or dings and pings that tells you there is a new email or text message or whatever.
If you get a drop of blood on your fabric, spit on the spot and rub it. Spit and rub. Trust me. The blood will come out. Gross, I know, but it works. Your saliva will break down your blood on fabric. Your saliva will not break down someone else’s blood, though, only your own.
If you do cut yourself, apply pressure to the wound. Hold the wound above the level of your heart. Seek medical help immediately if needed.
Hold your rotary cutter straight up and down on the cutting mat and snug up against the edge of your ruler. Press down with enough force to move the blade, but keep it upright.
If you are pressing too hard and your cuts are not clean, it’s probably time to change your rotary blade.
Always keep extra blades on hand — store them safely. You never know when you will need to change your blade — they nick easily.
Change your blade regularly — a dull blade is more dangerous. If you are struggling to get through the layers cleanly, you might slip and cut yourself.
Dispose of your blades responsibly — do not just throw them in the trash. You could wrap it in cardboard and tape it up before throwing it away. You could use a large pill bottle or small container to collect used blades as well as broken and bent pins. It will take you a long time to fill it up. Then you can find a safe place to discard it.
Keep children and pets away when you are using your rotary cutter. Store your rotary cutter away from children and pets.
Keep the blade locked or in the down position when you are not using it.
DO NOT lay your rotary cutter down with the blade open or exposed, always close or cover your blade when you lay it down. An unattended exposed blade is an accident waiting to happen.
I find that I cut more easily and more accurately when I am standing versus when I am sitting.
Always cut on a rotary cutting mat. Otherwise, whatever you are cutting on top of will be damaged and most likely ruined.
If your table is too low for comfortable rotary cutting, raise it up on bed risers, PVC pipes, or whatever works safely.
I know this post is just the tip of the iceberg concerning the basics of rotary cutting. There is an entire body of information out there, you just have to look for it. Check out your favorite quilting books and magazines, your local quilt shops and quilt guilds/organizations, as well as online tutorials, blogs, posts, videos, and more.
Next week, we will talk about Pressing Techniques and the new September Rose Cards. So, stay tuned.
May the Force — the Rotary Cutting Force, that is — be with you.
Recently, we received a message from a quilter who purchased a couple kits featuring Villa Rosa Rose Card patterns at a quilt shop while traveling. She asked for instructions for the kits she purchased. Oh no! I thought, did the kits not include the Rose Cards?
After further communication back and forth, I found out the cards were in the kits, but the quilter, being unfamiliar with Rose Cards, wondered why the pattern was so small and on the back of a postcard– there must surely be more to the instructions than that, she thought. So, she contacted us.
This message got me thinking about how our Rose Card patterns really are very beginner friendly, but beginner quilters are expected to have some basic quilting skills.
So, what skills does a beginner quilter need to know in order to successfully make a Rose Card quilt pattern?
Haven’t gotten your August 2022 Rose Cards yet? You can buy them HERE.
Several things came to mind right way, so I thought — why not write some posts about beginning quilting skills? That way if we get beginner questions, we actually have somewhere to send them for answers besides a vague reference to the Internet or YouTube.
The first one I thought of — and possibly THE most important beginner quilting skill — is knowing how to sew an accurate 1/4″ seam.
An accurate 1/4″ Seam Allowance
Most if not all quilting patterns use a 1/4″ seam allowance. Pattern designers build that seam allowance into their cutting measurements so the pieces will fit together properly when you sew them together. YAY MATH! (You can check out my post about quilting and math HERE.) In the past, way before rotary cutters, quilters had to draw seam allowances around patches, cut them out of cardboard or heavy paper, and then cut the patches out with scissors using the cardboard patterns. HORRORS! Please note that applique can be a little different, though, as you might have to add a seam allowance around the shapes — but this is a topic for another day. For our purposes here, we will refer to pieced quilting patterns.
Seriously, though — a 1/4″ seam doesn’t just happen by magic — you need to make friends with your sewing machine so you are both on the same page. One of the best things you can do to make friends with your sewing machine is to keep your sewing machine manual nearby and to actually use it! If you’ve lost your sewing machine manual, you can check the manufacturer’s website because they might have your manual available for download. Sometimes you can find reprints of manuals on Amazon, too.
One of my all-time favorite sewing machine accessories is my 1/4″ guide foot. It’s a typical 1/4″ foot for quilting but it also has a nice little metal guide on the right (see below) that I can bump my fabric right up against while sewing, which helps me to sew a more accurate 1/4″.
Janome 1/4″ foot with guide
Don’t panic — if you don’t have a special 1/4″ foot for your sewing machine, there are other ways to get a accurate 1/4″ seam allowance.
The technique I was first taught as a beginner was to cut 3 strips of fabric 1 1/2″ wide by say 5″ long (the length is not as important as the 1 1/2″ width). Sew the 3 strips together side by side into a mini Rail Fence block. Measure the width of the center strip. If your center strip measures exactly 1″ wide, then you are already sewing an accurate 1/4″ seam so don’t change a thing!
If the center strip measures more than 1″ wide, then your seam is narrower than 1/4″, so you need to make an adjustment to sew a wider seam. Make the adjustment, then sew 3 more strips together and measure the center strip. If it’s still not right, keep making minute adjustments, sewing mini Rail Fence blocks, and measuring the width of the center strip until it is exactly 1″ wide. Note what adjustments you made so if you need to change the width of your seam allowance, you will be able to find your way back to your 1/4″. When in doubt, sew 3 strips together into a mini Rail Fence block and test the width of the center strip.
If the center strip measures less than 1″, then your seam is wider than 1/4″, so you need to make an adjustment to sew a narrower seam. Like above, keep making adjustments, sewing mini Rail Fence blocks, and measuring the width of the center strip until it is exactly 1″ wide. Note what adjustments you made so if you need to change the width of your seam allowance, you will be able to find your way back to your 1/4″. When in doubt, sew 3 strips together into a mini Rail Fence block and test the width of the center strip.
What adjustments can you make with your sewing machine to perfect your 1/4″ seam?
Your machine might have the option to move your presser foot either right or left, depending on whether your seam is too narrow or too wide.
You might need to place a strip of tape on your machine to mark where to line up the edge of your fabric to get your 1/4″ — you might try painter’s tape or washi tape, which would both be re-positionable as you make your adjustments to get your 1/4″.
Speaking of tape, you can actually stack up layers of tape to get the “bumper” effect of the guide on my 1/4″ foot.
If these ideas don’t work for you, you might want to consider purchasing a 1/4″ guide foot that will fit your sewing machine. To do this, you might have to know whether your machine is a low shank, a high shank, or rarely (mostly older Singers) a slant shank. How do you determine what kind of shank you have??? Why, refer to your sewing machine manual, of course!
Sew, what do you do with all of your little (and possibly wonky) Rail Fence blocks? Make a cute pin cushion, of course!
Here's how:

Press your Rail Fence block flat.  Make a tiny quilt sandwich with a piece of fabric for backing, a scrap of batting, and the Rail Fence block on top.  Press or pin in place.  Quilt by hand or by machine.  Square up your little Rail Fence sandwich.  Now place the Rail Fence sandwich right sides together with a piece of fabric you want for the back of your pin cushion.  Pin the layers together.  Sew 1/4" away from the outside edge of the Rail Fence block, leaving a couple inch opening on one of the long sides.  Trim the backing and Rail Fence block to the same size if needed.  Turn the pin cushion right sides out through the opening.  Push out the corners carefully.  Fill your pin cushion with stuffing or crushed walnut shells (mine is filled with crushed walnut shells).  Stuff or fill it firmly, making sure to fill the corners.  Leave a little bit of space at the long edge with the opening.  Turn the backing fabric and Rail Fence block raw edges to the inside of the opening.  Pin in place.  Now hand sew the opening closed using matching thread.  DONE!
I do want to point out that a consistent seam allowance is just as important as an accurate 1/4″ seam allowance. That being said, not all 1/4″ seam allowances are exactly the same. You would think so, but in truth there really is no one PERFECT EXACT 1/4″ seam allowance.
SHHHHHHHH. Don’t pass this around — you’re sure to offend someone who thinks their seam allowance is THE perfect 1/4″. We ALL know a quilter like this. LOL!
But alas, as hard as you try to find that elusive perfect 1/4″ seam allowance, there are always going to be things that make tiny differences — like the machine you use, the thickness of your fabric, you, how accurate your cutting is, possibly even the environment, and a host of other little things.
My advice to you is to find YOUR very best 1/4″ seam allowance and stick with it. Your pieces will still fit together as long as you’re consistent.
Our next topic will be Rotary Cutting Basics. Sew……Stay tuned!