
Hello Quilty Friends!
Happy Thursday to you!
Whoah!?! Hard to believe it’s August! YIKES! Right now I feel like I’ve lost the whole summer, so I guess I have A LOT of summer to cram into August, don’t I?
Here are some things I want to do this month:
- Go to the Baldwin Reynolds Museum and see the 250th Anniversary Quilt Display
- Visit some Quilt Shops with my quilty pals (FART)
- Play Mini golf with my Dad
- Go bowling!
- Thrifting with my Mom
- Do some decluttering (yeah – this always needs done)
- Make a fun project just because
- Keep working on my latest art and design projects (and actually finish a few of the ones I have in progress right now)
- Finish my 2nd Feedsack book (this one has been waiting a really long long time)
- Read a good book
- Just sit on the back porch with my dog and do absolutely nothing
Let’s see if by writing them down, I will get more of them accomplished this month. What’s on your August to-do list?
Small Project Summer Challenge Update
Well, the final numbers are in! All together we participants created 108 completed projects during our 6 week Challenge. WOOHOO! I hope each of you who participated pats yourself on the back for a job well done. Did you find a new favorite small project pattern? How many of you made something for Christmas? Any other thoughts about the Challenge? Please let me know in the comments.
I am still waiting to hear back from our Week 6 winner, so I will have that info for you next week.
I also want to congratulate
Dana S. from TX
as a co-winner for Week 5.
Awesome Applesauce, Dana! Yay you!
Now let’s check out the latest VRD tutorial, Fondue!
VRD Quilt Tutorial – Fondue
I was sifting through my stack of “quilt kits” and came across one for Fondue and I thought this would be a great one for the blog because I know people are already starting to think about autumn.
Fondue is a terrific pattern for 24″ panels along with coordinating fabrics. It finishes at a nice 49″ x 63″ and goes together quickly and easily. Fondue is beginner friendly and it’s flexible – you can add an outer border (or borders) to make your quilt larger if desired.

Get your digital pattern HERE or print pattern HERE
Of course, the first thing we need to do is gather up our fabrics. Today I’m working with a Hoffman Fabrics collection called Stag & Stone. Deer fabrics aren’t my norm, but I was really drawn to the colors in this collection and I find the deer to be quite elegant. And hey – it never hurts to have a great guy quilt handy for when you might need one. I think panels are a fabulous option for guy quilts because you can find wonderful panels with coordinating fabrics and a lot of guys aren’t necessarily into a quilt with a bunch of fussy pieces.
Here are my fabrics:

Next up, time to cut all my pieces out. I go back and forth between cutting everything out first or cutting as I go. I guess it depends on each project as well as what I’m in the mood for. Which do you prefer?


Depending on the dimensions of your panel, you might need to trim it to the right size for the pattern or even add some spacer strips to make it a little bit bigger if needed.
I needed to trim my panel to the right size. When you do this, you really need to be careful lest you trim off too much. So do your math carefully. You know the old saying – measure twice and cut once? Words to live by!
Have you ever cut too much off your panel? I have and do know what I do? I sew that piece right back on and re-cut the panel correctly. It’s not perfect, but it works.

My fabrics are cut and the panel is the right size, so now I’m going to sew the inner border to the sides of the panel and press the seams towards the border. Then I’m going to sew the borders to the top and bottom. Again, I’ll press the seams towards the border. So far so good.


Now let’s work on the side pieced borders. The borders are quick to sew together because the pieces are so big. Once I get the pieces sewn together, then I’ll press them. I am going to press my seams towards the sashing strips.
One thing I really LOVE about the Fondue pattern is that you can use directional fabric because of the way the pieces for the side borders are cut. This is a great thing because it’s not unusual to have directional companion fabrics for panels.


Let’s sew the side borders onto the framed panel! I like to match the center of the border to the center of the panel and pin. Then I match up the outside edges and pin, including an extra pin at the bottom edge of the border to help keep everything square. This was a little tip given to me by an experienced quilter named Pat when I was a newbie. It really does make a difference in keeping your border strips square instead of ripply.
Finally, I add a few pins in between the middle pin and the outside pins to keep everything lined up. I must admit that I will probably go to quilt jail someday because I tend to sew over my pins instead of removing them……..


Now let’s add the left side border onto the panel. SHEESH! I sewed my border upside down to the left side of the panel. How did I miss that????
Gee whiz!
Well, directional fabric is awesome as long as you sew everything right side up. LOL!

You know what’s next, don’t you?!? Rip, rip, rip!

You can find my Clover Grip Fit seam ripper HERE
Now to re-sew the left side border on, right side up this time. Silly me. I bet that’s never happened to you before, right?!? LOL!


Now that the trees and animals are no longer standing on their heads, I’m going to press the side borders towards my dark fabric, which is the inner border/sashing fabric.

On to the top and bottom borders….finally. Again, these are quick to stitch together because the pieces are large. After I get them sewn into strips, I’m going to press the seams towards the dark sashing pieces. Easy peasy.


Next I’m going to pin the top border to the top of the panel. Again, I will match my centers and outside corners, adding that extra pin to keep things square. That extra pin is like magic!
Then on to the sewing machine to stitch the top border to panel. After that, I need to press my top border seam towards the dark inner border/sashing fabric.


All right! The bottom border is next!

WHEW! Here is the completed Fondue top.
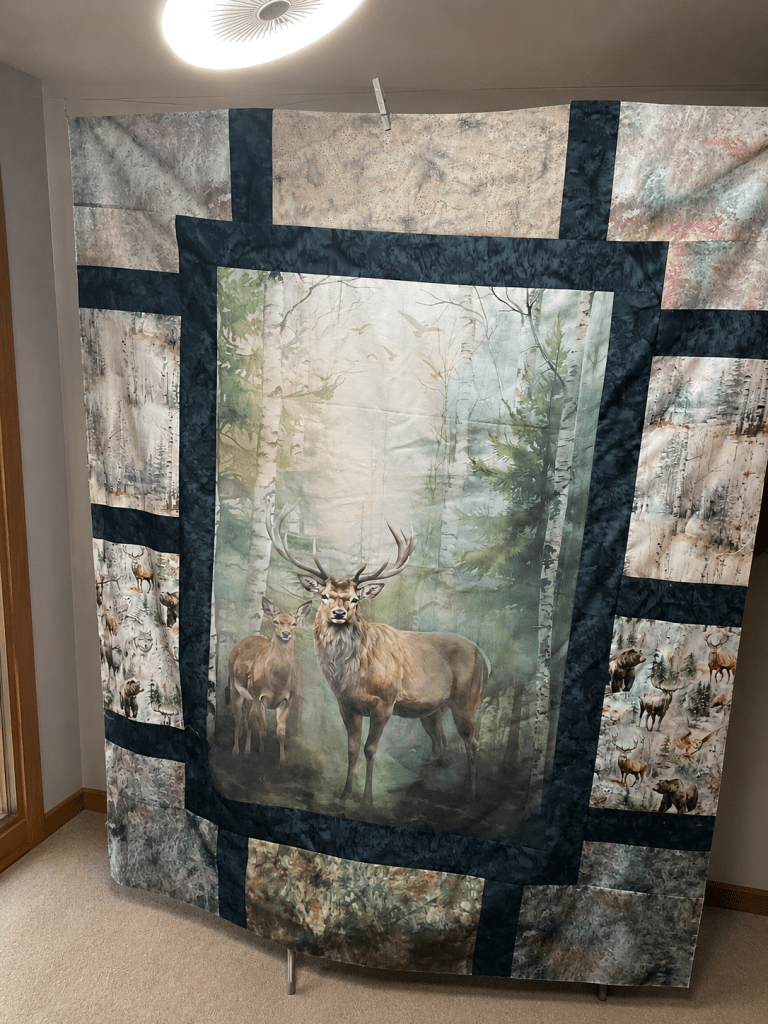
I took a chance and ran outside to see if I could get a decent photo, but it was a bit breezy, it was lightly raining, and there was still a rumble of thunder in the air. So, I kind of high-tailed it back inside instead of waiting for the perfect shot. Oh well. What can you do – Pennsylvania weather can sometimes be a little unpredictable.

I really like how this quilt turned out! The colors are really very soft and meditative. And it went together easily, except for me flipping the left border upside down. LOL! I totally recommend you try the Fondue pattern to showcase your favorite 24″ panels!
Well, that’s it for me today. Have a wonderful week and I hope you get the chance to cross a few things off your August list.
Until next time –
Sew. Laugh. Repeat.
Always,
Tricia @ VRD




 Villa Rosa Quilts