Blog Hop 2023 · Panel Quilts · Rose Cards · Tips and Tricks · Tutorials · villa rosa designs

VRD Bella Vista Panel Quilt Tutorial and Finally — the VRD Blog Hop Grand Prize Winners!

Hello Quilty Friends!

Happy Thursday to you!

What have you been up to this past week?

Another week has zoomed by and I am not getting anything accomplished! Or at least it feels that way. We’ve had some lovely February weather here in northwest Pennsylvania and I’m getting those “Spring into Spring” feelings when I want to clean, sort, and organize everything! Hah! I wish I could find an extra 2 hours in every day to get started on that ginormous undertaking, but I do need to sleep at least a few hours every night. You would think working from home, I’d have so much extra time to work on stuff, but sadly that is not the case for me. ARGH!

I want to start with my studio because it kind of looks like a fabric store/flea market threw up. I totally serious here. One of my local quilt shops hosts a “fabric yard sale” every year and I think it’s time to get signed up for it! I wasn’t planning on it this year because of a few time conflicts, but now those conflicts have been postponed, so I am calling today to get my space reserved. Even with less time than usual to prepare, this will inspire me to do some purging in my fabrics and such.

What do you do when your studio gets taken over by fabric, notions, patterns, books, rulers, scraps, and everything else?

VRD Blog Hop Grand Prize Winners

Okay, you’ve all been waiting to hear who won the 2 Grand Prize boxes from the Blog Hop.

Drum roll please………….

Congratulations to:

Joy from Oregon

and

Charlene from Georgia

Here’s a photo from the blog hop showing some of the fun quilting goodies in the boxes:

As for the rest of the prizes, they are being shipping out this week, so if you are a winner and you haven’t received your prize yet, you should have it shortly.

Wow! I think I’ve gone through 3 rolls of tape preparing all the packages! But you know what? I smile while I put on the labels because I know how much each winner is going to enjoy their prize from the Blog Hop.

VRD Bella Vista Panel Quilt Tutorial

Recently, I decided to make a special quilt for a cousin of mine who is having some rough times. I knew I wanted to use a panel because panel quilts go together so quickly, so I thought I’d give our new Bella Vista pattern a go.

This is a fabulous pattern for those horizontal panels. Sometimes it can be hard to find a pattern that uses this type of panel, so Bella Vista is a great pattern to have up your sleeve. It also works with ANY style of horizontal panel and can work with different sizes, too, as long as you measure as you go instead of cutting everything out first.

Don’t want to use a panel? You could replace that section of the quilt with blocks, appplique, or even a novelty fabric. Just keep in mind, you might have to do a little math. Yay math! Love math!

You can buy the Bella Vista pattern HERE.

Looking for a panel to jump-start a new project? You can go HERE and check out Villa Rosa’s large selection of panels.

Let’s get started on our quilt project!

So, the first thing I did was gather up my fabrics. My cousin loves eagles so I chose this flying eagle panel and a coordinating eagle print along with a light grey (I decided not to use the medium grey you see in the photo) texture, red tonal, and a blue tonal for the binding. My plan will be to back this quilt with fleece to make a cozy quilt for my cuz, so it will be like wrapping him up in a warm hug when he needs one.

Quilts are one of the BEST forms of therapy for folks going through tough times in their lives, wouldn’t you agree?

You all know how much I love The Quilts of Valor Foundation and the impact they are making one quilt at a time. To learn more about the Quilts of Valor Foundation, go HERE.

My cousin does not have a military background, but he loves red, white, and blue and is very patriotic, so an eagle quilt will be a good fit for him.

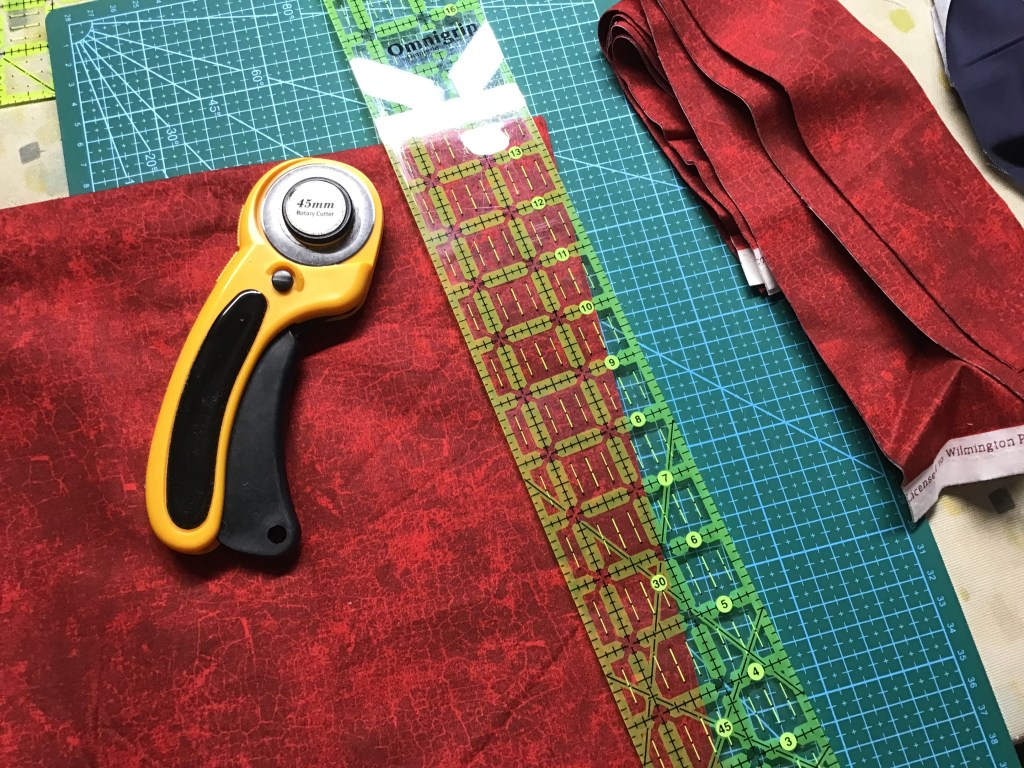
Now I have all the fabrics ready, it’s time to get going on this quilt project. The first thing I’m going to do is trim off the selvedges on the panel. This panel is bigger than the dimensions of the panel in the pattern, but I don’t really need to cut it down. Instead, I will measure as I go before I cut my fabrics.

Here I am cutting the red strips for the first border.

Next I measured the panel through the center horizontally. Those who know me won’t be surprised when I share this little Lazy Quilter hint about measuring. Tehehe……

I don’t use a ruler or a measuring tape. Nope, not at all to measure when I’m putting a quilt together. Instead I use my fabric or border strip or whatever I’m sewing together in order to get the right measurement. I’m a pretty consistent quilter, so this works well for me. I will say that this technique may not work for everyone, so use it at your own risk. LOL!

I folded my panel in half horizontally and laid it on my flat surface. I smoothed it all out nice and flat with the edges even. Then I gathered up my border strips which were already sewn end to end to make longer strips. These will be sewn to the top and bottom as per the directions.

I carefully laid the border strips out along the folded center. Then I smoothed the strips and lined up the edge of the strip to the edge of the panel. I usually put a pin at the edge to keep things from sliding around. Finally, I took a deep breath and cut the border strips to the width of the panel. I repeat this process all over again for the side borders, too, except that I use the vertical center to measure with, instead of the horizontal. I hope this makes sense…….

Now let’s sew the border strips onto the top and bottom of the panel.

Let me tell you how I do that, too, because I have another little trick up my sleeve.

First, I find the middle of the panel and the middle of the strip, match them up, and put a pin in the centers. Next I smooth the border strip along the edge of the panel and pin the outside, matching up the edges of the strip to the panel edges. I also put a pin at the bottom outside edge of the strip in a horizontal fashion (see this trick in the photo below on the left side). This helps to keep the strip square to the panel. Such a simple little thing can really make a difference. I learned this tip from an experienced quilter when I a beginner.

Then I add some more pins between the center and the ends before I head to the sewing machine.

Here is the panel with the first red border sewn onto all four sides. Don’t you just love the cool framed and matted effect of the printed borders in brown and navy around the edge of the panel.

So far, so good. Let’s keep moving.

I cut my second border strips using the light grey fabric. Next, I sewed 2 strips together to make a longer border strip. I decided to sew my border strips together with a straight seam instead of doing a diagonal seam for this project. It’s quicker and has less fabric waste, but mainly the tonals will hide the straight seam. I like to press my seam open to reduce the bulk. (I did the same with the first red border, but didn’t do a photo of it.) Take a look at the last photo in this group and you can hardly see on the front side of the border strip where I sewed the seam.

Now to measure the grey border strips against the panel just like I did above with the first red border. Time to pin, pin, pin. Then sew, sew, sew. Oops, sewing over my pins………

Here’s the quilt so far with the first red border and the second grey border on all four sides. Looking good!

Now I’m going to add the third border, which only goes on the top and bottom of the quilt.

You know, if you wanted to, you could sew the next borders together before sewing the border strip sets to the top and bottom of the quilt center. Just sayin’…….

Anyway, let’s add the top and bottom red borders.

I can’t believe how big this quilt is getting to be! It will be a really nice size when it’s finished.

I think for the eagle print border strip and the last red border, I am going to sew the strips together and then sew the border strip sets to the top and bottom of the quilt center. I wish I would have done this when I sewed the previous red border to the top and bottom (as I hinted to all of you, above, which was really after the fact). I think it would have been a bit easier. Did I mention this quilt is getting big? LOL.

I had to be careful when I was sewing the eagle print strips together into a longer border strip because it is directional and I didn’t want my eagles flying in different directions. There’s just something wrong with eagles flying backwards……

Then I had to watch when I was sewing the outer red border strips to the eagle print border strips because of the eagle print’s directionality — I really didn’t want my eagles flying upside down when I sewed them to the quilt center.

So if you are working with a directional fabric, take your time and double check placement before you sew, that way you don’t have to rip out your stitches.

Okay, the border strips are sewn together and now I need to sew them to the panel quilt. Again, I have to make sure I’m sewing the right border strip set to the right part of the quilt, or my eagles will be belly up. Deep breath….here goes!

YAY! All the eagles are flying straight and true! I am so relieved about that.

(Psst. In the bottom right corner of the above photo, you can see prizes in priority mailers getting ready to be mailed — they took over my comfy chair in my studio!)

Here’s a couple more photos of the finished Bella Vista top. I headed outside for these photos, even though it was a bit breezy. I just love to see quilts swaying in the breeze on a clothesline on a nice day, don’t you? Right now I can close my eyes and smell the clean fresh outside smell of quilts (and laundry) hung outside to dry on a breezy spring or summer day. Ahhhhhhh.

I mentioned above that my plan was to back this quilt with cozy fleece. When I put fleece on the back of a quilt, I do not use batting because it makes the quilt too heavy and too thick. I will most likely machine quilt it simply, probably with a large meander. I have learned over the years, that when quilting fleece, it’s not a good idea to cross over lines when you are machine quilting because fleece stretches and the cotton fabric on the front of the quilt doesn’t stretch like that. I definitely don’t want bunchy areas and pleats on the back of my quilt.

I’ll have to head over to one of my local quilt shops so I can use the tables in the classroom to layer and pin this quilt. Of course, I’ll probably do a spot of shopping while I’m there…………. Sorry, not sorry.

Well, that’s it for me for this week.

Take care and I’ll see you all next Thursday!

Until then —

Sew. Laugh. Repeat.

Always,

Tricia @ VRD

Blog Hop 2023 · Rose Cards · villa rosa designs

Villa Rosa Designs Fast & Fun Blog Hop Comes to an End

Hello Quilty Friends!

Happy Thursday to you!

I can’t believe that a week has passed since we began our very first VRD Blog Hop. It’s been SEW MUCH FUN, hasn’t it?

Our participating bloggers have shared their VRD quilts, tips and tricks, and inspiration by the boatload — just what we all needed in the middle of January to help us jump start a new fun project! You can visit Villa Rosa Designs HERE to see our catalog of over 500 Rose Card patterns for even more inspiration.

Here’s the special VRD Rose Card collection used for this very Fast & Fun Blog Hop:

Get your own set before they’re gone HERE.

An enormous HUG goes out to our amazing bloggers for participating in the Blog Hop and showing us their own spin for the VRD Rose Card patterns above. Thank you, Bloggers, for taking the time to be part of the Blog Hop!

From Bolt to Beauty
Kathleen McMusing
Jaftex Companies

Pieceful Thoughts
Little Penguin Quilts

Quilt with a View
MMM Quilts

Cheryl’s Teapots 2 Quilting
Devoted Quilter
Quilts of Valor Foundation

Needle and Foot
Am I Shouting Yet?
Electric Quilt

The Crafty Quilter
Jo’s Country Junction
Keepsake Quilting
Stitchin At Home

And of course, did I mention all the prizes up for grabs??? See below for MORE PRIZES!

We couldn’t have done this Blog Hop without the support of our very generous sponsors —

website

website

website

website

website

website

website

website

website

website

I’m bummed that the Fast & Fun Blog Hop is wrapping up today. Sadly, all good things much come to an end sometime. And this Blog Hop really was a “good thing,” wasn’t it?

I really enjoyed reading each participating blogger’s post each day, didn’t you? I must confess that I read them over breakfast because I honestly couldn’t wait to see which quilt each blogger created! And I absolutely loved reading the comments on our VRD post as well as the comments on the other blogs. What fun!

THANK YOU to everyone who took the time to hop from blog to blog this past week. It really warms my heart that so many folks came along for our Fast & Fun Blog Hop ride!

If you haven’t finished reading all the posts for the Hop and leaving comments to register for prizes, you have through Sunday, January 29th to do so. Use the links above to visit each participating blogger to catch up on your reading and your prize entries.

I just have to do a quick shout out to my cousin, Robin, a fellow quilter. Robin had her knee replaced yesterday and after waking up from anesthesia and while she had a little lunch, she made sure to read Wednesday’s blog posts for the Hop. Now that’s real dedication! Heal fast, Cuz.

Winners will be drawn next week, notified, and prizes will be shipped in February. We will also be posting the winners in February, so stay tuned — it could even be you.

One Last VRD Fast & Fun Blog Hop Giveaway

Let’s review all the prizes that are up for grabs for this Blog Hop:

Everyone is eligible to win prizes. Please note that winners outside the USA will receive a digital set of the 2023 Blog Hop Rose Card pattern collection.

There are several opportunities for you to win prizes during the blog hop:

  1. Individual bloggers may be hosting giveaways on their blogs for you to win. Please visit these bloggers to find out about their giveaways and how to register.
  2. Villa Rosa Designs is giving away a 2023 Blog Hop Rose Card pattern collection on each participating blog.
  3. Sponsor prizes have been donated by our lovely Sponsors, above, and even from some of the bloggers, too! These prizes are divided into 2 different categories —
    • Grand Prize Boxes (of which there are 2) are filled with tons of quilting goodies including books, fabric, precuts, notions, patterns, and more.
    • Individual Prizes (each blogger will select 3 winners on their blog) which may be books, patterns, fat quarter bundles, 5″ squares, 2 1/2″ strips, 10″ squares, notions, and more.

No purchase is necessary to participate in the Blog Hop or to win prizes.

Now, how about ONE LAST GIVEAWAY???

3 MORE QUILTS!!!

Quilt #1 (left) — Brownsville is 43″ x 54″

Quilt #2 (center) — Foxfire is 56″ x 72″

Quilt #3 (right) — Opening Night is 53″ x 71″

Here’s how to win one of these finished quilts:

You have up to 3 chances to win the quilts listed above on this blog post.

1.  Leave a comment on this post and tell us your thoughts about the VRD Fast & Fun Blog Hop.

2.  Become a blog follower/subscriber and leave a comment on this post telling us that you are a blog follower/subscriber.

3. Join our VRD Facebook group and leave a comment on this post telling us you joined our FB group.

Ready!  Set!  GO!

Please note that in order to leave a comment on this blog post to be registered for prizes, you will need to click on the comments link just under the blog title at the top of this blog post. After you click the “comments” link found to the right side, you need to scroll all the way down to the bottom of “comments” in order to find the “Reply” box to leave your own comment. Be patient — there may be a lot of comments to go through until you get to the bottom. Thank you.

Don’t forget — registration for prizes closes Sunday, January 29th.

 Winners will be selected randomly on Monday/Tuesday January 30th/31st.

PLEASE MAKE SURE TO INCLUDE AN EMAIL ADDRESS SO WE CAN CONTACT YOU IF YOU ARE A WINNER!

Well, Quilty Friends, I thank you for hopping along with us this past week. Hope you had as much fun as we did!

See you next Thursday!

Until then —

Sew. Laugh. Repeat.

Always,

Tricia @VRD

Tips and Tricks · villa rosa designs

Getting Organized for 2023 and a VRD Quilt Blog Hop!

Hello Quilty Friends!

Happy Thursday to you!

Here we are, wrapping up the year 2022. Already. Can you believe it? That’s really hard for me to wrap my head around!

How about you? Are you ready for a whole new year?

Image by Freepik

I used to write New Year’s Resolutions at the end of each year, but like most people, after a couple months, those Resolutions just didn’t resonate with me anymore and I failed more often than I succeeded. And each year, I would repeat the same process with the same results.

Somehow I stumbled onto the idea to write GOALS, not Resolutions.

Aha! Just a different word choice, but the same thing, you might think. But there is a big difference.

According to the Oxford Dictionary, a Resolution is a firm decision to do or not to do something.

A Goal on the other hand is defined as the object of a person’s ambition or effort; an aim or desired result.

Same general idea, but Resolutions and Goals really are different things.

So now I write down a list of Goals for each new year (PSST! I love writing lists! My sister, Tracy, knows this and gave me a list-making journal for Christmas. LOL!). For me, Resolutions just end in failure and why should I set myself up for failure when Goals are a more positive concept — goals in sports, anyone!?! — and feel more attainable to me. I have also discovered that Goals can change or morph into new Goals, they can have multiple components to accomplish, a series of steps to complete in a specific order or not, and I can even — gasp! — add, subtract, or refine Goals throughout the year.

Goals are definitely more valuable to me than Resolutions.

Do you do New Year’s Resolutions or Goals?

One of my biggest Goals every year is to Get Organized. It is certainly an ongoing project for me (as in ongoing for years…). Maybe this is one of yours too?

Something I’ve found out in the last couple years about myself is that keeping a planner/journal/calendar helps me to organize my goals, my thoughts, appointments, tasks, and more. Writing things down helps me to see my progress over time, plan what steps I need to do next, and even to change directions if I need to.

I am such a believer in planners/journals/calendars that — Big Surprise! — I even designed one, which incorporates blank weekly and monthly grids so people can start it whenever it’s convenient AND it’s a Block of the Month project too! Woo-hoo! Talk about multi-tasking — keep yourself organized and make a quilt one block at a time for a whole year!

It’s called the Blue Moon Block of the Month Quilter’s Planner and you can find it HERE.

I guess you could consider my planner my main tool for getting organized. Maybe 2023 will be my best organized year yet!

How do you approach getting organized? I can always use more tips!

Speaking of organization, recently I’ve been seeing some posts on our VRD Facebook pages about organizing Rose Cards. I know we’ve talked about this before — you can revisit the posts HERE and HERE. With over 500 patterns in our catalog with more added every month, we hope to offer some kind of storage option for your Rose Cards in the future.

What would you like to see? What kind of storage options for your Rose Cards would you be interested in? What do you need to keep your Rose Cards organized?

We’ve got a lot of new fun stuff coming in 2023 here at Villa Rosa Designs (not sure if some kind of Rose Card organizational tool will be one of them though) and I’m sew sew excited to tell you about the very first one coming in January — our very first Villa Rosa Designs Blog Hop!

VRD Blog Hop

What’s a Blog Hop? It’s a group of bloggers who write about a specific topic or theme. The participating bloggers write and share their posts during a specific period of time. During the blog hop, people can read the posts each day of the hop and register for prizes. YES! I said prizes! It’s a lot like a quilt shop hop, but you hop from blog to blog instead of store to store.

Our blog hop will be January 19-26, 2023 and we have a great group of participants who will be telling you all about their Fast & Fun VRD projects. We will also be offering a special Blog Hop Rose Card Collection.

Mark your calendars for January 19-26 and stay tuned for more about the Blog Hop next week.

Looking Ahead to 2023

What would you like to see in 2023 at Villa Rosa Designs? Ideas? Products? Are there new types of patterns you’d like to see that we aren’t already creating?

We always welcome your thoughts and feedback. Feel free to leave a comment on this post or email me at tricia@villarosadesigns.com.

Thank you, dear friends, for your support and enthusiasm for Villa Rosa Designs during 2022. We couldn’t do what we do without you and we are looking forward to a New Year filled with exciting new Rose Cards and more.

Stay safe and warm as you celebrate the New Year.

Until next Thursday —

Sew. Laugh. Repeat.

Always,

Tricia @VRD