Today is a kind of blah day — raining off and on, overcast, and grey — not what I’d call a typical summer day at all. It’s been looking more fall-like here in NW PA. In fact, I was looking at one of the maple trees in the back yard yesterday and I actually saw the leaves starting to change on ends of several branches. As much I hate to see summer going, I do love autumn. What’s your favorite season?
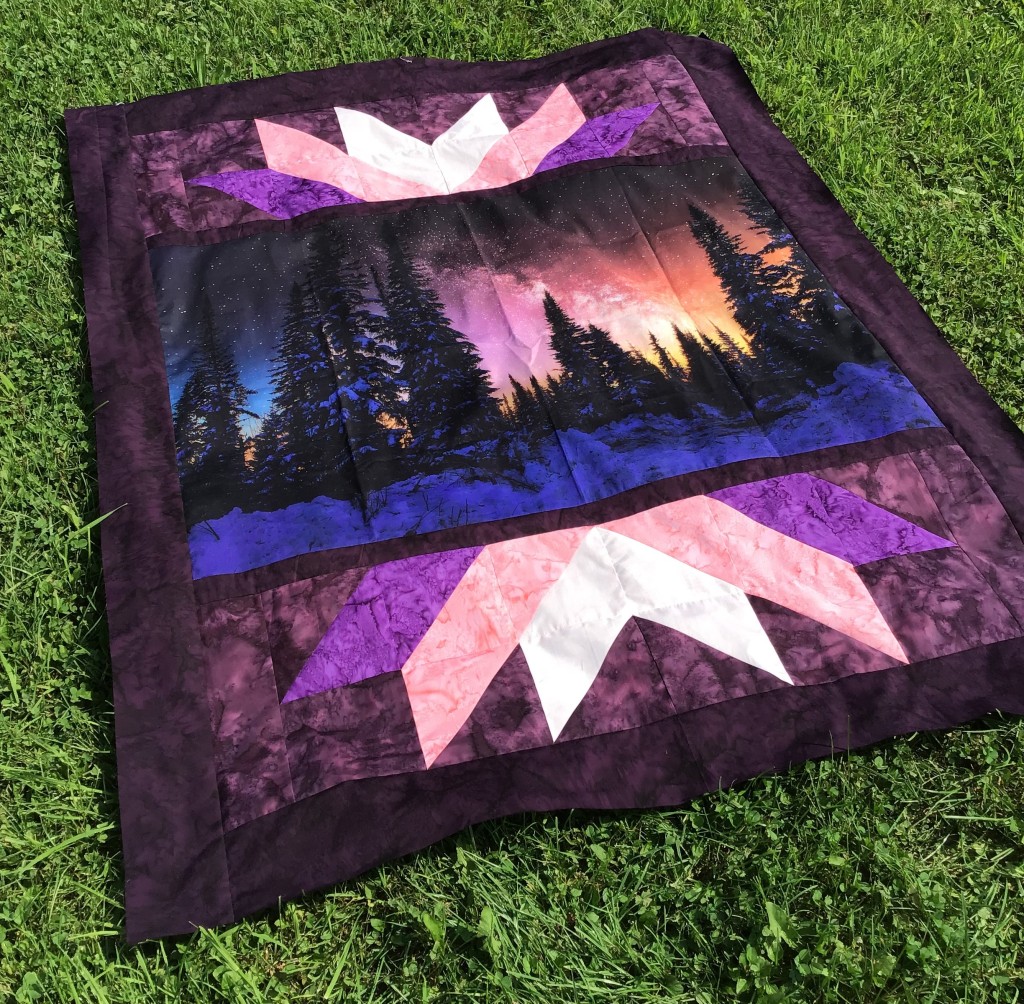
As I’ve mentioned before, I get fall fabrics on my brain this time of year! Then I can’t wait to start making fall quilts. What better day than a dreary one to share an awesome FALL tutorial with you? And you can’t get more fall than October Sky!
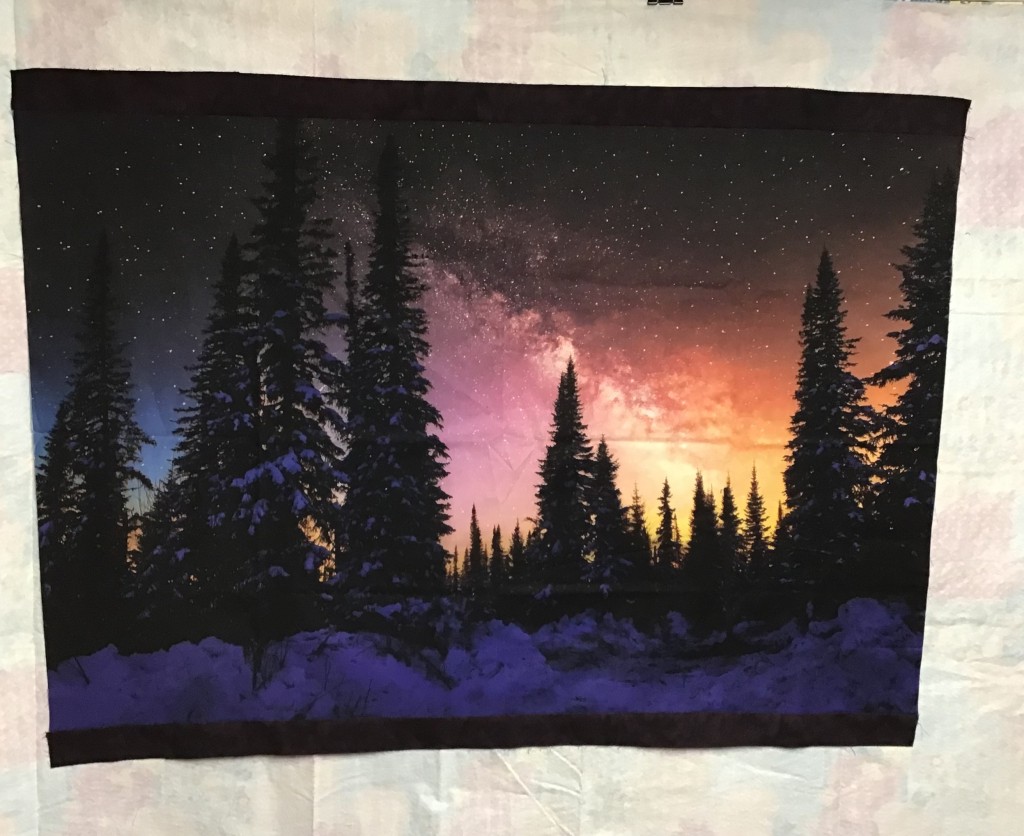
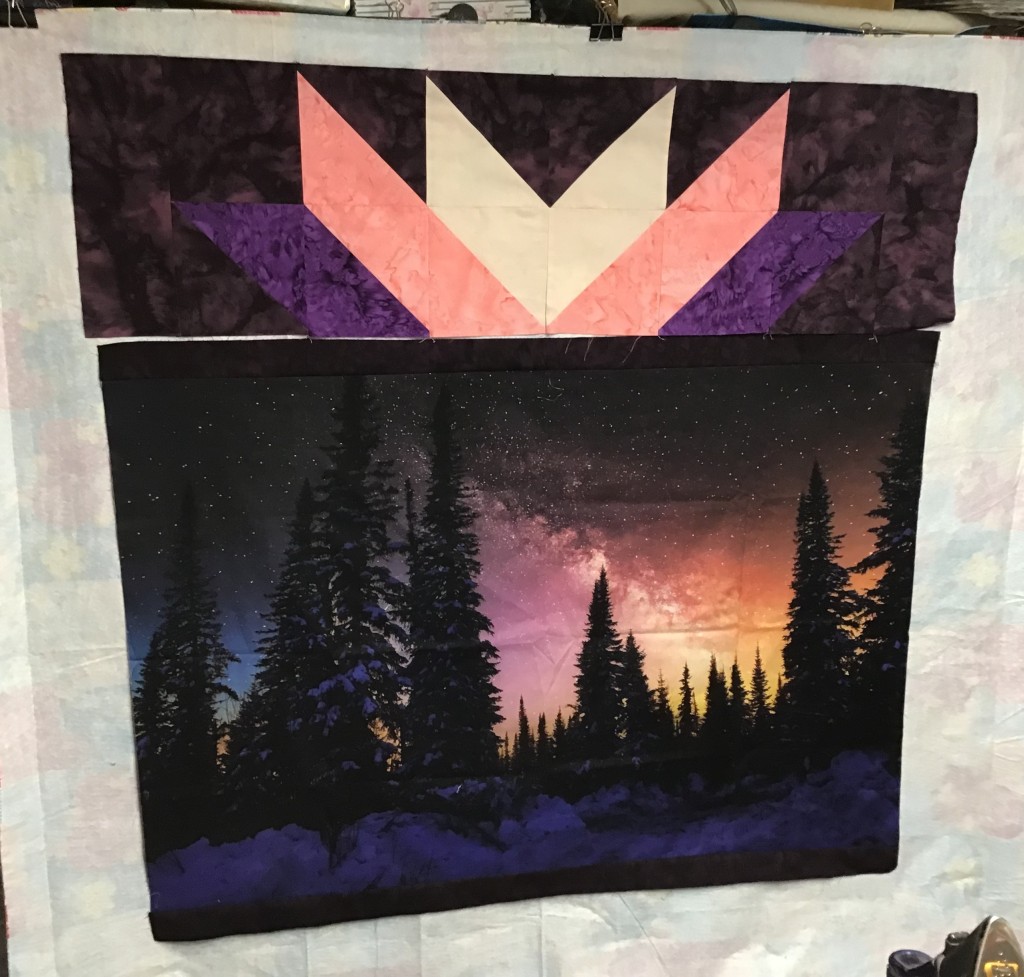
Don’t let the name of the pattern fool you — you can use any kind of horizontal panel — any one your little hear desires. I’m not using actual fall fabrics for this quilt, but to me, it still feels like a fall quilt. I think it’s the jewel-tone colors. Take a look at these yummy fabrics from Hoffman California Fabrics, one of our quilting partners. The digital panel is called Nightshade and the fabrics are coordinating 1895 Watercolors batiks. Simply scrumptious!
Let’s get started!
1. Trim the selvages off your panel. Horizontal panels can vary slightly so it doesn’t hurt to do a quick measurement of your panel, then you’ll know how it compares to the pattern. You don’t really need these numbers right now, but if your panel is not as wide as the pattern, you will need to make a small adjustment a bit later in the construction process.
2. Cut your border strips for the top and bottom of the panel and sew them on.
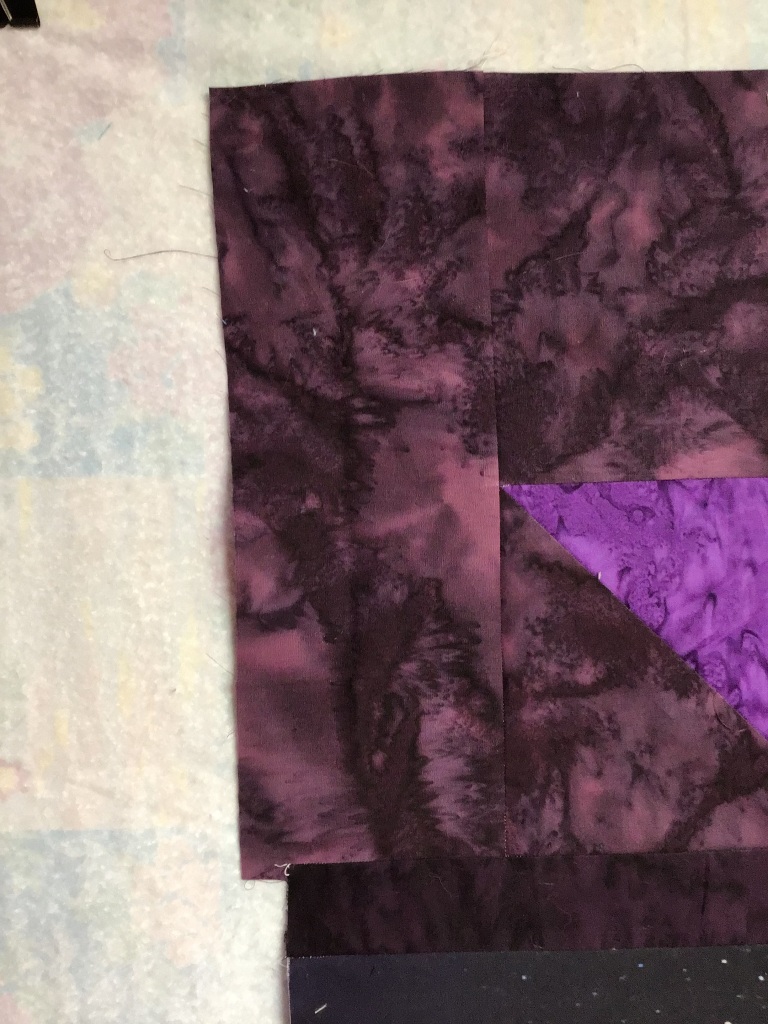
3. Now we are going to cut out the squares for the pieced sections at the top and bottom of the panel. I just love these 1895 Watercolors batiks — they go with everything. The dark plum in front is my background.
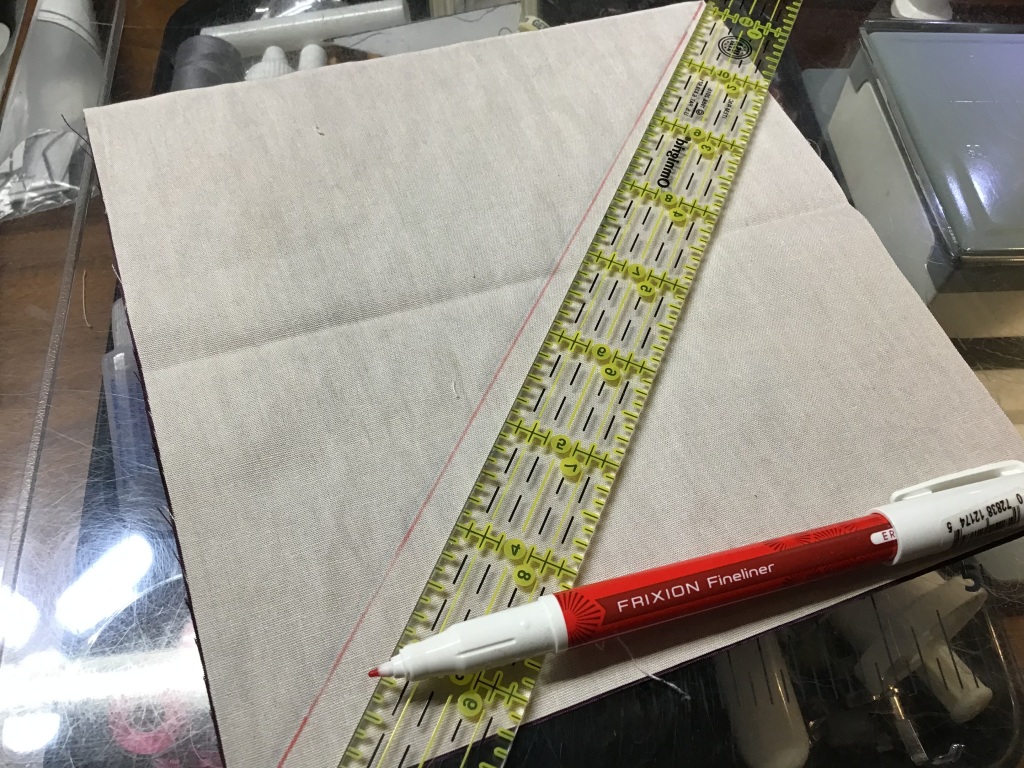
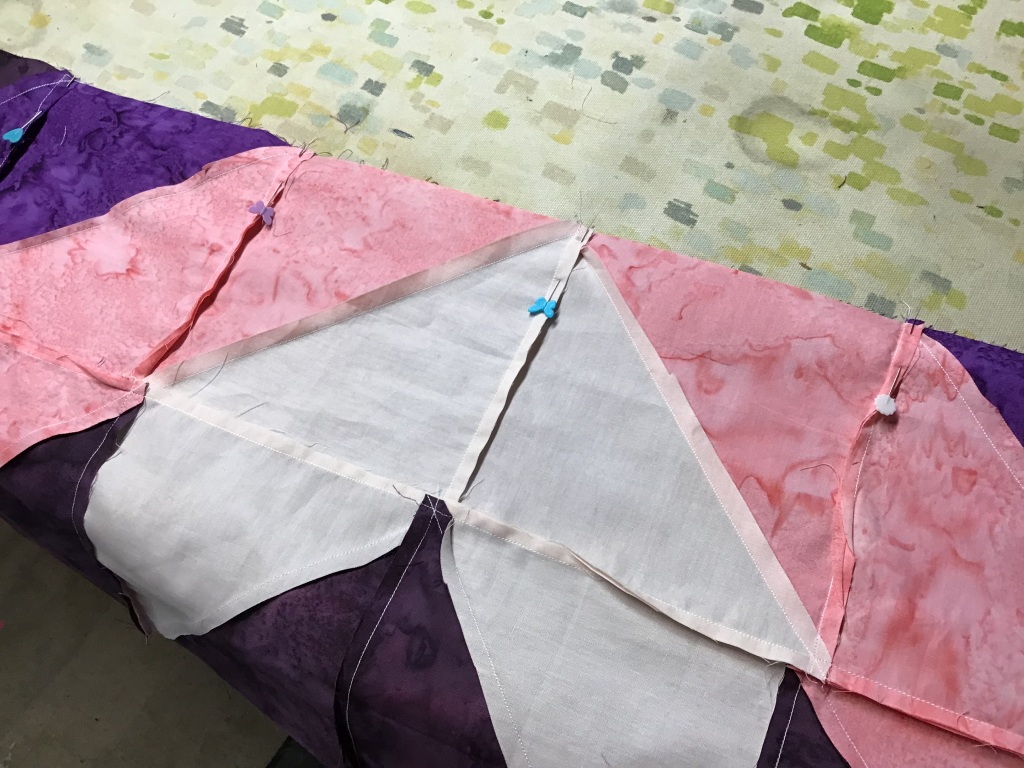
4. Time to make some Half Square Triangles, or HSTs. Layer 2 squares right sides together, drawn a diagonal line from corner to opposite corner. Sew 1/4″ away from both sides of the drawn line. Cut apart on the drawn line and press open.
5. Having a flannel board — or in my case, the back of a flannel tablecloth clipped to my wall cube unit — to arrange the HSTs makes getting the arrangement right the first time much easier to accomplish.
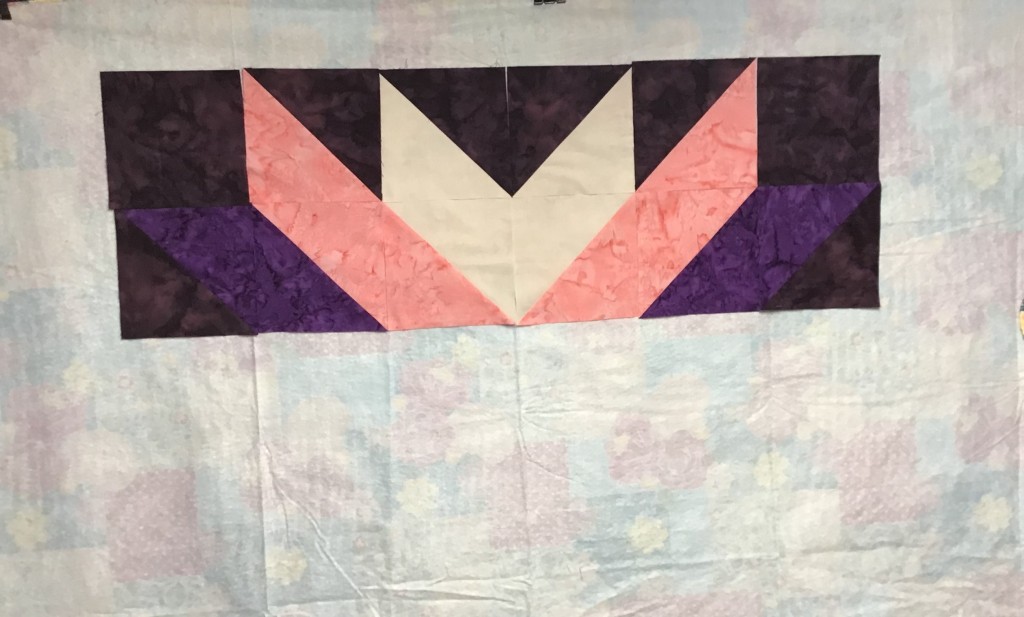
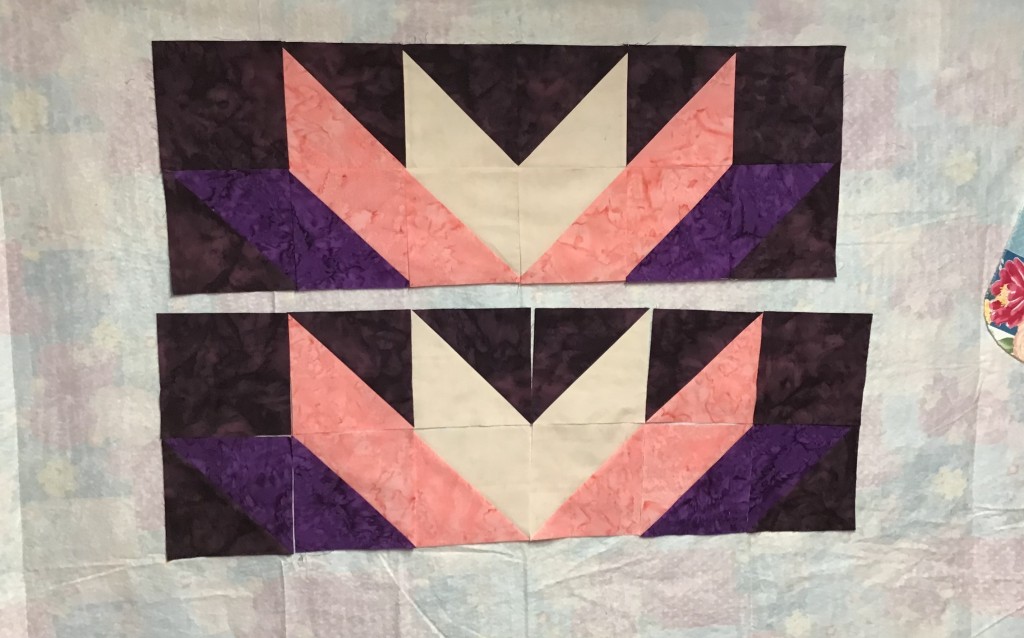
6. Sew the HSTs together. Make 2 identical pieced sections. You will be flipping one upside down to sew t the bottom of the panel. It makes an interesting design even without the panel in the middle though, doesn’t it?
7. Refer back to your panel measurements. If your panel is not as wide as the panel measurement in the pattern, you may need to add a little extra width to the side background rectangles. To be on the safe side, I added an extra 1″ or so to the side rectangles just to make sure my pieced sections would be wide enough because my panel wasn’t quite the same size as the one listed in the pattern.
It’s okay if the side rectangles make the pieced sections a little wider than the panel — you can trim and square things up in a later step.
8. The most important part of this step is to find the centers of both the pieced sections and the panel. Then match those centers up before sewing because nobody wants off-center sunbursts! LOL!
Once you’re happy with your placement (I used pins to keep everything lined up just right), sew the pieced sections onto the panel. Lookin’ good!
9. Now it’s time to trim and square up the sides of the pieced sections. Ahhh! Much better!
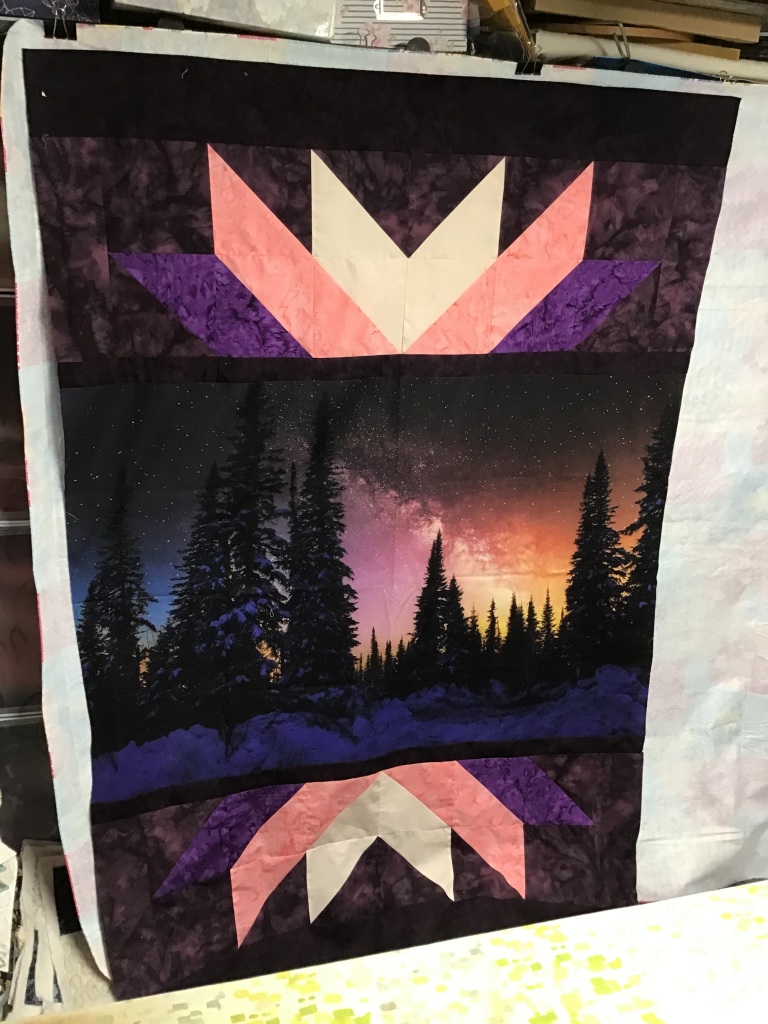
10. Time to add top and bottom borders. I actually increased the width of my borders a couple inches to make the quilt just a little bit bigger as a throw. Do the same if you’d like. Just keep in mind, you might need more fabric if you increase the width of your borders.
11. Ready to add those side borders now? You will need to piece those side borders to make them long enough. VOILA! The top is done!
Since I couldn’t get the breeze to cooperate with me, I took another photo of the October Sky out flat. Gorgeous, isn’t it? The colors are so rich and yummy.
12. The next steps will be layering, quilting, binding, and labeling the quilt. And then….another VRD quilt DONE!
I hope you enjoyed this tutorial! I’d love to see your October Sky quilts — you can post them on our Facebook page HERE or drop me an email if you’d like. And there will be more fun VRD tutorials coming, so stay tuned!
Whew! We had some crazy weather here in NW PA over the last week end. Hail, heavy rain, wild wind gusting into the 60s [MPH]…..trees down all over the place in my area, but luckily no serious injuries. Our electricity was out for over 24 hours, a friend of mine just got her electricity back on on Wednesday — it went off on Saturday!
I personally found the lack of electricity, no running water, and zero Internet very difficult — I hadn’t realized how much I took those things for granted. It’s not a bad idea to have a “lights out” crate with things to do in such as case. Not too mention extra batteries, water, lanterns, nonperishable food, blankets, etc.
Dear friends, I hope you and your loved ones are all safe and sound.
It’s been a while since I’ve done a tutorial, so let’s make a quilt!
I’ve been wanting an excuse to do Molly’s Helix Rose Card pattern. From the first moment I saw this pattern, I was intrigued. I told my good friend Mary Lee about Helix (I knew she would love it!). DANG! She bought it before I did at one of our two local quilts shops, Homespun Treasures. I was so jealous — I had only seen it online when I blogged about the new patterns in February — so I made up an excuse to go to the quilt shop and get one for myself (not that I really need an excuse). LOL!
I dove into my stash of fat quarters to find the perfect fabrics for Helix — deciding on a scrappy collection of blues, greens, and turquoises with a white on white floral background. One thing I really love about our VRD patterns is the ability to actually use the fabrics in my stash without having to run to the quilt shop every time I turn around — which is not a bad thing to do by any stretch of the imagination. Instead, I can jump right into my project right now. Besides, when I shop in my stash, sometimes I find things I had forgotten all about and I get excited about another idea or project before I’ve even finished the one I’m working on.
Quilting, for me, is never boring!
Okay, so my fabrics are gathered and I’m ready to go!
Cutting
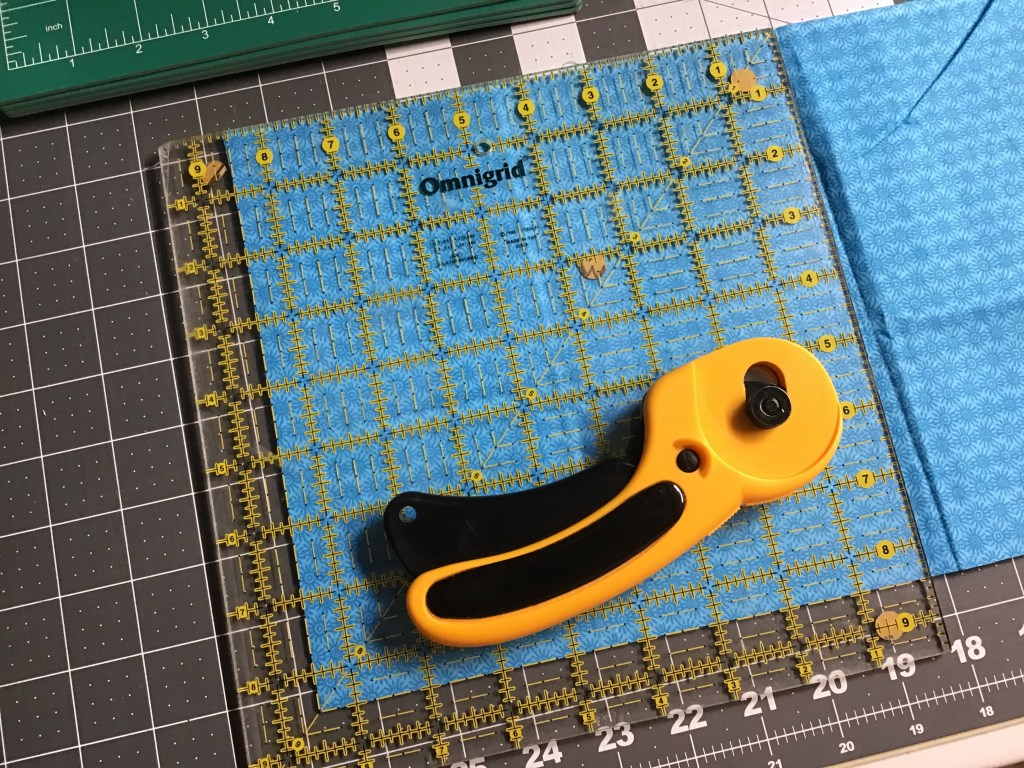
I layered a couple fat quarters on top of each other for cutting, but if you are not comfortable with that, go ahead and cut each fat quarter individually. Making a quilt is not about who finishes first — it’s about the journey (unless you are participating in a Jelly Roll Race).
Here you can see my fat quarters (FQs) stacked up and I am ready to make my first cut. I just cut the top edge straight and I’m ready to find the right measurement on my ruler so I can cut the strip.
Here I have cut my wide strip.
Next I am going to cut large squares from my wide strip. I will get 2 squares from each strip. But wait….there’s more! (You know I LOVE saying this!) We are not done cutting our squares yet!
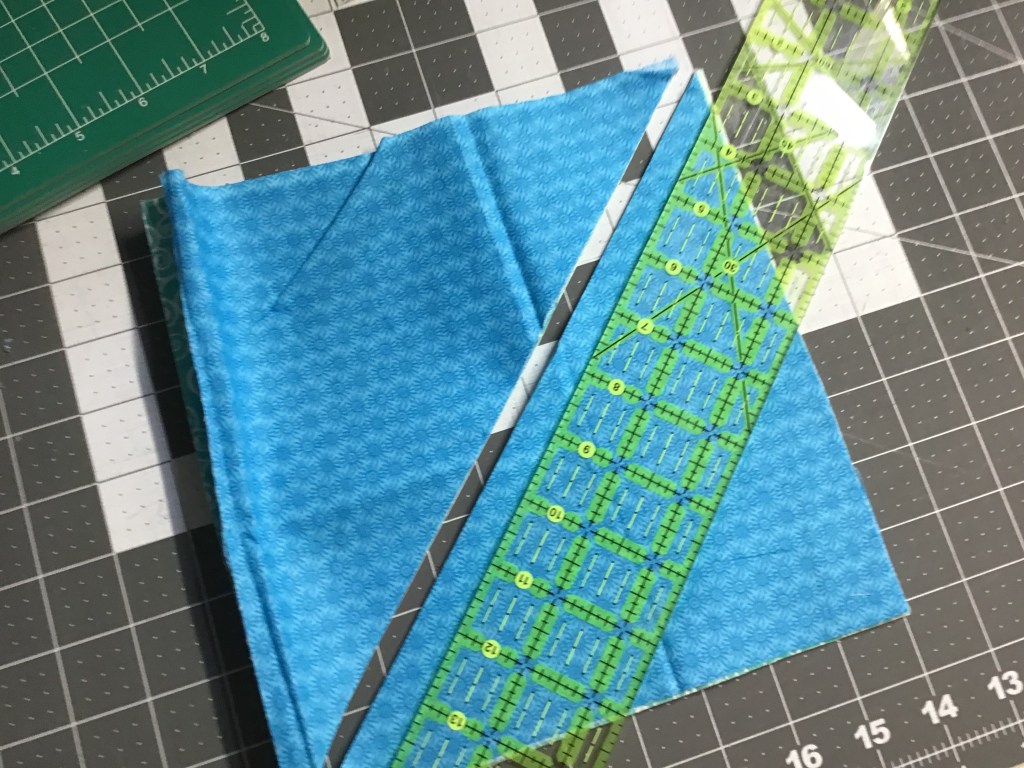
Time to cut these big squares in half diagonally. I had to switch rulers because my ruler wasn’t long enough so I grabbed my 2.5×18 ruler for cutting diagonally.
Don’t move those triangles — we are still not done cutting!
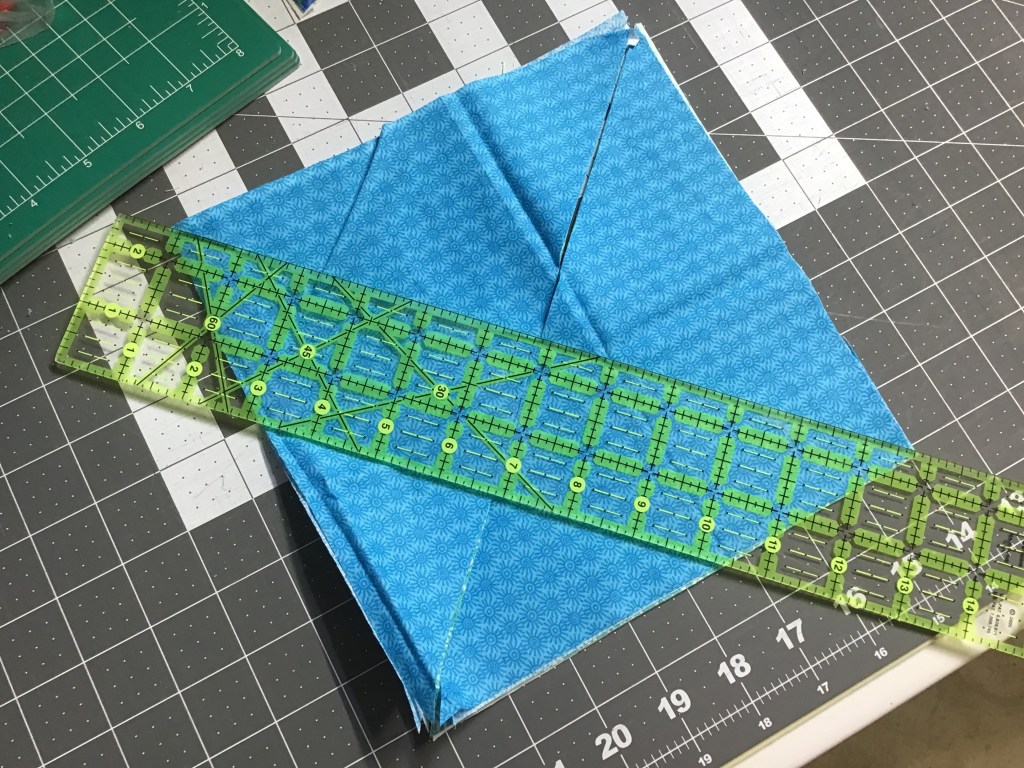
With my diagonally-cut triangles still together, I am going to cut on the other diagonal too — that way I get 4 smaller triangles from each block. Caution — these smaller triangles each have 2 bias edges, so treat them gently and handle them as little as possible to minimize distortion and stretching.
TIP: Do you see that blue, green, and turquoise leafy print triangle on top of my triangle stack in the 3rd photo? That was my “inspiration” piece for selecting the other FQs for this quilt project. I often choose a fabric with multiple colors in it to pull together fabric from my stash or scraps. Heck, I even do that in the quilt shop. This is definitely one of my favorite ways to gather a group of fabrics together for a project.
In addition to the FQ triangles, you need to cut some background — triangles, squares, and strips.
Sewing
Hmmmmm. I think we’re finally ready to do some sewing. Yay!
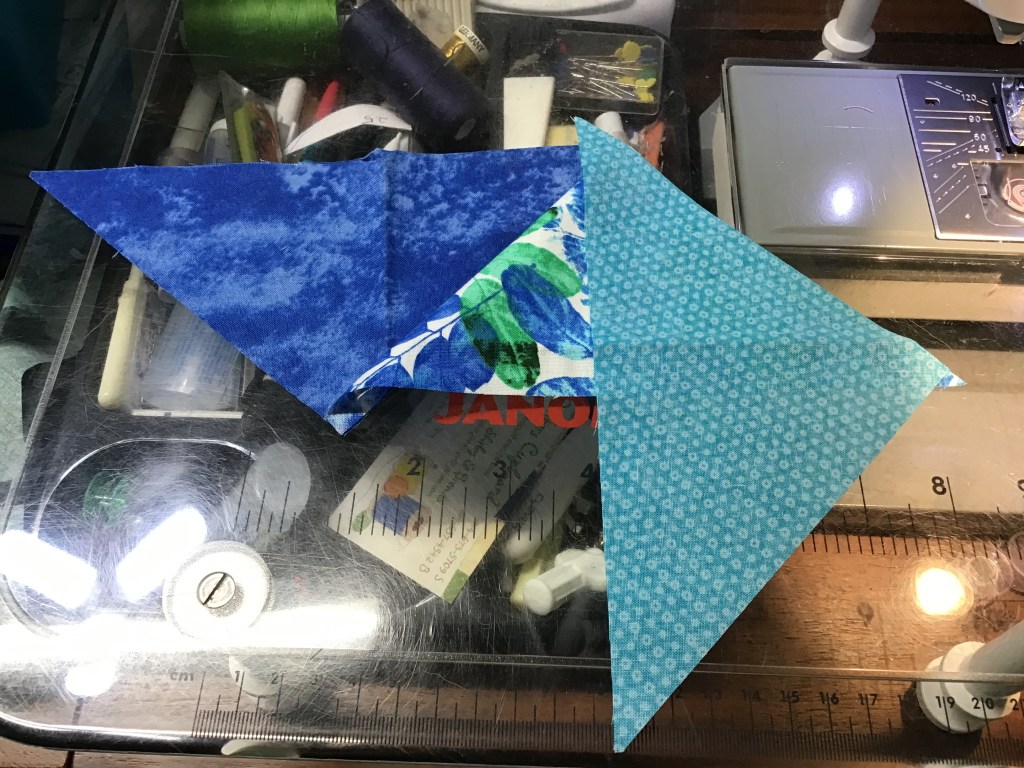
Let’s take 2 print triangles and lay them side by side, one pointing down and one pointing up.
Now let’s flip the right side triangle (leaf print) on top of the left triangle (blue tonal), right sides together (RST). Line up the edge with about a 1/4″ of the blue tonal peeking up above the leaf print and the leaf print should be overhanging the blue tonal about a 1/4″ at the bottom. Pin to keep them from sliding if you want to, but I find if I do the layering right at my sewing machine, I don’t need to pin them together.
Sew along the edge with your 1/4″ seam.
Don’t forget to trim the little overhanging triangles (around here, we call them “dog ears” [don’t ask me why…..]). Practice doing this as you go along so you don’t forget. Open the unit. Nice!
I don’t recommend pressing if you can comfortably avoid it — these triangles have 2 out of 3 bias edges and you don’t want them to stretch and distort. Better to wait until you have all the triangles sewn together into a row before pressing.
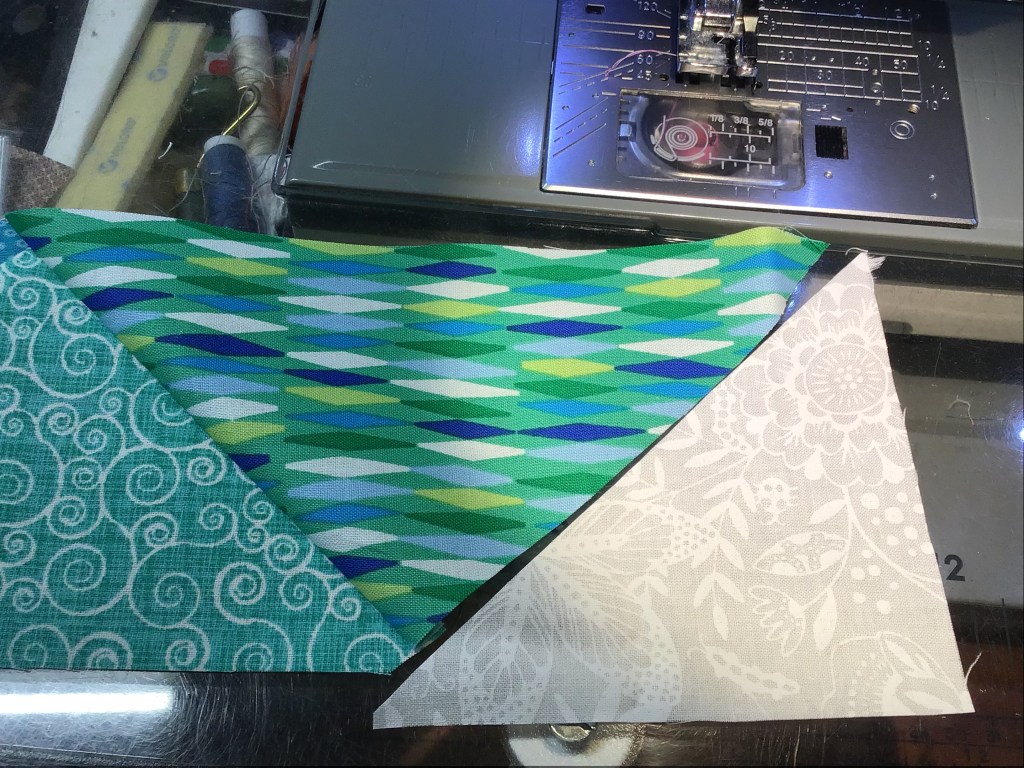
Pick another triangle and lay it next to the unit we just sewed together.
Flip that triangle over on top of the second triangle with RST. Line up the edges and slide the top triangle down a little bit so you see about 1/4″ of the triangle underneath peeking out above the top triangle and the top triangle extends about 1/4″ beyond the bottom of the triangle underneath.
You might be scratching your head and wondering what’s up with this silly “slide it down so you see about 1/4″ of the triangle underneath peeking out above the top triangle and the top triangle extends about 1/4″ beyond the bottom of the triangle underneath” business. I have 2 words (kind of) for you — 1/4″ seam. Sliding the top triangle down 1/4″ accommodates the 1/4″ seam we sew with so that the pieces will line up straight. Don’t believe me — try it! Lay your triangle as exactly on top of each other as you can and sew them together with your 1/4″ seam.
Aha! Told you so!
Sorry, not sorry — I don’t get to say that very often…….
Okay, let’s get back to our project.
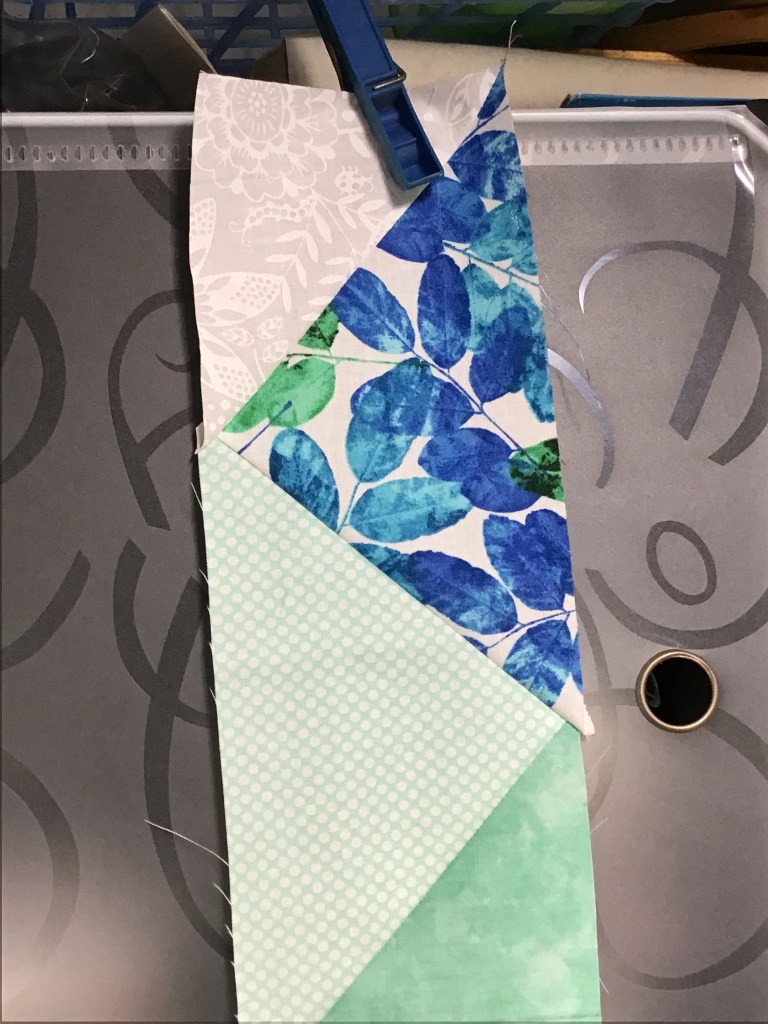
Sew the triangle to the unit with your 1/4″ seam. Trim the dog ears and open the unit. 3 triangles done………5 million to go!
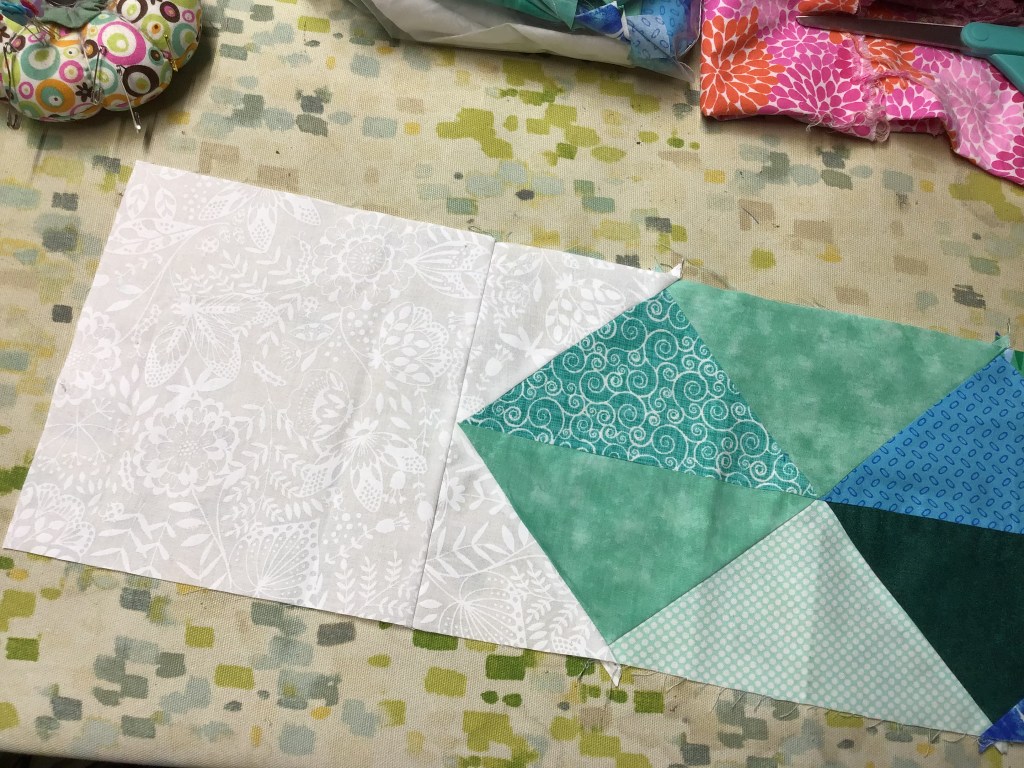
Sew a total of 11 triangles together to make half of a Helix row.
Yay! Now let’s lay out and sew small white triangles to each end of our triangle strip.
Looking good!
Time to sew 11 more triangles together. Don’t forget to cut off those dog ears. Then sew background triangles to each end.
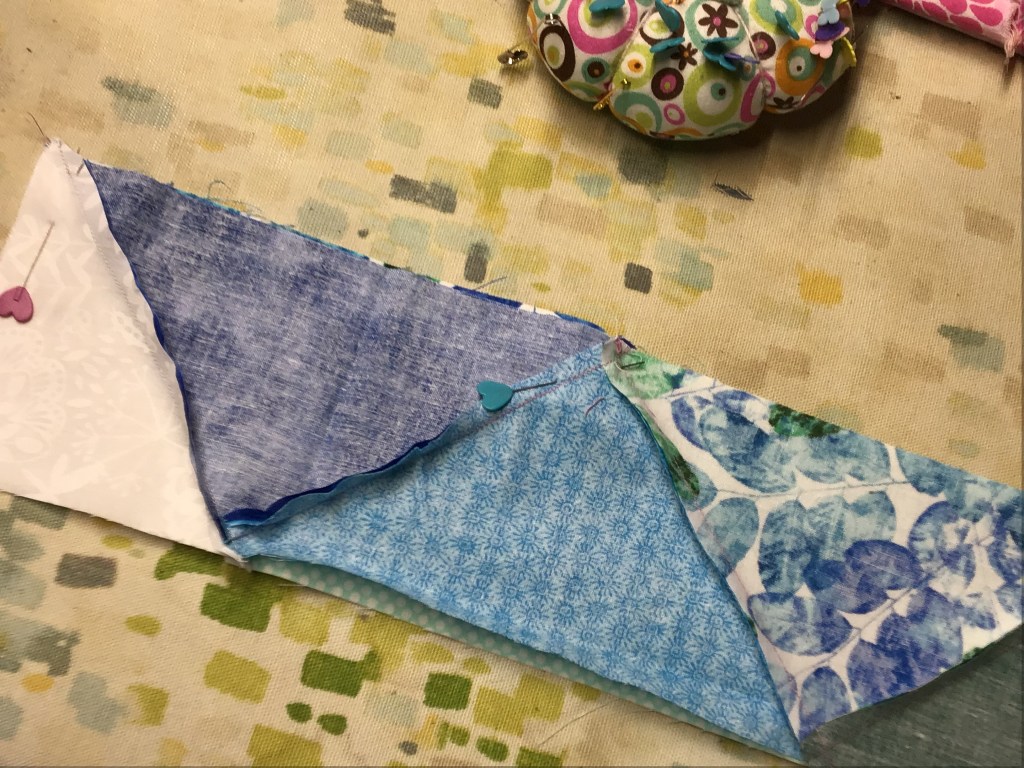
Here’s the tricky part next — we are going to sew the 2 half rows together to make one Helix row. Yikes! Grab your pins, because you’re going to need them.
I found this part very challenging — I was all thumbs lining up the 2 rows. I crossed my fingers (and my toes, too) and hoped that I had lined things up well enough and that my points would meet. Pin heavily — you will be sewing over seam intersections with a lot of bulk and your fabric is going to want to shift.
Ugh…..I am not pleased with how my points lined up (or didn’t), especially on one of them where I wasn’t even in the ballpark! I might have to do a little unsewing to correct this section.
I pressed the row after sewing it all together. My seams were willy-nilly all over the place on the back instead of nestling neatly like they usually do for me. Frustrating.
I pressed the long center seam open to help reduce the bulk.
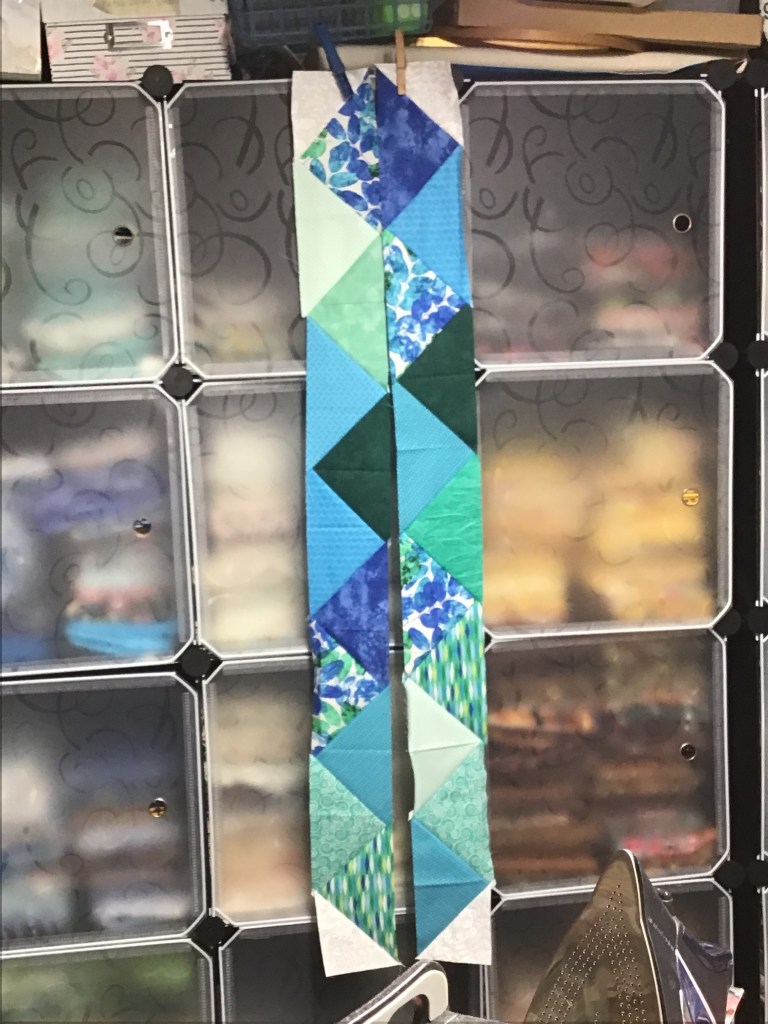
Repeat these steps to make a total of 7 Helix rows.
Here are 2 of mine so far.
Look! Look! Look! I got all 7 of my Helix rows done. They are completed, but I am not 100% happy with how they turned out. I even tried another method of sewing the triangles together, but that didn’t make things any better — it must be me (frowny face here).
My suggestions to you are to sew slowly and line things up carefully — this project requires a good deal of accuracy for everything to come out well.
Here are my rows hanging off my fabric storage cubes.
The next step is to sew one square to an end of each of the 7 Helix rows. I do really like the colors, even if the piecing isn’t fantastic……
These squares work to offset the rows once we assemble them with the background strips, which just so happens to be our next step.
Now let’s add a background spacing strip. You will have to piece strips together to get the correct length — I cut 1 strip into 3 equal pieces and then sewed a 1/3 piece onto the end of a full width strip. Then I measured through the center of a Helix row and cut my strip to that measurement. Next I matched the ends and the centers of my Helix row and my background strip, pinning everything in place.
I sewed the strip to the Helix row using my 1/4″ seam. Then I pressed my seam towards the background strip.
Now to sew more Helix rows and background strips together!
Here are my first 2 rows sewn together with a background strip in between. So far, I am pleased with the fact that my rows are the same length, even if I mangled my triangle points here and there. Sigh…..
Let’s sew on more rows and background strips! Woohoo! I am on a roll!
Too bad I am not going to finish this quilt top before this blog post has to be finished. Sorry, folks, I’ve been working on it for three days, but I didn’t realize how long sewing the triangles was going to take me. I would have started it sooner, but we no electricity over the weekend.
I promise to add a photo of the completed top ASAP. By the way, I think I might add background strips on the sides of the quilt top if I have enough background left. I have found through previous experience that I do not like triangle points at the outside of my quilts (because I chop them off with the binding).
Well, that’s it for me — it’s after midnight (EST) now and I am getting tired. Time for bed….
Until next Thursday —
Sew. Laugh. Sleep. Repeat.
Always,
Tricia @VRD
Helix Update
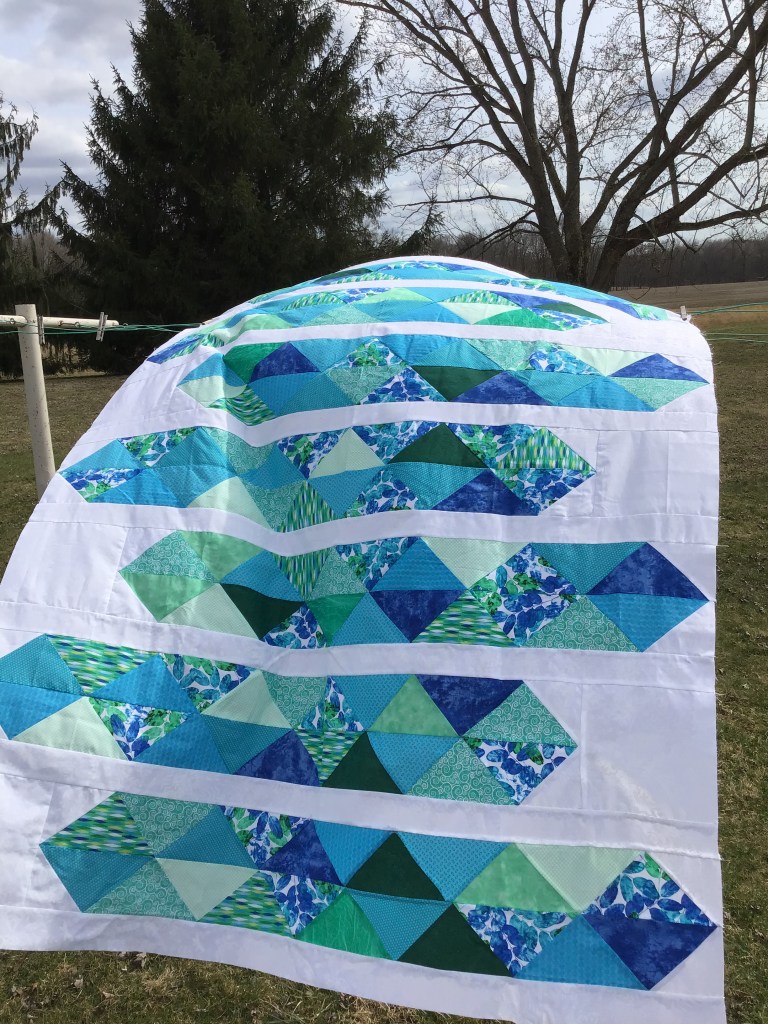
Yay! I finished the quilt top a few days later. Now to layer, quilt, and bind it. And, of course, add a label!
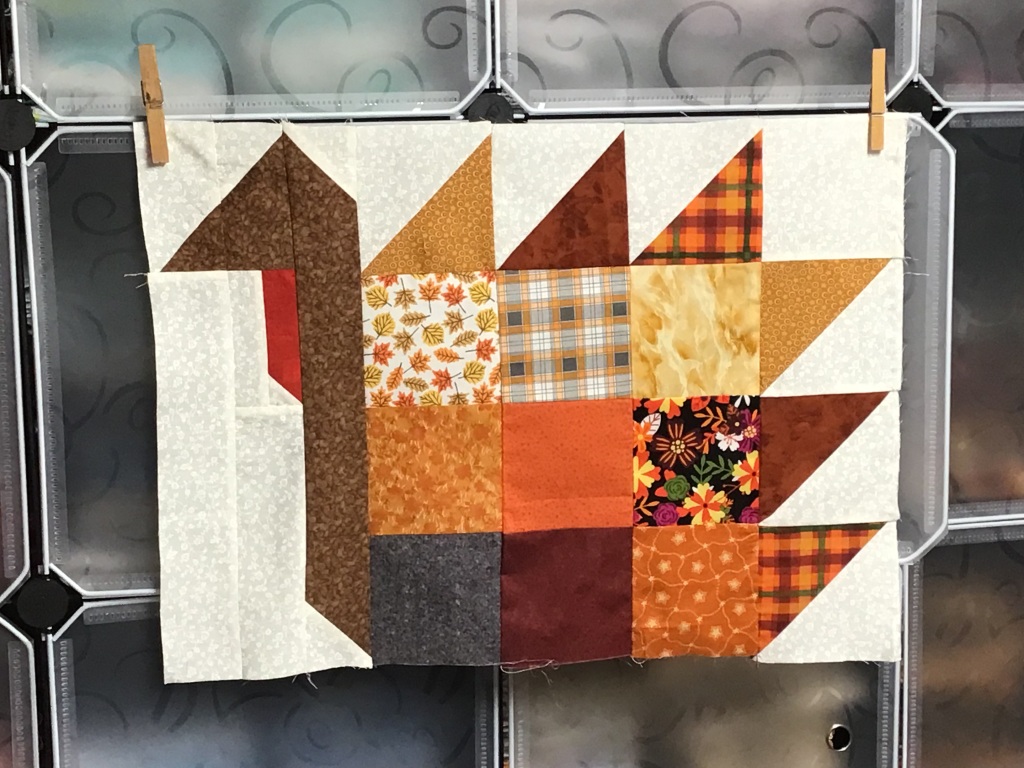
I hope you all had a wonderful Thanksgiving Day last week. Did you get a chance to make the Talking Turkey Quilt block yet? If you didn’t stop by and read last week’s post with my cute Thanksgiving turkey block tutorial, you can find it HERE.
On another note, I just finished making the quilt top for the Villa Rosa Designs Rose Card pattern, Splendor, so thought I’d share another panel tutorial for you. Then beginning next week for the rest of December, I’m going to blog about Christmas-y quilty fun things, but we’ll probably go back to tutorials again in January when you are all itching to start some new projects.
This is Splendor. It is an AWESOME pattern — who knew you could take a panel, some fabric for sashing, and a handful of fat quarters and come up with a quilt as big as this one turns out. It’s an incredibly clever pattern by our VRD designer, Molly Cook, and uses the whole fat quarter to build the sections around the quilt. I was so amazed to see how slick everything went together and how nicely everything fit.
LOVE LOVE LOVE this pattern! If you don’t have it, you need to get it! You can buy the Splendor pattern HERE:
Great quilt, huh? I can already see visions of sugar plum quilts using the Splendor pattern dancing in your head. Don’t you just love how the panel is offset? Isn’t that unique? And everything truly goes together like magic!
Let’s get started!
Splendor Panel Quilt Tutorial
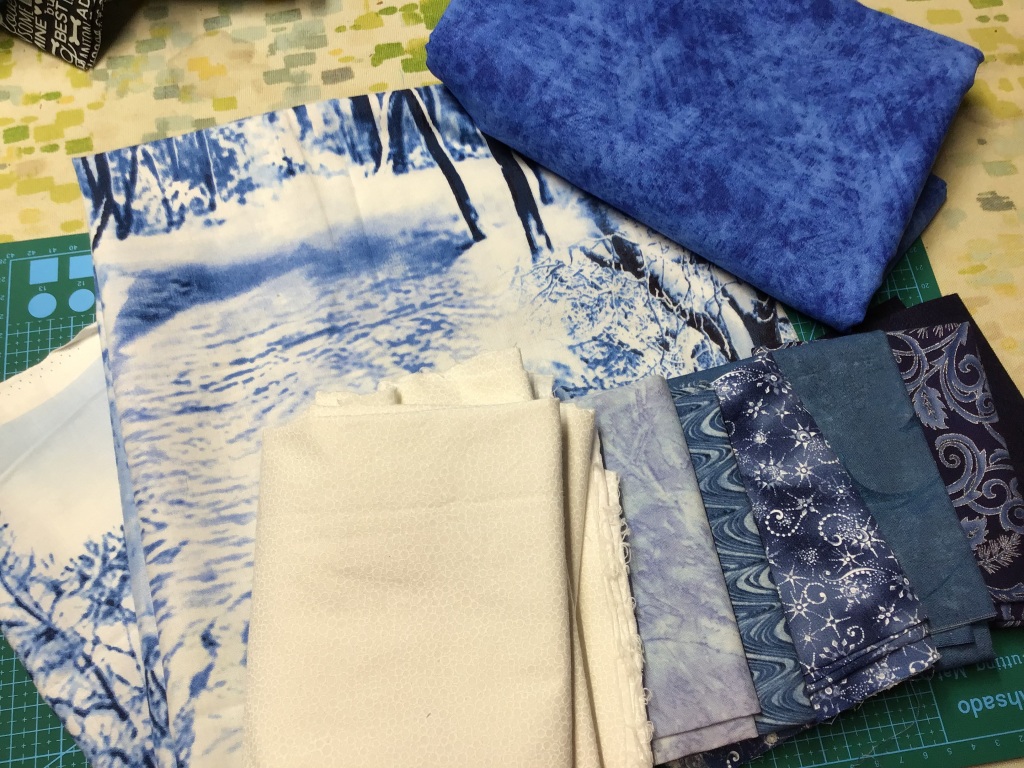
Time to gather up your panel, sashing, and fat quarters. I had this great winter panel in my stash and thought a blue and white version of Splendor would be fun. I grabbed the blue tonal for my sashing and then “shopped” in my blue fat quarter bins. As a final thought, I added the white on white fabric from my yardage drawer to represent the snow. Looking back, though, I think I could have skipped the white on white and just went with shades of blue, but that’s okay. I think the quilt will still turn out just fine. Let me know what you think once you’ve seen how the top turned out down below.
I did end up swapping out the light silvery blue fabric you see in the photo because when I opened it up to cut, the fabric had some fading. I didn’t think I could cut around the faded areas and have enough fabric to cut the pieces I needed so I found a replacement. No worries.
Next you need to measure your panel, because panels come in all different sizes these days. My friend Mary Lee and I were just talking about this. 24″ x 42″ used to be the standard size for panels, but now they come in 36″ x 44″, 44″ x 44″, and everything in between!
So take the time to measure your panel. You may need to trim your panel to the size noted in the pattern. Or if your panel is a bit narrower, you may need to add a bit to the sashing so your center ends up the correct size. If you don’t want to trim your panel, you can also adjust the size of the sashing if needed.
I can’t stress enough how important these measurements (for the panel plus the sashing) are. This is what makes the whole quilt work so if your measurements are off, you will have problems sewing the sections to the center of the quilt. Isn’t it better to take your time right now and get the measurements correct right up front? You know the saying, “measure twice, cut once?”
Once you’ve measured your panel and decided whether you need to trim it or add a little extra to the sashing, then it’s time to cut out your sashing strips. My panel was a bit too narrow so I ended up adding a half inch all the way around to the sashing in order to get the correct size. Then I was ready to sew on the sides and the top and bottom.
Tricia’s Tip: When I add borders to a quilt, I take my time. First, I find the center of both the side of the quilt and the border strip. Then I match my centers and pin (see the lime green circle in the photo). Next I pin the ends and I add a pin perpendicular to the edge of the quilt/border in order to keep things all nice and square (see the red circles in the photo) — I do this at both ends of the border. Finally, I add pins spaced between the middle and each end. Sounds like a lot of work, but it really helps me to keep my borders straight. Who wants borders that stand up and wave?
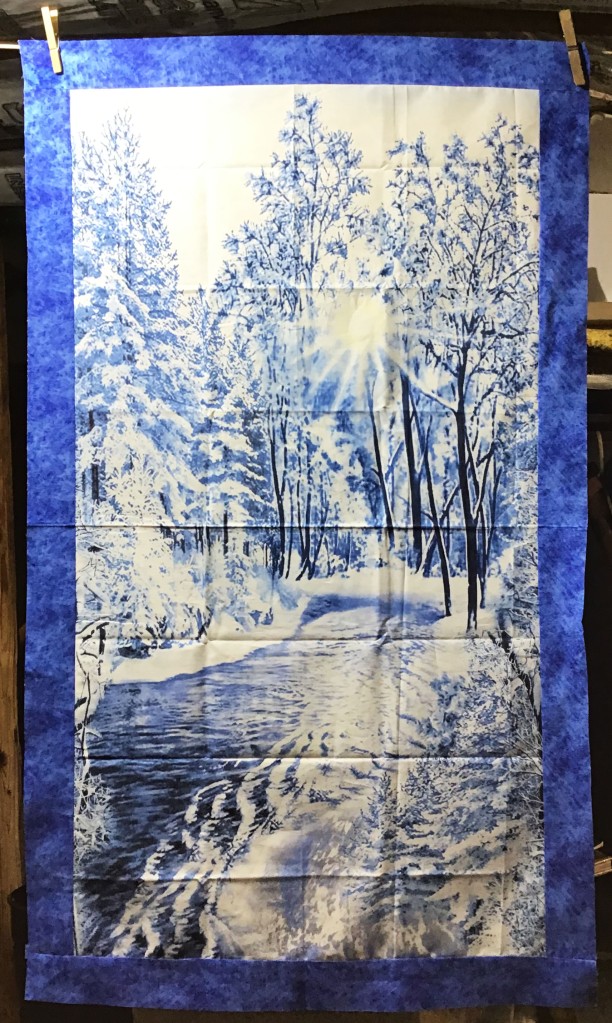
Here is my panel with the sashing around it. I love how the mottled blue really brings the color out of this mostly monochromatic panel. It reminds me of winter here in Pennsylvania.
Let’s keep moving! I promise you, this is the fussiest part of the quilt. Once you get the right measurements, it’s a breeze from here out.
Time to cut out the pieces from the fat quarters. Follow the cutting diagram in the pattern. If you feel comfortable, you can stack a couple fat quarters together to reduce some of your cutting, but it’s perfectly fine to take your time and cut each fat quarter individually.
Something to think about — as all fat quarters are NOT cut a true 18″ x 22″, it’s not a bad idea to have an extra coordinating fat quarter around just in case you can’t get all four rectangles out of each fat quarter or in case you make a cutting mistake. Extra fabric are not bad words in my vocabulary. Besides, it will go into another project……..someday……..
So the next thing to do is to sew each group of rectangles together into strips. There are a couple options here:
You could organize your fabrics and keep them in the same order in each section — wouldn’t it be cool to organize your pieces from light to dark or dark to light?
You could sew your rectangles together and make sure that each section has a different arrangement of fabrics, making your quilt look scrappy and relaxed.
I chose to do the second option (big surprise to those of you who know me!!! LOL!), which takes a bit more time, but I really like the finished result. Either option will turn out great, so just pick one.
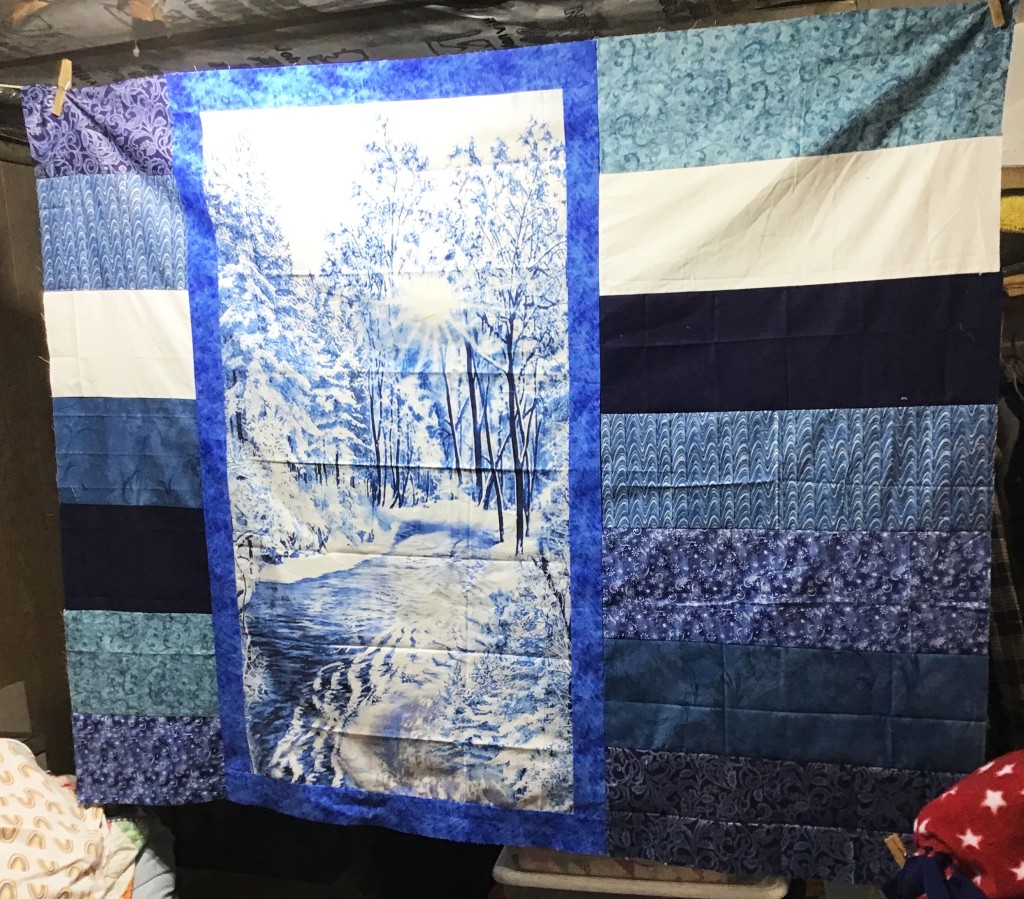
I sewed the pieces together for the right side section first. I just did it randomly at my sewing machine. Then I pressed the seams, folded the pieced strip, and found the center of the strip. Next I folded the sashed panel and found the center on the right side of it. Finally I matched up the centers, pinned the pieced section to the sashed panel, and sewed them together.
After I got the right side section on and I pressed it, I laid out the pieces for the left side. Pinned. Sewed the rectangles together. Pressed.
I was totally excited when I realized how fast the sides went on the sashed panel. Like magic!
I did find I’d somehow made a mistake when I went to match up my centers and pin my left side section to the sashed panel. My pieced section was too long. Huh! What was going on here?!?
I reread the instructions and looked closely at the cover quilt and diagrams. After a couple minutes, I went back and remeasured only to discover I had cut each of my pieces a half inch too big, so of course the pieced section was too long when I went to pin it to the panel.
What do you think I did?
I matched up my centers and ignored the excess fabric sticking out beyond the sashed panel. I pinned and sewed like normal and then I trimmed the excess off of each side with an acrylic ruler and my rotary cutter (with a cutting mat underneath), making my left pieced section flush with the sashed panel.
You might notice in the photo that my top and bottom rectangles on the left side are a bit narrower than the other rectangles. But that’s okay. Everything will still fit together great and I really doubt it will make much difference in how the quilt looks in the end because of the different-sized pieces all around the sashed panel.
I wouldn’t have even mentioned my oops, but I like to point out my mistakes and how I handle them. Sometimes my mistakes are just happy accidents — or good things in disguise. It helps to share my mistakes with other quilters so they don’t do the same thing I did. Just ask the members of my Friday group (BIG Shout out to Gail, Mary Lee, Robin, Sherry, Gaynel, Missi, Deb, Anita, Jean, Donna and Kim).
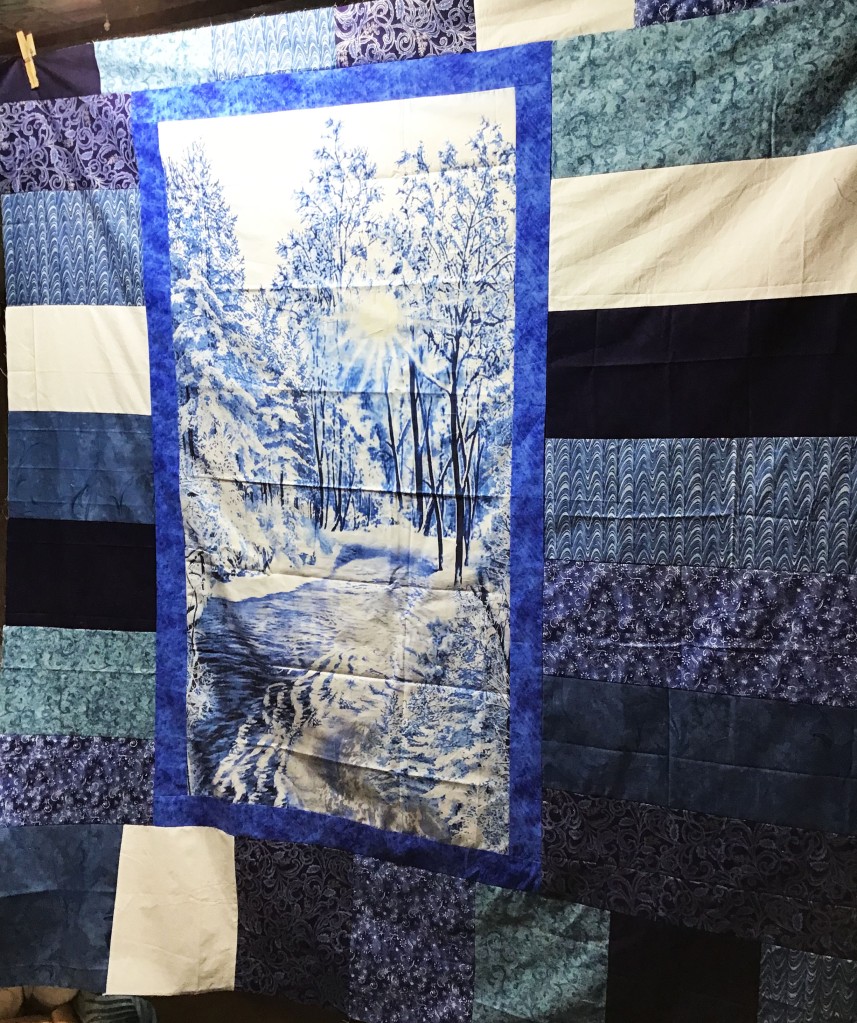
Now it’s time to sew the top and bottom sections together. Again, I did each one separately to make sure I liked my random fabric placement — I didn’t want any fabrics to be touching the same fabric in another section of the quilt.
So here it is — my completed Splendor quilt top. What do you think?
This was definitely a FUN and FAST quilt project and I hope that you will give it a try! If you’ve made Splendor before, I’d love to see your pictures. You can email them to me at tricia@villarosadesigns.com or post them on our Facebook page.
Before I go, here’s a fun video tour at Quilt Market recorded by Jaftex, just click the link below:
After talking about our VRD Rose Card patterns featuring quilt panels a couple weeks ago, I thought it would be fun to do a series of Panel Quilt Tutorials for you. You can find the Panel post HERE.
There’s no way I would be able to do ALL of the Rose Cards I featured in the Panel post, but I thought it would be fun to do some of my favorites. I hope these Panel Quilt tutorials will inspire you to reduce your own stash of panels by making quilts — what an unusual thing to do with fabric, right???
So let’s make Hillside Charm! I just really love this Panel pattern — it looks great with whatever panel and fabrics you use. Don’t have 5″ charm squares? Cut fat quarters, scraps, or even yardage into the number of squares you need. Want to make it bigger? Add another border? Want it smaller? Don’t add the extra border. LOVE LOVE LOVE Hillside Charm! You can buy the pattern HERE.
Right now we even have some great Hillside Charm kits for sale on the website — Halloween, Christmas and more — so check them out HERE.
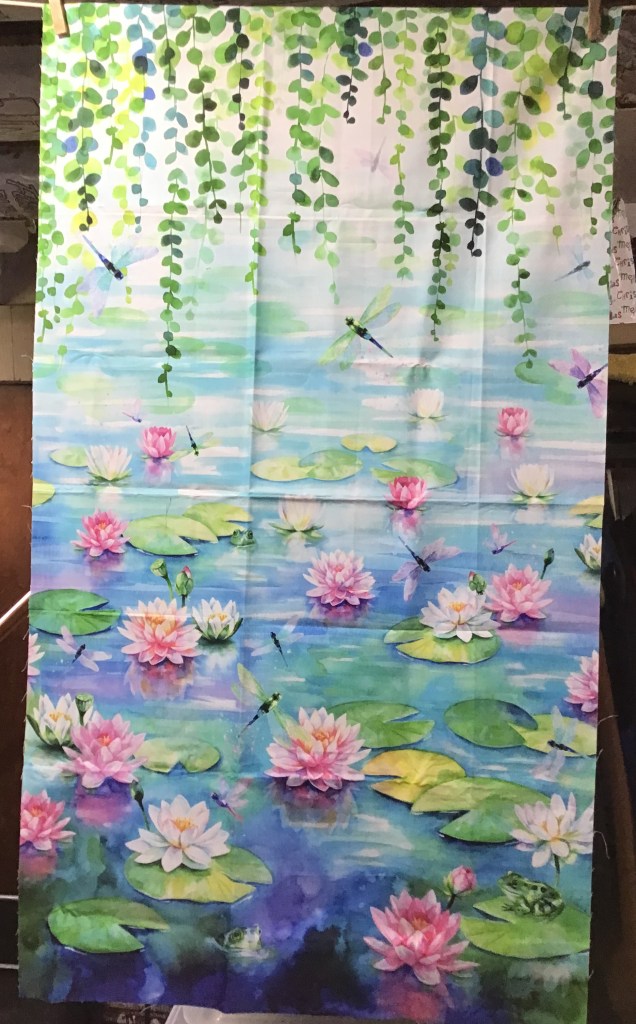
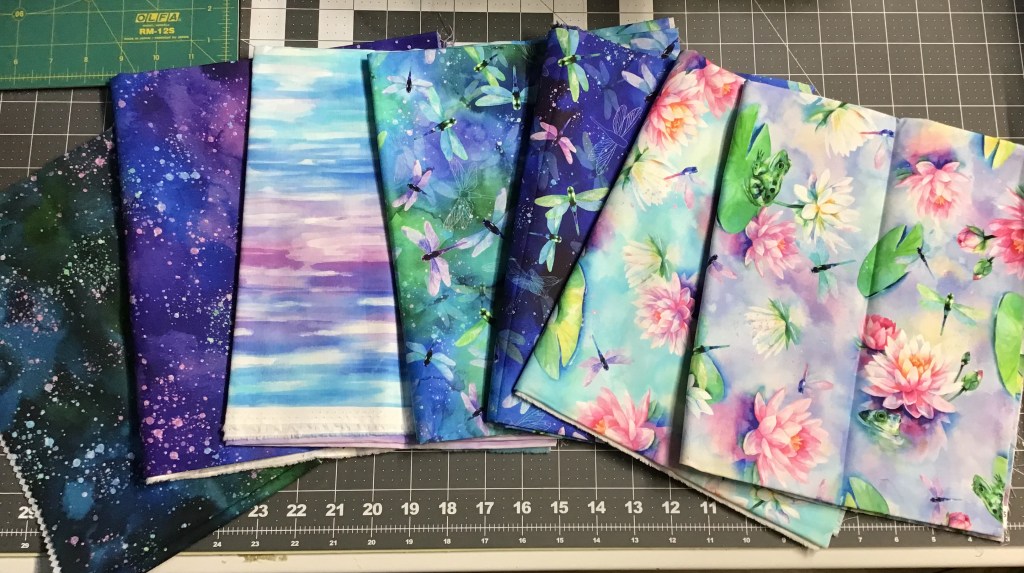
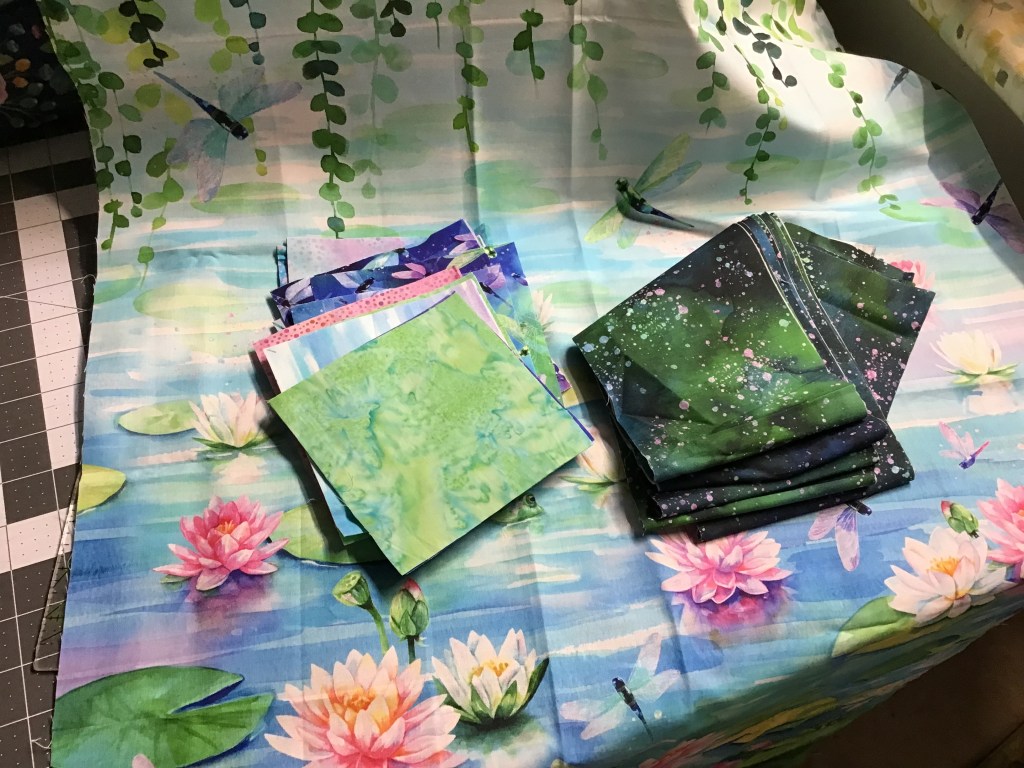
Before we jump into the tutorial, I have to do a SHOUT OUT to Hoffman Fabrics and a big thank you to them for providing the fabrics for this Hillside Charm Quilt. The collection is called Wading with Water Lilies. Isn’t it beautiful? In addition to the gorgeous digitally-printed panel and coordinates, I also used some of the basics from the 1895 Watercolors collection and 885 Dot Batiks collection.
YAY! We have the panel and some of the coordinates on the website. You can find them HERE. Grab them now because when they’re gone, they’re gone!
The gorgeous panel. Just look at the amazing array of colors that digital printing can create!
These are the companion fabrics.Here are the accents I used from 1895 and 885.
Now you’ve seen the fabrics, lets get to the tutorial!
Hillside Charm Tutorial
The first thing I did was trim the panel to the dimensions listed in the pattern. Sigh……I really hated cutting anything off this amazing panel but if I wanted to make the quilt, it had to be done. So I did it. I also cut out the squares and the strips. The pattern actually calls for a pack of charm squares, but since I didn’t have an actual charm pack, I went ahead and cut the squares I needed. I won’t have as much variety as I would have with a charm pack, but it will still be beautiful. Sometimes, less is more.
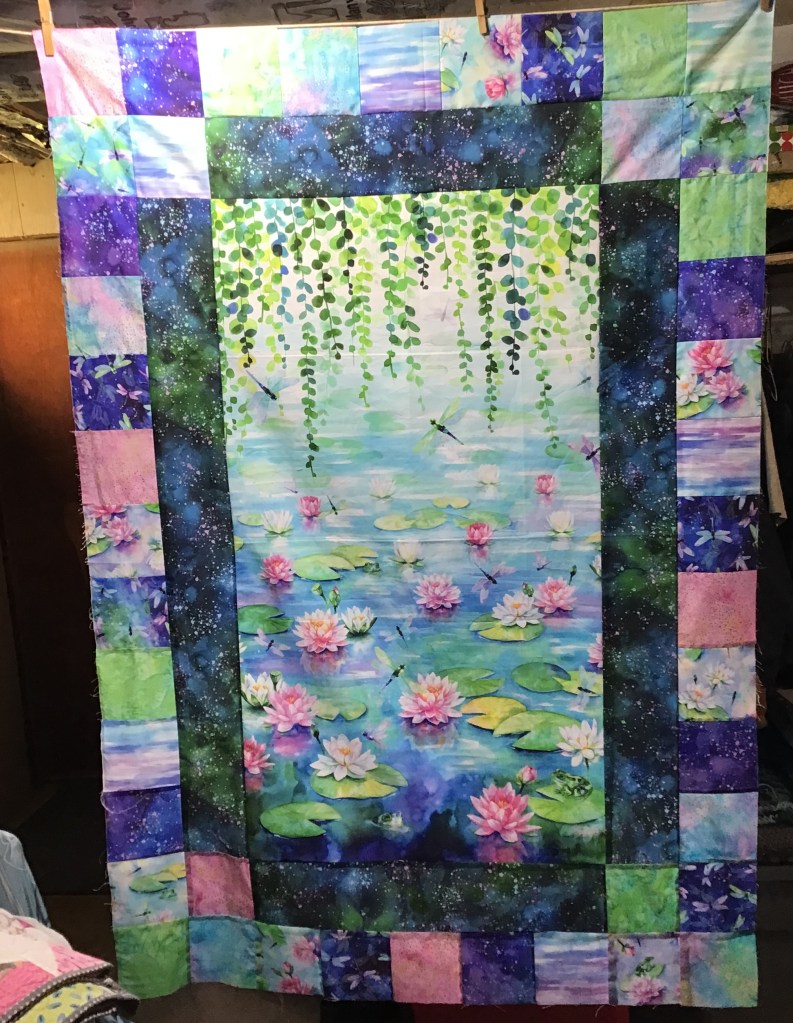
Next I sewed the side strips on to the panel. Then I sewed squares to the ends of the top and bottom strips before sewing them into the panel. It’s already taking shape. I’m really excited about this quilt — it is going to be really gorgeous!
Time to sew my charm squares into strips for the next border. I just had to make sure not to sew 2 of the same fabric side to side. Easy peasy.
Here you can see that I took the time to pin the pieced charm square strip to the framed panel. This is an important step because I don’t want my quilt to be a funny shape. Nope, I like ’em squared up as much as I can as I go along. And one of the best ways to do that is to match your centers and your ends and pin generously.
Yay! Let’s sew the pinned charm square side borders on. Sigh….I must admit I hate removing my pins as I sew and I am guilty of sewing over my pins. Mea culpa.
Here are the pieced charm square borders added to the sides. I am so excited how this quilt is coming together.
Now let’s add the top and bottom charm square pieced strips. Pin, pin, pin. Sew, sew, sew. I really like how the pieced border is giving the look of Four Patch blocks in the corners. Tricky, tricky!
More side borders to add. This time I have to be more careful with the placement of the squares so that I don’t accidentally line up 2 of the same fabric, especially since I’m not using as much variety as a charm pack would provide (although, nowadays there are lots of duplicates in a charm pack because fabric collections are a lot smaller than they used to be).
Here are my last borders — the top and bottom pieced borders. Now you can see the rectangles of the blue/green marbled fabric at each corner, mimicking the inner blue/green marbled inner border. Cool detail!
DONE!
I can’t wait to see your Hillside Charm Quilts! You can email your Hillside Charm photos me at tricia@villarosadesigns.com and I’ll share them on the blog and Facebook.
Thanks for sewing along with this tutorial. Stay tuned for another tutorial next week.
Wait! I can’t go yet without showing you the NEW November Rose Card patterns.
Check out these awesome new patterns. If you attended Quilt Market or Festival last week, you already had a sneak peak. Lucky you!
Oh look! Another Panel quilt! You can buy the November set of 5 Rose Cards HERE for $8.95.
This is my new table runner, Baskets, for this month:
I hope you find a little time to get sewing because the Holidays are right around the corner and if you are like me, you have a long list of quilty gifts you want to make even though you know you’ll never get them all finished. The New November Rose Cards could help you jump start your holiday sewing! Just sayin’….
I was so excited after last week’s post about Panels and our Villa Rosa Rose Card patterns that work for panels, I just had to play with my stuff! I decided to go ahead and get the top done for Hypnotized, using my adorable Halloween Gnomes,. Who doesn’t love gnomes???? I just had to, I didn’t want to wait until next year, although I might not get it quilted and bound until next Halloween.
If you missed last week’s Panel Post, you can find it HERE.
The first thing you need to do is to cut out your pieces. I used this adorable Halloween Gnome novelty fabric from Northcott instead of a panel. The cool thing about quilt patterns made for panels is that you can usually substitute a novelty print as long as you cut it to the right dimensions.
YAY! GNOMIES! (That’s what my sister, Tracy, calls them.)
I did not cut the pieces for the inner and outer border out yet. I like to wait until I have the center of the quilt made because sometimes my measurements don’t exactly match the measurements given in the pattern.
If this happens to you too, don’t cut the border strips until you can measure your quilt center. That way you can cut the border strips (and piece the strips together if needed) to your specific measurements, not someone else’s.
Remember when we talked about the “perfect” quarter inch seam allowance? Go HERE if you need a refresher. There really isn’t one. Basically, everyone’s quarter inch seam is a touch different, either a bit smaller or bigger than that elusive quarter inch. Anyway, as each of us use a slightly different quarter inch seam, the dimensions of our quilts are going to be slightly different too. That makes sense, doesn’t it?
So sew with your best quarter inch seam — accuracy is more important than a perfect quarter inch seam in most cases — and measure your quilt before you cut the borders.
Let’s keep moving!
After you’ve cut your pieces, sew strips to the sides of the small square. Then sew strips to the top and the bottom.
You know, I photographed every step of this process, but for some reason all my photos are not on my iPad. Methinks my cat Griffin might have deleted photos when he was painting on his iPad cat painting app.
A cat that paints? No, that’s not strange at all……. What’s strange is that he scratches at my iPad (covered with a protective screen cover) and gets out of his painting game and into other apps somehow. Kids….
Anyway, sew strips to the sides of this block and then add the strips to the top and bottom. Voila! This is your center square. Make 1. (Sorry for the EQ images, but the photos are gone!) Silly Griffy!
Now sew strips to the side of your other 8 squares. Then add the longer strips to the top and the bottom. Make 8.
Here are all my blocks ready to go. Aren’t they fun???
Wow! This quilt is coming together fast. Now to add some background rectangles to our quilt blocks.
Sew a background rectangle to the top of a Framed block. Make 3.
Please Note: If your fabric is not directional, you can skip adding background rectangles to various sides of the Framed square blocks. Instead, sew background rectangles to one side of each of the 8 Framed square blocks.
Sew a background rectangle to the bottom of a Framed block. Make 3. (Sorry, these photos are gone, too.) Argh….Griffin…….
Now sew a background rectangle to the left side of a Framed block. Make 1.
Lastly, sew a background rectangle to the right side of a Framed block. Make 1.
Whew! That was a little confusing, I know, but now we get to put things together!
Sew 2 top facing background rectangle units with a bottom facing background rectangle unit in the center. Then sew a long background rectangle to each end of the row. Make 1 row.
Make the bottom row pretty much the same as the top row, above, but reversed — sew 2 bottom facing background rectangle unit with a top facing background rectangle unit in the center. Then sew large background rectangles to the ends of the row. Make 1 row.
Now for the middle row — sew a right facing background rectangle unit, the single center block, and a left facing background rectangle unit at the end. Make 1 row.
Next sew the 3 rows together.
Isn’t this quilt top adorable so far? The orange frame in the center block really pops, don’t you think? Can’t wait to get the borders on next!
Now sew the inner border strips to the sides of the quilt center. You’ll probably have to piece the strips so they’re long enough. Add the top and bottom inner border strips, piecing them too.
Almost there! It’s time to add outer border strips to the sides — piece those border strips carefully, please. Finally! Our last step for the top — sew on the top and bottom borders, piecing your strips.
Houston….we have a problem!
I just discovered I don’t have enough border print fabric to sew borders on all 4 sides of the quilt.
Whatever can I do???
Why, just add borders to the top and bottom of the quilt! Good solution on the fly. That’s how I roll.
Yay! Mission accomplished — adorable Halloween Gnomies quilt top completed before Halloween! (Sorry the photos of the quilt as it gets put together aren’t very good — I am limited on space for working with larger quilts, so here I’m hanging the quilt top on a clothesline strung in the basement. Hey, we do what we have to do, right?)
What do you think?
As I write this post, I’m crazily packing my stuff to head to International Quilt Market in Houston, TX. I haven’t been to Market since 2019 — before the Pandemic. I’m really excited as this will be my first time being part of the Villa Rosa team.
If you’re headed to Market, stop by the booth, we are Booth #747, right behind the center Info booth on the main walkway. VRD is also doing 2 Schoolhouse lectures on Friday, Oct 28th. If you’re headed to Quilt Festival, Villa Rosa Designs will have a booth there, too. We’d love to say “hi.”
Sigh….Back to my packing.
Stay tuned — next week’s post will be all about my Quilt Market trip. The sights, the sounds, the food….
Again, THANK YOU for following our Basic Quilting Skills for Beginners series. We are all thrilled with your interest to this series of posts. Sadly, this series will come to an end next week with Labeling Your Quilt.
So, I thought I’d ask — are there any other topics you’d like to see here? If so, please leave a comment or you can email your suggestions to me at tricia@villarosadesigns.com. I’d love to have your thoughts and ideas so our blog will continue to be relevant to you, our VRD fans and followers.
Now let’s get to BINDING!
The good news is that once you reach the binding stage, you are totally in the homestretch of having a finished quilt.
Yay you!
This week for our binding tutorial, we’ll use my Halloween Ice Jam table runner again. If you didn’t order the pattern last week, you can order it HERE.
There’s a couple of things we have to go over before we can do our binding.
How wide do I cut my strips?
You could ask a bunch of different quilters this same question and you would get multiple answers, I’m afraid — it’s not a one size fits all situation.
A lot of quilt patterns and quilters prefer to cut binding strips 2 1/2″ wide. As this seems to be the most common size in the quilting world, I too use this width for my patterns, but I personally find 2 1/2″ a bit too floppy, so when I do my own binding, I cut my strips 2 1/4″ wide, which for me makes a nice full binding. Of course, you will have to try both to see which one you prefer.
Yes, I use 2 1/4″ for almost all of my binding, but I must confess that there are a few types of projects I actually cut 2″ wide binding strips for — miniature quilts and any other tiny little quilty projects. Again, you’ll just have to try different widths on different projects to find out what works best for you.
Here’s a little something to consider — I have found that if your 1/4″ seam is a “fat” 1/4″ seam, then you’ll probably like using 2 1/2″ or if you’re like me and you use a “scant” 1/4″ seam, then 2 1/4″ might be a better fit.
As for mini quilts and such, you’ll probably want to use a slightly narrower width than what you use for your regular-sized quilts. You’ll just have to try things out to see what you like better because trial and error is all part of learning, isn’t it?
How do I know how many strips to cut for my binding?
Sometimes you get lucky and your quilt pattern will include the number of strips to cut and it might even suggest a specific width. But, if your pattern doesn’t specify how many strips to cut, read on my friend!
If you don’t know the dimensions of your quilt, you will need to measure the width and the length using your tape measure.
Let’s use my Halloween Ice Jam measurements for this example — it measures 18″ wide x 54″ long, so we need to add together 2 widths and 2 lengths to get the total inches around the outside of the quilt (otherwise known as the circumference).
18+18+54+54=144
Now we are going to divide 144 by 40.
This number will tell us how many strips to cut because we are dividing the total inches by the inches in the width of fabric.
Please understand I didn’t just pull a random number out of the air — ha ha! — 40 is the average width of fabric that I and a lot of other quilt designers use to determine yardage requirements for our patterns. Fabric can vary in width so it helps to use an average number maybe a little smaller than the actual width and 40 does that when fabric generally ranges from 42″ – 45″ wide. Besides, that little extra also helps to make sure you don’t run out of fabric by accident.
So, let’s continue.
144÷40=3.6
Let’s round that number up to 4 — I need 4 strips of fabric for my binding. That little extra is helpful to make room for the corners and joining our binding ends. There’s nothing worse than getting close to the end of sewing on your binding to find you are 3 inches short. When in doubt, add an extra strip.
But what do you do when you get a whole number instead of a fraction for the number of strips needed? Me, I definitely add an extra strip because I don’t want to run out of binding before I get to the end.
Yay! Quilt Math to the rescue again! Three cheers for math! Want to read my post about quilting and math? Check it out HERE.
Moving on……
Cut the required number of strips and then cut off all the selvedges. The selvedges are those tightly woven long sides of the fabric which usually have little holes in them. Off with the selvedges, I say, off with those selvedges!
Now we’re heading back over to the sewing machine.
There are a couple different ways to sew your binding strips together.
The first way is to layer 2 strips right sides together with the ends lined up. Use a 1/4″ seam to sew the strips together, just like in piecing. Press the seam allowance open to reduce bulk in the binding — nobody wants a lumpy binding. LOL!
The second way to join the strips is on the bias or diagonal. Lay a strip right sides up on your flat surface. Place a second strip perpendicular to (NO, not another math word! Horrors!!!) and on top of the first strip with the wrong side up, that way the strips are right sides together. Next, draw a diagonal line from corner to corner.
Then — you guessed it! — sew on the line. Does this sound familiar? It should because quilters use this technique for making triangles (HSTs) and flippy corners.
The next thing you need to do is find the end of the strip that is on top. Turn the strip over so it is now facing right side up. This is really important or else your binding will not have all the seams on the back of the strip. Take another strip and place it perpendicular to the second strip with the right side down, again making them right sides together. Draw a diagonal line and sew on the line again. Repeat this until you’ve sewn all the strips into one long binding strip.
Clip the threads in between the strips if you chain-piece and then cut off the waste triangles where the strips meet, leaving a 1/4″ seam allowance.
Time to press our binding strips. Let’s head back to the ironing board.
Place your binding strip right side down on your ironing board. Using your iron on a cotton or hot setting, fold the strip in half with the wrong sides together, pressing as you go. Remember, you are pressing, not ironing here. We just want to make sure the strip gets folded and creased.
When you come to a seam, press the seam allowance open like we did when we joined our strips into one long binding strip. Then fold, press, and keep going.
Almost done now. Just keep folding and pressing until you get to the end of the very long strip. Keep in mind the bigger the quilt you are working on, the longer the strip and the more time it will take to do this step.
Let’s head back to the sewing machine once again because it’s time to sew the binding onto your quilt. I know this seems like a lot of steps, but writing/reading about it takes longer than actually doing it. After some practice, it will become second-nature and you won’t even have to think about it, you’ll just do it.
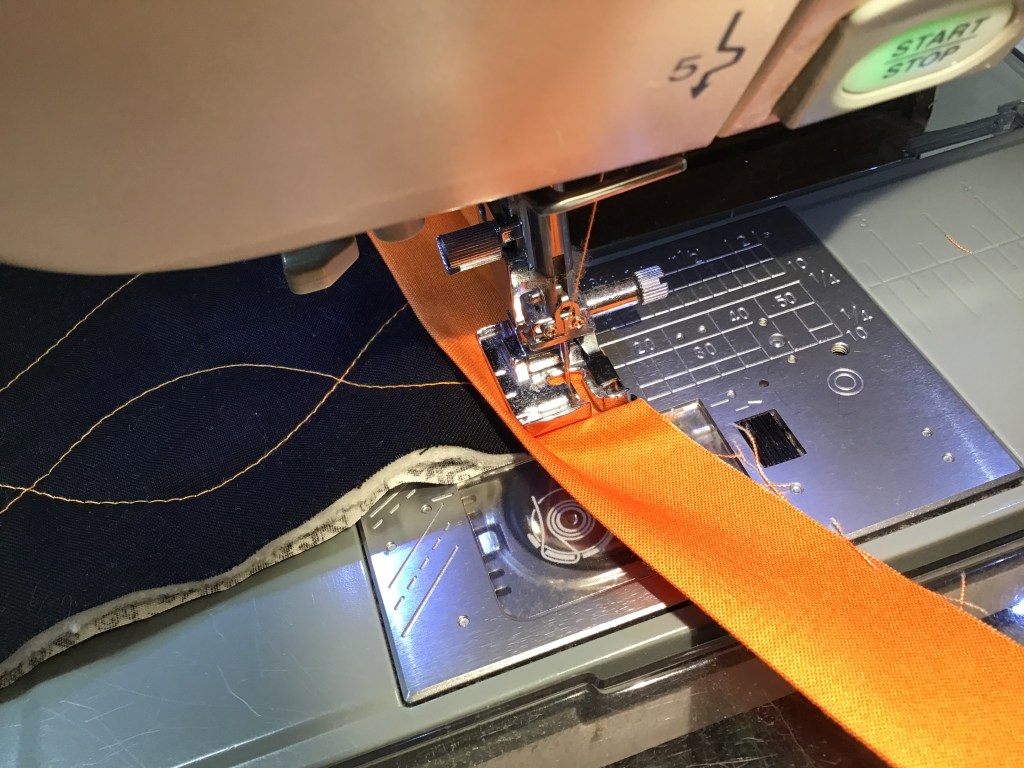
Lay your binding on top of the right side of your quilt with the raw edges lined up. I usually start my binding somewhere towards the middle of a long side. Be careful here because you want to avoid placing binding seams at your corners because the added bulk can make your corner turn out weird. Trust me on this. Been there, done that. It’s okay if you want to pin your binding all the way around your quilt, but with a little practice, you’ll have a fairly good idea how to avoid the dreaded seam allowance at the corner issue.
Pin the layers together about 10-12 inches from where the binding strip starts. Then place a pin through the quilt right before the binging begins, but not through the binding, only the quilt. This second pin right before the binding starts is a marker you will need later.
Start sewing at the pin 10-12 inches from the beginning of the binding strip. Backstitch a few stitches, and….GO.
Most people use a 1/4″ seam for sewing on their binding, but I personally use about a 3/8″ seam because I like a nice full binding. Try both ways to see which one works best for you.
Sew until you get to about 1/4″ from the corner.
When you get to 1/4″ from the corner — STOP and backstitch to secure the stitching. Cut your thread and pull your quilt out from under the needle.
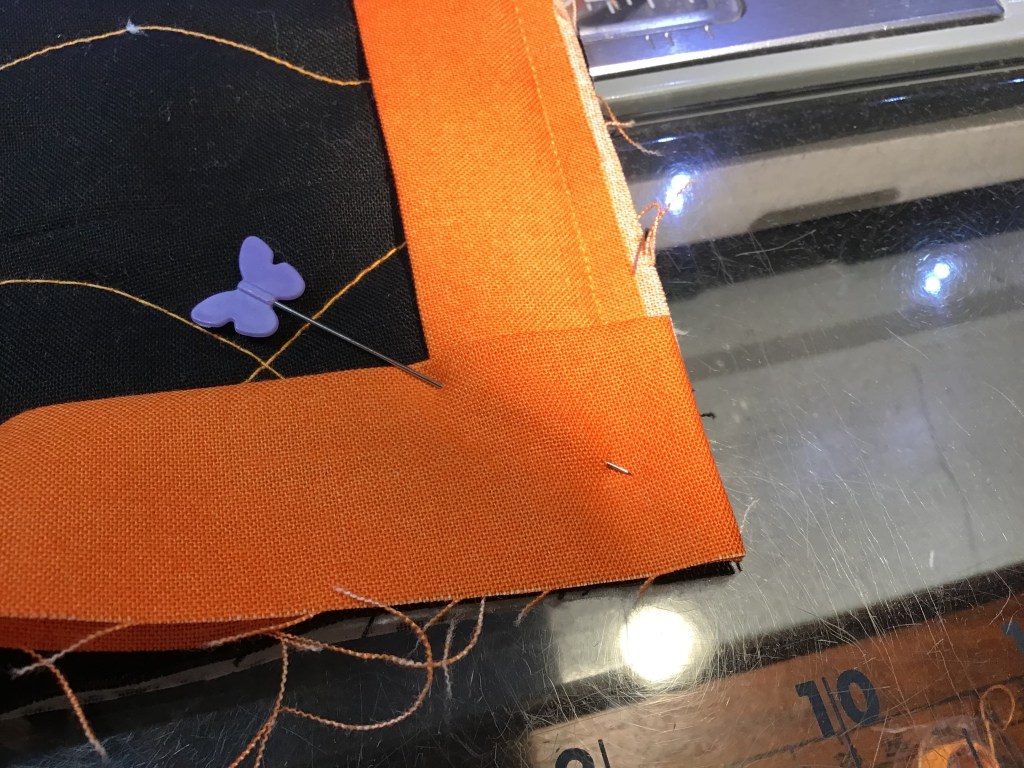
GULP! Here comes the scary part — making a French fold mitered corner. Cue the scary music….
Fold your binding strip at a 45 degree angle towards the right.
Now fold the binding strip back over itself to the left. Place a pin if you need to. This little fold here makes you able to overlap the binding into a nice miter on the back which will give you a really nice square corner.
Turn your quilt and start sewing at the corner, backstitch a couple stitches and sew until you get to 1/4″ from the next corner. Not scary, easy peasy!
Repeat the mitered corner fold, turn your quilt again, and keep going. When you finish the fourth corner, keep your eye out for the pin marking the place where the binding strip began. Stop sewing 3-4 inches before that pin and backstitch to secure the stitching. Once you’ve backstitched, cut your threads and pull your quilt out from under the needle.
Here’s a helpful little video from Alex Anderson and Ricky Tims about mitering corners.
Now we’re going to sew the ends of our binding strip together. This next part is really a leap of faith, but it does work, I promise you. Just stick with me, I won’t steer you wrong.
Smooth your binding strip over and beyond where the marker pin is (move the loose beginning binding tail out of your way). Use a ruler and measure from the marker pin the length of how wide you cut your binding strip. For a lot of you, that would probably be 2 1/2″ but for me and some others, that will be 2 1/4″. Draw a line with a fabric pen at that measurement from the marker pin and cut on the line.
Next open both ends of the binding, overlap them with the the ends right sides together at an angle, and then pin the binding layers together. Draw a diagonal line if you like or just eyeball it.
Please note that this technique isn’t the only one out there. If you want to learn other ways of doing binding, you can do an Internet search.
Sew on your drawn line and trim away the waste triangles 1/4″ beyond your sewing line.
Finger press the seam open to reduce the bulk and refold the binding with wrong sides together again.
Your binding strip should now lay nice and snug against your quilt. Yay! Next pull out the pins and use them to keep the rest of the binding lined up with the quilt.
Now it’s time to finish sewing the binding on. Start where you stopped before we sewed the ends of the binding together until you overlap where you originally started sewing the binding on. Backstitch at the both the beginning and the end of your stitching line.
Finishing Binding by Hand or Machine?
While doing this series about beginning skills, I have discovered that I am an “old school” quilter. It pains me that I am starting to show my age, but I know these tried and true methods work. Feel free to explore different methods to do any of these skills, but keep in mind that it’s important to know the old skills before you can learn the new skills — you have to have somewhere to start. So, maybe I’m not as antiquated as it sometimes feels these days. LOL! But that’s okay, those old skills serve me well and keep me making quilt after quilt with excellent results.
That being said, there are 2 ways to finish your binding on your quilt — by hand or by machine.
I finish all my binding by hand. After writing multiple books and making oodles of samples for magazines and patterns, I know I’ve probably hand-sewn miles and miles and miles of binding. But that’s okay. I like how a hand-stitched binding looks.
If you are interested in learning to finish your binding by machine, here’s a nice video from Jenny at Missouri Star Quilting. It’s actually a complete binding tutorial and shows you how you can sewn it down by machine.
If you prefer finishing your binding by hand, you can check out this video by Quilting in the Rain as she shows you how to sew a hidden blind stitch.
You might wonder why I’m giving you videos here, but I learned a long time ago that as a lefty, there are just some things I can’t teach to righties and sewing down binding is one of them!
BIG SHOUT OUT to my pal, Cathey Laird of Cathey Marie Designs, the inventor of the Y Block Ruler.
Long long ago, I tried to teach Cathey how to do mitered corners like I did, she found out hours later that a lefty can’t teach a righty how to do that because we fold our corners in different directions. Oops, sorry, Cathey!
Anyway, I don’t want to confuse anyone, so here’s a righty doing the hidden blind stitch for you. If you are a lefty and need a little help from a lefty, just shoot me a message and I’d be glad help you.
Here is my cute little Halloween Ice Jam table runner! Now all I have to do is sew the binding down and put a label on it.
Whew! I’m totally worn out now! I guess that’s about it for binding, folks. I can’t think of anything else to add.
If you have any questions, though, just ask. Did you know you can send us a message on the blog? You can go to our Contact Us page and scroll down to the bottom to find a form to fill out.
Stay tuned for next week’s post about labeling your quilt.